
Welcome to Flash CS4 Professional. We suspect you are here because you have seen a lot of the great stuff Flash can do, and it is now time for you to get into the game. Flash can be one great big, scary application to those unfamiliar with it. Or you may be here because, as a Flash user, you have found that CS4 is suddenly a lot different from Flash 8 or Flash CS3, and you need to get up to speed with this new stuff in relatively short order. In either case, both of the authors have been in your shoes at some point in our careers, which means we understand what you are feeling. So instead of jumping right into the application, let's go for a stroll.
Here's what we'll cover in this chapter:
Exploring the Flash interface
Using the stage
Working with panels
Understanding the difference between a frame and a keyframe
Using frames to arrange content on the stage
Using layers to manage content on the stage
Adding objects to the library
Testing your movie
The following files are used in this chapter (located in Chapter01/ExerciseFiles_Ch01/Exercise/):
Magnify.flaBall.flaProperties.flaMotionPath.flaLayers.flaMoonOverLakeNanagook.flaNanagook.mp3
The source files are available online from either of the following sites:
http://www.FoundationFlashCS4.comhttp://www.friendsofED.com/download.html?isbn=15905910931
In this chapter, we'll take a walk through the authoring environment, called the Flash interface, pointing out the sights and giving you an opportunity to play with the features. By the end of the stroll, you should be fairly comfortable with this toolbox called Flash, and have a good idea of what tools you can use and how to use them as you start creating a Flash movie.
As we go for our walk, we will also be having a conversation that will help you to understand the fundamentals behind the creation of a Flash movie. Having this knowledge right at the start of the process gives you the confidence to build upon what you have learned. So let's start right at the beginning of the process, at the Welcome screen.
The first thing you see when you launch Flash is the Welcome screen shown in Figure 1-1. This interface, common to all of the Adobe CS4 applications, is divided into three areas:

Open a Recent Item: The area on the left side shows a list of documents you have previously opened. Click one of them, and that document—provided it hasn't been deleted or moved to another location on your computer—will open. TheOpenlink at the bottom of the list lets you navigate to a document that isn't on the list.Create New: The middle area of the page is where you can choose to create a variety of new Flash documents. Your choices include a blank Flash file (called a FLA, pronounced "flah") for web content; an Adobe Integrated Runtime (AIR) file for desktop applications; a mobile document, aimed at cell phones or PDAs; a series of code-based files; and a Flash project for organizing multiple files in a given project. A published Flash movie—not available from this menu—is called a SWF (pronounced "swiff").Note
You can select a new document based on the version of ActionScript that will be used in the document. The current version of ActionScript is 3.0, which was introduced in Flash CS3. The previous version of this language, used in Flash 8 and Flash MX 2004, was ActionScript 2.0. As you can see, it's still available in Flash CS4, but we won't be covering it in this book. We will be digging into ActionScript 3.0 in greater depth in Chapter 4. Unless otherwise stated, you will be selecting the Flash File (ActionScript 3.0) option when creating new documents throughout this book.
Create from Template: The right area of the page is reserved for a variety of templates you can use. Clicking one of the folders opens theNew from Templatedialog box, as shown in Figure 1-2. TheExtendarea at the bottom of this column of the Welcome screen contains a link to the Flash Exchange, an Adobe website where you can download a variety of tools and projects that are available for free or a nominal cost.

Let's create a new document. To accomplish this, simply click Flash File (ActionScript 3.0) in the Create New area of the Welcome screen to open the Flash interface, as shown in Figure 1-3. This feature-rich authoring environment is the heart and soul of Flash. If you are already a Flash user, the first thing that will catch your attention is that the interface is radically different from previous versions of the application.

Flash CS4 marks the introduction of the Object Windows Library (OWL) interface, shown in Figure 1-3, which is common to all of the applications in the CS4 lineup from Adobe. If you are a Mac user, depending on your "rabidity" of all things Mac, you are either going to love this interface or hate it. Adobe has dispensed with the floating panels that tended to drive Flash developers and designers who worked cross-platform up a wall, across the ceiling, and down the other wall.
The stage—the large white area in the center of the screen—is where the action happens. A good way of regarding the stage in relation to Flash is this: if it isn't on the stage, the user isn't going to see it. Although this is not always true, as you'll learn later in this book, it's definitely a rule of thumb.
On the far right side of the screen is a set of tools that will allow you to draw, color, and otherwise manipulate objects on the stage. Just left of that is the Properties panel, called the Property inspector, which longtime Flash users will remember used to appear along the bottom of the screen.
In Flash CS4, the bottom of the interface is populated by the Timeline panel (officially called the timeline). As you can see, the timeline is broken into a series of boxes called frames. The best way of regarding frames is as individual frames of a film. When you put something on the stage, it will appear in a frame. If you want it to move from here to there, it will start in one frame and end in another a little further along the timeline. The box with the vertical stem draped over frame 1—this is red in Flash—is called the playhead. Its purpose is to show you the current frame being displayed. When a Flash movie is playing through a browser, the playhead is in motion, and the user is seeing the frame where the playhead is located. This is how things appear to move in Flash. Another thing you can do with the playhead is drag it across the timeline while you are creating the Flash movie. This technique is known as scrubbing the timeline, and has its roots in film editing.
The right side of the interface is where panels appear by default. Panels are used to modify and manipulate whatever object you may have selected on the stage or to add objects to the stage. These objects can be text, photographs, line art, short animations, video, or even interface elements (check boxes, radio buttons, and so on) called components. You can use the panels and the menus to change not only the characteristics of the objects, but also how the objects behave on the stage. Panels can be connected to each other (docked) or can float freely in the interface (floating), and can be positioned practically anywhere you like. To move a panel, simply click the panel's tab and drag it to a new location. If you see a temporary blue line or bar, the panel will dock to that location.
From our perspective, one of the most indispensable panels is the Property inspector. As you become more comfortable with the application, this panel will become a very important place for you. We'll talk more about the Property inspector later in the chapter, in the "Exploring panels in the Flash interface" section.
Note
For those of you who have used Flash in the past, we are willing to bet you had a "Holy smokes!" reaction when you first fired up the application. If you are still in a bit of shock, take a deep breath. Not everything has changed. Mostly, things have just been moved around. If you find this disturbing, then be our guest and move everything back to where it "should be." To do this, select Window
As you may have surmised, the Flash authoring environment is one busy place, and if you talk to an experienced Flash developer or designer, you'll hear it can become one crowded place as well, as it fills up with floating panels and other elements. This has all changed in Flash CS4.
As you start creating Flash projects, you will discover that real estate on your screen is a valuable commodity. Here's how you can manage the panels:
Collapse panels: At the top of the
Toolspanel and the other panels area on the right side of the workspace is an icon that looks like a double-headed arrow (see Figure 1-4). Click this icon, and the panels will collapse and become icons with text. (Actually, theToolspanel collapses to just an icon by default.) This process is called panel collapse, and is designed to free up screen space in Flash. In fact, Adobe is so thrilled with this feature that you can expect to see it added to all of the applications in the Creative Suite over the next couple of years.Show collapsed panels as icons only: With the panel collapsed, place the cursor to the left of the icons in the panel strip. When the cursor changes to a double-headed arrow, drag the panel strip to the left or to the right. As you drag to the left, the panel icons will expand and show the name of the panel. As you drag to the right, the names will disappear and only the icon will be visible.
See tooltips for panel icons: Place the cursor over any icon on a panel strip that has been reduced to icons only. The icon will change from gray to color, and a tooltip will appear, telling you what the item is.
Open and close drawers: With the panel collapsed, click an icon in the strip, and the contents of that panel will fly out, as shown in Figure 1-5. Click it again, and the contents of the panel will slide back. These panels that fly out and slide in are called drawers.
Minimize panels: Another method of saving some screen real estate is to collapse a panel vertically by minimizing it. Double-click the panel's name, and it will collapse upward. Double-click it again, and the panel will grow to its original dimensions. This is especially helpful with free-floating panels.
Close panels: Right-click (Ctrl-click) a panel and select
Close, and the panel will be removed from the group. If you do remove a panel, all is not lost. Open theWindowmenu and click the name of the panel you closed to restore it.Add panels to sets: Drag one of the panel icons onto another panel. When you release the mouse, the panel will expand to include the new panel. This is called a panel set. To remove a panel from a set, just drag the panel icon to the bottom of the stack.


Note
Though not a technique, this tip falls squarely into the "well, it's about time" category of neat stuff. If you drag a floating panel over another interface element, the floating panel temporarily becomes partially transparent so you can see what is under the panel. This was new with Flash CS3.
To save your customizations, select Window
Now that you have learned to become the master of the work environment, let's take a look at how you can also become the master of your Flash document.
Managing the workspace is a fundamental skill, but the most important decision you will make concerns the size of the Flash stage and the space it will take up in the browser. That decision is based upon a number of factors, including the type of content to be displayed and the items that will appear in the HTML document in addition to the Flash movie. These decisions affect the stage size and, in many respects, the way that the document is handled by Flash. These two factors are managed by the Preferences and Document Properties dialog boxes.
To access preferences, select Edit
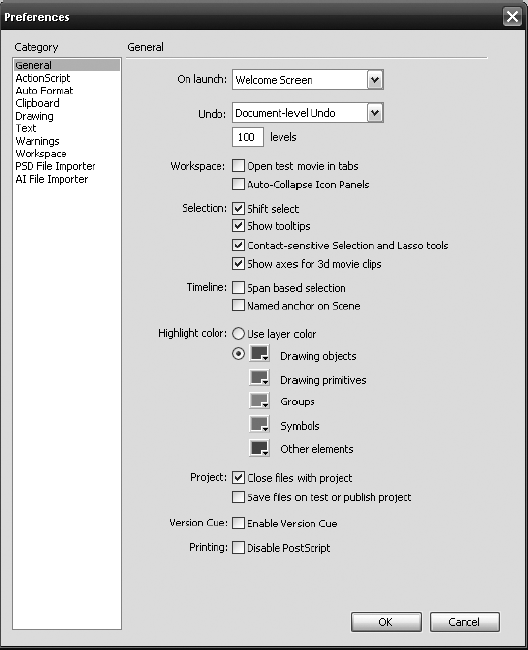
Figure 1.6. The General preferences can be used to manage not only the workspace, but also items on the stage.
If you examine the selections, you will realize they are fairly intuitive. You can choose to see the Welcome screen when the application starts, to see tooltips when the cursor is over a tool or object, and to have a test movie appear in a tabbed window or float. You can also specify how items are selected on the stage and the timeline, and even the colors that will be used to indicate which type of object has been selected on the stage.
Note
If you have been using Flash for a few years, you'll find the expansion of the Highlight color list to include a variety of objects a welcome addition.
Now that you know how to set your preferences, let's look at managing the document properties. Click the Cancel button in the Preferences dialog box to close the window and return to the Flash interface.
To access the Document Properties dialog box, use one of the following methods:
With the stage selected, click the
Editbutton in theProperties(notPublish) area of theProperty inspector.Select
Modify
Press Ctrl+J (Cmd+J).
Right-click (Ctrl-click) on the stage and select
Document Propertiesfrom the context menu.
Note
As you have just seen, there are a number of methods you can use in Flash to obtain the same result. In this case, it is opening the Document Properties dialog box. Which one is best? The answer is simple: whichever one you choose.
The Document Properties dialog box is shown in Figure 1-7. The Dimensions input area is where you can change the size of the stage. Enter the new dimensions, press the Enter (Return) key or click the OK button, and the stage will update. The Match area is commonly used to shrink the stage to the size of the content on the stage when you select Contents (which happens to be grayed out in Figure 1-7 because there is currently nothing on the stage). You can also change the stage (background) color, how fast the movie plays, and the units for the ruler.

Note
If you have been using Flash prior to this release, did you catch the change in the Document Properties dialog box? The default Flash frame rate has increased from 12 to 24 frames per second.
For example, if you change the Dimensions setting to a width of 400 and height of 300, set Background color to #000066, and click OK, the stage will shrink to the new dimensions and change color to a dark blue. These changes will also be shown in the Property inspector, as shown in Figure 1-8.

You may discover that the stage is a pretty crowded place. In these situations, you'll want to be sure that each item on the stage is in its correct position and is properly sized. Depending on the size of the stage, this could be difficult because the stage may fill the screen area. Fortunately, Flash allows you to reduce or increase the magnification of the stage through a technique called zooming. (Zooming the stage has no effect on the actual stage size.)
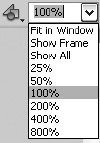
To zoom the stage, click the Magnification drop-down menu near the upper-right corner of the screen. As shown in Figure 1-9, this menu contains a variety of sizes, ranging from Fit in Window to 800% magnification. For example, click the 400% option, and the stage will likely fill or overflow the screen, as shown in Figure 1-10. Click the Show Frame option, and the stage will be visible in its entirety.
If you want more zoom, you can get a lot closer than 800%. Select View
If you want a side-by-side comparison in which one image is at 100% and the other is at some other percentage, follow these steps:
Open the
Magnify.flafile in the Chapter 1Exercisefolder.Select
WindowSet the new window's magnification level to
800%.Undock the new window and let it float, as shown in Figure 1-11.
Click the
Selectiontool (the solid arrow) at the top of the toolbar.Click and drag the image in the new floating window around the stage. You will see that the version in the docked window also moves. This is a really handy feature if precise positioning of elements on the stage is critical.
Click each window's close button to close it. Don't save the changes.

At this point in our stroll through the Flash interface, you have had the chance to play with a few of the panels. We also suspect that by now you have discovered that the Flash interface is modular. By that, we mean it's composed of a series of panels that contain the tools and features you will use on a regular basis, rather than an interface that's locked in place and fills the screen. You have also discovered that these panels can be moved around and opened or closed depending on your workflow needs.
In this section, we are going to take a closer look at the more important panels that you will use every day. They include the following:
The
TimelinepanelThe
Property inspectorThe
ToolspanelThe
LibrarypanelThe
Motion EditorpanelThe
Helpmenu (not actually a panel, but very useful)
There is a fundamental truth to becoming a proficient designer with Flash: master the timeline and you will master Flash.
When someone visits your site and an animation plays, Flash treats that animation as a series of still images. In many respects, those images are comparable to the images in a roll of film or one of those flip books you may have played with when you were younger. The ordering of those images on the film or in the book is determined by their placement on the film or in the book. In Flash, the order of images in an animation is determined by the timeline. The timeline controls what users see, and more important, when they see it.
At its most basic, all animation is movement over time, and all animation has a start point and an end point. The length of your timeline will determine when animations start and end, and the number of frames between those two points will determine the length of the animation. As the multimedia author, you control those factors.
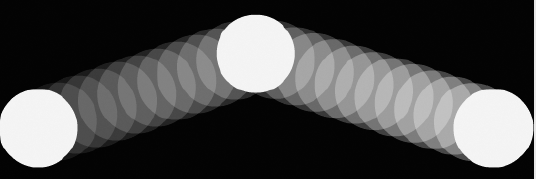
Figure 1-12 shows a simple animation. A ball is placed at the left and right edges of the stage. In between, the ball is at the top of the stage. From this, you can gather that the ball will move upward when the sequence starts and will continue to its finish position at the right edge of the stage after it has reached the middle of the sequence.

Obviously, just having three images won't result in a ball moving. Between the start point and the middle point, and the middle point and the end point, there needs to be a series of ball images. These will give the user the illusion of a ball moving up and then down again to its finish position. These images will represent the various locations of the ball as it moves through time, as shown in Figure 1-13.
So where does time come into play? It is the number of frames (discussed in the next section) between the start and middle, and middle and end points in the animation. The default timing in a Flash CS4 movie—called the frame rate—is 24 frames per second (fps). In the animation shown previously, the duration of the animation is 24 frames, which means it will play for 1 second. You can deduce from this that the ball's middle location is the twelfth frame of the timeline. If, for example, you wanted to speed up the animation, you could reduce the length of the timeline to 12 frames or increase the frame rate to, say, 48 fps; if you wanted to slow it down, you could increase the number of frames to 48 or decrease the frame rate.
Let's wander over to the timeline and look at a frame.
If you unroll a spool of movie film, you will see that it is composed of a series of individual still images. Each image is called a frame, and this analogy applies to Flash as well.
When you open Flash, your timeline will be empty, but you will see a series of rectangles—these are the frames. You may also notice that these frames are divided into groups. Most frames are white and every fifth frame is gray (see Figure 1-14), just to help you keep your place. Flash movies can range in length from 1 to 16,000 frames, although a Flash movie that is 16,000 frames in length is highly unusual.
A frame shows you the content that is on the stage at any point in time. The content in a frame can range from one object to hundreds of objects, and a frame can include audio, video, programming, images, text, and drawings, either singly or in combination with each other.
When you first open a new Flash document, you will notice that frame 1 contains a hollow circle. This visual clue tells you that frame 1 is waiting for you to add something to it. Let's look at a movie that actually has something in the frames and examine some of the features of frames.
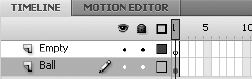
Open the Ball.fla file located in the Chapter 1 Exercise folder. You will see a yellow ball, in frame 1, sitting on the stage. You should also note the solid dot in the Ball layer (layers are discussed later in this chapter). This indicates there is content in the frame. The Empty layer above it has a hollow dot, which indicates there is no content in that frame. This is also shown in Figure 1-14.
Place the cursor on any frame of the timeline and right-click (Ctrl-click) to open the context menu that applies to frames, as shown in Figure 1-15. As you can see, quite a few options are available, ranging from adding a frame to the timeline to adding actions (code blocks) that control the objects in the frame. We aren't going to dig into what each menu item does just yet, but rest assured, by the time you finish this book, you will have used each one.
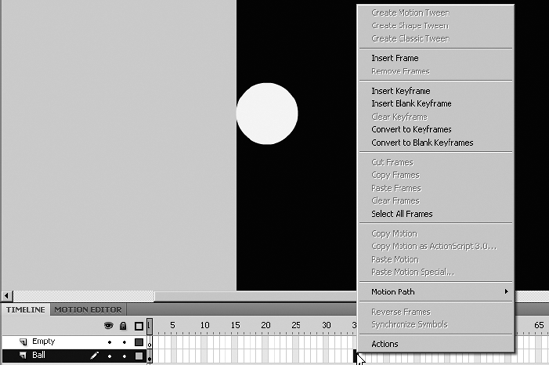
Place the cursor at frame 12 of the Ball layer, open the context menu, and select Insert Keyframe. Repeat this step at frame 24 as well. You will see that the timeline changes to the series of extended gray rectangles and three black dots, as shown in Figure 1-16. These gray rectangles represent spans of frames, separated by keyframes.
Note
If you prefer to use the keyboard, place the cursor at frame 24 and press F5. With that frame selected, press F6. The F5 command adds a frame (which creates a span of frames), and pressing F6 converts the selected frame to a keyframe. If you prefer to do that all in one move, just select frame 24 and press F6.

An obvious question at this point is, "So, guys, what's a keyframe?" Remember when we talked earlier about animations and how they have a start point and an end point? In Flash, those two points are called keyframes. Any movement or changes are thanks to keyframes. In Flash, there are two types of keyframes: those with stuff in them (indicated by the solid dot shown in frame 1 of Figure 1-16) and those with nothing in them. Blank keyframes are shown as frames with a hollow dot. The first frame in any layer, until you add something to that frame, is always indicated by a blank keyframe.
To navigate to specific frames in the timeline, you use the playhead. It is the red rectangle with the line coming out of it. Drag the playhead to frame 12 and click the ball on the stage. Move the ball to the top center of the stage. Drag the playhead to frame 24 and move the ball to the right edge of the stage.
As you moved the ball in frame 12, you may have noticed there was a ghosted version of the ball's previous position until you released the mouse. This feature is new to Flash CS4. It gives you a reference to the starting position of the motion.
Note
As mentioned earlier in the chapter, the technique of dragging the playhead across the timeline is called scrubbing. As you scrub across the timeline, you will see the values in the Current Frame and Elapsed Time areas at the bottom of the timeline change as well. This is quite useful in locating a precise frame number or time in the animation.
Scrub the playhead across the timeline. The ball snaps to a new position as the playhead encounters each keyframe. But this movement isn't smooth! To fix that, right-click (Ctrl-click) anywhere inside the gray span of frames between each pair of keyframes and select Create Classic Tween from the context menu. Scrub again, and the ball will move smoothly across the stage. Those arrows that appeared indicate a classic motion tween.
Note
Yes, classic tweens are new! To Flash old-timers, this is what used to simply be motion tweens. Flash CS4 introduces a completely new—and mindblowingly cool—timeline tweening model, which is touched on later in this chapter and discussed in detail in Chapter 8.
A classic tween is one of the ways simple animations are created in Flash. Flash looks at the locations of the objects between two keyframes, creates virtual copies of those objects, and puts them in their positions in the frame. If you scrub through your timeline, you will see that Flash has placed copies of the ball in frames 2 through 11 and 13 through 23, and put them in their final positions to give the illusion that the ball is moving up and down.
That was interesting, but we suspect you may be wondering, "OK, guys, do tweens work only for stuff that moves?" Nope, you can also use tweens to change the shapes of objects, their color, their opacity, and a number of other properties. We'll get to those uses later in the book.
Drag the playhead to frame 12 and click the ball on the stage. Drag the ball to the bottom of the stage. If you scrub through the timeline again, you will see the ball move in the opposite direction. This tells you that you can change an animation by simply changing the location of an object in a keyframe. Close the file without saving it.
Another key concept to grasp, especially if you are new to Flash, is that everything on the stage has properties that can be changed or otherwise manipulated. To understand this concept, let's step away from Flash and consider the authors.
At our most basic, we are two humans on the planet Earth. In Flash terms, we are two objects on the stage. The things that describe us are our properties. For example, our height, weight, hair color, and location on the planet are properties that describe visual facets of who we are. If we were somehow able to be placed on the Flash stage, those descriptive properties of us would appear in the Property inspector when the mouse selects us. The neat thing is that the Property inspector lets you do more than just review those properties: it also lets you change them.
The Property inspector, shown in Figure 1-17, is designed to make your life easy. As you become more proficient and comfortable with Flash, this panel will become an indispensable aid to your workflow.
Note
Why is it called an inspector, even though it behaves like a panel? And why does it say Properties, when it's called the Property inspector? Ah, there are mysteries in life, and we make no honest claim to fathom them all.
The panel is positioned, by default, to the right of the workspace. You can move it elsewhere on the screen by simply dragging it into position and releasing the mouse. There are locations on the workspace where you will see a shadow or darkening of the location when the panel is over it. This color change indicates that the panel can be docked into that location. Otherwise, the panel will "float" above the screen.

When an object is placed on the stage and selected (or even when the stage itself is selected), the Property inspector will change to reflect the properties of that object that can be manipulated. For example, in Figure 1-18, a box has been drawn on the stage. The Property inspector shows the type of object that has been selected (Shape), and tells you the stroke and the fill color of the object can be changed. In addition, you can change how scaling will be applied to the object and the treatment of the red stroke around the box.

Figure 1.18. The Property inspector changes to show you the properties that can be manipulated regarding a selected object on the stage (in this case, the stroke and fill properties of the box on the stage).
Let's experiment with a Flash file:
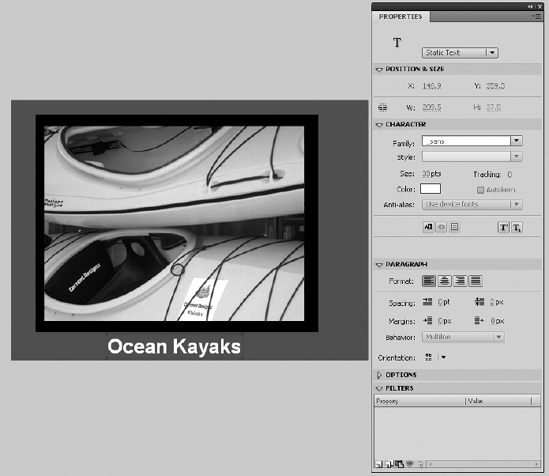
Open the file named
Properties.flain theExercisefolder. You will see an image of kayaks over a black background and the wordsOcean Kayaksat the bottom of the stage.In the
Toolspanel, click theSelectiontool, which is the solid black arrow at the top of theToolspanel (see Figure 1-19).Note
Clicking tools is one way of selecting them. Another way is to use the keyboard. When you roll the cursor over a tool, you will see a tooltip containing the name of the tool and a letter. For example, the letter beside the Selection tool is V. Press the V key, and the Selection tool will be highlighted in the Tools panel.
Using the
Selectiontool, click the text. TheProperty inspectorwill change to show all the properties you can change for text, as shown in Figure 1-20.In the
Property inspector, click theFill Colorrectangle—called a color chip—to open the Color Picker. Click the white color, and the text will turn white. You have just changed the color property of the selected text.Click the gray area of the stage. The
Property inspectorwill change to show the stage properties. Change the stage color to a dark gray:#666666. When you select the color, the stage will change color, and the color selected will appear in theProperty inspector.Click the black box surrounding the image. The
Property inspectorwill change to show that you have selected a shape and that the fill color for this shape is black. It also lets you know that there is no stroke around the shape. In thePosition & Sizearea, four numbers tell you the width, height, and x and y coordinates of the shape on the stage. Select the width (W) value and change it from428.9to435.Change the height (H) number from333to335, as shown in Figure 1-21. Each time you make a change, the selected object will get wider or higher.Note
If you are an After Effects user, seeing properties as links is not new. It is seriously new if you have been using Flash prior to this release. If you want to quickly change any value, simply click and drag that value to the left or right (the technique is called scrubbing). As you drag, the numbers will change, and the selected object on the stage will reflect these new values. Hold Shift while dragging, and the range of values changes to a less finely grained degree. Adobe calls these links hot text.

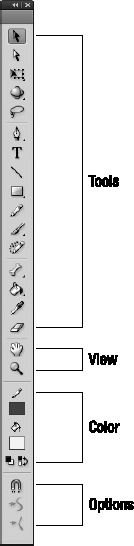
The Tools panel, shown in Figure 1-22, is divided into four major areas:
Tools: These allow you create, select, and manipulate text and graphics placed on the stage.
View: These tools allow you to pan across the stage or to zoom in on specific areas of the stage.
Colors: These tools allow you to select and change fill, stroke, and gradient colors.
Options: This is a context-sensitive area of the panel. In many ways, it is not unlike the
Property inspector. It changes depending on what you have selected.
If there is a small down arrow in the bottom-right corner of a tool, this indicates additional tool options. Click and hold that arrow, and the options will appear in a drop-down menu, as shown in Figure 1-23.

The Library panel (officially called the library) is one of those features of the application that is so indispensable to Flash developers and designers that we simply can't think of anyone who doesn't use it religiously.
In very simple terms, the library is the place where content used in the movie is stored for reuse later in the movie. It is also the place where symbols and copies of components are automatically placed when the symbols are created or the components are added to the stage.
Let's take a look at the library. Assuming your Library panel is collapsed, click the Library icon on the right side of the screen. The Library panel will fly out, as shown in Figure 1-24. Inside the library, you will see that the image of the kayaks is actually a library asset. Drag a copy of the kayaks image from the library to the stage. Leave it selected and press the Delete key. Notice that the image on the stage disappears, but the library asset is retained.
To collapse the Library panel, click the stage. Panels are configured by default to collapse automatically. You can change this preference under Edit

In previous versions of Flash, the Property inspector could be used to change the properties of an animation. This would include techniques such as ramping the speed of an animation, called easing, or even changing how an animation occurs, such as adding or removing rotation. This is still true for shape tweens and classic tweens, but the new home for this sort of configuration—for motion tweens—is the Motion Editor panel.
Though we are going to get deeper into using this new panel in Chapter 8, now would be a good time to stroll over and take a peek at it. Open the MotionPath.fla file in the Chapter 1 Exercise folder. The first thing you will notice is a different icon beside the layer name. This "zooming square" icon indicates the layer is a tween layer (more on those in Chapter 8). The other thing you may have noticed, especially if you've used Flash before, is the absence of an arrow between the two keyframes. The tween span is indicated in blue, and because of the icon, the use of the arrow is not necessary. The dotted line on the stage, visible when you select the tween layer, indicates a tween path.
Note
If you are an After Effects user, you may be looking at that tween path and thinking, "Nah ... it can't be!" Yes, it is a motion path and, just like an After Effects motion path, you can adjust that path by clicking and dragging one of the dots. Each dot represents a frame of the animation.
Drag the playhead across the timeline in the Timeline panel, and you will see that the object fades in, tumbles, and grows as you move the playhead from left to right. Click anywhere in the span of tweened frames and select the Motion Editor panel, as shown in Figure 1-25.
One of the really interesting aspects of the Motion Editor panel is that it gives you more control over how things move than at any point in the history of Flash. When Adobe acquired Macromedia a few years back, there was a lot of speculation in the Flash design community about whether Flash would start to inherit some of the powerful features of After Effects. We didn't have to wait very long to find out. The process started in Flash CS3 with how After Effects creates an FLV video file used by Flash. This version of Flash essentially "seals the deal" and sends a very strong message to both the video and Flash communities that these two applications were made for each other.
The Motion Editor panel can trace its roots in a straight line back to After Effects (Adobe's powerhouse video postproduction software). In that application, objects put in motion or otherwise manipulated over time have a full set of properties and guides for each layer of content in an After Effects project. The major property is motion. Flash users who use After Effects to create motion graphics for their Flash projects find the "After Effects way of doing things" to be relatively compact and simple. The result over the years has been Flash designers wondering why Flash didn't have this feature. Obviously, enough of you have asked the question, because it is now an integral feature of Flash CS4.
Note
Back in the year 2000, one of the authors attended the first ever Flash Conference—Flashforward—and Adobe introduced a Flash competitor called LiveMotion. LiveMotion used the same timeline as the Motion Editor. At the time, the author (and practically everyone at the conference) thought the LiveMotion version was one "sweet" piece of work, and wondered if Macromedia would ever change the timeline.
If you have never used After Effects, now would be a good time to start easing you into the application. We'll start with terminology. See those triangles beside the property names in Figure 1-25? If you click one, it rotates down and the area is revealed. After Effects users call those triangles twirlies, and the term for clicking one of them to reveal the contents of its area is twirl down. We will be using these terms quite extensively when we talk about the Motion Editor panel.
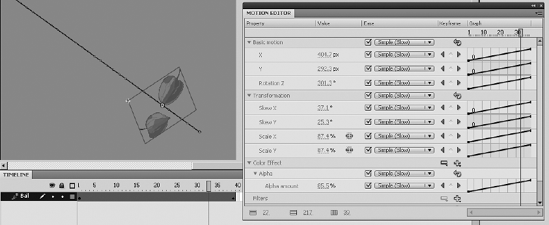
The Motion Editor panel is divided into five distinct areas:
Basic motion: If you twirl downBasic motion, you will see that it controls movement of the object on the x and y axes, and rotation on the z axis.Transformation: Think of this panel as a "by-the-numbers" version of theFree Transformtool, which allows you to resize (scale), slant (skew), and rotate objects.Color Effect: This panel allows you to manipulate alpha (transparency), color, brightness, and tint.Filters: This is where you apply one of the filters—Drop Shadow, Blur, Glow, Bevel, Gradient Glow, Gradient Bevel, or Adjust Color—to the object on the stage.Eases: This area is where you affect the ramping up or down of an animation's motion, transformation, color, or filter changes.
When you twirl down an area of the panel, all of the properties it can affect are revealed.
At the bottom of the panel are three icons with a blue number beside each one, as shown in Figure 1-26. These allow you to control how the graph and frames appear in the panel.

Place the cursor over one of the numbers, and notice how the cursor changes to a pointer finger with a double arrow. This tells you the number can be changed, because it's hot text. One way to change the value is to double-click the number and type a new value. Another way is to click and drag across the number; as you do so, the value changes. This click-and-drag method is called scrubbing. Yup, it's just like scrubbing the timeline. Hold Shift while you scrub to change the rate at which your values change. Scrubbing here works as follows:
Scrub across the
Graph Sizevalue, and the height of every graph in the panel gets larger or smaller.Scrub across the
Expanded Graph Sizevalue, and the expanded size of the selected graph gets larger or smaller. You'll need to actually click one of the properties first to see this. For example, in theBasic motionarea, click theXproperty anywhere that isn't a check box, drop-down menu, or some other widget. When you do, the property expands to a full grid, and now you can adjust its expanded size.Scrub across the
Viewable Framesvalue, and you will see the frames in the graph get larger or smaller. The maximum value for this feature is the current number of frames in the selected tween span, not the Flash movie. Notice how you can't get a number larger than the 39 frames in this particular because the selected tween span has only 39 frames.
Twirl down the Basic motion section. Scrub across any of the values, and the object in that particular frame will change.
Note
Be careful with that "U-turn" back arrow on the layer strip. This is the Reset Values button, but it does more than simply reset the values to their original values. Click it, and the whole tween is removed!
Click the drop-down list in the Eases area, and you see that you can remove any eases or apply a Simple (Slow) ease to the entire area or to individual properties. We aren't going to explain a Simple (Slow) ease yet, because you have strolled over here for a peek, rather than a lesson. We'll cover this in greater depth in Chapters 7 and 8.
You will notice that you have a timeline in this panel's grids. Obviously, if you have a timeline, you should be able to add a keyframe. Drag the playhead to frame 15 of the timeline in this panel. In the keyframe area are two arrows on either side of a diamond. Click the diamond. This adds a keyframe to the animation. The keyframe is visible as a dot on the graph and, if you look back to the Timeline panel, you'll see a keyframe has also been added in frame 15 of the main timeline, as shown in Figure 1-27. The diamond also turns golden. If you move the playhead to another position, the keyframe changes back to gray. This should tell you that a golden diamond means there is a keyframe in the frame. If you click the arrows on either side of the diamond, you will jump to the previous or next keyframe. When one of those arrows is grayed out, you are essentially being told there are no further keyframes beyond the current position of the playhead.
Note
Technically speaking, keyframes added with the Motion Editor panel's diamonds are called property keyframes. You'll learn all the nitty-gritty on this new panel in Chapter 8.

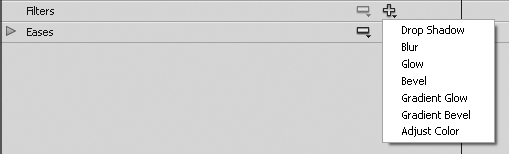
The Color Effect, Filters, and Eases strips are treated a bit differently. Instead of a curved arrow, they have plus and minus signs. Click the + in the Filters area. A drop-down menu containing a list of the available filters appears, as shown in Figure 1-28. To remove a filter, click and hold on the –. A drop-down list of the filters applied to that object will appear. Click a filter in that list, and it will be removed.
In the early days of desktop computing, software was a major purchase, and nothing made you feel more comfortable than the manuals that were tucked into the box. If you had a problem, you opened the manual and searched for the solution. Those days have long passed. Software is more complex, and printing large manuals would be costly. Today, such manuals are supplied on discs or are web-based. In this version of Flash, the user manuals are found in the Help menu, which opens these documents in your default web browser.
To access Help, select Help
The documentation is divided into a series of books, listed on the left side. They cover a variety of subjects, ranging from the use of Flash CS4 Professional to the coding languages used to program content for mobile devices. The right side is where the information you are looking for is displayed.

Click the Using Flash book to open it, and then click Adobe Flash CS4 Professional. As you can see, the books are actually collections of individual documents designed to help you learn what you need to know, along with practical examples of specific techniques.
To go to a specific topic, just continue to click hyperlinks on the left to drill down to the subject of interest. For example, click the + next to Working with video to open that book. Notice the documents About digital video and Flash, Importing and playing Flash video files, and so on.
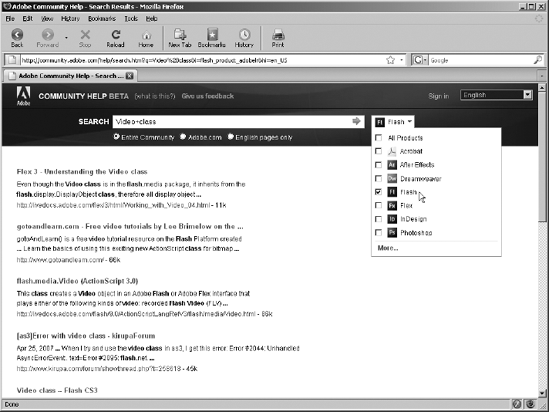
Alternatively, you can use the Search field to look for answers both in the documentation and among tutorials, articles, and blogs on various Adobe and third-party websites. For example, search for the phrase Video class and note that results include free training videos from Lee Brimelow's lauded gotoAndLearn.com website and the flash.media.Video entry of the ActionScript 3.0 Language and Components Reference, as shown in Figure 1-30. Use the drop-down filter to the right of the Search field to sort by product (in this case, Flash, obviously).
Note
So, why search for Video class, rather than just video? What does class mean? Does it mean lessons? Not in this context. You don't have to use the term, but if you're looking for ActionScript-specific results, the word class refers to a concept or an object's type—the sort of thing it is. For code-oriented searches, try MovieClip class when you're looking up movieclips, TextField class when you're looking up text fields, and so on. More on this in Chapter 4.
The final stop on our walkabout is back at the bottom of the interface: the layers facet of the timeline. Let's begin with a few things you need to know regarding layers:
You can have up to 16,000 layers in a Flash movie. They have no effect on the file size.
Use layers to manage your movie. Flash movies are composed of objects, media, and code, and it is a standard industry practice to give everything its own meaningfully named layer. This way, you can easily find content on a crowded stage. In fact, most kinds of tweens require that the objects involved be on their own layers. (That said—not to get too ahead of ourselves—the new tweening model does allow multiple objects on a single layer, as you will learn in Chapter 8.)
Layers can be grouped. Layers can be placed in a layer folder, which means you can, for example, build a complex animation and have all of the objects in the animation contained in their own layers inside a folder.
Layers stack on top of each other. For example, you can have a layer with a box in it and another with a ball in it. If the ball layer is above the box layer, the ball will appear to be above the box. You can easily change this stacking order.
Name your layers. Yes, we mentioned this already, but it bears repeating. This is another standard industry practice that makes finding content in the movie much easier than a jumble of the default layer names:
Layer 1, Layer 2, Layer 3, and so on.Note
Want to collapse the layers to buy yourself some screen real estate? Double-click the Timeline tab. This will reduce the height of the Timeline panel. Double-click again to bring it back.
Layers can be switched among very specific modes, which change the behavioral characteristics of the layer. We will be using this feature quite extensively in Chapter 3 (which covers symbols) and Chapters 7 and 8 (on animation).
To configure modes, right-click (Ctrl-click) a layer's name and choose Properties. The modes are as follows:
Normal layer: This is what you've seen so far. When you tween an object using the Flash CS4 version of a motion tween—as opposed to a shape tween or classic tween—your normal layer enters a special submode in which tween properties on the layer are no longer controlled by the
Property inspector, but rather through the newMotion Editorpanel. The icon for a normal layer is a folded-up sheet of paper.Masking layer: The shape of an object on a masking layer is used to hide anything outside that shape, and reveals only whatever is under the object. For example, place an image on the stage and add a box in the layer above it. If that layer is a masking layer, only the pixels of the part of the image directly under the box will be seen. The icon for a masking layer is a square with an oval in the middle of it.
Masked layer: It takes two to tango, and the same goes for masking. Assuming a masking layer is already in place, layers immediately beneath it can be made masked layers of the masker. The icon for a masked layer is a folded-up sheet of paper, facing the opposite direction as the icon for a normal layer. We'll get into masks in much more detail in Chapter 3.
Folder layer: You won't necessarily think of this as a layer—it really is a folder that contains layers—but Flash CS4 lets you save FLAs as CS3 files (meaning that they can be opened with Flash CS3). In turn, Flash CS3 can save FLAs as Flash 8 files, and so on. You'll lose new features as you travel back in time, but eventually, folder layers become regular layers, so at least they're not lost. Since you'll be using Flash CS4, it really makes no difference. Think of folder layers as timeline folders. The icon for a folder layer is an open file folder.
Guide layer: A guide layer contains shapes, symbols, images, and so on that you can use to align elements on other layers in a movie. These things are really handy if you have a complex design and want a standard reference for the entire movie. What makes guide layers so important is that they aren't rendered when you publish the SWF. This means, for example, that you could create a comprehensive design, or comp, of the Flash stage in Fireworks CS4 or Photoshop CS4, place that image in a guide layer, and not have to worry about the comp adding file size to the published SWF. With classic tweens, guides can also provide paths on which to animate symbols. The icon for a guide layer is a T-square.
Note
Flash CS4 Professional allows you to optionally omit layers that are hidden when you publish the SWF. As with guide layers, this means that hidden layers can be configured to not add weight to published content. This feature was introduced in Flash CS3.
Let's start using layers. First, we'll create some new layers.
Open the
Layers.fladocument in the Chapter 1Exercisefolder. You will see two colored shapes on the stage, as shown in Figure 1-31. These shapes are sitting in one layer.Open the library. You will notice that there is an object named
Pentagoncontained in the library. That object is a movieclip. We'll get into movieclips in a big way in Chapter 3.Each object should be placed on its own layer. Click the
New Layerbutton—it looks like a page with a turned-up corner—directly under theLayer 1strip. A new layer, namedLayer 2, is added to the timeline. Flash keeps track of your timelines on a per-FLA basis, so you might see other numbers besides 2, 3, and so on. The point is that new layers are sequential.Select
Layer 1and add a new layer. Notice how the new layer is placed betweenLayer 1andLayer 2. This should tell you that all new layers added to the timeline are added directly above the currently selected layer. Obviously,Layer 3is out of position. Let's fix that.Drag
Layer 3aboveLayer 2and release the mouse. Now you know how to reorder layers and move them around in the timeline. Layers can be dragged above or below each other.Add a new layer. Hold on—we have four layers and three objects. The math doesn't work. That new layer has to go.
Select
Layer 4and click theTrash Canicon under theLayer 1strip.Layer 4is deleted, and now you know how to get rid of an extra layer.Double-click the
Layer 1layer name to select it. Rename the layerBox. Now that you know how to rename a layer, rename the remaining two layersBallandPentagon.

Content can be added to layers in one of two ways:
Directly to the layer by moving an object from the library to the layer
From one layer to another layer
Let's put some content in our layers:
Select the
Pentagonlayer and drag the movieclip from the library to the stage. The hollow dot in the layer will change to a solid dot to indicate that there is content in the frame. When moving objects from the library to the stage, be sure to select the layer, sometimes called a target layer, before you drag and drop. This way, you can prevent the content from going in the wrong layer.Click the ball on the stage. Notice how the layer is also selected? This is a handy way of determining the layer where an object is located.
Select
EditClick the
Balllayer and selectEdit

Note
Whatever happened to a simple paste command in the Edit menu? The Paste in Center command replaces it. It has always been a fact of Flash life that any content on the clipboard is pasted into the center of the stage. The change in name simply acknowledges this. The other paste command—Paste Special —opens a dialog box that asks you if you want the contents of the clipboard as text. This is a handy way of adding a block of text from a word processor into Flash.
You may have noticed three icons—an eyeball, a lock, and a hollow square—above the layers, as shown in Figure 1-33. Let's see what they do.
Figure 1.33. The Show/Hide All Layers, Lock/Unlock All Layers, and Show All Layers as Outlines icons. Note the pencil icon in the Ball layer, which tells you that you can add content to that layer.
Click the eyeball icon. Notice that everything on the stage disappears and the dots under the eyeball in each layer change to a red x. This eyeball is the Show/Hide All Layers button, and clicking it turns off the visibility of all of the content in the layers. Click the icon again, and everything reappears. Using this feature lets you temporarily hide all existing content while you add something new. Or you can hide everything, and then unhide the one layer of interest.
Note
In previous versions of Flash, a layer's visibility did not carry into the SWF file itself. This was merely a feature to be used for convenience during authoring. In Flash CS4, invisible layers may optionally be omitted from the published SWF. Select File
Next, select the Pentagon layer, and click the dot under the eyeball. Just the pentagon disappears. This tells you that you can turn off the visibility for a specific layer by clicking the dot in the visibility column.
When you click a layer, you may notice that a pencil icon appears on the layer strip. This tells you that you can add content to the layer. Click the Ball layer, and you'll see the pencil icon. Now click the dot under the lock in the Ball layer. The lock icon will replace the dot. When you lock a layer, you can't draw on it or add content to it. You can see this because the pencil has a stroke through it. If you try to drag the pentagon symbol from the library to the Ball layer, you will also see that the layer has been locked—the cursor changes from a tan arrow to a circle with a line through it. Also, if you try to click the ball on the stage, you won't be able to select it. Locking a layer is handy in situations where precision is paramount and you don't want to accidentally move something or delete something from the stage.
Note
Actually we sort of "fibbed" by telling you that you can't put anything on a locked layer. The only thing that can be added to a locked layer is ActionScript. In fact, it is a common practice to create an ActionScript-only layer and then lock that layer. This prevents anything other than code from being added to that layer.
The final icon is the Show All Layers as Outlines button. Click it, and the content on the stage turns into outlines. This is somewhat akin to the wireframe display mode available in many 3D modeling applications. In Flash, it can be useful in cases where dozens of objects overlap, and you simply want a quick "X-ray view" of how your content is arranged. With animation in particular, it can be helpful to evaluate the motion of objects without needing to consider the distraction of color and shading. Like visibility and locking, the outlines icon is also available on a per-layer basis.
Note
You can change the color used for the outline in a layer by double-clicking the color chip in the layer strip. This will open the Layer Properties dialog box. Double-click the color chip in the dialog box to open the Color Picker and click a color, and that color will be used.
You can also group layers using folders. Here's how:
Click the folder icon in the
Timelinepanel. A new unnamed folder—Folder 1—will appear on the timeline. You can rename a folder by double-clicking its name and entering a new name.Drag the three layers into the folder. As each one is placed in the folder, notice how the name indents. This tells you that the layer is in a folder.
Next, remove the layers from the folder. To do so, simply drag the layer above the folder on the timeline. You can also drag it to the left to unindent it.
To delete the folder, select it and click the
Trash Canicon.Note
Make sure that the folder is empty before you click the Trash Can icon to delete it. If you delete a folder that contains layers, those layers will also be deleted. If this happens to you, Adobe has sent a life raft in your direction: an alert box telling you that you will also be deleting the layers in the folder. Click Cancel instead of OK if you've changed your mind.
Now that you have had a chance to wander through the interface and try out a few things, let's put what you have learned to practical use. Moving squares and circles around the stage isn't exactly why you are here, so let's take what you have learned and hike over to Lake Nanagook.
We have shown you where many of the interface features can be found and how they can be used. Now we are going to give you the opportunity to see how all of these features combine to create a Flash movie.
You will be undertaking tasks such as the following:
Using the
Property inspectorto precisely position and resize objects on the stageCreating layers and adding content from the library to the layers
Using the drawing tools to create a shape
Creating a simple animation through the use of a tween
Saving a Flash movie
Testing a Flash movie
By the end of this exercise, you will have a fairly good understanding of how a Flash movie is assembled and the workflow involved in the process.
The specifications for the project dictate the stage is to be 400 pixels wide by 300 pixels high. It also calls for a dark-blue stage color to give the illusion of night. Follow these steps to set up the stage:
Open the
MoonOverLakeNanagook.flafile in the Chapter 1Exercisefolder.Show the
Librarypanel, if it isn't already in view, by selectingWindowClick the stage, and then click the
Editbutton in thePropertiesarea of theProperty inspectorto open theDocument Propertiesdialog box.Change the width value to
400and the height value to300. Click theBackgroundcolor chip to open the Color Picker. Select the color text and change it from#FFFFFFto#000066(dark blue). ClickOKto accept the changes and close the dialog box. The stage will shrink to its new size and be colored a dark blue. The new size and color will now appear in theProperty inspector, as shown in Figure 1-35.


Next, use the Gradient movieclip for the sky. Although using your eyes for object placement on the stage is a great way to get stuff into position, your eyes aren't as precise as Flash. The gradient needs to completely cover the stage and not hang out on the pasteboard (the nonstage work area) by even one pixel. Why? So that the gradient covers the whole "sky" area. Here's how you do that:
Rename
Layer 1toGradientby double-clicking the layer name and entering that text.Drag the
Gradientmovieclip from the library to the stage.Click the gradient on the stage to select it. In the
Property inspector, set itsXandYvalues to0. The object will align itself with the upper-left corner of the stage.Click frame 60 of the
Gradientlayer and press the F5 key. This adds 59 new frames to the timeline; you can tell this because the layer expands to the sixtieth frame and a rectangle (indicating the new span of frames) is shown at the end of the layer. This gradient is going to be animated later in the exercise.
When Flash measures the location of an object on the stage, it uses the upper-left corner of the stage as its 0,0 point. The actual position of the object is based on something called its registration point. In the case of this gradient, the registration point of the symbol also happens to be its own upper-left corner, which is why x and y values of 0 cause it to fit neatly on the stage. If the registration point of the gradient were changed to 200,150—that is, down and in from its own upper-left corner—the gradient would end up being positioned partly on the pasteboard and partly on the stage, as shown in Figure 1-36. The symbol's registration point is indicated by the + sign you see inside the symbol (near the small circle) in Figure 1-36. In the sample file, you'll see the + sign is in the symbol's upper-left corner instead. In Chapter 3, you'll learn how to change a symbol's registration point however you see fit.
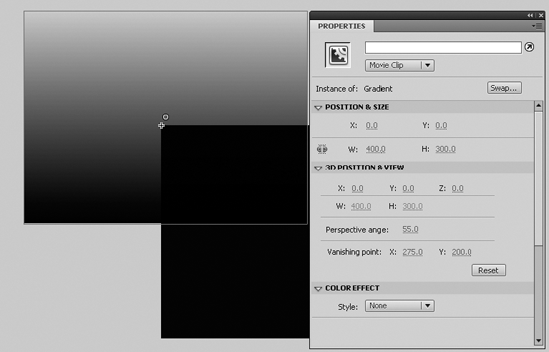
Figure 1.36. The stage and the object's registration point determine position on the stage when using the Property inspector.
Lock the layer by clicking the black dot under the
Lockicon on the timeline. This is a good habit to develop. Flash projects, including this one, can get fairly complex in a relatively short time. By locking the layer, you are ensuring that you don't accidentally move the background later while you're working on the project.
One of the really great things about Flash is that it gives us designers the chance to practice the art of illusion. If you look at the gradient on the stage, you will notice that the sky is a dark blue that gradually changes to black as it approaches the bottom of the stage. This gives the illusion of a night sky. Let's look at how this was accomplished.
Double-click the
Gradientsymbol in the library to open the Symbol Editor. This is also known as entering a symbol's timeline.
The Symbol Editor looks suspiciously like the main timeline. In fact, symbols have their own timelines that can function independently of the main timeline. You'll see what we mean by this in a couple of minutes. For now, let's just get you oriented. Beside the Scene 1 link on the top-left corner of the stage, you see a movieclip icon and the name Gradient. This tells you that you are in the Symbol Editor, editing the Gradient symbol. Clicking the Scene 1 link returns you to the main timeline. But for now, get yourself back to the Symbol Editor.
Once in the gradient's timeline, click the gradient. The first thing you should notice is that the gradient becomes pixelated. This is a visual clue that you have selected a vector shape. Colors and gradients can be associated with shapes by way of the
Paint BucketandInk Bottletools.Select Window
Click the left black crayon, and you will see the color appear in hexadecimal format:
#000000. Note that theAlphavalue is100%. Alpha is Flash's term for opacity, and 100% means that the color is fully opaque; in other words, it cannot be seen through at all. Click the right black crayon. This time, theAlphavalue is0%(as shown in Figure 1-37).

The color in the gradient actually fades in from transparent black to opaque black. As the color moves from the top to the bottom, the pixels become visible, hiding the blue. As they increase in number, the black takes over and the blue looks like it is transforming to black. Now you know how the illusion of a night sky was created.
Click
Scene 1or selectEdit
With the stage prepared and the sky in place, you can now turn your attention to adding the assets to the movie. The scene involves mountains, trees, grass, a lake, a twinkling star, and the moon. What this tells you is that the objects furthest away need to be placed near the bottom of the layering order. This means that the mountains are the next piece of content to be added.
Add a new layer to the main timeline and name it
Mountains.With the new layer selected, open the library and drag the
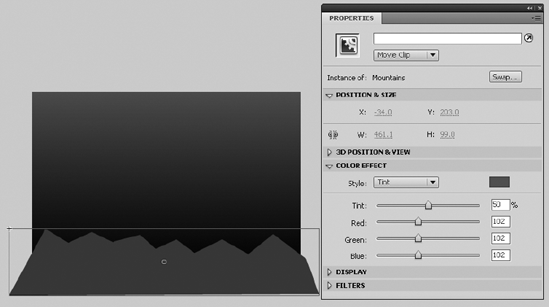
Mountainsmovieclip onto the stage.With the mountains selected on the stage, in the
Property inspector, set theXvalue to -34and theYvalue to203. The mountain range will sit at the bottom of the stage and hang off both sides of the stage. There is, of course, one great big problem: the mountains are black and they have been placed against a black background. Let's fix that.Select the mountains on the stage and, in the
Color Effectarea of theProperty inspector, selectTintfrom theStyledrop-down menu. TheProperty inspectorwill change to show you a color chip, a tint percentage, and the RGB color of the selected object.Note
Remember that everything on the stage, including the stage itself, has unique properties. including its color. Changing the tint of a selected object allows you to manipulate the color property of that object. The original library asset's color is not affected.
Click the color chip, and when the Color Picker opens, select the dark-gray color directly under the black chip on the left side of the picker (
#333333). The mountains become a lot more distinct; in fact, they are now too obvious if yourTintvalue is applied at 100%.With the mountains still selected, move the
Tintslider until the value is70%. Now move it to50%(as shown in Figure 1-38). What you have discovered is that the strength of a tint color is another tool in the color arsenal for you to deploy as needed. If you are a power user, feel free to set theTintvalue to50by typing it manually.Now would be a good time to save your work. Select
FileNote
If you have been using Flash for a while, we are willing to bet you missed something rather significant when you added the new layer. Did you happen to catch that the frame span of the new layer matched that of the Gradient layer? In the past, any new layer started off as a single frame, and you pressed the F5 key to add a frame to create the span.
The mountains are in place and are faintly visible against the night sky. Let's add some depth to the scene by adding a couple of trees.
Create two new layers, named
Tree1andTree2.Drag one copy of the
Treessymbol to the stage while each tree layer is selected. This puts each tree on its own layer. You may notice that the icon for theTreessymbol is different from the other symbols in the library. This icon indicates that the tree is a graphic symbol. Graphic symbols can be created with the various drawing tools in Flash—which is the case with this tree—and also make good containers for imported photographs.Note
Graphic symbols' timelines are locked in step with the timeline they're in, unlike movieclip symbols, whose timelines run independently. This explains why graphics are the de facto symbol for JibJab-style animation (
http://www.jibjab.com). Complex nested symbols can be scrubbed in this way for testing in the timeline, whereas movieclips only show nested animation when published. A symbol placed on the stage is called an instance. We will cover symbols in Chapter 3, and animation in Chapters 7 and 8.Select the tree on the lower of the two tree layers. Use these values to precisely place the selected tree on the stage, resize it, and darken it:
X: 49Y: 178.5W: 65H: 105Color Effect: TintTint Color: #000000 (black)Tint Amount: 48%
The tree gets smaller, moves to the left side of the stage, and darkens. Resizing the image and darkening it give the illusion of depth in this scene.
Select the remaining tree and use these values in the
Property inspector:X: 76.2Y: 160.6W: 68H: 123Color Effect: TintTint Color: #000000 (black)Tint Amount: 26%
The tree gets a bit smaller, moves to the left side of the stage, and, due to the low tint amount, becomes a bit brighter than the tree behind it, as shown in Figure 1-39. The reason for this is that it will be lit by the moon, which you will create in a couple of minutes.
Note
If you have used Flash prior to this version, setting the location and size properties of a selected object using the Property inspector will, as one of the authors discovered, take a bit of "brain rewiring." In previous versions, the first properties you changed, due to their location in the Property inspector, were width and height; then you set the x and y coordinates. These have been reversed in the Position & Size area in Flash CS4.

Figure 1.39. Location and size are other properties that can be manipulated using the Property inspector.
Let's finish off the scene by adding the grass and the lake.
Add a new layer named
Grass. With this new layer selected, drag theGrassmovieclip from the library to the stage. Set itsXandYvalues in theProperty inspectorto-277.6and268.9, respectively.Note
What's with the decimals? This is deliberate. You need to know how to input values as well as scrub the values. You may have noticed that when you scrub values, the numbers don't have decimals. If precise placement of objects on the stage is "mission-critical," you need to know that typing the numbers by hand accomplishes this task. But isn't a decimal value smaller than a pixel? You bet it is, but we're dealing with vector graphics here, and vectors don't need to sit exactly on a pixel.
Add a new layer named
Lake. With this new layer selected, drag theLakemovieclip from the library to the stage. Set itsXandYvalues in theProperty inspectorto-252and274, respectively.
So far, so good. It is starting to look like Lake Nanagook (see Figure 1-40), but we need to add two more elements to make it a bit more realistic: the moon and a twinkling star. We obviously need the moon because it is reflected in the lake, and a twinkling star is a subtle bit of eye candy that will make the scene that much more interesting and catch the viewer's attention. Let's start with the star.

One of the steady messages running throughout this chapter is that we, as Flash designers, are illusionists. In this exercise, you will discover how to create the illusion of a star twinkling in the night sky.
Open the library and double-click the
starmovieclip to open it in the Symbol Editor. When the movieclip opens, you will see that it is composed of a layer nameddiamond. The shape on the stage was created using theRectangle Primitivetool, making the sides concave and filling the shape with #FFCC00, which is a gold color.Note
If the shape is too small, select the Zoom tool (with the magnifying glass icon) on the Tools panel, and click and drag it across the star. This is how you can precisely zoom in on an object on the stage.
Add a new layer named
diamond2. Click the star in thediamondlayer and copy it to the clipboard.Select the first frame of the
diamond2layer and selectEditMove the playhead back to frame 1 and click the star. This will select the star in the
diamond2layer.In the
Property inspector, change the star'sFill Color, in theFill & Strokearea, to#FFFF99, which is a faint-yellow color.With the star in the
diamond2layer selected, right-click (Ctrl-click) the star to open its context menu. SelectConvert to Symbol. In theNew Symboldialog box, name the symbolstar2and selectMovie Clipfrom theTypedrop-down list. ClickOKto accept the change.
You need to convert the rectangle primitive to a symbol in order to apply the sort of tween you're about to do. Note that converting a symbol from a shape or primitive already in place keeps everything positioned where it was.
If you are an After Effects user, you are about to discover the Motion Editor panel is a very familiar place. If you are new to Flash or have never used After Effects, you are about discover that creating motion in Flash has moved, in one leap, from a general tool to a finely tuned precision instrument. We will be getting deeper into this panel in Chapter 8, which means the intent of this exercise is to give you an opportunity to take the Motion Editor panel for a short spin around the block. In this exercise, you are going to do nothing more than have the star rotate 360 degrees in a clockwise direction, and best of all, it requires only a couple of mouse clicks.
Right-click (Ctrl-click) on any frame in the
diamond2layer to open the context menu. When the menu opens, selectCreate Motion Tween. The span will turn blue. Open theMotion Editorpanel and move the playhead to frame 60 of the timeline.In the
Basic motionarea, set theRotation Zvalue to 360. When you finish, you will see that a motion tween has been added to the timeline, as shown in Figure 1-41. Positive values will rotate an object in a clockwise direction; negative values will rotate the object in a counterclockwise direction.Scrub across the frames to see the rotation.
Zoom the stage to the 100% view, and click the
Scene 1link on the top left of the stage to return to the main timeline.Save the project.

To this point, we have essentially handed you the assets and let you put them in place and otherwise manipulate them. It is now your turn to go solo and create the moon that rises over Lake Nanagook, complete with shadow.
Select
InsertNote
So far, we have used the term movieclip and not put a space between the two words. The use of the single word has developed into a standard when writing about Flash. The New Symbol dialog box is actually one of the very few places that Adobe uses the two-word form.
Rename
Layer 1tobg. Add a new layer namedshadow. Theshadowlayer should be above thebglayer.In the
Toolspanel, click and hold theRectangletool, and when the tool drop-down list appears, select theOvaltool. In the options area of theToolspanel, hover until you find theObject Drawingbutton (a tooltip will tell you when you've hit it; this is the button adjacent to the horseshoe magnet). Make sure theObject Drawingbutton is not selected before completing the next few steps.Click the
Stroke Colorchip in theProperty inspectorto open the Color Picker. Select the red on the left as the stroke color (#FF0000). Click theFillcolor and select a light blue. While you're there, give theStrokea value of3to help it show up better.Select the first frame of the
bglayer and, with theOvaltool selected, click the stage and drag out a circle. Switch to theSelectiontool and double-click the circle to select both the fill and the stroke. In theProperty inspector, change the circle's width and height values to120, making a perfect circle, and set theXandYvalues to0. This is your moon (well, the beginnings of it).With the moon still selected—again, you've selected both the stroke and the fill—copy it to the clipboard.
Select the first frame in the
shadowlayer and paste the shape from the clipboard into this layer.With the newly pasted shape still selected, move it upward and to the left, so that it overlaps the bottom layer, but both circles show. These shapes should look something like what you see in the movies when a character looks through binoculars.
Click the
Show All Layers as Outlinesbutton to temporarily display both circles as outlines. The intersection between the two shapes should look like football or rugby ball. Click theShow All Layers as Outlinesbutton again to exit outlines mode.Click the red stroke on the shape in the
shadowlayer to select it. Press the Delete key to remove it. You now have a solid blue circle over another circle that has a red stroke, as shown in Figure 1-42.Select the red stroke around the circle in the
bglayer and cut it to the clipboard. Select theshadowlayer and selectEdit

What has happened here is that the stroke you just pasted into the shadow layer has actually cut the football shape for you. The reason this is possible is because you turned off Object Drawing mode in step 3. You'll learn more about this mode in Chapter 2.
In the
shadowlayer, click the portion of the blue circle that is outside the stroke. Press the Delete key. Now select and delete the stroke itself. If you turn off the visibility of thebglayer, you will see that you have created the shadow shape. Let's make it a true shadow.Click the football shape to select it, and then open the
Colorpanel by selectingWindowSet the fill color to
#000066and reduce the alpha value to36%. Turn on the visibility of thebglayer, and you will see that you indeed have a shadow, as shown in Figure 1-43.
The final task in the process of creating the moon is to add a gradient fill in order to give it a bit of a glow.
Select the circle in the
bglayer and open theColorpanel.Select
Radialfrom theTypedrop-down list. The moon turns into a black-and-white radial gradient. Click the black crayon to select it. Change the hex color under the Color Picker to#C4DDEE. Click the white crayon and change its color to#93BDE0. The moon takes on a faint glow, thanks to the similar colors in the gradient, as shown in Figure 1-44.Click the
Scene 1link to return to the main timeline.Add a layer named
Starand another namedMoon. These layers should appear above the others.Add the
starsymbol to theStarlayer, and set itsXandYvalues to219and42, respectively.Add the
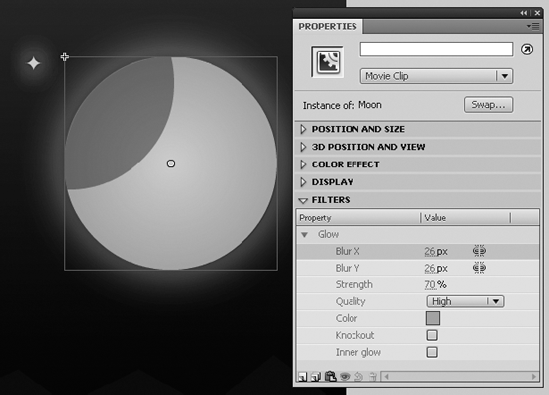
moonsymbol to theMoonlayer, and set itsXandYvalues to241and43, respectively.


Next, let's really make the moon and the star shine in the sky over Lake Nanagook. Let's add a glow effect to both of them. Here's how:
Select the star on the stage and click the
Filterstwirlie on theProperty inspectorto open theFiltersarea.Click the leftmost icon at the bottom of the
Filtersarea to open theAdd Filtermenu list of the filters. Select theGlowfilter.Use these settings in the
Glowfilter:Blur X: 14Blur Y: 14Strength: 418%Quality: HighColor: #93BDE0
The star looks like it is about to go into supernova. Let's make it a bit smaller.
With the star selected on the stage, set its width and height values in the
Property inspectorto13.Select the moon on the stage and apply the following
Glowfilter values:Blur X: 26Blur Y: 26Strength: 70%Quality: HighColor: #93BDE0
The moon and the star now look like they belong together in the sky, as shown in Figure 1-45. Save the project.
Note
Filters can be added only to movieclips, text fields, and buttons.
If we are going to have an outdoor scene, it only makes sense to add a bit of outdoor sound to the mix. Fortunately, adding audio to a Flash file is not terribly complicated.
Add a new layer and name it
Audio.Open the library and locate the imported
Nanagook.mp3audio file. Double-click it to open theSound Propertiesdialog box.Click the
Advancedbutton to reveal all of the features of this dialog box, as shown in Figure 1-46. Click theTestbutton to preview the audio file. Ah, the sounds of crickets and wolves howling in the night. ClickOKto close the dialog box.With the
Audiolayer selected, drag the sound file from the library onto the stage. When you release the mouse, the audio waveform appears in the layer.Note
Dragging a sound file from the library to the stage isn't the only way to get an audio file to the timeline. In many respects, what we've shown is not exactly regarded as a best practice because audio can be big, and when it is in the library, it can increase the SWF size. We have a whole chapter, Chapter 5, devoted to audio best practice, so for now, let's content ourselves with getting sound into the presentation and getting it to play.
5Click anywhere on the sound's waveform in the
Audiolayer, and you will see theProperty inspectorchange to show the sound properties (open theSoundtwirlie, if you necessary).Click the
Syncdrop-down menu and selectStream, as shown in Figure 1-47.Scrub across the timeline, and you will hear the audio file. This is possible because of the
Syncchange you made in step 6. Drag the playback head to frame 1 and press the Return (Enter) key. The sound will start playing, but it abruptly ends at frame 50. This is because the audio was originally recorded for a slower movie frame rate.Scroll the timeline so you can see frame 130. Click into the
Audiolayer at frame 130 and drag downward without lifting the mouse—until you hit theGradientlayer. This selects the last frame of all your layers. Press the F5 key. This adds enough frames to every layer so that the sound has enough room to play out completely.Save the file.
Note
Picking up a pattern here? Get into the habit of saving the file every time you do something major to your movie. This way, if the computer crashes, you won't have a lot of extra work in front of you trying to reconstruct the movie up to the point of the crash.

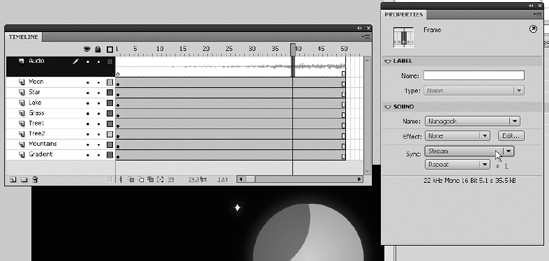
You may have looked at Figure 1-47 and thought, "Hey, my Audio layer doesn't look like yours." Good eye. Layers can also be made larger. To do this, right-click (Ctrl-click) on a layer's name to open the context menu. Select Properties to open the Layer Properties dialog box, as shown in Figure 1-48. Select 200% in the Layer height drop-down list, or enter your own value. Click OK to accept the change.
You have created the animation and scrubbed through the timeline, and everything looks like it is in order. Now would be a good time to test your movie in Flash Player. We can't overstate the importance of this step in your workflow. The procedure, as one of the authors is fond of telling his students, is, "Do a bit. Test it. Do a bit more. Test it." Flash movies can be quite complex. Each element you add to your movie adds to the complexity of the movie. Developing the habit of regularly testing your work, regardless of how simple it may be, will point out mistakes, errors, or problems in the work that you've just completed. What it comes down to is this: do you really want to burrow through a complex movie, and even more complex code, searching for an issue, or do you want to catch it early?

To test your Flash movie, press Ctrl+Enter (Cmd+Return). If you prefer to use a menu, select Control
If you open the folder where you saved the FLA file, you will see that a SWF file has also been added to the folder.
We've been gently reminding you that Flash involves the art of illusion. The other thing you need to know is that Flash developers are fanatics about detail. They pay close attention to their environment, and then try and mimic it in their projects.
In this final piece of this exercise, we are going to get you up close and personal with that last statement. The plan is to have the moon rise into the night sky. On the surface, that sounds like a no-brainer: tween the motion of the moon between its start position and its finish position. But that's not quite how it works.
This is a night scene, and if there is no moon, things are quite dark. They only light up when the moon is in the sky. If you look at Lake Nanagook, you can see there is a problem. The lake already contains the reflection of the moon. The lake should be dark and only start to light up as the moon rises in the sky. The other issue is the trees. They, too, are lit by the moon. but they should be dark and start to light up as the moon rises.
Although fixing the movie may sound rather complex, it can all be handled by the Property inspector and Motion Editor panel. Follow these steps to start yourself on the path to becoming a fanatic about detail:
The first issue is the moon itself. It is in a higher layer. This means that if you animate the moon in its current position, it will appear to rise in front of Lake Nanagook. Drag the
Moonlayer down to just above theGradientlayer. Now the moon will rise behind the mountains.Turn off the visibility of the
Lakelayer. You will need to see what you are doing, and the lake will hide the start point of the moon rise.Right-click (Ctrl-click) the
Moonlayer and selectCreate Motion Tween. This layer can now be used with theMotion Editorpanel.Select the
Moonlayer and open theMotion Editorpanel.Drag the playhead to frame 1 and, using the
Position & Sizearea of theProperty inspector, set the moon's position to230on the x axis and305on the y axis.Drag the playhead to frame 50 and make sure the
Basic motiontwirlie is open. Add keyframes to theXandYrows by clicking theAdd or Remove Keyframebutton (the diamond) for either one of them.Move the playhead to frame
100and set theXandYvalues to241,43(the original position of the moon). If you scrub across the timeline—either in theTimelinepanel or theMotion Editorpanel—the moon rises from behind the mountains.
Want to earn some "bonus marks"? How about we have the moon travel through an arc to its final position?
Lock the
Mountainslayer. You are going to manipulate the motion path—the series of dots—to create the arc, and you don't want to move the mountains by accident.Click one of the dots where the path crosses the edge of the mountain range and drag it to the left. A couple of things happened:
When you rolled the cursor over the path, an arc appeared under the arrow. This tells you the path can be changed.
When you dragged the path, it changed to a solid line, which bent in the direction you were dragging, and the graph in the
Motion Editorpanel also bent. This tells you motion paths can be thought of as vectors.
When you release the path, it becomes a dotted line again, as shown in Figure 1-50. Scrub the playhead across the animation, and the moon follows a gentle arc as it moves into the night sky.
Note
If you are an experienced Flash user, you'll notice the ability to directly edit a motion path on the stage has replaced the Add Motion Guide button used in previous versions of the application. Old-style motion guides are still available with classic tweens (see Chapter 7 for details).

Obviously, if the moon is behind the mountains when the movie starts, the lake and trees shouldn't be lit up. Let's have them become distinct as the moon rises.
Unhide the
Lakelayer on theTimelinepanel and right-click (Ctrl-click) to selectCreate Motion Tween. Drag the playhead to frame 1.With the
Lakelayer selected, open theMotion Editorpanel and click the+sign in theColor Effectarea.Select
Brightness. Reduce theBrightnessvalue to-100. This will turn the lake black because you have essentially removed all of the color from the lake.Drag the playhead to frame 50 and click the
Brightnessdiamond to add a keyframe. Do this again at frame 100 and increase theBrightnessvalue to0%. The lake returns to its original color state. Scrub across the timeline, and the reflection of the moon in the lake becomes brighter as the moon moves across the night sky.Return to the
Timelinepanel and perform the next few steps with each tree layer in turn:Right-click (Ctrl-click) at frame 50 and select
Insert Keyframe. This adds a classic keyframe to the layer at that position. Do the same at frame 100.Right-click (Ctrl-click) anywhere in the layer between frames 50 and 100 and select
Create Classic Tween.Drag the playhead to frame 50. Click the tree in the current layer and use the
Color Effectarea of theProperty inspectorto change the tree'sTintvalue to100%, which completely darkens that tree, as shown in Figure 1-51. (The keyframe at frame 100 still holds the tree's originalTintvalue.)Drag the playhead to frame 1 and change the tree's
Tintvalue to100%there as well.
Save and test the movie. Your movie should look a lot more realistic. This tells you that the new motion tween model and classic tweens can be combined.
You have concluded your introductory walk through Flash CS4 Professional.
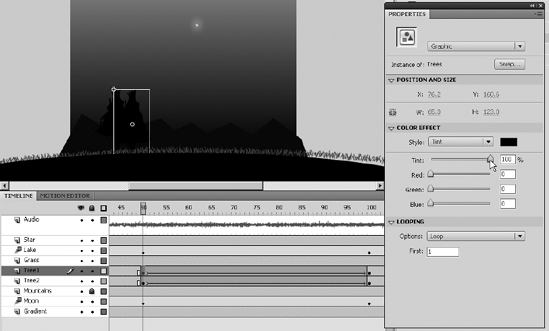
In this chapter, you learned the following:
How to customize your Flash workspace
A number of methods for manipulating objects on the Flash stage
How to dock, undock, collapse, and minimize panels
The importance of the
Property inspectorin your daily workflowThe difference between a frame and a keyframe
The process involved in using frames to arrange and animate content and the properties of content on the stage using the
TimelineandMotion EditorpanelsHow to add, delete, nest, and rearrange layers
How to test a Flash movie
In the next chapter, you'll learn how to use the tools to create content in your movies, and how Fireworks CS4, Photoshop CS4, and Illustrator CS4 are important elements in your workflow.