
When it comes to Flash on the Web, a common user experience is sitting around waiting for the movie to start. From your perspective, as the artist who designed the site, this may seem odd. After all, when you tested the movie in the authoring environment, it was seriously fast and played flawlessly. What happened? To be succinct, the Web happened. Your movie may indeed be cool, but you made a fundamental mistake: you fell in love with the technology, not the user. In this chapter, we'll talk about how to improve the user experience.
Here's what we'll cover in this chapter:
Understanding how Flash movies are streamed to a web page
Using the Bandwidth Profiler to turbo-charge movies
Optimizing Flash movies
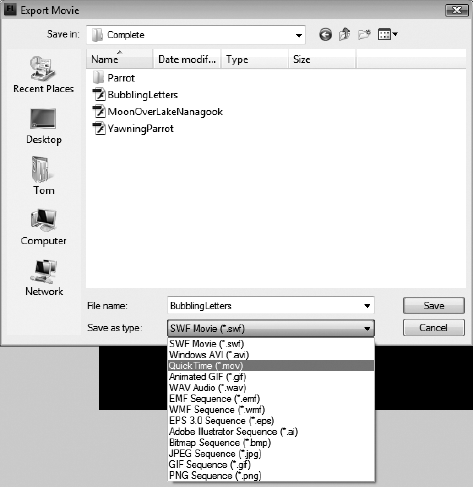
Converting a Flash movie to a QuickTime video
Choosing web formats
Publishing a SWF for web playback
Dealing with remote content
The following files are used in this chapter (located in Chapter15/ExerciseFiles_Ch15/Exercise/):
YawningParrot.flaBandwidthTest1.flaBandwidthTest2.flaBeefcake.flaBeefcakeDistributed1.flaBeefcakeDistributed2.flaParrotFW.gifMoonOverLakeNanagook.flaTinBangs.fla
The source files are available online from either of the following sites:
http://www.FoundationFlashCS4.comhttp://www.friendsofED.com/download.html?isbn=9781430210931
Back in the early days of Flash, when we really didn't know better, Flash designers would prepare these really "cool" intros to the site, which played while the rest of the site loaded. The problem was they were large and, in many cases, the intro seemed to take almost as long to load as the site. The solution was the infamous Skip Intro button, as shown in Figure 15-1. The intro would start playing and, after a couple of seconds, the Skip Intro button would appear. The user would click it, only to discover the site hadn't quite loaded. Users were left to sit there, drumming their fingers on their desk. So, users began to see the button not as a Skip Intro option, but as a Skip Site warning. This resulted in Flash gaining a rather nasty reputation for bloat, which it still has not shaken entirely.
Note
Of course, the Flash community does have quite a sense of humor. One of the more popular Flash sites of the time was named "Skip Intro." You can watch it via archive.org's Wayback Machine, http://web.archive.org/web/20011214005850/http://www.skipintro.nl/skipintro/skipintro98.htm. When you launch the site, make sure to click the phrase "Play Ball" (hip for "Enter this site") to start the never-ending Flash intro.
To deal with the bloat issue, it is critical that you understand the underlying technology behind your Flash movie. This means we need to revisit what the Web really is, so you can become familiar with many of the terms commonly used in the Flash design and developer community.

The Internet's roots go back to the U.S. Department of Defense's need to create a bulletproof means of maintaining communications among computers. This involved such things as file transfers, messaging, and so on. At the time, computers were a virtual Tower of Babel, which meant different computer types and operating systems rarely, if ever, could talk to each other. As well, in battle conditions, the needed system would have to carry on even if a piece of it was knocked out, and it had to be accessible to everything from portable computers to the big, honking mainframes in "clean rooms" around the world.
The solution was an enabling technology called the Internet Protocol suite, though we know it by a far sexier name: TCP/IP. This is how data moves from your computer to our computers, or from your web server to our computers and, as you may have guessed, the slash character indicates that it comes in two parts.
IP (Internet Protocol): How data gets from here to there by using an address called the IP address. This address is a unique number used to identify any computer currently on the Internet. This protocol creates little bundles of information, called packets, which can then be shot out through the Internet to your computer. Obviously, the route is not a straight line. The packets pass through special computers called routers, and their job is to point those packets to your computer. Depending on the distance traveled, there could be any number of routers, which check your packets and send them either directly to your computer or to the next router along the line.
TCP (Transmission Control Protocol): The technology that verifies all of the data packets got to your computer. The IP portion of the trip couldn't care less if packet 10 arrives at your computer before packet 1, or even that it got there at all. This is where TCP comes in. Its job is to ensure that all of the packets get to where they are supposed to go.
Once all of this got the kinks worked out, the US military had quite the communications system on its hands.
Although straight data transmission was interesting, once the cool factor wore off, people started wondering how it would be possible to use this communication network to access files containing images, audio, and video. The solution was the World Wide Web—a network of networks, which is commonly seen as web pages and hyperlinks.
A web page is a simple text file, which uses HTML—a formatting language of tags and text—to define how a page should look and behave. This is important, because your Flash movies should always be found in an HTML wrapper.
Note
The concept of hyperlinks and hypertext was around long before the Internet. The gentleman who managed the atomic bomb project for the United States during World War II, Vannevar Bush, wrote an article for the Atlantic Monthly in July 1945 that proposed a system of linking all information with all other information. The article was entitled "As We May Think," and you can still read it at http://www.theatlantic.com/doc/194507/bush.
An HTML page may be nothing more than a text file, but it can contain links to other assets, such as CSS files, JPGs, GIFs, and your Flash movies. These links take the form of a URL (Uniform Resource Locator) and specify the location of the assets requested by the HTML document. When Firefox, Internet Explorer, or any other graphical browser translates the page, those addresses are used to load the external assets and display them on your computer screen. Thus, the Web is really composed of two parts: browsers that request files and servers that store files and make them available when a browser asks for them.
As you can see, the infrastructure that moves your SWF files from a server to thousands of browsers is already in place. Where your pain and heartache arise is from something called bandwidth.
In the early days of Flash, around the year 1999, one of the authors read an article written by a New York Flash designer, Hillman Curtis, and one phrase leaped out of the article and has been glued to the front of his cerebral cortex ever since. What's that phrase? "Keep an eye on the pipe."
The "pipe" is bandwidth. Bandwidth is a measure of how much data will move along a given path at a given time or how much information can be downloaded through a modem and how fast. One of the authors, when speaking on this topic at conferences or in class, uses a rather amusing analogy that will help you to understand this topic. Imagine trying to push the amount of data contained in your favorite TV show through a modem. When that modem is connected to a telephone line, the effort is no different from "trying to push a watermelon through a worm."
Bandwidth is measured in bits per second (bps), usually in the thousands (Kbps) or millions (Mbps). A bit is either a one or a zero, so ultimately, bandwidth is a measure of how many ones and zeros can be fed through a modem each second. The higher the number, the greater the bandwidth, and the faster things get from here to there. But bandwidth is not constant. It requires more bandwidth to move a video from here to there than it does to transfer a page of text. The issue is not "here to there." The issue is the modem's capacity to manage the data. This is the "pipe." Users with 56K dial-up modems have a pipe that has the diameter of a garden hose. Users with cable modems have a pipe that has the diameter of a fire hose. Connect the tiny garden hose to the fire hydrant in front of your house, and you will get a graphic demonstration of data flow and the pipe when you turn on the hydrant.
As we pointed out earlier, the data packets sent to your computer get there eventually, and the route is never a straight line. Over time, TCP/IP ensures that the transmission rate averages to a more or less constant rate, but this is technology we're dealing with here. It is the prudent Flash designer who approaches technology with a dose of pragmatism and does not assume a constant flow. This has implications for your design efforts, and we will get into those shortly.
You need to regard the pipe and data transmission in much the same manner you regard your local highway. It may have six lanes for traffic and a posted speed limit of 60 mph or 100 kph, but all of that becomes irrelevant during rush hour. Traffic moves at the pace of the slowest car. It is no different with the Internet. Servers can become overloaded.
A powerful example of this in recent history is the infamous event known as 9/11. On that day, the Internet essentially ground to halt as it seemed like every computer on the planet was attempting to get the latest information on the tragedy. What people overlooked on that day was that a server is only a computer, and can only reply to a finite number of requests at a set rate. If the browser can't get the information, it will assume the assets are not there. As a consequence, the requested page will either not be displayed or will be displayed with information missing. It got so bad for CNN and the BBC that they were forced to post a message that essentially told people "come back later." Even the people lucky enough to make a connection experienced pauses in the download and frequent disconnects, which are the hallmarks of an overloaded server.
What you need to take away from this story is that the time it takes to download and play your Flash movie is totally dependent on the contents of your Flash movie and traffic flow on the Internet. This means you need to not only concentrate on what is in your movie, but also on who wants to access it. This is where you fall in love with the user and not the technology.
The Flash community is an oddball collection of people, ranging from those who ride skateboards for entertainment to the classic nerd working in a corporate cubicle farm. This disparity, which actually is the strength of the Flash community, has resulted in a bit of a split between those who use supercharged computers to develop their content, and take a "Sucks to be you" attitude if you can't revel in their work, and the corporate types who operate within strict standards set by their IT department. This standard is usually in the form of the following commandment:
Thou shalt develop to a Flash Player 7 standard, and may whatever god you worship have mercy upon your miserable soul if you step outside this stricture.
So, what do you really need to know before putting your work out there? Here are some general guidelines:
Small means fast. Studies show you have 15 seconds to hook the user. If nothing is happening or is appealing to your users, they're gone. Small SWFs mean fast download. The days of introductory eye candy for your Flash movies are over. If the content they see within that 15-second window is not relevant to the site or the experience, users leave.
If a bleeding-edge Flash site isn't viewable on a two-year-old computer with a standard operating system and hardware, it's time to go back to the drawing board.
For a commercial site, you may have to go back three years. Corporations are relatively slow to upgrade hardware because of the significant cost to do so. Old hardware means slower computers.
If your target audience is urban and in a developed country, assume they have, at minimum, a cable connection.
If your audience is the world, develop to the lowest common denominator, which is a dial-up modem.
Now that we have provided some background, let's look at how your Flash file actually gets from here to there.
As you have discovered by this point in the book, simply tossing a bunch of audio, images, and video into your movie is not a good thing. They take an inordinate amount of time to download. In fact, toss all of that content into frame 1, and you can kiss your 15-second window of opportunity good-bye.
In the previous chapter, we looked at ways to prevent bulking up frame 1, by preloading the SWF itself and by externalizing assets and loading them at runtime. In this chapter, you'll learn how to optimize the rest of your timeline, to help balance out and redistribute the load of a SWF's assets. Your goal will be to facilitate Flash Player's natural tendency to stream.
Please understand that streaming doesn't make things faster. What it does is give you the opportunity to intelligently organize the timeline so the movie starts playing in very short order. Used wisely, streaming can ensure that everything in the Flash movie is downloaded before it is needed. The result is a Flash movie that seems to start playing almost immediately and moves "as smooth as the hair on frog's back."
So, what happens when a web page requests your movie? Two things are sent to the browser:
The movie's timeline, including ActionScript and the stuff that is not in the library, such as text and shapes that haven't been converted to symbols
The library, including audio, video, images, and symbols
When your Flash movie is shot through the Net to the user's browser, the movie is received in frame-by-frame order. If the movie is split into scenes (a relatively rare practice today), the scenes will be sent in the order they appear in the Scenes panel, which is effectively in sequential order of the main timeline. The library is also sent, but the library items are not received in the order they appear in the Library panel. They are received in the sequence in which they appear on the timeline. To reinforce what we have just said, let's take a look at a typical file.
Open the YawningParrot.fla file in the Exercise folder for this chapter. As shown in Figure 15-2, the timeline is linear, but there are a lot of layers. Your first reaction might be, "Man, that is going to take a while to load." But that's not really the case.
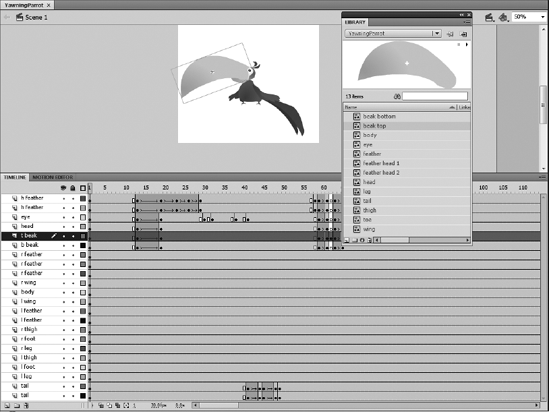
Figure 15.2. Streaming plays a movie in frame order and loads library content in the order in which it appears on the timeline.
Open the Library panel. You'll notice there is a lot less content in the library than in the timeline layers—only 13 library assets versus 22 layers. This is because the symbols in the library are reused and repurposed. The "finger feathers," for example, all use the same feather asset. All six claws use the same toe symbol; they're just arranged differently (horizontal flips and tints, all performed on the stage).
When this particular movie loads, because of how the parrot is constructed, all of its parts are loaded in frame 1 and composed of all of the objects in the library. These library objects are purposely designed to be lightweight. They're vector shapes with few anchor points, which means they equate to a relatively small file size. As a result, little bandwidth is required to load them and get the movie playing.
To make sense of how this movie streams, consider adding an imaginary extra playhead to the timeline When the movie starts. Both playheads are in frame 1, but only one of them starts moving. That's the imaginary one. Let's call it the streamhead (just a made-up name), which advances ahead of the actual playhead. The streamhead's position on the timeline indicates how much of the movie has been downloaded. In contrast, the playhead indicates which frame is currently displayed on the stage. It should make sense that the playhead can never get ahead of the streamhead. That would be like writing a check for more money than you have in your account.
Now let's assume that you toss in a movieclip, containing a 3-second FLV file embedded in the symbol's timeline, and this movieclip is added to frame 10. The odds are really good that the streamhead will stay put on frame 10 for a few seconds, while that frame's movieclip (complete with its video) loads. The playhead will catch up pretty quickly, especially with a default 24 fps frame rate. Until the embedded FLV loads, the playhead has no choice but to stay put. Essentially, the whole movie stops dead at frame 10, until the streamhead restarts its journey along the timeline.
To avoid this nastiness, you'll want to use a strategy called a streaming buffer. This could be in the form of a preloader or any other technique that keeps the playhead in place (in an interesting way) or smoothes out its path in order to let the streamhead do its job and load content.
In case you're having difficulty visualizing two heads on the timeline, Flash has a tool that lets you see how these two heads work, and how the pipe can affect the delivery of your Flash movie to the browser. What is this tool? It's called the Bandwidth Profiler.
In many respects, the Bandwidth Profiler is similar to what you see in Device Central when you test a mobile movie. In Device Central, the movie opens up in a mock device that emulates the performance of your movie in the chosen device. Likewise, the Bandwidth Profiler emulates how your movie will behave when it downloads from a remote server. Though the Bandwidth Profiler is an extremely useful tool, keep in mind that it is nothing more than an emulator. It won't mimic the real-life ebb and flow of network traffic, and it assumes a constant transfer rate into the browser. That noted, the Bandwidth Profiler can give you a good idea of where streaming bottlenecks are likely to occur. This can be an invaluable aid in relieving the "data jam" and solving a problem before it becomes a major one.
Let's see how the Bandwidth Profiler works.
Open the
BandwidthTest1.flafile in the Chapter 15Exercisefolder. You will see that we have placed an audio file on the timeline, and embedded an FLV into a movieclip and placed it in frame 1. Scrub over to frame 2, and you will see that we have added some text to the stage. If you open the library, you will see the text is actually a graphic symbol. Just by looking at the timeline, you can see that the movieclip with the FLV and the audio file will be the first pieces of content to load, and then the text will load.Test the movie. When the SWF opens, select
View

On the left side of the window are three headings: Movie, Settings, and State. To the right is a frame-by-frame representation of the data downloading into each frame. Notice the spike in frame 1. This is understandable, because the audio file and the FLV need to load in this frame. The trouble is that this spike happens right at the beginning of the movie.
Under the Settings heading on the left, take a look at the Bandwidth entry: 4800 B/s (400 B/fr). Now look at the bottommost line on the right side. That red line is the bandwidth limit and represents the maximum throughput the selected modem emulation can handle. Notice that it matches the Bandwidth value on the left. Bars under the line are handled quickly. Bars that rise above the line indicate potential bottlenecks.
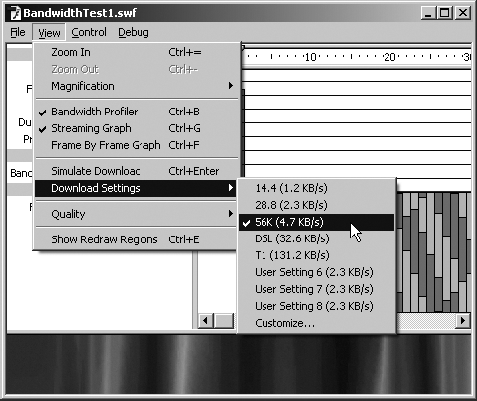
Select
View
Select the
DSL (32.6 KB/s)choice from the drop-down menu and scroll back to the start of the movie. You will notice the bandwidth limit has increased from 400 bytes to 2.78KB, and the markings on the graph have changed to reflect your selection.
You are most likely looking at that spike in the first frame and thinking, "Yeah, so? What's the deal?" Rather than having us explain it, we are going to let you experience it.
Change back to the
56Kmodem choice and this time selectView
Let us guess. You sat around for about 20 seconds waiting for the movie to start? What you have just experienced is the other, and most important, half of the Bandwidth Profiler. You just sat through what a person with a 56K modem will experience—under ideal circumstances. Let's take a minute and talk about this.
When you selected Simulate Download, you essentially re-created how the movie will load into a 56K modem. The other thing that happened is the profiler developed a green bar at the top of the graph, as shown in Figure 15-5, which held steady until the movie started to play.

Figure 15.5. You can experience the user's issue with the movie's first frame by simulating the download.
The green bar is important. It's the imaginary streamhead we mentioned earlier. You are seeing what happens when the playhead catches up to the streamhead. If you wait long enough, the streamhead will suddenly rocket off to the right, and the playhead will follow behind, sticking to a rate no faster than the frame rate specified in the FLA (which happens to be 12 fps for this file). You can scrub that playhead, by the way. Drag it around as you would in the Timeline panel to view content on any of the frames.
On the left side of the Bandwidth Profiler, under the Movie heading, you'll see a value called Preload, which in this example is 233 fr or 19.4 s. When you started emulating the movie, the Settings area became active (to see this, you may need to increase the size of the Bandwidth Profiler window by dragging the bottom edge down). The Preload value tells you it will take about 19.4 seconds to load in all of the content in the first frame.
Change the
Download SettingstoDSLand selectSimulate Download.
You should find that you still had a short delay, but there was a marked decrease in how long you had to wait. The Preload setting should show you 33 fr (2.8 s). That's dramatically less than the almost 20 seconds you had to wait using a 56K modem.
If you want to emulate a modem not represented in the list, choose Customize, which opens the Custom Download Settings dialog box, as shown in Figure 15-6. You can edit any of the existing entries, three of which are set aside for custom values. To return to the original values at any time, click the Reset button.

As you can see, the Bandwidth Profiler is a rather powerful tool that you need to master. With it, you can tailor your movie to the bandwidth constraints of your user and ensure that you meet that 15-second window of opportunity that will open to you.
With the Download Settings option, not only do you get to see how bandwidth will affect your movie, but you also get to actually experience it, which isn't always fun. At this point, you may be thinking "Shoot, I can cut back the preload value by using ActionScript to play the sound!" Doing that means the sound can be removed from the SWF altogether. Let's see if it works.
Open the BandwidthTest2.fla file in this chapter's Exercise folder. Open the library, and you will see the sound file is absent. Open the code in frame 3 of the scripts layer, and you will see we have added the ActionScript necessary to load to the sound from an external MP3.
Test the movie and select Simulate Download. The graph has significantly changed, as shown in Figure 15-7. The overall size of the SWF has gone from 149KB—see the Size value in the Movie heading—down to 94KB, Yet the spike in frame 1 hasn't changed much at all, and the same nearly 20-second delay is still there. What gives?
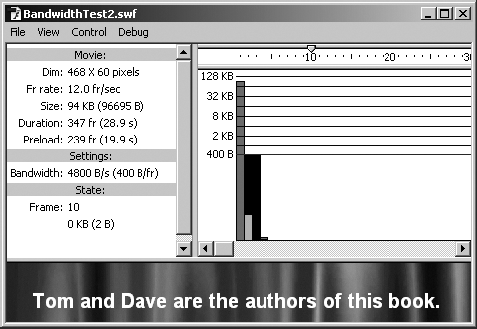
Part of the answer is that the audio, previously attached to the timeline, had its Sync property set to Stream. Remember that the Stream setting keeps the audio from having to load all at once, as it does with, say, the Event setting. Because the audio's file size was spread out, only 1/300 of its weight appeared in frame 1 (because the timeline is roughly 300 frames long). This tells you the issue really isn't the sound in this case, but rather the FLV embedded into the movieclip.
You have just discovered another use for the Bandwidth Profiler. Not only can it show you where the problem is, but it can even be used to isolate the content causing the delay.
Note
How would we fix this? First off, bear in mind there will always be a spike in frame 1 of any movie you create. The goal is to get that spike to do the limbo—to get it as close to the red line as possible, if not below it. For this example, one approach would be to reduce the time of the curtains effect from its current 46 frames seconds to 23 frames in the background movieclip. Do this, and the preload time drops to 9.7 seconds. Another approach would be to use a percentage-based preloader like the one demonstrated in Chapter 14.
The Bandwidth Profiler's right-hand graph gives you a quick bird's-eye view of your worst bandwidth offenders. If you want to dial in to the exact numbers, drag the playhead to any of your graph spikes and keep an eye on the State heading on the left side. The Frame value of that heading tells you which frame you're on and exactly how many bytes that frame contains.
If you really want to crunch the numbers, Flash will even create a log file for you. Head over to File
Now that you know what the spikes mean, your goals are to minimize them when you can and to distribute their weight when possible. The next section tells you how.
As you saw in the previous example, a simple thing like reducing the number of frames in an FLV can have a dramatic impact on how the movie loads. In this section, we'll outline a few tips, tricks, and techniques you can use to make your Flash movies leaner, meaner, and faster.
Surprisingly, the first mistake most people make often happens before a single pixel is lit up. That mistake is to not plan the movie.
That old adage "Plan your work and work your plan" is especially true when working with Flash. You can't make it up as you go along. You need to take the time before you start to think about what the user sees, and in what order, before you starting firing content into the library and then onto the stage. For example, a video site that lets the user choose from a number of videos would probably involve the following:
Preloader
Intro screen
Main movie screen where the videos are chosen and viewed
A set of links to other video sites you may have created
This means when users arrive at the site, they would usually proceed as follows:
See the preloader for a few seconds and then be taken to the Intro frame.
From there, choose to read the information and then move to the video picker screen by clicking a button. The video frame would load.
Click a series of buttons to view the videos associated with the buttons.
Choose to return to the Intro screen or go to a frame that contains a series of interactive links.
Now that you have an idea of what will happen, you might even want to put together a small flowchart that shows the purpose of each frame in the movie, as shown in Figure 15-8. Having one of these charts handy allows you to see how the user will move around the movie and provides a broad view of the content of each frame.

In fact, if you have arrived at Flash CS4 through the Adobe Web Premium Bundle, you have an ideal tool for this process at your disposal. Fireworks CS4 has been repositioned as a rapid prototyping tool. If you open that application and select Window

By writing out what each frame does, you are ordering the content on the timeline. By "falling in love with the user" and streaming the content into the movie in that order, your site will meet the needs of your users. If you haphazardly place the content on the timeline, you have no way of ensuring it will load in any meaningful manner. The result is a site that must download in its entirety before the user can interact with it smoothly.
Though many sites go the haphazard route, it is not considered a best practice within the Flash design community. Instead, you'll want to be mindful of balance.
It isn't always possible to eliminate your bandwidth spikes, even when planning ahead, but you can usually spread out the assets that cause them. If you've ever witnessed the sport known as curling—something like shuffleboard, but on ice (celebrated in Canada)—then you've seen how the team members clear the way. They run ahead of the traveling stone as it glides across the curling sheet, feverishly sweeping the ice a few feet ahead, minimizing irregularities in the path. That's sort of what you can do with the main timeline.
Usually, it means making a few test runs with the Bandwidth Profiler to see where your culprits are. You might, for example, have a dozen symbols make their first appearance in frame 300, suddenly giving that frame a spike. Meanwhile, the previous 100 frames might be very lean in terms of bytes per frame. To diminish streamhead blockage on frame 300, you could place copies of those dozen symbols in earlier frames, just off the stage (on the pasteboard). Simply drag out another instance of each symbol as needed.
For example, let's say you're aiming for 56K modems. That means your bandwidth limit, as indicated by the Bandwidth Profiler's red horizontal line, is set to 200 bytes per frame. You essentially have a budget of 200 bytes to spend per frame. In order to minimize the spike in frame 300, you could drag a couple 100-byte symbols from the library and place them on frame 200. Drag a handful of 30-byte symbols to frame 220, another 180-byte symbol to frame 240, and so on. Make sure to position these symbols off the stage or use the Property inspector to set their Alpha property to 0%. Arranged like this, each symbol makes its presence known before it is actually seen. By the time the streamhead hits frame 300, each of those symbols has already loaded, and the streamhead breezes right on by—the ice is smooth—clearing the path for the playhead.
How can you tell how much each symbol weighs? Unfortunately, the Library panel doesn't tell you, outside of the Bitmap Properties dialog box for imported graphics files. You'll need to do your best to distribute weight based on common sense, and some trial and error with the Bandwidth Profiler. The extent to which you rearrange things depends on deadlines, budget, and your own personal predilection for anal-retentiveness. Just be aware of this strategy, because it really can make a difference.
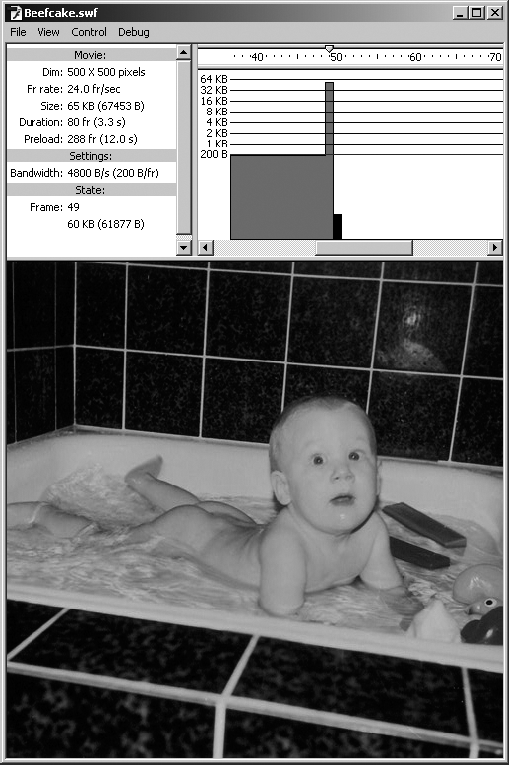
Sometimes your assets aren't so easy to redistribute. Consider an imported BMP. In cases like that, you'll need to get creative. To see what we mean, open the Beefcake.fla file from the Exercise folder for this chapter. Test the movie and take a look at the Bandwidth Profiler. As Figure 15-10 shows, there's a spike at frame 50, right on a photo of one of the authors. Any content after that frame will be delayed until that 60KB has loaded. A possible solution is a preloader, displaying percent loaded of the SWF itself or percent loaded of the image as an external JPG.
Another possibility is to divide the bitmap into smaller pieces, and distribute those as hidden symbols among previous frames. Let's see how that works. Open BeefcakeDistributed1.fla in this chapter's Exercise folder and scrub the timeline. In this version, a new layer named hidden contains four quarters of the photo among four of its earlier frames, each set to 0% Alpha, (see Figure 15-11). In frame 50, where the full photo originally appeared, the four quarters are arranged to look like the complete image. Test the movie and look at the Bandwidth Profiler. This time, instead of a 60KB spike in a single frame, you have four approximately 15KB spikes. This is still not ideal, because the bandwidth limit is 200 bytes—but it's an improvement.

Figure 15.11. Breaking up the bitmap, while tedious, can reduce bandwidth spikes. (We increased the Alpha to 43% to show you that, yes indeed, the photo is there.)
To take this example to an extreme, check out BeefcakeDistributed2.fla, in which each of the photo's quarters has been quartered again. This is likely a more scrupulous route than you'll want to take. However, as you can see in Figure 15-12, the Bandwidth Profiler now shows 16 mini-spikes of 3KB to 4KB apiece, while frame 50—the completed "jigsaw puzzle"—weighs a mere 662 bytes.

Every chapter in this book has directly or indirectly made it clear that Flash loves "small." After your experiences with the Bandwidth Profiler, we think you now understand why we are so adamant on this point. Small files mean fast loads. A fast load means short wait time. A short wait time means happy users. In various chapters, we have shown you several methods of keeping things small when it comes to images, sounds, fonts, and video. What about vectors?
We know Flash and vectors are bosom buddies. The thing about vectors is that they can be both small and large at the same time. Huh? Every time Flash encounters a vector point, it must load it into memory in order to draw the shape. If you create a vector with a large number of vector points, you may have a small file on your hands, but you have also increased the demand on memory to redraw the image, as you encountered with the American flag exercise in Chapter 9. The result is the inevitable spike in the Bandwidth Profiler. Here's one way of addressing this issue:
Create a new Flash document. Add three more keyframes to
Layer 1in theTimelinepanel. You now have four keyframes on the timeline.Select the
Penciltool and, in frame 1, draw a curvy shape, like the one in Figure 15-13.Copy your shape to the clipboard. Select each of the remaining three key frames in Layer 1 and select
EditSelect the shape in frame 2 and select
ModifySelect the shape in frame 3 and select
ModifySelect the shape in frame 4 and select
ModifyNote
The image shown in Figure 15-14 is a composite image. We created it to show you what the alert box looks like when you click
OKin theOptimize Curvesdialog box. You normally don't see both dialog boxes at the same time.Test the movie. The graph shows you the file size of the content in each frame and the effect that modifying the shape has in each frame. As you can see in Figure 15-15, the results are quite dramatic.


You are most likely looking at the graph and thinking, "Wow, I am going to start optimizing all of my vector shapes!" Not so fast. Each of the three methods presented did a good thing and a bad thing. They did indeed reduce the bandwidth load. However, they also introduced distortions into the image. If you are happy with the distortions, fine. If you aren't, then you might want to consider doing the optimization manually, by selecting the shape with the Subselection tool and manipulating the shape and the points.
So why was there such a drop in the graph between the object in frame 1 and its counterpart in frame 4? Remember that vector nodes require bandwidth. You removed a few of them using the Optimize Curves dialog box, which accounts for the drop in required bandwidth.
If you import vector artwork from outside sources, such as Illustrator files, you may find shape optimization quite challenging. Obviously, it depends on the intricacy of the artwork, but industrial-strength tools like Illustrator naturally have more complex features than the drawing tools provided by Flash. When Flash imports vectors from other tools, it does its best to "translate" those anchor points into the "language" it uses internally.
Just be mindful of the pipe. If elaborate vector artwork seems to weigh more than you would expect, consider exporting it from the original application as a bitmap and compare file sizes. If you don't have the original application, import the artwork into Flash, situate it on the timeline of a temporary stand-in FLA, and then use File
Aren't vectors supposed to be smaller? Generally speaking, yes. But every rule has its exception, and it goes both ways. Giulia Balladore (http://www.juniatwork.com/), a self-taught artist featured on http://www.FlashGoddess.com, produces jaw-droppingly beautiful artwork directly in Flash. Her vector drawings rival the sort of detail that normally requires a camera and meticulous studio lighting. And yet, because she works in Flash and optimizes her vectors, images like "Sole" (see Figure 15-16) can be resized in the browser without ever getting pixelated. And the depicted SWF weighs a miniscule 23KB!

As you may have surmised when reading this section's heading, we are not only going to be thinking outside the box, but thinking outside the room where the box is located.
This may come as a bit of a surprise, but Flash has been (and still is) used to create animated cartoons that are shown on television, from commercials to actual shows, and even in theaters. In earlier Flash history, the process was, to say the least, convoluted, but it could be done. The problem was that, even though Flash could output to QuickTime, only the main timeline could be exported. Library content, ActionScript-driven animation, and even nested movieclips were not exported. When you consider the fact that the maximum length for the Flash timeline is just over 16,000 frames, the achievement of a 10-minute cartoon was not possible unless the movie was broken into pieces and stitched together in a video-editing program.
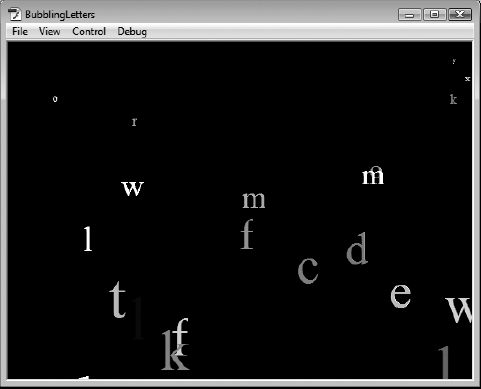
Flash CS4 contains a relatively new feature that allows you to not only export the content on the timeline and in nested animations, but even to create animations solely powered by ActionScript. These exported QuickTime movies can then be used as motion graphics in applications like Adobe After Effects CS4. In fact, in the following exercise, the stage is entirely blank. All of the letters that appear in this animation will be randomly generated, colored, and put in motion using ActionScript. Follow these steps to create a QuickTime movie in Flash:
Create a new Flash document and set the stage color to
#000000(black). RenameLayer 1toscripts.Select frame 1 of the
scriptslayer and open theActionspanel. Type the following code:var t:Timer = new Timer(50, 0); t.addEventListener(TimerEvent.TIMER, createLetter); t.start(); function createLetter(evt:Event):void { var fmt:TextFormat = new TextFormat(); fmt.size = randomBetween(80, 120); fmt.color = Math.floor(Math.random() * 16777216); var mc:MovieClip = new MovieClip(); var tf:TextField = new TextField(); tf.autoSize = TextFieldAutoSize.CENTER; tf.text = String.fromCharCode(randomBetween(97, 122)); tf.setTextFormat(fmt); mc.addChild(tf); mc.x = (Math.random() * stage.stageWidth); mc.y = stage.stageHeight; mc.ang = 0; mc.range = randomBetween(4, 20); addChild(mc); mc.addEventListener(Event.ENTER_FRAME, shimmy); };
The first line of code creates an instance of the Timer class, which will repeat every 50 milliseconds indefinitely, thanks to that second parameter of 0. The next line associates a custom function, createLetter(), with the TimerEvent.TIMER event for the t instance. Finally, the third line—t.start();—starts the clock running.
The createLetter() function is how the letters arrive in the movie. The first variable, fmt, creates a TextFormat() instance, which is used to format text fields, as you learned in Chapter 6.
With the fmt instance created, we need to give it some formatting information. The size of the text is set by using a custom function, randomBetween(), which determines the maximum and minimum size of the letters. That function is coming in step 4. The color is set by picking a random value between 0 and 1 and then multiplying that result by 16,777,216. Where did that number come from? That's how many colors you can find in the 24-bit color space.
We then create a movieclip and add a text field to its display list. Before it is added to the display list, the text field is centered, and random letters are added to it. That's accomplished with this line:
tf.text = String.fromCharCode(randomBetween(97, 122));
This looks rather complex, but it makes sense when you break it down. We needed random values, so we reused that randomBetween() function and told it to return a value between (and inclusive of) 97 and 122. What numbers are those? Those represent ASCII values for the lowercase letters a through z. The String.fromCharCode() method converts those into their corresponding characters.
The next two lines tell Flash to apply the text formatting to the text field—tf.setTextFormat(fmt)—and finally, to add the text field to the movieclip's display list—mc.addChild(t).
The remainder of the code tells Flash where to position the text-containing movieclip (including the configuration of two custom properties: ang and range, used in an event handler function you're about to write). The final line tells Flash to animate the movieclip by using a custom shimmy() function. Let's write that function.
Press Return (Enter) twice and enter the following code, which puts the letters in motion:
function shimmy(evt:Event):void {
  var mc:MovieClip = MovieClip(evt.target);
  mc.y -= randomBetween(6, 10);
  mc.x += (mc.range * Math.cos(mc.ang += 0.4));
  mc.scaleY -= 0.02;
  if (mc.scaleY <= 0) {
    mc.removeEventListener(Event.ENTER_FRAME, shimmy);
    removeChild(mc);
  }
};
Before we start explaining this code, remember that all motion in Flash is either across the stage on the x axis or up and down the stage on the y axis. Objects moving from the top to the bottom of the stage have increasing Y values, and all objects moving from right to left have decreasing X values, and vice versa.
This code block determines the stage movement of the movieclip containing a random letter from the previous code block. Each one is randomly placed on the y axis, and the cosine method of the Math class—Math.cos()—is used to add a right to left shimmy, as the letters move upward.
As the letters move up the stage along the y axis, they are continuously scaled down by 2%—mc.scaleY -= 0.02;—every time the Timer instance "ticks." The last three lines essentially tell Flash, "Look, this thing is going to eventually scale down to a value of 0. When you hear that, get rid of the movieclip."
To finish off the code, let's write that randomBetween() method.
Press Return (Enter) twice and type the following:
function randomBetween (min:Number, max:Number):Number {
  return (Math.random() * (max - min)) + min;
};
This function picks a random number using the parameters sent by the code that calls it. The return statement sends the chosen number back. Let's see how this works in regard to setting the size of the letters. The following line does that:
fmt.size = randomBetween(80, 120);
This means the calculation would be as follows:
return (Math.random() * (120 - 80)) + 80;
Let's assume the Math.random() value is 0.35, so the calculation would be like this:
return (0.35 * (120 - 80)) + 80;
return (0.35 * 40) + 80;
return (14) + 80;
return 94;
Therefore the size of this letter would be 94 pixels.
Note
If you get any errors, you might want to check your code against ours. The file—BubblingLetters.fla—can be found in the Chapter 15 Complete folder.
Save and test the movie. You should see letters moving up the stage in a wavy motion (see Figure 15-17). They get smaller as they move upward and eventually disappear.
Select
FileIn the
QuickTime Export Settingsdialog box, selectIgnore stage color (generate alpha channel)and change theAfter time elapsed:value to10, as shown in Figure 15-19. Click theExportbutton.A progress bar will appear, and you'll eventually see an alert that tells you where the export log can be found. Click
OKand quit Flash.Open your new QuickTime movie. Pretty neat!

Let's return to the QuickTime Export Settings dialog box and briefly review its options:
Render widthandRender height: These values match the current stage size and will be the physical dimensions of the video. You can change these values by clicking theQuickTime Settingsbutton.Maintain aspect ratio: When checked, this option ensures distortion is not added if you resize the video.Ignore stage color: Selecting this option essentially turns the stage color invisible, which makes it ideal if you want this animation to play over content in After Effects CS4 or some other video editor.Stop exporting: The choices in this section give Flash an idea of when to stop the process. The first choice should be used if you have content on the timeline. The second one is ideal for situations such as this exercise, where content is generated by ActionScript. In this case, we are producing a clip with a duration of 10 seconds.Store temp data: This is used during the render process. You can choose to store this data in memory for short movies, or choose to create the temporary file on the desktop or some other location.QuickTime Settings: This button opens a QuickTime settings dialog box, where you can change the codec and audio settings for the final movie.
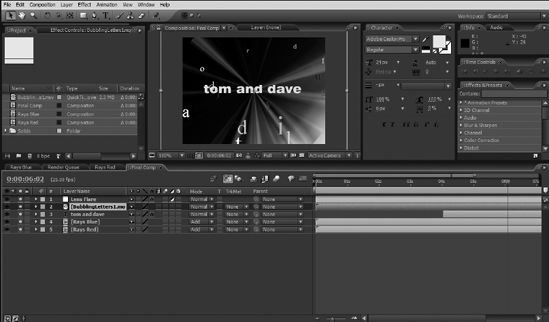
As we said earlier, you can export these Flash-created movies as animations for use in other applications. For example, one of the authors dropped the file into an After Effects CS3 project, as shown in Figure 15-20, and then created the QuickTime movie named BubblingLettersFinal.mov that is found in this chapter's Complete folder.
If there is one fundamental fact regarding publishing your Flash movie to the Web, it is this: the SWF isn't a web document . Nothing drives us crazier than someone telling us, "Dudes, check out my Flash site," only to have that individual double-click a SWF on his computer's desktop. Flash SWFs should appear on the Web only if they are embedded into an HTML page. Why? Because you can use the HTML to control aspects of the SWF—scaling, context menu items, and more—that you can't do without the HTML wrapper. Thus a "Flash site," to be precise, is composed of an HTML page that points to the SWF, along with any media—audio, video, images, text—that the SWF may need from external sources.
Creating the SWF is a bit more complicated than selecting File
Again, we stress the same theme we have been repeating since page 1 of this book: keep it small! This is the reason for Flash's broad acceptance on the Web and where an understanding of the publishing process is invaluable. Up to this point, we have essentially created a bunch of FLA files and asked you to test them. The time has arrived to get off the test track and put the vehicle on the street.
When you publish your movie, Flash compresses the file, removes the redundant information in the FLA, and what you are left with—especially if you've been taking this chapter to heart—is one sleek, mean web presentation. The default output file format—yes, there is more than one—is the SWF. The SWF is wrapped in HTML through the use of <object> and/or <embed> tags, plus extra information about how the browser should play the SWF.
Note
Yes, you can link directly to a SWF without that bothersome HTML. Just be aware that the SWF will expand to the full size of the browser window, meaning all of the content on the stage will also enlarge. In many respects, linking directly to the SWF is rookie error number one.
Before we move into actually publishing a movie, let's look at some of the more common file types used on the Web, listed here:
Flash
(.swf)HTML
(.htm or .html)Images (
.gif, .jpg, and .png)QuickTime (
.mov)
Before there was Flash, there was Director. Though used primarily for interactive CDs, DVDs, and kiosks, it was at one time the main instrument employed to get animations to play on the Web. The technology developed by Macromedia to accomplish this was named Shockwave, and the file extension used was .dcr. Flash also made use of this technology, and in order to differentiate between them, it became known as Shockwave for Flash and used the .swf file extension. Flash Player is the technology that allows the SWF to play through a user's browser. Through a series of clever moves, Flash Player has become ubiquitous on the Web. In fact, Adobe can rightfully claim that Flash Player, regardless of version, can be found on 98% of all Internet-enabled computers on the planet. This means, in theory, that you can assume your movies are readily available to anyone who wishes to watch them. But the reality gets a bit more complicated.
Note
For you trivia buffs, the first couple of iterations of Shockwave for Director used a small application named Afterburner to create the DCR files. When Director developers prepared a presentation for the Web, they didn't just create the DCR, the movie was "shocked." One of the authors happened to be around on the night Macromedia quietly released Shockwave and Afterburner to the Director community. He still remembers the excitement generated by members of the group as they posted circles that moved across the page, and the "oohs" and "ahs" that followed as the circles moved up and down.
Each new Flash Player version brings with it new functionality. Flash Player 8 introduced filter and blend effects, which can't be displayed in Flash Player 7. FLV video can't be played in Flash Player 5. Any movie you prepare using ActionScript 3.0 can be played only in Flash Player 9 or higher. Flash Player 9,0,115,0 was the first to display HD video content. Though you may initially regard this as a nonissue, you would be making a gross miscalculation. Corporations, through their IT departments, have strict policies regarding the addition or installation of software to corporate-owned computers. We personally know of one organization that isn't budging, and its Flash Player policy is Flash Player 6 or lower to this day. Shrewd Flash designers actually ask potential clients which versions of Flash Player are to be targeted for the project. The last thing you need is to find yourself rewriting every line of code and reworking the project, because you assumed the target was Flash Player 9, but corporate policy dictates Flash Player 7 or lower.
Note
Flash Player 10 follows a tradition that each successive version of Flash Player will play content faster than its predecessors. When Flash Player 9 was released, Adobe claimed it provided a 75% speed increase over Flash Player 8, which was partly due to the support for ActionScript 3.0 introduced in Flash Player 9. This sort of increase is usually enough for most users to install the new version. Even so, in many instances, actually downloading and installing the plug-in is becoming a thing of the past. Flash Player has the ability to download and install in the background, but, as one of the authors is quick to point out: "It takes a programmer to make it work.
HTML is short for Hypertext Markup Language. Where HTML and ActionScript part company is that HTML is a formatting language, whereas ActionScript is a scripting language. This means HTML is composed of a set of specific instructions that tell the browser where content is placed on a web page and what it looks like. ActionScript has nothing to do with the browser. It tells Flash how the movie is to perform.
The HTML instructions, or tags, are both its strength and its weakness. HTML was originally developed to allow the presentation of text and simple graphics. As the Web matured, HTML found itself hard-pressed to stay current with a community that was becoming bored with static content on pages.
The real problems with HTML start when you try to drop multimedia or interactive media into a web page. HTML simply wasn't designed for this sort of heavy-lifting, which explains why JavaScript (a language that shares roots with ActionScript) is now so widely used.
For a Flash designer, knowledge of how HTML works is critical, because it is the technology that enables your movies to be played on the Web. Of course, this isn't as difficult as it once was. Today, through the use of Dreamweaver CS4 and even Flash, creating the HTML involves nothing more than a couple of mouse clicks. You will still need to play with the HTML—you saw this in Chapter 10 when you had to dig into the JavaScript code to enable full-screen playback of a Flash video—because your HTML document can do things that Flash can't. This would include such features as alt attributes for screen readers and keywords used to attract search engines.
The other thing to stick in the back of your mind is that Flash-only web pages aren't as common as they once were. Web pages consisting solely of one SWF are still around, but Flash is also becoming a medium of choice for the delivery of banner ads, videos, and other interactive content that are elements of an HTML web page. To see an example of this, you need look no further than our beloved publisher. If you hit the friends of ED home page at http://www.friendsofEd.com, you will see a Flash banner at the top of the home page (see Figure 15-21), while the rest of the page is composed of HTML.

Before there was Shockwave, there was the infamous animated GIF file. These files were the original web animations, and you still can export your Flash movie as an animated GIF. Why would you want to do this if Flash Player is so ubiquitous? Because users don't need to install the Flash plug-in to view them. In fact, it is a two-way street: you can import a GIF animation into a Flash movie, and you can export a Flash movie as an animated GIF.
Let's reuse our now-familiar parrot to see how animated GIF exporting works.
Open the
YawningParrot.flafile in this chapter'sExercisefolder. This is the file to be exported as an animated GIF. Flash will convert each frame of the movie to a GIF image. There are 355 frames in this animation, meaning you should prepare yourself to create 355 separate GIF images.Note
Okay, web-heads, settle down. Creating an animated GIF consisting of 355 frames is, as our editor, Ben Renow-Clarke, would say, "Simply not done, old chap." We know that, but if you understand what happens—in a big way—you'll be more cautious in your efforts. Anyway, the parrot is pretty cool and makes for a rather interesting workout for Fireworks CS4.
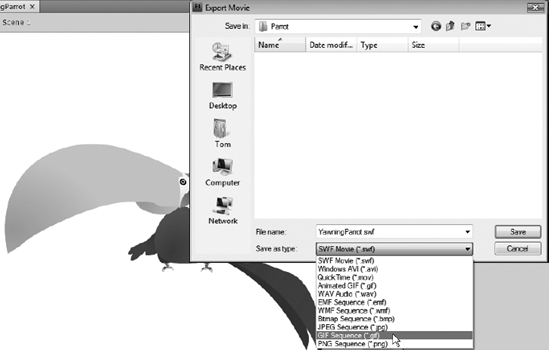
Select
FileIn the
Export GIFdialog box, specify these settings (see Figure 15-23):Dimensions: 570 × 550 pixelsColors: 256Smooth: Selected

You may notice that when you change the Dimensions settings, there is a corresponding reduction in the Resolution value. If you click the Match Screen button, you will be returned to the original settings for this image. The physical reduction of each frame and its corresponding reduction in resolution have the net effect of creating a rather small GIF image. In this case, you need to just ignore size. That can be dealt with in Fireworks CS4.
Click the
OKbutton. A progress bar will appear, showing you the progress of the export. This is a fairly quick process and should take less than 10 or 15 seconds. When it finishes, the progress bar will disappear, and you will be returned to the Flash stage.
At this point, you are now the proud owner of the 355 GIF images that will be used to create the animation. We aren't going to get into the nitty-gritty of creating the GIF animation in Fireworks CS4. The process is fairly simple, and the next steps give you the general idea.
Launch Fireworks CS4, and then select
FileScale the images to a size of 113 × 109 and save the scaled images to a new folder.
Still in Fireworks CS4, click the
Openbutton on the Welcome screen, and navigate to the folder containing your GIF images. Select all of them in theOpendialog box and selectOpen as animation, as shown in Figure 15-24. Then click theOpenbutton.
Fireworks will create the animated GIF by putting each image in a frame. You can then do what you need to do and export the file from Fireworks CS4 as an animated GIF.

Note
Only the main timeline is considered when Flash content is converted to an animated GIF. Nested movieclip timelines and ActionScript do not make it through the translation process. The simple rule of thumb is that if you can see it move while you manually scrub the timeline, the GIF can, too. If you can't, it won't show.
Yes, this exercise was partly mischievous. If you select File
Now that you know how to create a GIF animation in Flash, let's look at the reverse process. Here's how to import a GIF animation into Flash:
Open a new Flash CS4 document and select
FileNavigate to the
ParrotFW.giffile in theExercisefolder for this chapter and clickImport to Library. When the process finishes, you will see that each image in the animation, along with a movieclip, has been added to the library.Drag the movieclip to the stage and test the movie. You have a low-resolution version of the yawning parrot, as shown in Figure 15-25.

QuickTime is Apple's Internet streaming video technology. As we have pointed out throughout this book, QuickTime is losing its grip as the premiere web video technology. What you should have learned from the BubblingLetters.fla exercise earlier in this chapter is this: the reports of QuickTime's death are premature.
Flash is gaining ground as a broadcast animation technology, and no matter how you slice it, QuickTime is the way to go with digital video. Up until the previous release of Flash, QuickTime and Flash have had a rather uneasy relationship. It was extremely difficult to get Flash animations into QuickTime for editing in a video-editing application. Why? Because you couldn't use nested movieclips, nested timelines, or ActionScript. These impediments have been removed, and publishing a Flash document as a QuickTime movie is easier than it ever has been.
Which raises this question: how do you publish a Flash movie for the Web?
Everything works as it should. You have sweated buckets to optimize the movie, and the client has finally signed off on the project. It's showtime. The Flash movie is ready to hit the Web and dazzle the audience. Though you may think publishing a Flash movie involves nothing more than selecting Publish in the File menu, you would be seriously mistaken. The process is as follows:
Open the
Publish Settingswindow to determine how the movie will be published.Publish the movie and preview the SWF.
Upload the SWF and any support files to your web server.
We'll start by exploring the publish settings. Open MoonOverLakeNanagook.fla in this chapter's Exercise folder. Let's finish the book by working with the file you created when you started the book.
Select File

Note
You can also launch the Publish Settings dialog box by clicking the Edit button in the Profile area of the Publish section in the Property inspector. The one thing you don't want to do, unless you have a lot of Flash experience under your belt, is to select File
As you can see, this dialog box is divided into three distinct sections: Formats, Flash, and HTML. In fact, that last tab (or tabs) will change depending on the format chosen. We'll get to that in a minute. The five buttons along the top, next to the drop-down menu, are the Profile buttons. These allow you to "tweak" your settings and then save them for future use.
The file types are as follows:
Flash (.swf): Select this, and you will create a SWF that uses the name in theFilearea unless you specify otherwise.HTML (.html): The default publishing setting is that the Flash and HTML settings are both selected. This does not mean your SWF will be converted to an HTML document. It means Flash will generate the HTML wrapper for the SWF.Note
If you are a Dreamweaver CS4 user, you don't need to select the HTML
(.html)option. Dreamweaver will write the necessary code for the SWF when it is imported into the Dreamweaver CS4 document.GIF Image (.gif): Select this, and the Flash animation will be output as an animated GIF, or the first frame of the movie will be output as a GIF image.JPEG Image (.jpg): The first frame of the Flash movie will be output as a JPEG image.PNG Image (.png): The first frame of the movie will be output as a PNG image. Be careful with this one, because not all browsers can handle a PNG image.Windows Projector (.exe): Think of this as being a desktop SWF that is best suited to play back from a Windows desktop or CD, not from the browser.Macintosh Projector: This is the same idea as the Windows projector. Just be aware that a Mac projector won't play on a PC, and vice versa.
The Navigate buttons (they look like folders and are located beside each file type) allow you to navigate to the folder where the SWF will be saved (see Figure 15-27). If you see a path, click the Use Default Names button to strip out the path from the file name.
Select all of the types. Notice how each file type kicks out its own tab. Deselect everything but the Flash (.swf) option before continuing.
Click the Flash tab to open the Flash settings, as shown in Figure 15-28.
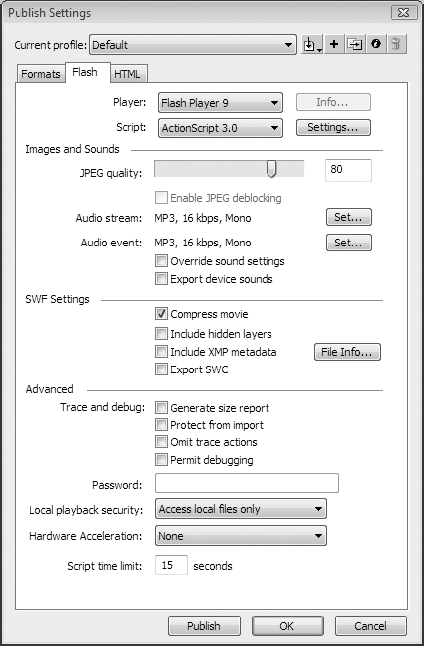
Let's review each of the areas in this panel:
Player: This drop-down menu allows you to choose any version of Flash Player from versions 1 to 10 (the current version), AIR 1.1, and any version of Flash Lite Player from versions 1 to 3.0. If you have theProperty inspectoropen, you will see the version chosen also appears there. It is extremely important you understand that if you change your Flash Player version and are using features in the movie that aren't supported by the chosen Flash Player version, you will be greeted by the alert dialog box (see Figure 15-29), but this happens only when you return to the Flash stage and try to add or manipulate something that isn't supported. In the case of Figure 15-29, we tried to use theFLVPlaybackcomponent, and that feature is not supported in our target player.Script: There are three versions of the ActionScript language. If you are publishing to Flash Player 9 or higher, you are safe withActionScript 3.0, ActionScript 2.0, orActionScript 1.0(we recommendActionScript 3.0). If you are publishing to Flash Player 8 through 6, or Flash Lite 2 or 2.1,ActionScript 2.0is your choice, thoughActionScript 1.0will work. Everything else usesActionScript 1.0.Images and Sounds: This is where you control the compression of JPG images and sound quality. Your choices are as follows:JPEG quality: This slider and text field combo specifies the amount of JPEG compression applied to bitmapped artwork in your movie. The value you set here will be applied to all settings in theBitmap Propertiesarea of the library, unless you override it for individual bitmaps on a per-image basis.Audio stream: Unless there is a compelling reason to do otherwise, leave this one alone. The value shown is the one applied to theStreamoption for audio in theProperty inspector.Audio event: Same warning as the previous choice but for event sounds.Override sound settings: Click this, and any settings—StreamorEvent—you set in theSound Propertiesarea of the library are, for all intents and purposes, gone.Export device sounds: Use this only if you are using Flash Lite and publishing to a mobile device.
SWF Settings: Use this area to tell Flash how to create the SWF. The following options are available:Compress movie: Even though Flash compresses the FLA's assets when it creates the SWF, selecting this allows Flash to compress the SWF itself—usually text-heavy or ActionScript-heavy—to an even greater extent during the publish process. If you are publishing to Flash Player 5 or lower, you can't use this option.Include hidden layers: This option falls squarely in the category of "it's your call." All this means is that any timeline layer whose visibility icon is turned off will not be compiled into the SWF. Designers often like to keep reference layers handy during authoring, but in previous versions of Flash, such layers would show in the SWF, even if they were hidden in the FLA. An old trick to "really" hide them was to convert such layers to guide layers—but that can get tedious. If you really want those layers gone, just delete them. If you're a little lazy, use this feature instead. We tend to leave it unselected, but if there is a compelling reason to include your hidden layers, select this option.Include XMP metadata: Select this option and click theFile Infobutton, and the dialog box shown in Figure 15-30 will appear. Any text entered here will be added to the SWF's metadata. As you can see, the amount of metadata you can add is quite extensive. For more information about Extensible Metadata Platform (XMP), seehttp://www.adobe.com/products/xmp/.Export SWC: Unless your name is Grant Skinner or you have been living and breathing Flash for most of your natural life, leave this one alone. It is used to create a component for Flash.
Advanced: You have a number of options regarding the treatment of the SWF available to you:Generate size report: Select this, and Flash will generate a.txtdocument that shows you where potential bandwidth issues may be located. The.txtfile is generated when you publish the SWF.Protect from import: When this option is selected, the user will be prevented from opening your SWF in Flash.Omit trace actions: Flash will ignore any appearances of thetrace()function you may have added to your ActionScript (they will actually be removed from the SWF). You use this function to track the value of a variable and display that value in theOutputwindow. Tracing is great for debugging, but enough such statements can affect performance.Permit debugging: Select this, and you have access to theDebuggerworkspace in Flash, even if the file is being viewed in a web browser. You really should turn this off before you make the movie public on the Web.
Password: This option works in conjunction with theDebuggerworkspace, but only for ActionScript 2.0. If you add a password to this text-entry box, whoever opens the ActionScript 2.0Debuggerpanel will be prompted to enter the password if debugging the SWF in a browser. If the plan is to test and debug your Flash application remotely, this is a "must do."Local playback security: The two options in this drop-down menu—Access local files onlyandAccess network only—permit you control the SWF's network access. The important one is the network choice.Access networks onlyprotects information on the user's computer from being accidentally uploaded to the network.Hardware Acceleration: This needs a bit of explanation because if you make the wrong choice, your user is in for a really bad day. We'll provide that explanation after the description of the next, and last, item in theFlashpanel.Script time limit: Sometimes your scripts will get into a loop, sort of like a dog chasing its tail. This can go on for quite a long time before Flash sighs and gives up. Enter a value here, and you are telling Flash exactly when to give up.


For the Hardware Acceleration option, you get three choices, as shown in Figure 15-31. These choices are offered thanks to Flash Player 10 and its ability to do a lot more heavy-lifting than any Flash Player in history. By using hardware acceleration, Flash will work with the user's video card to render graphics and video more smoothly.

The first choice (None) is self-explanatory. The next one, Level 1 – Direct, tells Flash to look for the shortest path through the CPU from the video card to the screen. This mode is ideal for video.
The Level 2 – GPU option is brand spanking new and, to be honest, Adobe hasn't quite figured out what it can do. The best way of wrapping your mind around it is to consider how movieclips are rendered. They are essentially drawn on the screen using software, but they are rendered—think of the moon rising over Lake Nanagook—with your graphics card. Scaling is a great example of this, and full-screen HD video rendering is also done this way.
You probably read that last sentence and thought, "Well shucks, I'll do everything this way. " Not so fast bucko. As Flash engineer Tinic Uro points out in his blog (http://www.kaourantin.net/2008/05/what-does-gpu-acceleration-mean.html), "Just because the Flash Player is using the video card for rendering does not mean it will be faster. In the majority of cases your content will become slower."
Essentially, the Level 2 – GPU choice requires a minimum DirectX 9 card. If you are a Vista user, for example, and Aero Glass is a problem, you can bet that hardware rendering of Flash graphics will be equally problematic, because Aero has the same hardware requirements as the GPU choice.
Also, frame rate will be an issue, because the frame rate will max out to the screen refresh rate. This means if you have a Flash movie with a frame rate of 72 fps, you have exceeded the refresh rate of 60 times per second. In this case, your Flash movie's frame rate will downshift to 60 fps or, more realistically, 50 to 55 fps, thanks to dropped frames.
The bottom line here is that either Hardware Acceleration choice will result in a serious memory hit on the browser, to the point where the browser becomes either sluggish or unresponsive. If you must use this feature, limit yourself to one SWF per HTML page and use Level 1 – Direct as your first choice. Both choices are tied directly to the video card manufacturers and their drivers. It will take time for Adobe to get up to speed with Vista, which means your users may not be able to view your content due to driver and other software issues.
Click the Formats tab and select the HTML (.html) file type. When you do that, the Publish Settings dialog box sprouts an HTML tab. Click the HTML tab to see the HTML settings shown in Figure 15-32.
Note
If you are a Dreamweaver CS4 user or prefer to "roll your own" HTML code, it still won't hurt to review this section, but be aware that Dreamweaver CS4 does this job for you.
As we noted earlier, be aware that using this dialog box does not convert your SWF to HTML. The best way to consider this option is like buying a hamburger at a large international chain. When the hamburger is finally ready, it will be wrapped in paper or placed in a colored box that identifies the contents. For example, you have ordered the MegaBurger, and the burger is wrapped in blue paper that has "MegaBurger" printed on it. The HTML option performs the same job: it provides the wrapper that tells the browser what's inside.
Note
If the Flash movie is to appear in a CSS-based layout, a lot of the options in this dialog box will not be used by the coder. Still, the HTML page to be created is a good starting point for a code jockey.
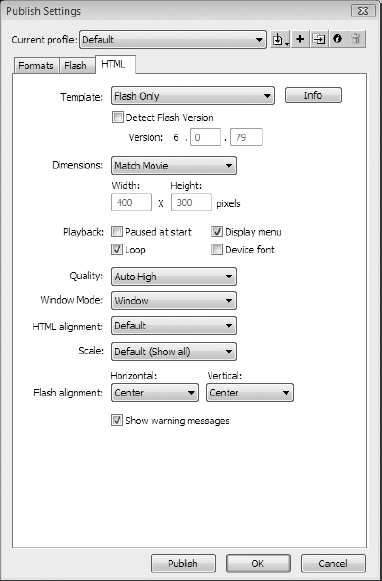
Let's review the main features of this panel:
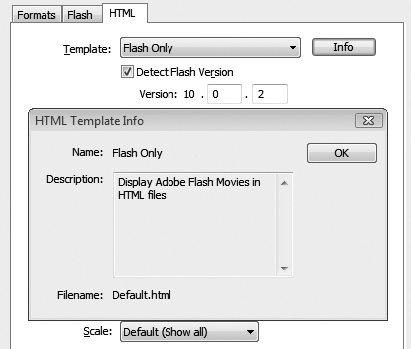
Template: This drop-down menu contains 11 options, but they all specify the type of HTML file in which you want the SWF to be embedded. TheInfobutton will give you a brief description of the selected template (see Figure 15-33). These templates can be found inC:Program FilesAdobeAdobe Flash CS4enFirst RunHTMLon your PC orHD:/Applications/Adobe Flash CS4/First Run/HTMLon your Mac. If you are a hard-core coder and know exactly what you are doing, feel free to change them (but only after you have made a backup of the files). Though there are a number of templates, theFlash Onlytemplate will most likely be the one you use most often.Detect Flash Version: This option determines whether the JavaScript code for this purpose is added to the HTML. It checks to see whether the user's Flash plug-in will work with the version of Flash Player you have targeted. If the user has the version, life is a wonderful thing and the movie will play. If not, the user will see an explanatory message and a link to the location where the latest plug-in can be found.Note
If you are a JavaScript wizard, feel free to customize the detection JavaScript to react differently if the wrong plug-in version is detected. For instance, if the IT boys have decreed "Thou shalt not add software to our machines," you could rewrite the code to load and play an alternate version of the SWF instead of suggesting the user do something that is forbidden.
Dimensions: You get three choices in this drop-down menu:Match Movie, Pixels, orPercent. Select one of the last two options, and you can change the physical size of your movie. If you choosePercent, you will discover the one circumstance that allows content positioned outside the stage to possibly show.Playback: These four choices determine what happens when the movie starts playing:Paused at start: This means the user gets things going. This is very common with banner ads, and you would need to provide a button to tell the playhead to start moving, or the user would have to be smart enough to right-click and use the plug-in's context menu to selectPlay.Display menu: This option is actually quite important. It has nothing to do with menus in the movie and everything to do with Flash Player. If you testMoonOverLakeNanagook.flaand right-click (Ctrl-click) the SWF, the menu shown in Figure 15-34 appears. This menu allows the user to modify how Flash Player displays the movie. Many Flash designers and developers turn this off because they don't want people switching to low-quality graphics or zooming in on the stage. Still, there is a very important use for this menu. If your site requires users to use a web camera or a microphone, clicking theSettingsbutton will allow them to choose the devices to be used.Loop: When selected, this option plays the movie loop again from the beginning. If it's not selected, it plays the loop only once. The key point here is anystop()actions you may have in your ActionScript will override this selection.Device font: This selection replaces any static text in your movie with a system font—_sans, _serif, and_typewriter—which can result in a significant file-size reduction. The downside to this choice is that you have absolutely no control over which font is used. If the user doesn't have the three fonts installed, the machine will use one that is closest to the font, meaning the text may wrap or even change the look of your movie. Is this one of those things that falls into the category of "things you should never do"? Not really. It is your movie, and if you decide this is the way to go, you at least are aware of the potential hazards of the choice.
Quality: This drop-down menu contains the six choices shown in Figure 15-35. These specify the render quality at which your movie will play, and the choice you make determines the speed at which your movie runs on the user's machine or device. We suggest you start withAuto High, which permits Flash to automatically drop the quality to maintain the frame rate and synchronization if necessary. In many respects, this area is not one that should concern you, because ifDisplay menuis selected, the user can change this setting at runtime.Window Mode: The selection you make here will appear in thewmodesettings in the<object>and<embed>tags used in the HTML. If you are unsure as to what the choices do, just leave the choice at the default, which isWindow.HTML alignment: This selection allows you to specify the position of your movie window inside the browser window. The default will place the SWF in the center of the browser window.Scale: If you have changed the dimensions of the movie using theDimensionsoption, the choices in this drop-down menu determine how the movie is scaled to fit into the browser window.Flash alignment: These two options permit you to set theVerticalandHorizontalalignment of your movie in its window and how it will be cropped, if necessary.Show warning messages: If this box is checked, any errors discovered when the HTML file is loaded—missing images is a common error—are displayed as browser warnings when the user arrives on the page.


Now that we have reviewed the major points, let's publish Lake Nanagook and look at it in a browser. Before you start, click the OK or Cancel button to close the Publish Settings dialog box and return to the Flash stage. Save the MoonOverLakeNanagook.fla to the Nanagook folder in your Chapter 15 Exercise folder. We'll explain why in a moment. Now open the Publish Settings dialog box and let's get busy.
Click the
Formatstab and select theFlashandHTMLformats.Click the
Flashtab and specify these settings:Version: Flash Player 10Script: ActionScript 3.0Compress movie: SelectedInclude hidden layers: Deselected
Click the
HTMLtab and specify these settings:Template: Flash OnlyDimension: Match MovieQuality: Auto HighFlash alignment: Center for bothHorizontalandVertical
Click the
Formatstab. In this panel, click theUse Default Namesbutton to strip off any paths that might be associated with this movie.Click the
Publishbutton. You will see a progress bar that follows the publishing process. ClickOKto close thePublish Settingsdialog box and return to your movie.Minimize the Flash stage and open the
Nanagookfolder in the Chapter 15Exercisefolder. You will see that Flash has created three files: the FLA file, the SWF file, and an HTML file (see Figure 15-36). The only file that doesn't need to get uploaded to the server is the FLA.Open the
MoonOverLakeNanagook.htmlfile in a browser. The movie starts playing (see Figure 15-37). Congratulations!

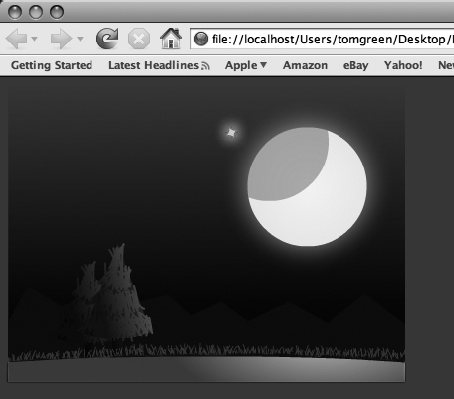
Note
Hang on. How did the background color of the browser page turn blue? There was nothing in the HTML settings for that one. If you publish a Flash movie and use the HTML option, the background color of the HTML document will change to the stage color of the Flash movie.
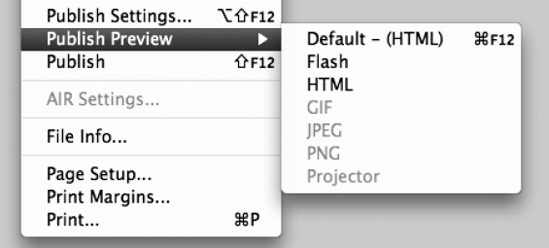
Before we move on, we would like to talk about another option on the Flash File menu. As shown in Figure 15-38, the Publish Preview submenu contains the formats from the Publish Settings dialog box. Selecting this will publish the movie, and if you selected Default - (HTML), you can launch the results in a browser. This menu reflects the choices made in the Publishing Settings dialog box, which explains why a lot of the options are grayed out. If you are a Dreamweaver CS4 or Fireworks CS4 user, this menu item is the same as being able to do a browser preview in both of those applications. In fact, they all use the same key, F12, to launch the preview. The browser that opens will be the default browser used by your computer's operating system.
In Chapters 5 and Chapter 14, you created an MP3 player. Though you tested it locally, nothing beats testing on a remote server. Another aspect of that exercise is playing content located in another folder on the server. In the case of the MP3 files, this actually makes sense. Let's assume you are going to use the same MP3 soundtrack in five Flash movies over the coming year. If that MP3 is 5MB in size, you will have used up 25MB of server space if the file is slipped into the folder for each project that uses it. Doesn't it make more sense to upload it once and have the movies call it into the SWF from a single location?
In this example, we are going to assume the three audio files are located in a folder named Tunes in the mythical domain of mySite.com.
Open the
TinBangs.flafile located in theExercisefolder for this chapter.Open the
Actionspanel and scroll down to theloadSong()function in line 56 of theScriptpane.The critical line in this function is line 47, which uses the
load()method to get the song. Change this line to the following:req = new URLRequest("http://www.mySite.com/Tunes/" + file);
That's all it takes. Of course, what you're seeing is just a sample URL, so if you test the file, you won't actually hear any music. The point is that you can add fully qualified paths to your URLRequest instances.
Everything is straightforward if you use absolute paths. Absolute paths contain the full domain name, which means they're accessible from anywhere on the Internet. That's both a plus and a minus. If you hard-code all your file references as absolute paths, you know they'll work—until you decide to change your domain name, or until you repurpose your content for another project in another folder structure somewhere else. In cases like that, a relative path may suit your needs. Relative paths do not reference a domain name, and because of that, they depend entirely on a very particular point of view: the physical location of the file making the reference. (If this sounds familiar, that's because we touched on it in Chapter 10 in regard to video files. Consider this a recap.)
You would think that a SWF looking for MP3s (or any external files) would consider itself as the beginning of the path—"Where is that file in relation to me ?"—but that's not how it works. When a SWF references external files with relative paths, its point of view is actually that of the HTML document that contains it. If the SWF and the HTML file are in the same folder, this is a moot point, but keep it in mind if you decide to put all your SWFs in one folder and your HTML files in another.
To make matters even more interesting, there's an exception: FLV files. If you are using the FLVPlayback component, the path to the video, if it is a relative path, takes its cue from the location of the SWF itself. The same thing goes for a video object using the NetStream class. That said, the FLVPlayback component optionally uses skins, and skins are SWF files. If your movie uses relative paths to reference an FLVPlayback skin, set your point of view to the HTML document that contains this movie, but when referencing the FLV, set your point of view to the movie itself.
This "gotcha" often raises its ugly head if you have a custom controller or video skin, or are using a server that dynamically loads the content. Either make sure you understand the gotcha fully, or enter the paths as absolute paths (see Figure 15-39).

There wasn't a lot of geeky or cool stuff in this chapter. Instead, the focus on this chapter was how to optimize your Flash movies for web playback. We examined how the data in your Flash movie gets from "here to there" and in what order. We reviewed several ways of using the Bandwidth Profiler, from identifying content bottlenecks to actually emulating the download of a bloated Flash movie into a dial-up modem. It wasn't pleasant, but we then showed you a number of ways to fine-tune your Flash movies in order to let you maximize that "15-second window of opportunity" you get when a user hits your site. The chapter wrapped up with a lengthy discussion about the publishing process. Along the way you learned the following:
How Flash movies are streamed to a web page
A couple of ways of turning the Bandwidth Profiler into your new best friend
Tips and tricks for optimizing content for fast download
How to prepare a SWF for web playback
How to export a Flash movie as a GIF animation and how to import a GIF animation into Flash
How to deal with remote content needed by the SWF
This chapter dealt with the "end game" in Flash. We think you are now aware that preparing your Flash files for web output involves a lot more than simply selecting Publish in the File menu. There is a lot to consider, and those considerations range from what format will be used to output the file to a number of very important options that need to be addressed. We also dealt with remote content and how the SWF can grab it from elsewhere on your site and on the Web.
Speaking of the end game, we are at the end of this journey that started and ended at Lake Nanagook. We hope you had fun and that you are inspired to explore Flash CS4 even further. As you do, you will discover a fundamental truth about this application: The amount of fun you can have with it should be illegal. We'll see you in jail!