
Chapter 7
Fiddling with Document Layout
IN THIS CHAPTER
![]() Constructing sturdy tables for your Docs data
Constructing sturdy tables for your Docs data
![]() Augmenting your documents with headers and footers
Augmenting your documents with headers and footers
![]() Messing around with margins, breaks, and other page setup chores
Messing around with margins, breaks, and other page setup chores
![]() Convincing text to display in columns
Convincing text to display in columns
![]() Making footnotes look easy
Making footnotes look easy
In Chapter 6, I talk about Docs at the “tree” level of words, sentences, and paragraphs. But getting more out of Docs also requires that you deal with the app at the “forest” level of pages and documents. This means you need to get familiar with the document layout and page setup tools.
The terms document layout and page setup refer to how text and paragraphs are laid out on each page, and they involve building tables, adding headers and footers, setting margin sizes, specifying the page orientation, choosing the paper size, and so on. This chapter shows you how to work with these and other document layout features.
Building a Table with Your Bare Hands
In this section, you learn a bit of computer carpentry when I show you how to build and work with tables. Don't worry, though, if you can't tell a hammer from a hacksaw: The kinds of tables you deal with are purely digital because, in Docs, a table is a rectangular grid of rows and columns in a document. You can enter all kinds of info into a table, including text, numbers, and graphics.
What is a table?
Most documents consist of text in the form of sentences and paragraphs. However, you may find yourself in situations where you want to include a list of items in a document and, if you want each item in the list to include two or more details, a standard bulleted list won't do the job. For a short list with just a few details, the quickest way to add the list to a document is to type each item on its own line and press Tab between each detail. You can then add tab stops to the ruler (see Chapter 6 for the details on this topic) to line up the sub-items into columns.
That works for simple items, but to construct a more complex list in Docs, you can build a table, a rectangular structure with the following characteristics:
- Each item in the list gets its own horizontal rectangle, called a row.
- Each set of details in the list gets its own vertical rectangle, called a column.
- The rectangle formed by the intersection of a row and a column is called a cell, and you use the table cells to hold the data.
In other words, a Docs table is similar to a Sheets spreadsheet. Figure 7-1 shows a sample table.
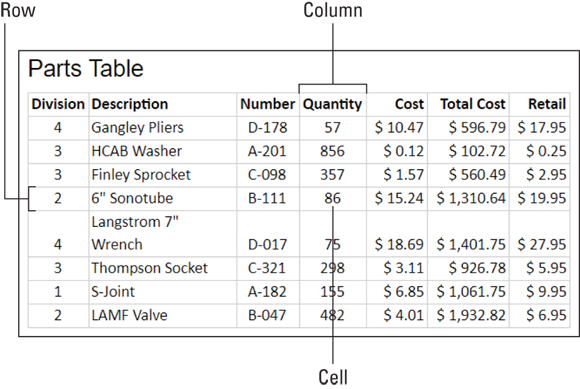
FIGURE 7-1: A table in a Docs document.
Inserting a table
Here are the are-you-sure that's-all-there-is-to-it? steps to follow to insert a table into a document:
- Position the insertion point where you want the table to appear.
-
Choose Insert ⇒ Table.
Docs displays a grid of squares that you use to define the initial size (that is, the number of rows and columns) of your table.
-
Move the mouse pointer over the square that corresponds to the number of rows and columns you want in your table.
For example, to create a table with four columns and three rows, move the mouse pointer over the square shown in Figure 7-2. Note that the text below the grid says
columns x rows, which tells you the number of columns and rows in the current grid selection. If you need more squares for a big table, as you drag toward the bottom and/or right, Docs expands the grid.
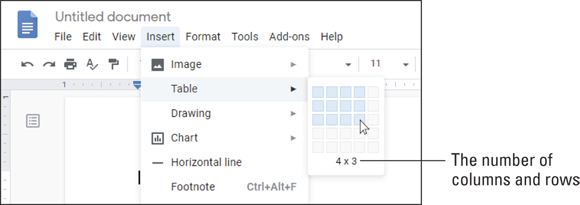
FIGURE 7-2: Use this grid to set the initial number of rows and columns in your table.
-
Select the square.
Docs creates an empty table with the number of rows and columns you specified. (See Figure 7-3, which appears a bit later in this chapter.)
Populating a table
After you've created a table, your next task is to enter the table values. As I mention earlier in this chapter, the intersection between each row and column in a table is called a cell, and you use these cells to enter text.
To try this out, either select the cell you want to work with or select any cell and then use the following keyboard techniques to get around:
|
Press |
To Move |
|
Tab |
Right one column |
|
Shift+Tab |
Left one column |
|
Up arrow |
Up one row |
|
Down arrow |
Down one row |
Now enter the value you want to appear in the cell. Here are some guidelines to keep in mind:
- If your text is longer than the width of the cell, Docs wraps the text and adjusts the height of the cell to accommodate the entry.
- You can format the cell text just like regular document text.
- To start a new line within the cell, press Enter or Return.
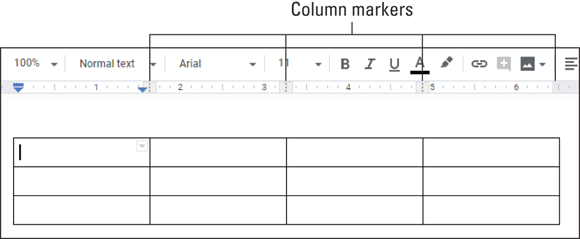
FIGURE 7-3: You can set a column's width by dragging its Column marker on the ruler.
Adjusting column widths
By default, Docs creates each table with equal column widths. However, chances are you'll want some columns narrower and some wider, so make use of any of the following techniques to change the column widths:
- On the ruler, drag the Column markers (pointed out in Figure 7-3).
- In the table, drag a column's right border.
- In the Table Properties dialog box (see the next section), set the Column Width value, in inches.
Selecting table cells
Whenever you need to work with one or more cells within a table, you need to select those cells in advance. Here are the techniques to use:
- Selecting a single cell: Click and drag the mouse pointer across the width of that cell.
- Selecting two or more cells in a table row: Move the mouse pointer over the first cell you want to select, then click and drag the pointer to the right until you've selected all the cells you need in the row.
- Selecting two or more cells in a table column: Move the mouse pointer over the first cell you want to select, then click and drag the pointer down until you've selected all the cells you need in the column.
- Selecting multiple cells in multiple rows and columns: Move the mouse pointer over the first cell you want to select, then click and drag the pointer down and to the right until you've selected all the cells you need.
- Selecting cells with the keyboard: Position the cursor anywhere inside the first cell you want to select, then use the right and down arrow keys to extend the selection to all the cells you need.
Setting table properties
To change the formatting of the table cells, you select the cells you want to work with and then use the standard formatting tools (font, paragraph, and so on). For more table-specific formatting, you can use the Table Properties dialog box. Here are the steps to follow:
- Select which part of the table you want to format:
- To format just a cell, select that cell.
- To format multiple cells, select those cells.
- To format a column-related property, select one or more cells in that column.
- To format a row-related property, select one or more cells in that row.
-
Choose Format ⇒ Table ⇒ Table Properties.
Docs offers up the Table Properties dialog box, shown in Figure 7-4.
-
Use the Table Border controls to set the color (left) and width (right) of the table border.
If you want your table to be borderless, choose 0 pt for the border width.
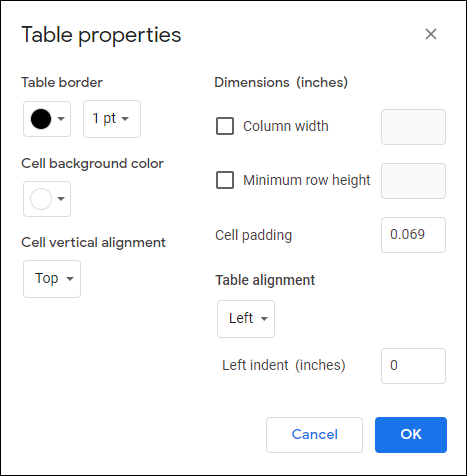
FIGURE 7-4: You can format various table settings in the Table Properties dialog box.
- Use the Cell Background Color palette to set the fill color for the selected cell or cells.
- Use the Cell Vertical Alignment option to set how the data in the selected cell or cells is positioned vertically within its cell:
- Top: Aligns the cell content vertically with the top edge of the cell.
- Middle: Aligns the cell content vertically with the middle of the cell.
- Bottom: Aligns the cell content vertically with the bottom edge of the cell.
- Select the Column Width check box and then enter a value, in inches, in the text box to set the width of the selected column or columns.
-
Select the Minimum Row Height check box and then enter a value, in inches, in the text box to set the minimum height of the selected row or rows.
Minimum height means that the row height can grow taller if needed for the data, but it can't grow smaller than the value you specify.
- Use the Cell Padding text box to set the value, in inches, of the space that Docs adds around the data in the selected cell or cells.
- Use the Table Alignment list to select how you want the data aligned horizontally within the selected cell or cells.
- Left: Aligns the cell content horizontally with the left edge of the cell.
- Center: Aligns the cell content horizontally with the center of the cell.
- Right: Aligns the cell content horizontally with the right edge of the cell.
-
Use the Left Indent text box to set the value, in inches, that you want Docs to indent the data in the selected cell or cells.
The Left Indent text box is enabled only if you select Left in the Table Alignment list.
-
Click OK.
Docs puts the table properties into effect.
Inserting a new row or column
Unlike real carpentry, building a Docs table doesn't require all kinds of advance planning (which is good news for those of us who wouldn't know a blueprint from a blue moon). This is fortunate because, with many of the tables you create, you won't know in advance how many rows or columns you need. That's not a problem, though, because it's easy enough to just create a basic table and then toss in a new row or column whenever you need it. The following steps show you how it's done:
-
Decide where you want the new row or column to appear and then position the insertion point as follows:
- If you're inserting a new row, position the insertion point in any cell in a row that will be adjacent to the new row. If you're adding a new row to the bottom of the table, use a cell in the last row of the table.
- If you're inserting a new column, position the insertion point in any cell in a column that will be adjacent to the new column. If you're adding a new column to the right of the table, use a cell in the rightmost column of the table.
If you want to insert multiple rows, you can insert them all in one operation by selecting cells in the same number of existing rows. For example, if you want to insert three rows into your table, select cells in three existing rows. Again, you're inserting the new rows either above or below the selection, so select the cells accordingly. Yep, you can do this with columns, too, by selecting cells in the same number of columns as you want to insert. For example, to insert two columns into your table, select cells in two existing columns. - Choose Format ⇒ Table.
- Choose the command you want to run:
- Insert Row Above: Inserts a new row over the current row
- Insert Row Below: Inserts a new row under the current row
- Insert Column Left: Inserts a new column to the left of the current column
- Insert Column Right: Inserts a new column to the right of the current column
Need to add a new row to the bottom of a table? Here's the easy way: Position the insertion point in the rightmost cell of the bottom row and then press Tab. Don't mention it.
Deleting a row or column
If you end up with an extraneous column or row in your table, you should remove it to keep things neat and tidy. Here's how:
- Select at least one cell in the row or column you want to remove.
- Choose Format ⇒ Table.
- Choose the command you want to run:
- Delete Row: Deletes the current row
- Delete Column: Deletes the current column
- Delete Table: Nukes the entire table — no questions asked
Merging table cells
Although most people use tables to store lists of data, using a table to lay out a page in a particular way is also common. For example, if you’re building a Docs document that looks like an existing paper form or invoice, you almost certainly need to use a table to do it. However, on most forms, not all the fields — which are the cells in the table you create — are the same width: You might have a small field for a person's age or a much wider field for an address, for example. Changing the column width as I describe earlier doesn't work, because you need to change the sizes of individual cells.
The best way to control how table data is laid out is to build your table normally and then merge two or more cells. For example, if you merge two cells that are side by side in the same row, you end up with a single cell that’s twice the width of the other cells.
To merge cells, follow these steps:
-
Select the cells you want to merge.
You can select cells in a single row, a single column, or in multiple rows and columns. However, the selection must be a rectangle of adjacent cells.)
-
Choose Format ⇒ Table ⇒ Merge Cells.
Docs merges the selected cells.
Headers and Footers from Head to Toe
A header is a section that appears at the top of each page between the top margin and the first line of text. Any text, graphics, or properties you insert in any header appear at the top of every page in the document. Typical header contents include the document title and the date the document was created or modified.
A footer is a section that appears at the bottom of each page between the bottom margin and the last line of text. As with a header, anything you insert in any footer appears at the bottom of every page in the document. Typical footer contents include the page number and document filename.
 It's more precise to say that anything you insert in a typical header or footer appears on every page of your document. A bit later in this section, I show you how to set up different headers and footers for the first page of the document and for odd and even pages.
Here are your choices for adding content to a header or footer:
- Text: You can type any text, such as a brief document description, a note to the reader, your company name, or a link to a website or another document.
- Page numbers: You can insert just the page number, just the page count (that is, the total number of pages in the document), or both. For the last option, you probably want to insert something like the phrase Page X of Y (where X is the current page number and Y is the page count).
- Image or drawing: You can insert a photo or another image using any of the Docs image options, or you can draw something.
Adding a header
Here are the steps you need to plow through to add a header to your document:
-
Choose Insert ⇒ Headers and Footers ⇒ Header.
You can also insert a header by holding down the Ctrl+Alt key combo (on a Mac, hold down Ctrl+⌘ ), pressing O, and then pressing H.
Docs opens the Header section, as shown in Figure 7-5.
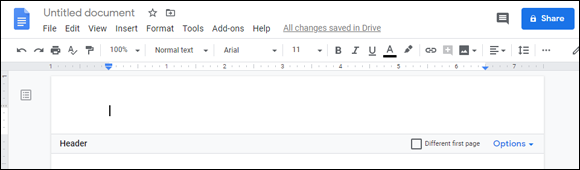
FIGURE 7-5: Running the Header command opens the Header section for editing.
-
If you want to include page numbers in your header, choose Options ⇒ Page Numbers.
Docs opens the Page Numbers dialog box, shown in Figure 7-6. Here are some notes:
- Leave the Header option selected.
- If you don't want the page number to appear on the first page (this is common), deselect the Show On First Page check box.
- If you want your page numbers to start with a particular value, enter that value in the Start At text box.
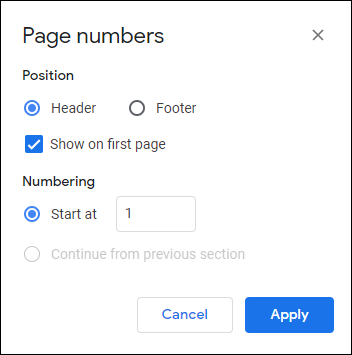
FIGURE 7-6: Use the Page Numbers dialog box to set up page numbers for your header.
- Click Apply to add the page numbers to the header.
- To add the page count to the header, position the cursor where you want the count to appear, and then choose Insert ⇒ Page Numbers ⇒ Page Count.
- To add more stuff to the header, position the insertion point within the header and then enter some text, insert an image, or whatever.
- To close the header, click anywhere in the document.
Adding a footer
Here are the steps to follow to set up your document with a footer:
-
Choose Insert ⇒ Headers and Footers ⇒ Footer.
Another way to insert a footer is by holding down the Ctrl+Alt key combo (on a Mac, hold down Ctrl+⌘ ), pressing O, and then pressing F.
Docs opens the Footer section, as shown in Figure 7-7.

FIGURE 7-7: Running the Footer command opens the Footer section.
-
To add page numbers to your footer, choose Options ⇒ Page Numbers.
Docs opens the Page Numbers dialog box. Here are a few things to bear in mind:
- Leave the Footer option selected.
- To leave the page number off the first page, deselect the Show On First Page check box.
- If you want your page numbers to start with a value other than 1, enter that value in the Start At text box.
- Click Apply to add the page numbers to the footer.
- To add the page count to the footer, position the cursor where you want the count to appear, and then choose Insert ⇒ Page Numbers ⇒ Page Count.
- To add more info to the footer, position the insertion point within the footer and then enter some text, insert images, and so on.
- To close the footer, click anywhere in the document.
Opening the header or footer for editing
After you close your header or footer, later you might decide to make some changes to the existing text, add some new content, or whatever. To make any changes to a header or footer, you have to open it. Here's how:
- Opening the header: Either double-click inside the header or hold down the Ctrl+Alt key combo (on a Mac, hold down Ctrl+⌘ ), press O, and then press H.
- Opening the footer: Either double-click inside the footer or hold down the Ctrl+Alt key combo (on a Mac, hold down Ctrl+⌘ ), press O, and then press F.
Creating a unique first-page header and footer
By default, when you define the content for one header or footer, Docs displays the same content in every header or footer in the document. However, many situations arise in which this default behavior isn’t what you want. One common situation is when you want to use a different header or footer on the first page of a document. For example, many texts use no header or footer on the first page. Another example is when you want to insert document instructions or notes in the first header or footer but you don't want that text repeated on every page.
For these kinds of situations, you can tell Docs that you want the first page's header or footer to be different from the headers or footers in the rest of the document:
- Header: Open the Header section and select the Different First Page check box. Docs changes the label of the first page header to First Page Header.
- Footer: Open the Footer section and select the Different First Page check box. Docs changes the label of the first page footer to First Page Footer.
Creating unique odd and even page headers and footers
Many documents require different layouts for the header or footer on odd and even pages. A good example is the book you’re holding. Notice that the even page footer has the page number on the far left, followed by the part number and title, whereas the odd page footer has the current chapter number and title, followed by the page number on the far right.
To handle this type of situation, you can configure your document with different odd and even page headers or footers by following these steps:
-
Choose Format ⇒ Headers & Footer ⇒ More Options.
Alternatively, either open the Header section for editing and then choose Options ⇒ Header Format, or open the Footer section for editing and then choose Options ⇒ Footer Format.
Either way, the Headers & Footers dialog box pops up.
- Select the Different Odd & Even check box, as shown in Figure 7-8.

FIGURE 7-8: Select Different Odd & Even to work with unique odd and even page headers and footers.
-
Click Apply.
Docs changes the labels of the page headers to Even Page Header and Odd Page Header, and the labels of the page footer to Even Page Footer and Odd Page Footer.
- Open the Even Page Footer and add or edit the content you want to see on your document's even-numbered pages.
- Open the Odd Page Footer and add or edit the content you want to see on your document's odd-numbered pages.
Changing the Page Setup
The Docs options and features for setting up pages are legion, but few people use them with any regularity. That's a shame because the Docs page setup tools are often useful and easy to use, after you get to know them. In the next few sections, I walk you through the most useful of the Docs page setup features.
Setting the page margins
One of the most common page layout changes is to adjust the margins, or the blank space to the left and right, as well as above and below the document text (including the header and footer). The standard margins are 1 inch on all sides, but you can override that, if you like. Why would you want to do such a thing? Here are a few good reasons:
- If someone else will be making notes on the page, it helps to include bigger left and right margins (to give the person more room for scribbling).
- Smaller margins all around mean that you can fit more text on a page. On a really long document, this could save you a few pages when you print it out.
- If you have a document that's just slightly longer than a page (say, by only a couple of lines), you can decrease the top and bottom margins just enough to fit the wayward lines onto a single page.
Note, however, that decreasing the margins can make the page look cluttered and uninviting. If you increase the margins, you fit less text on each page, though the added white space can make the document look more appealing.
You can set specific margin sizes for the top, bottom, left, and right margins by following these steps:
-
Choose File ⇒ Page Setup.
Docs asks the Page Setup dialog box to make an appearance. (See Figure 7-9.)
- Use the Top text box to set the top margin.
- Use the Bottom text box to set the bottom margin.
- Use the Left text box to set the left margin.
- Use the Right text box to set the right margin.
-
Click Apply.
Docs applies the new margin settings.

FIGURE 7-9: Use the Page Setup dialog box to set margin sizes.
You can also use the Docs ruler to adjust the left and right margins. First, make sure the ruler is onscreen by choosing View ⇒ Show Ruler from the menu bar. Look closely, and you see that the ruler has a mostly white background, but it also has a gray background on the left and right sides. These gray backgrounds contain two important controls called margin markers:
- Left Margin marker: This is the portion of the gray background on the left side that runs from the right edge of the gray background to the left edge of the page, as pointed out in Figure 7-10.
- Right Margin marker: This is the portion of the gray background on the right side that runs from the left edge of the gray background to the right edge of the page, as pointed out in Figure 7-10.

FIGURE 7-10: Drag the margin markers to adjust the left and right margins.
Here how you use these margin markers:
- To adjust the left margin, drag the Left Margin marker. Dragging left decreases the margin, and dragging right increases the margin.
- To adjust the right margin, drag the Right Margin marker. Dragging right decreases the margin, and dragging left increases the margin.
Changing the page orientation
By default, page text runs across the short side of the page and down the long side. This is called the portrait orientation. Alternatively, you can configure the text to run across the long side of the page and down the short side, which is called landscape orientation.
What's the use? You'd use the landscape orientation mostly when you have text or an image that's too wide to fit across the page in portrait orientation. If you're using letter-size paper and its margins are set to 0.75 inches, you have only 7 inches of usable space across the page. Wide images, a table with many columns, or a long line of programming code are just a few of the situations in which this width might not be enough. If you switch to landscape, however, the usable space grows to 9.5 inches, a substantial increase.
Here's what you do to choose a page orientation:
-
Choose File ⇒ Page Setup.
Docs opens the Page Setup dialog box. (Refer to Figure 7-9.)
- In the Orientation section, choose either Portrait or Landscape.
-
Click Apply.
Docs changes the orientation without protest.
Changing the paper size
Docs assumes that you'll be viewing or printing your documents on standard letter-size paper, which is 8.5 inches by 11 inches. If you plan to use a different paper size, you need to let Docs know so that it can print the document correctly:
-
Choose File ⇒ Page Setup.
Docs opens the Page Setup dialog box. (Refer to Figure 7-9.)
-
In the Paper Size list, choose the size you want to use.
For example, for letter-size paper, choose Letter (8.5" x 11"). Two other possibilities are Legal (8.5" x 14") and A4 (8.27" x 11.69").
-
Click Apply.
Docs changes the document's paper size — no problem.
Adding a page break
As you might know by now, Docs signals the start of a new page by displaying a narrow gap between the previous page and the current page. That gap is called a page break. Text that appears above the break prints on one page, and text below the break prints on the next page. This text arrangement isn’t set in stone, of course. If you insert a new paragraph or change the margins, the text on both sides of the page break line moves accordingly.
But what if you have a heading or paragraph that has to appear at the top of a page? You can fiddle around by, say, pressing Enter above the text until the text appears at the top of the next page, but that's a strategy that too fragile to be useful.
Instead, Docs gives you an easier and more robust method. Position the cursor at the start of the text that you want to appear at the top of a new page, and then do either of the following:
- Choose Insert ⇒ Break ⇒ Page Break from the menu bar.
- Press Ctrl+Enter (⌘ +Enter on a Mac).
Docs creates a new page break at the cursor position.
Adding a section break
In Docs-related training sessions and question-and-answer periods, some of the most common complaints and queries center on using multiple page layouts in a single document:
- How can I have different headers (or footers) for different parts of a document?
- I have a long table on one page. How can I set up that one page with smaller margins?
Most people end up splitting a single document into multiple documents to accomplish these and similar tasks. However, you don’t have to break up your document just because you want to break up the page layout. The secret to doing this is the section, a document part that stores page layout options such as headers, footers, and margins.
When you create a document, Docs gives it a single section that comprises the entire document. However, you’re free to create multiple sections within a single document, and you can then apply separate page layout formatting to each section. The transition from one section to another is called a section break.
Docs offers two types of section breaks:
- Next Page: Starts a new section on a new page
- Continuous: Starts a new section at the insertion point (doesn’t add a page break)
Follow these steps to add a section break:
- Position the cursor where you want the new section to begin.
- Choose Insert ⇒ Break.
- Choose a section break:
- Choose Section Break (Next Page) for a next-page section break.
- Choose Section Break (Continuous) for a continuous section break.
Figure 7-11 shows what the Page Setup dialog box (choose File and then Page Setup) looks like when you have one or more sections on the go. You use the Apply To list to select the section you want to work with (you can also choose Whole Document to work with everything), and then make your margin adjustments for that section.
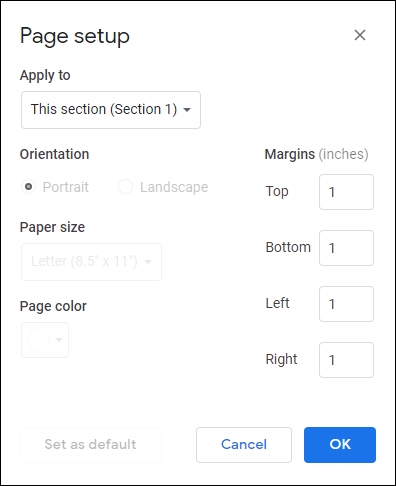
FIGURE 7-11: The layout of the Page Setup dialog box changes when you add a section.
Working with Columns, Just Like the Pros
Docs, of course, is good for more than just the odd letter or memo. All kinds of people are using the program to self-publish things like newsletters, booklets, pamphlets, fanzines, and more. To give these kinds of documents a more professional look, Docs lets you arrange text into columns, just like you see in newspapers and magazines. (Check out Figure 7-12 for an example.) The next few sections show you how to define columns and enter text into them.

FIGURE 7-12: A document with text finagled into two columns.
Getting text into columns, Part 1: The easy way
Columns have always been one of those features that many people avoided like the plague because, well, they just seemed too complicated and so weren't worth the bother. Docs has changed all that, however, and it's now easier than ever to set up and use columns. To prove it for yourself, just follow these three oh-so-simple steps to define columns for your document:
-
Select the text that you want to convert into columns.
If you want to convert the entire document, don't select anything.
If you haven't entered the document text yet, that's okay; it's perfectly acceptable to set up columns first and then type the text later.
-
Choose Format ⇒ Columns.
Docs displays the column options shown in Figure 7-13.
-
Choose either two columns (the middle option) or three columns (the option on the right).
Docs converts your text into columns, just like that.
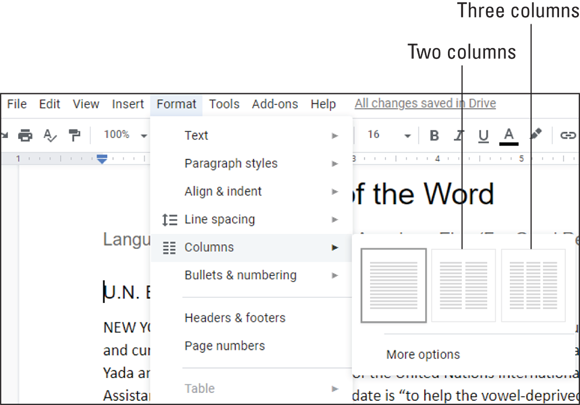
FIGURE 7-13: Select the Columns command, and then choose how many columns you want.
Getting text into columns, Part 2: The ever-so-slightly-harder way
Docs has a second column-creation method that gives you slightly more control over the process. Here's how it works:
-
Select the text that you want to see in columns.
Don't select anything if you're looking to convert the entire document to columns.
-
Choose Format ⇒ Columns ⇒ More Options.
Docs releases the Column Options dialog box, shown in Figure 7-14.
- Use the Number of Columns list to select how many columns you want.
- Use the Spacing text box to set the distance, in inches, that you want between each column.
-
If you want Docs to add a vertical line between each column, select the Line Between Columns check box.
If you're using a somewhat narrow space between your columns (say, anything less than half an inch), adding the line between columns can make your text easier for folks to read.
-
Click Apply.
Docs wastes no time in converting your text into columns.
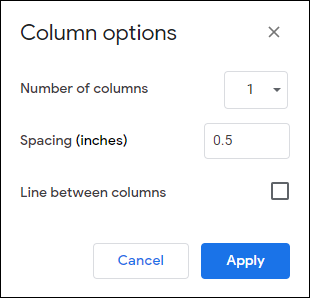
FIGURE 7-14: The Column Options dialog box gives you a few extra column-related settings to fiddle with.
Entering text in columns
After you have defined your columns, your next step is to fill them in by entering some text (unless, of course, you converted existing text into columns). Here are some guidelines to follow when entering text in columns:
- Entering text in a column isn't all that different from entering text in a normal document. Place the cursor into the column you want to use and then start pecking away. If the columns are empty, you have to begin at the top of the first column.
- If you want to move the cursor to the next column before you reach the end of the page (this is called inserting a column break), choose Insert ⇒ Break ⇒ Column Break from the menu bar.
Show Your Work: Adding Footnotes
One of the best ways to make people think you worked really hard on a document is to include footnotes at the bottom of the page. Footnotes say, “Hey, this person took the time and effort to write this little parenthetical note for my edification or amusement. I think I'll take them out to lunch.”
To make sure we're on the same page (so to speak), here are some concepts to keep in mind as you work through this section:
- A footnote is a short note at the bottom of a page that usually contains asides or comments that embellish something in the regular document text on that page.
- Docs indicates a footnote with a reference mark, a number that appears as a superscript in both the regular text and in a special footnote area at the bottom of the page.
- Footnotes are a convenient way to add extra info for the reader, though too many on one page can make your text look cluttered.
If you've ever tried adding footnotes to a page manually, you know what a nightmare it can be trying to coordinate the size of the note with the regular page text. And if you need to change your footnote numbers? Forget about it.
Docs changes all that by making footnotes as easy as entering text. The program arranges things so that your pages accommodate any footnote size perfectly, and it even manages the footnote numbers for you — automatically!
Because a footnote always refers to something in the regular text, your first task is to position the insertion point where you want the little footnote number to appear. (Usually, it’s at the end of whatever word, phrase, or sentence your footnote is embellishing.)
After you've done that, choose Insert ⇒ Footnote from the menu bar. (You can also press Ctrl+Alt+F or, on a Mac, ⌘ +Option+F.) Docs adds a footnote number at the cursor, creates a special footnote area at the bottom of the page, and then inserts the same footnote number there. Now type your footnote text in the footnote area and you're done. Figure 7-15 shows an example.

FIGURE 7-15: A document with a footnote.