
Chapter 10
Creating Eye-Popping Presentations
IN THIS CHAPTER
![]() Getting comfy with Slides
Getting comfy with Slides
![]() Adding and manipulating slides
Adding and manipulating slides
![]() Formatting your slides
Formatting your slides
![]() Adding transitions and animations
Adding transitions and animations
![]() Mastering the Master slide
Mastering the Master slide
![]() Running your slide show
Running your slide show
Presentations let you communicate your ideas to groups of people. Using a variety of presentation formats and techniques, you can present textual material, tables, graphs, drawings, and other types of information to your audience to inform, persuade, train, or otherwise influence their thinking. In G Suite, Slides provides the framework and engine for creating eye-catching presentations.
The Slides presentational building blocks are, appropriately enough, slides, which are individual “chunks” of information in the form of text, graphics, tables, charts, and other objects. Slides generally convey information in telegraphic or shorthand style — short phrases or “bursts” of text, pictures, charts, or graphs. Save long sentences and flowing prose for reports — presentations use short, pithy lines to make text easy to grasp.
In this chapter, I help you explore the creation of a Slides presentation with an emphasis on design and learning to consciously choose the elements of an effective presentation. My goal here is to present a “middle way” that avoids the two most common Slides faults: drab, lifeless presentations that are ineffective because they bore the audience to tears and overly fancy presentations that are festooned with formats, transitions, sounds, and other effects that have no discernible purpose, use, or benefit. With the middle way, you learning how to create attractive presentations that offer visual interest without sacrificing clarity.
Opening Slides
If you're ready to get the presentation party started, use either of the following techniques to get Slides on the dance floor:
- Send your favorite web browser to
https://slides.google.com. (Note that you actually end up onhttps://docs.google.com/presentation, but the other address is shorter to type.) - If you're in a G Suite app that has the Google Apps icon (such as Mail or Calendar; see Figure 10-1), select Google Apps and then choose Slides from the menu that appears.

FIGURE 10-1: Choose Slides on the Google Apps menu.
Touring the Google Slides Home Page
When you first get to Slides, you see the app's home page, which looks somewhat like the page shown in Figure 10-2.
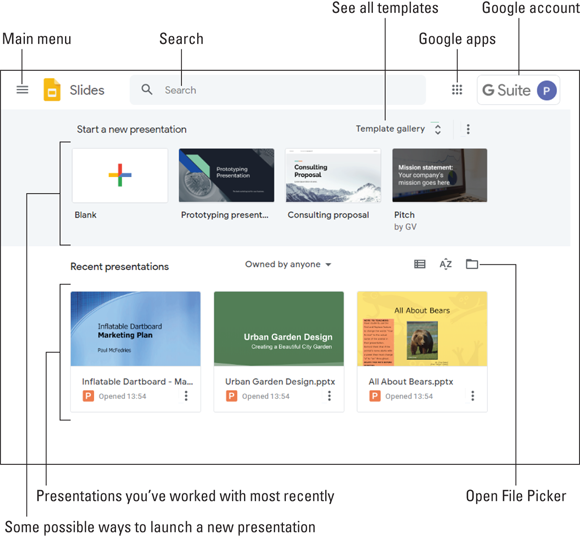
FIGURE 10-2: The home page is your Slides launching point.
Here's a fast look at the main features of the screen (refer to Figure 10-2, which points out the features in this list):
- Main menu: An icon you click to open the main menu, which gives you access to other G Suite apps (such as Docs and Sheets), Settings, and Drive. To close the menu, select any empty space outside of the menu.
- Search: Enables you to search Slides for the presentation you want.
- Google apps: Displays icons for all Google apps.
- Google account: Gives you access to your Google account.
- Start a new presentation: Displays a few templates you can use to start a new presentation. (A template is a presentation that comes with predefined slides, text, formatting, and even an image or two to get you off to a quick start.)
- Template gallery: A button you click to see the complete list of templates.
- Recent presentations: The three presentations you've worked on most recently.
- Open file picker: An icon you click to open a presentation file from Drive.
Creating a New Presentation
From the Slides home page, you can open a file you worked on previously (see the later section “Opening an existing presentation”), but you'll usually want to create a new presentation. You have two ways to crank up a new presentation:
- To open an empty presentation (that is, a presentation with no predefined text or formatting), click Blank in the Start a New Presentation section.
- To open a presentation that has some ready-to-edit text, formatting, and images, either choose one of the template tiles shown in the Start a New Presentation section or click Template Gallery and then choose a template from the long list of possibilities that Slides displays.
Checking Out the Presentation Screen
Whether you create a new presentation or open an existing presentation, you end up eyeballing the presentation screen. Figure 10-3 shows an example and points out the following features:
- Current slide: Where you add, edit, and format your slides content.
- Toolbar: Offers one- or two-click access to the most popular Slides features.
- Slides Home: Takes you back to the Slides home page.
- Presentation name: The name you've given your presentation. When you start a new blank presentation, the area says
Untitled Presentation; when you start a new presentation from a template, the area says the name of the template. - Menu: Gives you access to the full arsenal of Slides commands, features, and tools.
- Start Presentation: The button/list you click to start your slide show.
- Hide menus: An arrow you click to hide the Slides Home icon, the menu, and the presentation name to gain a bit more vertical headroom for your presentation.
- Google Account: Gives you access to your Google account.
- Side panel: The sidebar on the right, which consists of the following elements:
- Calendar: Opens the Calendar pane for quick access to your Google Calendar.
- Keep: Opens the Keep pane so you can add a note to the Keep app.
- Tasks: Opens the Tasks pane so you can add a task to the Tasks app.
- Hide side panel: An arrow you click to collapse the side panel and gain a little extra horizontal legroom. Click the arrow again to return the side panel.
- Filmstrip: Displays a vertical list of your presentation's slides.
- Filmstrip view/Grid view: Toggles Slides between the filmstrip and the grid, which displays a larger view of your slides that takes up most of the Slides screen.

FIGURE 10-3: A typical presentation and the Slides features that surround it.
Dealing with Presentations
Before you learn how to add, edit, and format slides, it pays to take a few minutes to learn some basic presentation chores.
Slides saves your work for you
As you work in Slides, with each change you make, the presentation's save-status text changes to Saving …. When the save is complete, you see the status All changes saved in Drive.
That's right: With Slides, you never have to worry about saving your work, because Slides takes over the saving duties from here. Every time you make a change to the presentation, you see the saving status change briefly to Saving, followed a second or two later by the anxiety-killing message All changes saved in Drive. Later, after you close and then reopen the presentation, status tells you how long ago you last edited the presentation.
Naming a new presentation
If you've just started a new presentation, one of your earliest tasks should be to give the presentation a descriptive name. Slides launches a new presentation with the too-boring-for-words name Untitled Presentation. Follow these steps to give your presentation a proper name:
-
Select the
Untitled Presentationtext, which appears near the top-left corner of the page.Alternatively, you can choose File ⇒ Rename from the menu bar.
Either way, Slides opens the filename for editing.
- Delete the
Untitled Presentationtext. - Enter the name you want to use for the new presentation.
-
Press Enter or Return.
Slides saves the presentation using the new name.
Opening an existing presentation
To return to a presentation you worked on previously, you need to open it by following these steps:
- Open the Slides home page.
-
If you see the presentation you want to open in the Recent Presentations area, select it and then skip the rest of these steps. Otherwise, click the Open File Picker button. (Refer to Figure 10-2.)
Slides displays the Open a File dialog box.
- Choose the presentation you want to mess with.
-
Click Open.
Slides opens the file.
Saving a copy of a presentation
One of the secrets of Slides productivity is to never reinvent the wheel. That is, if you have an existing presentation and you need a second presentation that's very similar, don't go to the time and trouble to re-create the original presentation from scratch. Instead, it's not hard to convince Slides to make a copy of the original. With that copy in hand, all you need to do is make whatever changes are needed.
Here's how to make a copy of an existing presentation:
- Open the presentation you want to copy.
-
Choose File ⇒ Make a Copy ⇒ Entire Presentation from the menu bar.
Slides opens the Copy Document dialog box. The Name text box shows
Copy of, followed by the name of the original presentation. - Use the Name text box to give a descriptive name to the copy.
-
Click OK.
Slides opens a new browser tab and displays the copy you just created.
Applying a presentation theme
When you start a new presentation, Slides opens the Themes pane, as shown in Figure 10-4. A theme is a predefined collection of formatting options that control the colors, fonts, and background used with each slide in the presentation. Slides comes with nearly two dozen ready-to-present themes, and to apply one of them, you can use either of the following techniques:
- If you've just started a new presentation, choose a theme in the Themes pane.
- If the Themes pane isn't visible, you can open it by either choosing Slide ⇒ Change Theme from the menu bar or clicking Theme on the toolbar. Either way, you end up at the Themes pane, where you can choose a theme for your presentation.
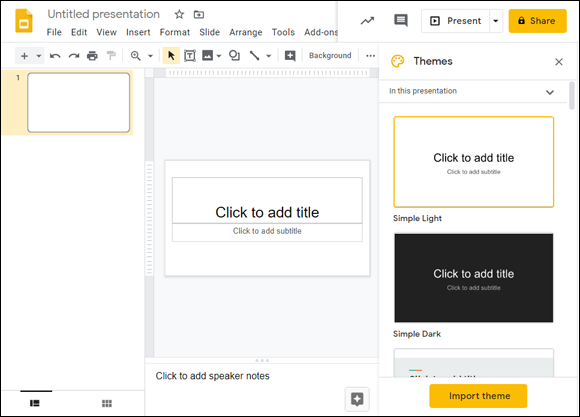
FIGURE 10-4: When you start a new presentation, Slides asks you to choose a theme.
 If another presentation has a theme you want to reuse, display the Themes pane and then click the Import Theme button. In the Import Theme dialog box, either use the Presentations tab to choose an existing presentation or use the Upload tab to choose a file from your computer.
Working with Slides
The heart-and-soul of any presentation is the collection of slides that comprise the bulk of its content and serve as both the focal point and the organizing structure of your talk. The slides serve as the bridge between your audience — who, for the most part, have no idea what you're going to talk about — and yourself — who (presumably) knows exactly what you want to say. Building an effective presentation consists mostly of creating and organizing slides, which in turn involves four things:
-
The content — text and graphics — presented on each slide
- The organization of the content presented on each slide
- The formatting applied to each slide: fonts, colors, and background, for example
- The organization of the slides within the context of the entire presentation
In most of what follows in this chapter, I talk about various Slides techniques and tricks that support these four design ideas.
Adding a slide to the presentation
When you start a new presentation, the resulting file starts off with a single slide (refer to Figure 10-4) that uses a layout called the Title Slide because you normally use it to add a title and subtitle to your presentation. After you've done that, you then add more slides to your presentation so that you can add the content. Thumbnails of the slides appear on the left side of the window in Filmstrip view, and a more-or-less full-size version of the selected slide appears on the right.
Before you get to the specifics of adding a slide, you should understand that all slides contain some combination of the following two elements:
- Title: A text box that you normally use to add a title for the slide
- Text: A text box that you normally use to add text to the slide, which is usually a collection of bullets
In each case, the new slide contains one or more placeholders, and your job is to fill in the placeholder with your text. Each slide uses some combination of Title and Text placeholders, and the arrangement of these placeholders on a slide is called the slide layout.
Inserting a new slide
Here are the steps to follow to add a slide with a predefined layout:
- In Filmstrip view on the left, select the slide after which you want the new slide to appear.
-
Choose Slide ⇒ New Slide from the menu bar.
You can also click Layout on the toolbar. Either way, you see a gallery of slide layouts.
 If you just want to add a blank slide (that is, a slide that uses the Blank layout, which contains no placeholders), you can press Ctrl+M and then bypass Step 3.
 -
Choose the slide layout you want to use.
Slides inserts the new slide.
Duplicating a slide
If you have a slide in the current presentation that has similar content and formatting to what you want for your new slide, you can save yourself a great deal of time by inserting a duplicate of that slide and then adjusting the copy as needed. Here are the steps to follow to duplicate a slide:
-
In Filmstrip view on the left, choose the slide you want to duplicate.
If you have multiple slides you want to duplicate, you can save time by selecting all the slides at one time. I talk about selecting multiple slides later in this chapter, in the “Selecting slides” section.
-
Choose Slide ⇒ Duplicate Slide.
Slides creates a copy of the slide and inserts the copy below the selected slide.
A quicker way to duplicate a slide is to select it, press Ctrl+C to copy it, and then press Ctrl+V to paste it. If you want the copy to appear in a particular place within the presentation, select the slide after which you want the copy to appear and then press Ctrl+V. The slide you copied appears below the slide you selected.
Yet another way to create a duplicate of a slide is to hold down Ctrl (Option on a Mac) and then click-and-drag the slide. When you drop the slide, Slides creates a copy of the slide in the new location.
Importing slides from another presentation
One of the secrets of Slides productivity is to avoid redoing work you've performed in the past. If you have a slide with boilerplate legal disclaimer text, why re-create it in each presentation? If you create an organization chart slide and your organization hasn't changed, you don’t need to build the chart from scratch every time you want to add it to a presentation.
In the preceding section, you can see how to duplicate a slide from the current presentation. However, the far more common scenario is that the slide you want to reuse exists in another presentation. Here are the steps to follow to import one or more slides from an existing presentation into the current presentation:
- In Filmstrip view on the left, select the slide after which you want the imported slides to appear.
-
Choose File ⇒ Import Slides from the menu bar.
Slides opens the Import Slides dialog box.
-
On the Presentations tab, choose the presentation that has the slides you want to import.
If the presentation you want to use isn’t online, select the Upload tab instead, and then choose the presentation file on your computer.
-
Click the Select button.
Slides displays all slides that are in the selected presentation.
- Select each slide you want to import.
-
If you want to preserve the formatting of the imported slides, select the Keep Original Theme check box.
If you deselect Keep Original Theme, Slides applies the theme of the current presentation to the imported slides.
-
Click the Import Slides button.
Slides inserts the slides into the presentation below the slide you selected in Step 1.
Adding data to a slide
After you've added one or more slides, the next step is to fill in the slide data. How you do this depends on whether you're filling in an existing slide placeholder or inserting another object, such as an image.
Adding slide text
With a Title or Text placeholder, select inside the placeholder to enable editing and then enter your text. Strangely, when you're filling in a Text placeholder, Slides does not assume that you'll add bullet points, despite the fact that 99.99 percent of all the nontitle text in every presentation ever made consists of bullet points. This means you have to endure the extra steps of creating a bulleted list. You have two choices:
- Choose Format ⇒ Bullets & Numbering ⇒ Bulleted List from the menu bar and then choose the style of bullets you want to use.
 Click the toolbar's Bulleted List button to insert a standard bulleted list. To choose a different list style, click the button's drop-down arrow and then select the list style you want.
Press Enter at the end of each bullet to start a new bullet.
You can have multi-level bulleted lists, where an item in the list can have one or more sub-bullets, those items can have one or more sub-sub-bullets, and so on. The original list items are at the top level of this hierarchy, sub-bullets are on the second level, sub-sub-bullets are on the third level, and so on.
You can also use the keyboard shortcuts in Table 10-1 to work with bullet items.
TABLE 10-1 Keyboard Shortcuts for Working with Slide Bullets
|
Press This |
To Do This |
|
Tab |
Demote a bullet to a lower level |
|
Shift+Tab |
Promote a bullet to a higher level |
|
Alt+Shift+down arrow (Control+Shift+down arrow on a Mac) |
Move a bullet down one position in the list |
|
Alt+Shift+up arrow (Control+Shift+up arrow on a Mac) |
Move a bullet up one position in the list |
If you've completed your list and you want to add some regular text below the list, press Enter twice to jump out of Bullet List mode.
Adding slide objects
To insert content outside of any slide placeholder, click the Insert menu and then choose the content type: Image, Text Box, Audio, Video, Shape, Table, Chart, Diagram, Word Art, or Line.
Adding speaker notes
When determining the content of your presentation, you keep to a minimum the actual amount of information on a slide — just the high-level points to provide the framework for the topics you want to present. How then do you keep track of the details you want to cover for each slide? What if you want to provide those details to your audience, too? The answer to both questions is to use slide notes.
Notes let you have paper printouts that contain both your slides and additional information you enter in notes. Consider the following ways you can use notes:
- As presentation notes: These are notes that only you see while you're making the presentation.
- As additional detailed handouts for your audience: These are notes that you print out and pass around to your audience so they have something to refer to during your presentation.
- As a copy of your presentation with a blank area for your audience to take their own notes. Have you ever been to a conference where someone distributed hard copies of the presentations with three-slides-per-page printouts with lines for notes and you wanted to do the same thing? Keep reading to find out how.
- As a student guide. If you use a presentation as your primary teaching medium, you can put additional information on notes pages for your learners.
- As an instructor’s guide. Again, if you teach from your presentation, you might have points you want to make or other information associated with a particular slide. Add this information as notes and you have your instructor’s guide, perfectly in sync with the information you’re giving to your learners.
To create notes, select the text box — the one that contains the text Click to add speaker notes — that appears below the slide. If you don't see this box, choose View ⇒ Show Speaker Notes from the menu bar.
If you want more room to type, click-and-drag the separator bar at the top of the notes box. Drag the bar up until the notes box is the size you want, and then release the bar. This gives you less room for the slide, but you can also return the notes box to its original size after you've added your notes.
Selecting slides
To work with slides, you must first select one or more. Here are the techniques you can use in the filmstrip:
- To select a single slide, select it from the filmstrip on the left.
- To select multiple, consecutive slides, select the first slide you want in the filmstrip, hold down Shift, and then select the last slide.
- To select multiple, nonconsecutive slides, select the first slide you want in the filmstrip, hold down Ctrl, and then select each of the other slides.
- To select all slides, select any slide in the filmstrip and then press Ctrl+A. (You can also choose Edit and then Select All.)
Rearranging slides
If you need to change the order that your slides appear in the presentation, Slides gives you two different methods, either of which you can use in the filmstrip or in Grid view (choose View ⇒ Grid View from the menu bar to open Grid view):
- Select the slide you want to move, press Ctrl+X, select the slide after which you want the moved slide to appear, and then press Ctrl+V.
- Click-and-drag the slide and drop it below the slide after which you want it to appear.
Changing the layout of a slide
If the original layout you applied to a slide just isn't cutting it for you, you can change the layout by following these steps:
- Select the slide or slides you want to change.
-
Choose Slide ⇒ Apply Layout from the menu bar.
You can also click the toolbar's Layout button.
Slides displays a gallery of slide layouts.
- Choose the layout you want to use.
Changing the slide background
Most themes offer a solid color background, which is usually a good choice because you don't want your background to interfere with the slide content. However, each theme gives you a choice of background colors and gradients, or you can use an image.
Here are the steps to follow to change the slide background style:
- If you're applying the background to only certain slides, select the slides.
-
Choose Slide ⇒ Change Background from the menu bar.
Alternatively, click the toolbar's Background button.
Slides opens the Background dialog box.
- Choose the background you want to apply:
- To apply a color or gradient, use the Color palette.
- To apply an image, click Choose Image.
-
Click Done.
Slides applies the new background to the selected slides.
Working with the Master Slide
One of the Slides templates might be just right for your presentation. If so, great! Your presentation’s design will be one less thing to worry about on your way to an effective presentation. Often, however, a template is just right except for the background color, title alignment, or font. Or, perhaps you need the company’s logo to appear on each slide. Using the template as a starting point, you can make changes to the overall presentation so that it’s just right for your needs.
However, what do you do if your presentation already has a number of slides? It'll probably require a great deal of work to change the background, alignment, or font on every slide. Fortunately, Slides offers a much easier way: the Master slide, which is available for every presentation. The Master slide acts as a kind of “design center” for your presentation. The Master slide’s typefaces, type sizes, bullet styles, colors, alignment options, line spacing, and other options are used on each slide in your presentation. Not only that, but any object you add to the Master slide — a piece of clipart or a company logo, for example — also appears in the same position on each slide.
The beauty of the Master slide is that any change you make to this single slide, Slides propagates to all slides in your presentation. Need to change the background color? Just change the background color of the Master slide. Prefer a different type size for top-level items? Change the type size for the top-level item shown on the Master slide. G Suite also has masters for each type of layout.
To see the Master slide onscreen, choose View ⇒ Master from the menu bar to display the master. Figure 10-5 shows Master view for the Simple Light theme.
FIGURE 10-5: Each theme comes with its own Master slide, which acts as a design center for the slides.
Master view shows several masters on the left, with the Master slide at the top and the masters for the standard layouts below it. Choose the master you want to work with, and then use the following techniques to customize it:
- To work with a placeholder, select it.
- To delete a placeholder, select it and then press Delete.
- To size a placeholder, position the mouse pointer over one of the placeholder’s sizing handles (the squares that appear at the corners and border midpoints). Click-and-drag the sizing handle to the position you want.
- To move a placeholder, position the mouse pointer over one of the placeholder borders (but not over a sizing handle). The pointer changes to a 4-headed arrow. Click-and-drag the placeholder to the position you want.
- To display an object, such as an image or a text box, on every slide, click the Insert menu and then insert the object into the master.
Note, too, that after you select a master, you can format the text, background, bullets, and colors as if you were working on a regular slide. When you finish, choose Close (X) in the top right corner.
Now one of the following will happen:
- If you made a change to the Master slide, you'll see that change reflected in every slide in your presentation. The exception here is that Slides doesn't overrule layout master modifications, so if you've already made the same change to a layout master, then you won't see your Master slide change in that layout.
- If you made a change to a layout master, you'll see that change reflected in every slide that uses that layout.
Formatting Slide Text
When formatting the slide text, strive for an attractive look (by, for example, avoiding too many typefaces in each slide), though your main focus must be on maximizing readability — particularly if you’re presenting to a large audience. Fortunately, Slides offers a wide variety of font formatting options, as the next few sections show.
Formatting with fonts
To apply font formatting, select the block of text you want to format. You then choose your font formatting using any one of the following three methods:
- Choose Format ⇒ Text from the menu bar.
- Press a keyboard shortcut.
- Click a toolbar button.
Table 10-2 shows the Text menu commands and their corresponding keyboard shortcuts you can select.
If you do a lot of work with fonts, you'll appreciate the push-button convenience of the font-related buttons on the Slides toolbar. Table 10-3 shows you the available buttons for font-related chores.
TABLE 10-2 Font Formatting via Menu and Keyboard
|
Text Menu Command |
Keyboard Shortcut |
|
Bold |
Ctrl+B (⌘ +B on a Mac) |
|
Italic |
Ctrl+I (⌘ +I on a Mac) |
|
Underline |
Ctrl+U (⌘ +U on a Mac) |
|
Strikethrough |
Alt+Shift+5 (⌘ +Shift+X on a Mac) |
|
Superscript |
Ctrl+. (period; ⌘ +. on a Mac) |
|
Subscript |
Ctrl+, (comma; ⌘ +, on a Mac) |
|
Size, Increase Font Size |
Ctrl+Shift+. (period; ⌘ +Shift+. on a Mac) |
|
Size, Decrease Font Size |
Ctrl+Shift+, (comma; ⌘ +Shift+. on a Mac) |
TABLE 10-3 Font Formatting from the Toolbar
|
Toolbar Button |
Button Name |
What It Does |
|
|
Font |
Displays a list of typefaces |
|
|
Font size |
Displays a list of font sizes |
|
|
Bold |
Applies bold to the text |
|
|
Italic |
Applies italics to the text |
|
|
Underline |
Underlines the text |
|
|
Text color |
Displays a color palette and then applies the color you select to the text |
|
|
Highlight Color |
Displays a color palette and then applies the color you select to the background of the text |
Aligning paragraphs
Aligning stuff is about getting your paragraphs dressed up so that they look all prim and proper. Specifically, I'm talking about lining up the left and right ends of your paragraph lines with respect to the left or right margins — or both. Slides offers three alignment methods:
- Choose Format ⇒ Align & Indent from the menu bar.
- Press a keyboard shortcut.
- Click a toolbar button.
Table 10-4 shows the Align & Indent menu commands, their corresponding keyboard shortcuts, and the equivalent toolbar buttons for the four Slides alignment options.
TABLE 10-4 Aligning Paragraphs in Slides
|
Align & Indent Menu Command |
Keyboard Shortcut |
Toolbar Button |
What It Does |
|
Left |
Ctrl+Shift+L (⌘ +Shift+L on a Mac) |
|
Aligns each line on the left margin |
|
Center |
Ctrl+Shift+E (⌘ +Shift+E on a Mac) |
|
Centers each line between the left and right margins |
|
Right |
Ctrl+Shift+R (⌘ +Shift+R on a Mac) |
|
Aligns each line on the right margin |
|
Justified |
Ctrl+Shift+J (⌘ +Shift+J on a Mac) |
|
Aligns each line on both the left and right margins; ignores the last line in a paragraph if it's too short |
|
Top |
|
Aligns data vertically with the top of the placeholder | |
|
Middle |
|
Aligns data vertically with the middle of the placeholder | |
|
Bottom |
|
Aligns data vertically with the bottom of the placeholder |
Slide formatting considerations
Slides has many tools and features for tweaking the formatting of your slides. Like any program with a large number of options, the temptation is to try them all to develop a feel for what Slides is capable of. However, trying the formatting features is one thing, but actually using all of them is quite another. If you lay on the formatting too thick, you run the risk of hiding the slide content under too many layers of fonts, colors, images, and effects.
To help you avoid that all-too-common fate, here are a few formatting considerations to keep in mind when working on your slides:
- When in doubt, opt for simplicity. The most effective presentations are almost always the simplest presentations. This doesn’t mean that your slides must be dull, plain affairs. There’s nothing wrong with formatting, and a judicious use of fonts, colors, effects, and (particularly) images can greatly enhance your message. Simplicity in presentations just means that whatever formatting you add must not interfere with your content and must not overwhelm the senses of your audience.
- Remember your message. Before even opening a new Slides file, think about the overall message you want your presentation to convey. Then, when you format each slide, ask yourself whether each formatting tweak is an enhancement of your message or, at worst, a neutral effect on it. If the answer is No, don’t add the formatting.
- Consider your audience. Some designs suit certain audiences better than others. For example, if you’re presenting to children, a bright, happy design with kid-friendly images will work, whereas a plain, text-heavy design will induce naptime. If, however, you’re presenting to managers or the board of directors, you need a design that gets straight to the point and has little in the way of design frills.
- Preserve your company's image. I mean this in two ways: First and most obviously, if your company has a set color scheme or style, your presentation should reflect it. Second, if your company is known as one that's staid or bold, serious or fun, your presentation should not conflict with that image.
- Be consistent across all slides. This advice means using the same typeface and type size for all your titles, using consistent bullet styles throughout the presentation, using the same or similar background images on all slides, and having the company logo in the same place on each slide. The more consistent you are, the less work your audience has to do to interpret the formatting for each slide, so the more they can concentrate on your content.
- Remember, however, not to use the same layout on every slide. To help keep your audience interested, vary the layout from slide to slide.
- Remember typeface considerations. For the typeface, use sans serif fonts (the ones without the little “feet” at the letter tips), such as Arial, Comic Sans MS, Microsoft Sans Serif, and Verdana. These typefaces are easier to read than serif typefaces (the ones with the little feet) and are much better choices than fancy, decorative typefaces, which are very difficult to decipher from a distance.
- Remember type size considerations. For the type size of your slide content, don't use anything smaller than the default sizes. In particular, never use a type size smaller than 20 points, because it’s nearly impossible for your audience to read. If your audience is older or you're presenting in a large hall, consider using type sizes even larger than the Slides defaults.
- Remember color considerations. For maximum readability, be sure to have significant contrast between the text color and the slide's background color. Dark text on a light background is best for most presentations. Finally, don't use a background image unless it's relatively faint and the text stands out well against it.
- Design slide content. Finally, and perhaps most important, design your slides so that they don't include too much information. Each slide should have, at most, four or five main points; anything more than that and you're guaranteed to lose your audience by making them work too hard.
Animating Your Slides
Many years ago, someone defined fritterware as any software program that offered so many options and settings that you could fritter away hours at a time tweaking and playing with the program. The Slides animation features certainly put it into the fritterware category because whiling away entire afternoons playing with transitions, entrance effects, and other animation features isn't hard. Consider yourself warned that the information in the next few sections might have adverse effects on your schedule.
Learning a few animation guidelines
Before you learn how to apply slide transitions and object animations, it's worth taking a bit of time now to run through a few guidelines for making the best use of slide show animations:
-
Enhance your content. The goal of any animation should always be to enhance your presentation, either to emphasize a slide object or to hold your audience’s interest. Resist the temptation to add effects just because you think they're cool or fun, because chances are good that most of your audience won’t see them that way.
- Remember that transitions can be useful. Using some sort of effect to transition from one slide to the next is a good idea because it adds visual interest, gives the audience a short breather, and helps you control the pacing of your presentation.
- Remember that transitions can be distracting. A slide transition is only as useful as it is unremarkable. If everybody leaves your presentation thinking, “Nice transitions!” you have a problem, because they should be thinking about your message. Simple transitions such as fades, wipes, and dissolves add interest but don't get in the way. On the other hand, if you have objects flying in from all corners of the screen, your content will seem like a letdown.
- When it comes to transitions and animations, remember that variety is not the spice of life. Avoid the temptation to use many different transitions and animations in a single presentation. Just as slide text looks awful if you use too many fonts, your presentations will look amateurish if you use too many animated effects.
- Keep up the pace. For transitions, use the Fast setting (or one close to it) to ensure that the transition from one slide to another never takes more than a few seconds. Also, avoid running multiple object animations at the same time, because it can take an awfully long time for the effect to finish, and audiences never like having their time wasted on such things.
- Match your animations to your audience. If you're presenting to sales and marketing types, your entire presentation will be a bit on the flashy side, so you can probably get away with more elaborate animations; in a no-nonsense presentation to board members, animations and transitions should be as simple as possible.
Setting up a slide transition
A slide transition is a special effect that displays the next slide in the presentation. For example, in a fade in transition, the next slide gradually materializes, while in a flip transition, the next slide appears with an effect similar to turning over a card. Slides has seven transition effects, and for each one you can control the transition speed.
Here are the steps to follow to apply a slide transition to one or more slides:
- If you want to apply the transition to only certain slides, select the slides you want to work with.
-
Choose View ⇒ Motion from the menu bar.
Alternatively, click the toolbar's Transition button or press Ctrl+Alt+Shift+B (⌘ +Alt+Shift+B on a Mac).
Slides displays the Motion pane, shown in Figure 10-6.
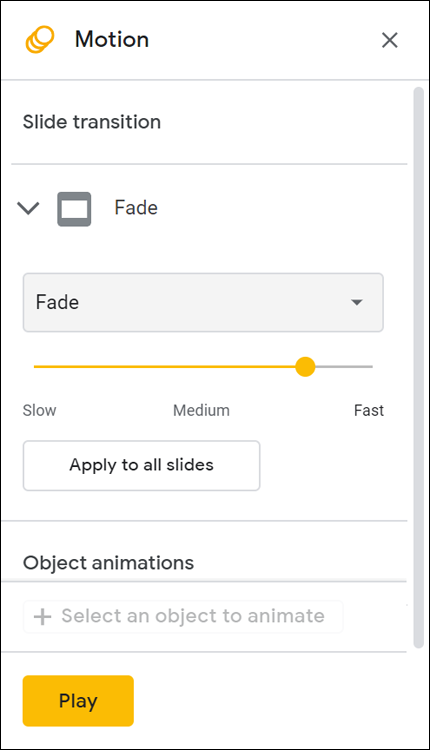
FIGURE 10-6: In the Motion pane, use the Slide Transition controls to apply a built-in slide transition to the selected slides.
- In the Slide Transition group, use the drop-down menu to choose the transition effect you want.
-
Use the slider to select the transition speed.
Drag the slider to the left for a slower transition speed; drag the slider to the right for a faster speed.
-
If you want to use the transition for all slides in the presentation, click Apply to All Slides.
If you don’t choose this option, the transition applies to only the selected slides.
- To see how the transition looks, click Play.
- Click Close (X) in the top right corner of the Motion pane.
Slides indicates that a slide has an applied transition by adding the Animation icon (three overlapping circles) below the slide number in Filmstrip view.
Animating slide objects
Whereas a slide transition is a visual effect that plays during the switch from one slide to another, an object animation is a visual effect applied to a specific slide element, such as the slide title or bullet text or an image.
Here are the steps to follow to apply an animation to a slide object:
-
Select the slide object.
If you want to apply the same animation to multiple objects, go ahead and select them.
-
Choose View ⇒ Motion from the menu bar.
Alternatively, click the toolbar's Animate button or press Ctrl+Alt+Shift+B (⌘ +Alt+Shift+B on a Mac).
Slides displays the Motion pane.
- In the Object Animations group, click Add Animation.
- Use the Animation Type drop-down menu to choose the animation effect you want.
- Use the Start Condition drop-down menu to choose how you want the animation to start:
- On Click: The animation starts when you click the mouse.
- After Previous: The animation starts immediately after the previous animation is complete.
- With Previous: The animation starts at the same time as the previous animation.
-
To animate bullet points individually, select the By Paragraph check box.
If you deselect By Paragraph, Slides animates the entire list.
-
Use the slider to select the animation speed.
Drag the slider to the left for a slower animation speed; drag the slider to the right for a faster speed.
- If you want to apply multiple animations (easy now), select Add Animation and then repeat Steps 3–6 to configure the new animation.
- To see how the animation looks, click Play.
- Click Close (X) in the top right corner of the Motion pane.
Slides indicates that a slide has an applied animation by adding the Animation icon (three overlapping circles) below the slide number in Filmstrip view.
Running a Slide Show
With your slides laid out, the text perfected, the formatting just right, and transitions and animations tastefully applied, it looks like you're good-and-ready to present your slide show. The next few sections show you how to start and navigate a slide show.
Starting the slide show
Slides gives you two ways to launch a slide show:
- To start the slide show from the first slide, click the Start Presentation button (refer to Figure 10-3) and then choose Present from Beginning from the menu that appears. You can also press Ctrl+Shift+F5.
- To start the slide show from a particular slide, select that slide and then click the Start Presentation button. You can also press Ctrl+F5.
Navigating slides
With your slide show running, you now need to navigate from one slide to the next. By far the easiest way to do so is to use the mouse, and Slides gives you two choices:
- Click the mouse to advance to the next slide.
- Turn the mouse wheel forward to advance to the next slide.
If you have animations defined in a slide, clicking the mouse or turning the wheel forward also initiates those animations in the order you defined.
For other navigation techniques and slide show controls, click anywhere in the slide show to view a toolbar with the following controls (see Figure 10-7):
- Next: Moves to the next slide in the presentation.
- Previous: Moves to the previous slide in the presentation. (You can also turn the mouse wheel backward.)
-
Play: Runs the slide show automatically.
To set the duration that Slides uses for each slide when you click Play, click Options, choose Auto-Advance from the menu that appears, and then choose a time interval. You can also click Loop to have Slides automatically start over when it reaches the end. - Go to Slide: Displays a menu of the slides in the presentation. Select the slide you want to view.
- Q & A: Opens the Presenter View window with the Audience Tools tab displayed. You can then click Start New to accept questions from your audience. (Slides displays a web address that audience members can use to submit their questions.)
- Notes: Opens the Presenter View window with the Speaker Notes tab displayed, which shows you your speaker notes for each slide.
- Pointer: Toggles the laser pointer on and off.

FIGURE 10-7: Click the slide show to view the toolbar and its navigation controls.
- Captions: Turns on closed captions.
- Tips: Displays a list of keyboard shortcuts.
- Full screen: Toggles Full-Screen mode on and off.
- Options: Displays the slide show options.
- Exit: Stops the slide show.
Navigating the slide show from the keyboard
Slides gives you quite a few keyboard alternatives for navigating and controlling the slide show. These are useful alternatives because displaying the toolbar can look unprofessional, and pressing a key or key combination is also usually faster. Table 10-5 lists the available keyboard shortcuts for navigating a slide show.
TABLE 10-5 Slide Show Keyboard Navigation Techniques
|
Press This |
To Do This |
|
N |
Advance to the next slide or animation. (You can also press the spacebar or the Enter, right arrow, down arrow, or Page Down keys.) |
|
P |
Return to the previous slide or animation. (You can also press the Backspace, left arrow, up arrow, or Page Up keys.) |
|
n, Enter |
Navigate to slide number n. |
|
Home |
Navigate to the first slide. |
|
End |
Navigate to the last slide. |
|
A |
Display audience tools. |
|
B |
Toggle black screen on and off. (You can also press the period [.].) |
|
L |
Toggle the laser pointer. (You can also press Ctrl+Shift+P on a PC.) |
|
S |
Display speaker notes. |
|
W |
Toggle white screen on and off. (You can also press the comma [,].) |
|
Ctrl+Shift+C |
Toggle captions. |
|
Ctrl+Shift+F |
Toggle full screen. (You can also press F11 on a PC, or ⌘ +Shift+F on a Mac.) |
|
Esc |
End the slide show. |