Chapter 14
Chatting with Your Team
IN THIS CHAPTER
![]() How do I chat with thee? Let me count the ways
How do I chat with thee? Let me count the ways
![]() Exchanging messages with your coworkers
Exchanging messages with your coworkers
![]() Setting up your very own chat room
Setting up your very own chat room
![]() Using Chat to collaborate with colleagues
Using Chat to collaborate with colleagues
![]() Conversing with chat bots
Conversing with chat bots
Chatting — that is, exchanging simple text messages with one or more other people — is so easy and so convenient that it's quickly becoming (if it isn't already) the de facto communication choice for G Suite users. Not that long ago, chat was the medium you used for quick-and-short communiqués. Nowadays, it's not unusual to see people exchanging messages that consist not just of a short phrase or two but also multi-sentence — even multi-paragraph mini-essays. This ain't your father's chat.
In this chapter, you dig into G Suite's messaging features, with a special emphasis on its flagship chat app, Google Chat. You learn not only how to exchange direct messages but also how to create chat rooms, use Chat to collaborate with your coworkers, and more.
Chatting, G Suite Style
As proof of chat's ascendance in the corporate communications realm, you need look no further than the myriad ways that G Suite enables its users to message each other: Gmail, Docs, Sheets, Slides, and Meet. Before moving on to Google Chat, the next few sections take a quick look at these alternative chat methods.
Chatting with Gmail
When you're hanging around in Gmail, you can use Google Hangouts to exchange messages with people you know, including people outside of your organization. You can set up a classic one-on-one text conversation, or you can organize (or join) a group chat of up to 100 people.
Here are the steps to follow in order to start a chat in Gmail:
-
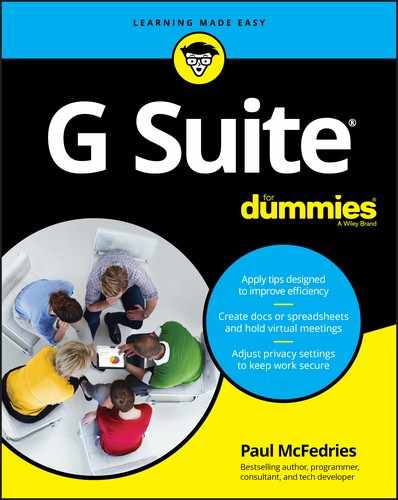
In the Chat section of the navigation menu running down the left side of the page, click the New Conversation (+) icon.
A Hangouts Chat dialog box appears, prompting you to specify someone to chat with.
- (Optional) If you want to chat with two or more people, click New Group and then use the Name Your Group text box to enter an optional moniker for the group.
-
Use the Enter Name, Email Address, or Telephone Number text box to enter the name, email, or phone number of the person you want to chat with.
Hangouts Chat displays a list of names (see Figure 14-1) that match what you've typed so far in three categories: people inside your organization; people outside your organization who have a Hangouts account; and people who don't have a Hangouts account.
If you see the person you want, select that name from the list.
-
If you opted to chat with a group, repeat Step 3 as needed to populate the group. When you're done, select the check mark.
Hangouts Chat opens a chat window.
-
For a one-on-one conversation, click Send Invitation; for a group chat, send your initial message.
Hangouts Chat sends the invitation or message, which appears in the other person's (or persons') Chat area in Gmail. When that person clicks (or those people click) Accept, you can begin the conversation.
Chatting with Docs, Sheets, and Slides
![]() When sharing a document, spreadsheet, or presentation with other people, you might need to ask a question or just be sociable with someone who's editing the file with you. Easier done than said: Click the Chat icon in the top left corner of the screen to open the Chat pane (see Figure 14-2) and then start “talking.”
When sharing a document, spreadsheet, or presentation with other people, you might need to ask a question or just be sociable with someone who's editing the file with you. Easier done than said: Click the Chat icon in the top left corner of the screen to open the Chat pane (see Figure 14-2) and then start “talking.”
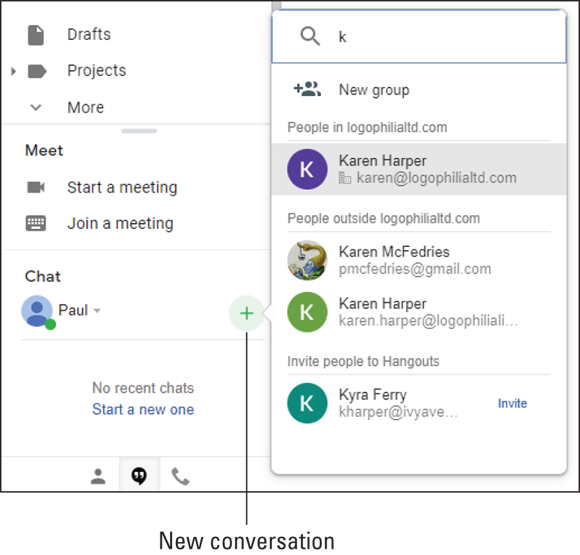
FIGURE 14-1: As you enter a name or an address, you see a list of names that match.
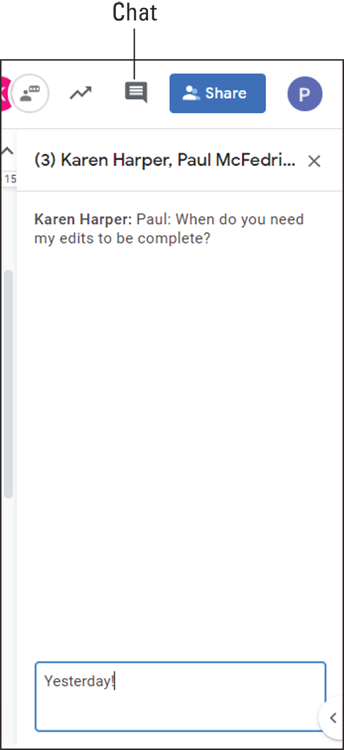
FIGURE 14-2: In a shared Docs, Sheets, or Slides file, click the Chat icon to converse with your collaborators.
Chatting with Meet
During a meeting, you might want to make a comment to another participant without interrupting the meeting, ask a question, or share a link with everyone. You can do all that and more by clicking the Chat icon to open the Chat pane, as shown in Figure 14-3.

FIGURE 14-3: In a Meet video conference, click the Chat icon to message the meeting participants.
 Remember that all Meet chats are public, meaning that anyone else in the meeting can read the messages you exchange with someone. Therefore, Meet chats are definitely not the place to rag on your boss or make snarky comments about someone in the meeting!
Chatting with Google Chat
The rest of this chapter covers Google Chat, which is the main messaging app for G Suite users. To get you started, here are the three ways you can access Google Chat (which I call Chat from here on out):
-
On the web: Take your web browser by the hand and guide it gently to
chat.google.com. Figure 14-4 shows the stark Chat landscape that appears when you first open the site. If you've been conducting some Hangouts Chat conversations recently, they'll likely show up here, so your version of the Chat page might look a little livelier.
 - On the desktop: There's a Chat app available for Windows and Mac. Head over to
https://chat.google.com/downloadand click the Download button. - On your mobile device: There's a mobile version of the Chat app available for Android and iOS. Use Google Play (Android) or the App Store (iOS) to install the app on your device.
FIGURE 14-4: Google Chat's web home.
Exchanging Messages
When you're ready to start a conversation, here are the steps to follow on the Chat website to get a chat off the ground:
-
In the Find People, Rooms and Bots text box, start entering the name of the person you want to converse with.
Chat displays a list of people in your organization who match what you’ve entered so far.
 If you want to chat with someone outside of your organization, you need to enter that person's email address.
 -
When you see the person you want, select that person.
Chat launches a new conversation.
- Enter your initial message in the text box that’s provided.
-
Click the Send Message icon (pointed out in Figure 14-5) or press Enter.
Chat tosses the message at the other person.
- Read the response you get from the other person.
- Repeat Steps 4 and 5 until you can't take it any more.

FIGURE 14-5: Enter your message and then click Send Message (or press Enter).
Formatting chat text
The vast majority of your messages will use plain old text, but you'll occasionally want to spice up your chats with a little formatting: bold to make a word or phrase stand out; italics to emphasize something; even an emoji or two to give your message that certain visual oomph that only a well-chosen emoji can give. Here's what you can do:
- Making text bold: Surround the word or phrase with asterisks (*). For example, entering
To make it rain cats and dogs, clicking the *Poodle* buttonwould display asTo make it rain cats and dogs, click thePoodlebutton. - Making text italic: Surround the word or phrase with underscores (_). For example, entering
That is a _terrible_ idea!would display asThat is aterribleidea! - Adding an emoji: Click the Add Emoji icon to display the dialog box shown in Figure 14-6, and then select the emoji that does the job for you.
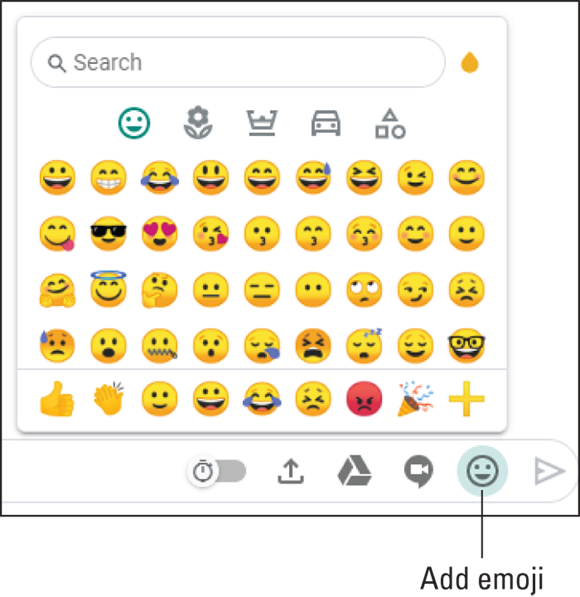
FIGURE 14-6: Click the Add Emoji icon to sprinkle your messages with your favorite emoji.
Messing around with messages
Did you make a typo, a grammatical gaffe, or a factual error in a text? Hey, it happens. You might think, after you toss a message out into the ether, that the message becomes a fixed, unchangeable, un-mess-with-able thing. Not so. In fact, Chat gives you a host of ways to mess with a message, including fixing any errors.
In the list of sent chat messages, select the message you want to do something with. Chat displays the icons shown in Figure 14-7.
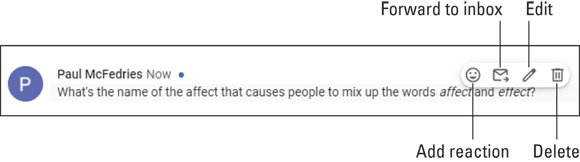
FIGURE 14-7: Select a message in your chat history to see the icons shown here.
The icons shown in Figure 14-7 are the ones you see when you select one of your own messages; if you select another person's message, you see only the Add Reaction and Forward to Inbox icons.
Here are the four icons you see when you select one of your messages:
- Add reaction: Adds a reaction emoji to the message.
- Forward to inbox: Sends a copy of the chat messages to your Gmail address.
- Edit: Opens the message for editing. Make your changes and then click Update.
- Delete: Removes the message from the chat history. When Chat asks you to confirm the deletion, click Delete.
Collaborating with Chat
A chat is ideal for quick bursts of one-on-one conversations, but Google Chat rocks a bunch of features that enable you to shift your interactions from conversation to collaboration. In the next few sections, I talk about these collaboration features.
Chatting with a group
If you have a question to answer, a controversy to settle, or a detail to hash out, the quickest and easiest way to get it done is to gather everyone involved into a group chat. That way, any member of the group can send a direct message that's seen by everyone else in the group.
Group chats are only for people in your organization. If you need to create a multiperson chat that includes one or more people from outside your organization, you need to create a chat room. See “More Collaboration: Congregating in a Chat Room,” later in this chapter.
Here are the steps to follow to organize a group chat:
-
Click in the Find People, Rooms and Bots text box, but instead of immediately typing a name or an email address, choose Group Message from the menu that appears below the box.
Chat displays the Direct Message page.
-
Start entering the name of a person you want to include in the group.
Chat displays a list of people in your organization who match what you've entered so far.
-
When you see the person you want, select that person.
Chat adds the person to the list.
- Repeat Steps 2 and 3 until you've added all the people you want in the group chat.
-
Click the Message button.
Chat opens a chat window for the group.
Chat automatically supplies a name for the chat, which is usually the first names of the participants. - Enter your initial message in the text box that’s provided.
-
Click the Send Message icon (refer to Figure 14-5) or press Enter.
Chat distributes the message to each person in the group.
- Read the responses you get from the other members.
- Repeat Steps 7 and 8 as needed.
Unfortunately, you can't add people to an existing group chat. If you need to expand the group, select the group name at the top of the chat window, and then choose Start a New Chat from the menu that appears. You end up alongside the Start a New Chat dialog box, where you see the members of the previous chat already added. Add the extra people you need and then click Create.
Uploading a file to a chat
If you want your chat mate (or mates) to take a look at a file, you can upload the file into the chat, where anyone can then select the file to view it. Note that you can upload any file to the chat, not just files you created in a G Suite app.
Here are the steps required to upload a file midchat:
- In the chat text box, type a message explaining that you're going to upload a file.
-
Click the Upload File icon.
Figure 14-8 points out the Upload File icon.
Chat displays the Open dialog box.
-
Select the file you want to upload, and then click Open.
Chat adds the file to your message.
-
Click the Send Message icon.
Chat adds a thumbnail image of the file to the chat transcript. Refer to Figure 14-8.
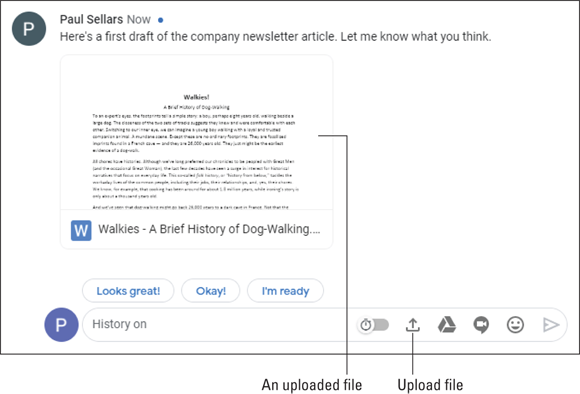
FIGURE 14-8: A file, uploaded to a chat.
Adding a video meeting to a chat
A common chat scenario is to be mid-conversation and realize that you need to show or demonstrate something to the other person (or other people, if you're in a group chat). Yep, you can upload a file, as I describe in the previous section, but that doesn't help if you need to perform some action.
For these and similar scenarios, the best thing to do is to create an on-the-fly Meet video meeting. That enables both you and the other chat participants to quickly join the meeting and see the presentation (or just see each other).
Here's what you do to add a Meet video meeting to a chat:
- In the chat text box, type a message explaining that you're going to add a video meeting.
-
Click the Add Video Meeting icon.
Figure 14-9 points out the Add Video Meeting icon.
Chat adds a Video Meeting to your message.
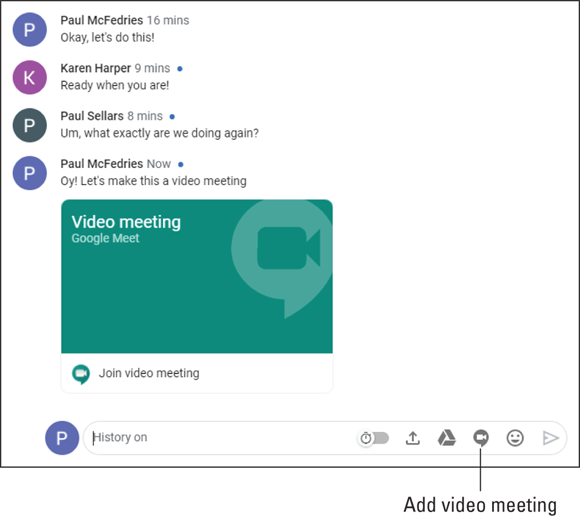
FIGURE 14-9: Select a message in your chat history to see the icons shown here.
-
Click Send Message.
Chat adds the video meeting to the chat transcript. Refer to Figure 14-9.
-
Each person in the chat clicks Join Video Meeting and then Join Now.
Meet starts the videoconference. If you need more info on using Meet for video conferencing, see Chapter 13 for the details.
More Collaboration: Congregating in a Chat Room
Chat and collaboration combine in a big way with the concept of a chat room. This special Chat area enables you to not only exchange messages with your team but also organize those messages into multiple conversation threads, share files and other resources, add chat bots, include people from outside your organization, and more.
Creating a room
When you're ready to build a chat room with your bare hands, follow these steps:
-
Click in the Find People, Rooms and Bots text box, but rather than immediately type a name or an email address, choose Create a Room from the menu that appears below the box.
Chat opens the Create a Room dialog box.
-
Use the Room Name text box to enter the name you want to use for your chat room.
Room names can be a maximum of 64 characters.
-
If you want to allow guests to join your chat room, select the Allow People Outside Your Organization to Join check box.
Chat is happy to let you include guests (that is, people not from your organization) in a chat room, but you have to configure this by selecting the Allow People Outside Your Organization to Join check box. If you leave this check box deselected, there's no way to reconfigure the room later, to allow people from outside your organization to join the room. -
Click the Create button.
Chat creates your new room. If you selected the Allow People Outside Your Organization to Join check box in Step 3, you see
Externalto the right of the room name. -
Click the Add People and Bots button.
Chat opens the Add People, Groups or Bots to Room dialog box, where Room is the name of your chat room.
-
Start entering the name of a person you want to add to the room.
Chat displays a list of people in your organization who match what you’ve entered so far.
If your room is configured to allow people from outside your organization, start typing the external person's email address instead. In this case, Chat displays a list of people outside your organization — marked as
External— who match what you've entered. -
When you see the person you want, select that person.
Chat adds the person to the list.
- Repeat Steps 6 and 7 until you've included all the people you want to add to the room.
-
Complete the room:
- If you don't want to send an email notification about the new room, deselect the Notify People via Email check box, click Add, and then skip the rest of these steps. Note that each person you've added sees the new room in the Rooms section of their Chat window.
- If you want to send an email notification about the new room, leave the Notify People via Email check box selected and then click Send.
If you’ve added one or more external users, you must invite them via email. In that case, after you click Send, Chat asks you to confirm that you want to include those users in the room. -
Click Confirm.
Chat creates the room.
Managing a room
Figure 14-10 shows a freshly minted chat room and points out a few features.

FIGURE 14-10: A brand-new chat room, ready for the team.
Here's a list of the things you can do in your new chat room:
- Add more people to the room: Either click the Add People and Bots button, or click the room name at the top of the window and then choose Add People and Bots from the menu that appears.
- Start a new conversation thread: Click the New Thread in Room button, where Room is the name of your room.
- Send a direct message to a room member: Click the room name, and then choose View Members from the menu that appears to see a list of the room's current members. Select the person you want to message, click More Options (the three vertical dots), and then choose Message from the More Options menu that appears.
- Remove someone from the room: Click the room name, and then choose View Members from the menu that appears to see the Members list. Select the person you want to kick out, click More Options (the three vertical dots), and then choose Remove from Room from the More Options menu that appears.
- Change the room name: Click the room name, choose Rename from the menu that appears, type the new name in the Name the Room text box, and then click Rename.
- Leaving the room: Click the room name, choose Leave from the menu that appears, and then click the Leave the Room button when Chat asks you to confirm.
- Rejoining a room: Click in the Person, Room or Bot text box, choose Browse Rooms from the menu that appears, and then click the room's Join (+) icon.
Robotexting: Chatting with Bots
You might think that chatting is all about connecting with people, but you can use Chat to exchange messages with nonhumans as well. Nonhumans? Yep. I'm talking here about bots, hunks of software that have been programmed to respond to specific phrases, questions, or events. If you're wondering how such a thing can possibly be useful, you'd be surprised. Most bots are designed to perform specific tasks related to online services. For example, if you or your team use the services Box, GitHub, Salesforce, Trello, or Zoom, each has its own bot that you can chat with to perform tasks related to the service. Dozens of bots are available, so you should be able to find one that does something useful or fun.
Not all G Suite administrators allow bots, so if you can't add a bot to a chat, it means that your admin has put the kibosh on bots.
Adding a bot
I talk about some specific bots a bit later, but for now you should know the various techniques that Chat offers to add a bot:
- Chatting directly with a bot: If you know the bot's name, enter the name in the Find People, Rooms and Bots text box, and then select the bot in the list that appears. (Make sure you select the bot from the list's Bots section.) If you're not sure of the bot’s name, click Find a Bot (the plus sign, + — refer to Figure 14-4) to open the Find a Bot page, scroll the bot list, and then select the bot you want.
- Adding a bot to an existing chat: At the top of the Chat page, select the name of the person you're chatting with and then click Add Bots. Enter the name of the bot and then click Add.
- Adding a bot to a room: If you just created the room, click the Add People and Bots button. Otherwise, at the top of the Chat page, select the name of the room and then choose Add People and Bots from the menu that appears. (Refer to Figure 14-10.) Enter the name of the bot, deselect the Notify People via Email check box, and then click Add.
Bear in mind that some bot requests might not work unless you're chatting directly (that is, one-on-one) with the bot. For example, if you add the Meet bot (which I describe below) to a multiperson chat or to a room and then ask Meet for your schedule, the request fails because, for privacy reasons, Meet provides that info only in a one-on-one chat.
Once you've added a bot, how you interact with that bot depends on what type of chat you’re in:
- One-on-one chat: Enter the bot commands directly.
- Group chat or chat room: Precede each bot command with @botname, where botname is the name of the bot.
To learn what a bot can do, send the message help to the bot. (In a multiperson chat or a chat room, send the message @botname help to the bot, where botname is the name of the bot.
There are, as I mention earlier, dozens of bots available from both Google and third-party developers. Rather than list them all (don't be silly!), in the next three sections, I provide quick introductions to three Google bots: GIPHY, Meet, and Drive.
GIPHY: Animated GIF fun and frivolity
GIPHY is a bot that returns animated GIFs based on what you text. For example, if you send the message dog to GIPHY, you see an animated GIF that contains a dog, as shown in Figure 14-11. Is it useful? Nope. Is it fun? Oh, yeah.

FIGURE 14-11: Select a message in your chat history to see the icons shown here.
Table 14-1 lists the main commands you can use with the GIPHY bot.
TABLE 14-1 GIPHY Bot Commands
|
Command |
Result |
|
text |
Displays the first GIF related to text. |
|
random text |
Displays a random GIF related to text. |
|
choose text |
Displays a carousel containing 25 GIFs related to text; click Prev and Next to navigate the carousel, and then click Done to choose the currently displayed GIF. |
|
rating |
Displays the current rating of GIFs returned by the bot. (GIPHY rates the GIFs and uses the same rating system as the Motion Picture Association of America.) |
|
rating MyRating |
Sets the rating of GIFs returned by the bot; replace MyRating with G, PG, PG–13, or R. |
|
Help |
Displays a list of commands. |
 GIF is the original web graphics format. (It’s short for Graphics Interchange Format.) Technically, you can use the GIF format (which is limited to 256 colors) for basic images, like line art and clip art, but these days people use GIFs only for creating simple animations. “Okay, fine,” I hear you thinking, “but how do you pronounce it?” Oh, man, you just had to bring that up, didn't you? The web is full of oddball debates, but one of the oddest is centered around the pronunciation of GIF: Is it “giff,” with a hard g, or “jiff,” with a soft g? For what it's worth, the people behind the GIPHY database of animated GIFs pronounce it as “giff.” (For some fun along these lines, send the message choose jif to the GIPHY bot.) In the end, it really doesn't matter, of course, but I bring it up as a warning that you wade into this teapot-size tempest at your peril.
Meet: Managing your meetings
You can use the Meet bot (not related to, or to be confused with, the Google Meet videoconferencing app; see Chapter 13) to view your schedule, add new meetings, or modify existing meetings.
Here are some Meet commands you can use to schedule a meeting (includes setting the title, date/time, and duration and the number of guests):
- Schedule a meeting with Karen Harper Monday at 3 P.m.
- Schedule a meeting with Paul on August 23 at 1 P.m. for 30 minutes.
- Find 45 minutes with Karen Harper and Paul Sellars next week, and title it Budget Showdown.
- Find a time (in a chat room) next week when we can all meet.
If Meet finds multiple people with a name you mention, or if it finds multiple times to schedule the meeting, it presents a list labeled A), B), and so on. Text the letter that matches the result you want. Figure 14-12 shows an example.
Here are some Meet commands to modify a meeting you just scheduled:
- Move this meeting to Tuesday afternoon.
- Add Biff to this meeting.
- Rename this meeting to Budget Smackdown.

FIGURE 14-12: A Meet transcript example.
Now for some Meet commands to modify existing meetings:
- Reschedule my meeting with Steve.
- Reschedule my meeting with Paul to 4:30 P.m.
- Cancel my meeting with Karen.
Finally, you can use these Meet commands to see your scheduled meetings:
- Do I have any meetings tomorrow?
- Am I free Monday afternoon?
- What is my schedule on Friday?
- What meetings do I have next week?
- Do I have any meetings with Karen this week?
Google Drive: Getting file alerts
In Chapter 11, I go on at some length about the various ways you can collaborate on documents, spreadsheets, and presentations. Wouldn't it be nice to know when someone has commented on one of your files or shared a file with you? Why, yes, it would, and that's exactly what the Google Drive bot can do.
Unlike the GIPHY and Meet bots I describe in the previous two sections, the Google Drive bot doesn't respond to commands you text. Instead, it monitors your Google Drive and then sends you a message in Chat when certain events occur, including the following:
- Someone edits one of your files.
- Someone adds a comment to one of your files.
- Someone replies to a comment in one of your files.
- Someone shares a file or folder with you.
- Someone requests editing permission for one of your files.
- Your Drive is getting low on storage.
When you start a chat with Google Drive, the bot first asks whether you want to turn on drive notifications, and you should click Yes.