Chapter 17
Ten Tips for Working from Home
IN THIS CHAPTER
![]() Keeping sane by defining your working hours and availability
Keeping sane by defining your working hours and availability
![]() Staying in touch with remote colleagues
Staying in touch with remote colleagues
![]() Adding multiple time zones and clocks to Calendar
Adding multiple time zones and clocks to Calendar
![]() Reading email from more than one account
Reading email from more than one account
![]() Setting up your home video meeting space
Setting up your home video meeting space
As I was writing this book in the spring and summer of 2020, I had the notion that perhaps I ought to get through the whole thing without mentioning The Great Shutdown. I speak, of course, of the entire world coming to a virtual halt in order to stop — or at least slow down — the spread of the novel coronavirus that emerged in late 2019. Literally overnight, those of us who were used to spending our working days in bustling offices located in faraway skyscrapers were now forced to stay home, quarantined from our colleagues and bosses.
Being at home means watching Netflix all day, right? Fat chance! No, our work still cried out to get done, and those colleagues and bosses still clamored for our attention. Those same executives who nixed any calls for allowing employees to work from home in the Before Time insisted that now everyone was a work-from-home employee.
Ah, but working from home isn't as easy as it sounds. Distractions abound, work is no longer bookended by commutes to and from the office, and it's just harder to get things done when the people you rely on or collaborate with are hunkered down in their own homes. Fortunately, G Suite has your back here. In this chapter, I take you through ten G Suite tips and techniques that can help the working-from-home work effectively from home.
Set Your Working Hours
One of the biggest problems with working from home is that the working part of your day doesn't have a set beginning and end. At least when you work at the office, the morning commute acts as a transition into your working day, and the commute home is a signal to your mind and body that the working part of the day is done. (Yes, I know that our modern workdays are really 24/7, but humor me here.) At home, where your “commute” is, at best, a walk down a hallway or up a flight of stairs, you don't get that same sense of separation between your work life and the rest of your life.
Even worse, your colleagues and managers also have that same lack of work-life boundaries, so they end up sending you requests for meetings and chats that happen pretty much any time of day or night. It's madness!
You can fight back and inject a little sanity into your work-from-home life by setting your working hours, which are the days of the week you work and the times on those days that you've set aside for work. Any go-getter without a personal life who tries to invite you to a meeting at some insane time of the morning or evening gets notified that the event occurs outside of your working hours, as shown in Figure 17-1.
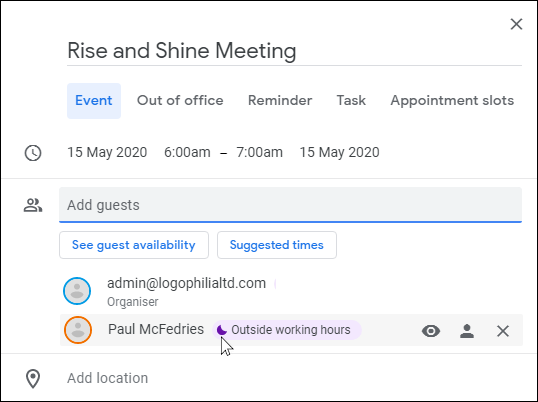
FIGURE 17-1: Calendar lets people know when they're trying to invite you to an event that occurs outside of your working hours.
You set your working hours using the Calendar app:
- Navigate to
calendar.google.com. - Choose Settings Menu ⇒ Settings from the menu bar.
- On the new page that appears, choose Working Hours from the navigation menu on the left.
- Select the Enable Working Hours check box.
- Deselect the icon for each day of the week that you don't work.
- Using the controls for the first day of your workweek, set the start and end times of your workday.
-
Select Copy Time to All (see Figure 17-2) to use the same hours on each of your other workdays.
If you work different hours each day, skip Step 7 and set the start and end times for each workday.
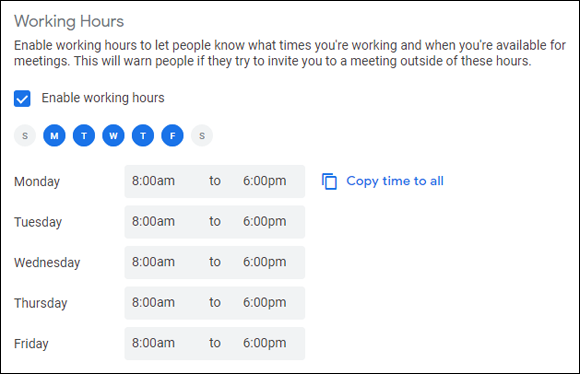
FIGURE 17-2: Define your workday by specifying your working hours.
 For members of your team to get notified when they try to rope you into an event that's outside your working hours, you must share your calendar with the team. To learn how to share a calendar, see Chapter 12.
Show Your Availability
Setting your standard working hours, as I describe in the previous section, is a great start for setting boundaries between your work life and your home life. However, sometimes you have to step out of the home office for a few hours or even a few days. In such cases, you need to let people know you're unavailable. G Suite offers two methods you can use:
- Set up a vacation responder in Gmail, as I describe in Chapter 2.
- Create an Out of Office “event” in Calendar.
The latter of these is a special type of event that blocks out a specified chunk of time on one or more days. When someone tries to invite you to a meeting or another event during those hours, Calendar automatically declines the invitation.
To schedule an Out of Office event, Calendar offers a couple of ways to get started:
- For a single-day Out of Office event, navigate to the date, switch to Day view, and then click inside the time zone area. Alternatively, switch to Month view, navigate to the month of the event, and then click the date of the event.
- For a multiday Out of Office event, navigate to the dates, switch to Week view, and then click-and-drag across the time zone area for each day of the event. Alternatively, switch to Month view and then click-and-drag across each day of the event.
Calendar creates a new event and you follow these steps to complete the Out of Office event:
-
Select the Out of Office tab.
Calendar switches to the interface shown in Figure 17-3.
- If the Out of Office start and/or end times are incorrect, click each time and then either edit it to the correct time or choose the time you want from the list.
- If you don't want Calendar to decline invitations for you, deselect the Automatically Decline New and Existing Meetings check box.
- If you scoffed at Step 3 (good for you!), use the Message text box to specify the message that Calendar sends back to the meeting organizers.
-
Select Save.
If you left the Automatically Decline New and Existing Meetings check box selected, Calendar asks you to confirm that you want the app to decline meetings on your behalf.

FIGURE 17-3: Use the Out of Office tab to set up an Out of Office event in Calendar.
-
Select Save & Decline.
Calendar adds the Out of Office event to the Events area.
Tell Chat to Chill for a While
One of the unique challenges of working from home is that you often have to perform other tasks around the house during work hours: Empty the dishwasher, fill the dishwasher, put in a load of laundry, wax the dog, and so on.
If your coworkers are a chatty bunch, you probably don't want a fistful of chat notifications to come rolling in while you're taking care of the homestead. To silence chat notifications for a while, follow these steps:
- Head on over to
chat.google.comto open Chat. -
Select the Notifications menu, which appears to the right of the Chat logo.
Chat displays the Mute Notifications list, as shown in Figure 17-4.
-
Select the amount of time you want blissful silence.
Chat activates Do Not Disturb for the amount of time you selected and changes your status from Active to Do Not Disturb (the moon logo), as shown in Figure 17-5.
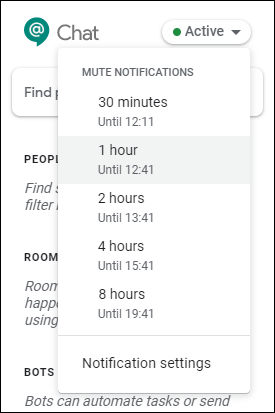
FIGURE 17-4: Use the Mute Notifications list to specify how long you want to turn on Do Not Disturb.

FIGURE 17-5: After you mute notifications, Chat changes your status to Do Not Disturb.
Keep Up the Face-to-Face Communication
When you're at home and everyone you deal with every day is “out there” somewhere, it can be easy to fall into the trap of responding to requests, questions, and discussions using text-based communication channels such as email, messaging, and chat. Those methods are convenient and quick, but they do come with a significant downside: When you're out of sight, you're out of mind. That is, communicating with coworkers only via the written word can quickly erode your relationships and can make all your communications feel increasingly impersonal and formal.
How do you prevent your work relationships from going south in this way? Easy: Connect via video as often as you can (or as often as you're comfortable). There's no substitute for face-to-face conversation as a way of staying in the loop, keeping relationships friendly and cordial, and responding empathetically (because you can read facial expressions and hear tone of voice).
Fortunately, G Suite makes a video get-together a no-brainer, thanks to Google Meet's easy video meeting setups. To learn more, head over to Chapter 13.
Know Which Communications Tools to Use
G Suite gives you lots of ways to reach out to your coworkers, but not every communications tool is right for every task. After all, you wouldn't use a hammer to peel an orange. (At least, I think you wouldn't.)
Here are the main G Suite communications apps, along with some suggestions about when it's appropriate to use each one:
- Chat: Useful for short conversations, time-sensitive updates, urgent messages, and quick feedback.
- Video call: Useful for conversations that consist of sensitive topics, constructive criticism, or any other matter where facial expressions are important.
- Groups: Useful for most day-to-day communications, question-and-answer sessions, status updates, and so on.
- Meet: Useful for longer discussions, larger groups, or ad hoc meetings to discuss issues too complex for Groups posts.
- Gmail: Useful for longer, more thoughtful, and less time-sensitive messages and replies.
Add Time Zones in Your Calendar
If you have colleagues, customers, or suppliers who work in a different time zone, it’s often important to know the correct time in that zone. For example, you probably won't have much luck calling someone at work at 9 A.m. your time if that person lives in a time zone that’s three hours behind you. Similarly, if you know that a business colleague leaves work at 5 P.m. and that person works in a time zone that’s seven hours ahead of you, you know that any calls you place to that person must occur before 10 A.m. your time.
If you need to be sure about the current time in another time zone, you can customize Calendar's display to show not only your current time but also one or more world clocks, each of which displays the current time in another time zone. Follow these steps to add one or more world clocks to Calendar:
- Cajole your web browser into displaying
calendar.google.com. - Choose Settings Menu ⇒ Settings.
- In the World Clock section, select the Show World Clock check box.
-
Click the Add Time Zone button.
Calendar adds a Time Zone list.
- Use the Time Zone list to select a time zone you want to display in your world clock.
-
To add more world clocks, repeat Steps 4 and 5 as needed.
Calendar saves your settings automatically.
Figure 17-6 shows Calendar with a couple of world clocks on the go.

FIGURE 17-6: Calendar, rocking a couple of world clocks.
Knowing the current time elsewhere is great, but it's not a big help when it comes to setting up events and meetings. Fortunately, Calendar can help by displaying a second time zone in Day view and Week view. Here's how to set this up:
- Ask your web browser to please take you to
calendar.google.com. - Choose Settings Menu ⇒ Settings.
- In the Time Zone section, select the Display Secondary Time Zone check box.
-
Use the Label text box to the right of the Primary Time Zone list to enter a short name for your main time zone.
While you're at it, double-check that the Primary Time Zone list is set to your time zone.
- Use the Secondary Time Zone list to select the other time zone you want to display.
-
Use the Label text box to the right of the Secondary Time Zone list to enter a short name for the second time zone.
Figure 17-7 shows the Time Zone section with a secondary time zone all set up and ready to go. Figure 17-8 shows how the two time zones appear in Calendar (in Week view, in this case).
Calendar saves your settings automatically.

FIGURE 17-7: Calendar's Time Zone settings with a secondary time zone added.

FIGURE 17-8: How the two time zones appear in Week view.
Configure Calendar for Speedy Meetings
The biggest problem with working from home is not only that you have multiple hats to wear — besides your work hat, you might also have a spouse hat, a parent hat, a cook hat, a taking-out-the-garbage hat, and many more — but you also often need to switch from one hat to another throughout the day. That's life in the big city, but you can give yourself a bit more time to change hats by configuring Calendar to schedule slightly shorter meetings by default. Using the Speedy Meetings settings, Calendar automatically schedules meetings as follows:
- When you create a 30-minute meeting, Calendar schedules the meeting for just 25 minutes. For example, if you create a “30-minute” meeting to start at 3:00pm, Calendar schedules the meeting to end at 3:25pm.
- When you create any meeting longer than 30 minutes, Calendar sets the end time for 10 minutes less than what you selected. (For example, if you select a 60-minute meeting, Calendar schedules it for only 50 minutes.)
I ask you: Who doesn't like shorter meetings? If you're loving the sound of all this, follow these steps to configure Calendar to automatically schedule shorter meetings:
- Make your web browser go to
calendar.google.com. - Choose Settings Menu ⇒ Settings.
-
In the Event Settings section, select the Speedy Meetings check box.
Calendar saves the new setting automatically.
Read Email from Another Account
When you're working from home, you might have to monitor email messages from one or more accounts besides your Gmail account. Normally, monitoring another email account means configuring an email client or accessing a website where that account is configured. However, you can avoid all that hassle by configuring Gmail to check for messages from that account. If Gmail finds any messages on the other server, it helpfully imports them into your Gmail Inbox for leisurely reading.
To set up Gmail to check mail from another account, here's a rundown of the information you should have at your fingertips:
- The account email address.
- The username and password for the email account. (Note that in most cases the username is the account email address.)
-
The address used by the email provider's incoming mail server. This address often takes the form mail.provider.com or pop.provider.com, where provider is the name of the email provider. Gmail calls this address the POP server, where POP is short for Post Office Protocol.
A mail server is a computer that your ISP uses to store and send your email messages. - Whether your email provider requires a secure connection to check for and retrieve mail. Secure connections are handled via a protocol called Secure Sockets Layer (SSL).
- Whether the email provider requires you to use a special port number for incoming mail. You can think of a port as a communications channel, and Gmail and your provider must be tuned to the same channel for things to work. If you don't have any info on this, your provider probably uses the standard port number: 110 if you don't use SSL; 995 if you do use SSL.
With all that info at your fingertips, follow these steps to add the other account to Gmail:
- Head on over to mail.google.com
mail.google.com. -
Choose Settings ⇒ See all settings.
Gmail opens its settings.
- Select the Accounts tab.
-
In the Check Email from Other Accounts section, select Add an Email Account.
Gmail opens the Add an Email Account window.
-
Enter the account address in the Email Address text box and then click Next.
Gmail asks you to enter the settings for the account. Note that Gmail makes a few guesses about the info, most of which should be accurate, or close to it.
- In the Username text box, enter the account username (usually, the email address).
- In the Password text box, enter the account password.
- In the Pop Server text box, enter the address of the server that your provider uses for incoming mail.
-
In the Port list, select the port number your provider uses for incoming mail.
Again, this is 110 if your provider doesn't require SSL (see Step 11 in this list); if your provider does want you to use SSL, select 995 in the Port list.
-
If you want Gmail to leave a copy of any imported message on the original server, select the Leave a Copy of Retrieved Message on the Server check box.
If you still want to access the account's messages using another email client, selecting the Leave a Copy of Retrieved Message on the Server check box is a good idea. If you'll access the messages only in Gmail, leave the check box deselected so that after Gmail retrieves your messages, it deletes the messages from the original server.
- If your email provider requires that incoming mail connections be secure, select the Always Use a Secure Connection (SSL) When Retrieving Mail check box.
-
It's a good idea to label the account's messages in some way, so select the Label Incoming Messages check box.
By default, Gmail labels the messages using the account's email address. If you prefer to use a different label, use the drop-down list to select New Label, enter the label in the dialog box that appears, and then click OK.
-
If you want Gmail to bypass the Inbox and send the account's incoming messages straight to the label you specified in Step 12 (or to the All Mail label, if you skipped Step 12), select the Archive Incoming Messages check box.
Figure 17-9 shows a filled-in version of the Add an Email Account window.
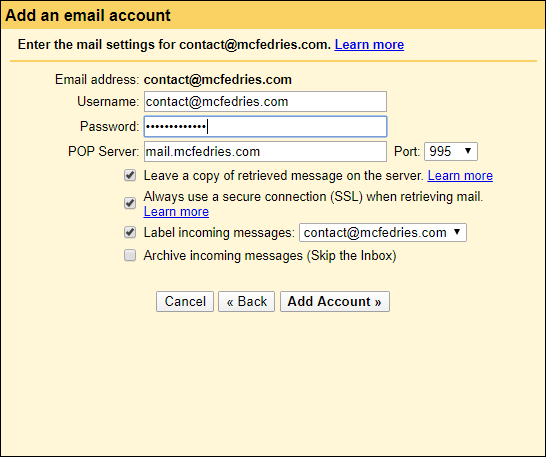
FIGURE 17-9: To import incoming messages from another account, fill in the settings in the Add an Email Account window.
-
Click the Add Account button.
Gmail adds the account and then asks whether you also want to be able to send email from the account. Alas, this functionality isn't available through G Suite work accounts.
-
Click the No radio button and then click Next.
Gmail now regularly checks your account for messages.
Handle Microsoft Office Documents
Because you're a full-fledged G Suite user, there's a good chance your organization has decided to go all in with Docs, Sheets, and Slides for productivity apps. That makes exchanging files with your colleagues easier, but when you're working from home, you might have to deal with people who haven't gone all-Google and still use Microsoft's Office productivity stalwarts: Word, Excel, and PowerPoint. Fortunately, G Suite understands this and is happy to work with Office documents. Here are the three main techniques you need to know:
- Opening Office documents: G Suite gives you a few different ways to open Office documents in their corresponding Google apps:
- In a Google app, choose File ⇒ Open from the menu bar, select the Office document, and then click Open. This opens a preview of the Office document (see Figure 17-10), and you then select Open with Google App (where App is Docs, Sheets, or Slides, depending on the file type).
- If you receive an Office document as an email attachment, select the attachment's Edit with Google App icon (where App is Docs, Sheets, or Slides, depending on the file type).
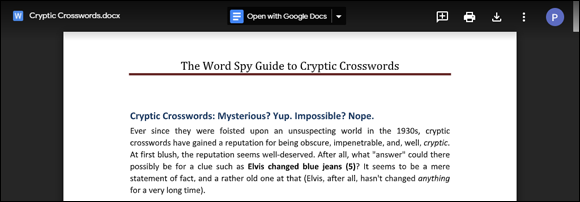
FIGURE 17-10: From the preview of the Office document, select Open with Google App.
-
If the Office document is in Drive, select the document, click the More Options icon (the three vertical dots), choose Open With from the menu that appears, and then select the Google app that works with the file type.
Whichever method you use, the Office document appears in the Google app. To remind you that this is an Office file and not a native Google file, you see the Office document's file extension beside the document name. For example, Figure 17-11 shows a Word document open in Docs, so you see the
.DOCXfile extension.
FIGURE 17-11: Google displays the Office file extension beside the document name to remind you that you're working with an Office document.
- Converting an Office document to Google format: If you only ever use Google apps but you have a bunch of Office documents lying around, you should convert those files to their Google-equivalent formats to make it easier to work with the files. To convert an Office document, first open it in the corresponding Google app: Docs for a Word document; Sheets for an Excel spreadsheet; or Slides for a PowerPoint presentation. Choose File ⇒ Save As Google App (where App is Docs, Sheets, or Slides, depending on the file type) from the menu bar.
- Sharing a Google file as an Office file: If you've created a file using a Google app but you want to email that file to an Office user, you're out of luck, right? Nope. You can actually attach the Google file as an Office file, which enables your recipient to view and work with the file — no problem. To share a file in this way, open the file in its native Google app, and then choose File ⇒ Email as an Attachment from the menu bar. In the Email As Attachment dialog box, use the Attach As list to select the Office format (such as Microsoft Excel for a Sheets spreadsheet file). Fill in the To, Subject, and Message fields in the usual email way and then click Send.
Set Up Your Video Conference Space
Conducting video meetings at the office is easy enough because you almost always have the right equipment, the right space, and the right environment. Holding video meetings at home, on the other hand, is quite a bit trickier. I close this chapter with a few tips borne out of hard-won experience with home-based video meetings.
First, here are some things to consider, equipment-wise:
- To minimize the disturbance for others in your household, consider wearing headphones or earbuds. This not only prevents meeting noises from leaking to other rooms in your house but also has the added benefits of giving you the best audio experience and preventing potential echoes.
- You'll almost certainly be taking notes during the meeting, so to avoid subjecting your meeting buddies to the noise of your typing, be sure to mute your microphone when you're not talking.
- What's that? You often type while you talk? Wow, good on you! In that case, however, you should think about using an external microphone instead of your computer's built-in mic, to minimize the typing noises.
- Okay, so now that you're in the market for an external microphone, you should get a wireless mic or headset, right? Not so fast. Wireless mics are convenient and easier to manage in the heat of the call, but the sound quality is often not that great. For the best audio, go for a wired headset or mic.
- Make sure Meet is using the microphone and camera that you prefer. I talk about how to check this in Chapter 13.
Now get a load of these tips for setting up your home environment:
- The room you use should have good lighting — preferably, natural light from a nearby window.
- Don't sit with the light behind you, which turns your head and upper body into a silhouette. Try to position yourself so that the light is in front of you.
- Don't rely on your camera feed to judge your lighting and position. Cajole a colleague or friend into running a test call to see how things really look.
- Ideally, the wall or space behind you should be blank or, at least, nondistracting.
- Make sure that whatever section of the room people can see is neat and tidy. This is a business call, after all.
- Ideally, the space you use should have little to no ambient noise. Do not — I repeat — do not play music or talk radio during the meeting.
- If you can't avoid noise, or if noise is always a potential danger (parents with children under 10 nod their heads knowingly), be sure to mute your microphone when you're not speaking.
Finally, here are some ideas for eking out the best video performance:
- Connect your computer to your Internet router directly with an Ethernet cable, if possible.
- If you need to use Wi-Fi, try to sit as close as possible to the wireless access point.
- For the best Wi-Fi performance, use a 5 GHz network, if you have one.
- Politely ask the other members of your family to hold off on heavy-duty Internet activities (such as streaming video or online gaming) for the duration of the meeting. Be prepared to buy everyone pizza as compensation.