
Chapter 28
Modeling Perception and Awareness in Tom Clancy’s Splinter Cell Blacklist
Martin Walsh
28.1 Introduction
With many games incorporating stealth elements and generally trying to increase fidelity, having solid perception and awareness models for nonplayer characters (NPCs) is becoming increasingly important. This chapter discusses four types of perception and awareness that were modeled in Tom Clancy’s Splinter Cell Blacklist: visual, auditory, environmental, and social/contextual. Before jumping in, we’ll present the four characteristics that we believe these models need to display to be successful: fairness, consistency, good feedback, and intelligence.
28.1.1 Fairness
In a game with stealth, getting detected can be the difference between success and the player throwing their controller across the room, especially if it felt unfair. Having models that feel fair is key, it is also one of the most difficult things to achieve since both the models themselves and how fair they are in a given situation are extremely subjective.
28.1.2 Consistency
As a player, you need to have some idea of what the AI will perceive and how they will react so you as the player can strategize and improve; so the AI’s behavior needs to be somewhat predictable. This is in contrast to actual humans who vary in terms of what they perceive and how they react and, as a result, tend to be very unpredictable. Note that predictability does not mean repetitiveness; we need, for example, to get similar distances and timing for reactions every time, but the animations and barks (short vocal clips) need to be different; otherwise, immersion is broken very quickly.
28.1.3 Good Feedback
While consistency is essential, good feedback is also required to help the player understand the AI’s behavior. The player must be able to “read” or understand what the AI is doing and why they are doing it. Similar to what is mentioned earlier, it’s a difficult balance between readable feedback and something that looks and feels human. Getting the right barks and animations is important, as well as having enough variety.
28.1.4 Intelligence
Finally, if your opponents feel dumb, it isn’t satisfying to beat them. But not being dumb does not necessarily mean being smart; it means always being plausible.
Now that we’ve covered the four key components for success, let’s examine the models themselves.
28.2 Visual Perception
Any game where the player can hide, or break line of sight (LOS), requires some type of visual perception model. Commonly, we refer to this as a vision cone, and while a cone does a good job of modeling what the NPC can see directly in front of him, it does a poor job of modeling many other aspects of vision. The two most glaring examples are peripheral vision and vision at a distance. It’s pretty obvious why a cone doesn’t model peripheral vision well, but for vision at a distance, we need to dive a bit deeper.
Before we do, we will examine the difference between perception and awareness. On Splinter Cell, we used the following definition of awareness and perception: awareness is a set of discreet mental states (levels of awareness) that represent an increasingly more detailed understanding of the thing being perceived and that can be reached progressively over time through sensory perception.
When you first perceive something, you only start to become aware of it. In other words, if you see something moving in the distance, all you can really say is, “I see something over there.” What’s key here is you don’t know exactly what you see; that potentially takes more time and depends on many factors such as what you expect to see, lighting, and the amount of time you see it for. Many games, including Blacklist, abstract all of that into a progress bar that, while analog in nature, only represents two binary states for the NPC: “I don’t see anything suspicious” or “that’s enemy #1 over there!” Some games (including Splinter Cell) include a third, intermediate, state where the NPC knows he saw something and will go to investigate (usually at some percentage of the progress bar). See Figure 28.1, Figure 28.2, and Figure 28.3 for a description of how we did this on Blacklist.
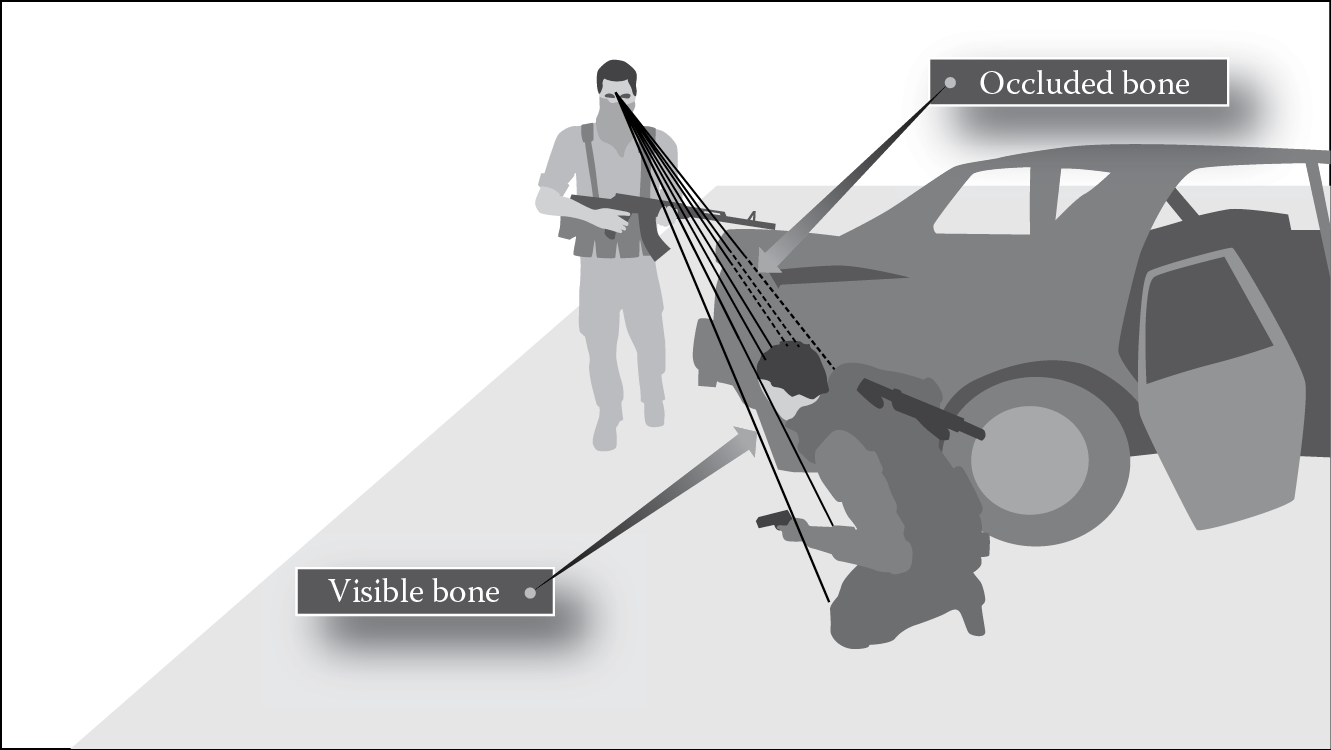
On Blacklist , we raycast to eight different bones on the player’s body. Depending on the stance, it takes a certain number of visible bones to kick off detection. In this case, the player stance is “in cover” that requires more than the two bones that are currently visible so detection has not yet begun.
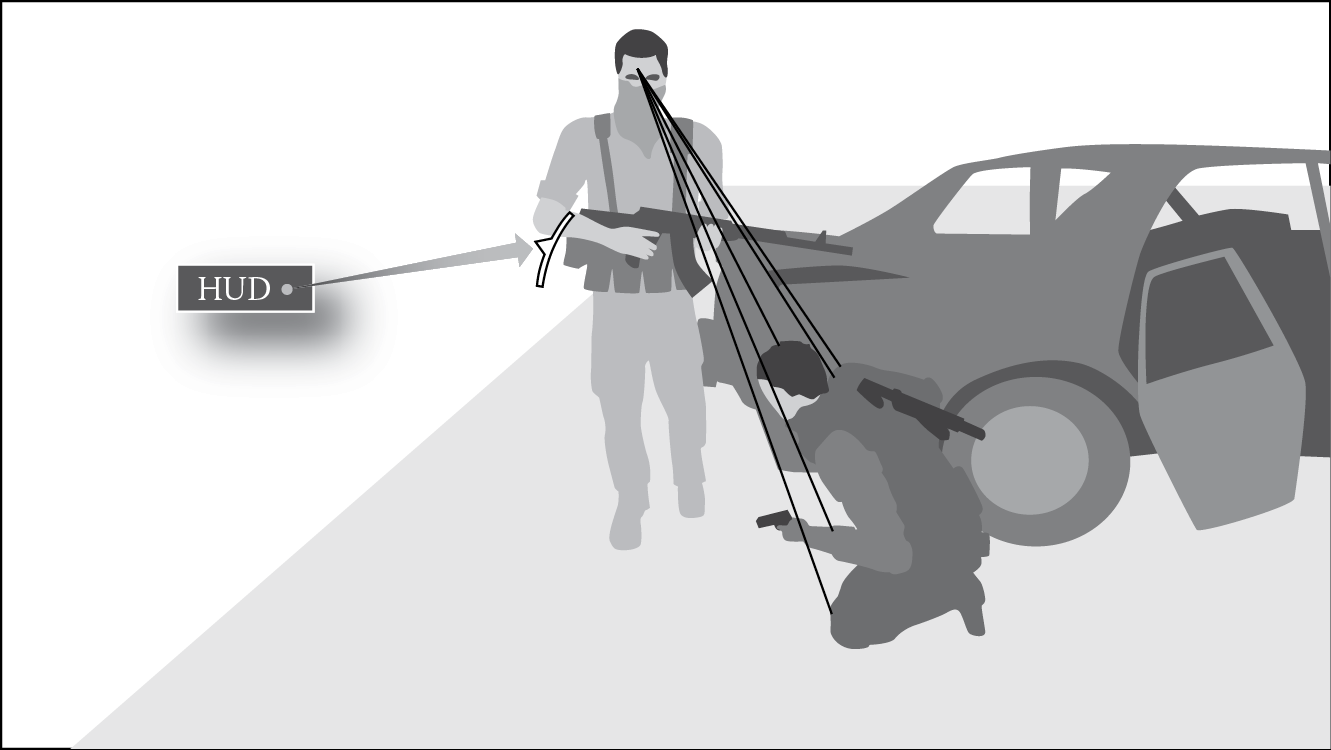
Once enough bones are visible to the NPC, the detection process starts and a timer kicks off. The full range of the timer is defined by the detection shape the player is in ( Figure 28.3 ), and the actual value used is arrived at by scaling linearly inside that range based on the current distance to the player. The timer is represented by the growing HUD element that provides feedback to the player that defines his window of opportunity to break LOS or kill the NPC to avoid detection. Once the detection HUD is full, the player is detected.
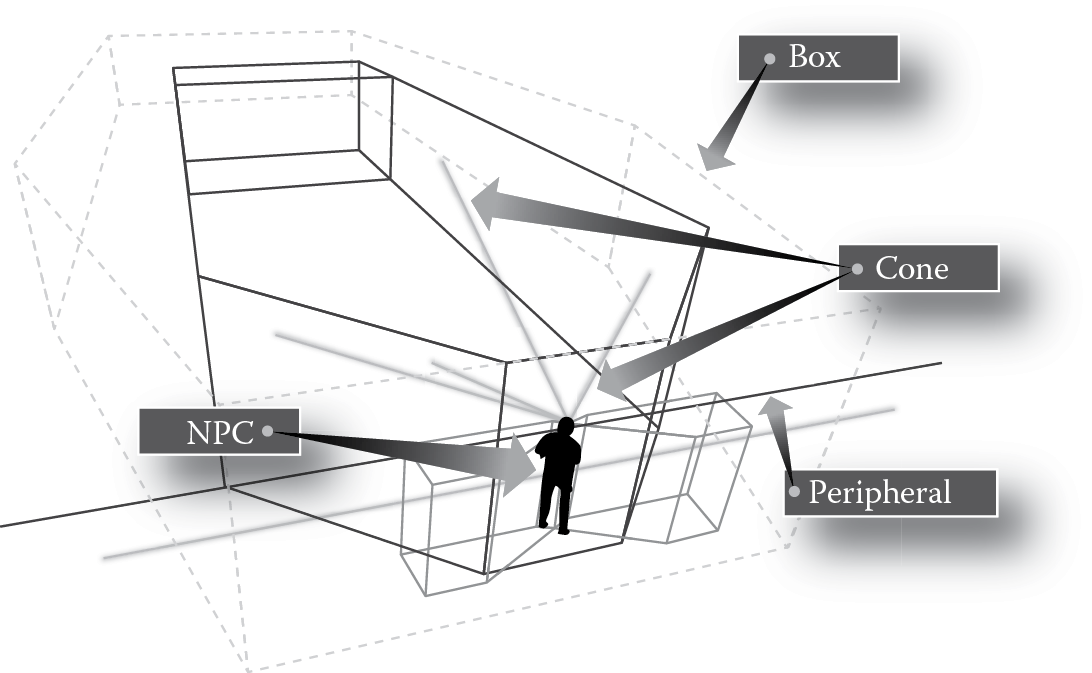
This debug drawing represents the detection shapes in Blacklist . The coffin-shaped box can be seen, as well as the standard vision cone that defines the area directly in front of the NPC where the player should get detected quickly. The most inclusive shape the player is in defines the range of the detection timer.
The point is that AI developers try to combine the concepts of seeing something and being aware of what we see into a single concept modeled essentially using vision shapes and a timer. On Blacklist, when the player is inside of a vision shape of the NPC, unobstructed and lit, a timer kicks off, which is scaled based on the distance to the player, lightness of the player, NPC state, etc., and when that timer reaches 0 (or the progress bar is full), the NPC immediately does two things: he perceives the player and becomes aware of him as a threat. This abstraction forces us to compromise: we need to define the area where the NPC should perceive and become aware of the player within some reasonable time.
Getting back to the vision cone, the reason a cone doesn’t model vision at a distance well is that a cone expands as it moves away from the NPC, which implies that as things get further away from the NPC in the direction he is looking, he tends to perceive, and become aware of, things that are laterally farther away. Up to a certain distance that is plausible, but past that distance, it doesn’t provide reasonable behavior. If the player is far enough away and off to one side, we don’t want the NPCs to become aware of them at all, even though it seems they should still be perceiving him within their field of view. This insight caused us to first replace cones with boxes for vision at a distance; this is the solution we used on Splinter Cell Conviction. On Blacklist, we refined it further and replaced our standard boxes with coffin-shaped boxes (Figure 28.3) that expand up to a point like a cone and then start to contract as they continue to move further away from the NPC, which gives us the effect we want.
It’s important to note that no solution is perfect. All of the variations described have a threshold (the edge of the vision shape). If the player is 1 cm outside of that threshold, then the NPC will stand there forever without seeing the player. One centimeter inside and the player will be detected within a couple of seconds at most. This is a direct result of the way the model is abstracted and the need to match the NPC state to the feedback we display to the player (in this case the detection HUD).
On Splinter Cell, we arrived at our solution through many hours of playtesting and designer tweaking. For different games, the right solution may be different and it’s impossible to have a single solution that gives the expected results for everyone all the time. Even if we had a perfect model of vision, a player may feel that in a certain case, an NPC should have seen him when he didn’t and vice versa. This is not fixable since even in real life we can be surprised when we think someone is looking right at something and doesn’t see it (anyone who watches sports with referees can attest to that). What’s important is to provide a consistent model, with good feedback, that fits the expectations of the players of your game.
28.3 Environmental Awareness
Environmental awareness is a broad term. At the very basic level, the navmesh or navigation graph provides environmental awareness. It tells the NPC which parts of the environment are walkable and whether two parts of the environment are connected. Other common parts of the model include cover representation and interactive objects like doors or switches. All of these give the NPC some knowledge about his environment that helps him interact with it better and appear more intelligent because of this. The two things we focused on modeling beyond these basics in SC were changes to objects in the environment and the connectivity of the environment.
28.3.1 Connectivity
In the first Splinter Cell games, there were very few active NPCs. This meant that, once in combat, finding a cover that (when peeked out) gave LOS on the player was relatively easy and taking that cover was enough to give the impression that NPCs were aware of their environment on a basic level. Starting with Conviction, we had 12 active NPCs and some very tight areas. This meant that often many NPCs could not find cover with LOS on the player because in many situations there were more NPCs than available covers. These NPCs ended up staring at the player through walls since they couldn’t get a direct LOS but had nothing better to look at.
To solve this problem, we initially thought about pathfinding to the player and having the NPC look at some visible point along that path to give the impression that he is looking at where the player may be coming from instead of staring at a wall. While this could work in some cases, it has a couple of major drawbacks: it’s often hard to find the right point to look at, and in our game the player could take paths that were not walkable or accessible to NPCs. For example, if the area the NPC is in is only directly connected to the player’s area by a window, the pathfinding solution would have him staring in the wrong direction since it would not take that window into account. And even if it did, there could be multiple windows or doors; so picking the one along the shortest path would have all NPCs in that area covering the same choke point, which is not what we wanted. We realized that what we needed was a way to model the connectivity of the environment (i.e., which areas, or rooms, are connected to which other areas through which choke points).
It is important to note that this model maps better to an indoor environment with well-defined areas and choke points than it does to wide open spaces. However, in practice, even our outdoor environments could be broken down into areas separated by choke points although defining those areas and chokes is less obvious outdoors.
To achieve this we created a model we called Tactical Environment Awareness System (TEAS) (Figure 28.4). This system subdivided the world into areas (defined by subnavmesh areas) and defined the connections between those areas. So, for example, if two rooms are connected by a door and a window, each room would have its own subnavmesh (essentially a subset of the triangles of the navmesh), and these would be connected to each other by two choke nodes: one representing the window and the other the door.
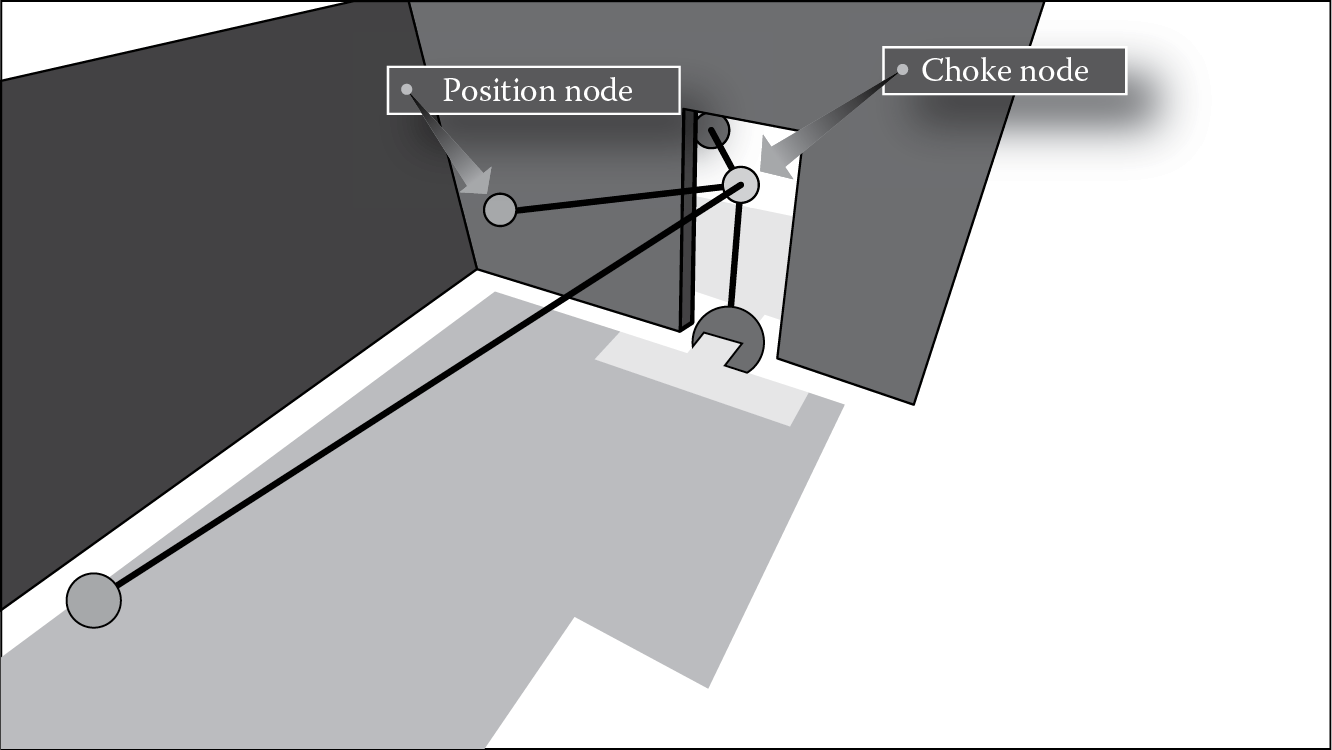
An example of TEAS in Blacklist . Assume we are looking at a door that leads from a hallway to a room. You can see the position node outside the room connected to the choke node, which is connected to the position node inside the room. This indicates that the area outside the room is connected to the area inside through the choke (a door in this case). You can also see the second position node attached to the choke node that can be used as a fallback position.
One question that should immediately come to mind is, “How are these areas and connections generated?” This process on Conviction worked as follows. First, the level designer (LD) would subdivide the navmesh into subnavmeshes by tagging the triangles for each area using our navmesh tool (every triangle had to belong to at least one subnavmesh). Note that the LD could tag triangles directly since our “base navmesh” was hand-authored to precisely fit to the contours of the structural geometry (all static props and dynamic objects would then automatically cut the navmesh). He would then create special overlap triangles to define the choke area (if it was walkable, like a door). These triangles were members of both subnavmeshes. Finally, the LD would place the choke nodes above the overlap triangles in the walkable case and above an area with no navmesh (like in a window) in the nonwalkable case. These choke nodes came with a red and a blue position node attached. The LD would place one of the position nodes above navmesh in area A and one in area B. This was sufficient to tell the system that area A is connected to area B through the choke node. There could be multiple choke nodes connecting two areas, one for each distinct choke point. Additionally, the LD had the option of adding multiple red or blue position nodes. The reason for this was that position nodes served two purposes. On top of defining which area was linked to the choke node, they also served as backup positions for covering that choke, so their position was important. If the NPC could not find suitable cover with LOS on the choke node, he knew he could always fall back to a position node that was a good open position with LOS. Finally, the LD would place an area property node above a triangle in the area. This node contained metadata for the area including the size of the area, the number of NPCs that should enter that area for search or combat, and the type of area (open balcony or closed room).
This system added substantial depth to our NPC tactics. They could now reason about player location with respect to the environment and act accordingly. For example, they could know that the player was hiding in a small room that is a dead end and cover the only way out instead of rushing in to their death. In the case with two rooms (areas A and B) connected by a door and a window, it meant that NPCs in area A who couldn’t get LOS on the player in area B and didn’t want to enter his area could intelligently cover the door and window leading to the player’s area. In other words, NPCs who couldn’t get LOS on the player always had something intelligent to do, which was important for our game since the player could outflank the NPCs in combat and see them through walls using his goggles. There is nothing worse than feeling smart by outflanking an NPC just to realize that he’s just sitting there staring at a wall.
We made a lot of improvements to this system on Blacklist including autogenerating choke nodes and the special overlap triangles and adding a bunch of error checking in the editor to try to determine if the LD missed some linking opportunities or had linked two areas improperly. One thing we could have done but never got around to was autogenerating the subnavmesh areas themselves. We could have done this by allowing the LDs to place choke nodes where we couldn’t autogenerate them first (i.e., narrow areas with no door objects), then generating the overlap triangles, and finally using flood fill to tag all the remaining triangles.
28.3.2 Changed Objects
The system we used for detecting and reacting to changes in environmental objects (doors, windows, lights, etc.) was very simple, but it is worth mentioning since it gave us more bang for our buck than any other system. In fact, a few of the reviews for the game brought up the fact that NPCs noticed doors that had been opened or light switches that turned off [Metro 13].
In Splinter Cell, when an object changed state from its previously known state, it would create an event with a lifetime. The first NPC to witness that event would claim it and potentially do a minor investigation depending on his state and other factors. Theoretically, the player could use this tactically to distract the NPC, but mostly it was there to give the impression of intelligence. Obviously, the key to making something like this work is selling the reaction with good feedback. If the NPC just looks like he randomly walked to the door the player left open, you get no sense of the fact that he noticed an open door; so the NPC needs to announce it, but in a way that feels realistic. We did this by having very obvious reaction animations where the NPC would stop and look at the area around the door, combined with more subtle barks where the NPC would ask introspectively, “Did I leave that door open?” after which he would walk through the door playing a “sweep” (look left–right) animation. This works very well but can lead to problems with immersion: the more specific a dialog line is, the more memorable it is, and the more immersion breaking it is when you hear that line repeated.
On Blacklist we did a major overhaul of our barks system, and one thing we did to address this issue was to create a three-tiered bark system that worked as follows: tier 1 barks were the very specific barks like the one mentioned earlier, tier 2 barks were more generic (e.g., “Did I leave that open?”) that could apply to a door or window, and tier 3 barks were completely generic (e.g., “Huh?”). The idea was that we would cycle through the tier 1 barks first so the player would get the specific barks the first few times something happened, then we would drop to tier 2 and finally tier 3, so as the player got used to the NPC behavior and didn’t need the specific barks, he would get the generic ones (which had a larger pool) and never hear the same memorable line twice.
28.4 Auditory Perception
Auditory perception for us is pretty simple: every audio event has a radius and priority; if an NPC is in range of the event, he will hear it and react differently based on the event, who else is in range, and his current state. On Conviction, we had two major problems with our auditory events: the first was accurately calculating the audio distance and the second had to do with the fairness of getting detected by NPCs you don’t see because of events you don’t directly control (details in the next section).
28.4.1 Calculating Audio Distance
In a game where creating sounds (e.g., by running) can get you detected, it is important to accurately calculate the audio distance of events. Using Euclidian distance is obviously not good enough since that would mean the player would be heard through walls. Initially, we used our sound engine, but it was not optimized for calculating arbitrary sound distance, and some calls were insanely expensive. A second issue with using the sound engine was that if the audio data weren’t built (which happened often), it created all kinds of false detection bugs, which made testing difficult. The solution we ended up with made use of TEAS described earlier. Remember that TEAS is a connectivity graph that represents areas connected through choke points.
To calculate sound distance, we would get the “area path” from the source (event location) to the destination (NPC location). This would give us a shortest path represented by a series of areas (let’s call it list A with n areas A0…An − 1) starting with the room containing the source and ending with the room containing the destination. In the trivial case where the source and destination are in the same room, we just used Euclidian distance; otherwise, we used the following equation:
(28.1)
Now let’s say the sound was made in area A and the NPC is in area D and those areas are connected in the following way: area A is connected by window1 to area B, area B is connected by door2 and window2 to area C, and area C is connected by door3 to area D, with the extra information that window1 is closer to door2 than window2. Then the total distance would be Although this is clearly a rough approximation, in practice, the results were accurate enough that we made the switch and never looked back.
28.4.2 Auditory Detection Fairness
The second problem we faced with auditory events is actually a general problem: it can feel unfair to be creating events that get noticed by guards you can’t see, especially if you don’t know that they are reacting to an event you created. This problem occurred often in internal reviews. Our creative director would often complain about being detected for no reason. For example, he’d be running down a hallway with no NPC in sight and all of a sudden hear an NPC say, “Hey, who’s there!?!” Sometimes it was due to a bug, but often if we paused and used the free cam to show him where the NPC who heard him was, it usually made sense to him why he got detected. However, that didn’t stop him from complaining the next time, and he was right to complain because ultimately it’s irrelevant what the NPC should be able to hear. The player can’t pause the game and free-cam, so it just ends up feeling unfair.
One important thing we learned here, as with tuning vision, is that it’s only important what’s plausible from the player’s point of view—it really doesn’t matter what the NPC should see or hear; it’s what the player thinks the NPC can see and hear. This is a really important distinction. It implies that in the case of player perception versus simulation accuracy, player perception should win. This is not an absolute statement, however, and in the solution we will present, we’ll show how this is actually limited by plausibility. However, first, let’s look at a solution that we rejected.
To solve the fairness issue, we could have gone with the brute force solution of tuning down auditory event distances to make them more forgiving. This would have solved the unfairness problem but would have led to other issues: namely, it would feel ridiculous if you can see a guard in front of you, and you’re sprinting toward him, but he can’t hear your footsteps until you’re very close. Not only would that make him seem unresponsive, but in our case, it would actually break the game since we had “insta-kill takedowns” if you got the jump on an NPC; so a player could just sprint through the map stabbing everyone in the back.
There’s actually a big problem that we’re trying to solve here: for two NPCs at the same distance from you (with one just around the corner), it can feel fair getting detected by the one that you see and unfair by the one you don’t. To solve this problem, we considered having some HUD feedback for sound, which may have helped, but design wanted minimal HUD, so in the end we solved this in two ways.
The first thing we did was that NPCs that are offscreen, but far enough away from the player that it was plausible they didn’t hear him, have their hearing reduced for certain events by ½. The result was that the game instantly became more fun and our creative director stopped complaining. We ended up applying this to some indirect visual events as well, such as seeing an NPC get shot. This is actually a good example of balancing plausibility versus fairness. Imagine the case where you are on one side of a corner and an NPC is right around the corner (a few feet from you). If you run and make noise, it still feels unfair if you get detected by the NPC you don’t see, but if he didn’t react and then you rounded the corner, it would feel ridiculous that he didn’t hear you! Therefore, we still needed to pick a distance where this case leads to a plausible result even if it may feel unfair to the player (at least until he realizes where the NPC is), which is why we couldn’t just reduce hearing completely for all offscreen NPCs.
The second thing we did was to provide better feedback to the player. We mentioned earlier how we overhauled our barks system with the “three-tiered” strategy, and this is one area where that had a big impact. We created a lot of very specific barks to put in tier 1 (like “I think I heard footsteps”); tier 2 had more generic barks like “I think I heard someone over there,” down to tier 3’s “I think someone’s over there.” The results, again, were that the player got the feedback they needed the first few times they were heard (so in this case, they realized that running created footstep noise) and then got the more generic versions to avoid repetition when the explicit ones were no longer necessary.
28.5 Social/Contextual Awareness
The last type of awareness I want to discuss is social and contextual. We’ve lumped these two together for a couple of reasons. First, the idea behind them is similar. You want the NPCs to appear aware of social and contextual events that are happening around them, and you want future NPC behavior to be affected by past events. Second, we’ll look at these together because we didn’t really have an overarching model for either of these. We did have a group behavior system that made modeling social awareness easier, but in general, the awareness came through in the design of the group behaviors themselves, not as a direct result of the system, and the rest was done with some clever tricks. So this section will be more like a “tips and tricks for giving the impression of social and contextual awareness” as opposed to a detailed description of a model.
Before presenting the tricks we used, we’d like to define what we mean by “contextual event” and give a couple of reasons for actually trying to model this in the first place since many games don’t do this at all.
A contextual event is an event whose meaning changes based on context. So, for example, in Splinter Cell, if a searching NPC spots a dead body for the first time, he will get very agitated and call for help. On the other hand, if that same NPC spots a dead body in the middle of a war zone, he will ignore it. The event is the same (“see dead body”), but the context is different. Another example described in the following section is seeing the player. On Splinter Cell, seeing the player in the open was different from seeing the player in an unreachable area (like a rooftop) or seeing him in a dead end. Again, the event is the same (“see player”), but the reactions, barks, and behaviors are different. Perhaps more to the point, seeing a player on a rooftop for the first time is different from seeing him on that same rooftop again after he massacred five NPCs from there last time he was seen. In this case, the reactions and behaviors will be completely different (the NPCs will call out that he’s back on the roof and immediately run to safety instead of trying to engage). So the event “see player” is actually interpreted as “see player again on rooftop after massacre” due to the context.
Social awareness is a subset of contextual awareness; if an NPC is engaged in a conversation with someone or waiting for someone to return, he will treat certain events (e.g., or lack of events—if he’s expecting a response) very differently from the situation where he is just in the proximity of another NPC.
On Splinter Cell, we modeled this for two reasons:
- To make NPCs seem more intelligent (you spend more time observing them than in most games)
- To create antiexploits in the form of group behaviors
We’ll give two examples that use group behaviors followed by a trick we used to solve a common social/contextual awareness problem: the disappearing NPC problem.
28.5.1 Social Awareness: Conversation
In most games, if you interrupt two NPCs talking, either it breaks the conversation or the conversation restarts robotically. On Blacklist, when NPCs are in a conversation, they are actually in a group behavior. The group behavior system takes control of all NPCs involved and gets to be first to handle any event received by any of those NPCs; so, for example, when a minor event occurs, the behavior gets the opportunity to handle it. In this case, it can pause itself and have the NPCs branch into a group investigation with the possibility of resuming the conversation after the investigation is complete. This allows us to do some interesting stuff, like having the NPC discuss the event received in context before investigating, maintain awareness of each other during the investigation, and branch seamlessly back into the conversation if the investigation does not yield anything. This was made possible by the fact that, for every conversation, our dialog writers wrote custom breakout and rejoin lines and also blocked out each conversation. When restarted, the rejoin line would be played and then the conversation would resume at the beginning of the current dialog block.
Here is an example of how a conversation that’s interrupted by a minor event plays out in Blacklist:
- The NPCs are discussing a football match on TV.
- The player creates a minor event (footsteps, whistle, etc.).
- The NPCs hear the event.
- The system handles the event and branches to the “ignore minor event” behavior, with the lines:
- “Hey, did you hear that?”
- “Yeah, must’ve been the TV, now what were you saying…” (custom rejoin line)
- The system then resumes the conversation only to be interrupted by a second event.
- “Hey that wasn’t the TV; you better go check it out!”
At this point the NPCs branch into a two-man investigation with the conversation on pause. Note how they delivered their lines in context and demonstrated awareness of what activity they are engaged in and what happened previously.
There are two possible outcomes to this investigation that could cause this scenario to continue: either the NPC finds nothing and they return to the conversation with a line like “Guess it was nothing. So what were you saying?” or the NPC gets killed silently during the investigation. In that case, the group behavior system receives the “NPC died” event that allows it to handle the event in context. The result is that the behavior waits a bit and then sends an investigation event to the NPC who’s still alive near the location where the NPC was killed. He will branch into this second investigation with a line like “Hey, are you ok over there? Talk to me!” at which point the group behavior will end and he will do a systemic investigation at that location.
All of this really gives the impression that the NPCs are aware of their current situation and have some model of what has happened in the recent past and also who is around them and what they might be doing.
28.5.2 Contextual Awareness: Unreachable Area
Depending on where the player is, and what the situation is, the AI may not be able to, or want to, engage in direct combat. In this example I’ll describe a situation that arises frequently in Blacklist (the player in an unreachable area) and how we deal with it. First, note that this situation can easily become an exploit; so when we deal with it, we are actually trying to solve two problems:
- Remove the exploit. We don’t want the player to be able to sit on a rooftop and shoot the AI like fish in a barrel.
- React in a believable and readable way. We want the player to understand what the AI is doing and why. This makes them seem more intelligent for understanding the situation and also allows the player to adapt.
This is actually a situation that arises in many games: the player finds a spot where he has a big tactical advantage. This is exacerbated when the player has traversal moves the AI doesn’t and can reach areas the AI can’t get to. In Splinter Cell, there are really only three things the AI can do to deal with the player in this scenario: shoot back (which is not a good option since the player has the advantage), throw a grenade (this is not always easy to pull off since they have to land the grenade in a hard to reach area, but it’s very effective when it works), and fall back (this is effective as an antiexploit but can be frustrating to the player if it’s not called out).
To tackle this scenario, we used a combination of the group behavior system and TEAS. TEAS allows us to reason about the environment; so we know that the player is in an unreachable area (no valid area paths to the player) and what type of area it is, thanks to the markup in the area node. Therefore, in the scenario being described, TEAS allows us to know that the player is on a small, unreachable rooftop. The group behavior system then selects the appropriate behavior to kick off, in this case the “unreachable above” behavior. The mechanism for this selection works as follows: when no group behavior is running, the group behavior system is constantly looking for a trigger to kick off the most appropriate group behavior. The event “player seen” gets mapped to the event “player seen on unreachable rooftop” based on the criteria mentioned earlier. This event and some other checks (e.g., certain group behaviors should not be repeated) cause the group behavior system to select the most appropriate group behavior (which is mapped to its respective contextual event, “player seen on unreachable rooftop” in this case). The scenario proceeds as follows:
- The player starts shooting at the AI from the unreachable rooftop.
- Once his location is known, we kick off the “unreachable above” group behavior.
- NPC A: “He’s hiding up there! Toss a frag and flush him out!”
- NPC B: “I’m on it! Give me cover fire!”
- NPC A and other NPCs cover fire and NPC B throws the frag.
At this point, a few different things could happen, but we’ll describe two of them. In the first case, the player gets off of the roof undetected and something similar to the following plays out after a few seconds:
- NPC A: “Do you think he’s still up there?”
- NPC B: “I doubt it. Let’s spread out and search the area!”
- NPCs transition to search.
If the grenade throw is not successful and the player starts firing back and killing them, the following proceeds:
- NPC A: “Forget it! Fall back! Fall back!”
- NPC A covers fires while the other NPCs run for protective cover.
- NPC B provides cover while NPC A falls back.
So you can see that we’ve been able to deal with this exploit in a way that preserves the lives of the NPCs, makes them seem aware, and gives the player the feedback they need. One important thing to note is that the dialog lines aren’t callouts but a discussion. This has the effect of making the behavior seem much more natural as opposed to just being a means of giving information to the player [Orkin 06, Orkin 15].
28.5.3 Disappearing NPC Problem
We’ll conclude this section by discussing our solution to a common problem: the disappearing NPC problem. The problem goes something like this: there are a bunch of NPCs guarding an area. The player starts stealthily taking them out one by one. At the end, there are only a couple of NPCs left, and unless they find a dead body, they are oblivious to the fact that an area that was crawling with their buddies is now an empty wasteland.
As mentioned earlier, we have a solution for the specific case when the NPCs are currently engaged in a conversation, but what about the general case where they are just near each other? Before discussing our solution, it’s interesting to think about what we’re trying to model. The idea here is that NPCs should be aware of the presence of other NPCs because they are seeing or hearing them at regular intervals. They should then become aware of the fact that they are no longer seeing and hearing those NPCs, get suspicious, and investigate. Trying to model this directly would be a lot of work for not a lot of gain. You’d have to create events for hearing and seeing NPCs, store a history of those events per NPC, and then detect the fact that the NPC is no longer receiving those events.
We chose a much simpler and cheaper solution. If NPC A has been in earshot (sound distance-wise) of NPC B for 10 seconds and then for 5 more seconds after he stops making noise (i.e., once he’s dead), then we generate an investigation event. This event has a pretty long cooldown to avoid repetition and exploits. This gives us the result we want: if two NPCs are in the same general area and you kill one of them and if the other NPC is still in that area after a few seconds, he will become suspicious because he is no longer hearing/seeing the NPC that was just in his vicinity.
28.6 Conclusion
As you can see, the success of these models depends largely on a combination of picking the right abstraction and clever design. The goal is not so much to get an accurate model as it is to get one that feels fair to the player and allows you to provide good, consistent feedback, all while maintaining the illusion that the NPCs are human (plausibility). It’s a difficult balance that requires a lot of playtesting, iterations, and working closely with design, animation, and dialogue. Hopefully, this chapter has brought those points home and given you some useful tips and tricks, which we arrived at through many hours of playtesting and iterating, that you can apply to your project.
References
[Metro 13] Metro.co.uk. 2013. Splinter cell: Blacklist—Sneaky compromise. http://metro.co.uk/2013/08/15/splinter-cell-blacklist-review-sneaky-compromise-3925136/ (accessed July 11, 2014).
[Orkin 06] Orkin, J. 2006. 3 States and a plan: The AI of F.E.A.R. Game Developers Conference, San Jose, CA.
[Orkin 15] Orkin, J. 2015. Combat dialogue in F.E.A.R.: The illusion of communication. In Game AI Pro2: Collected Wisdom of Game AI Professionals, ed. S. Rabin. A K Peters/CRC Press, Boca Raton, FL.