
Chapter 36
Realizing NPCs
Animation and Behavior Control for Believable Characters
Jeet Shroff
36.1 Introduction
A core goal for game developers is to build nonplayer characters (NPCs) that are believable to the player. Believability does not necessarily imply realism, but in order to be believable, these characters must move convincingly, bound by their physicality and environment. They must look, act, and react meaningfully, both individually and in groups. Their actions and intentions must be clearly understood by the player. NPCs that maintain the illusion of believability compel the player to interact with them, further sell the fantasy, and ground the player within the game world. The process of clearly visualizing and communicating not only the NPCs’ actions but also their intentions can be referred to as behavior realization.
Animation plays a central role in bringing NPC behaviors to life. By focusing on realizing NPC behaviors with improved animation fidelity, in combination with systems that help control how behaviors are varied, assigned, and executed by NPCs, we can ensure the authenticity of our characters.
This chapter will discuss a wide range of animation techniques that can be used to provide improved realization of NPC behaviors while simultaneously addressing the cost of production and memory budgets. In addition, it will look at ways to control the execution of behaviors in an effort to provide the player with a consistently positive and believable experience.
36.2 Character Movement
Nearly all NPCs have to be able to move in some way. Believable movement does its best to respect the laws of motion, factoring in inertia and momentum. In addition, characters that play animations that convey their intention while moving increase their authenticity by providing the player an awareness of their mental state and context. In this section, we will look at a few techniques to help accomplish this while still keeping our memory and production costs low.
36.2.1 Movement Models
Many game engines use a game-driven approach to character movement, where the animation does not define the motion of the character. Instead, movement is driven by an AI controller that evaluates the position of the character and requests the physics system to move the character’s physical representation. The controller also feeds this information to the animation system, which plays animations that match the movement. For example, if the AI controller wishes to move the character forward, a forward moving walk or run animation might be selected by the animation system. Such animations would be authored as moving on-spot animations. This is a fully game-driven approach to character movement.
The alternative is to allow the animation to drive the character’s movement. This is referred to as animation-driven movement and is achieved through the use of a root or reference node within the character’s skeleton. The root node is a bone that represents the translation and rotation of the character’s motion during the animation. The animation contains transform data for this bone for each frame of animation, just like it does for every other bone. This node is generally placed on the ground, centered directly under the hips of the character, as shown in Figure 36.1.
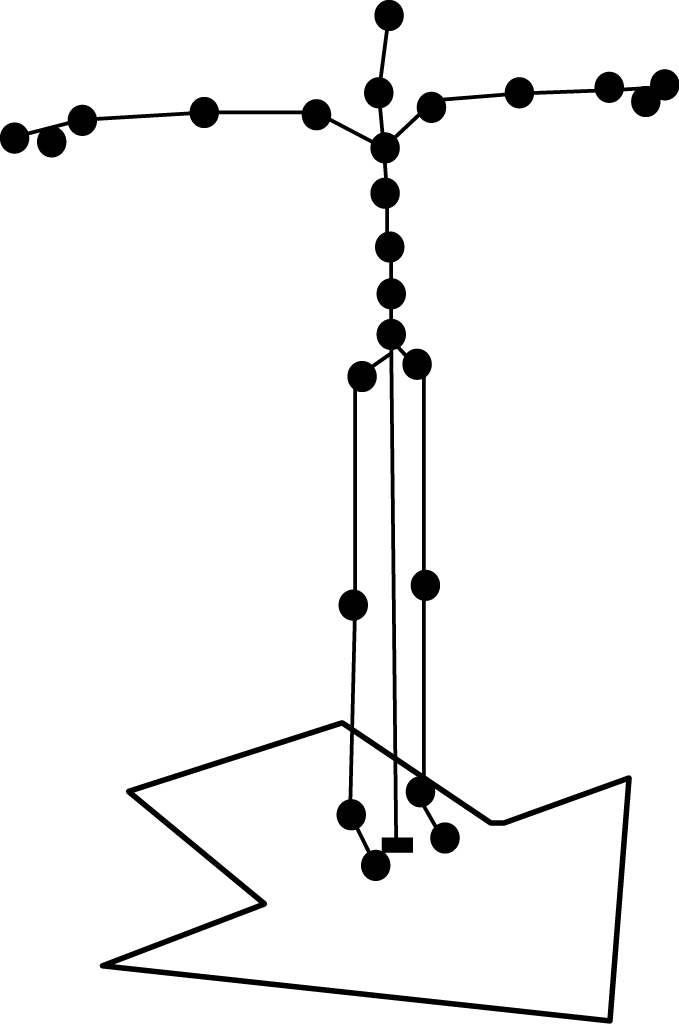
Every frame, after updating the animation pose, the position and orientation of the root node is passed to the physics system, which updates the position and orientation of the character’s capsule (as shown in Figure 36.2). This is referred to as “extracting motion from the animation.”
Both these techniques have their advantages. Game-driven movement provides us with maximum level of flexibility as it drives the character independent of animation. Animation-driven movement ensures that the character’s overall motion matches that of the animation, providing the best visual results. In addition, this approach better conveys a character’s change in momentum along with intention of motion when necessary. For example, a well-authored transition animation that drives the character fully through animation can convey the energy and acceleration or deceleration needed for the character during such movement. Effective realization requires both control and fidelity, which we can achieve through a combination of both of these techniques.
36.2.2 Decoupling Extracted Motion
When combining game- and animation-driven movement, it is important to ensure that the extracted motion is decoupled from the animation update. In other words, instead of directly updating physics (and the character’s capsule) with the animation’s motion when the animation pose is updated, we can separate the animation from the motion update. This allows us to modify the extracted motion in order to better control the character and also to increase animation coverage (i.e., to cover a wider range of motion using a given animation set).
We want to limit our modifications and base them on the original extracted motion. This avoids visual inconsistencies (such as keeping our characters from significantly sliding when moving) and also preserves specific movement characteristics such as weight and energy. In other words, it allows us to stay true to the intentions of the animation and to avoid changes that might be noticed by the player.
36.2.3 Motion Correction
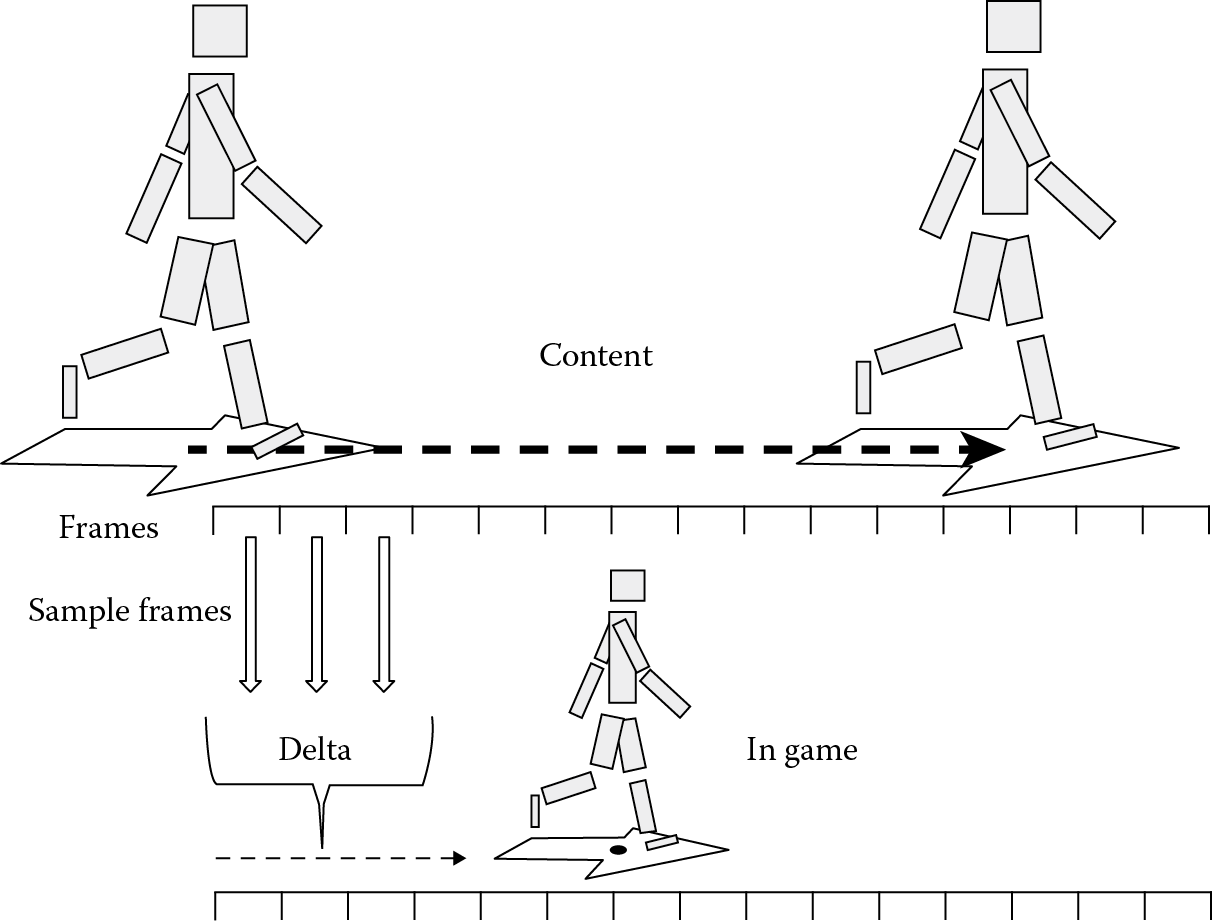
Character motion can be represented and updated using three core components: the displacement direction (i.e., the world space direction that the character is moving), the orientation of the character (i.e., the world space direction that the character is facing), and the speed at which the character is moving. Each frame, after the motion has been extracted, the change in displacement direction, orientation, and speed is read and applied to our character’s physical representation by passing that information to the physics system. If no change is made, then the character is being driven fully via animation.
Each of these components can be corrected independently of each other, to match a specific game situation. This corrected change is then used to update physics and the character’s motion. The following sections will describe a variety of ways in which we can correct motion as well as techniques that use a combination of game- and animation-driven movement to provide greater animation coverage.
36.2.4 Correcting Displacement Direction and Orientation
The animations within a movement system can be categorized as either looping, transition, or one-off (nonlooping) animations. Some examples of looping animations include forward- and backward-moving (or “backpedal”) cycles. The displacement direction and orientation for these animations typically remain at the same offset to each other throughout the course of the animation. For example, the displacement direction and orientation in a looping backpedal animation point in opposite directions throughout the entire animation. Looping animations are also created so that the start and end frames are identical, so that you can play them over and over again to make the character move continuously.
In contrast, transition animations may update the offset of the displacement direction and orientation throughout the course of the animation to account for the change in the transition of movement that is needed. For example, a transition animation from standing to walking might rotate the character to face the displacement direction and also move and accelerate the character in that direction. Looping, transition, and one-off animations can all use motion correction to extend their coverage.
36.2.4.1 Looping Animations
The displacement direction and orientation of looping animations can be corrected to match a target direction. The target direction is set up by the path following or movement controller. In the case of following a path facing forward, the character will need to align their displacement direction and orientation to be along the path, so that they do not veer off the path or unintentionally strafe sideways.
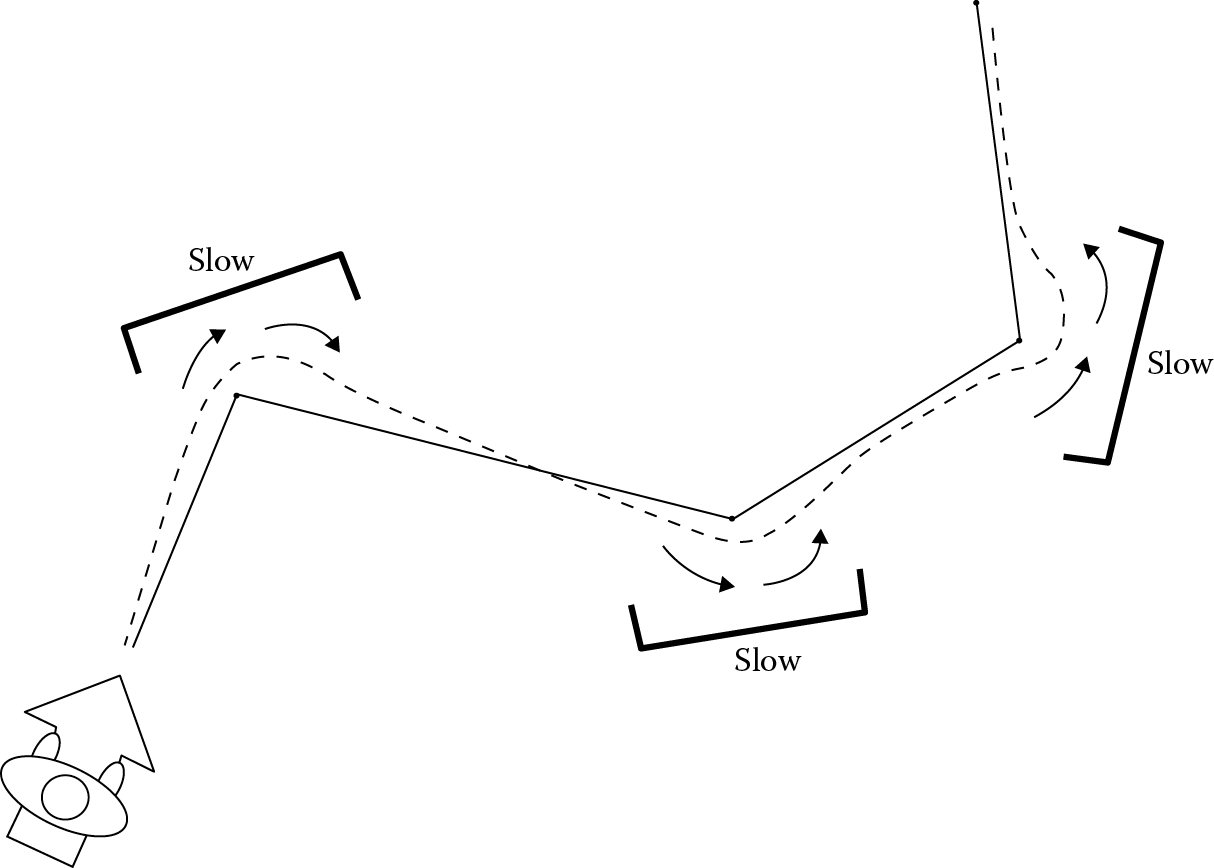
A wide range of smoothing algorithms can be used to drive the orientation and displacement direction toward the one needed by the path. The most basic approach would be to use a simple interpolation. On analyzing the path, every frame, the controller sets up the target directions that are needed. Then new directions are evaluated that smoothly drive the current directions to the targets. These directions are passed on to physics. Other algorithms that factor in angular acceleration, along with the curvature of the path, can be used to provide more believable results. For example, we can use sets of tunable acceleration curves to control the rate of correction of the character’s displacement direction and orientation for different circumstances. The speed of the character must also be modified to account for the radius of the turn (as shown in Figure 36.3), but speed adjustments will be discussed in a later section. Since the animation is updated independently of the corrected motion, we can add a procedural lean to account for these corrections and visually communicate this change to the player.
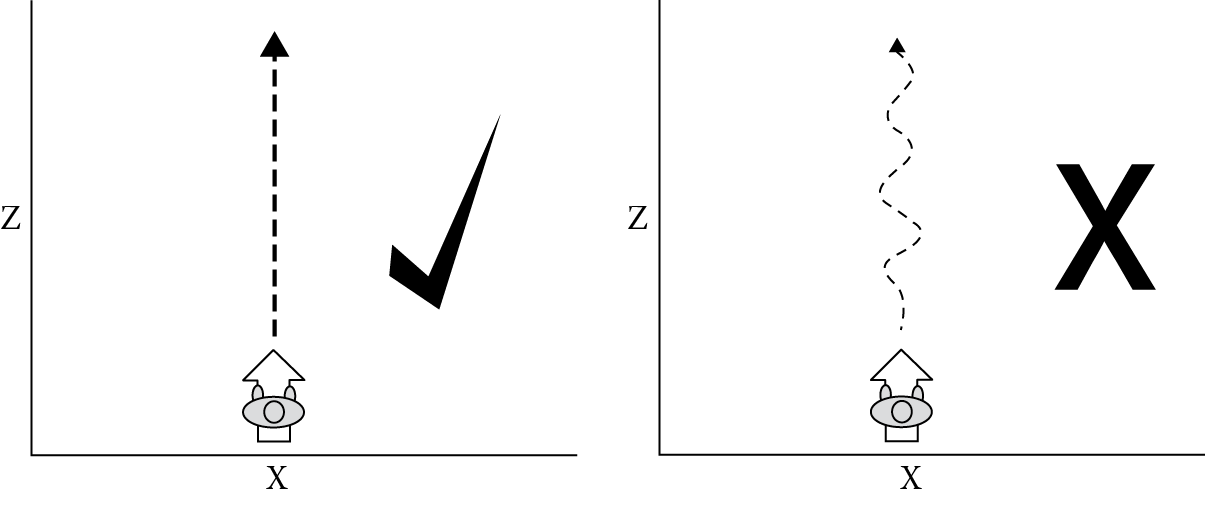
In order to be able to correct the displacement direction and orientation of our animations, we must impose certain constraints on the way the root node is animated. In the case of these looping animations, the animations should be animated within one plane (such as the XZ plane; in our examples we will always assume that Y is up). In addition, we also need to minimize the curvature within the translation for the root node, as shown in Figure 36.4. Transition animations require a different set of constraints.
36.2.4.2 Transition and One-Off Animations
Transition animations, such as starting to move, planting to turn, and stop animations help to communicate a character’s change in momentum to the player. Using a naive approach, we often need a wide range of animations to cover all cases. For example, a given starting to move animation can only rotate a character by a fixed amount. Blending animations together may help to alleviate the amount of coverage needed, but persistently blending motion-based animations can lose the subtle nuances of motion particularly authored for specific directions. Motion correction can be used in this case to generate a wider range of coverage while preserving the fidelity of the original content.
Let us continue with the example of starting to move. When starting to move from an idle, we want the character to be able to move in any direction without getting stuck in the transition animation for too long. To account for this, we can use motion correction to perform an additional rotation after the orientation is calculated from the extracted motion. This correction adjusts for the difference between rotation in the animation and the rotation required to face the target direction, which is fixed in this case. On each frame, we add the appropriate portion of this difference as a delta to the animation rotation to ensure that the character ends up facing the intended direction. When using this approach, it is important to ensure that the animation is built with a little shuffling or movement in both feet. This helps to hide the fact that the feet will slide as the character turns. Ensuring that the difference is spread evenly across every frame of the rotational component of the animation and imposing a constraint that the root node be rotated at a constant rate during the animation, we can also help to minimize the sliding that one might notice.
Using this approach, we were able to create 360° of coverage using just three start animations: a 0° direction, a 120° to the right direction, and a 120° to the left direction. This provided surprisingly good results, even though we might think more coverage would be necessary. With that said, if the fidelity is not good enough, more coverage can easily be added by adding just a few more transitions (for instance, 60° to the right and left transitions). This is illustrated in Figure 36.5.
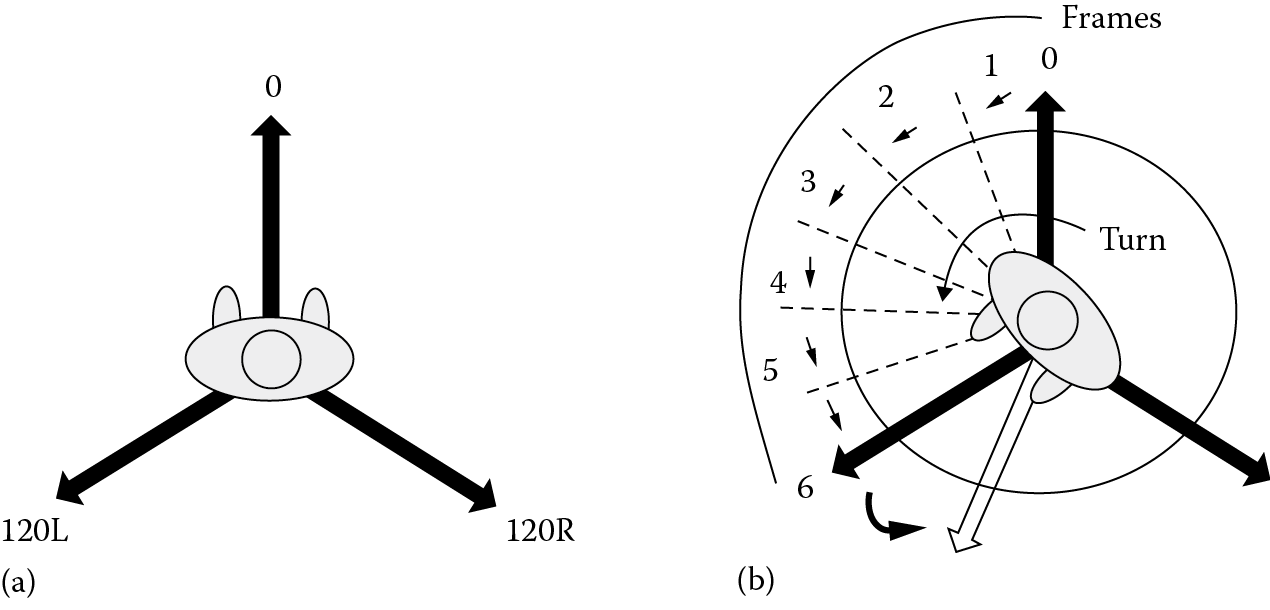
Motion correction applied during starting to move animations. (a) Original start animations, 0, 120R, and 120L. (b) Intended angle in white is 155L. Select the 120L animation, add on the difference of 35 degrees, and spread uniformly across the 6 frames of rotation to end up at 155 degrees from the original facing angle at the end of the rotation.
As each of our three components can be updated independently, it is worth noting that in this case, the displacement direction can be corrected as described in the previous section via the controller, the speed can be fully driven by the animation, and the orientation can be corrected using the aforementioned technique. Within the same animation, toward the end of the rotational segment, the orientation can be blended to be corrected by the same smoothing technique used in looping animations to match the requested direction. In cases where target direction is varying during the course of the animation, we can use a combined technique of orientation smoothing along with the delta rotational adjustment per frame. Different combinations of either movement model with motion correction can be used for many forms of transition animations, such as stop animations or plant and turn animations, as well as one-off animations such as rotating or reacting in place animations.
Displacement direction or orientation correction can also be used to add variety to the trajectory of one-off animations such as a hit reaction or death animations from an explosion. In the case of explosion animations, we can also add a random upward component to the extracted motion, which changes how high the character’s body flies. As with the orientation changes described earlier, the upward component should be distributed across the course of the animation. All of these techniques can create variety and increase coverage from a small set of animations.
Finally, motion correction can also be applied to one-off animations where the end position of the character is set by the game. This can be used for animations like entering a vehicle or interacting with a specific object. As with the adjustment on the start animations, we can calculate the difference between the end position of the one-off animation and the intended target position and then apply an appropriate-sized delta, each frame, to align the character’s displacement direction and orientation accordingly. Speed adjustments can also be made to match this correction.
36.2.5 Correcting Speed
Looping animations are typically authored to have a fixed speed throughout the animation. As mentioned earlier, in some cases, we may want to temporarily alter that speed. For example, when following a path, we might want to slow the character down as he or she goes around a tight turn. Similarly, we might want to alter the speed of the player character to match the position of the thumb stick. We want to do this without creating custom animations for every possible speed.
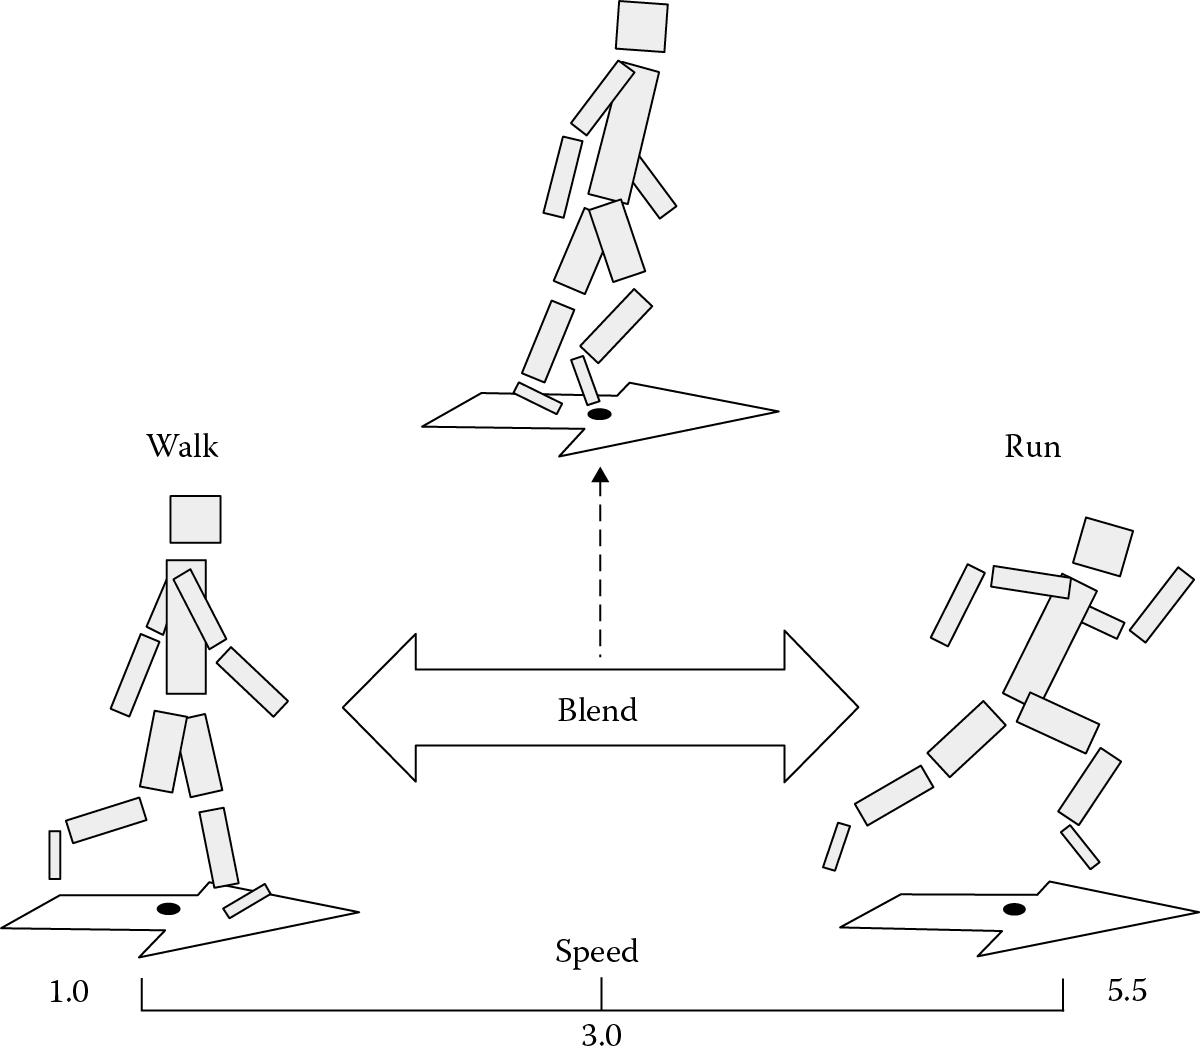
One approach, shown in Figure 36.6, is to take two animations that were authored at different speeds and blend them together in order to achieve the desired result. While common, this approach can impose restrictions on the authoring of the animations themselves and typically results in a loss of animation fidelity. In reality, moving at different speeds introduces a wide range of subtleties in body movement and stride (distance between each step) of a character. In order to ensure that these cycles blend well with each other, these differences usually have to be heavily dampened or eliminated. In addition, in most cases, these animations need to be authored with the same number of steps, which is limiting both from a stylistic and a motion capture perspective. The bottom line is that the subtleties of motion are lost during the persistent blend of all these animations. Another approach is to drive the character’s speed through the game, while correcting the animation’s playback rate to match this speed. This maintains the original posing, weight, and motion of the character from the source animation. By limiting the correction to the extracted motion and adjusting the playback rate of the animation to match the correction, we can satisfy both the fidelity and coverage concerns.
During gameplay, the target speed is calculated for the character each frame. If this speed is faster or slower than the current speed of the character, every frame, the AI controller calculates a “next” speed that approaches the target speed using smoothing or an acceleration/deceleration curve (similar to what we did for displacement direction and orientation). Since the motion is decoupled from the pose, we can pass this speed on to the physics system to move the character. At the same time, we visually match the speed of the character by adjusting their animation playback rates. As the character speeds up or slows down, we will need to transition between animations (e.g., from walk to run to sprint).
We control this by specifying a set of speed ranges. Each speed range specifies a looping animation that we have identified as a speed that our character typically moves at (i.e., their usual run speed, walk speed, sprint speed). The speeds of these animations become our reference speeds. The animation is then played back at a lower or higher rate to account for the difference between the current speed and the reference speed. Since this is simply a visual match with decoupled motion, the reference speed for an animation can be adjusted, even if it doesn’t really move at that speed in the animation, to best match the character’s movement in game. To ensure smooth motion, we allow the speed ranges to overlap, so that there are transition areas where we change from one animation to another as the speed smoothly moves up or down to the next reference speed. Each frame, we check which animation or animations are appropriate given the current speed. If only one animation is appropriate, then that is what we play. When we are in a transition where two animations are appropriate, we blend them together. Note that this is the only time when these scaled animations are blended together. The amount of overlap is defined by the available coverage. This technique is illustrated in Figure 36.7.
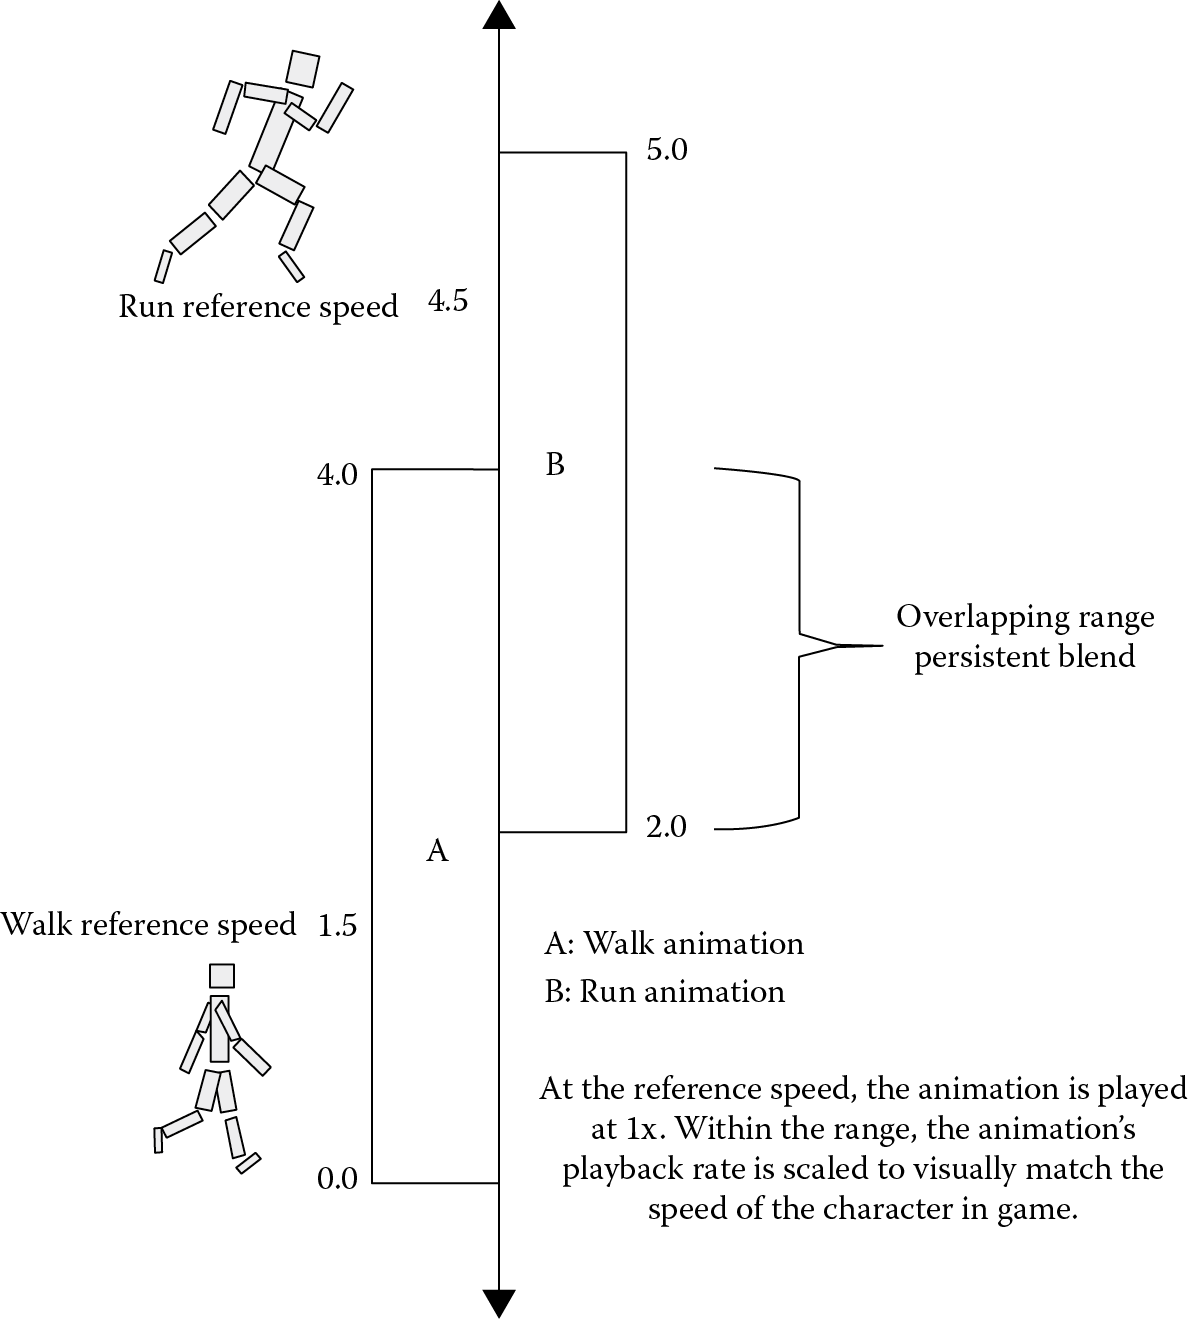
Using ranges to scale the playback rate of animations to visually match the character’s motion.
We can minimize the amount of time that the character remains within an overlapping range by ensuring that the AI controller always tries to set the target speed to be a reference speed. This avoids the persistent blend and ensures that the character plays the core looping animation at the reference speed, as it was originally intended as much as possible. As the overlap between these ranges is fairly small, we rarely notice the difference in the actual movement and animation sampling.
Transition animations, such as start or stop transitions, can also be speed corrected to visually match the target speed of motion. In these cases, the speed is not constant throughout the animation, so specific reference speeds are defined for the varying acceleration and deceleration segments within the animation. Further improvement can be made by removing the need for the reference animations to have the same number of steps. This allows for more freedom when capturing and creating data. For example, a walk animation requires far more steps to look natural than a run, since the walk is at a much slower pace and begins to look mechanical when looped, while a highly intentional run is far more forgiving. In order to do this, we need two variants of the animation: the base version and a variant that is intended specifically for blending. When in an area of the speed range that overlaps, we play the blending variant, but as soon as we are out of the overlap range, we go back to the better-looking base version. We can use an animation technique known as pose matching (described later) to allow us to smoothly blend between the base version and the blending variant as needed.
Using speed correction along with speed ranges can yield a higher level of quality while still allowing for the smooth transitions that we can get by blending the transitions as we speed up or slow down.
36.3 Interrupting and Blending Movement
One of the challenges when transitioning between moving animations is that if the time between footfalls, or the motion of the arms, or some other significant feature in the two animations is not precisely in sync, the character’s appendages may scissor, freeze, windmill, or otherwise move implausibly. For example, the time between footfalls when running is generally longer than the time in between footfalls when walking. Thus, at one second into a run animation, the right foot may be descending, headed toward a foot plant. In the walk animation, the right foot may already have planted, and the left foot may be swinging forward. If you try to blend these two animations simply based off of time, you’ll get odd results because the feet are doing different things. This is particularly common when we must interrupt an animation at any point.
36.3.1 Pose Matching
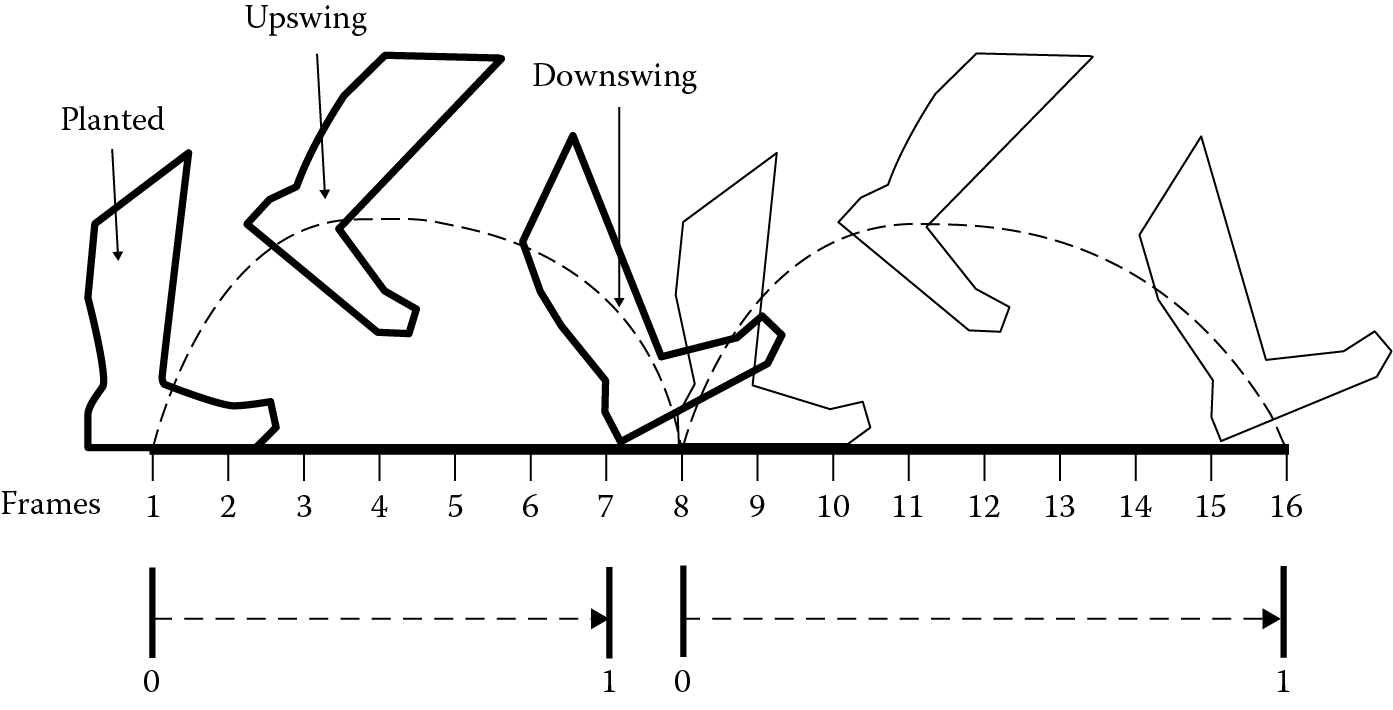
Pose matching is a technique that addresses this problem. Instead of blending animations based on elapsed time, we blend the two animations based on their pose. In most moving animations, the pose can be defined by phase. In this case, the phase of an animation is defined as the time in the swing cycle of each foot, as shown in Figure 36.8, going from 0 to 1. With that said, for any given set of animations, the definition used should depend on the feature that you are trying to match. Phase information can be generated offline and stored as metadata, keeping runtime calculations to a minimum.
States can define whether to apply pose matching when they blend in from another state or only when they blend out to another state. Looping animations, for instance, will choose to pose match when a character transitions to and from them, since they include phase information for the entire cycle. Certain transition animations, however, may only choose to apply pose matching when transitioning out of the state. This is necessary because pose matching on entry may cause us to skip the most important parts of the animation.
36.3.2 Pose-Only and Per-Bone Blending
Interrupting movement to come to a stop also poses a unique set of challenges. Stop animations are transitions that are used to convey the shift in momentum and deceleration needed when a character comes to a stop. Often, our games require that the characters come to a stop on a dime, especially when dealing with the player releasing game pad input. Stopping in an instant is an animator’s nightmare. Coming to a complete stop immediately is both physically impossible and visually unnatural. This problem is exacerbated by the fact that if you’re using motion capture, the data will always have some motion in it. A simple animation technique that helps to improve the quality of this is pose-only blending.
When we transition from a movement animation to our stop animation, we can blend the pose and the root node separately. In the case of an instant stop, we do not include any of the root node translation, which ensures that the character will stop instantly, but we still blend in the pose from the movement animation, which helps to create the illusion of deceleration and alleviates the visual harshness of the sudden transition. In order to work, this requires that the root node for the stop animations be authored without any translation.
This idea can be further extended not just to blend the root node without any blending but also to blend different sets of bones at different rates. This is known as per-bone blending. Using this technique, we can create the illusion of momentum or motion lag, for example, by blending in the upper- and lower-body parts differently.
36.4 Combining Actions
NPCs often need to do more than one thing at the same time. For instance, they might need to carry and aim their weapons while running or talk on a cell phone while riding a bicycle. In the case of carrying or aiming weapons, having to create content for each different weapon type is also cumbersome and expensive. Memory limitations make this approach further challenging. In this section, we will discuss techniques for realizing these features using specific combat-based examples.
36.4.1 Animation Masking
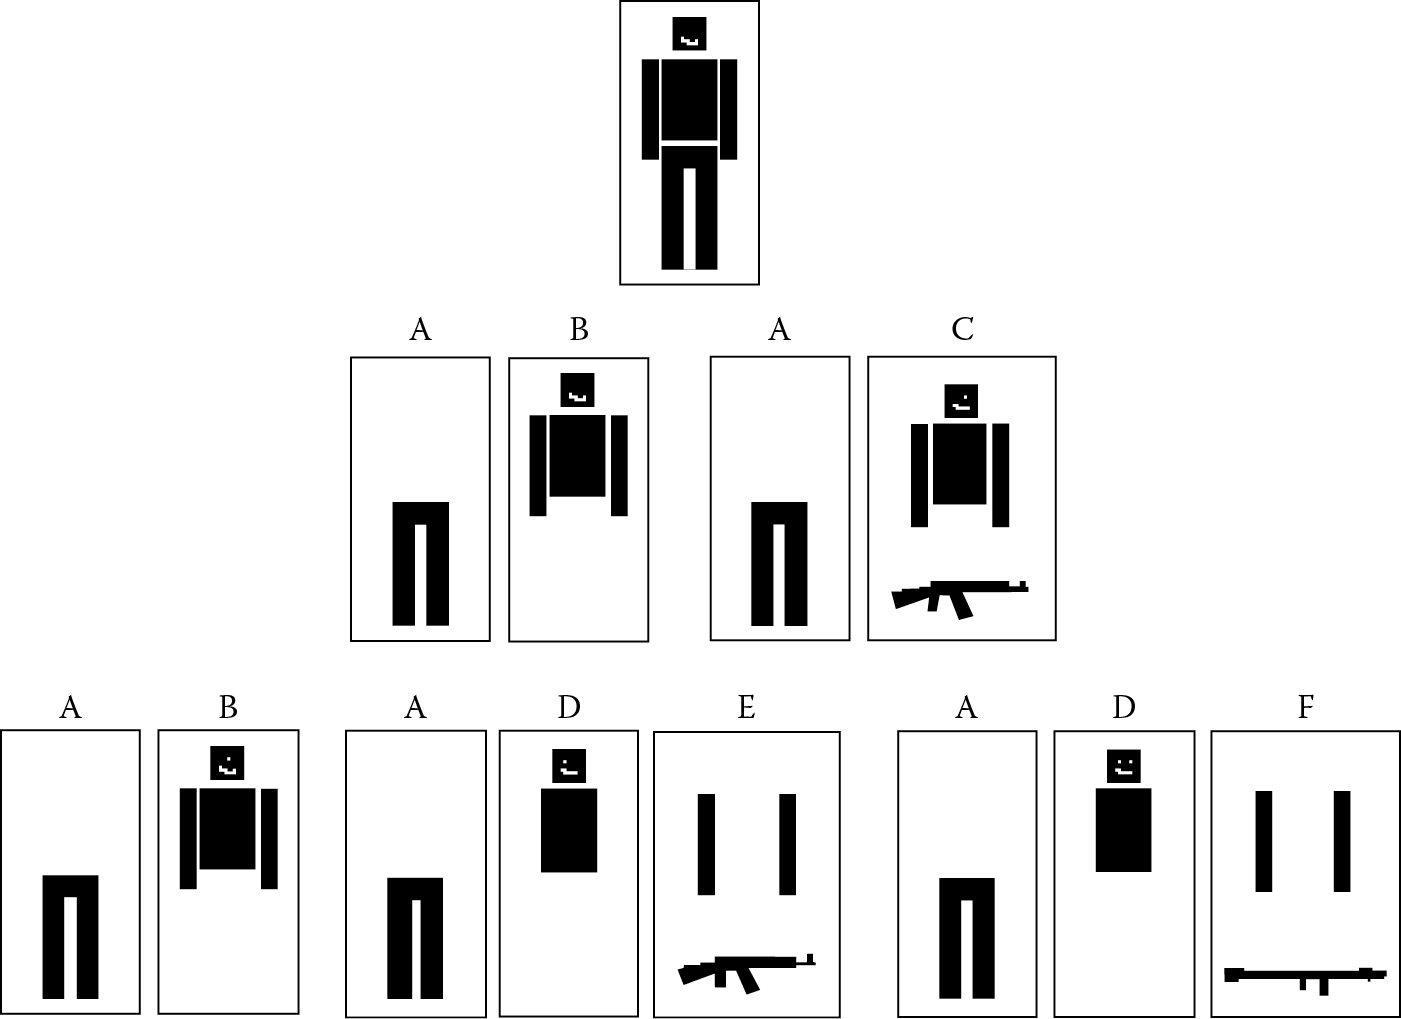
Sharing animation data among features is a great way to save on animation memory. Animation masking is one way to do this. We can use bone masks to split animations into combinations of masked animations that can be recombined as needed. This allows us to ensure that there is never any duplication of animation data. Data that can be shared is exported out as a mask only once. This mask is then reused as needed. Masks should be generated offline. We can think of our final animation pose as being built at runtime from a combination of these bone masks.
Figure 36.9 demonstrates this idea using the example of an idle animation. The original idle animation can be thought of as using no mask, including all bones shown at the very top. However, as we build content to hold a two-handed weapon such as a rifle, we realize the upper-body portion of the animation needs to be different, but the lower-body portion of both of these animations is the same. So we mask the original animation into two: a lower-body mask (A) and an upper-body mask (B). We then share the lower-body mask for both animations and need only a rifle holding upper-body mask (C) to create the rifle holding idle. When a significantly different weapon type is introduced, such as an RPG, we only need to change the arms of the upper-body two-handed rifle mask (C). And so we further mask that to separate the arms into their respective masks (E) and (F), along with the armless upper-body animation (D) to account for the two different weapons. This allows us to minimize our use of animation memory.
We can further optimize this by masking out bones that do not require key frame data for every frame of the animation. These often include the face and finger bones. They can be exported as simple poses, so that we only include data for those animations that require their bones to move.
36.4.2 Animation Mirroring
In order to save additional memory, we can make use of animation mirroring. Mirrored animations are animations that can be played symmetrically on either side of a plane, for example, animations that can be played either to the right or left, requiring the same movements in either direction (looping animations where the character is aiming either to the left or right side or one-off animations such as entering or exiting a vehicle from either side). Content is built only for one side and mirrored during runtime to get the coverage for the other side.
36.4.3 Animation Layering
Animation layering is a technique that can be used to play secondary actions that do not need to be synchronized with the base action. Animation layers can be thought of as tracks that can play an animation. You can think of the main layer as being the base animation that is played on the character. Once the base animation has been selected as either a no mask or combined with a set of masked animations, additional layers of animation that do not need to be synchronized with the base animation can be sequentially blended together with this pose to create the final pose of the character. When a layer’s blend weight is 1.0, it means that the animation that is being played on that layer is completely overriding the animation on the layer beneath it. This is exactly what is needed when we want to play an animation that can cover and override multiple base animations. This saves us additional authoring time and memory.
For example, we could have an animation that uses a single arm to detonate an explosive or both arms to reload a weapon. This technique also works very well for things like facial animation and conversational gestures. These animations can generally be used across several base animation states. Animation data per layer are applied sequentially in the local space of the character. To ensure that these animations work well, we must enforce the bone masks to be flexible enough to be applied independently of the base animation state. We can do this by limiting the masks to head or arm-only animations, thus preserving the base pose as best as possible.
These techniques are not limited to weapons or combat alone. The important takeaway here is that when it comes to dealing with large feature sets, it is important to think of ways to reuse animation content as widely as possible.
36.5 Tracking
NPCs often need to be able to track another object—for instance, by looking at another wandering NPC or aligning a weapon to aim at a specific target. Furthermore, we often need our NPCs to be able to track an object in all directions. Tracking an object while aiming a weapon without breaking the original pose or sticking the weapon through any part of the character’s body is a difficult problem to get right. In this section, using aiming as an example, we can look at some techniques to solve this problem.
36.5.1 Additive Aiming Poses
Additive animations are animations that are applied as additional offsets to an existing animation. These animations are created by taking the difference between two animations to generate offsets per frame. We can apply these offsets onto the base animation to generate a different pose. Many games use additives to provide extra runtime animation noise. This adds variety and communicates a character’s context to the player, for instance, additional breathing when a character is tired or leaning when making a hard turn.
There are two different ways we can generate and apply additive offsets: either as additive pose offsets (as a single frame) or as additive animation offsets (animations that are synced with the original animation). In either case, these additive offsets are created offline.
When using additive pose offsets, we must specify the animation pose and a reference pose that we can use to generate the offsets for that pose. For example, in the case of a leaning pose additive, we would provide the maximum leaning pose as the animation pose and the straight pose as the reference pose. When we generate the additive pose offset for this, we would get the additive offsets necessary to add to the straight pose to create the maximum leaning pose. We should ensure that the additive animation pose is built directly from the reference pose. This ensures a controlled and high-fidelity final pose when applying the offsets at runtime.
Coming back to the example of aiming, animators can create aiming poses for the maximum angles needed for aiming. We then use a reference pose of the base animation to generate the offsets for each maximum angle. Finally, a persistent blend of these pose offsets is used at runtime to create the final pose with the weapon aimed correctly. We should make sure this blended additive is applied last within the animation blend tree. This minimizes the adulteration of the pose. If further precision or fidelity is required, we can add more pose offsets at specific angles until we get the quality results that we need.
It is often a good idea to use this solution only for vertical aiming, that is, upward and downward, and instead to use inverse kinematics (IK) for our horizontal aiming. This dual aiming system will be discussed in greater detail later.
Additive pose offsets work exceptionally well for looping animations where the overall pose does not change significantly throughout the course of the base animation. Using additives for aiming provides the animator more control and allows the character to still hit key-authored poses, resulting in higher quality. In addition, using additive poses is a great way to minimize the amount of memory and time needed to create fully synced aiming animations for every base animation that would need to support aiming.
36.5.2 Additive Aiming Animations
The pose-based additive aiming solution does have a limitation. Additive pose offsets don’t quite work when the pose itself changes significantly during the course of the base animation. An example of such an animation would be a hard landing animation from a long fall. Since there is a significant squash component during the beginning of the animation, followed by a stretch component after which the hips and head stabilize, we would require different offsets along the course of the animation to ensure that we maintain the intended aiming direction. To solve this problem, we can use synced additive animations that are authored at the required maximum aiming angles. We then can generate offsets frame by frame for the whole animation. As before, we then blend in a weighted offset to create the angles we need. This solution should only be used for animations that require it, because it requires significantly more memory. When it is required, we can decrease the memory requirements by only creating an additive pose for every X frames of the base animation (where X is typically something like 10) and apply the offsets accordingly. This still provides the animators enough control to create high-quality aiming offsets, while dramatically reducing the size of the additive animations.
36.5.3 Inverse Kinematics
Although we could use additives for both vertical and horizontal aiming, doing so would require a lot more poses to ensure coverage of every possible aim angle. In addition, it can limit the animators to altering only very specific sets of bones in each directional offset to ensure that they don’t conflict with each other. Finally, if you need additive animations (rather than just poses), authoring the animations to meet these constraints can be painfully time-consuming.
As an alternative, IK works relatively well for horizontal aiming because the core rotation for aiming horizontally can be limited to a smaller set of bones. To make this work well, the locomotion system should select its movement animations based on the horizontal aiming range. Within a range, the horizontal aiming coverage needed is reasonably small and thus easily achievable through the use of IK. We can also choose to use a cheaper version of this for horizontal tracking when pointing or looking at an object. This rule generalizes that when using IK, it is important to select the right animations and bones to apply the IK to.
In addition to horizontal tracking, we use IK in other situations such as a postprocessing for foot or hand placement and for adding procedural variation to the pose.
36.6 Behaviors
The animation techniques described previously increase the fidelity of character realization of each individual NPC. However, maintaining the believability of our world requires us to think beyond that, looking at how often a character executes a specific behavior, how varied it is, and how it is distributed across multiple NPCs.
36.6.1 Creating Variety
Too often in games, we see an NPC play the same animations or behavior over and over again. One solution is to have a lot of animation and behaviors to pick from, but this can be expensive from both an authoring and memory standpoint. The ideas presented in this section can help to create the illusion of variation without requiring prohibitively large amounts of content.
36.6.1.1 Contextual One-Off Animations
Games generally make use of a large number of looping animations to communicate fundamental NPC actions such as idling or moving. While it’s important to include variations of these animations, they tend to be longer in length compared to other animations in the game. If we were to create a lot of variation for each of these cycles, we would quickly run out of both development time and memory. Consider walking, for example. People within a similar context (the same height, age, and mental state) walk in a similar fashion. Either changes to this cycle will not be very noticeable or they will look unnatural. It is the smaller nonlooping actions and movements, such as changes in stride, shifts in weight, or looking around, that differentiate how one walks from another.
Contextual one-off animations add variety and help to break up looping animations. By matching the context of the looping animation, they further communicate a character’s behavior to the player. These animations do not interrupt the underlying behavior, but instead desynchronize and vary them. Continuing with the example of walking, examples of some contextual one-offs might include stopping to scratch your leg, shifting your weight from side to side, and an animation to smoke (played as a mask on a different layer to save memory). These one-offs can be motion corrected to match both the current speed and the trajectory of the motion. For full-body one-offs, we use phase matching to transition seamlessly in and out of the one-off animation and back to the underlying looping animation. Most importantly, the contextual one-offs contain only the change we want to make to the base animation, so they are much smaller and can be reused across different contexts, which significantly increases the amount of variation we can create given a particular animation budget.
36.6.1.2 Micro Behaviors
Just as we can break up looping animations with smaller one-offs to create the illusion of variation within them, we can also extend this idea to vary behaviors themselves through the use of micro behaviors. Micro behaviors can be thought of as smaller subbehaviors that can run their logic in parallel with a core behavior, simply to provide variation. These behaviors can also temporarily interrupt a core behavior to perform a specific action, returning back to the core behavior after completion. Similar to animation one-offs, we can make use of a wide variety of micro behaviors to support the core behavior and break up behavior synchronization.
For example, imagine a combat situation with two NPCs that are executing a cover behavior. While in cover, they are peeking and shooting, evaluating for better cover, etc. One of the NPCs decides to reposition, and before the character performs this action, it shares this information with all other NPCs that are part of that scene. The cover behavior (i.e., being executed by all NPCs in cover) can include a micro behavior that reads this and plays a one-off animation to order an NPC to reposition. This doesn’t need to be synchronized and runs independently on each NPC. The behavior logic chooses how often to select these micro behaviors. What’s more, like contextual one-offs, micro behaviors can often be reused across multiple behaviors.
Another advantage to micro behaviors is that, in addition to creating variety, they can be used to clearly communicate the NPC’s intent, making the reasoning behind the core behaviors apparent to the player. This is a crucial part of behavior variation. We often focus on tweaking values or adjusting utility formulae to make the NPC execute a behavior slightly differently. While this form of variation in behavior is important, if we don’t clearly support this, it may be barely noticed by the player. Making the reasoning behind the behaviors obvious to the player allows the player to interact with them in meaningful ways. If the player doesn’t understand what’s happening, it might as well not be happening at all.
36.6.1.3 Using Additives with Idles
Idle animations suffer from the same issues described previously. They are cyclical and long. Additionally, they require a lot of variation to be compelling enough to notice. To deal with this problem, we can use a set of noise-based additive animations on a large number of idle poses (single-frame animations). These additive animations are played on a different animation layer and are unsynchronized with the base idle pose to add extra variation. This can create a large amount of variation from single-frame idle animations, which can save a great deal of animation memory and production time.
36.6.2 Behavior Distribution
One often overlooked aspect of NPC behaviors is how behaviors are distributed among a group of NPCs. NPCs whose behaviors are synchronized to happen at just the same time easily break the player’s suspension of disbelief. In this section, we will look at ways to assign and distribute NPC behaviors.
36.6.2.1 Action Tokens
We often need to control how often a specific action occurs. For example, while a group of NPCs are executing their cover behavior, we might need to control how often an NPC throws a grenade. We can use the concept of action tokens to help with this. Each action that can be executed by multiple NPCs is assigned a particular number of tokens, and before an NPC can execute an action, they must acquire one of these tokens. For example, characters that want to shoot at the player when moving all can share a set of “move and shoot tokens.” These tokens are used to limit the number of characters that can be moving and shooting at the same time.
The token system should support designer-specified parameters for each type of action. For example, the designers might want to specify the minimum amount of time that an NPC must wait after releasing a token before acquiring it again and whether the number of tokens should scale based on the number of characters in the scene. Using these sorts of parameters, we can control not only how often an action occurs but also how it is distributed across multiple characters.
36.6.2.2 Blackboards
In order to facilitate communication between logic that is spread across different behaviors for an individual character as well as among multiple characters, we can make use of data blackboards. These data blackboards can be defined at a global, group, or local level. All characters have access to the global blackboard, characters that are part of a specific context, have access to that context’s group blackboard (e.g., all of the passengers in a vehicle might share a group blackboard), and finally each individual character always has access to its own local blackboard. Through the blackboards, we can communicate and manage actions and behaviors for the NPCs within a specific scene, while still keeping the logic independent of each other.
36.6.2.3 Action Ranking
In addition to action tokens, we can evaluate and assign a unique rank to each character within a specific situation. For example, all NPCs that are currently engaged in combat can be given a combat action rank. We can then assign specific actions or behaviors to characters with different ranks or rank categories.
These action ranks can be used to ensure that the NPCs that are most relevant to the player are the ones that execute the most interesting behavior. We can use a simple utility-based formula to determine the ranks. Factors such as the distance to the player, whether the character is visible to the player, whether the player is aiming at the character, and event-based values such as hearing gunfire or receiving damage from a bullet can be used to calculate the action rank. The event-based stimuli can be limited to influence the action rank for a set period of time (which should be specified by the designer).
Some behaviors can be scripted to execute unique rank-specific micro behaviors to further add variation within the scene. For example, a character holding a high action rank may be allowed to taunt the player. In addition, we can use ranks to specify unique behaviors for particular characters before allowing their systemic AI to run. For example, we can require high-action-ranked NPCs to stand and shoot the player for a few seconds, when the player first initiates combat with a particular group of NPCs. This gives the player a few targets to engage with first, while the others scatter for cover, rather than just allowing everyone to rush for cover.
36.6.2.4 On-Screen Realization
In order to make our behaviors more player centric, we can distribute behaviors based on what the player is actually seeing. For example, we can use on-screen realization as part of our utility ranking to ensure that NPCs that are on-screen receive a higher action ranking than those offscreen. We can also use on-screen realization to influence behavior execution. For example, we can ensure that NPCs that are on-screen choose cover or goal positions that do not cause them to run offscreen (which is often annoying to the player).
36.7 Conclusion
AI character development must include a strong focus on the synergy between animation and behavior. Having the right mindset and focus on realizing characters ensures that our NPCs make appropriate and intended decisions while still maintaining a strong sense of believability. This effort contributes significantly to the overall player experience.
Using animation techniques that focus on creating coverage while preserving the original authored animations, using a minimal amount of content, and reusing animation content, we can strive to maintain a high level of overall fidelity while keeping our memory budget in check. When it comes to motion, our emphasis is on displaying behavioral intent, variation, and preservation of momentum.
Finally, it is important to focus on solutions that explicitly manage variety and that distribute behaviors between characters. This level of realization control, centered on the player, guarantees a consistently positive experience.