
Chapter 32
Extending the Spatial Coverage of a Voxel-Based Navigation Mesh
Kevin A. Kirst
32.1 Introduction
An AI navigation mesh, or navmesh for short, is a structure that can be used by an AI agent for pathfinding through a world. A voxel-based navmesh is one that is generated through the use of voxels. A voxel, representing a cube-shaped volume of space in a 3D grid, can be combined with other voxels to represent any volume of space. With voxels, a navmesh can be generated, which conforms greatly to the physical volume of a world, resulting in a navmesh that closely resembles the space in the world where an AI agent can physically fit. A voxel-based navmesh exists only where an AI agent can travel without colliding with or protruding into any physical body in the world.
A voxel-based navmesh is typically generated using parameters (notably height and radius) that describe the AI agent’s dimensions while standing. This results in a navmesh that exists only where the AI agent can stand. Any space that is too low or too narrow for the AI agent to fit in while standing is excluded from the navmesh.
What follows is an explanation of how a voxel-based navmesh can be generated that includes the nonstanding spaces in the world: areas where the AI agent could fit if it were to crouch, lie prone, sidestep, swim, or otherwise contort its physical body appropriately. Through appropriate markup, a more complete navmesh can be computed with a higher degree of spatial awareness. At a high level, an AI agent will continue to simply request a path from the pathfinder and travel along that path. Should that path take the AI agent through a small hole in the wall, the AI agent can use information embedded within the navmesh to dynamically contort its body to fit through the hole. Annotating navmeshes is nothing new; however, when combined with a voxel-based navmesh generator, the resulting procedurally built navmesh with extended spatial coverage can be used to give greater depth to an AI agent’s ability to navigate through the world.
32.2 Overview of Voxel-Based Navmesh Generation
Before exploring this idea further, it’s important to have a good understanding of the fundamentals behind a voxel-based navmesh. The goal here is to understand the steps involved in the generation process from a high-level perspective. This is important for understanding later how the process can be expanded to include other types of spaces in the navmesh. There are many articles on navmeshes and navmesh generation techniques (voxel based and otherwise). Greg Snook has done a wonderful job explaining the benefits and details of an AI navmesh [Snook 00]. David Hamm takes it one step further by discussing the benefits of utilizing an automatic navmesh generator while detailing the algorithm involved [Hamm 08]. There also exists a very well-respected voxel-based navmesh implementation known as Recast, written by Mikko Mononen, which is fully open sourced [Mononen 14]. This is a great resource containing example algorithms and a general code structure of a voxel-based navmesh generator.
32.2.1 Voxel-Based Navmesh Goals
Every voxel-based navmesh implementation out there is trying to solve the same problems and satisfy the same set of goals:
- Maximize the coverage of the AI navmesh in the level.
- Minimize the amount of human interaction required when placing the AI navmesh in the level.
- Reduce the time spent when updating the AI navmesh during level iterations.
To maximize the AI navmesh’s coverage, the navmesh needs to be extended across the entire level. The coverage will also need to be constrained by the physical world: ledges that are too high to jump over, slopes that are too steep to walk up, and walls that block the way forward should be omitted from the final navmesh.
To minimize the setup cost for building this AI navmesh in the level, the process needs to be automated as much as possible. The task should be no more difficult than painting the area where the AI agent can go in one broad stroke and having some automation fill in the blanks. To maximize the AI navmesh’s coverage, this automation must be able to break apart the physical world and figure out what areas the AI agent can and cannot fit in the physical space (collision detection between the AI agent and physical objects) and ensure the navmesh extends only to the areas where the AI agent does physically fit.
To reduce the time spent in maintaining this AI navmesh, this automation process ought to continuously run and refresh the AI navmesh whenever the physical space in the level changes. Keeping true with the idea of automation, this process should happen seamlessly in the background without any additional interaction needed by the level designer. For example, if the designer drops a large object down in the middle of the room, puts up a new wall, or changes the degree of the slope in the terrain, then the AI navmesh needs to reflect these changes immediately after the action is carried out.
32.2.2 Enter Voxelization
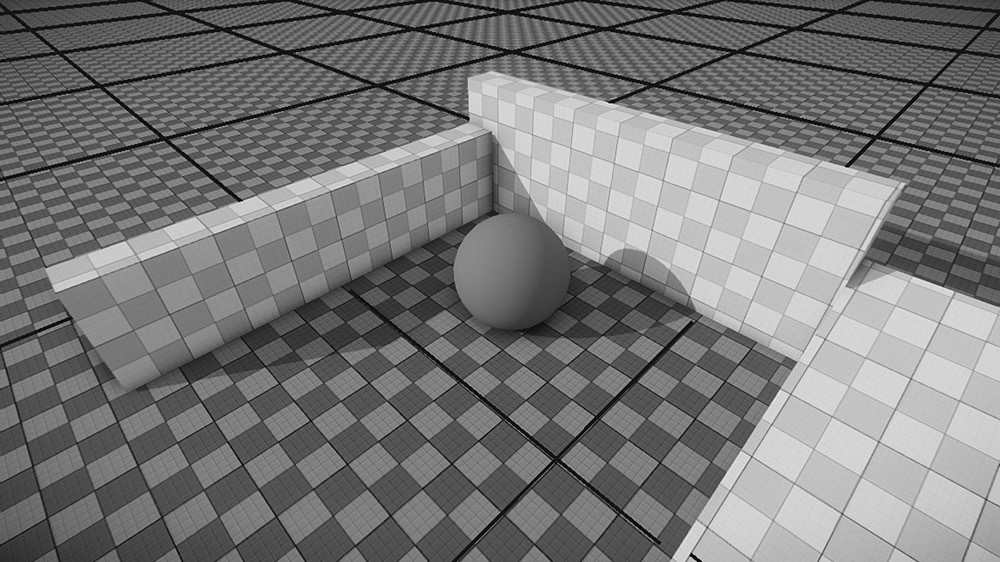
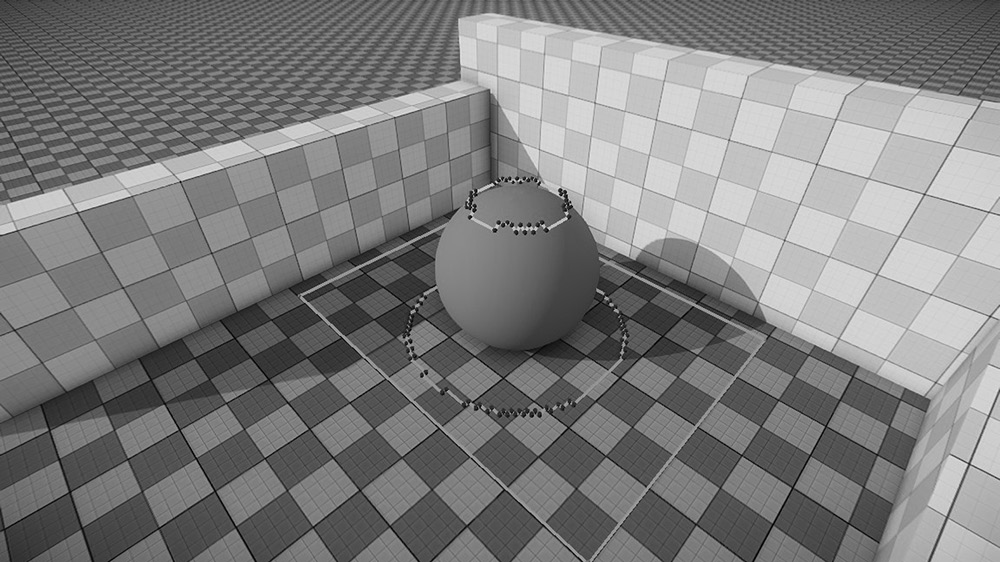
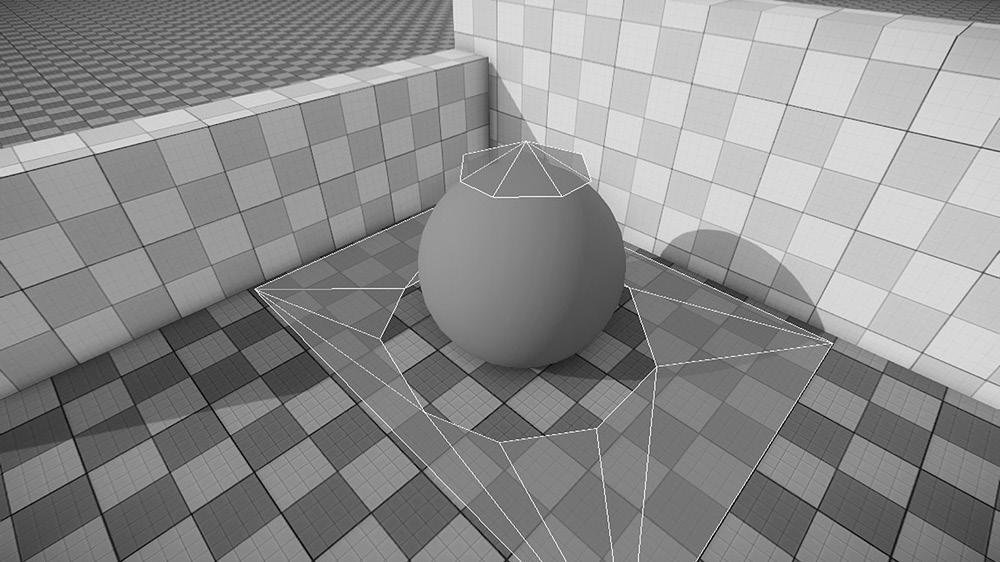
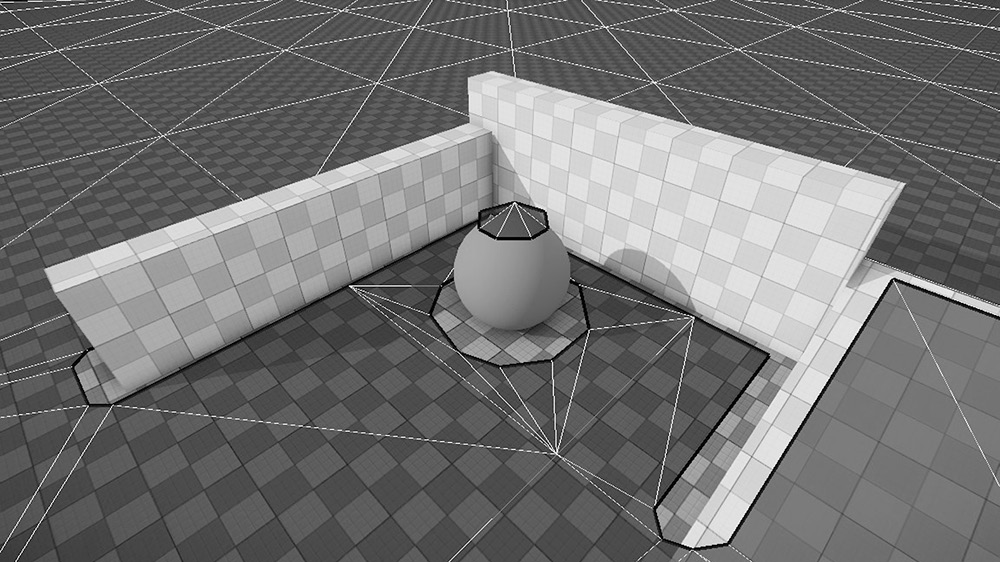
Voxels are generated for the purpose of understanding algorithmically the space being constrained by the level’s physical world. Figure 32.1 shows a simple in-engine scene. Figure 32.2 shows the same scene after voxelization.

Using these voxels, it is possible to calculate a set of planar polygons (hereafter referred to as only polygons), which cover the surfaces of the physical world and include in their areas as much of the navigable space as possible. These polygons are nontriangulated and consist of only a set of vertices that form the edges of the shape.
To generate the polygons, it must be determined which voxels form the edge of a polygon and how many polygons will be needed to cover the area. The area within these polygons will make up the AI navmesh in the level—anything outside these shapes are deemed nonnavigable by the AI agent. To find which voxels lay on the edge of a polygon (which subsequently will tell us how many polygons exist in the area), each voxel must be asked this single question: If an AI agent were to occupy the same space as this voxel, would that AI agent be able to legally move away from that space in any possible direction?
One obvious check for answering that question would be physical clipping. If the voxel is right up beside a wall and the AI agent stood centered on top of that voxel, then chances are the AI agent’s arm or leg may be clipping into the wall. This is probably not ideal, and so it will be necessary to ensure that this voxel is left outside of all of the polygon shapes. We have another scenario: suppose the voxel is located just above the terrain on a slope with a steep gradient. Should the AI agent stand centered on top of this new voxel, then there is a strong certainty that the AI agent’s feet may clip through the surface once it begins to play the run forward animation cycle. Since this is not ideal, it will again be necessary to ensure that this voxel is left outside of all of the polygon shapes.
To answer this question for each one of the voxels, a table of agent-driven parameters will be used. These parameters, when paired, describe two things:
- The physical space that a single AI agent takes up (i.e., no other physical items should be within this space to ensure that the AI agent will not collide or clip through a nearby physical object while the AI agent plays any possible animations)
- The maximum tolerance of the restrictions placed on the AI agent by motion-controlling animation
Listing 32.1 shows an example of what an agent-driven parameter table might look like.
The radius and height parameters are examples of description #1. With just these two parameters, it is ensured that the AI navmesh only covers areas where the AI agent can physically fit given its physics cylinder. The remaining parameters are examples of description #2. They do not describe anything about the physical world, but instead simply impose limitations on what would otherwise be legal navigable area. maxStepHeight can help in differentiating between a staircase and a large pile of rocks. maxSlopeRad can ensure the AI navmesh stays away from mountain slopes and sticks to just the rolling hills. Lastly, minWaterDepth and maxWaterDepth can be used to extend the AI navmesh a bit beyond the coastline.
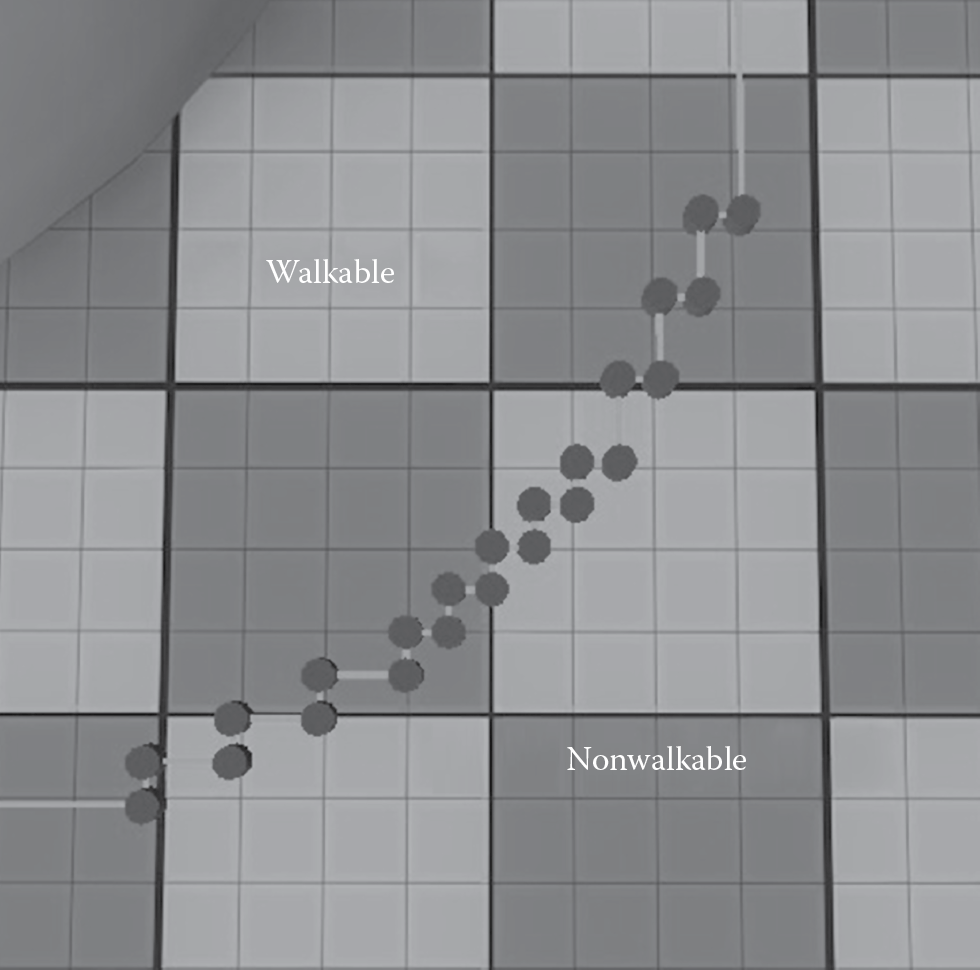
With these parameters in hand, each of the voxels need to be flagged in one of three ways: nonwalkable (violates the parameters), walkable (passes the parameters), and border (passes the parameters but one of the neighboring voxels violates the parameters). Figure 32.3 shows the previous scene’s voxels after they have been flagged. The nonwalkable and walkable voxels can safely be thrown away once all the voxels have been flagged. The remaining border voxels will be used to draw the outlines of the polygons—the voxels that neighbor one another are part of the same polygon. After going through all of these border voxels, one or any number of polygons may be determined, but it is important to remember which voxels belong to which polygon. Islands can form, as shown in Figure 32.4. These polygons may or may not be convex (some in fact might even have holes inside of them). This is perfectly okay, but should be remembered when moving on to the next step in the generation process.

32.2.4 Triangulating the Polygons
To facilitate pathfinding through the navmesh, nodes need to be placed within the polygon shape to act as points along the calculated path. Any concave polygons, or polygons with holes, must also be handled correctly. No calculated paths should ever cut through a hole in a polygon or otherwise exit that polygon’s borders and enter area not included in any of the other polygons. In order to use these polygons in the navmesh, they must be rendered convex. This can be done through a standard triangulation algorithm. Jonathan Richard Shewchuk describes a great triangulating algorithm that can handle both the convex, concave, and hole-filled polygons that may have been generated in the previous step [Shewchuk 02].
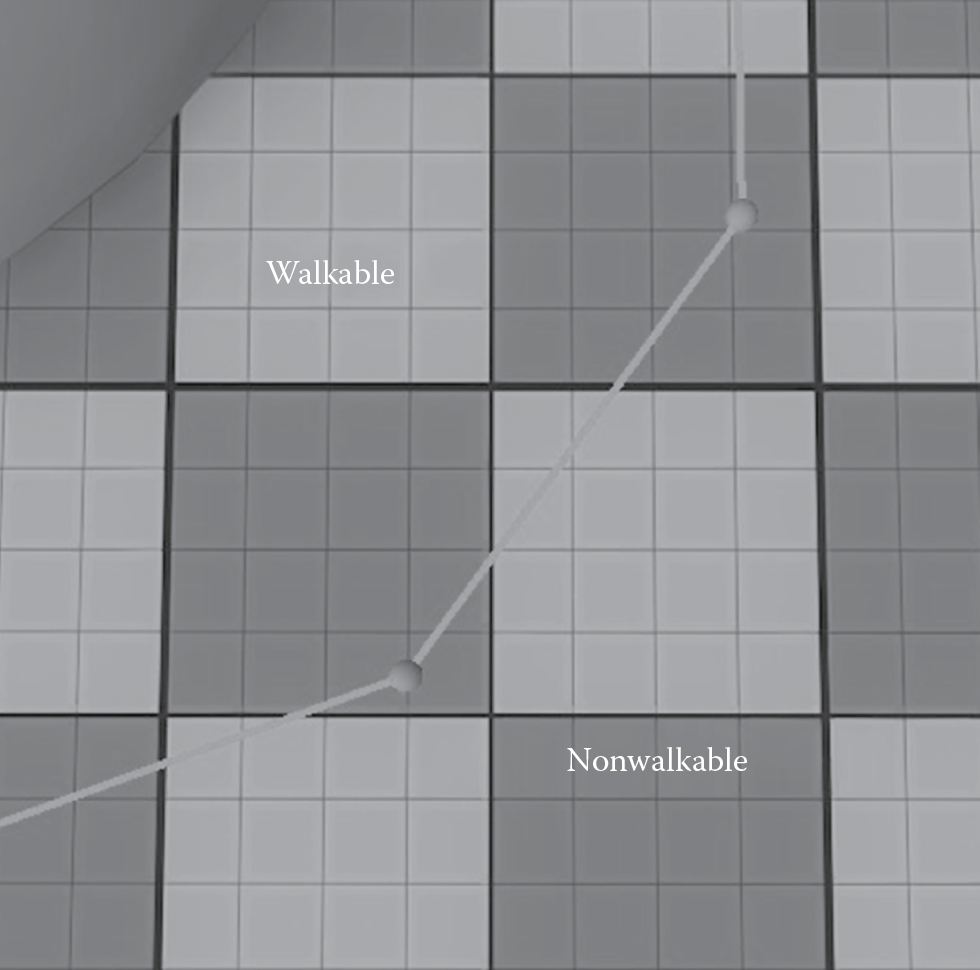
If the polygons shown in Figure 32.4 are triangulated without any additional modifications, the resulting triangle mesh would include an excessive number of small triangles in the parts around the polygon edges, due to the blocky border leftover from the voxelization process. See Figure 32.5 for an illustration of this point. This is not ideal, as it will result in placing a lot of nodes within a relatively small area, which is wasteful to both memory and computation time during pathfinding. What would be preferred is a polygon with a sloping side instead of a staircase side.
It is ideal if the polygon’s border is simplified before it is triangulated, turning these staircases into slopes. Note that since the outside space is now entirely made up of nonnavigable areas for the AI agent, the polygon border should be simplified by shaving away interior space without including any nonnavigable exterior space. We are sacrificing coverage of the navigable area in exchange for an increase in performance. Figure 32.6 shows the same polygon border after it has been simplified.
The triangle list calculated through the triangulation algorithm will become the basis of the AI navmesh—the centers of each triangle representing a node and each neighboring triangle receiving a path connection between the two nodes. Figure 32.7 shows our previous scene’s grid after triangulating the two polygons. Figure 32.8 shows the completed navigation mesh.
32.2.5 Recap
Here’s a quick recap of the voxel-based AI navmesh generation process.
- Segment the world into individual cells using a grid. Overlap each grid on top of its neighbors slightly.
- Using parallelization, perform the following on each cell:
- Voxelize the empty space in the cell (space not occupied by a physical body).
- Using the agent-driven parameters, flag all voxels as nonwalkable, walkable, or border.
- Throw away all nonwalkable and walkable voxels.
- Using the remaining border-flagged voxels, generate planar polygon shapes using the voxels as the edges.
- Simplify the polygon border shapes to prepare for triangulation, removing unnecessary vertices without increasing the area of the polygon.
- Triangulate the polygon and add the resulting localized triangle list to the master triangle list.
- Once all cells have been processed, generate pathfinder nodes for all triangles in the master triangle list.
- Create connections between the nodes that border each other—if they share the same triangle parent or if their parent triangles neighbor one another in the master triangle list.
This process gives us a workable AI navmesh that conforms to the physical world accurately, given a single static set of parameters based on an AI agent’s physical state and motion behavior. As long as the AI agent does not deviate from its parameters, it will safely be able to travel anywhere along this navmesh without getting stuck or blocked by some physical body—as long as the physical bodies don’t move around either! But if those physical bodies do move or change in some way, you could always regenerate the localized triangle list for the cells that contain that physical body and stitch the updated triangles back into the navmesh.
32.3 Extending the Navmesh’s Spatial Coverage
Suppose an AI agent were to deviate from its physical parameters for a moment. Most action games support having an AI agent that can crouch down low, reducing its physical height. Suppose now the AI agent were to begin moving around while in this crouched state. As long as the new physical space that the AI agent occupies is less than the space used to generate the navmesh, there won’t be any issues. Small objects can always fit in large spaces; therefore, the AI agent will still be able to safely travel everywhere along the navmesh. From that AI agent’s perspective, the world has seemingly become much larger. Now, the space under a table looks easily passable. The AI agent could now fit through the air-conditioning duct opening. Even the holes blown out of the walls look passable from this state. But the navmesh was generated in a way that only considers where the AI agent could fit while standing. These new hiding places and shortcuts were passed over during the generation process. The voxels that filled these spaces were flagged as nonwalkable and were discarded.
32.3.1 Reintroducing the Discarded Space
It would be great if all of this discarded nonwalkable-flagged space could be reintroduced into the navmesh. But before that is done, it is important to flag this space with appropriate annotations. Without any additional metadata associated with the space, there is no way for the AI agent to determine if the space can be navigated while standing upright. Therefore, two rules must be satisfied:
- The crouch-only triangles must be clearly separated from the stand-only triangles. Stand-only triangles should only exist in spaces where the AI agent can legally stand. Crouch-only triangles should only exist in spaces where the AI agent can legally crouch.
- The crouch-only triangles must be flagged in some way, so that it is possible to later delineate what area is stand only and what area is crouch only on the navmesh.
The first rule is easily satisfied. The navmesh will be generated using the voxel-based generation process described earlier as usual; however, instead of discarding the nonwalkable voxels, these voxels will simply be set aside and sorted into a separate container for later revisiting. Once the generation process has finished constructing the localized triangle list for a cell, step #2 can be repeated in its entirety using the nonwalkable voxels that were set aside as a result of the previous pass’ step #2a. That is, instead of voxelizing the cell space again, the nonwalkable voxels will be used as the starting pool of voxels, with all of their flags discarded. These voxels are then processed once again like before, but with a different set of agent-driven parameters—parameters that describe the AI agent’s physical state and motion behavior from a crouching perspective. This will result in a new localized triangle list that spans across the remaining space in the cell where the AI agent can physically fit so long as it is crouched. And since the space in the cell where the AI agent could physically fit while standing is not being considered again (as those voxels were not included in the crouch-only pool of voxels), the edges of the newly calculated crouch-only triangles will exactly border the edges of the previously calculated stand-only triangles. Figure 32.9 illustrates this point.
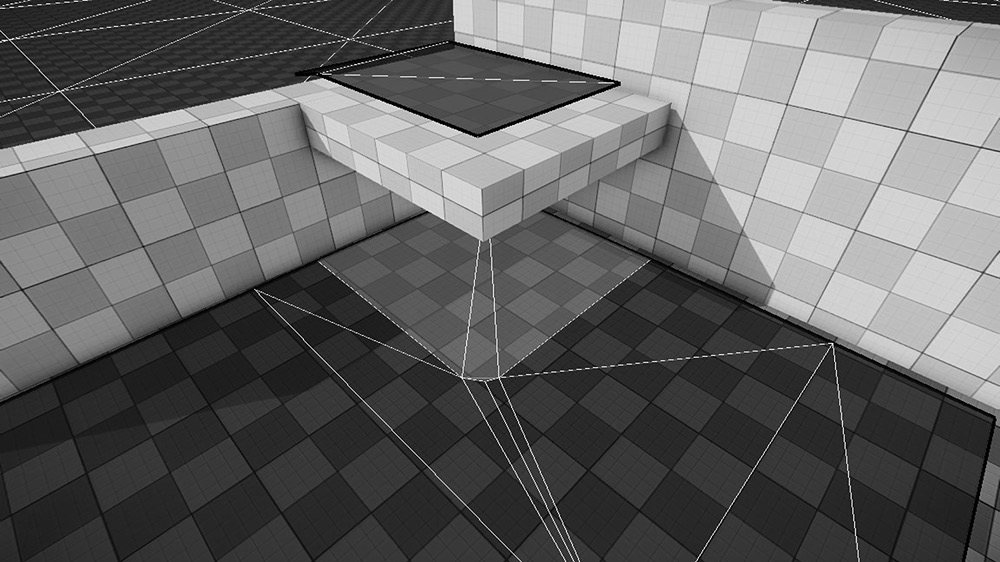
Table 32.1 shows a side-by-side comparison of what the agent-driven parameters could look like for standing and crouching.
Standing and Crouching Agent-Driven Parameters
|
Parameter |
Standing |
Crouching |
|
radius |
0.4 m |
0.4 m |
|
height |
2.0 m |
1.2 m |
|
maxStepHeight |
0.5 m |
0.25 m |
|
maxSlopeRad |
0.5 rad |
0.35 rad |
|
minWaterDepth |
0.0 m |
0.0 m |
|
maxWaterDepth |
1.5 m |
0.7 m |
Notice how the height has decreased while the radius has stayed the same. While the AI agent is crouched down, the height of its collision cylinder has naturally lowered to match the difference in displacement from the floor to its head. The maxWaterDepth has also decreased proportionally. While crouched, the AI agent’s motion behavior has been altered as well. The AI agent can no longer climb steep slopes like it used to and it cannot raise its legs high enough to pass over certain steps. As a result, the maxStepHeight and maxSlopeRad values were decreased to better match its movement restrictions while crouched.
When these crouch parameters are used to flag the remaining voxel pool (remember the voxels in the pool were the ones that were flagged as nonwalkable by a standing AI agent), the voxels will then reflect if they are nonwalkable, walkable, or border for a crouching AI agent. For example, the voxels that were placed just above the floor but below the table were nonwalkable by a 2 m tall AI agent but are now clearly walkable by a 1.2 m tall AI agent. Voxels that are being found are now walkable, some of which are forming borders due to the absence of neighboring voxels that did not carry over from the previous pass. These newly flagged border voxels can generate new polygons, which once simplified and triangulated will fill a new localized triangle list full of crouch-only triangles.
If this localized triangle list were to be combined with the localized triangle list from the previous pass and merged into the master triangle list “as is,” only the first rule will have been satisfied. The triangles from both passes will be clearly separated with no overlapping occurring. But the crouch-only triangles will have no distinguishing annotations associated with them that separate them from the stand-only triangles. An AI agent will still think it can traverse over these triangles while standing. These crouch-only triangles must be annotated in some way before being combined with the stand-only triangles, so that it is possible to distinguish between the two triangle types at path-planning time.
To satisfy the second rule, metadata are incorporated into the triangle data type. These metadata inform an AI agent of how it must alter its physical state or motion behavior in order to successfully travel over the triangle.
32.3.2 Using the Metadata
The last key of the puzzle involves getting the AI agent to make use of the metadata. When an AI agent requests a path of the pathfinder, triangle nodes in the navmesh become the vertices of the path. In the end, the AI agent is simply walking from one triangle node to another until the AI agent reaches the node from the last triangle (the one that contains the destination point within its area). The AI agent can always figure out which triangle it’s currently standing over and which it’s moving toward next, just by looking at the nodes in the path that it is following.
By including the metadata associated with the triangle in the path vertex, it then becomes possible for the AI agent to refer to the metadata while following its path. As an example, Listing 32.2 shows a simple structure describing a path vertex. The vertex is constructed from a triangle node. The metadata from that triangle node is included in the path vertex.
With the inclusion of the metadata in the path vertices, it is now just a matter of using the data at the right time. While the AI agent is following its path, it can look at the next path vertex and determine if it should be crouching or not. If the next path vertex has a true value for bCrouch, then the AI agent needs to set its stance to be crouching. If there is a false value for bCrouch, then the AI agent needs to set its stance to be standing. See Figure 32.10 as an example. A path can now be generated through standing-only space and crouch-only space interchangeably. The AI agent will set its stance correctly based on which area it is about to enter next.
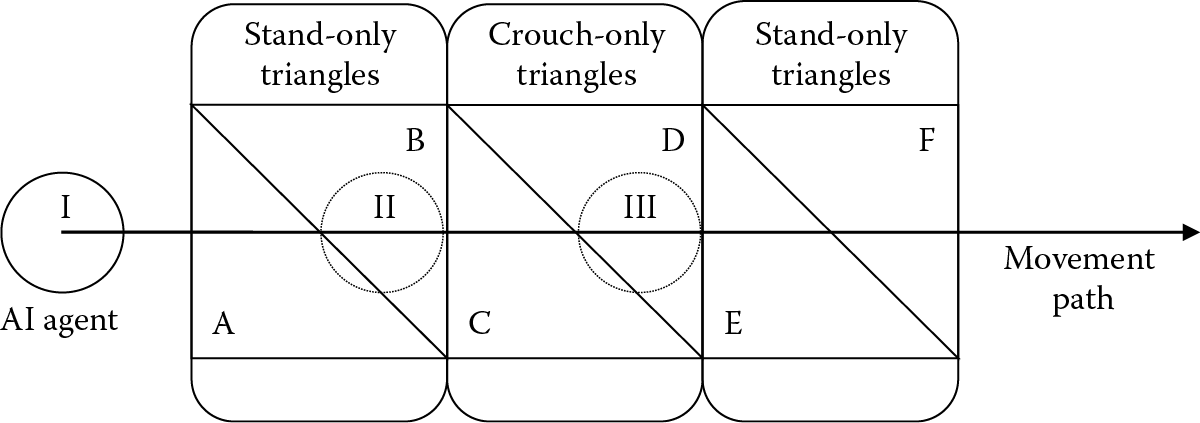
An AI agent’s movement path on top of the navmesh. Six triangles are shown from the navmesh (A through F), with the middle two (C and D) being flagged as crouch only. Three points of interests are shown as circles labeled with the numerals I through III.
Notice how the previous triangle node is passed in to the SPathVertex constructor if available. Figure 32.10 illustrates why this is needed. Six triangles are shown, forming the navmesh. A movement path is passing through all six triangles (the nodes originating from the midpoints of the triangle segments), with the AI agent being located at the start of the path (point I). Note that triangle B is stand only, while triangle C is crouch only. When the AI agent has reached the path vertex from triangle B and begins to move toward the path vertex from triangle C (point II), the AI agent will begin to crouch. This is the correct behavior, as it gives the AI agent time to crouch before leaving the stand-only space of triangle B and entering the crouch-only space of triangle C. Now look at triangles D and E. Triangle D is crouch only, while triangle E is stand only. When the AI agent has reached the path vertex from triangle D and begins to move toward the path vertex from triangle E (point III), the AI agent will have begun to stand. This is because triangle E has a false value for bCrouch, and since the path vertex made using triangle E is the next path vertex, the AI agent ought to set its stance to be standing. But the AI agent is still within the crouch-only space of triangle D. The AI agent needs to exit this space before it can stand up. The safest way to know if the AI agent has cleared the crouch-only space of triangle D is to wait until the AI agent has reached triangle E and has moved on to the next path vertex from triangle F. To keep the AI agent crouching while navigating toward triangle E, we set its bCrouch value to be true, not because triangle E’s metadata say so but because the previous node (triangle D) is crouch only.
32.4 Identifying Other Spaces
Crouch navigation is just one example of how the recycling process can be applied to a voxel-based navmesh generator. The following is an assortment of other possibilities that can be explored. Each one of these possibilities involves just adding another recycling pass of the leftover nonwalkable voxels using a different tweak to the agent-driven parameters and another entry in the triangle metadata.
32.4.1 Prone Navigation
Just like with crouch navigation, prone navigation works off the height parameter—just with a much lower value. For prone navigation, the agent-driven parameters might contain the values in Table 32.2.
Proning Agent-Driven Parameters
|
Parameter |
Standing |
Proning |
|
radius |
0.4 m |
1.0 m |
|
height |
2.0 m |
0.5 m |
|
maxStepHeight |
0.5 m |
0.1 m |
|
maxSlopeRad |
0.5 rad |
0.15 rad |
|
minWaterDepth |
0.0 m |
0.0 m |
|
maxWaterDepth |
1.5 m |
0.35 m |
The radius parameter has doubled that of the standing height. This is because, while in the prone position, the AI agent will be lying flat down on its stomach, and so from its pivot point located near its pelvis joint, the maximum radius of a circle that fully encloses the AI agent is half its standing height, or 1 m. The height parameter and the various motion behavior parameters are lowered and adjusted to fit the new height of the AI agent.
32.4.2 Swim Navigation
Swim navigation works off of the minWaterDepth and maxWaterDepth parameters. By using a minWaterDepth equal to the standing maxWaterDepth and a much larger value for the new maxWaterDepth, a navigation mesh can be generated along the sea floor of a very deep lake or even an ocean. The agent-driven parameters might contain the values in Table 32.3.
Swimming Agent-Driven Parameters
|
Parameter |
Standing |
Swimming |
|
radius |
0.4 m |
1.0 m |
|
height |
2.0 m |
0.5 m |
|
maxStepHeight |
0.5 m |
48.5 m |
|
maxSlopeRad |
0.5 rad |
2π rad |
|
minWaterDepth |
0.0 m |
1.5 m |
|
maxWaterDepth |
1.5 m |
50.0 m |
The radius and height parameters match those used in the proning parameters, as the AI agent will be swimming, which involves lying flat on its stomach. The minWaterDepth matches the maxWaterDepth used in the standing parameters. This ensures only surfaces below sea level that are lower than the standing height of the agent up to its neck are considered. The maxWaterDepth parameter uses a value of 50 m, but this value can be however low or high as is necessary for the world. It will just cap how far out into the water the AI agent can swim, given how deep the water is at that point. The maxSlopeRad parameter is set to 360°. Since the AI agent will be swimming along the surface of the water, the slope of the ground or objects underneath the water surface is irrelevant, and using a value of 360° ensures any legal calculated slope will always pass.
The maxStepHeight parameter is a bit more interesting here and was calculated as
(32.1)
Imagine a large cube resting on the sea floor 50 m below the water surface. If the height of that cube is less than 48.5 m, the AI agent can float on the water surface and not touch the top of the cube. If the height of the cube is greater than or equal to 48.5 m, then the AI agent could stand on the surface of the cube and be nearly or fully out of the water, meaning the height difference from the water surface to the top of the cube is too small for the AI agent to swim through.
Keep in mind that the AI navmesh is being generated along the sea floor and not the water surface. When constructing the path vertices along this section of the navmesh, the height of the vertex should be adjusted to match the height of the water surface, so that the AI agent does not attempt to follow a path underwater.
32.4.3 Sidestep Navigation
Sidestepping navigation involves moving one’s body without extending one’s legs forward. If one is moving to their left, then to sidestep, they would extend their left leg out to the left of their body and then retract their right leg so that it comes to rest beside their left leg again. This style of motion allows one to move through very tight spaces, as long as they can suck their gut in enough! For an AI agent, sidestepping translates into a navigation method that works with a much smaller radius. The agent-driven parameters might look something like Table 32.4.
Sidestepping Agent-Driven Parameters
|
Parameter |
Standing |
Sidestepping |
|
radius |
0.4 m |
0.2 m |
|
height |
2.0 m |
2.0 m |
|
maxStepHeight |
0.5 m |
0.5 m |
|
maxSlopeRad |
0.5 rad |
0.5 rad |
|
minWaterDepth |
0.0 m |
0.0 m |
|
maxWaterDepth |
1.5 m |
1.5 m |
These parameters are identical to the standing parameters, with the exception of radius, which has been halved to a mere 20 cm. If these parameters are used to generate sidestep-only triangles after a stand-only pass, the navmesh would be extended in tighter-fitting areas where the AI agent could still stand. An example of such an area might be a narrow ledge along the parameter of a building or a room packed with boxes making a maze of walkways.
To navigate this space requires a more stylized approach for an AI agent. A unique set of locomotion animations that drive the AI agent’s character to move forward by sidestepping is required. The collision cylinder around the AI agent might also need to be temporarily adjusted, so that the radius of the cylinder matches the maximum 20 cm space.
32.4.4 Multiple Generation Parameter Passes and Hierarchy
Due to the recursive nature of the multiple generation passes when using different parameters, the order in which the parameters are parsed is critical in determining the resulting navmesh. As each pass only considers those voxels that have previously been flagged as nonwalkable, the next set of parameters can only add (and consequently mark up) space that has not yet been included in the navmesh.
For example, consider generating the navmesh with standing, crouching, and proning parameters. If the hierarchy is standing, then proning, then crouching, the resulting navmesh will mostly consist of only standing- and proning-marked space. Since it is possible to prone anywhere where one can crouch (with the slight exception of the slightly wider radius for prone vs. crouch), all of the nonwalkable voxels from the stand-only pass will be consumed during the prone-only pass. The crouch-only pass will have very few nonwalkable voxels left for it to consider. Should the hierarchy be modified to consider crouching before proning, a better mixture of crouch-only and prone-only space will be distributed throughout the navmesh. Sometimes one method may be preferred over the other, and so there is no right or wrong answer for the order of hierarchy. This leaves the door open for many interesting combinations and resulting navmeshes to experiment with!
32.5 Playing with the Heuristic
Here is one additional footnote for consideration: it might be the case that having an AI agent that avoids crouching, proning, swimming, or whatever nonstanding navigation is preferable, if it is possible. Consider a table in the middle of the room. If the AI agent were to walk from one end of the room to the other, is it better for that AI agent to walk up to that table in the center, crouch down, crawl through the space underneath, emerge at the other end, and continue on? Or should that AI agent simply walk around the table?
Level of effort comes into play here. It requires far less energy to take the few extra steps and navigate around the table than it does to contort one’s body to fit through the space underneath the table. Unless the point beneath the table top is the destination, there most likely isn’t a logical reason for the AI agent to spend that extra energy to pass under it. This level of effort can be described through your pathfinding heuristic. By artificially scaling the pathfinding cost to move into a crouch-only triangle, an AI agent can usually be convinced that the pathway around the table is a far cheaper alternative than the direct path under the table.
32.6 Conclusion
Voxel-based navmeshes, when generated using the recycling strategy here described, can greatly enhance an AI agent’s spatial awareness through its navigation. The examples that were covered (crouching, proning, swimming, and sidestepping) are just the tip of the iceberg of possibilities. Any tweak that is made to the agent-driven parameters to cover previously discarded areas can be merged into the navmesh, and with the addition of another aggregate in the triangle metadata, an AI agent can discern the information needed to contort their bodies to fit these newly covered spaces.
We have some parting food for thought: your triangle metadata can be used for much more than what has been stated thus far. Consider including other spatial information in your triangle metadata. For example, the triangles of your navmesh that lay under a forested area could include metadata flagging the area as forested. This information could then be read by an AI agent as it paths through the forest and used to modify its behavior, perhaps guiding it to take more advantage of the abundance of cover provided by trees as good hiding spots to seek or investigate. The navmesh will almost certainly be under an AI agent’s feet at all times, so use it to your advantage! Store whatever information you can in the navmesh to help your AI agents understand the space they’re in, and opportunity will surely come knocking.
References
[Hamm 08] Hamm, D. 2008. Navigation mesh generation: An empirical approach. In AI Game Programming Wisdom 4, S. Rabin, Ed. Charles River Media, Boston, MA.
[Mononen 14] Mononen, M. 2014. Recast navigation solution. https://github.com/memononen/recastnavigation (accessed September 10, 2014).
[Shewchuk 02] Shewchuk, J.R. May 2002. Delaunay refinement algorithms for triangular mesh generation. Computational Geometry: Theory and Applications, 22(1–3):21–74.
[Snook 00] Snook, G. 2000. Simplified 3D movement and pathfinding using navigation meshes. In Game Programming Gems, M. DeLoura, Ed. Charles River Media, Boston, MA.