
Allegro has a history that goes way back to the 1980s, when it was originally developed for the Atari ST computer, which was a game programmer's dream machine (as were the Atari 800 that preceded it and the Commodore Amiga that was in a similar performance class). While IBM PC users were stuck playing text adventures and ASCII role-playing games (in which your player was represented by @ or P), Atari and Amiga programmers were playing with tile-based scrolling, hardware-accelerated sprites, and digital sound. If you revel in nostalgia as I do, I recommend you pick up High Score! The Illustrated History of Electronic Games by DeMaria and Wilson (McGraw-Hill Osborne Media, 2003). Given such roots, it is no surprise that Allegro has such terrific support for scrolling and sprites.
Here is a breakdown of the major topics in this chapter:
Working with tile-based backgrounds
There is a drawback to the scrolling functionality—it is very platform dependent. Modern games simply don't use video memory for scrolling any longer. Back in the old days, it was a necessity because system memory was so limited. We take for granted a gigabyte of memory today, but that figure was as unbelievable in the 1980s as a manned trip to Mars is today. Allegro's scrolling functionality works with console-based operating systems such as MS-DOS and console Linux, where video memory is not a graphical handle provided by the operating system as it is today. Even so, the virtual screen buffers were very limited because they were designed for video cards with 256 to 1024 KB of video memory. You were lucky to have two 320 × 240 screens, let alone enough for a large scrolling world. Therefore, this chapter will focus on creating tile-based backgrounds with scrolling using secondary buffers. As you will discover, this is far easier than trying to wrangle memory out of a video card as programmers were forced to do years ago. A memory buffer will work well with either full-screen or windowed mode.
What is scrolling? In today's gaming world, where 3D is the focus of everyone's attention, it's not surprising to find gamers and programmers who have never heard of scrolling. What a shame! The heritage of modern games is a long and fascinating one that is still relevant today, even if it is not understood or appreciated. The console industry puts great effort and value into scrolling, particularly on handheld systems, such as the Game Boy Advance. Given the extraordinary sales market for the GBA, would you be surprised to learn that more 2D games may be sold in a given day than 3D games? Oh, you're already sold on 2D games? Right; I digress. Figure 12.1 illustrates the concept of scrolling.
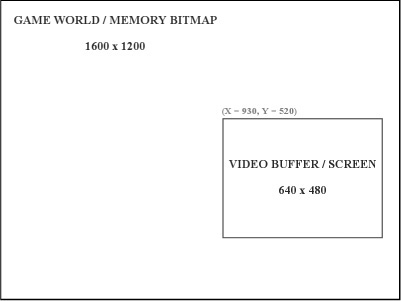
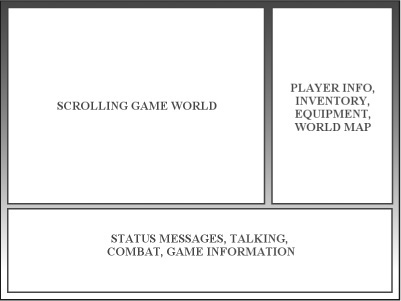
The key to scrolling is actually having something in the virtual game world to display in the scroll window. Also, I should point out that the entire screen need not be used as the scroll window. It is common to use the entire screen in scrolling-shooter games, but role-playing games often use a smaller window on the screen for scrolling, using the rest of the screen for gameplay (combat, inventory, and so on) and player/party information (see Figure 12.2).
You could display one huge bitmap image in the virtual game world representing the current level of the game, and then copy (blit) a portion of that virtual world onto the screen. This is the simplest form of scrolling. Another method uses tiles to create the game world, which I'll cover shortly. First, you'll write a short program to demonstrate how to use bitmap scrolling.
I have written a program called ScrollScreen that I will show you. The CD-ROM contains the bigbg.bmp file used in this program (look in the Chapter 12 folder). Although I encourage you to write the program yourself, feel free to load the project from the CD-ROM. Figure 12.3 shows the bigbg.bmp file.
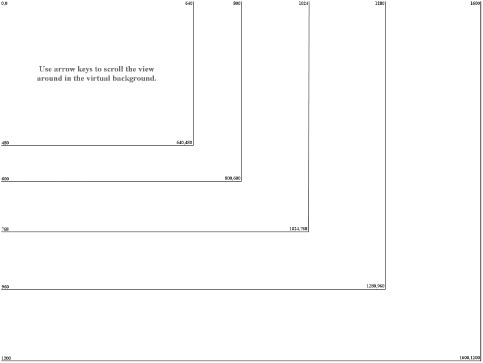
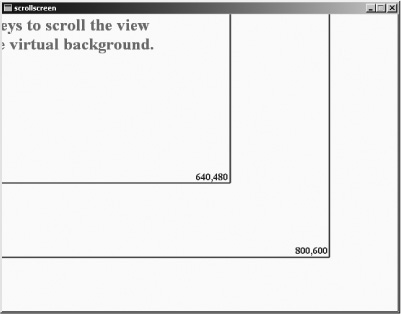
When you run the program, the program will load the bigbg.bmp image into the virtual buffer and display the upper-left corner in the 640 × 480 screen. (You can change the resolution if you want, and I also encourage you to try running the program in full-screen mode using GFX_AUTODETECT_FULLSCREEN for the best effect.) The program detects when the arrow keys have been pressed and adjusts the x and y variables accordingly. Displaying the correct view is then a simple matter of blitting with the x and y variables (see Figure 12.4).
Note
You could just as easily create a large virtual memory bitmap at runtime and draw on that bitmap using the Allegro drawing functions you have learned thus far. I have chosen to create the bitmap image beforehand and load it into the program to keep the code listing shorter. Either method works the same way.
#include <stdlib.h>
#include "allegro.h"

//define some convenient constants
#define MODE GFX_AUTODETECT_FULLSCREEN
#define WIDTH 640
#define HEIGHT 480
#define STEP 8

//virtual buffer variable
BITMAP *scroll;

//position variables
int x=0, y=0;

//main function
int main(void)
{

   //initialize allegro
   allegro_init();
   install_keyboard();
   install_timer();
   set_color_depth(16);
   set_gfx_mode(MODE, WIDTH, HEIGHT, 0, 0);

   //load the large bitmap image from disk
   scroll = load_bitmap("bigbg.bmp", NULL);

   //main loop
   while (!key[KEY_ESC])
   {
     //check right arrow
     if (key[KEY_RIGHT])
     {
        x += STEP;
        if (x > scroll->w - WIDTH)
            x = scroll->w - WIDTH;
     }

     //check left arrow
     if (key[KEY_LEFT])
     {
        x -= STEP;
        if (x < 0)
            x = 0;
     }

     //check down arrow
     if (key[KEY_DOWN])
     {
        y += STEP;
        if (y > scroll->h - HEIGHT)
            y = scroll->h - HEIGHT;
     }

     //check up arrow
     if (key[KEY_UP])
     {
        y -= STEP;
        if (y < 0)
            y = 0;
     }

     //draw the scroll window portion of the virtual buffer
     blit(scroll, screen, x, y, 0, 0, WIDTH-1, HEIGHT-1);

     //slow it down
     rest(20);
   }
   destroy_bitmap(scroll);
   allegro_exit();
   return 0;
}
END_OF_MAIN()
The first thing I would do to enhance this program is create two variables, lastx and lasty, and set them to equal x and y, respectively, at the end of the main loop. Then, before blitting the window, check to see whether x or y has changed since the last frame and skip the blit function. There is no need to keep blitting the same portion of the virtual background if it hasn't moved.
Sidebar
If you have gotten the ScrollScreen program to work, then you have taken the first step to creating a scrolling arcade-style game (or one of the hundred thousand or so games released in the past 20 years). In the old days, getting the scroller working was usually the first step to creating a sports game. In fact, that was my first assignment at Semi-Logic Entertainments back in 1994, during the prototype phase of Wayne Gretzky and The NHLPA All-Stars—to get a hockey rink to scroll as fast as possible.
Back then, I was using Borland C++ 4.5, and it just wasn't fast enough. First of all, this was a 16-bit compiler, while the 486- and Pentium-class PCs of the day were capable of 32-bit memory copies (mov instruction) that could effectively draw four pixels at a time in 8-bit color mode or two pixels at a time in 16-bit mode. Fortunately, Allegro already uses high-speed assembly instructions for blitting, as the low-level functions are optimized for each operating system using assembly language.
You have seen what a simple scroller looks like, even though it relied on keyboard input to scroll. A high-speed scrolling arcade game would automatically scroll horizontally or vertically, displaying a ground-, air-, or space-based terrain below the player (usually represented by an airplane or a spaceship). The point of these games is to keep the action moving so fast that the player doesn't have a chance to rest from one wave of enemies to the next. Two upcoming chapters have been dedicated to these very subjects! For the time being, I want to keep things simple to cover the basics of scrolling before you delve into these advanced chapters.
Tip
For an in-depth look at vertical scrolling, see Chapter 15, “Vertical Scrolling Arcade Games.” If you prefer to go horizontal, you can look forward to Chapter 16, “Horizontal Scrolling Platform Games.”
A background is comprised of imagery or terrain in one form or another, upon which the sprites are drawn. The background might be nothing more than a pretty picture behind the action in a game, or it might take an active part, as in a scroller. When you are talking about scrollers, they need not be relegated only to the high-speed arcade games. Role-playing games are usually scrollers too, as are most sports games.
You should design the background around the goals of your game, not the other way around. You should not come up with some cool background and then try to build the game around it. (However, I admit that this is often how games are started.) You never want to rely on a single cool technology as the basis for an entire game, or the game will be forever remembered as a trendy game that tried to cash in on the latest fad. Instead of following and imitating, set your own precedents and make your own standards!
What am I talking about, you might ask? You might have the impression that anything and everything that could possibly have been done with a scrolling game has already been done ten times over. Not true. Not true! Remember when Doom first came out? Everyone had been imitating Wolfenstein 3D when Carmack and Romero bumped up the notch a few hundred points and raised everyone's expectations so high that shockwaves reverberated throughout the entire game industry—console and PC alike.
Do you really think it has all been done before and there is no more room for innovation, that the game industry is saturated and it's impossible to make a successful “indie” game? That didn't stop Bungie from going for broke on their first game project. Halo has made its mark in gaming history by upping everyone's expectations for superior physics and intelligent opponents. Now, a few years later, what kinds of games are coming out? What is the biggest industry buzzword? Physics. Design a game today without it, and suddenly your game is so 1990s in the gaming press. It's all about physics and AI now, and that started with Halo. Rather, it was perfected with Halo—I can't personally recall a game with that level of interaction before Halo came along. There is absolutely no reason why you can't invent the next innovation or revolution in gaming, even in a 2D game.
Tip
Eh . . . all this philosophizing is giving me a headache. Time for some Strong Bad. Check out http://www.homestarrunner.com/sbemail94.html for one of my favorites. Okay, back to business.
The real power of a scrolling background comes from a technique called tiling. Tiling is a process in which there really is no background, just an array of tiles that make up the background as it is displayed. In other words, it is a virtual virtual background and it takes up very little memory compared to a full bitmapped background (such as the one in ScrollScreen). Take a look at Figure 12.5 for an example.
Can you count the number of tiles used to construct the background in Figure 12.5? Eighteen tiles make up this image, actually. Imagine that—an entire game screen built using a handful of tiles, and the result is pretty good! Obviously a real game would have more than just grass, roads, rivers, and bridges; a real game would have sprites moving on top of the background. How about an example? I thought you'd like that idea.
The TileScroll program uses tiles to fill the large background bitmap when the program starts. Other than that initial change, the program functions exactly like the ScrollScreen program. Take a look at Figure 12.6.
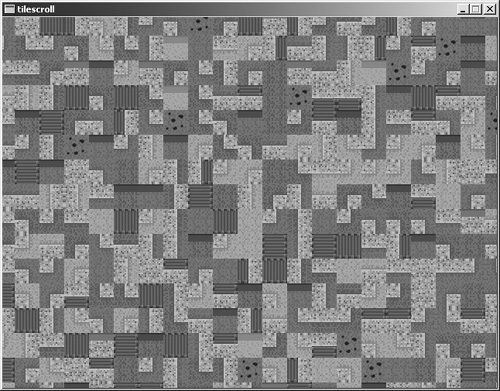
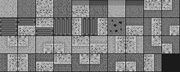
You might wonder why the screen looks like such a mess. That was intentional, not a mistake. The tiles are drawn to the background randomly, so they're all jumbled incoherently—which is, after all, the nature of randomness. After this, I'll show you how to place the tiles in an actual order that makes sense. Also, you can look forward to an entire chapter dedicated to this subject in Chapter 13, "Creating a Game World: Editing Tiles and Levels.” Why an entire chapter just for this subject? Because it's huge! You're just getting into the basics here, but Chapter 13 will explore map editors, creating game worlds, and other higher-level concepts. The actual bitmap containing the tiles is shown in Figure 12.7.
Here's the source code for the TileScroll program:
#include <stdlib.h>
#include "allegro.h"

//define some convenient constants
#define MODE GFX_AUTODETECT_FULLSCREEN
#define WIDTH 640
#define HEIGHT 480
#define STEP 8
#define TILEW 32
#define TILEH 32
#define TILES 39
#define COLS 10

//temp bitmap
BITMAP *tiles;

//virtual background buffer
BITMAP *scroll;

//position variables
int x=0, y=0, n;
int tilex, tiley;


void drawframe(BITMAP *source, BITMAP *dest,
               int x, int y, int width, int height,
               int startx, int starty, int columns, int frame)
{
    //calculate frame position
    int framex = startx + (frame % columns) * width;
    int framey = starty + (frame / columns) * height;
    //draw frame to destination bitmap
    masked_blit(source,dest,framex,framey,x,y,width,height);
}

//main function
int main(void)
{
    //initialize allegro
    allegro_init();
    install_keyboard();
    install_timer();
    srand(time(NULL));
    set_color_depth(16);
    set_gfx_mode(MODE, WIDTH, HEIGHT, 0, 0);

    //create the virtual background
    scroll = create_bitmap(1600, 1200);
//load the tile bitmap
tiles = load_bitmap("tiles.bmp", NULL);

//now draw tiles randomly on virtual background
for (tiley=0; tiley < scroll->h; tiley+=TILEH)
{
    for (tilex=0; tilex < scroll->w; tilex+=TILEW)
    {
        //pick a random tile
        n = rand() % TILES;
        //draw the tile
        drawframe(tiles, scroll, tilex, tiley, TILEW+1, TILEH+1,
            0, 0, COLS, n);
    }
}

//main loop
while (!key[KEY_ESC])
{
    //check right arrow
    if (key[KEY_RIGHT])
    {
      x += STEP;
      if (x > scroll->w - WIDTH)
          x = scroll->w - WIDTH;
    }

    //check left arrow
    if (key[KEY_LEFT])
    {
       x -= STEP;
       if (x < 0)
           x = 0;
    }

    //check down arrow
    if (key[KEY_DOWN])
    {
       y += STEP;
       if (y > scroll->h - HEIGHT)
           y = scroll->h - HEIGHT;
    }

    //check up arrow
    if (key[KEY_UP])
    {
       y -= STEP;
       if (y < 0)
           y = 0;
    }

    //draw the scroll window portion of the virtual buffer
    blit(scroll, screen, x, y, 0, 0, WIDTH-1, HEIGHT-1);

    //slow it down
    rest(20);
  }

  destroy_bitmap(scroll);
  destroy_bitmap(tiles);
  return 0;
}
END_OF_MAIN()Displaying random tiles just to make a proof-of-concept is one thing, but it is not very useful. True, you have some code to create a virtual background, load tiles onto it, and then scroll the game world. What you really need won't be covered until Chapter 13, so as a compromise, you can create game levels using an array to represent the game world. In the past, I have generated a realistic-looking game map with source code, using an algorithm that matched terrain curves and straights (such as the road, bridge, and river) so that I created an awesome map from scratch, all by myself. The result, I'm sure you'll agree, is one of the best maps ever made. Some errors in the tile matching occurred, though, and a random map doesn't have much point in general. I mean, building a random landscape is one thing, but constructing it at runtime is not a great solution—even if your map-generating routine is very good. For instance, many games, such as Warcraft III, Age of Mythology, and Civilization III, can generate the game world on the fly. Obviously, the programmers spent a lot of time perfecting the world-generating routines. If your game would benefit by featuring a randomly generated game world, then your work is cut out for you but the results will be worth it. This is simply one of those design considerations that you must make, given that you have time to develop it.
Assuming you don't have the means to generate a random map at this time, you can simply create one within an array. Then you can modify the TileScroll program so it uses the array. Where do you start? First of all, you should realize that the tiles are numbered and should be referenced this way in the map array.
Here is what the array looks like, as defined in the GameWorld program:
int map[MAPW*MAPH] = {
   0,0,0,0,0,0,0,0,0,0,0,0,0,0,0,0,0,0,0,0,0,0,0,0,0,
   0,2,2,2,2,2,2,2,2,2,2,2,2,2,2,2,2,2,2,2,2,2,2,2,0,
   0,2,2,2,2,2,2,2,2,2,2,2,2,2,2,2,2,2,2,2,2,2,2,2,0,
   0,2,2,2,2,2,2,2,2,2,2,2,2,2,2,2,2,2,2,2,2,2,2,2,0,
   0,2,2,2,2,2,2,2,2,2,2,2,2,2,2,2,2,2,2,2,2,2,2,2,0,
   0,2,2,2,2,2,2,2,2,2,2,2,2,2,2,2,2,2,2,2,2,2,2,2,0,
   0,2,2,2,2,2,2,2,2,2,2,2,2,2,2,2,2,2,2,2,2,2,2,2,0,
   0,2,2,2,2,2,2,2,2,2,2,2,2,2,2,2,2,2,2,2,2,2,2,2,0,
   0,2,2,2,2,2,2,2,2,2,2,2,2,2,2,2,2,2,2,2,2,2,2,2,0,
   0,2,2,2,2,2,2,2,2,2,2,2,2,2,2,2,2,2,2,2,2,2,2,2,0,
   0,2,2,2,2,2,2,2,2,2,2,2,2,2,2,2,2,2,2,2,2,2,2,2,0,
   0,2,2,2,2,2,2,2,2,2,2,2,2,2,2,2,2,2,2,2,2,2,2,2,0,
   0,2,2,2,2,2,2,2,2,2,2,2,2,2,2,2,2,2,2,2,2,2,2,2,0,
   0,2,2,2,2,2,2,2,2,2,2,2,2,2,2,2,2,2,2,2,2,2,2,2,0,
   0,2,2,2,2,2,2,2,2,2,2,2,2,2,2,2,2,2,2,2,2,2,2,2,0,
   0,2,2,2,2,2,2,2,2,2,2,2,2,2,2,2,2,2,2,2,2,2,2,2,0,
   0,2,2,2,2,2,2,2,2,2,2,2,2,2,2,2,2,2,2,2,2,2,2,2,0,
   0,2,2,2,2,2,2,2,2,2,2,2,2,2,2,2,2,2,2,2,2,2,2,2,0,
   0,2,2,2,2,2,2,2,2,2,2,2,2,2,2,2,2,2,2,2,2,2,2,2,0,
   0,2,2,2,2,2,2,2,2,2,2,2,2,2,2,2,2,2,2,2,2,2,2,2,0,
   0,2,2,2,2,2,2,2,2,2,2,2,2,2,2,2,2,2,2,2,2,2,2,2,0,
   0,2,2,2,2,2,2,2,2,2,2,2,2,2,2,2,2,2,2,2,2,2,2,2,0,
   0,2,2,2,2,2,2,2,2,2,2,2,2,2,2,2,2,2,2,2,2,2,2,2,0,
   0,2,2,2,2,2,2,2,2,2,2,2,2,2,2,2,2,2,2,2,2,2,2,2,0,
   0,0,0,0,0,0,0,0,0,0,0,0,0,0,0,0,0,0,0,0,0,0,0,0,0,
};
It's not complicated—simply a bunch of twos (grass) bordered by zeroes (stone). The trick here is that this is really only a single-dimensional array, but the listing makes it obvious how the map will look because there are 25 numbers in each row—the same number of tiles in each row. I did this intentionally so you can use this as a template for creating your own maps. And you can create more than one map if you want. Simply change the name of each map and reference the map
you want in the blit function so that your new map will show up. You are not limited in adding more tiles to each row. One interesting thing you can try is making map a two-dimensional array containing many maps, and then changing the map at runtime! How about looking for the keys 1–9 (KEY_1, KEY_2, . . . KEY_9), and then changing the map number to correspond to the key that was pressed? It would be interesting to see the map change right before your eyes without rerunning the program (sort of like warping). Now are you starting to see the potential? You could use this simple scrolling code as the basis for any of a hundred different games if you have the creative gumption to do so.
I have prepared a legend of the tiles and the value for each in Figure 12.8. You can use the legend while building your own maps.

Figure 12.8. A legend of the tiles and their reference numbers used to create a map in the GameWorld program.
Note
All of the tiles used in this chapter were created by Ari Feldman, and I also owe him a debt of gratitude for creating most of the artwork used in this book. If you would like to contact Ari to ask him about custom artwork for your own game, you can reach him at http://www.flyingyogi.com.
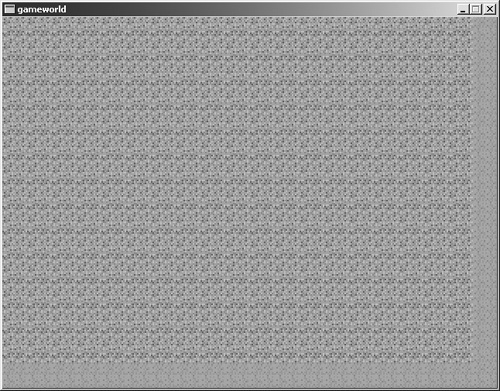
Call the new program GameWorld. This new demo will be similar to TileScroll, but it will use a map array instead of placing the tiles randomly. This program will also use a smaller virtual background to cut down on the size of the map array. Why? Not to save memory, but to make the program more manageable. Because the virtual background was 1600 × 1200 in the previous program, it would require 50 columns of tiles across and 37 rows of tiles down to fill it! That is no problem at all for a map editor program, but it's too much data to type in manually. To make it more manageable, the new virtual background will be 800 pixels across. I know, I know—that's not much bigger than the 640 × 480 screen. The point is to demonstrate how it will work, not to build a game engine, so don't worry about it. If you want to type in the values to create a bigger map, by all means, go for it! That would be a great learning experience, as a matter of fact. For your purposes here (and with my primary goal of being able to print an entire row of numbers in a single source code line in the book), I'll stick to 25 tiles across and 25 tiles down. You can work with a map that is deeper than it is wide, so that will allow you to test scrolling up and down fairly well. Figure 12.9 shows the output from the GameWorld program.
How about that source code? Let's just add a few lines to the TileScroll program to come up with this new version. I recommend creating a new project called GameWorld, setting up the linker options for Allegro's library file, and then pasting the source code from TileScroll into the new main.c file in the Game-World program. If you don't feel like doing all that, fine; go ahead and mess up the TileScroll program!
First, up near the top with the other defines, add these lines:
#define MAP_ACROSS 25
#define MAP_DOWN 25
#define MAPW MAP_ACROSS * TILEW
#define MAPH MAP_DOWN * TILEH
Then, of course, add the map array definition below the defines. (Refer back a few pages for the listing.) Only one more change and you're finished. You need to make a slight change to the section of code that draws the tiles onto the virtual background bitmap. You can remove the line that sets n to a random number; simply change the blit line. Note the last parameter of drawframe, which was changed from n to map[n++]. That's the only change you need to make. Now go ahead and build this puppy, and take it for a spin.
//now draw tiles randomly on virtual background
for (tiley=0; tiley < scroll->h; tiley+=TILEH)
{
    for (tilex=0; tilex < scroll->w; tilex+=TILEW)
    {
        //draw the tile
        drawframe(tiles, scroll, tilex, tiley, TILEW+1, TILEH+1,
           0, 0, COLS, map[n++]);
   }
}
It's a lot more interesting with a real map to scroll instead of jumbled tiles randomly thrown about. I encourage you to modify and experiment with the GameWorld program to see what it can do. Before you start making a lot of modifications, you'll likely need the help of some status information printed on the screen. If you want, here is an addition you can make to the main loop, just following the blit. Again, this is optional.
//display status info
textprintf_ex(screen,font,0,0,makecol(0,0,0),-1,
    "Position = (%d,%d)", x, y);
Enlarge the map to see how big you can make it. Try having the program scroll the map (with wrapping) without requiring user input. This is actually a fairly advanced topic that will be covered in future chapters on scrolling. You should definitely play around with the map array to come up with your own map, and you can even try a different set of tiles. If you have found any free game tiles on the web (or if you have hired an artist to draw some custom tiles for your game), note the layout and size of each tile, and then you can modify the constants in the GameWorld program to accommodate the new tile set. See what you can come up with; experimentation is what puts the “science” in computer science.
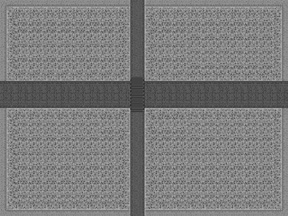
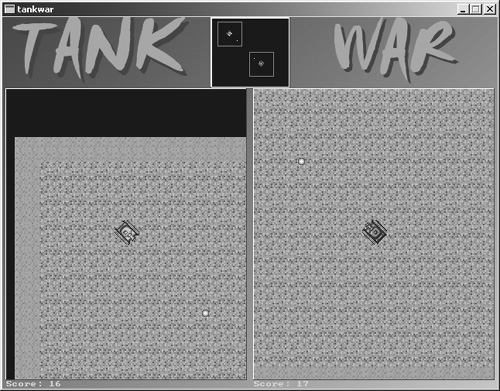
I have been looking forward to this edition of Tank War since the first chapter in which it was introduced (Chapter 4, “Writing Your First Allegro Game”). The only drawback is that at least half of the game has been revised, but the result is well worth the effort. The game now features two (that's right, two!) scrolling game windows on the screen—one for each player. Shall I count the improvements? There's a new bitmap to replace the border and title; the game now uses a scrolling background, one for each player (and which you can edit to create your own custom battlefields); the game is now double buffered; debug messages have been removed; and the interface has been spruced up. Take a look at Figure 12.10 for a glimpse at the new game.
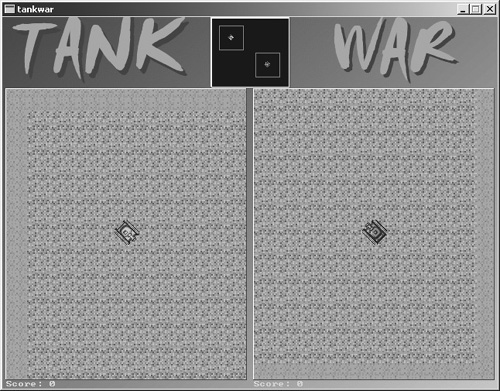
Terrific, isn't it? This game could seriously use some new levels with more creativity. Remember, this is a tech demo at best, something to be used as a learning experience, so it must be easy to understand, not necessarily as awesome as it could be. I leave that to you! After I've done the hard work and walked you through each step of the game, then it's your job to create awesome new levels for the game.
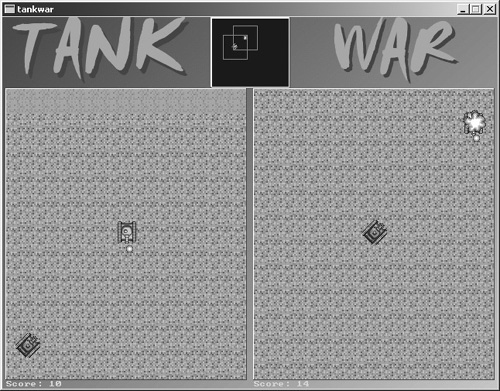
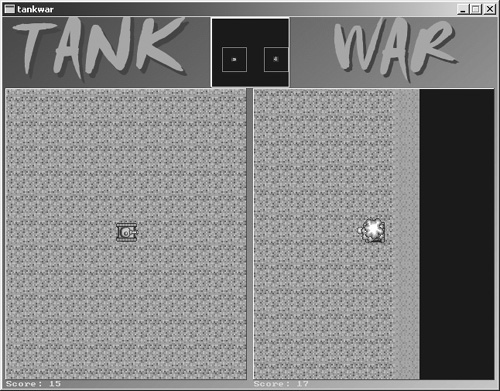
Since you'll be spending so much time playing this great game with your friends (unless you suffer from multiple personality disorder and are able to control both tanks at the same time), let me give you a quick tour of the game, then we'll get started on the source code. Figure 12.11 shows what the game looks like when player 2 hits player 1. The explosion should occur on both windows at the same time.
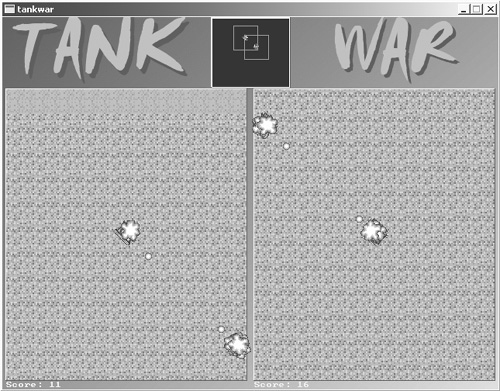
The next screenshot of the game (see Figure 12.12) shows both tanks engulfed in explosions. D'oh! Talk about mutually assured destruction. You might be wondering where these ultra-cool explosions came from. Again, thanks to Ari Feldman's wonderful talent, we have an explosion sprite that can be rotated, tweaked, and blitted to make those gnarly boom-booms.
Okay, the next two figures show a sequence that is sad but true: someone is going to die. Figure 12.13 shows player 1 having fired a bullet.
Then, referring to Figure 12.14—ooooh, direct hit; he's toast.
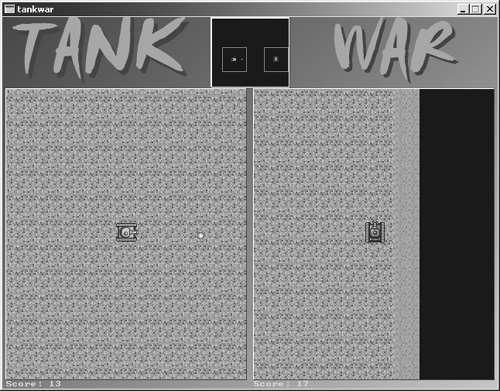
Okay, the last image shows something interesting that I want to bring to your attention when designing levels. Take a look at Figure 12.15.
See how the border of the game world is black? That's not just empty space, it's a blank tile from the tiles.bmp image. It is necessary to insert blanks around the edges of the map so the tanks will seem to actually move up to the edge of the map. If you omit a border like this, the tanks will not be able to reach the true border of the map. Just a little trick for you at no cost; although, I'm fairly certain someone has written a book about this.
There's something about the project that you will probably object about, and that is a lack of integration for some of the new concepts we've learned about. For instance, the angular motion code and sprite classes from Chapter 10, and the new timing code from Chapter 11. To be honest, the game hasn't progressed enough for those advanced features yet. I don't want the code to get too out of control this early on, because we've still got a ways to go. Just take this chapter, for example. You've only just learned about tile-based scrolling, and we're trying to integrate that into the game, and it involves rewriting a lot of the game's source code!
Although the game is enhanced even more in Chapters 13, 14, and 18, the truly advanced version of Tank War has been provided on the CD-ROM and is not covered in the text, mainly because the code for the final Tank War was too involved to cover in a chapter. (The fifth revision covered in this chapter requires over twenty pages, and the final version of Tank War is twice as complex as this version.) The final game incorporates game state with a title screen and victory screen, health bars, sound and music, and some terrific-looking new graphics. In addition to these features, the final game uses the sprite class, incorporates angular velocity (thus eliminating the 8-way movement!), a gigantic new battleground map, and the ability to fire a bullet at any angle. You may open the TankWar-Final project from the CD-ROM and explore the complete game in it's final state!
It's time to get down and dirty with the new source code for Tank War. Let me paint the picture this way, and explain things straight up. Almost everything about the source has been changed. I'm afraid a line-by-line change list isn't possible this time because over half the game has been modified. I mean, come on, it's got dual scrolling, what do you expect, a couple of line changes? Er, sorry about that, been watching too much Strong Bad. Okay, let's get started.
The first significant change to the game is that it is now spread across several source code files. I decided that this was easier to maintain, and would be easier to understand on your part rather than wading through the 10-page long source code listing in a single main.c file. I'll go over this with you, but you may feel free to load the project off the CD-ROM, from the Chapter 12 folder if you are in a hurry. I heartily recommend you follow along as there's a lot of real-world experience to be gained by watching how this game is built. Don't be a copy-paster!
First up is the tankwar.h file containing all the definitions for the game.
/////////////////////////////////////////////////////////////////////
// Game Programming All In One, Third Edition
// Tank War Enhancement 5 - tankwar.h
/////////////////////////////////////////////////////////////////////

#ifndef _TANKWAR_H
#define _TANKWAR_H

#include "allegro.h"

//define some game constants
#define MODE GFX_AUTODETECT_WINDOWED
#define WIDTH 640
#define HEIGHT 480
#define MAXSPEED 4
#define BULLETSPEED 10
#define TILEW 32
#define TILEH 32
#define TILES 39
#define COLS 10
#define MAP_ACROSS 31
#define MAP_DOWN 33
#define MAPW MAP_ACROSS * TILEW
#define MAPH MAP_DOWN * TILEH
#define SCROLLW 310
#define SCROLLH 375

//define some colors
#define TAN makecol(255,242,169)
#define BURST makecol(255,189,73)
#define BLACK makecol(0,0,0)
#define WHITE makecol(255,255,255)
#define GRAY makecol(128,128,128)
#define GREEN makecol(0,255,0)

//define the sprite structure
typedef struct SPRITE
{
//new elements
   int dir, alive;

   int x,y;
   int width,height;
   int xspeed,yspeed;
   int xdelay,ydelay;
   int xcount,ycount;
   int curframe,maxframe,animdir;
   int framecount,framedelay;
}SPRITE;

SPRITE mytanks[2];
SPRITE *tanks[2];
SPRITE mybullets[2];
SPRITE *bullets[2];

//declare some variables
int gameover;
int scores[2];
int scrollx[2], scrolly[2];
int startx[2], starty[2];
int tilex, tiley, n;
int radarx, radary;

//sprite bitmaps
BITMAP *tank_bmp[2][8];
BITMAP *bullet_bmp;
BITMAP *explode_bmp;
//the game map
extern int map[];

//double buffer
BITMAP *buffer;

//bitmap containing source tiles
BITMAP *tiles;

//virtual background buffer
BITMAP *scroll;

//screen background
BITMAP *back;

//function prototypes
void drawtank(int num);
void erasetank(int num);
void movetank(int num);
void explode(int num, int x, int y);
void movebullet(int num);
void drawbullet(int num);
void fireweapon(int num);
void forward(int num);
void backward(int num);
void turnleft(int num);
void turnright(int num);
void getinput();
void setuptanks();
void setupscreen();
int inside(int,int,int,int,int,int);
BITMAP *grabframe(BITMAP *, int, int, int, int, int, int);

#endifI have transplanted all of the routines related to handling bullets and firing the weapons into a file called bullet.c. Isolating the bullet code in this file makes it easy to locate these functions without having to wade through a huge single listing. If you haven't already, add a new file to your Tank War project named bullet.c and type the code into this new file.
/////////////////////////////////////////////////////////////////////
// Game Programming All In One, Third Edition
// Tank War Enhancement 5 - bullet.c
/////////////////////////////////////////////////////////////////////

#include "tankwar.h"

void explode(int num, int x, int y)
{
   int n;

   //load explode image
   if (explode_bmp == NULL)
   {
      explode_bmp = load_bitmap("explode.bmp", NULL);
   }

   //draw the explosion bitmap several times
   for (n = 0; n < 5; n++)
   {
     rotate_sprite(screen, explode_bmp,
         x + rand()%10 - 20, y + rand()%10 - 20,
         itofix(rand()%255));

     rest(30);
   }
}

void drawbullet(int num)
{
   int n;
   int x, y;

   x = bullets[num]->x;
   y = bullets[num]->y;

   //is the bullet active?
   if (!bullets[num]->alive) return;

   //draw bullet sprite
   for (n=0; n<2; n++)
   {
       if (inside(x, y, scrollx[n], scrolly[n],
       scrollx[n] + SCROLLW - bullet_bmp->w,
       scrolly[n] + SCROLLH - bullet_bmp->h))

       //draw bullet, adjust for scroll
       draw_sprite(buffer, bullet_bmp, startx[n] + x-scrollx[n],
         starty[n] + y-scrolly[n]);
   }

   //draw bullet on radar
   putpixel(buffer, radarx + x/10, radary + y/12, WHITE);

}

void movebullet(int num)
{
   int x, y, tx, ty;

   x = bullets[num]->x;
   y = bullets[num]->y;

   //is the bullet active?
   if (!bullets[num]->alive) return;

   //move bullet
   bullets[num]->x += bullets[num]->xspeed;
   bullets[num]->y += bullets[num]->yspeed;
   x = bullets[num]->x;
   y = bullets[num]->y;

   //stay within the virtual screen
   if (x < 0 || x > MAPW-6 || y < 0 || y > MAPH-6)
   {
      bullets[num]->alive = 0;
      return;
   }

   //look for a direct hit using basic collision
   tx = scrollx[!num] + SCROLLW/2;
   ty = scrolly[!num] + SCROLLH/2;

   //if (collided(bullets[num], tanks[!num]))
   if (inside(x,y,tx-15,ty-15,tx+15,ty+15))
   {
    //kill the bullet
    bullets[num]->alive = 0;

    //blow up the tank
        x = scrollx[!num] + SCROLLW/2;
        y = scrolly[!num] + SCROLLH/2;

        if (inside(x, y,
           scrollx[num], scrolly[num],
           scrollx[num] + SCROLLW, scrolly[num] + SCROLLH))
       {
          //draw explosion in my window
          explode(num, startx[num]+x-scrollx[num],
            starty[num]+y-scrolly[num]);
       }

     //draw explosion in enemy window
     explode(num, tanks[!num]->x, tanks[!num]->y);
     scores[num]++;
  }
}

void fireweapon(int num)
{
    int x = scrollx[num] + SCROLLW/2;
    int y = scrolly[num] + SCROLLH/2;

    //ready to fire again?
    if (!bullets[num]->alive)
    {
       bullets[num]->alive = 1;

       //fire bullet in direction tank is facing
       switch (tanks[num]->dir)
       {
          //north
          case 0:
             bullets[num]->x = x-2;
             bullets[num]->y = y-22;
             bullets[num]->xspeed = 0;
             bullets[num]->yspeed = -BULLETSPEED;
             break;
          //NE
          case 1:
             bullets[num]->x = x+18;
             bullets[num]->y = y-18;
             bullets[num]->xspeed = BULLETSPEED;
             bullets[num]->yspeed = -BULLETSPEED;
             break;
          //east
          case 2:
             bullets[num]->x = x+22;
             bullets[num]->y = y-2;
             bullets[num]->xspeed = BULLETSPEED;
             bullets[num]->yspeed = 0;
             break;
          //SE
          case 3:
             bullets[num]->x = x+18;
             bullets[num]->y = y+18;
             bullets[num]->xspeed = BULLETSPEED;
             bullets[num]->yspeed = BULLETSPEED;
             break;
          //south
          case 4:
             bullets[num]->x = x-2;
             bullets[num]->y = y+22;
             bullets[num]->xspeed = 0;
             bullets[num]->yspeed = BULLETSPEED;
             break;
          //SW
          case 5:
             bullets[num]->x = x-18;
             bullets[num]->y = y+18;
             bullets[num]->xspeed = -BULLETSPEED;
             bullets[num]->yspeed = BULLETSPEED;
             break;
         //west
         case 6:
             bullets[num]->x = x-22;
             bullets[num]->y = y-2;
             bullets[num]->xspeed = -BULLETSPEED;
             bullets[num]->yspeed = 0;
             break;
         //NW
         case 7:
             bullets[num]->x = x-18;
             bullets[num]->y = y-18;
             bullets[num]->xspeed = -BULLETSPEED;
             bullets[num]->yspeed = -BULLETSPEED;
             break;
      }
   }
}Next up is a listing containing the code for managing the tanks in the game. This includes the drawtank and movetank functions. Note that erasetank has been “erased” from this version of the game. As a matter of fact, you may have noticed that there is no more erase code in the game. The scrolling windows erase everything so there's no need to erase sprites. Add a new file to your Tank War project named tank.c and type this code into the new file.
/////////////////////////////////////////////////////////////////////
// Game Programming All In One, Third Edition
// Tank War Enhancement 5 - tank.c
/////////////////////////////////////////////////////////////////////

#include "tankwar.h"

void drawtank(int num)
{
    int dir = tanks[num]->dir;
    int x = tanks[num]->x-15;
    int y = tanks[num]->y-15;
    draw_sprite(buffer, tank_bmp[num][dir], x, y);

    //what about the enemy tank?
    x = scrollx[!num] + SCROLLW/2;
    y = scrolly[!num] + SCROLLH/2;
    if (inside(x, y,
       scrollx[num], scrolly[num],
       scrollx[num] + SCROLLW, scrolly[num] + SCROLLH))
   {
       //draw enemy tank, adjust for scroll
       draw_sprite(buffer, tank_bmp[!num][tanks[!num]->dir],
       startx[num]+x-scrollx[num]-15, starty[num]+y-scrolly[num]-15);
   }
}


void movetank(int num){
    int dir = tanks[num]->dir;
    int speed = tanks[num]->xspeed;


    //update tank position
    switch(dir)
    {
       case 0:
            scrolly[num] -= speed;
            break;
       case 1:
           scrolly[num] -= speed;
           scrollx[num] += speed;
           break;
       case 2:
           scrollx[num] += speed;
           break;
       case 3:
           scrollx[num] += speed;
           scrolly[num] += speed;
           break;
       case 4:
           scrolly[num] += speed;
           break;
       case 5:
           scrolly[num] += speed;
           scrollx[num] -= speed;
           break;
       case 6:
           scrollx[num] -= speed;
           break;
       case 7:
          scrollx[num] -= speed;
          scrolly[num] -= speed;
          break;
     }
     //keep tank inside bounds
     if (scrollx[num] < 0)
         scrollx[num] = 0;
     if (scrollx[num] > scroll->w - SCROLLW)
         scrollx[num] = scroll->w - SCROLLW;
     if (scrolly[num] < 0)
         scrolly[num] = 0;
     if (scrolly[num] > scroll->h - SCROLLH)
         scrolly[num] = scroll->h - SCROLLH;
}The next listing encapsulates (I just love that word!) the keyboard input functionality of the game into a single file named input.c. Herein you will find the forward, backward, turnleft, turnright, and getinput functions. Add a new file to your Tank War project and type the code into this new file.
/////////////////////////////////////////////////////////////////////
// Game Programming All In One, Third Edition
// Tank War Enhancement 5 - input.c
/////////////////////////////////////////////////////////////////////

#include "tankwar.h"

void forward(int num)
{
   //use xspeed as a generic "speed" variable
   tanks[num]->xspeed++;
   if (tanks[num]->xspeed > MAXSPEED)
       tanks[num]->xspeed = MAXSPEED;
}

void backward(int num)
{
   tanks[num]->xspeed-;
   if (tanks[num]->xspeed < -MAXSPEED)
       tanks[num]->xspeed = -MAXSPEED;
}

void turnleft(int num)
{
   tanks[num]->dir--;
   if (tanks[num]->dir < 0)
       tanks[num]->dir = 7;
}

void turnright(int num)
{
   tanks[num]->dir++;
   if (tanks[num]->dir > 7)
       tanks[num]->dir = 0;
}

void getinput()
{
   //hit ESC to quit
   if (key[KEY_ESC])    gameover = 1;

   //WASD - SPACE keys control tank 1
   if (key[KEY_W])      forward(0);
   if (key[KEY_D])      turnright(0);
   if (key[KEY_A])      turnleft(0);
   if (key[KEY_S])      backward(0);
   if (key[KEY_SPACE])  fireweapon(0);

   //arrow - ENTER keys control tank 2
   if (key[KEY_UP])     forward(1);
   if (key[KEY_RIGHT])  turnright(1);
   if (key[KEY_DOWN])   backward(1);
   if (key[KEY_LEFT])   turnleft(1);
   if (key[KEY_ENTER])  fireweapon(1);

   //short delay after keypress
   rest(20);

}The game setup functions are easily the most complicated functions of the entire game, so it is good they are run only once when the game starts. Here you will find the setupscreen and setuptanks functions. Add a new file to your Tank War project named setup.c and type the following code into this new file.
/////////////////////////////////////////////////////////////////////
// Game Programming All In One, Third Edition
// Tank War Enhancement 5 - setup.c
/////////////////////////////////////////////////////////////////////

#include "tankwar.h"

void setuptanks()
{
    int n;

    //configure player 1's tank
    tanks[0] = &mytanks[0];
    tanks[0]->x = 30;
    tanks[0]->y = 40;
    tanks[0]->xspeed = 0;
    scores[0] = 0;
    tanks[0]->dir = 3;

    //load first tank bitmap
    tank_bmp[0][0] = load_bitmap("tank1.bmp", NULL);

   //rotate image to generate all 8 directions
   for (n=1; n<8; n++)
   {
       tank_bmp[0][n] = create_bitmap(32, 32);
       clear_to_color(tank_bmp[0][n], makecol(255,0,255));
       rotate_sprite(tank_bmp[0][n], tank_bmp[0][0],
           0, 0, itofix(n*32));
   }

   //configure player 2's tank
   tanks[1] = &mytanks[1];
   tanks[1]->x = SCREEN_W-30;
   tanks[1]->y = SCREEN_H-30;
   tanks[1]->xspeed = 0;
   scores[1] = 0;
   tanks[1]->dir = 7;

   //load second tank bitmap
   tank_bmp[1][0] = load_bitmap("tank2.bmp", NULL);

   //rotate image to generate all 8 directions
   for (n=1; n<8; n++)
   {
       tank_bmp[1][n] = create_bitmap(32, 32);
       clear_to_color(tank_bmp[1][n], makecol(255,0,255));
       rotate_sprite(tank_bmp[1][n], tank_bmp[1][0],
           0, 0, itofix(n*32));
   }

   //load bullet image
   if (bullet_bmp = = NULL)
       bullet_bmp = load_bitmap("bullet.bmp", NULL);

   //initialize bullets
   for (n=0; n<2; n++)
   {
     bullets[n] = &mybullets[n];
     bullets[n]->x = 0;
     bullets[n]->y = 0;
     bullets[n]->width = bullet_bmp->w;
     bullets[n]->height = bullet_bmp->h;
   }

   //center tanks inside scroll windows
   tanks[0]->x = 5 + SCROLLW/2;
   tanks[0]->y = 90 + SCROLLH/2;
   tanks[1]->x = 325 + SCROLLW/2;
   tanks[1]->y = 90 + SCROLLH/2;
}

void setupscreen()
{
   int ret;

   //set video mode
   set_color_depth(16);
   ret = set_gfx_mode(MODE, WIDTH, HEIGHT, 0, 0);
   if (ret != 0) {
      allegro_message(allegro_error);
      return;
   }

   text_mode(-1);
   //create the virtual background
   scroll = create_bitmap(MAPW, MAPH);
   if (scroll = = NULL)
   {
      set_gfx_mode(GFX_TEXT, 0, 0, 0, 0);
      allegro_message("Error creating virtual background");
      return;
   }

   //load the tile bitmap
   tiles = load_bitmap("tiles.bmp", NULL);
   if (tiles = = NULL)
   {
      set_gfx_mode(GFX_TEXT, 0, 0, 0, 0);
      allegro_message("Error loading tiles.bmp file");
      return;
   }

   //now draw tiles on virtual background
   for (tiley=0; tiley < scroll->h; tiley+=TILEH)
   {
     for (tilex=0; tilex < scroll->w; tilex+=TILEW)
     {
        //use the result of grabframe directly in blitter
        blit(grabframe(tiles, TILEW+1, TILEH+1, 0, 0, COLS,
           map[n++]), scroll, 0, 0, tilex, tiley, TILEW, TILEH);
     }
   }

   //done with tiles
   destroy_bitmap(tiles);

   //load screen background
   back = load_bitmap("background.bmp", NULL);
   if (back = = NULL)
   {
      set_gfx_mode(GFX_TEXT, 0, 0, 0, 0);
      allegro_message("Error loading background.bmp file");
      return;
   }
   //create the double buffer
   buffer = create_bitmap(WIDTH, HEIGHT);
   if (buffer = = NULL)
   {
      set_gfx_mode(GFX_TEXT, 0, 0, 0, 0);
      allegro_message("Error creating double buffer");
      return;
   }

   //position the radar
   radarx = 270;
   radary = 1;

   //position each player
   scrollx[0] = 100;
   scrolly[0] = 100;
   scrollx[1] = MAPW - 400;
   scrolly[1] = MAPH - 500;

   //position the scroll windows
   startx[0] = 5;
   starty[0] = 93;
   startx[1] = 325;
   starty[1] = 93;

}The main.c source code file for Tank War has been greatly simplified by moving so much code into separate source files. Now in main.c we have a declaration for the map array. Why? Because it was not possible to include the declaration inside the tankwar.h header file, only an extern reference to the array definition inside a source file. As with the previous code listings, this one is heavily commented so you can examine it line-by-line. Take particular note of the map array definition. To simplify/beautify the listing I have defined B equal to 39; as you can see this refers to the blank space tile around the edges of the map.
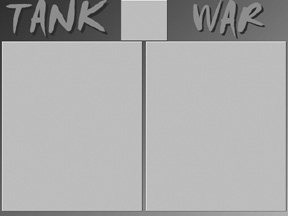
The game also features a new background image to improve the appearance of the game. Figure 12.16 shows the image, which acts as a template for displaying game graphics.
////////////////////////////////////////////////////////////////////
// Game Programming All In One, Third Edition
// Tank War Enhancement 5 - main.c
////////////////////////////////////////////////////////////////////

#include "tankwar.h"

#define B 39
int map[MAPW*MAPH] = {
   B,B,B,B,B,B,B,B,B,B,B,B,B,B,B,B,B,B,B,B,B,B,B,B,B,B,B,B,B,B,B,
   B,B,B,B,B,B,B,B,B,B,B,B,B,B,B,B,B,B,B,B,B,B,B,B,B,B,B,B,B,B,B,
   B,B,B,B,B,B,B,B,B,B,B,B,B,B,B,B,B,B,B,B,B,B,B,B,B,B,B,B,B,B,B,
   B,B,B,B,B,B,B,B,B,B,B,B,B,B,B,B,B,B,B,B,B,B,B,B,B,B,B,B,B,B,B,
   B,B,B,0,0,0,0,0,0,0,0,0,0,0,0,0,0,0,0,0,0,0,0,0,0,0,0,0,B,B,B,
   B,B,B,0,2,2,2,2,2,2,2,2,2,2,2,2,2,2,2,2,2,2,2,2,2,2,2,0,B,B,B,
   B,B,B,0,2,2,2,2,2,2,2,2,2,2,2,2,2,2,2,2,2,2,2,2,2,2,2,0,B,B,B,
   B,B,B,0,2,2,2,2,2,2,2,2,2,2,2,2,2,2,2,2,2,2,2,2,2,2,2,0,B,B,B,
   B,B,B,0,2,2,2,2,2,2,2,2,2,2,2,2,2,2,2,2,2,2,2,2,2,2,2,0,B,B,B,
   B,B,B,0,2,2,2,2,2,2,2,2,2,2,2,2,2,2,2,2,2,2,2,2,2,2,2,0,B,B,B,
   B,B,B,0,2,2,2,2,2,2,2,2,2,2,2,2,2,2,2,2,2,2,2,2,2,2,2,0,B,B,B,
   B,B,B,0,2,2,2,2,2,2,2,2,2,2,2,2,2,2,2,2,2,2,2,2,2,2,2,0,B,B,B,
   B,B,B,0,2,2,2,2,2,2,2,2,2,2,2,2,2,2,2,2,2,2,2,2,2,2,2,0,B,B,B,
   B,B,B,0,2,2,2,2,2,2,2,2,2,2,2,2,2,2,2,2,2,2,2,2,2,2,2,0,B,B,B,
   B,B,B,0,2,2,2,2,2,2,2,2,2,2,2,2,2,2,2,2,2,2,2,2,2,2,2,0,B,B,B,
   B,B,B,0,2,2,2,2,2,2,2,2,2,2,2,2,2,2,2,2,2,2,2,2,2,2,2,0,B,B,B,
   B,B,B,0,2,2,2,2,2,2,2,2,2,2,2,2,2,2,2,2,2,2,2,2,2,2,2,0,B,B,B,
   B,B,B,0,2,2,2,2,2,2,2,2,2,2,2,2,2,2,2,2,2,2,2,2,2,2,2,0,B,B,B,
   B,B,B,0,2,2,2,2,2,2,2,2,2,2,2,2,2,2,2,2,2,2,2,2,2,2,2,0,B,B,B,
   B,B,B,0,2,2,2,2,2,2,2,2,2,2,2,2,2,2,2,2,2,2,2,2,2,2,2,0,B,B,B,
   B,B,B,0,2,2,2,2,2,2,2,2,2,2,2,2,2,2,2,2,2,2,2,2,2,2,2,0,B,B,B,
   B,B,B,0,2,2,2,2,2,2,2,2,2,2,2,2,2,2,2,2,2,2,2,2,2,2,2,0,B,B,B,
   B,B,B,0,2,2,2,2,2,2,2,2,2,2,2,2,2,2,2,2,2,2,2,2,2,2,2,0,B,B,B,
   B,B,B,0,2,2,2,2,2,2,2,2,2,2,2,2,2,2,2,2,2,2,2,2,2,2,2,0,B,B,B,
   B,B,B,0,2,2,2,2,2,2,2,2,2,2,2,2,2,2,2,2,2,2,2,2,2,2,2,0,B,B,B,
   B,B,B,0,2,2,2,2,2,2,2,2,2,2,2,2,2,2,2,2,2,2,2,2,2,2,2,0,B,B,B,
   B,B,B,0,2,2,2,2,2,2,2,2,2,2,2,2,2,2,2,2,2,2,2,2,2,2,2,0,B,B,B,
   B,B,B,0,2,2,2,2,2,2,2,2,2,2,2,2,2,2,2,2,2,2,2,2,2,2,2,0,B,B,B,
   B,B,B,0,0,0,0,0,0,0,0,0,0,0,0,0,0,0,0,0,0,0,0,0,0,0,0,0,B,B,B,
   B,B,B,B,B,B,B,B,B,B,B,B,B,B,B,B,B,B,B,B,B,B,B,B,B,B,B,B,B,B,B,
   B,B,B,B,B,B,B,B,B,B,B,B,B,B,B,B,B,B,B,B,B,B,B,B,B,B,B,B,B,B,B,
   B,B,B,B,B,B,B,B,B,B,B,B,B,B,B,B,B,B,B,B,B,B,B,B,B,B,B,B,B,B,B,
   B,B,B,B,B,B,B,B,B,B,B,B,B,B,B,B,B,B,B,B,B,B,B,B,B,B,B,B,B,B,B
};

//perform basic collision detection
int inside(int x,int y,int left,int top,int right,int bottom)
{
    if (x > left && x < right && y > top && y < bottom)
       return 1;
    else
       return 0;
}

//reuse our friendly tile grabber
BITMAP *grabframe(BITMAP *source,
            int width, int height,
            int startx, int starty,
            int columns, int frame)
{
   BITMAP *temp = create_bitmap(width,height);

   int x = startx + (frame % columns) * width;
   int y = starty + (frame / columns) * height;

   blit(source,temp,x,y,0,0,width,height);

   return temp;
}
//main function
int main(void)
{
   //initialize the game
   allegro_init();
   install_keyboard();
   install_timer();
   srand(time(NULL));
   setupscreen();
   setuptanks();

   //game loop
   while(!gameover)
   {
     //move the tanks and bullets
     for (n=0; n<2; n++)
     {
       movetank(n);
       movebullet(n);
     }

     //draw background bitmap
     blit(back, buffer, 0, 0, 0, 0, back->w, back->h);

     //draw scrolling windows
     for (n=0; n<2; n++)
       blit(scroll, buffer, scrollx[n], scrolly[n],
         startx[n], starty[n], SCROLLW, SCROLLH);

     //update the radar
     rectfill(buffer,radarx+1,radary+1,radarx+99,radary+88,BLACK);
     rect(buffer,radarx,radary,radarx+100,radary+89,WHITE);

     //draw mini tanks on radar
     for (n=0; n<2; n++)
       stretch_sprite(buffer, tank_bmp[n][tanks[n]->dir],
          radarx + scrollx[n]/10 + (SCROLLW/10)/2-4,
          radary + scrolly[n]/12 + (SCROLLH/12)/2-4,
          8, 8);

     //draw player viewport on radar
     for (n=0; n<2; n++)
       rect(buffer,radarx+scrollx[n]/10, radary+scrolly[n]/12,
          radarx+scrollx[n]/10+SCROLLW/10,
          radary+scrolly[n]/12+SCROLLH/12, GRAY);

     //display score
     for (n=0; n<2; n++)
       textprintf(buffer, font, startx[n], HEIGHT-10,
          BURST, "Score: %d", scores[n]);

     //draw the tanks and bullets
     for (n=0; n<2; n++)
     {
        drawtank(n);
        drawbullet(n);
     }

     //refresh the screen
     acquire_screen();
     blit(buffer, screen, 0, 0, 0, 0, WIDTH, HEIGHT);
     release_screen();

     //check for keypresses
     if (keypressed())
        getinput();

     //slow the game down
     rest(20);
   }

   //destroy bitmaps
   destroy_bitmap(explode_bmp);
   destroy_bitmap(back);
   destroy_bitmap(scroll);
   destroy_bitmap(buffer);
   for (n=0; n<8; n++)
   {
      destroy_bitmap(tank_bmp[0][n]);
      destroy_bitmap(tank_bmp[1][n]);
   }
   allegro_exit();
   return 0;
}
END_OF_MAIN()This marks the end of yet another graphically intense chapter. In it, I talked about scrolling backgrounds and spent most of the time discussing tile-based backgrounds—how they are created and how to use them in a game. Working with tiles to create a scrolling game world is by no means an easy subject! If you skimmed over any part of this chapter, be sure to read through it again before you move on because the next three chapters dig even deeper into scrolling. You also opened up the Tank War project and made some huge changes to the game, not the least of which was creating dual scrolling windows—one for each player!