
This chapter builds on the subject covered in the last chapter on creating levels with Mappy, and takes it one step further by providing the information and source code you'll need to load up a native Mappy file directly with Allegro. You will be able to edit a Mappy FMP file and then load that file directly in your game. This will eliminate the need to export the level data from Mappy, and greatly speed up and simplify the development of a tile-based game (such as the games we'll create in the following two chapters). Here's what is covered in this chapter:
The Mappy file structure is binary and includes not only the data, but also the tiles. A library has been created to support Mappy within Allegro programs and is available for download on the Mappy website at http://www.tilemap.co.uk. The library is called MappyAL, and the current release at the time of this writing is 11D. The MappyAL code is available on the CD-ROM in the softwaremappy folder.
All you need are the mappyal.c and mappyal.h files to use Mappy map files in your own programs. Because I will not be going into the advanced features of Mappy or the MappyAL library, I encourage you to browse the Mappy home page, view the tutorials, and download the many source code examples (including many complete games) to learn about the more advanced features of Allegro. We only really need basic tile editing and the ability to save a simple Mappy file for use in our programs. If you want to do something like multi-layer levels, you can refer to Chapter 16, “Horizontal Scrolling Platform Games,” for more information.
Note
Like Mappy itself, the Mappy Allegro library (MappyAL) was created by Robin Burrows. I am grateful to Robin for sharing his excellent level editing program and library source code.
The MappyAL library is very easy to use. Basically, you call MapLoad to open a Mappy file. MapDrawBG is used to draw a background of tiles, and MapDrawFG draws foreground tiles (specified by layer number). There is one drawback to the MappyAL library—it was written quite a long time ago, back in the days when VGA mode 13h (320 × 200) was popular. Unfortunately, the MappyAL library only renders 8-bit (256 color) maps correctly.
You can convert a true color map to 8-bit color. Simply open the MapTools menu and select Useful Functions, Change Block Size/Depth. This will change the color depth of the map file; you can then import 8-bit tiles and the map will be restored. Paint Shop Pro can easily convert the tiles used in this chapter to 8-bit without too much loss of quality. Ideally, I recommend using the simple text map data due to this drawback. Table 14.1 shows a list of the most useful of the global variables exposed by the MappyAL code. This is not a comprehensive list.
Table 14.1. Mappy Allegro Library Global Variables
Variable | Data Type | Description |
|---|---|---|
| int | Error number after failed load |
| int | Width of map (in tiles) |
| int | Height of map (in tiles) |
| int | Width of single tiles |
| int | Height of single tiles |
| int | Color depth of tiles |
| short int | Total number of blocks in map |
Let's take a look at some of the key functions in the Mappy Allegro library as well, since you'll be working with them quite a bit. There are support functions in the library beyond this list, but they are mainly called by these functions. I think the function names are self-descriptive. This is not a comprehensive list (the less important functions are seldom used).
void MapFreeMem (void);int MapLoad (char *);int MapGetBlockID (int, int);int MapGenerateYLookup (void);int MapChangeLayer (int);int MapGetXOffset (int, int);int MapGetYOffset (int, int);void MapInitAnims (void);void MapUpdateAnims (void);void MapDrawBG (BITMAP *, int, int, int, int, int, int);void MapDrawFG (BITMAP *, int, int, int, int, int, int, int);BITMAP * MapMakeParallaxBitmap (BITMAP *, int);void MapDrawParallax (BITMAP *, BITMAP *, int, int, int, int, int, int);
Given that you have an FMP file ready to be loaded, you can use the MapLoad function provided by the MappyAL library to load a native Mappy file. Here is an example:
MapLoad("level.fmp");Tip
Due to a bug in the MapLoad function, it returns a–1 for success and 0 for failure, which causes problems when checking the return value. Therefore, when you check the return value, you want to look for non-zero to indicate success. Since we have the source code, it would be easy to fix this bug, but I have left MappyAL as is.
Once you have loaded a Mappy file, the MappyAL library exposes a lot of global variables and functions that contain the information you need to work with the Mappy file. Before you load another level, or quit the program, you should always free the memory used by the Mappy level by calling the MapFreeMem function:
MapFreeMem();
You can check on a tile number located at a specific x,y location by calling the MapGetBlockID function. This represents the tile number of the block at that position in the level. Here is an example:
tile_num = MapGetBlockID(200, 300);
Mappy allows you to configure a tile that is drawn as the background or the foreground for the layer you're working on. In essence, you can draw two different layers from a single tile map. To draw the background layer, you can use the MapDrawBG function. Here is an example that draws the tile map starting at coordinates (map_pos_x, map_pos_y) in a window at the upper-left corner of the screen with a size of 200, 200:
MapDrawBG(screen, map_pos_x, map_pos_y, 1, 1, 200, 200);
You can specify up to three foreground layers for a single tile map, each with a different tile if you want. Most of the time you'll just use a single layer for a level and tell it which tiles are solid or not (for collision purposes—something we'll get into in Chapter 16). The only time you'll need to draw a foreground is when you've created a parallax level in which there's a background (such as clouds or mountains or something else in the distance) that scrolls independently of the foreground objects (usually ledges and other things to walk on). Most of the time, for simple games, you'll only draw a background. When you do need to draw a foreground layer over the top of a background layer (with transparency), you use the MapDrawFG function. It has the exact same set of parameters as MapDrawBG, and here's an example:
MapDrawFG(screen, map_pos_x, map_pos_y, 1, 1, 200, 200);
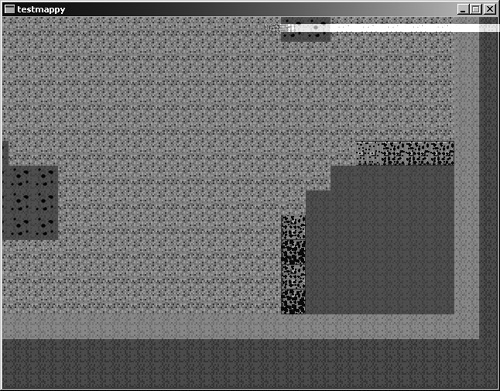
Now it's time to write a short test program to see how to load a native Mappy file containing map data and tiles, and then display the map on the screen with the ability to scroll the map. Create a new project, add a reference to the Allegro library, and add the mappyal.c and mappyal.h files to the project. (These source code files provide support for Mappy in your Allegro programs.) Then, type in the following code into the main.c file. You can use the map1.fmp file you saved earlier in this chapter—or you can use any Mappy file you want to test, because this program can render any Mappy file regardless of dimensions (which are stored inside the map file rather than in the source code). Figure 14.1 shows the TestMappy program running.
#include "allegro.h"
#include "mappyal.h"
#define MODE GFX_AUTODETECT_WINDOWED
#define WIDTH 640
#define HEIGHT 480
#define WHITE makecol(255,255,255)

//x, y offset in pixels
int xoffset = 0;
int yoffset = 0;

//double buffer
BITMAP *buffer;

int main (void)
{
    //initialize program
    allegro_init();
    install_timer();
    install_keyboard();
    set_color_depth(16);
    set_gfx_mode(MODE, WIDTH, HEIGHT, 0, 0);

    //create the double buffer and clear it
    buffer = create_bitmap(SCREEN_W, SCREEN_H);
    clear(buffer);

    //load the Mappy file
    if (MapLoad("map1.fmp") != 0)
    {
       allegro_message ("Can't
       return 1;
    }

    //main loop
    while (!key[KEY_ESC])
    {
       //check for keyboard input
       if (key[KEY_RIGHT]) xoffset+=4;
       if (key[KEY_LEFT])  xoffset-=4;
       if (key[KEY_UP])    yoffset-=4;
       if (key[KEY_DOWN])  yoffset+=4;

       //make sure it doesn't
       if (xoffset < 0) xoffset = 0;
       if (xoffset > mapwidth*mapblockwidth-SCREEN_W)
           xoffset = mapwidth*mapblockwidth-SCREEN_W;
       if (yoffset < 0) yoffset = 0;
       if (yoffset > mapheight*mapblockheight-SCREEN_H)
           yoffset = mapheight*mapblockheight-SCREEN_H;
       //draw map with single layer
       MapDrawBG(buffer, xoffset, yoffset, 0, 0, SCREEN_W-1, SCREEN_H-1);

       //print scroll position
       textprintf_ex(buffer,font,0,0,WHITE,-1,
           "Position = %d,%d", xoffset, yoffset);
       textprintf_ex(buffer,font,200,0,WHITE,-1,
           "Map size = %d,%d, Tiles = %d,%d", mapwidth, mapheight,
           mapblockwidth, mapblockheight);

       //blit the double buffer
       blit (buffer, screen, 0, 0, 0, 0, SCREEN_W-1, SCREEN_H-1);
    }

    //delete double buffer
    destroy_bitmap(buffer);

    //delete the Mappy level
    MapFreeMem();

    allegro_exit();
    return 0;
}
END_OF_MAIN()Now it's time for an update to Tank War, the seventh revision to the game. Chapter 13 provided some great fixes and new additions to the game, including animated tanks and non-interrupting explosions. As you might have guessed, this chapter brings native Mappy support to Tank War. It should be a lot of fun, so let's get started! This is going to be an easy modification, just a few lines of code, because Tank War was designed from the start to be flexible. However, there is a lot of code that will be removed from Tank War, because MappyAL takes care of all the scrolling for us. So by using a more powerful library, we've significantly cut down on the amount of code in the game itself.
Do you remember the dimensions of the map1.fmp file that was used in Chapter 13? It is 100 tiles across by 100 tiles down. However, the “actual” map only uses 30 tiles across, 32 tiles down. This is a bit of a problem for Tank War, because MappyAL will render the entire map, not just the visible portion. The reason the map was set to 100 × 100 was to make the Mappy tutorial easier to explain, and at the time it did not matter. Now we're dealing with a map that is 3,200 × 3,200 pixels, which won't work in Tank War. (Actually, it will run just fine, but the tanks won't be bounded by the edge of the map.)
To remedy this situation, I have created a new version of the map file used in this chapter and called it map3.fmp. It is located in chapter14 ankwar_r7 along with the project files for this new revision of Tank War. That same map file was also used in the TestMappy program (because I didn't want to confuse you when the program scrolls beyond the edge of the “map”).
What's the great thing about this situation? You can create a gigantic battlefield map for Tank War! There's no reason why you should limit the game to a mere 30 × 32 tiles. Go ahead and create a huge map, with lots of different terrain, so that it isn't so easy to find the other player. Of course, if you do create a truly magnificent level, you'll need to modify the bullet code—it wasn't designed for large maps, so you can't fire again until the bullet reaches the edge of the map. Just put in a timer so that the bullet will expire if it doesn't hit anything after a few seconds.
The first thing to do is add mappyal.c and mappyal.h to the project to give Tank War support for the MappyAL library. I could show you how to render the tiles directly in Tank War, which is how the game works now, but it's far easier to use the functions in MappyAL to draw the two scrolling game windows. You can open the completed project from chapter14 ankwar_r7, or open the Chapter 13 version of the game and make the upcoming changes.
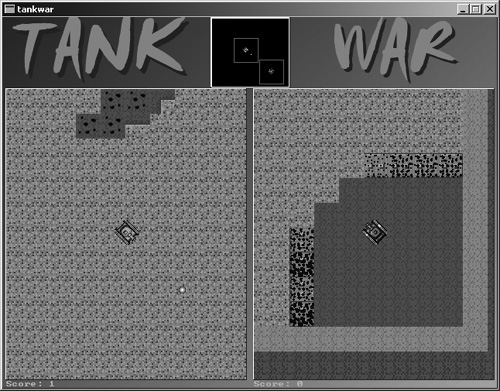
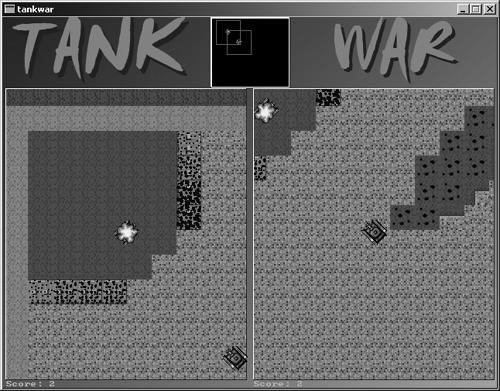
How about a quick overview? Figure 14.2 shows Tank War using the map file from the TestMappy program! The next shot, Figure 14.3, player two is invading the base of player one!
Now let's make the necessary changes to Tank War to replace the hard-coded background with support for Mappy levels.
First up is the tankwar.h header file. Add a new #define line to include the mappyal.h file in the project. Note the change in bold.
/////////////////////////////////////////////////////////////////////////
// Game Programming All In One, Third Edition
// Tank War Enhancement 7 - tankwar.h
/////////////////////////////////////////////////////////////////////////

#ifndef _TANKWAR_H
#define _TANKWAR_H

#include "allegro.h"
#include "mappyal.h"
Next, remove the reference to the hard-coded map array (I have commented out the line so you will see what line to remove). This line follows the bitmap definitions.
//the game map
//extern int map[];
Next, delete the definition for the tiles bitmap pointer. Because Mappy levels contain the tiles, your program doesn't need to load the tiles, just the map file (isn't that great?).
//bitmap containing source tiles
//BITMAP *tiles;
Finally, delete the reference to the scroll bitmap, which is also no longer needed:
//virtual background buffer
//BITMAP *scroll;
Well, you've ripped out quite a bit of the game with just this first file! That is one fringe benefit to using MappyAL, in that a lot of source code formerly required for scrolling (the hard way) is now built into MappyAL.
Next up is the setup.c source code file. Scroll down to the setupscreen function and slash the code that loads the tiles and draws them on the virtual background image. You can also delete the section of code that created the virtual background. I'll list the entire function here with the code commented out that you should delete. Note the changes in bold.
void setupscreen()
{
    int ret;

    //set video mode
    set_color_depth(16);
    ret = set_gfx_mode(MODE, WIDTH, HEIGHT, 0, 0);
    if (ret != 0) {
        allegro_message(allegro_error);
        return;
    }


/* REMOVE THIS ENTIRE SECTION OF COMMENTED CODE
   //create the virtual background
     scroll = create_bitmap(MAPW, MAPH);
     if (scroll = = NULL)
     {
        set_gfx_mode(GFX_TEXT, 0, 0, 0, 0);
        allegro_message("Error creating virtual background");
        return;
     }

     //load the tile bitmap
     tiles = load_bitmap("tiles.bmp", NULL);
     if (tiles = = NULL)
     {
        set_gfx_mode(GFX_TEXT, 0, 0, 0, 0);
        allegro_message("Error loading tiles.bmp file");
        return;
     }

     //now draw tiles on virtual background
     for (tiley=0; tiley < scroll->h; tiley+=TILEH)
     {
         for (tilex=0; tilex < scroll->w; tilex+=TILEW)
         {
             //use the result of grabframe directly in blitter
             blit(grabframe(tiles, TILEW+1, TILEH+1, 0, 0, COLS, map[n+ +]),
            scroll, 0, 0, tilex, tiley, TILEW, TILEH);
     }
   }

     //done with tiles
     destroy_bitmap(tiles);

     END OF THE CHOPPING BLOCK
*/

     //load screen background
     back = load_bitmap("background.bmp", NULL);
     if (back == NULL)
     {
        set_gfx_mode(GFX_TEXT, 0, 0, 0, 0);
        allegro_message("Error loading background.bmp file");
        return;
     }

     //create the double buffer
     buffer = create_bitmap(WIDTH, HEIGHT);
     if (buffer == NULL)
     {
         set_gfx_mode(GFX_TEXT, 0, 0, 0, 0);
         allegro_message("Error creating double buffer");
         return;
     }

     //position the radar
     radarx = 270;
     radary = 1;

     //position each player
     scrollx[0] = 100;
     scrolly[0] = 100;
     scrollx[1] = MAPW - 400;
     scrolly[1] = MAPH - 500;

     //position the scroll windows
     startx[0] = 5;
     starty[0] = 93;
     startx[1] = 325;
     starty[1] = 93;
}Now open up the tank.c file and scroll down to the movetank function. Down at the bottom of the function, you'll see the section of code that keeps the tank inside the boundary of the map. This was based on the virtual background bitmap's width and height, but now needs to be based on the Mappy level size instead. The mapwidth, mapblockwidth, mapheight, and mapblockheight variables are global and found inside mappyal.h. Make the changes noted in bold.
void movetank(int num)
{
    int dir = tanks[num]->dir;
    int speed = tanks[num]->xspeed;

    //animate tank when moving
    if (speed > 0)
    {
       tanks[num]->animdir = 1;
       tanks[num]->framedelay = MAXSPEED - speed;
    }
    elseif (speed < 0)
    {
        tanks[num]->animdir = -1;
        tanks[num]->framedelay = MAXSPEED - abs(speed);
    }
   else
      tanks[num]->animdir = 0;


   //update tank position
   switch(dir)
   {
      case 0:
         scrolly[num] -= speed;
         break;
      case 1:
          scrolly[num] -= speed;
          scrollx[num] += speed;
          break;
    case 2:
         scrollx[num] += speed;
         break;
    case 3:
       scrollx[num] += speed;
       scrolly[num] += speed;
       break;
    case 4:
       scrolly[num] += speed;
       break;
    case 5:
       scrolly[num] += speed;
       scrollx[num] -= speed;
       break;
    case 6:
       scrollx[num] -= speed;
       break;
    case 7:
       scrollx[num] -= speed;
       scrolly[num] -= speed;
       break;
}

//keep tank inside bounds
if (scrollx[num] < 0)
{
    scrollx[num] = 0;
    tanks[num]->xspeed = 0;
}

else if (scrollx[num] > mapwidth*mapblockwidth - SCROLLW)
{
    scrollx[num] = mapwidth*mapblockwidth - SCROLLW;
    tanks[num]->xspeed = 0;
}

if (scrolly[num] < 0)
{
   scrolly[num] = 0;
   tanks[num]->xspeed = 0;
}
else if (scrolly[num] > mapheight*mapblockheight - SCROLLH)
 {
   scrolly[num] = mapheight*mapblockheight - SCROLLH;
   tanks[num]->xspeed = 0;
 }
}
Now open up the main.c file. The first thing you'll need to do in main.c is remove the huge map[] array definition (with included map tile values). Just delete the whole array, including the #define B 39 line. I won't list the commented-out code here because the map definition was quite large, but here are the first three lines (for the speed-readers out there who tend to miss entire pages at a time):
//#define B 39
//int map[MAPW*MAPH] = {
// B,B,B,B,B,B,B,B,B,B,B,B,B,B,B,B,B,B,B,B,B,B,B,B,B,B,B,B,B,B,B,
Don't forget to delete the rest of the map array definition that follows these lines.
Next, scroll down to the main function, and add the code that loads the Mappy file as shown in the bold lines that follow.
//main function
int main(void)
{
    int anim;

    //initialize the game
    allegro_init();
    install_keyboard();
    install_timer();
    srand(time(NULL));
    setupscreen();
    setuptanks();
    loadsprites();

    //load the Mappy file
    if (MapLoad("map3.fmp") != 0)
    {
       allegro_message
       return 1;
    }
Next, you'll need to modify the lines that used to draw the scrolling background, replacing those lines with a call to MapDrawBG, which is all you need now to draw the background (note where the blit function call has been commented out). We'll use the same variables as before.
//game loop
while(!gameover)
{
    //move the tanks and bullets
    for (n=0; n<2; n++)
    {
        movetank(n);
        animatetank(n);
        movebullet(n);
    }

//draw background bitmap
blit(back, buffer, 0, 0, 0, 0, back->w, back->h);

//draw scrolling windows (now using Mappy)
for (n=0; n<2; n++)
     //blit(scroll, buffer, scrollx[n], scrolly[n],
     //    startx[n], starty[n], SCROLLW, SCROLLH);
       MapDrawBG(buffer, scrollx[n], scrolly[n],
           startx[n], starty[n], SCROLLW, SCROLLH);
Remove the line of code down near the end of main that destroys the scroll bitmap, which is no longer used.
//destroy bitmaps
destroy_bitmap(explode_bmp);
destroy_bitmap(back);
//destroy_bitmap(scroll);
destroy_bitmap(buffer);
Okay, just one more change to main and you'll be done. Add the following line of code at the bottom of main to free the MappyAL tile map:
     //free the MappyAL memory
     MapFreeMem();

     return 0;
}
END_OF_MAIN()
This chapter explained how to use the Mappy Allegro library (MappyAL). The latest version of Tank War now incorporates support for native Mappy files via the MappyAL library, giving the game a huge boost in playability. Now anyone can create battlefield maps for Tank War and fight it out with friends. In the next revision we'll learn how to add solid objects to the Mappy level so the tanks will be able to interact with the level to a certain degree.
You can find the answers to this chapter quiz in Appendix A, “Chapter Quiz Answers.”