
It is amazing to me that in the year 2006, we are still talking about, writing about, and developing games with sprites. There are just some ideas that are so great that no amount of new technology truly replaces them entirely. A sprite is a small image that is moved around on the screen. Many programmers misuse the term to describe any small graphic image in a game. Static, unmoving objects on the screen are not sprites because by definition a sprite is something that moves around and does something on the screen, usually in direct relation to something the player is doing within the game. The analogy is to a mythical sprite—a tiny, mischievous, flying creature that quickly flits about, looking something like a classical fairy, but smaller. Of course the definition of a sprite has grown to include any onscreen game object, regardless of size or speed.
While the previous chapter provided all the prerequisites for working with sprites, this chapter delves right into the subject at full speed. Technically, a sprite is no different than a bitmap as far as Allegro is concerned. In fact, the sprite-handling functions in this chapter define sprites using the BITMAP * pointer. You can also draw a sprite directly using any of the bitmap drawing functions. However, Allegro provides a number of custom sprite functions that help to make your life as a 2D game programmer a little easier, in addition to some special effects that will knock your socks off! What I'm talking about is the ability to add dynamic lighting effects to one or more sprites on the screen! That's right—in this chapter you will learn to not only load, create, and draw sprites, but also how to apply lighting effects to those sprites. Combine this with alpha blending and transparency, and you'll learn to do some really amazing things in this chapter.
This chapter uses the word “introduction” in the title because, although this is a complete overview of Allegro's sprite support, the upcoming chapters will feature a lot of the more advanced coverage. At this point, I believe it's more important to provide you with some exposure to all of the sprite routines available so you can see how they'll be used as you go along. If you don't see the big picture yet, that's understandable, but it's very helpful to grasp the key topics in this chapter because they're vital to the rest of the book. To help solidify the new information in your mind, you'll dig into Tank War a little more at the end of the chapter and enhance it with some sprites!
Here is a breakdown of the major topics in this chapter:
Now that you've had a thorough introduction to bitmaps in the last chapter—how to create them, load them from disk, make copies, and blit them—you have the prerequisite information for working with sprites. A sprite image is simply a bitmap image. What you do with a sprite image (and the sprite functionality built into Allegro) differentiates sprites from mere bitmaps.
The first and most important function to learn is draw_sprite.
void draw_sprite(BITMAP *bmp, BITMAP *sprite, int x, int y)
This function is similar to masked_blit in that it draws the sprite image using transparency. As you'll recall from the previous chapter, the transparent color in Allegro is defined as pink (255, 0, 255). Therefore, if your source bitmap uses pink to outline the image, then that image will be drawn transparently by draw_sprite. Did you notice that there are no source_x, source_y, width, or height parameters in this function call? That is one convenience provided by this function. It is assumed that you intend to draw the whole sprite, so those values are provided automatically by draw_sprite and you don't need to worry about them. This assumes that the entire bitmap is comprised of a single sprite. Of course, you can use this technique if you want, but a far better method is to store multiple sprites in a single bitmap and then draw the sprites by “grabbing” them out of the bitmap (something I'll cover in the next chapter).
The most important factor to consider up front when you are dealing with sprites is the color depth of your game. Until now, you have used the default color depth and simply called set_gfx_mode before drawing to the screen. Allegro does not automatically use a high-color or true-color color depth even if your desktop is running in those modes. By default, Allegro runs in 8-bit color mode (the mode that has been used automatically in all the sample programs thus far). Figure 8.1 shows a sprite drawn to the screen with the default color depth.
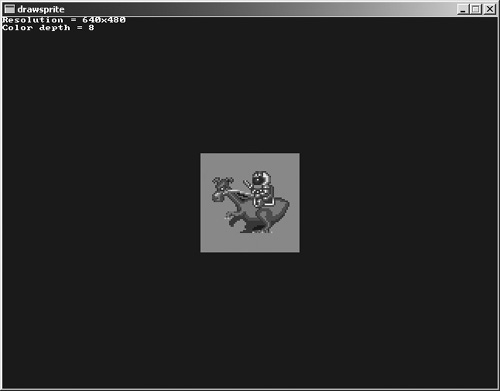
Figure 8.1. A high-color sprite drawn to the screen with a default 8-bit color depth. Sprite image courtesy of Ari Feldman.
Drawing that same sprite using a 16-bit high-color mode results in the screen shown in Figure 8.2. Notice how the sprite is now drawn with the correct transparency, whereas the pink transparent color was incorrectly drawn on the 8-bit display shown in Figure 8.1.
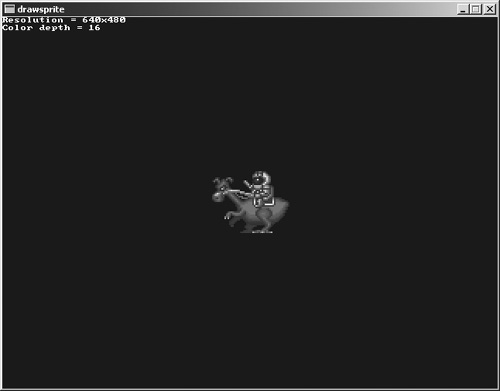
Figure 8.2. The high-color sprite is drawn to the screen with 16-bit color. Sprite image courtesy of Ari Feldman.
The program to produce these sprites is provided in the following listing and included on the CD-ROM under the name drawsprite.
#include <stdlib.h>
#include <allegro.h>

#define WHITE makecol(255,255,255)

int main(void)
{
  BITMAP *dragon;
  int x, y;

  //initialize the program
  allegro_init();
  install_keyboard();
  set_color_depth(16);
  set_gfx_mode(GFX_AUTODETECT_FULLSCREEN, 640, 480, 0, 0);

  //print some status information
  textprintf_ex(screen,font,0,0,WHITE,0,"Resolution = %ix%i",
      SCREEN_W, SCREEN_H);
  textprintf_ex(screen, font, 0, 10, WHITE,0,"Color depth = %i",
      bitmap_color_depth(screen));

  //load the bitmap
  dragon = load_bitmap("spacedragon1.bmp", NULL);
  x = SCREEN_W/2 - dragon->w/2;
  y = SCREEN_H/2 - dragon->h/2;

    //main loop
  while (!key[KEY_ESC])
   {
    //erase the sprite
    rectfill(screen, x, y, x + dragon->w, y + dragon->h, 0);

    //move the sprite
    if (x-- < 2)
        x = SCREEN_W - dragon->w;

    //draw the sprite
    draw_sprite(screen, dragon, x, y);

    textprintf_ex(screen,font,0,20,WHITE,0,"Location = %ix%i", x, y);
    rest(10);
  }

  //delete the bitmap
  destroy_bitmap(dragon);
  allegro_exit();
  return 0;
}
END_OF_MAIN()
Transparency is an important subject when you are working with sprites, so it is helpful to gain an understanding of it right from the start. Figure 8.3 shows an example of a sprite drawn with and without transparency, as you saw in the sample drawsprite program when an 8-bit color depth was used.
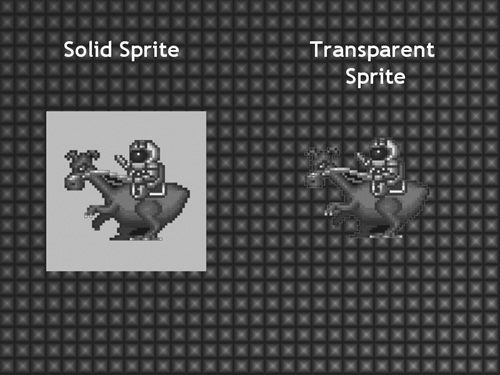
Figure 8.3. The difference between a sprite drawn with and without transparency. Sprite image courtesy of Ari Feldman.
When a sprite is drawn transparently, all but the transparent pixels are copied to the destination bitmap (or screen). This is necessary because the sprite has to be stored in a bitmap image of one type or another (BMP, PCX, and so on), and the computer can only deal with rectangular bitmaps in memory. In reality, the computer only deals with chunks of memory anyway, so it cannot draw images in any other shape but rectangular (see Figure 8.4).
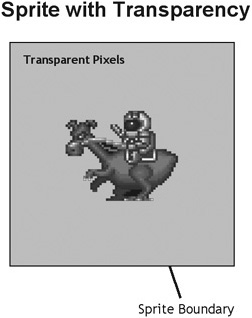
Figure 8.4. The actual sprite is contained inside a rectangular image with transparent pixels. Sprite image courtesy of Ari Feldman.
In the next chapter, I'll show you a technique you can use to draw only the actual pixels of a sprite and completely ignore the transparent pixels during the drawing process. This is a special feature built into Allegro called compiled sprites. Compiled sprites, as well as run-length encoded (compressed) sprites, can be drawn much faster than regular sprites drawn with draw_sprite, so the next chapter will be very interesting indeed!
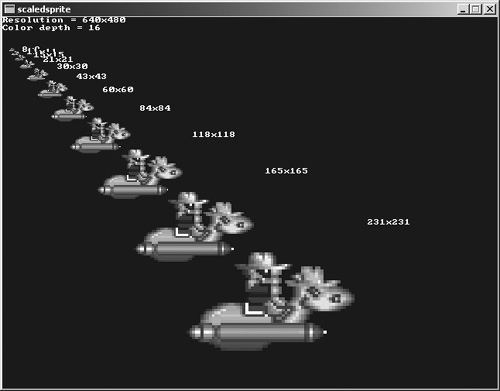
Scaling is the process of zooming in or out of an image, or in another context, shrinking or enlarging an image. Allegro provides a function for drawing a sprite within a specified rectangle on the destination bitmap; it is similar to stretched_blit. The function is called stretch_sprite and it looks like this:
void stretch_sprite(BITMAP *bmp,BITMAP *sprite,int x,int y,int w,int h)
The first parameter is the destination, and the second is the sprite image. The next two parameters specify the location of the sprite on the destination bitmap, while the last two parameters specify the width and height of the resulting sprite. You can only truly appreciate this function by seeing it in action. Figure 8.5 shows the ScaledSprite program, which displays a sprite at various resolutions.
#include <stdlib.h>
#include <allegro.h>

#define WHITE makecol(255,255,255)

int main(void)
{
  BITMAP *cowboy;
  int x, y, n;
  float size = 8;

  //initialize the program
  allegro_init();
  install_keyboard();
  set_color_depth(16);
  set_gfx_mode(GFX_AUTODETECT_FULLSCREEN, 640, 480, 0, 0);

  //print some status information
  textprintf_ex(screen,font,0,0,WHITE,0,
      "Resolution = %ix%i", SCREEN_W, SCREEN_H);
  textprintf_ex(screen,font,0,10,WHITE,0,
      "Color depth = %i", bitmap_color_depth(screen));

  //load the bitmap
  cowboy = load_bitmap("spacecowboy1.bmp", NULL);

  //draw the sprite
  for (n = 0; n < 11; n++) {
      y = 30 + size;
      stretch_sprite(screen, cowboy, size, y, size, size);
      textprintf_ex(screen,font,size + size + 10,y,WHITE,0,"%ix%i",
        (int)size,(int)size);
      size *= 1.4;
  }

  //delete the bitmap
  destroy_bitmap(cowboy);

  while(!keypressed());
  allegro_exit();
  return 0;
}
END_OF_MAIN()
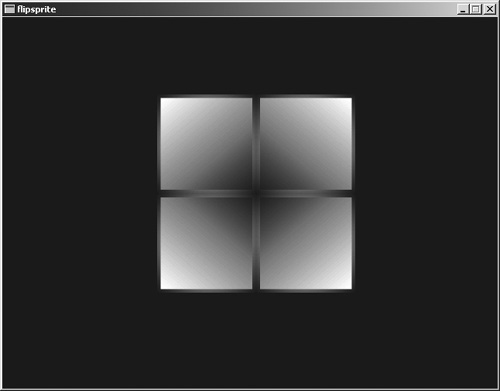
Suppose you are writing a game called Tank War that features tanks able to move in four directions (north, south, east, and west), much like the game we have been building. As you might recall, the last enhancement to the game in the last chapter added the ability to blit each tank image as a bitmap, which sped up the game significantly. Now imagine eliminating the east-, west-, and south-facing bitmaps from the game by simply drawing the north-facing bitmap in one of the four directions using a special version of draw_sprite for each one. In addition to the standard draw_sprite, you now have the use of three more functions to flip the sprite three ways:
void draw_sprite_v_flip(BITMAP *bmp, BITMAP *sprite, int x, int y)
void draw_sprite_h_flip(BITMAP *bmp, BITMAP *sprite, int x, int y)
void draw_sprite_vh_flip(BITMAP *bmp, BITMAP *sprite, int x, int y)
Take a look at Figure 8.6, a shot from the FlipSprite program.
#include <stdlib.h>
#include <allegro.h>

int main(void)
{
    int x, y;

    //initialize the program
    allegro_init();
    install_keyboard();
    set_color_depth(16);
    set_gfx_mode(GFX_AUTODETECT_WINDOWED, 640, 480, 0, 0);

    //load the bitmap
    BITMAP *panel = load_bitmap("panel.bmp", NULL);

    //draw the sprite
    draw_sprite(screen, panel, 200, 100);
    draw_sprite_h_flip(screen, panel, 200 + 128, 100);
    draw_sprite_v_flip(screen, panel, 200, 100 + 128);
    draw_sprite_vh_flip(screen, panel, 200 + 128, 100 + 128);

    //delete the bitmap
    destroy_bitmap(panel);

    while(!keypressed());
    allegro_exit();
    return 0;
}
END_OF_MAIN()
Allegro has some very cool sprite manipulation functions that I'm sure you will have fun exploring. I have had to curtail my goofing off with all these functions in order to finish writing this chapter; otherwise, there might have been 90 sample programs to go over here! It really is incredibly fun to see all of the possibilities of these functions, which some might describe as “simple” or “2D.”
Perhaps the most impressive (and incredibly useful) sprite manipulation function is rotate_sprite.
void rotate_sprite(BITMAP *bmp, BITMAP *sprite,
    int x, int y, fixed angle)
This function rotates a sprite using an advanced algorithm that retains a high level of quality in the resulting sprite image. Most sprite rotation is done in a graphic editor by an artist because this is a time-consuming procedure in the middle of a high-speed game. The last thing you want slowing your game down is a sprite rotation occurring while you are rendering your sprites.
However, what about rotating and rendering your sprites at game startup and then using the resulting bitmaps as a sprite array? That way, sprite rotation is provided at runtime, and you only need to draw the first image of a sprite (such as a tank) facing north, and then rotate all of the angles you need for the game. For some programmers this is a wonderful and welcome feature because many of us are terrible artists. Chances are, if you are a good artist, you aren't a game programmer, and vice versa. Why would an artistically creative person be interested in writing code? Likewise, why would a programmer be interested in fooling with pixels? Naturally, there are exceptions (maybe you?), but in general, this is the way of things.
Who cares? Oh, right. Okay, let's try it out then. But first, here are the details. The rotate_sprite function draws the sprite image onto the destination bitmap with the top-left corner at the specified x and y position, rotated by the specified angle around its center. The tricky part is understanding that the angle does not represent a usual 360-degree circle; rather, it represents a set of integer angles from 0 to 256. If you would like to rotate a sprite at each of the usual 360 degrees of a circle, you can rotate it by (256 / 360 = ) 0.711 for each angle.
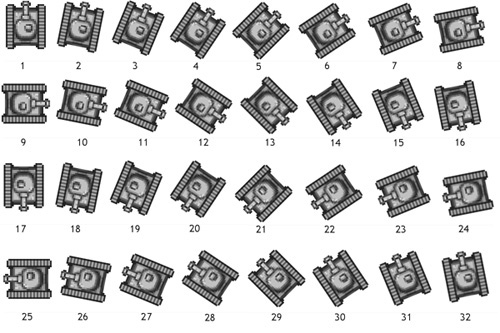
In reality, you will probably want a rotation scheme that generates 8, 16, or 32 rotation frames for each sprite. I've never seen a game that needed more than 32 frames for a full rotation. A highly spatial 2D shooter such as Atari's classic Blasteroids probably used 16 frames at most. Take a look at Figure 8.7 for an example of a tank sprite comprised of eight rotation frames.
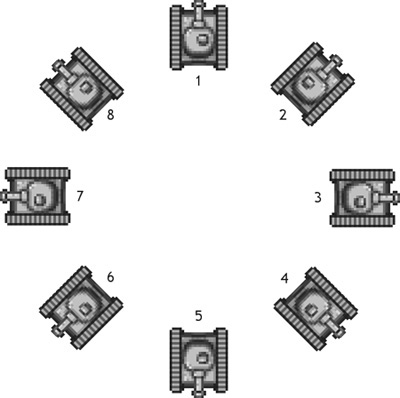
When you want to generate eight frames, rotate each frame by 45 degrees more than the last one. This presumes that you are talking about a graphic editor, such as Paint Shop Pro, that is able to rotate images by any angle. Table 8.1 provides a rundown of the eight-frame rotation angles and the equivalent Allegro angles (based on 256). In the Allegro system, each frame is incremented by 32 degrees, which is actually easier to use from a programming perspective.
Table 8.1. Eight-Frame Rotation Angles
Frame | Standard Angle (360) | Allegro Angle (256) |
|---|---|---|
1 | 0 | 0 |
2 | 45 | 32 |
3 | 90 | 64 |
4 | 135 | 96 |
5 | 180 | 128 |
6 | 225 | 160 |
7 | 270 | 192 |
8 | 315 | 224 |
Note
Even an eight-way sprite is a lot better than what we have done so far in Tank War, with only four pathetic sprite frames! What a travesty! Now that you've seen what is possible, I'm sure you have lost any ounce of respect you had for the game. Just hold on for a little while because you'll give the Tank War game a facelift at the end of this chapter with some proper sprites. It's almost time to do away with those ugly vector-based graphics once and for all!
A 16-way sprite is comprised of frames that are each incremented 22.5 degrees from the previous frame. Using this value, you can calculate the angles for an entire 16-way sprite, as shown in Figure 8.8.
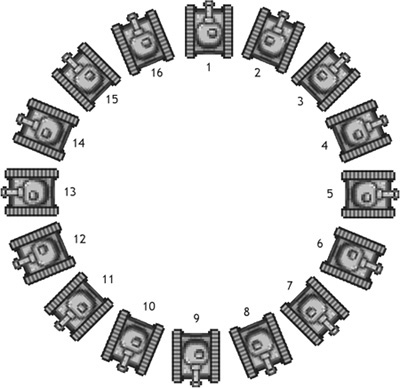
One glance at the column of Allegro angles in Table 8.2, and you can see why Allegro uses the 256-degree circle system instead of 360-degree system; it is far easier to calculate the common angles used in games! Again, to determine what each angle should be, just divide the maximum angle (360 or 256, in either case) by the maximum number of frames to come up with a value for each frame.
Although it's certainly a great goal to try for 24 or 32 frames of rotation in a 2D game, such as Tank War, each new set of frames added to the previous dimension of rotation adds a whole new complexity to the game. Remember, you need to calculate how the gun will fire in all of these directions! If your tank (or other sprite) needs to shoot in 32 directions, then you will have to calculate how that projectile will travel for each of those directions, too! To put it mildly, this is not easy to do. Combine that with the fact that the whole point of using higher rotations is simply to improve the quality of the game, and you might want to scale back to 16 if it becomes too difficult. I would suggest working from that common rotation count and adding more later if you have time, but don't delay the game just to get in all those frames so the game will be even better. My first rule is always to make the game work first, and then add cool factors (the bells and whistles).
Take a look at Figure 8.9 for an example of what a pre-rendered 32-frame sprite looks like. Each rotation frame is 11.25 degrees. In Allegro's 256-degree math, that's just a simple eight degrees per frame. You could write a simple loop to pre-rotate all of the images for Tank War using eight degrees, assuming you wanted to use a 32-frame tank.
That's a lot of sprites. In addition, they must all be perfectly situated in the bitmap image so that when it is drawn, the tank doesn't behave erratically with small jumps due to incorrect pixel alignment on each frame. What's a good solution? It probably would be a good idea to simply use a single tank image and rotate it through all 32 frames when the game starts up, and then store the rotation frames in a sprite array. Allegro makes it easy to do this. This is also a terrific solution when you are working on smaller platforms that have limited memory. Don't be surprised by the possibility that if you are serious about game programming, you might end up writing games for cell phones and other small platforms where memory is a premium. Of course, Allegro isn't available for those platforms, but speaking in general terms, rotating a sprite based on a single image is very efficient and a smart way to develop under limited resources. You can get away with a lot of sloppy code under a large operating system, when it is assumed that the player must have a minimum amount of memory. (1 GB of RAM is common on Windows machines today.)
Does it really matter how many different frames you need for a sprite if you can just use a function like rotate_sprite to rotate it at any angle? Well, this function does make it easy to do rotation, but when you get into code for firing bullets, it can be tricky if you don't use a specific angle. Can you think of a way to move a bullet when your rotation angle is something odd like 43 degrees? The bullet's velocity values would be an odd pair of decimal values, like an x speed of 0.27 and y speed of –1.43 (just examples, not something I calculated).
As it turns out, there is a convenient way to calculate velocity for a bullet based on any arbitrary angle that the tank is facing. What I'm talking about is calculating the angular velocity. This is such a great feature that I have devoted a whole section to it in Chapter 10, “Advanced Sprite Programming,” and we will develop an example game to demonstrate it.
Now it's time to put some of this newfound knowledge to use in an example program. This program is called RotateSprite, and it simply demonstrates the rotate_sprite function. You can use the left and right arrow keys to rotate the sprite in either direction. There is no fixed angle used in this sample program, but the angle is adjusted by 0.1 degree in either direction, giving it a nice steady rotation rate that shouldn't be too fast. If you are using a slower PC, you can increase the angle. Note that a whole number angle will go so fast that you'll have to slow down the program the hard way, using the rest function. Take a look at Figure 8.10, which shows the RotateSprite program running.
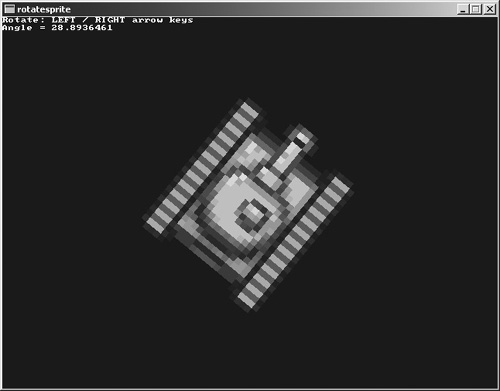
The only aspect of the code listing for the RotateSprite program that I want you to keep an eye out for is the actual call to rotate_sprite. I have set the two lines that use rotate_sprite in bold so you will be able to identify them easily. Note the last parameter, itofix(angle). This extremely important function converts the angle to Allegro's fixed 16.16 numeric format used by rotate_sprite. You will want to pass your floating-point value (float, double) to itofix to convert it to a fixed-point value.
Tip
Fixed-point is much faster than floating-point—or so says the theory, which I do not subscribe to due to the modern floating-point power of processors. Remember that you must use itofix with all of the rotation functions.
#include <stdlib.h>
#include <allegro.h>

#define WHITE makecol(255,255,255)

int main(void)
{
int x, y;
float angle = 0;

//initialize program
allegro_init();
install_keyboard();
set_color_depth(32);
set_gfx_mode(GFX_AUTODETECT_WINDOWED, 640, 480, 0, 0);
textout_ex(screen, font, "Rotate: LEFT / RIGHT arrow keys",
    0, 0, WHITE, 0);

//load tank sprite
BITMAP *tank = load_bitmap("tank.bmp", NULL);

//calculate center of screen
x = SCREEN_W/2 - tank->w/2;
y = SCREEN_H/2 - tank->h/2;

//draw tank at starting location
rotate_sprite(screen, tank, x, y, 0);

//main loop
while(!key[KEY_ESC])
{
    //wait for keypress
    if (keypressed())
    {
        //left arrow rotates left
        if (key[KEY_LEFT])
        {
            angle -= 0.1;
            if (angle < 0) angle = 256;
            rotate_sprite(screen, tank, x, y, itofix(angle));
        }

     //right arrow rotates right
     if (key[KEY_RIGHT])
     {
         angle += 0.1;
         if (angle > 256) angle = 0;
         rotate_sprite(screen, tank, x, y, itofix(angle));
     }
         //display angle
         textprintf_ex(screen,font,0,10,WHITE,0,"Angle = %f", angle);
     }
   }
   allegro_exit();
   return 0;
}
END_OF_MAIN()
Allegro is generous with so many great functions, and that includes alternative forms of the rotate_sprite function. Here you have a rotation function that includes vertical flip, another rotation function that includes scaling, and a third function that does both scaling and vertical flip while rotating. Whew! You can see from these functions that the creators of Allegro were not artists, so they incorporated all of these wonderful functions to make it easier to conjure artwork for a game! These functions are similar to rotate_sprite so I won't bother with a sample program. You already understand how it works, right?
void rotate_sprite_v_flip(BITMAP *bmp, BITMAP *sprite,
    int x, int y, fixed angle)
The preceding function rotates and also flips the image vertically. To flip horizontally, add itofix(128) to the angle. To flip in both directions, use rotate_sprite() and add itofix(128) to its angle.
void rotate_scaled_sprite(BITMAP *bmp, BITMAP *sprite,
    int x, int y, fixed angle, fixed scale)
The preceding function rotates an image and scales (stretches to fit) the image at the same time.
void rotate_scaled_sprite_v_flip(BITMAP *bmp, BITMAP *sprite,
    int x, int y, fixed angle, fixed scale)
The preceding function rotates the image while also scaling and flipping it vertically, simply combining the functionality of the previous two functions.
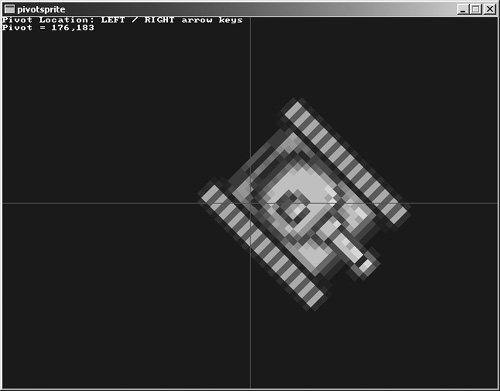
Allegro provides the functionality to pivot sprites and images. What does pivot mean? The pivot point is the location on the image where rotation occurs. If a sprite is 64 × 64 pixels, then the default pivot point is at 31 × 31 (accounting for zero); a sprite sized at 32 × 32 would have a default pivot point at 15 × 15. The pivot functions allow you to change the position of the pivot where rotation takes place.
void pivot_sprite(BITMAP *bmp, BITMAP *sprite, int x, int y,
    int cx, int cy, fixed angle)
The x and y values specify where the sprite is drawn, while cx and cy specify the pivot within the sprite (not globally to the screen). Therefore, if you have a 32 × 32 sprite, you can draw it anywhere on the screen, but the pivot points cx and cy should be values of 0 to 31.
The PivotSprite program demonstrates how to use the pivot_sprite function by drawing two blue lines on the screen, showing the pivot point on the sprite. You can use the arrow keys to adjust the pivot point and see how the sprite reacts while it is rotating in real time (see Figure 8.11).
#include <stdlib.h>
#include <allegro.h>
#define WHITE makecol(255,255,255)
#define BLUE makecol(64,64,255)

int main(void)
{
    int x, y;
    int pivotx, pivoty;
    float angle = 0;

    //initialize program
    allegro_init();
    install_keyboard();
    set_color_depth(16);
    set_gfx_mode(GFX_AUTODETECT_WINDOWED, 640, 480, 0, 0);

    //load tank sprite
    BITMAP *tank = load_bitmap("tank.bmp", NULL);

   //calculate center of screen
   x = SCREEN_W/2;
   y = SCREEN_H/2;
   pivotx = tank->w/2;
   pivoty = tank->h/2;

   //main loop
   while(!key[KEY_ESC])
   {
       //wait for keypress
       if (keypressed())
       {
          //left arrow moves pivot left
          if (key[KEY_LEFT])
          {
             pivotx -= 2;
             if (pivotx < 0) pivotx = 0;
          }

          //right arrow moves pivot right
          if (key[KEY_RIGHT])
          {
             pivotx += 2;
          if (pivotx > tank->w-1)
            pivotx = tank->w-1;
       }

       //up arrow moves pivot up
       if (key[KEY_UP])
       {
          pivoty -= 2;
          if (pivoty < 0) pivoty = 0;
       }

       //down arrow moves pivot down
       if (key[KEY_DOWN])
       {
         pivoty += 2;
         if (pivoty > tank->h-1)
             pivoty = tank->h-1;
       }
     }

     //pivot/rotate the sprite
     angle += 0.5;
     if (angle > 256) angle = 0;
     pivot_sprite(screen, tank, x, y, pivotx, pivoty,
         itofix(angle));

     //draw the pivot lines
     hline(screen, 0, y, SCREEN_W-1, BLUE);
     vline(screen, x, 0, SCREEN_H-1, BLUE);

     //display information
     textout_ex(screen, font,
         "Pivot Location: LEFT / RIGHT arrow keys", 0,0,WHITE,0);
     textprintf_ex(screen, font, 0, 10, WHITE, 0,
         "Pivot = %3d,%3d ", pivotx, pivoty);
     rest(1);
   }
   allegro_exit();
   return 0;
}
END_OF_MAIN()As usual, Allegro provides everything including the clichéd kitchen sink. Here are the additional pivot functions that you might have already expected to see, given the consistency of Allegro in this matter. Here you have three functions—pivot with vertical flip, pivot with scaling, and pivot with scaling and vertical flip. It's nice to know that Allegro is so consistent, so any time you are in need of a special sprite manipulation within your game, you are certain to be able to accomplish it using a combination of rotation, pivot, scaling, and flipping functions that have been provided.
void pivot_sprite_v_flip(BITMAP *bmp, BITMAP *sprite, int x, int y,
      int cx, int cy, fixed angle)
void pivot_scaled_sprite(BITMAP *bmp, BITMAP *sprite, int x, int y,
      int cx, int cy, fixed angle, fixed scale))

void pivot_scaled_sprite_v_flip(BITMAP *bmp, BITMAP *sprite,
     int x, int y, fixed angle, fixed scale)
Allegro provides many special effects that you can apply to sprites, as you saw in the previous sections. The next technique is unusual enough to warrant a separate discussion. This section explains how to draw sprites with translucent alpha blending.
Translucency is a degree of “see-through” that differs from transparency, which is entirely see-through. Think of the glass in a window as being translucent, while an open window is transparent. There is quite a bit of work involved in making a sprite translucent, and I'm not entirely sure it's necessary for a game to use this feature, which is most definitely a drain on the graphics hardware. Although a late-model video card can handle translucency, or alpha blending, with ease, there is still the issue of supporting older computers or those with non-standard video cards. As such, many 2D games have steered clear of using this feature. One of the problems with translucency in a software implementation is that you must prepare both bitmaps before they will render with translucency. Some hardware solutions are likely available, but they are not provided for in Allegro.
Translucency is provided by the draw_trans_sprite function:
void draw_trans_sprite(BITMAP *bmp, BITMAP *sprite, int x, int y)
Unfortunately, it's not quite as cut-and-dried as this simple function makes it appear. To use translucency, you have to use an alpha channel blender, and even the Allegro documentation is elusive in describing how this works. Suffice it to say, translucency is not something you would probably want to use in a game because it was really designed to work between just two bitmaps. You could use the same background image with multiple foreground sprites that are blended with the background using the alpha channel, but each sprite must be adjusted pixel by pixel when the program starts. This is a special effect that you might find a use for, but I would advise against using it in the main loop of a game.
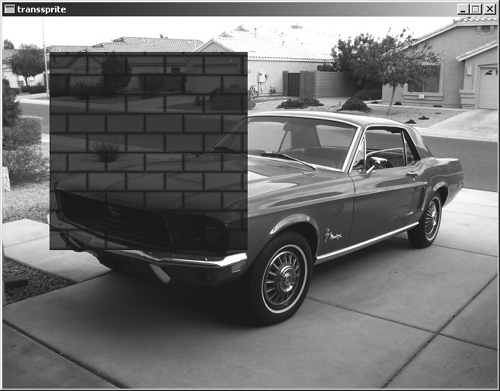
Here is the source code for the TransSprite program, shown in Figure 8.12. I will explain how it works after the listing.
#include <stdlib.h>
#include <allegro.h>

int main(void)
{
   int x, y, c, a;

   //initialize
   allegro_init();
install_keyboard();
install_mouse();
set_color_depth(32);
set_gfx_mode(GFX_AUTODETECT_WINDOWED, 640, 480, 0, 0);

//load the background bitmap
BITMAP *background = load_bitmap("mustang.bmp", NULL);

//load the translucent foreground image
BITMAP *alpha = load_bitmap("alpha.bmp", NULL);
BITMAP *sprite = create_bitmap(alpha->w, alpha->h);

//set the alpha channel blend values
drawing_mode(DRAW_MODE_TRANS, NULL, 0, 0);
set_write_alpha_blender();
//blend the two bitmap alpha channels
for (y=0; y<alpha->h; y++) {
   for (x=0; x<alpha->w; x++) {
      //grab the pixel color
      c = getpixel(alpha, x, y);
      a = getr(c) + getg(c) + getb(c);
      //find the middle alpha value
      a = MID(0, a/2-128, 255);
      //copy the alpha-enabled pixel to the sprite
      putpixel(sprite, x, y, a);
   }
}

//create a double buffer bitmap
BITMAP *buffer = create_bitmap(SCREEN_W, SCREEN_H);

//draw the background image
blit(background, buffer, 0, 0, 0, 0, SCREEN_W, SCREEN_H);

while (!key[KEY_ESC])
{
   //get the mouse coordinates
   x = mouse_x - sprite->w/2;
   y = mouse_y - sprite->h/2;

   //draw the translucent image
   set_alpha_blender();
   draw_trans_sprite(buffer, sprite, x, y);

   //draw memory buffer to the screen
   blit(buffer, screen, 0, 0, 0, 0, SCREEN_W, SCREEN_H);

   //restore the background
   blit(background, buffer, x, y, x, y, sprite->w, sprite->h);
 }

 destroy_bitmap(background);
 destroy_bitmap(sprite);
 destroy_bitmap(buffer);
 destroy_bitmap(alpha);

 return 0;
}
END_OF_MAIN()
Now for some explanation. First, the program loads the background image (called “background”), followed by the foreground sprite (called “alpha”). A new image called “sprite” is created with the same resolution as the background; it receives the alpha-channel information. The drawing mode is set to DRAW_MODE_TRANS to enable translucent drawing with the graphics functions (putpixel, line, and so on). The pixels are then copied from the alpha image into the sprite image.
After that, another new image called “buffer” is created and the background is blitted to it. At this point, the main loop starts. Within the loop, the mouse is polled to move the sprite around on the screen, demonstrating the alpha blending. The actual translucency is accomplished by two functions.
set_alpha_blender();
draw_trans_sprite(buffer, sprite, x, y);
The alpha blender is enabled before draw_trans_sprite is called, copying the “sprite” image onto the buffer. The memory buffer is blitted to the screen, and then the background is restored for the next iteration through the loop.
blit(buffer, screen, 0, 0, 0, 0, SCREEN_W, SCREEN_H);
Now it's time to use the new knowledge you have gained in this chapter to enhance Tank War once again. First, how about a quick recap on the state of the game? Take a look at Figure 8.13, showing Tank War as it appeared in the last chapter.
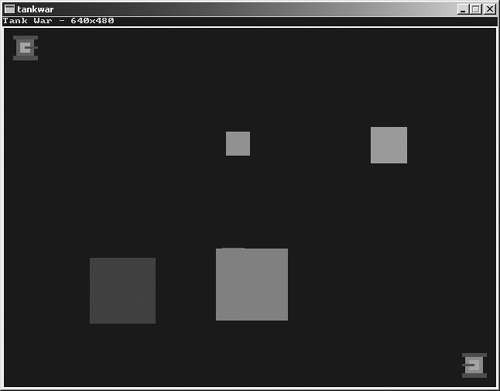
Not very attractive, is it? It looks like something that would run on an Atari 2600. I have been skirting the issue of using true bitmaps and sprites in Tank War since it was first conceived four chapters ago. Now it's time to give this pathetic game a serious upgrade!
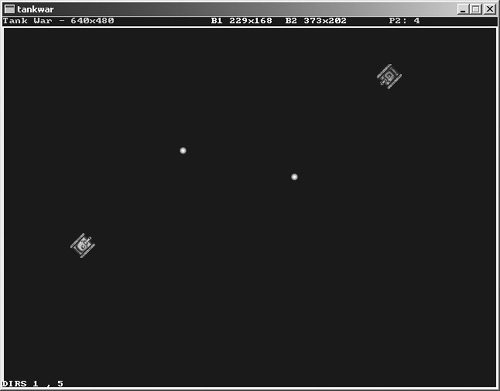
First, to upgrade the game, I made a design decision to strip out the pixel collision code and leave the battlefield blank for this enhancement. The game will look better overall with the eight-way tank sprites, but the obstacles will no longer be present. Take a look at Figure 8.14, showing a tank engulfed in an explosion.
It's really time to move out of the vector theme entirely. Because I haven't covered sprite-based collision detection yet to determine when a tank or bullet hits an actual sprite (rather than just checking the color of the pixel at the bullet's location), I'll leave that for the next chapter, in which I'll get into sprite collision as well as animation and other essential sprite behaviors. What that means right now is that Tank War is getting smaller and less complicated, at least for the time being! By stripping the pixel collision code, the source code is shortened considerably. You will lose checkpath, clearpath, and setupdebris, three key functions from the first version of the game. (Although they are useful as designed, they are not very practical.) In fact, that first version had a lot of promise and could have been improved with just the vector graphics upon which it was based. If you are still intrigued by the old-school game technology that used vector graphics, I encourage you to enhance the game and see what can be done with vectors alone. I am forging ahead because the topics of each chapter demand it, but we have not fully explored all the possibilities by any means.
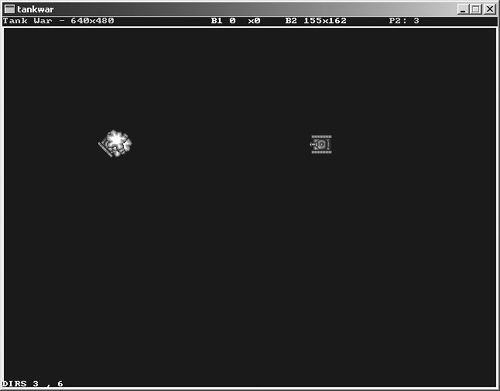
Now what about the new changes for Tank War? This will be the third enhancement to the game, but it is somewhat of a backward step in gameplay because there are no longer any obstacles on the battlefield. However, the tanks are no longer rendered with vector graphics functions; rather, they are loaded from a bitmap file. This enhancement also includes a new bitmap for the bullets and explosions. The source code for the game is much shorter than it was before, but due to all the changes, I will provide the entire listing here, rather than just highlighting the changes (as was the case with the previous two enhancements). Much of the original source code is the same, but many seemingly untouched functions have had minor changes to parameters and lines of code that are too numerous to point out. Figure 8.15 shows both tanks firing their newly upgraded weapons.
If you'll take a closer look at Figure 8.15, you might notice that the same information is displayed at the top of the screen (name, resolution, bullet locations, and score). I have added a small debug message to the bottom-left corner of the game screen, showing the direction each tank is facing. Since the game now features eight-way directional movement rather than just four-way, I found it useful to display the direction each tank is facing because the new directions required modifications to the movetank and updatebullet functions.
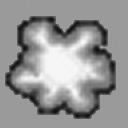
Figure 8.16 shows the new projectile sprite, and Figure 8.17 shows the new explosion sprite. These might not look like much zoomed in close like this, but they look great in the game.

The game is starting to get a bit large even at this early stage, so I've moved a lot of the constants and variable definitions into a header file called tankwar.h. If you are just modifying the project from the last chapter, then you will need to add a new file to the project called tankwar.h. You might notice the new bullet and explosion bitmaps in addition to the changes to tank_bmp, which now supports eight bitmaps, one for each direction. Now that color no longer plays a part in drawing the tanks, the color variable has been removed from the tank structure, tagTank. The three function prototypes for collision detection are included; clearpath, checkpath, and setupdebris are no longer needed so they have been removed. Since the game loop has been sped up, I have also modified BULLETSPEED so that it is now 6 instead of 10 (which was too jumpy).
////////////////////////////////////////////////////////////////////
// Game Programming All In One, Third Edition
// Chapter 8 - Tank War Header
////////////////////////////////////////////////////////////////////

#ifndef _TANKWAR_H
#define _TANKWAR_H

#include <stdlib.h>
#include "allegro.h"

//define some game constants
#define MODE GFX_AUTODETECT_WINDOWED
#define WIDTH 640
#define HEIGHT 480
#define MAXSPEED 2
#define BULLETSPEED 6

//define some colors
#define TAN makecol(255,242,169)
#define BURST makecol(255,189,73)
#define BLACK makecol(0,0,0)
#define WHITE makecol(255,255,255)

//define tank structure
struct tagTank
{
   int x,y;
   int dir,speed;
   int score;
} tanks[2];

//define bullet structure
struct tagBullet
{
   int x,y;
   int alive;
   int xspd,yspd;
} bullets[2];

//declare some variables
int gameover = 0;

//sprite bitmaps
BITMAP *tank_bmp[2][8];
BITMAP *bullet_bmp;
BITMAP *explode_bmp;

//function prototypes
void drawtank(int num);
void erasetank(int num);
void movetank(int num);
void explode(int num, int x, int y);
void updatebullet(int num);
void fireweapon(int num);
void forward(int num);
void backward(int num);
void turnleft(int num);
void turnright(int num);
void getinput();
void setuptanks();
void score(int);
void setupscreen();

#endif
Now I want to focus on the new source code for Tank War. As I mentioned previously, nearly every function has been modified for this new version, so if you have any problems running it after you modify your last copy of the game, you have likely missed some change in the following listing. As a last resort, you can load the project off the CD-ROM for your favorite compiler. I'll walk you through each major change in the game, starting with the first part. Here you have new drawtank, erasetank, and movetank functions that support sprites and eight directions.
/////////////////////////////////////////////////////////////////////
// Game Programming All In One, Third Edition
// Chapter 8 - Tank War Game (Enhancement 3)
/////////////////////////////////////////////////////////////////////
#include "tankwar.h"

/////////////////////////////////////////////////////////////////////
// drawtank function
// display the tank bitmap in the current direction
/////////////////////////////////////////////////////////////////////
void drawtank(int num)
{
  int dir = tanks[num].dir;
  int x = tanks[num].x-15;
  int y = tanks[num].y-15;
  draw_sprite(screen, tank_bmp[num][dir], x, y);
}

/////////////////////////////////////////////////////////////////////
// erasetank function
// erase the tank using rectfill
/////////////////////////////////////////////////////////////////////
void erasetank(int num)
{
  int x = tanks[num].x-17;
  int y = tanks[num].y-17;
  rectfill(screen, x, y, x + 33, y + 33, BLACK);
}

/////////////////////////////////////////////////////////////////////
// movetank function
// move the tank in the current direction
/////////////////////////////////////////////////////////////////////
void movetank(int num){
   int dir = tanks[num].dir;
   int speed = tanks[num].speed;

  //update tank position based on direction
  switch(dir)
  {
      case 0:
          tanks[num].y -= speed;
          break;
      case 1:
          tanks[num].x += speed;
          tanks[num].y -= speed;
          break;
      case 2:
          tanks[num].x += speed;
          break;
      case 3:
          tanks[num].x += speed;
          tanks[num].y += speed;
          break;
      case 4:
          tanks[num].y += speed;
          break;
      case 5:
          tanks[num].x -= speed;
          tanks[num].y += speed;
          break;
      case 6:
          tanks[num].x -= speed;
          break;
      case 7:
          tanks[num].x -= speed;
          tanks[num].y -= speed;
          break;
    }
    //keep tank inside the screen
    if (tanks[num].x > SCREEN_W-22)
    {
       tanks[num].x = SCREEN_W-22;
       tanks[num].speed = 0;
    }
    if (tanks[num].x < 22)
    {
       tanks[num].x = 22;
       tanks[num].speed = 0;
    }
    if (tanks[num].y > SCREEN_H-22)
    {
       tanks[num].y = SCREEN_H-22;
       tanks[num].speed = 0;
    }
    if (tanks[num].y < 22)
    {
       tanks[num].y = 22;
       tanks[num].speed = 0;
    }
}
The next section of code includes highly modified versions of explode, updatebullet, and fireweapon, which, again, must support all eight directions. One significant change is that explode no longer includes the code that checks for a tank hit—that code has been moved to updatebullet. You might also notice in explode that the explosion is now a bitmap rather than a random-colored rectangle. This small effect alone dramatically improves the game.
/////////////////////////////////////////////////////////////////////
// explode function
// display an explosion image
/////////////////////////////////////////////////////////////////////
void explode(int num, int x, int y)
{
   int n;

   //load explode image
   if (explode_bmp == NULL)
   {
      explode_bmp = load_bitmap("explode.bmp", NULL);
   }

   //draw the explosion bitmap several times
   for (n = 0; n < 5; n++)
   {
      rotate_sprite(screen, explode_bmp,
          x + rand()%10 - 20, y + rand()%10 - 20,
          itofix(rand()%255));

     rest(30);
   }

   //clear the explosion
   circlefill(screen, x, y, 50, BLACK);

}

/////////////////////////////////////////////////////////////////////
// updatebullet function
// update the position of a bullet
/////////////////////////////////////////////////////////////////////
void updatebullet(int num)
{
int x = bullets[num].x;
int y = bullets[num].y;


//is the bullet active?
if (!bullets[num].alive) return;


//erase bullet
rectfill(screen, x, y, x + 10, y + 10, BLACK);


//move bullet
bullets[num].x += bullets[num].xspd;
bullets[num].y += bullets[num].yspd;
x = bullets[num].x;
y = bullets[num].y;


//stay within the screen
if (x < 6 || x > SCREEN_W-6 || y < 20 || y > SCREEN_H-6)
{
   bullets[num].alive = 0;
   return 1;
}


//look for a direct hit using basic collision
//tank is either 0 or 1, so negative num = other tank
int tx = tanks[!num].x;
int ty = tanks[!num].y;
if (x > tx-16 && x < tx + 16 && y > ty-16 && y < ty + 16)
{
   //kill the bullet
   bullets[num].alive = 0;

   //blow up the tank
   explode(num, x, y);
   score(num);
}
else
//if no hit then draw the bullet
{

   //draw bullet sprite
   draw_sprite(screen, bullet_bmp, x, y);

   //update the bullet positions (for debugging)
   textprintf_ex(screen, font, SCREEN_W/2-50, 1, TAN, 0,
      "B1 %-3dx%-3d B2 %-3dx%-3d",
      bullets[0].x, bullets[0].y,
      bullets[1].x, bullets[1].y);
  }
}


/////////////////////////////////////////////////////////////////////
// fireweapon function
// set bullet direction and speed and activate it
/////////////////////////////////////////////////////////////////////
void fireweapon(int num)
{
   int x = tanks[num].x;
   int y = tanks[num].y;

   //load bullet image if necessary
   if (bullet_bmp == NULL)
   {
       bullet_bmp = load_bitmap("bullet.bmp", NULL);
   }


   //ready to fire again?
   if (!bullets[num].alive)
   {
      bullets[num].alive = 1;

      //fire bullet in direction tank is facing
      switch (tanks[num].dir)
      {
        //north
        case 0:
           bullets[num].x = x-2;
           bullets[num].y = y-22;
           bullets[num].xspd = 0;
           bullets[num].yspd = -BULLETSPEED;
           break;
        //NE
        case 1:
           bullets[num].x = x + 18;
           bullets[num].y = y-18;
           bullets[num].xspd = BULLETSPEED;
           bullets[num].yspd = -BULLETSPEED;
           break;
        //east
        case 2:
           bullets[num].x = x + 22;
           bullets[num].y = y-2;
           bullets[num].xspd = BULLETSPEED;
           bullets[num].yspd = 0;
           break;
        //SE
        case 3:
           bullets[num].x = x + 18;
           bullets[num].y = y + 18;
           bullets[num].xspd = BULLETSPEED;
           bullets[num].yspd = BULLETSPEED;
           break;
        //south
        case 4:
           bullets[num].x = x-2;
           bullets[num].y = y + 22;
           bullets[num].xspd = 0;
           bullets[num].yspd = BULLETSPEED;
           break;
        //SW
        case 5:
           bullets[num].x = x-18;
           bullets[num].y = y + 18;
           bullets[num].xspd = -BULLETSPEED;
           bullets[num].yspd = BULLETSPEED;
           break;
        //west
        case 6:
           bullets[num].x = x-22;
           bullets[num].y = y-2;
           bullets[num].xspd = -BULLETSPEED;
           bullets[num].yspd = 0;
           break;
        //NW
        case 7:
           bullets[num].x = x-18;
           bullets[num].y = y-18;
           bullets[num].xspd = -BULLETSPEED;
           bullets[num].yspd = -BULLETSPEED;
           break;
     }
  }
}
The next section of code covers the keyboard input code, including forward, backward, turnleft, turnright, and getinput. These functions are largely the same as before, but they now must support eight directions (evident in the if statement within turnleft and turnright).
/////////////////////////////////////////////////////////////////////
// forward function
// increase the tank's speed
/////////////////////////////////////////////////////////////////////
void forward(int num)
{
   tanks[num].speed++;
   if (tanks[num].speed > MAXSPEED)
       tanks[num].speed = MAXSPEED;
}

/////////////////////////////////////////////////////////////////////
// backward function
// decrease the tank's speed
/////////////////////////////////////////////////////////////////////
void backward(int num)
{
   tanks[num].speed--;
   if (tanks[num].speed < -MAXSPEED)
       tanks[num].speed = -MAXSPEED;
}

/////////////////////////////////////////////////////////////////////
// turnleft function
// rotate the tank counter-clockwise
/////////////////////////////////////////////////////////////////////
void turnleft(int num)
{
//***
  tanks[num].dir--;
  if (tanks[num].dir < 0)
      tanks[num].dir = 7;
}

/////////////////////////////////////////////////////////////////////
// turnright function
// rotate the tank clockwise
/////////////////////////////////////////////////////////////////////
void turnright(int num)
{
  tanks[num].dir++;
  if (tanks[num].dir > 7)
      tanks[num].dir = 0;
}

/////////////////////////////////////////////////////////////////////
// getinput function
// check for player input keys (2 player support)
/////////////////////////////////////////////////////////////////////
void getinput()
{
  //hit ESC to quit
  if (key[KEY_ESC])   gameover = 1;

  //WASD - SPACE keys control tank 1
  if (key[KEY_W])     forward(0);
  if (key[KEY_D])     turnright(0);
  if (key[KEY_A])     turnleft(0);
  if (key[KEY_S])     backward(0);
  if (key[KEY_SPACE]) fireweapon(0);

  //arrow - ENTER keys control tank 2
  if (key[KEY_UP])   forward(1);
  if (key[KEY_RIGHT]) turnright(1);
  if (key[KEY_DOWN]) backward(1);
  if (key[KEY_LEFT]) turnleft(1);
  if (key[KEY_ENTER]) fireweapon(1);

  //short delay after keypress
  rest(20);
}
The next short code section includes the score function that is used to update the score for each player.
/////////////////////////////////////////////////////////////////////
// score function
// add a point to a player's
/////////////////////////////////////////////////////////////////////
void score(int player)
{
   //update score
   int points = ++tanks[player].score;

   //display score
   textprintf_ex(screen, font, SCREEN_W-70*(player + 1), 1, 0,
       BURST, "P%d: %d", player + 1, points);
}
The setuptanks function has changed dramatically from the last version because that is where the new tank bitmaps are loaded. Since this game uses the rotate_sprite function to generate the sprite images for all eight directions, this function takes care of that by first creating each image and then blitting the source tank image into each new image with a specified rotation angle. The end result is two tanks fully rotated in eight directions.
/////////////////////////////////////////////////////////////////////
// setuptanks function
// load tank bitmaps and position the tank
/////////////////////////////////////////////////////////////////////

void setuptanks()
{
  int n;

  //configure player 1's tank
  tanks[0].x = 30;
  tanks[0].y = 40;
  tanks[0].speed = 0;
  tanks[0].score = 0;
  tanks[0].dir = 3;

  //load first tank bitmap
  tank_bmp[0][0] = load_bitmap("tank1.bmp", NULL);
  //rotate image to generate all 8 directions
  for (n=1; n<8; n++)
  {
      tank_bmp[0][n] = create_bitmap(32, 32);
      clear_bitmap(tank_bmp[0][n]);
      rotate_sprite(tank_bmp[0][n], tank_bmp[0][0],
         0, 0, itofix(n*32));
  }

  //configure player 2's
  tanks[1].x = SCREEN_W-30;
  tanks[1].y = SCREEN_H-30;
  tanks[1].speed = 0;
  tanks[1].score = 0;
  tanks[1].dir = 7;

  //load second tank bitmap
  tank_bmp[1][0] = load_bitmap("tank2.bmp", NULL);

  //rotate image to generate all 8 directions
  for (n=1; n<8; n++)
  {
    tank_bmp[1][n] = create_bitmap(32, 32);
    clear_bitmap(tank_bmp[1][n]);
    rotate_sprite(tank_bmp[1][n], tank_bmp[1][0],
      0, 0, itofix(n*32));
  }
}
The next section of the code includes the setupscreen function. The most important change to this function is the inclusion of a single line calling set_color_depth(32), which causes the game to run in 32-bit color mode. Note that if you don't have a 32-bit video card, you might want to change this to 16 (which will still work).
/////////////////////////////////////////////////////////////////////
// setupscreen function
// set up the graphics mode and draw the game screen
/////////////////////////////////////////////////////////////////////
void setupscreen()
{
   //set video mode
   set_color_depth(32);
   int ret = set_gfx_mode(MODE, WIDTH, HEIGHT, 0, 0);
   if (ret != 0) {
       allegro_message(allegro_error);
       return;
   }

   //print title
   textprintf_ex(screen, font, 1, 1, BURST, 0,
       "Tank War - %dx%d", SCREEN_W, SCREEN_H);

   //draw screen border
   rect(screen, 0, 12, SCREEN_W-1, SCREEN_H-1, TAN);
   rect(screen, 1, 13, SCREEN_W-2, SCREEN_H-2, TAN);
}
Finally, the last section of code in the third enhancement to Tank War includes the all-important main function. Several changes have been made in main, notably the removal of the calls to clearpath (which checked for bullet hits by looking directly at pixel color). The call to rest now has a value of 10 to speed up the game a bit in order to have smoother bullet trajectories. There is also a line of code that displays the direction of each tank, as I explained previously.
/////////////////////////////////////////////////////////////////////
// main function
// start point of the program
/////////////////////////////////////////////////////////////////////
int main(void)
{
   //initialize the game
   allegro_init();
   install_keyboard();
   install_timer();
   srand(time(NULL));
   setupscreen();
   setuptanks();

   //game loop
   while(!gameover)
   {
     textprintf_ex(screen, font, 0, SCREEN_H-10, WHITE, 0,
        "DIRS %d, %d", tanks[0].dir, tanks[1].dir);
     //erase the tanks
     erasetank(0);
     erasetank(1);

     //move the tanks
     movetank(0);
     movetank(1);

     //draw the tanks
     drawtank(0);
     drawtank(1);

     //update the bullets
     updatebullet(0);
     updatebullet(1);

     //check for keypresses
     if (keypressed()) getinput();

     //slow the game down
     rest(10);
   }

   //end program
   allegro_exit();
   return 0;
}
END_OF_MAIN()
This marks the end of perhaps the most interesting chapter so far, at least in my opinion. The introduction to sprites that you have received in this chapter provides the basics without delving too deeply into sprite programming theory. The next chapter covers some advanced sprite programming topics, including the sorely needed collision detection. I will also get into sprite animation in the next chapter. There are many more changes on the way for Tank War as well. The next several chapters will provide a huge amount of new functionality that you can use to greatly enhance Tank War, making it into a truly top-notch game with a scrolling background, animated tanks, a radar screen, and many more new features!
You can find the answers to this chapter quiz in Appendix A, “Chapter Quiz Answers.”