
Chapter 2
Hunting for Your Ancestral Treasures
IN THIS CHAPTER
![]() Determining who to research first
Determining who to research first
![]() Researching through interviews
Researching through interviews
![]() Understanding the value of photos
Understanding the value of photos
It’s likely that one of the reasons you are reading this book is to learn how to record the history of your ancestors. In Chapter 1, we gave you some practical experience in documenting your life. This chapter presents skills for documenting the lives of your ancestors.
A Brief Message about Research Steps
We know you are eager to find the juicy details of your ancestors’ lives and we don’t want to slow you down. However, it is important to understand a little about how to research before jumping in head first. To help, we introduce a few ideas here, and then, in your spare time, you can read Chapter 13 for more information on the research cycle.
To ensure you are getting the most out of your research and you don’t have to backtrack and research things again, it is a good idea to follow a research plan. We’ve come up with the Helm Online Family Tree Research Cycle to help you along the path. The Cycle contains six basic steps — planning, collecting, researching, consolidating, validating, and distilling. We cover each of these areas over the course of the book. In this chapter, we focus on the areas of planning and collecting.
Selecting a Person to Begin Your Search
Before you can get very far in your research, you need to take the first crucial step in planning — selecting a person to research. Selecting a person sounds easy, doesn’t it? Just choose your great-great-grandfather’s name, and you’re off to the races. But what if your great-great-grandfather’s name was John Smith? You may encounter millions of sites with information on John Smith — unless you know some facts about the John Smith you’re looking for, we can guarantee you’ll have a frustrating time online.
Trying a semi-unique name
The first time you research online, start with a person whose name is, for lack of a better term, semi-unique. By this we mean a person with a name that doesn’t take up ten pages in your local phone book but is still common enough that you can find some information on it the first time you conduct a search. If you’re really brave, you can begin with someone with a common surname such as Smith or Jones, but you’ll have to do a lot more groundwork upfront before you can determine whether any of your findings relate to your ancestor.
Also, consider variations in spelling that your ancestor’s name may have. Often, you can find more information on the mainstream spelling of his or her surname than on one of its rarer variants. For example, if you research someone with the surname Helme, you may have better luck finding information under the spellings Helm or Helms. If your family members immigrated to the United States in the last two centuries, they may have Americanized their surname. Families often Americanized their names so they would be more easily pronounced in English; sometimes the surname was simply misspelled and subsequently adopted by the family.
 For more information on name variations, check out the Name Variations in the United States Indexes and Records page at FamilySearch:
https://familysearch.org/wiki/en/Name_Variations_in_United_States_Indexes_and_Records
Narrowing your starting point
If you aren’t sure how popular a name is, try visiting a site with surname distribution maps. The Forebears website has a database for the meaning and distribution of 11 million surnames. Here’s what to do:
-
Open your browser and go to Forebears search site (
http://forebears.co.uk/surnames).The site appears with a search form at the top.
-
Type the surname you’re researching in the Enter a Surname field.
As you type, the site will suggest surnames. You can click on the drop-down list after you find a match for the surname you are using.
-
Click Search.
The color surname distribution map appears as in Figure 2-1. The surname is more frequent in areas colored in deep blue. The tables at the bottom of the page provide more details on the surname.
-
To get a closer look at a particular area, click the country on the map. The regional level appears (for selected countries).
Figure 2-2 shows the frequency of the Helm surname in the United States in 2014. For some countries, you can change the date on the map through the date drop-down box located just above the map.

FIGURE 2-1: A distribution map for the surname Helm.

FIGURE 2-2: The regional view of the Helm surname.
A good reason to check out distribution maps is that you can use them to identify potential geographic areas where you can look for your family during the years covered by the site. If we hit a wall and can’t find additional information online about a specific individual or the surname, we know we can start looking at records in these areas to find more clues about families with the name. We hope that by doing so, we’ll find our branch. For a list of surname distribution sites by country see the Surname Distribution Maps article at https://familysearch.org/wiki/en/Surname_Distribution_Maps.
Choosing someone you know about
In addition to choosing a person you’re likely to have success researching, you want to use a person you already know something about. The more details that you know about a person, the more successful your initial search is likely to be.
For example, Matthew used his great-grandfather William Abell because he knew more about that side of his family. His grandmother once mentioned that her father was born in LaRue County, Kentucky, in 1876. This gives him a point of reference for judging whether a site has any relevant information on his family. A site is relevant if it contains any information on Abells who were located in or near LaRue County, Kentucky, before or around the year 1876. Try to use the same technique with your ancestor. For more information on how to extract genealogical information from your family to use in your research, see the section, “Getting the 4-1-1 from Your Kinfolk,” later in this chapter.
Selecting a grandparent’s name
Having trouble selecting a name? Why not try one of your grandparent’s names? Using a grandparent’s name can have several benefits. If you find some information on an individual but you aren’t sure whether it’s relevant to your family, you can check with relatives to see whether they know any additional information that can help you. This may also spur interest in genealogy in other family members who can then assist you with some of your research burden or produce some family documents that you never knew existed.
 With a name in hand, you’re ready to see how much information is currently available about that individual. Because this is just one step in a long journey to discover your family history, you want to begin slowly. Don’t try to examine every resource right from the start. You’re more likely to become overloaded with information if you try to find too many resources too quickly. Your best approach is to begin searching a few sites until you get the hang of how to find information about your ancestors online. And keep in mind that you can always bookmark sites in your web browser, or record the URL in a spreadsheet or your genealogical application, so that you can easily return to them later, when you’re ready for more in-depth research.
For the purposes of this chapter, we’ll research Matthew’s great-grandfather, William Henry Abell — although, feel free to use the following steps on a person that is your research interest.
Beginning to Put the Puzzle Together
We’ve talked a bit about planning your research in the previous sections. We hope that you have selected a person or group of people to research. Before turning to the computer, we suggest that you move to the second research phase and collect some information that will help you evaluate the information that you find online, in a library, or in an archive. As you will see, there may be a lot of resources that you haven’t thought of that can propel your research.
When collecting information about William Henry Abell, we actually started with information that his daughter, Edna Abell, could provide — both in person and through documents about Edna. As we go through the following sections, we note the items that we learned from Edna that eventually help our research effort.
Getting the 4-1-1 from Your Kinfolk
It’s likely that you have some valuable but overlooked sources of genealogical gold. You may be looking right through them as they hover around the dessert table at the family reunion, reminding you about every embarrassing moment from your childhood and overstaying their welcome in your home. Yes, they are your relatives.
Interviewing your relatives is an important step in the research process. Relatives can provide family records and photographs, give you the proverbial dirty laundry on family members, and identify other people who might be beneficial to talk to about the family history. When talking with relatives, you want to collect the same type of information that you provided about yourself when you created your timeline in Chapter 1.
Your parents, brothers, sisters, grandparents, aunts, uncles, and cousins are all good candidates for information about your family’s most recent generations. Talking to relatives provides you with leads that you can use to find primary sources. (For more information on primary sources, see Chapter 1.) You can complete family interviews in person or through a questionnaire. We strongly recommend that you conduct these interviews in person; it’s a lot easier to ask additional questions and follow up on leads! However, if meeting your relatives in person is not feasible, by all means, drop them an email, open a Skype session, or write an old-fashioned letter.
Skype is a software and service that you can use for voice and video calls. The video-calling feature allows you to talk face-to-face over the Internet. For more information on Skype, check out their website (https://www.skype.com/en/). Another option is to use the video call feature in Google Hangouts (https://hangouts.google.com).
There’s no easy way to say this, so please excuse us for being blunt — you may want to begin interviewing some of your older relatives as soon as possible, depending on their ages and health. If a family member passes on before you have the chance to interview him or her, you may miss the opportunity of a lifetime to find out more about his or her personal experiences and knowledge of previous generations.
Here are a few tips to remember as you plan a family interview:
- Prepare a list of questions. Knowing what you want to achieve during the discussion helps you get started and keeps your interview focused. (See the nearby sidebar “Good interview questions” for some ideas.) However, you also need to be flexible enough to allow the interviewee to take the conversation where he or she wants to go. Often, some of the best information comes from memories that occur while the interviewee is talking — rather than being generated strictly in response to a set of questions.
- Bring a recorder to the interview. Use a recorder of your choice, whether it’s your phone, tablet, computer, a voice recorder, or a video camera. Make sure that you get permission from each participant before you start recording. If the interviewee is agreeable and you have the equipment, we recommend you video-record the session. That way, you can see the expressions on his or her face as he or she talks.
- Use photographs and documents to help your family members recall events. Often, photographs can have a dramatic effect on the stories that the interviewee remembers. If you have a lull in the interview, pulling out a photo album is an excellent way to nudge things along.
- Try to limit your interviews to two hours or less. You don’t want to be overwhelmed with information, and you don’t want the interviewee to get worn out by your visit. Within two hours, you can collect a lot of information to guide your research. And remember, you can always do another interview if you want more information from the family member. Actually, we strongly encourage you to do subsequent interviews — often the first interview stimulates memories for the individual that you can cover during a later interview. Who knows? It might lead to a regularly scheduled lunch or tea time with a relative whom you genuinely enjoy visiting.
- Be grateful and respectful. Remember that these are people who have agreed to give you time and answers. Treat them with respect by listening attentively and speaking politely to them. And by all means, be sure to thank them when you’ve completed the interview.
To accomplish two objectives at the same time, you might consider scanning documents and photographs while you are conducting the interview. Products such as the Flip-Pal scanner (http://flip-pal.com/) include software that can attach recordings to the images that you scan. Not only do you get a scan of a photo or object, but you can also get a verbal account of its history.
A few years before Matthew’s grandmother, Edna Abell, passed away, he had the opportunity to interview her using questions similar to those mentioned earlier in this chapter. During the course of the interview, Matthew asked about her parents. Edna stated that her father’s name was William Henry Abell and mother’s name was Lizzie Pickerell, and that the family lived in DeWitt County, Illinois, where she was born in 1901. Although Matthew learned much more from the interview, these items give us a place to begin our research for William. We’ll be looking for William and Lizzie Abell in DeWitt County, Illinois around 1901.
Dusting off old photo albums
A picture is worth a thousand words — so the saying goes. That’s certainly true in genealogy. Photographs are among the most treasured documents for genealogists. Pictures show how your ancestors looked and what conditions they lived in. Sometimes the flip side of the photo is more important than the picture itself. On the back, you may find crucial information such as names, dates, and descriptions of places.
Photographs are also useful as memory-joggers for family members. Pictures can help others recollect the past and bring up long-forgotten memories. Just be forewarned — sometimes the memories are good, and sometimes they’re not so good. Although you may stimulate thoughts of some great moments long ago, you may also open a can of worms when you ask Grandma about a particular person in a picture. On the plus side, she may give you the lowdown on not only that person, but also every single individual in the family who has ever made her angry — this can provide lots of genealogical leads.
You may run into several types of photographs in your research. Knowing when certain kinds of photographs were produced can help you associate a time frame with a picture. Here are some examples:
- Daguerreotypes: Daguerreotype photos were taken from 1839 to 1860. They required a long exposure time and were taken on silver-plated copper. The photographic image appears to change from a positive to a negative when tilted.
- Ambrotypes: Ambrotypes used a much shorter exposure time and were produced from 1858 to 1866. The image was made on thin glass and usually had a black backing.
- Tintypes: Tintypes were produced from 1858 to 1910. They were made on a metal sheet, and the image was often coated with a varnish. You can usually find them in a paper cover.
- Cartes-de-visite: Cartes-de-visite were small paper prints mounted on a card. They were often bound together into a photo album. They were produced between 1858 and 1891.
- Cabinet cards: Cabinet cards were larger versions of cartes-de-visite. They sometimes included dates on the borders of the cards. The pictures themselves were usually mounted on cardboard. They were manufactured primarily between 1865 and 1906.
- Albumen prints: These prints were produced on thin pieces of paper that were coated with albumen and silver nitrate. They were usually mounted on cardboard. Albumen prints were used between 1858 and 1910 and were the type of photographs found in cartes-de-visite and cabinet cards.
- Stereographic cards: Stereographic cards were paired photographs that rendered a three-dimensional effect when used with a stereographic viewer. They were prevalent from 1850 to 1925.
- Platinum prints: Platinum prints have a matte surface that appears embedded in the paper. The images were often highlighted with artistic chalk. They were produced mainly between 1880 and 1930.
- Glass-plate negatives: Glass-plate negatives were used between 1848 and 1930. They were made from light-sensitive silver bromide immersed in gelatin.
When you deal with photographs, keep in mind that too much light or humidity can easily destroy them. Oil from your fingerprints isn’t the greatest for old photos either, so you might want to keep a pair of light gloves in your research bag to use when handling these treasures. Also, some online resources can help you identify types of pictures. See the City Gallery website at www.city-gallery.com/learning for information about 19th-century photography, and visit the Identifying Photograph Types page at www.phototree.com/identify.htm for descriptions of several types of photographs.
During the Interview with Edna Abell, Matthew asked to see a picture of William Henry Abell. Edna produced a family picture showing a man, woman, and four small children (see Figure 2-3). Edna said that the man was William Henry Abell, the woman Lizzie Pickerell, the daughter standing in the back was Leona, the daughter sitting next to the father was Edna, the daughter standing next to the father was Lillian, and the baby held by the father was William. This photo helped garner names for three other people to research.
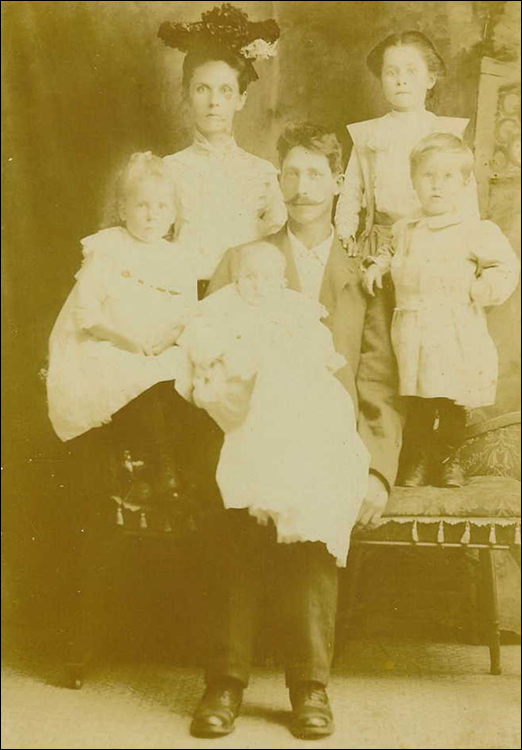
FIGURE 2-3: Family photo of William and Lizzie Abell.
Striking it rich in closets, in basements, and under beds
Are you a pack rat? A hoarder of sorts? You know what we mean: someone who keeps every little scrap of paper that he or she touches. If you are, you may be well suited for genealogy. In fact, if you’re lucky, you descended from a whole family of pack rats who saved all those scraps from the past in their attics or basements. You may be able to share in their treasures — digging to find things that can further your genealogical research. For example, pay a visit to Grandma’s attic, and you may discover an old suitcase or cigar box full of documents such as report cards, wartime ration cards, and letters. Eureka for the genealogist! These items may contain information that you can use to reconstruct part of your ancestor’s past or to enhance it.
When you go through old family treasures, look for things that can serve as primary sources for facts that you want to verify. For more information on primary sources, refer to Chapter 1. Here’s a list (although not an exhaustive one) of some specific things to look for:
- Family Bibles
- Property-related legal documents (such as mortgages, titles, and deeds)
- Insurance policies
- Wills
- Family letters
- Obituaries and newspaper articles
- Diaries
- Naturalization records
- Baptismal certificates and other church records
- Copies of vital records (such as birth, marriage, and death certificates, and divorce decrees)
- Report cards and other administrative papers from school
- Occupational or personnel records
- Membership cards or identification cards with photos
These gems that you find buried around the house contain all sorts of information: names and vital statistics of ancestors, names and addresses of friends of the family and neighbors, military units, religious affiliations, medical conditions and names of doctors or hospitals, work histories, and so many other things that can add color to your family history as well as give you place names and time frames to guide you in your subsequent research.
When talking with Matthew’s grandmother, Edna Abell, he asked to see any documents she might have pertaining to her father. She produced a copy of an obituary for William H. Abell that appeared in the local newspaper on 8 September 1955 (see Figure 2-4). Information gleaned from the obituary included: William passed away the previous Wednesday at 6:30 am in Hodgenville, Kentucky at the age of 82. He left behind his wife, Betty; and children Leona Helm and Edna Helm in Decatur; Lillian Laiser in Clinton; William Abell in Wapella; and Harland in East Chicago, Indiana. William Henry Abell also had brothers Peter Abell in Wapella; James Abell in Hopedale; and sisters Lanie Chaudoin in Wapella; and Minnie Simms in Brownstown. His body was transported from Kentucky to Clinton for the funeral.

FIGURE 2-4: Obituary of William H. Abell.
As you can tell, the obituary contained a treasure trove of information. This included death date and place, approximate birth date, his wife’s name (it wasn’t Lizzie, so we’ll have to figure out what happened to her), his children’s names and where they lived and his sibling’s names and where they lived. That’s six more people to research — that we didn’t already know about.
Adding Your Ancestors One by One
Earlier in this chapter, we covered resources that you can arm yourself with as you launch into your research. Now that you have some of those resources collected, we can move into the third phase — researching.
We always like to begin a search with one piece of proof in hand. To do this, we took a quick trip to an archive that holds Dewitt County, Illinois, records and was able to locate a copy of Edna Abell’s birth record (see Figure 2-5) with the help of a friendly archivist. The birth record states that Edna Ella Abell, a white female, second child of the mother, was born on 23 March 1901 in Wapella, Illinois. Her father was Wm. H. Abell, of American nationality, born in Kentucky, a blacksmith who was 27 years old at the time of the birth. Her mother was Lizzy F. Abell, maiden name Pickerell, of American nationality, born in Kentucky and living in Wapella, Illinois. The medical attendant was G. M. Robertson, MD, of Wapella, Illinois.

FIGURE 2-5: Copy of Edna Abell’s birth record.
From the interviews, photos, and documents that we collected (and discussed in the previous sections), we can assemble the following information useful in evaluating sources that we find online:
- Research target: William Henry Abell, born around 1873 in Kentucky and died on 7 September 1955. We derived the birth date based upon the obituary stating that he was 82 when he died. The birth place was from Edna’s birth record.
- Wives: Lizzie Pickerell and Betty (we don’t yet know her last name). The source for these were Edna’s birth record and William’s obituary.
- Children: Five children, Leona, Edna, Lillian, William, and Harland. The source for the children came from the interview with Edna, photograph, and William’s obituary.
- Siblings: Peter, James, Lanie, and Minnie. The source for this came from William’s obituary.
- Locations: Wapella, Dewitt County, Illinois around 1901 and Hodgenville, LaRue County, Kentucky around 1955. The source for this was Edna’s birth record and William’s obituary.
- Research goals: Find William’s birth date, locations where he lived from 1873 to 1955, and marriage dates for both wives.
Using a bit of (Roots)Magic to keep track of your family
Although all of the information we received from the interview and documents is good, we want to research to get more primary sources to prove what these sources, especially the obituary (from the previous section) mentioned. The information is enough to get a good start in finding the records that we need. To make sure that we don’t lose anything, we put this information into RootsMagic. Here’s how:
-
Open the RootsMagic Essentials application on your computer.
RootsMagic opens to the pedigree view. If you haven’t used RootsMagic Essentials yet, please refer to Chapter 1.
-
Double-click on the person in the Pedigree chart to enter information.
In our case, we clicked on William Henry Abell. The Edit Person page launches in a new window.
-
Click on the Add a Fact button.
The Add a Fact button (the button has a green plus sign) appears on the left side of the button bar on the Edit Person page. The Fact Types box appears.
-
Select a fact type from the list and click the Select button.
In our case, we clicked on Death, as we have William’s death date from the obituary. After you click on a fact, you are returned to the Edit Person page with the fact information located on the right side of the screen.
-
Fill in the information that you know about the fact on the right side of the screen and click on the Save button.
We entered the following information on William: The date of his death was 7 September 1955 and place of death was Hodgenville, LaRue, Kentucky, USA (that is, we entered the town, county, state, and country). After you click the Save button, the fact appears on the left side of the page (see Figure 2-6).
-
Click the Sources button in the lower-right side of the box.
The Citation Manager opens for the fact.
-
Select Add New Source.
The Select Source Type box appears, as shown in Figure 2-7.
-
Select from the list of source types.
In our case, we searched for the source type Obituary/Newspaper item. If you can’t find an existing source type to fit your need, select Free Form and enter your own source type.
-
Click OK.
The Edit Source box appears. Enter details about the source of your information. You should complete as many of the fields as you can for every source. Note that the fields have gray text in them with helpful tips.
- Click on the Media tab in the Edit Source page.
-
Click on Add New Media.
The Add Media Item box appears. Choose the Media type from the drop-down box and then click on the Disk or Scan button (depending upon whether you already have an image of the source). We have an image of the source, so we chose Image for the Media type and clicked on the Disk button.
-
Locate the image on your hard drive, select it, and click Open.
The Media Properties box appears. You can enter a caption, description, date, reference number, and tags to the image.
-
Click Okay.
The image of the source appears in the Edit Source window.
-
Select the Quality tab.
You see three boxes that help you assess the quality of the source. Answer the questions in each box, and RootsMagic assigns a Quality score. In our case, we answered that the source is in its first recorded form, that it is secondary (we chose this because the death happened in Kentucky and there is a good possibility that the obituary was written by someone in Illinois who did not witness the death), and indirect evidence (we need to find another primary source, such as a death record to substantiate the obituary).
-
Click Repository and then Edit Address.
Enter information about the repository location. If it is held privately, then use the person’s address.
-
Click OK.
A pop-over box appears asking for a Master Source Name. We tried to be as descriptive as possible by calling it “USA-Illinois-Decatur-Decatur Daily Review.”
-
Click OK.
The source now appears in the Citation Manager.
-
Click Close.
You are returned to the Edit Person screen. Notice there is now a green check mark in the source column of the fact.

FIGURE 2-6: A fact entered into the Edit Person screen.

FIGURE 2-7: The Select Source Type box.
You may have already noticed another way to get to the Source Manager. Choose Lists ⇒ Source List, click the Add a New Source button, and follow the preceding steps. This enables you to add a source that’s not necessarily tied to one specific event in that person’s life. If your ancestor kept a diary or memoirs of sorts, you might prefer to use this method of citing sources. Similarly, you have functionality to add sources that pertain to more than one person (called Family Sources in the drop-down list accessible from the Sources icon).
Because we also know the spouses of William, we put them in RootsMagic, too. Try the following:
-
From the Pedigree view, click the Add a Person button.
The Add a Person button is located in the top-left side of the button bar at the top of the page. It is in the shape of a little person with a plus sign. A drop-down box appears.
-
Select Spouse from the drop-down box.
Alternately, you can select an individual, parents, or child. The Add a Person box appears.
-
Select Add New person.
The Add Person box appears.
-
Fill in the fields and click OK.
Complete as many of the fields as you can. In our case, we filled in the name Lizzie Pickerell. We put Lizzie, even though we suspect the name is Elizabeth, because our sources thus far spell it this way. We can always change it later and add Lizzie as a nickname, if we find primary sources with Elizabeth.
Figure 2-8 shows the Family view of William Henry Abell with the items entered that we know about him (from the previous sections).

FIGURE 2-8: Family view of William Henry Abell.
After you’ve used RootsMagic Essentials for a while, you may find that you need more features such as the To Do list and Research Log. You can compare the features between RootsMagic and RootsMagic Essentials at www.rootsmagic.com/RootsMagic/Features.aspx to determine whether you need an upgrade.
Logging your data into Ancestry Family Tree
We want to show you one additional way to keep track of the information that you’ve gathered thus far. We take you through the process of adding a person in the Ancestry Family Tree. If you need to add additional information on someone already in the Family Tree or need to add sources, refer to Chapter 1. Try the following:
-
Point your web browser to
http://trees.ancestry.com/.The Ancestry.com online family tree page appears.
-
Click Trees in the black menu bar.
The menu bar is located at the top of the page next to the Ancestry logo.
-
Click on the [Your Name] Family Tree.
The resulting page shows the Pedigree view.
-
Click on a person in the Pedigree view.
A box appears with the person’s name and a menu bar with four buttons.
-
Click the far-right button with the tool shapes on it.
A drop-down box appears with two options — Add Relative or Delete This Person.
-
Select Add Relative and click on the type of relative to add.
A box appears with four choices — Father, Mother, Spouse, Child. We clicked on Spouse. Enter the individual’s first and middle names, maiden name, suffix, gender, birth date, birthplace, death date, and death place.
-
Click Save.
You are returned to the Pedigree view with the new person on the view.
For William Henry Abell, we added the information from the obituary, including approximate birth date, death date, and place, and details on his wives and children. Figure 2-9 shows the Facts view of William Henry Abell based on the information we gathered in previous sections.

FIGURE 2-9: Facts view of William Henry Abell.