
Chapter 14
Share and Share Alike
IN THIS CHAPTER
![]() Networking for success
Networking for success
![]() Sharing knowledge through blogs
Sharing knowledge through blogs
![]() Making the most of GEDCOM
Making the most of GEDCOM
![]() Generating reports
Generating reports
![]() Being a good citizen
Being a good citizen
Your genealogical database is growing with information about your relatives and ancestors. You’re excited about new findings and leads, and you want to share the news! Or maybe you’ve gone as far as you can on one bloodline and you need a boost. All of these are valid indicators that it’s time to start sharing the valuable information you discovered.
Sharing information is one foundation of a solid genealogical community. When you share information, you often get a lot in return from other researchers. For example, shortly after we began the Helm/Helms Family Research web page, several other Helm researchers throughout the world contacted us. We discovered several Helm lines existed that we didn’t even know about. Plus, we received valuable information on our own line from other researchers, not to mention we connected with some really nice folks we probably wouldn’t have met otherwise.
There is a vast number of resources online for sharing information about all sorts of subjects — including family history! In the early days of Internet-based genealogy, our advice to readers was to create from scratch and post your own home page (website) where you could open the doors to guests, inviting others to come to you for information and advice. But those days are long gone. There are much easier and friendlier options than mastering HyperText Markup Language (HTML) and other coding programs.
In this chapter, we focus on methods you can use to share information and connect with people via social networking sites and blogs. Also, we review how to use genealogical utility programs to help put content in specific formats for sharing.
Why Would Anyone Want Your Stuff?
Why would anyone want my stuff? seems like a logical first question when you stop and think about making the many tidbits and treasures you collected available to others. Who would want a copy of an old, ratty-looking photograph of Great-grandpa as a dirty-faced toddler in what appears to be a dress? Nobody else wanted it in the first place, and that’s probably how you ended up with it, right? The picture has sentimental value only to you. Wrong! Some of Great-grandpa’s other descendants may be looking for information about him. They, too, would love to see a picture of him when he was a little boy — even better, they’d love to have their own electronic copy of that picture!
As you develop more online contact with other genealogists, you may find a lot of people who are interested in exchanging information. Some may be interested in your research findings because you share common ancestors, and others may be interested because they’re researching in the same geographical area where your ancestors were from. Aren’t these the same reasons that you’re interested in seeing other researchers’ stuff? Sharing your information is likely to encourage others to share theirs with you. Exchanging information with others may enable you to fill in some gaps in your own research efforts. Even if the research findings you receive from others doesn’t directly answer questions about your ancestors, they may give you clues about where to find more information to fill in the blanks.
Also, just because you haven’t traced your genealogy back to the Middle Ages doesn’t mean that your information isn’t valuable. Although you should not share information on living persons without their explicit permission, feel free to share any facts you know about deceased ancestors. Just as you may not know your genealogy any further than your great-grandfather, someone else may be in the same boat — and with the same person! Meeting with that fellow researcher can lead to a mutual research relationship that can produce a lot more information in a shorter amount of time.
Making Friends on Facebook
Whether you’re an avid computer user or new to the game, chances are you’ve heard of social networking sites. In particular, you’ve likely heard of Facebook (www.facebook.com). In the couple of decades, Facebook has become a household name. Facebook touts itself as a social utility meant to connect people with a common strand in their lives, whether that’s working together, attending the same school, or living in the same or nearby communities. Facebook lends itself well to genealogists connecting with relatives and other researchers. Let’s explore how to use this general social networking site for our family history purposes.
Jumping on the Facebook bandwagon
Before we can explore how to use Facebook for genealogy-related connections, you need to register for a free Facebook account. It’s easy. Just follow these steps:
- Open your favorite web browser and go to
www.facebook.com. - In the Sign Up section on the right side of the screen (see Figure 14-1), type your First Name and Last Name in the appropriate fields.
- Provide your email address in both the Your Email and Re-enter Email fields.
-
Select a password and type it in the New Password field.
As with any site, your password should consist of characters that you can remember but that someone else cannot easily figure out. A combination of upper- and lowercase letters, numbers, and special characters make a strong password.
- Using the drop-down lists, select the month, day, and year of your birthday.
- Click the appropriate radio button next to your gender.
-
Click the Sign Up button.
If you have pop-up notifications blocked by your web browser, a window generates to ask if Facebook can Show Notifications. If you want to receive pop-up notifications from Facebook when online, click Allow. Otherwise, click Block.
This takes you to the Find Your Friends form. You’ll have the chance to look for Facebook friends later, so we’ll skip this step for now.
-
Click the Next button at the bottom-right. If you get a Find Your Friends pop-up, click Skip Step.
This takes you to the Welcome to Facebook form, where you can authorize Facebook to scan through your email to look for friends who have Facebook accounts, take a privacy tour, add a profile photo of yourself, or choose to proceed with finding friends.
At the top of the page are instructions to check your email account to complete the sign-up process. Follow the steps in the email from Facebook to confirm your account.
You’re taken to your Facebook page. Depending on your web browser, you may see a box at the top of the page offering to Remember Password. Below that will be your Newsfeed, although it likely won’t have any messages yet unless you chose to search for friends in an earlier step.
Down the right side of the page, you’ll see navigation links to different parts of Facebook. Click on your name to set up your profile — this is where you can add a photo of yourself, describe yourself, and provide information about where you live, as well as your work, education, and family.
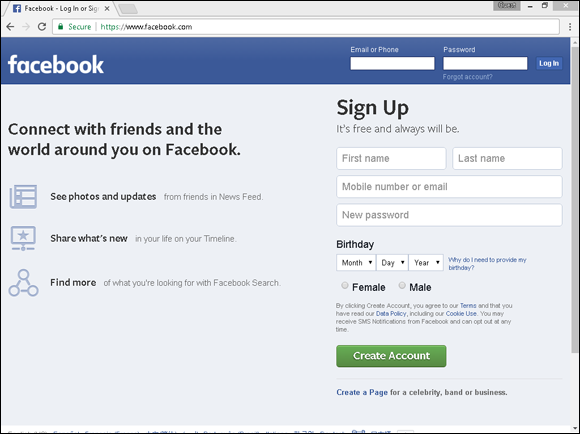
FIGURE 14-1: Complete the Facebook signup form to start the process of registering for an account.
Making Facebook friends
The main purpose of Facebook is to connect with people — old and new friends, relatives, and acquaintances. Finding friends is relatively easy. If you’re using a computer to sign up, follow these steps anytime you sign in to Facebook:
- If you’re not already signed in to Facebook, fire up your computer, open a web browser, and head over to
www.facebook.com. -
Click your name in the top navigation bar to get to your main profile page.
This takes you to the page with your timeline and profile information. This is where you can select any interests you want to share on Facebook, as well as set up other profile information, upload photos, and lots more.
- Scroll down and click the Friends link on the right.
-
Click the Find Friends button near the top of the Friends view.
This opens a page that displays any new Friends requests that are sent to you, as well as has a search form where you can enter information to guide your search for friends on Facebook.
- Use the Search for Friends fields to search by names, identify locations, educational institutions, or employers with which you have ties. Facebook immediately starts identifying other users who match your search criteria.
-
Scroll through the list of matches to see if you recognize anyone.
You can click the person’s name to see her Facebook page to learn more about her.
- If you find someone you know who you want to add to your friends list, click the Add Friend button by the person’s name.
After you’ve friended a few people, Facebook continues to look for other users that have experiences, interests, and locations in common with you. It displays them in a box in your Newsfeed labelled People You May Know. When you’re reading through your Newsfeed, periodically, look through the list to see if there’s anyone new that you’d like to extend a Friend invite to.
Sorting your Facebook friends
After you’ve connected with a few friends, you may find that you want to categorize them. This makes it easier to post genealogical triumphs and questions to only those friends with whom you share a research interest. It also makes it easier to restrict posts to only family members, if you so desire. To set up specific lists in Facebook, follow these steps:
- If you’re not already signed in to Facebook, fire up your computer, open a web browser, and head over to
www.facebook.com. - Click the Home link in the top navigation menu (upper-right).
-
Click the Friend Lists link on the left side of the screen.
This takes you to a page displaying the default and existing lists for categorizing your friends. The defaults are Close Friends, Family, and Restricted.
-
Click the Create List button at the top of the screen.
The Create New List dialog box pops up.
-
Type the name of your list in the List Name field.
For example, we might type the word Genealogy in the List Name field if we want a category of genealogy friends, or we might type a surname if we want to track our friends who share a family line or research interest.
-
Start typing a friend’s name in the Members section.
Facebook starts anticipating the name you’re typing and offers suggestions. Click your friend’s name if it comes up.
- Repeat Step 6 as many times as you want, adding all of your friends who you want to include in this list.
-
After you’ve added everyone you want, click the Create button.
The page for your new list opens and offers you the opportunity to post a status to the friends in this list, or add photos to share with this group.
Return to this page anytime you want to post messages restricted to these specific friends who share your genealogical interests, or to add more friends to the list.
Posting statuses on Facebook
When you’re ready to announce a research triumph, or pose a question to your friends with the same research interests, you can post your status on Facebook. A status is a quick update on your Facebook page that tells the world what you’re doing, thinking, or celebrating. When you post a status, Facebook sends out a notice to your friends — all of your friends unless you’ve restricted the list of recipients using the steps in the previous section of this chapter — and it appears in their Newsfeeds. Likewise, when your friends post statuses, some of them may appear in your Newsfeed, which is typically on the first page that you access in Facebook.
You can post a status to multiple places. Just look for the What’s On Your Mind? field.
Sharing photos via Facebook
Facebook is an easy way to share photos with your family and fellow researchers.
You might wish to share current photos from reunions and research trips, or you might want to share digitized copies of treasured family photos of ancestors. Here’s how to upload photos to Facebook:
-
If you’re not already signed in to Facebook, fire up your computer, open a web browser, and head over to
www.facebook.com.If you prefer to create an entire album of ancestral photos, you may click the Photo Album button in the top of the Create a Post box instead. Then follow the steps to set up an album before clicking the Photo/Video button and selecting photos to upload. You might want to categorize your photos in collections by surname, or ancestor, or specific research trip.
-
Click the Photo/Video link in the Create a Post box.
If you’re on your Newsfeed, the Create a Post box with the Photo/Video link is near the top-center of the page. This opens a file manager window where you can browse and pick the photo(s) you want to upload.
-
Type the filename for the location on your computer where the photos you want to upload are stored. Or you can use the navigation bar at the top to click through the directory tree to find the location.
For our example, we click the appropriate links in the left navigation menu until we get to the directory that stores the photos that we want to share with our Facebook friends. See Figure 14-2.
-
Highlight the pictures you want to upload.
To select all of the pictures in the directory, highlight the first one, then hold the Shift key and click the last photo in the set. This should highlight all of the pictures between the first and the last. Or if you want to upload only certain photos, highlight one, and then hold the Control key while clicking the others that you wish to select.
-
Click the Open button.
This begins the upload process and takes you to the album setup page.
- If you wish to provide a narrative about the photo, type your comment in the Say Something about This Photo field.
-
If you want to name someone in the photo or acknowledge who was with you, type the name in the With (Who Were You With) field.
You may also choose to Check In to provide the location for the photo, add an emoticon showing your emotional reaction to the photo, or Tag Friends so they get notification you’ve posted the photo.

FIGURE 14-2: Navigate to the directory on your computer where you store photos in order to pick those that you want to upload.
If you decide to create a photo album to house multiple pictures, you can allow your friends to contribute. This is handy for relatives who may have attended the same reunion or fellow genealogists who are researching the same family lines. When you’re in the Photo Album window, you can click the Make Shared Album button at the top and follow the steps for adding the names of those friends who can contribute to the album. The album also becomes visible through their timelines and gives them credit anytime they add a photo to the album.
Pinning Family History to Pinterest
Pinterest is both a social networking site (where you can connect with others with similar interests) and an organizational site of sorts (where you can “pin” links to other web pages, articles, photos, ideas, pretty much anything online to review or reference again at a future date).
To use Pinterest, you must set up a free account. Here’s how:
-
Open your browser and go to
https://www.pinterest.com/This results in the Welcome to Pinterest, the world’s catalog of ideas page. If you prefer to link your Pinterest account with an existing Facebook account, click the Continue with Facebook button instead and follow the instructions online. Otherwise, continue with the following steps.
- Enter your email address in the Email field.
- Type a password for your account in the Create a Password field.
-
Click the Continue button.
This brings up the Welcome to Pinterest window, where you can enter more information about yourself.
- Enter your first and last name in the Full Name field.
- Enter your age in the Age field.
-
Select your gender by clicking the appropriate radio button next to Male, Female, or Custom.
If you select Custom, a new pop-up box asks you to identify your Custom Gender, then click Save.
- Click the Sign Up button.
-
In the Like 5 Topics box, scroll through the list to click on (like) five topics or type a topic in the Search For Any Topic field.
For example, if you type “genealogy” in the Search field, and hit Enter, four topics appear — Genealogy, Genealogy Chart, Genealogy Organization, and Genealogy Humor. You can select all four, but you’ll still need to pick one more to get to five. Search for another topic of interest to select it.
-
A window pops up asking if you want to Get the Pinterest Browser Button. Click Get It Now if you want the button on your browser page so you can easily click it to save information for Pinterest. Otherwise, click the Skip link.
If you get a box asking if you want to Add Pinterest Save Button? Click Add Extension.
A box appears indicating you are all set to start. A new tab within your browser opens with a tutorial on how to use Pinterest. We recommend you take a few minutes and go through the tutorial so you’ll be better prepared to use Pinterest.
- When you’re done with the tutorial, close the tab and return to the tab where your Pinterest account is displaying, with links to resources related to the five topics you selected.
Next to the Search field at the top of the page are three icons: a circle with a diamond in it takes you to an Explore Pinterest page; a person icon takes you to your Pinterest page; and a dialogue bubble opens chat functionality where you can communicate with people who follow you. To view things you’ve saved to your Pinterest account, click the person icon.
As you’re researching online and see something you want to remember or revisit, use the Pinterest button you authorized earlier (which now appears next to the URL field of your browser) to mark the item (photo or article) or page to “save” it to your Pinterest account. You can choose to save it to an existing board in your account, or to create a new board related to the item.
For example, if you find a treasure of photos for a county where several of your ancestors lived, you might want to save the site or the individual photos to your Pinterest, and to file them on a new board with the name of the county and state, or you might want to file them to an existing board with the surname of the family that lived there.
You can also visit and/or follow other peoples’ Pinterest pages. Use the Search functionality to locate others with similar interests, then browse through their boards or choose to follow the person. If you click on an item on their Pinterest page, it will give you more information — at a minimum, it will tell you who posted the item. Some items have descriptions as well.
Realizing Instant Gratification with Instagram
Instagram is an application you can use on your smartphone to share photos with people who follow you. More and more genealogists are finding this to be a handy tool for sharing their research victories, as well as distributing beloved family treasures to others with the same family lines. In addition to allowing a user to send a picture to a multitude of interested parties at the same time, Instagram allows the user to attach a hashtag (#). The hashtag enables others to find the posting via search engines. This leads others who may have the same research interests to find and connect with you.
Networking Genealogy-Style
Like the number of networking sites in general, the number of genealogical-networking sites has grown at an incredible pace over the past few years. There are some significant differences between general networking or social sites and genealogical networking sites. Most genealogy-based networking sites have you start by sharing information from your Pedigree chart (also called a family tree) and research findings, rather than beginning with your profile of personal information about you. And the most interesting feature of some of these sites is that they use mathematical algorithms to link your tree(s) with trees that other people have submitted. In essence, this means they’re trying to help connect you to others with the same family lines. The drawback to some of these sites is that they charge subscription fees for some of their functionality or for value-added services such as access to online records.
You might have heard of some of these:
- Geni (
www.geni.com) - Familyrelatives.com (
www.familyrelatives.com) - OneGreatFamily (
www.onegreatfamily.com) - FamilyLink.com (
www.familylink.com)
Sharing your history on Geni.com
If you’re looking to set up a genealogy-networking site where others can discover your family lines and contribute information directly to you in a public forum, Geni is one place to start.
Geni.com has space where you can initiate public discussions about research, ancestors, or just about anything genealogy-related you can think of. Much like other social networking sites, it has areas within your profile where you can upload photos and videos, and maintain a timeline. Unlike typical social networking sites though, it has a section where you can cite sources of your research findings and share DNA results.
Here’s what to do to get started:
- Using your web browser, go to
www.geni.com. - In the Start My Family Tree box, begin by selecting the option for your gender.
- In the First Name field, enter your first name.
- In the Last Name field, enter your last name.
- In the Email Address field, type your preferred email address.
-
Click the Start My Family Tree button.
The registration opens to a page where you can activate your family tree by adding relatives.
-
Click the parent whose information you are ready to add; see Figure 14-3.
For this example, to enter information about your father, click the left parental box above your box on the family tree. A dialog box appears where you can enter information.
-
Using the drop-down menus at the top of the box, pick the appropriate Relationship.
The choices include parent, spouse, ex-spouse, partner, ex-partner, fiancé, sibling, or child in the first drop-down, and Biological, Adoptive, or Foster in the second drop-down.
- In the First Name field, enter your father’s first name.
- If your father’s last name is different from the one that automatically populates, fix it in the Last Name field.
- Select the appropriate option for Status to indicate whether your father is living or deceased.
- Select the appropriate Gender for your father.
-
If you like (and you have your dad’s permission), type your father’s email address in the Email (Optional) field.
Geni.com will use this email address to send this person an invitation to join Geni.com. Some relatives may consider these uninvited invitations to be spam, so be careful about entering other people’s email addresses at networking websites. For more information about protecting your relatives’ privacy, be sure to read the section “Earning a Good Citizenship Award,” later in this chapter.
-
Select a parameter from the drop-down next to Date of Birth — your choices are Exact, Before, After, and Between. The type your dad’s date of birth. If the date is approximate and not known for sure, you can click the Circa button next to Date.
If you did not enter an email address, Geni.com presents you with a pop-up box offering to welcome your relative to the family tree by giving you another opportunity to add his or her email address. If you don’t want to see these pop-up boxes every time you enter a relative, select the Do Not Show This Message Again checkbox in the lower left, then click the Skip button.
- Provide the place name where your father was born in the Place of Birth field.
- If you wish, you can enter a Current Location and Occupation in the last two fields in the box.
-
If you have other relatives to add, you can check the box labeled Add another family member of [focus person’s name].
On saving this person’s data, this opens another box where you can enter information about another relative immediately.
- Click the Save button.
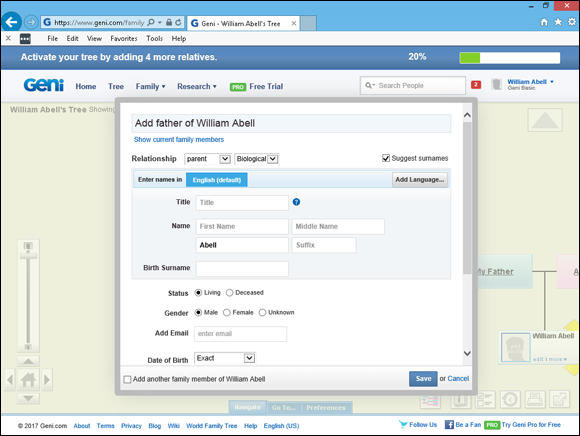
FIGURE 14-3: You can navigate to other ancestors through the Geni.com family tree to add information about your family.
After you add information about a person using one of the boxes in the family tree, the box becomes activated, and little yellow arrows surround it. You can click these arrows to navigate to that person’s parents, spouse(s), and children to add more individuals to your tree.
The Geni.com site is impressive in the ways it helps you share your family tree research with others. Here’s a quick overview of the various parts of the site:
- Tree: On this tab, you can view information about the family members included in the tree as a family tree (pedigree chart) or a list. You can navigate in the standard Geni.com format by clicking the yellow arrows and name boxes, or you can search by name in the Go To section.
- Family: Several handy functions are accessible on the Family menu including Lists, Photos, Videos, Calendar, Map, Statistics, Timeline, and a Last Names Index. This is also where you can find links to share your tree and to generate the Family Tree Chart. The Lists, Photos, and Videos sections are places for you to add items to your file to enhance the content. If you enter birth dates and anniversaries for your family members, the Calendar gives you a consolidated list that helps you remember special events. The Family Map shows you where your family members currently live and were born, if you include locations in the individualized data you record on the site. The Statistics section is very interesting if you like to look for overall patterns within the family, such as average life expectancy or number of children. The Timeline gives you a quick glance of all your Geni.com activities since registering. And the Last Name Index is just that — a list of last names in your records. Share Your Tree enables you to extend invitations to other users to view and/or contribute information. It also has a GEDCOM Export functionality so you can convert your tree for sharing. Lastly, the Family Tree Chart option builds an attractive family tree that you can then download for printing and sharing.
- Research: The Research menu offers services to help you connect with others to share research. It includes a Merge Center where you can see matches between people in your tree and other members’ trees and online records. There are also sections for discussions with other members, projects where you can create and administer joint research with others, and documents you can upload to support your research. Additionally, there’s a list of surnames in Geni.com to explore and a list of popular profiles for famous people that you can view. And if you want to order a DNA testing kit, the Research menu has information about services offered by their partner, MyHeritage DNA.
- PRO Free Trial: The PRO Free Trial tab allows you to register to try the PRO Geni.com membership for free for 14 days. The PRO membership enables access to enhanced service features and allows you to store unlimited photos, videos, and documents. It also offers a premium level of support if you have questions or need help. Be aware that you are required to provide a credit card when you sign up for the free trial. At the end of the trial period, you will automatically be charged the one-year membership fee to continue the service if you do not notify Geni.com to end your free trial before the 14 days are over.
- Profile: The menu to the Profile section appears under your name, to the right of the Search field in Geni.com. This Profile section is where you can store data specifically about you — everything from your birth date and age, to educational information, to your work experience, to personal narratives about your life, aspirations, and research interests, or whatever you’d like to say about yourself in the free-form text boxes. This is also where you can track who you’ve invited to view and participate in your Geni tree. The data is sorted into seven tabs: Basics, Relationships, About, Personal, Contact, Work, and Schools. Depending on which setting you choose, various aspects of your profile may or may not be visible.
Discovering contacts through Member Connect
If you have a paid subscription to Ancestry.com, it gives you an additional feature of the online family tree that is worth mentioning — Member Connect. The Member Connect feature actively looks for other people who are posting information about your ancestor on their online family trees. After finding a potential match, Member Connect lists the member’s name on the tab.
To find members who are researching one of your ancestors, follow these steps:
- Go to Ancestry.com and log in.
- Near the top of the landing page, you will see a box titled Recent Member Connect Activity (see Figure 14-4). If Ancestry.com found any recent activity on your family lines, the results will appear in this box.
- Click the appropriate link for the action you wish to take.
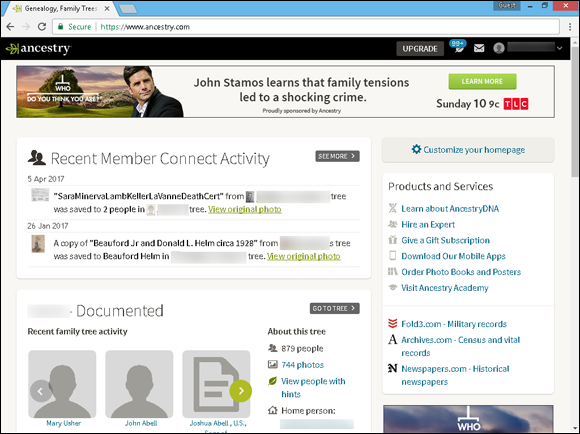
FIGURE 14-4: The Member Connect section of Ancestry.com generates a list of others’ activities related to your research interests.
The links in the results will vary. If someone posted an article or document related to a person you’re researching or matching a surname in your list, you can click the link to see the item. If a person posted a general interest or listed a surname that matches one of yours, the link will lead to that person’s profile. There may be other links present next to a person-based entry too, such as View Family Tree or Send a Message. These links help eliminate a few steps in the process if you’re only interested in his family tree or messaging him.
 Ancestry.com subscribers see links to the family trees containing the related information about the ancestor. Nonsubscribers see only the number of records, sources, and photos available on that family tree.
Showing context in LifeStory
A social networking type benefit of a paid subscription to Ancestry.com is the LifeStory feature. LifeStory in Ancestry Family Tree allows you to create an online timeline and retelling of your ancestor’s life, giving color and context to it. Using records and information you’ve collected, in conjunction with information about historical events and areas, LifeStory builds a narrative for the ancestor.
Interested in adding a LifeStory for one of your ancestors? Here’s how:
- Go to Ancestry.com and log in.
-
Select the Trees menu at the top of the page, and click on the family tree that contains the ancestor for whom you want to create a LifeStory.
For example, if we want to create a LifeStory for William Henry Abell, we select the Abell tree from our drop-down.
-
Click on the box in the tree for the ancestor, then select Profile.
We clicked on William Henry Abell’s box. As he is currently the main focal point of this tree, his box is in the center of the page.
Near the top of the page, there is a menu bar with options for Lifestory, Facts, Gallery, and Hints. The page defaults to the Facts view.
-
Click on the LifeStory feature in the menu bar.
The LifeStory generates in the form of a timeline. On the timeline are events about which you’ve entered information. There are maps of locations found in records for the ancestor, and historical facts that add color.
In our example (see Figure 14-5), the LifeStory for William Henry Abell has basic information about his birth, death, parents, and marriages, as well as general information and maps on the locations where he lived. The LifeStory also includes general information on the First Kentucky Derby, as William Henry Abell lived nearby in Kentucky at the time of the first derby. There is also an entry for the Great Lakes Storm in 1913 because William Henry Abell was living in Illinois when that weather system took its toll on the Midwest, so he may have been affected.
-
Choose which content to keep in the LifeStory.
If you see wrong information about your ancestor or wish to update something, you can choose to Edit the entries that come from facts you’ve entered in Ancestry.com.
If there are general historical entries that you don’t want to include in your ancestor’s LifeStory, simply click on the Ignore button next to the entry. It will disappear.
Use the Add drop down at the top-right of the screen if you wish to add photos or videos to the LifeStory. This allows you to select media that is already attached to the profile record for the ancestor.
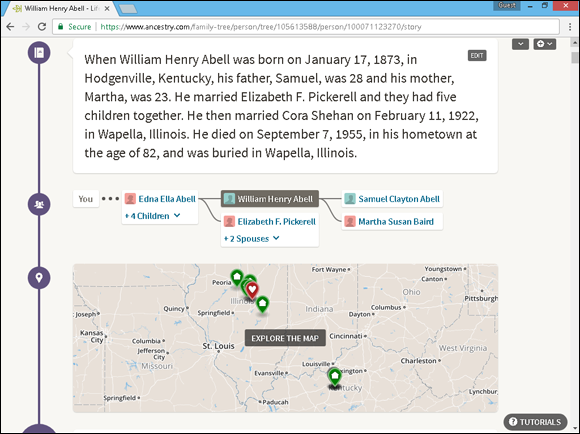
FIGURE 14-5: William Henry Abell’s LifeStory at Ancestry.com.
Blogging for Attention
Blog is a common term around the Internet. But what exactly is a blog? Blog is an abbreviated name for a web log, and it’s just what it sounds like: an online journal or log. Typically blogs include narratives on whatever topic the blogger (the person who maintains the blog) feels like writing about. Therefore, genealogy blogs typically contain narratives on family history research. These narratives are much like the web boards of years past, where people could go and post information about their research findings or needs, and others would post replies. The main difference is that the blogger typically updates the blog on a regular and frequent basis, anywhere from daily to weekly to monthly, and the blogger is the one who initiates the topics of discussion that are welcome on that blog. Some blogs even contain photos, video or audio clips, and links to other sites — all depending on the blogger’s interests and abilities to include these things.
Blogs are available about all aspects of genealogy, including how-tos, news, ethnic-based research, surnames, conferences, technology, and document preservation.
Hunting blogs
Looking for genealogy blogs to aid in your family history research? A lot are available. Of course you can find them by using a general Internet search engine such as Google.com. Or you can use a couple of other simple options for finding blogs. The first is to visit the Genealogy Blog Finder search engine at http://blogfinder.genealogue.com. Here’s how to use it:
- Open your web browser and go to
http://blogfinder.genealogue.com, as shown in Figure 14-6. - In the Search field, enter the name of the family or location you’re researching.
-
Click Search.
You see a list of results with links to each. Click any that interest you.
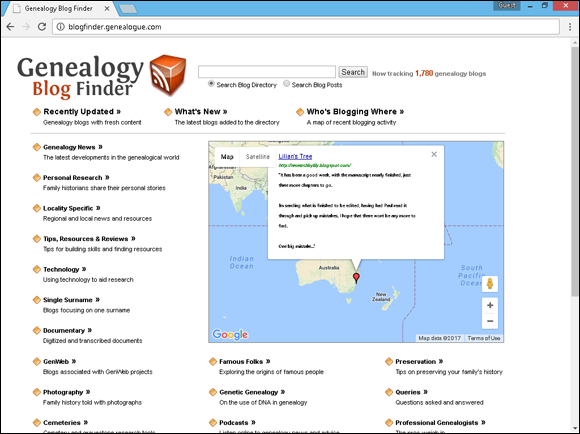
FIGURE 14-6: Genealogy Blog Finder helps you locate blogs of interest.
If you’re not sure of a spelling or if you just want to browse to see what’s available, you can also use the menu system to navigate the Genealogy Blog Finder. All the topics under which the blogs are organized are accessible from the main web page.
Getting a blog of your own
If you’re ready to start your own blog where you can share information about your research pursuits and genealogical interests, you have some options available. One is to use the blogging functionality at one of the popular networking sites — check out the section “Making Friends on Facebook,” earlier in this chapter, for more information. Another option is to use a site specifically designed to host your personal blog. A couple that come to mind are Google Blogger (www.blogger.com) and WordPress.com (www.wordpress.com).
These sites offer easy-to-use instructions for creating your blog. You can choose from templates for the overall design at each site and privacy controls so that you can determine who has access to your blog and what levels of permission the user has (whether the user can just read your narratives or post replies, as well as whether he or she can contribute original narratives initiating online discussions). They also offer the ability to post photos and files.
Here’s a walk-through on how to set up your own blog at Google Blogger:
-
Open your web browser and go to
www.blogger.com.This opens the Google Blogger site. In the middle of the page is a box with sign-in fields. Under the box is a Create an Account link.
-
Click the Create Your Blog button.
If you already have an account with Google, it will prompt you to log in. If you do not yet have an account with Google, this brings you to the Create Your Google Account page. Setting up an account is the first step in the process.
- Enter your first and last names in the appropriate fields.
- Type the username you’d like to have for your account.
-
Complete the Create a Password field, typing a password that’s at least eight characters long.
Remember that when setting up a password, you want to choose a combination of letters, numbers, or characters that won’t be easy for others to decipher. Don’t use your pet’s name or your mother’s maiden name. Instead, choose something that’s not common knowledge about you — such as the name of your favorite book character with your favorite number on the end or a special text character such as $, #, or %. Click the Password Strength link, if you want Google Blogger–specific information about selecting a password. Google Blogger provides some excellent hints on making your password as safe as possible. - In the Confirm Your Password field, provide the same password again.
- In the Birthday fields, enter your date of birth.
- Select your gender from the drop-down list.
- Type your mobile phone number in the appropriate field.
- In the Your Current Email Address field, type your current or preferred email address.
-
In the Type the Text box, retype the words or numbers that you see above the field.
The letters and numbers are usually presented in a wavy, distorted way.
- Select your location.
- Click the Terms of Service and read through them. If you agree to Blogger’s terms, select the I Accept the Google Terms of Service and Privacy Policy check box.
-
Click Next Step.
Google shows you how your profile name will appear and then takes you to the Welcome page.
-
Click the Back to Blogger button.
This brings up the Welcome to Blogger page.
- Scroll down and click the Continue to Blogger button.
-
Select the type of Profile you would like to use for your Blog: Google+ or Blogger.
The profile you select affects how your blog will work and who can find it. The Google+ profile allows any blog created under your login to be publicly searched and indexed by search engines. It has the potential to reach a larger audience. The Blogger profile has the potential to afford you anonymity, should you need or want it. With a Blogger profile, you can use pseudonyms (other name versions for yourself, such as nicknames or aliases).
For our example, we choose a Blogger profile.
- Type the name you want to be displayed on your blog in the Display Name field.
- Click the Continue to Blogger button.
-
Click the New Blog button in the upper left.
The Create a New Blog page opens.
- In the Title field, enter a name for your blog.
-
In the Address (URL) field, type part of a web address for your blog.
When choosing what to use for the section of the web address that you get to designate, think about using something that fits with the title of your blog. For example, if your blog will be called Gerty’s Genealogical Adventures, you might try using GenAdventure or GGAdventure in the URL.
As you type the name of your choice, the system automatically checks to see if that selection is available.
- Scroll through the list of templates and select the one that you like best.
-
Click Create Blog.
Congratulations! You’ve just created your blog. You get a message confirming that you have completed the blog-creation process, and you’re now ready to begin posting to your blog.
You may get a box titled Google Domains offering to find a domain name for your blog and connect it instantly. Click No Thanks.
The Google Blogger template is easy to use for posting your blog content. You’ll probably want to spend a little time exploring how it works and available options.
Building Your Own Home
When we wrote the first couple of editions of Genealogy Online For Dummies, the web was a very different place. Networking sites and blogs were not commonplace. Back then, we were quick to recommend designing your own home page (or website, if you will) from scratch. These days, we recommend coding your own site in HTML (HyperText Markup Language) only if you are a die-hard fan of writing code.
If you are the type of person who lives for creating things personally, fear not. You don’t need to be sufficiently versed in coding HTML. There are web hosting sites that have templates enabling you to create a professional-looking page without being an expert computer programmer.
Free web-hosting services
Some websites give you free space for your home page, provided you agree to their rules and restrictions. We can safely bet that you won’t have any problems using one of these freebies because the terms (such as no pornography, nudity, or explicit language allowed) are genealogist-friendly.
If you decide to take advantage of web space, remember that the companies providing the space must pay their bills. They often make space available free to individuals by charging advertisers for banners and other advertisements. In such cases, the web host reserves the right to require that you leave these advertisements on your home page. If you don’t like the idea of an advertisement on your home page, or if you have strong objections to one of the companies being advertised on the site that gives you free space, you should find a fee-based web space for your home page.
Here are a few free web-hosting services:
- Google sites (
www.google.com/sites) - Tripod (
www.tripod.lycos.com) - Wix (
www.wix.com) - RootsWeb.com (
http://www.rootsweb.com)
Most of these hosting services allow you to pick templates that make setting up your web page a breeze. You point and click to pick the look you like. Typically you can adjust colors if you’d like. And then you create and upload the content (or create it directly in the template), add photos or other media, and … voilà! Your page is ready to share.
Do you speak HTML?
HyperText Markup Language (or HTML) is the language of the web. HTML is a code in which text documents are written so that web browsers can read and interpret those documents, converting them into graphical images and text that you can see with a browser. HTML is a relatively easy language to learn, and many genealogists who post web pages are self-taught. If you prefer not to read about it and teach yourself by experimenting instead, you can surely find classes as well as other resources in your area that could teach you the basics of HTML. Check with a local community college for structured classes, local genealogical societies for any workshops focusing on designing and posting web pages, or the web itself for online courses. Or, check out HTML, XHTML & CSS For Dummies, 7th Edition, by Ed Tittel and Jeff Noble.
Deciding which treasures to include
Although the content of genealogical web pages with lots of textual information about ancestors or geographic areas may be very helpful, all-text pages won’t attract the attention of your visitors. Even we get tired of sorting through and reading endless narratives on websites. We like to see things that personalize a website and are fun to look at. Graphics, icons, and photographs are ideal for this purpose. A couple of nice-looking, strategically placed photos of ancestors make a site feel more like a home.
If you have some photographs that have been scanned and saved as .jpg or .gif images or some media clips (such as video or audio files) in a format that meets the compatibility requirements for your web-hosting service, you can post them on your website.
 Just as you should be careful about posting facts about living relatives, be careful about posting photos or recordings of them. If you want to use an image that has living relatives in it, get their permission before doing so. Some people are sensitive about having their pictures posted on the web. Also, use common sense and good taste in selecting pictures for your page. Although a photo of little Susie at age 3 wearing a lampshade and dancing around in a tutu may be cute, a photo of Uncle Ed at age 63 doing the same thing may not be so endearing!
Including Your GEDCOM
Suppose that you contact others who are interested in your research findings. What’s the best way to share your information with them? Certainly, you can type everything, print it, and send it to them. Or, you can export a copy of your genealogy database file — which the recipients can then import into their databases and create as many reports as they want — and save a tree in the process.
Most genealogical databases subscribe to a common standard for exporting their information called GEenealogical Data COMmunication, or GEDCOM. Beware that some genealogical databases deviate from the standard a little — making things somewhat confusing.
A GEDCOM file is a text file that contains your genealogical information with a set of tags that tells the genealogical database importing the information where to place it within its structure.
You may be asking, “Why is GEDCOM important?” It can save you time and energy in the process of sharing information. The next time someone asks you to send your data, you can export your genealogy data into a GEDCOM file and send it to him or her instead of typing it or saving a copy of your entire database.
If you plan to share the contents of your genealogical database online by generating and exporting a GEDCOM file, make sure that your file is ready to share with others. By this we mean be sure that it’s free from any information that could land you in the doghouse with any of your relatives — close or distant!
Some genealogical software programs enable you to indicate whether you want information on each relative included in reports and GEDCOM files. Other programs don’t allow you to do this. This may mean that you need to manually scrub your GEDCOM file to remove information about all living persons.
Generating GEDCOM files
Making a GEDCOM file using most software programs is quite easy. This is true for RootsMagic Essentials, too. If you have not yet downloaded and installed RootsMagic Essentials, flip back to Chapter 1. After you have the program ready to go, try this:
-
Open RootsMagic Essentials.
Usually, you can open your software by double-clicking the icon for that program or by choosing Start ⇒ Programs (or Start ⇒ All Programs) and selecting the particular program.
- Use the default database that appears, or choose File ⇒ Open to open another database.
-
After you open the database for which you want to create a GEDCOM file, choose File ⇒ Export.
The GEDCOM Export dialog box appears.
-
Choose whether you want to include everyone in your database in your GEDCOM file or only selected people. You can also choose the output format and what types of information to include. Then click OK.
If you choose to include only selected people in your GEDCOM file, you need to complete another dialog box marking those people to include. Highlight the individual’s name and then select Mark People ⇒ Person to include him or her. After you select all the people you want to include, click OK.
-
In the File Name field, type the new name for your GEDCOM file and then click Save.
Your GEDCOM file is created.
After a GEDCOM file is created on your hard drive, you can open it in a word processor (such as WordPad or Notepad) and review it to ensure that the information is formatted the way you want it. See Figure 14-7 for an example. Also, reviewing the file in a word processor is a good idea so you can be sure that you did not include information on living persons. After you’re satisfied with the file, you can cut and paste it into an email message or send it as an attachment using your email program.
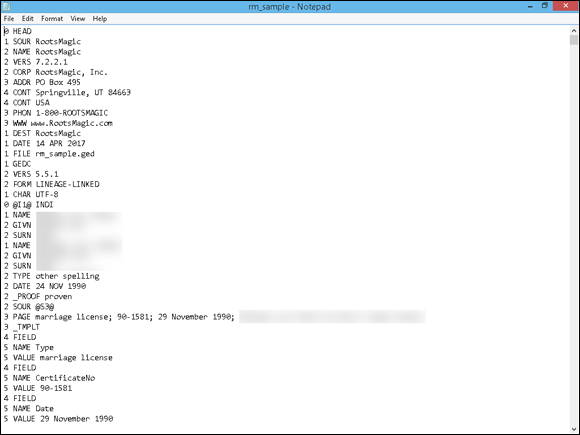
FIGURE 14-7: An example of a GEDCOM file opened in Notepad.
Checking a GEDCOM for possible errors
We’ve talked a lot about sharing your GEDCOM with others, but there are a few things you need to know about receiving GEDCOM files too. Just as you would be careful about trusting information written out in a report or chart, you need to be careful before importing someone else’s GEDCOM file into your genealogical database. If they have wrong information about an ancestor you share, you could corrupt your whole database and set you back in your efforts.
Lucky for you, there’s an application that can help you identify inconsistencies in a GEDCOM file. This helps you find information that may need to be corrected before or shortly after you import the file into your database. It’s called gedantic (http://gedantic.org/). Here’s how to use it:
- Open a web browser and head over to
http://gedantic.org/. - Click the Select File button.
-
Search in your computer directory for the GEDCOM file you saved earlier in this chapter. Select the file and click Open.
The gedantic program runs against the file and generates a report of potential problems. Across the top of the report are categories that will help you restrict the types of inconsistencies into a manageable number. The categories are All, Problem, Families, Missing Data, Individuals, and Sources.
-
Click on a blue box identifying a potential type of problem in the file.
This generates a list of things to review or double-check in the file to determine whether you need to fix or clean up something. For example, you can see a list of Children of Young Parents for one of Matthew’s Helm-Proven GEDCOM files (see Figure 14-8). We want to review the people identified on this list to see if there might have been an error on the parent’s or child’s date of birth to ensure they are correct.
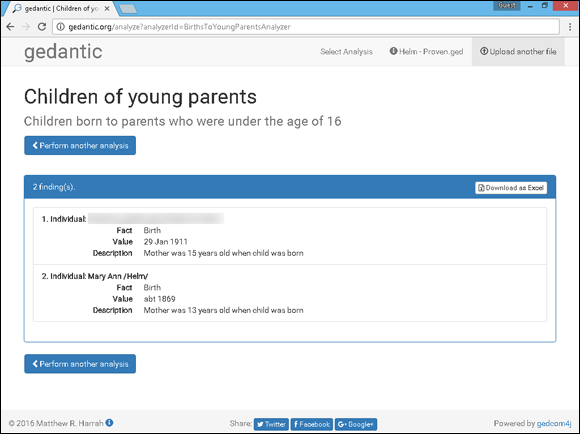
FIGURE 14-8: A gedantic analysis of Children of Young Parents in a GEDCOM file.
Creating traditional trees and reports
The process for generating a family tree or report should be similar for most genealogical software. Because we explain in earlier parts of this book how to download and install RootsMagic Essentials, that’s the software we use to demonstrate the process of creating reports. If you’ve not yet installed it or entered or imported some data into it, you might want to check out Chapter 1. It gives step-by-step instructions for entering all your detailed family information into RootsMagic Essentials.
Before you can generate a report, you have to find the person who will be the focus of that report. Here’s a quick refresher on how to get to the appropriate person’s record:
-
Open RootsMagic Essentials and select the family file for which you want to generate a chart or report by highlighting the filename and clicking Open.
Usually, you can open your software by double-clicking the icon for that program or by choosing Start ⇒ Programs (or Start ⇒ All Programs) and selecting the particular program.
-
Highlight the name of the person who will serve as the focus for your report.
On the Pedigree tab, highlight the name of the focal person of the family you select. For example, if Matthew wants to generate a report for his ancestor Samuel Clayton Abell, he highlights the Samuel Abell file.
-
On the Reports menu, select a chart or report.
Some report types are not available in the RootsMagic Essentials version. You have to purchase the full product to generate them.
-
Select the content to include in the report.
You can choose whether to generate the report on the current family or only selected people. You can also choose what information to include (such as spouses and children, photos, and notes) in the output. And you can manipulate some formatting options, such as layout, title, fonts, and sources.
-
Click Generate Reports.
RootsMagic Essentials generates the report and displays it on your screen.
Earning a Good Citizenship Award
To be a good genealogical citizen, you should keep a few things in mind, such as maintaining privacy, respecting copyrights, and including adequate citations. In this section, we discuss these key topics.
Mandatory lecture on privacy
Sometimes, we genealogists get so caught up in dealing with the records of deceased persons that we forget one basic fact: Much of the information we’ve collected and put in our databases pertains to living individuals and thus is considered private. In our haste to share our information with others online, we often create our GEDCOM files and reports, and then ship them off to recipients without thinking twice about whether we may offend someone or invade his or her privacy by including personal information. The same thing goes for posting information directly to websites and in our blogs — we sometimes write the data into the family tree or include anecdotal information in our blog narratives without thinking about the consequences to living individuals. We need to be more careful.
Why worry about privacy? Ah, allow us to enlighten you:
- You may invade someone’s right to privacy. We’ve heard horror stories about Social Security numbers of living individuals ending up in GEDCOM files that are available on the Internet. We’ve also heard of people who didn’t know that their biological parents weren’t married (to each other, anyway) and found out through an online database. Your relatives may not want you to share personal information about them with others, and they may not have given you permission to do so. The same is true for photos and video clips. Just because you’re gung-ho to show the world the group photo from your family reunion does not mean that every one of your parents, siblings, aunts, uncles, and cousins feels the same way. So don’t share the information or the image without the permission of everyone involved.
- Genealogists aren’t the only people who visit genealogical Internet sites. Private detectives and other people who search for information on living persons frequently use genealogical databases to track people. They are known to lurk about, watching for information that may help their cases. Estranged spouses may visit sites looking for a way to track down their former partners. Also, people with less-than-honorable intentions may visit a genealogical website looking for potential scam or abuse victims. And some information, such as your mother’s maiden name, may help the unscrupulous carry out fraud. For these reasons, it is illegal in some states and countries to share information about living persons on the Internet without first getting each person’s written permission.
When sharing genealogical information, your safest bet is to clean out (exclude) any information on living individuals from your GEDCOM file or report when sharing it with others and include only the data that pertains to people who have long been deceased — unless you’ve obtained written consent from living persons to share information about them. By long been deceased, we mean deceased for more than ten years — although the time frame could be longer depending on the sensitivity of the information. You may also want to keep in mind that the U.S. Government standard dictates that no record covered under the Privacy Act is released until it’s at least 72 years old.
Respecting copyrights
Copyright is the controlling right that a person or corporation owns over the duplication and distribution of a work that the person or corporation created. Although facts themselves can’t be copyrighted, works in which facts are contained can be. Although the fact that your grandma was born on January 1, 1900, can’t be copyrighted by anyone, a report that contains this information and was created by Aunt Velma may be. If you intend to include a significant portion of Aunt Velma’s report in your own document, you need to secure permission from her to use the information.
With regard to copyright and the Internet, remember that just because you found some information on a website (or other Internet resource) does not mean that it’s not copyrighted. If the website contains original material along with facts, it is copyrighted to the person who created it — regardless of whether the site has a copyright notice on it!
To protect yourself from infringing on someone’s copyright and possibly ending up in a legal battle, you should do the following:
- Never copy another person’s web page, email, blog, or other Internet creation (such as graphics) without his or her written consent.
- Never print an article, a story, a report, or other material to share with your family, friends, genealogical or historical society, class, or anyone else without the creator’s written consent.
- Always assume that a resource is copyrighted.
- Always cite sources of the information in your genealogy and on your web pages. (See the next section in this chapter for more information.)
- Always link to other web pages rather than copying their content on your own website.
If you don’t understand what copyright is or if you have questions about it, be sure to check out the U.S. Copyright Office’s home page at www.copyright.gov. Two U.S. Copyright Office pages of particular interest at the site are Copyright Basics and Frequently Asked Questions (FAQs).
Citing your sources
We can’t stress enough the importance of citing your sources when sharing information — online or through traditional means. Be sure to include references that reflect where you obtained your information; that’s just as important when you share your information as it is when you research it. Not only does referencing provide the other person with leads to possible additional information, but it also gives you a place to double-check your facts if someone challenges them. Sometimes, after exchanging information with another researcher, you both notice that you have conflicting data about an ancestor. Knowing where to turn to double-check the facts (and, with any luck, find out who has the correct information) can save you time and embarrassment.
Here are some examples of ways to cite online sources of information:
- Email messages: Matthew Helm, [<
[email protected]> or 111 Main Street, Anyplace, Anystate 11111]. “Looking for George Helm,” Message to April Helm, 12 October 2009. [Message cites vital records in Helm’s possession.] - Newsgroups: Matthew Helm, [<
[email protected]> or 111 Main Street, Anyplace, Anystate 11111]. “Computing in Genealogy” insoc.genealogy.computing, 05 June 2006. -
Websites: Matthew Helm, [<
[email protected]> or 111 Main Street, Anyplace, Anystate 11111]. “Helm’s Genealogy Toolbox.” <genealogy.tbox.com> January 2004. [This site contains numerous links to other genealogical resources on the Internet. On July 12, 2010, located and checked links on Abell family; found two that were promising.]With a note like the preceding one in brackets, you expect that your next two citations are the two websites that looked promising. For each site, you should provide notes stating exactly what you did or did not find.
Although most genealogical software programs now enable you to store source information and citations along with your data, many still don’t export the source information automatically. For that reason, double-check any reports or GEDCOM files you generate to see whether your source information is included before sharing them with other researchers. If the information isn’t included, create a new GEDCOM file that includes sources.