
Chapter 3
Searching Primary Resource Sites
IN THIS CHAPTER
![]() Surveying Ancestry.com
Surveying Ancestry.com
![]() Exploring FamilySearch.org
Exploring FamilySearch.org
![]() Introducing other primary resource sites
Introducing other primary resource sites
Before the age of the Internet, searching for primary sources was like trying to find a needle in a haystack. A typical research session would begin in a crowded room containing paper indexes of census records. After searching through rows and rows of information, you would jot down some names that looked familiar along with a record’s page number. Then you’d grab a roll of microfilm and scroll your way through it until you found the page number. Sometimes your potential ancestor wouldn’t be on that page, requiring you to search line by line before and after the targeted page. If you still couldn’t find the name for your search, you might have to read line by line through an entire county. Needless to say, it could take hours to find the individual, only to discover that it wasn’t really your ancestor after all.
Fast-forward to the age of the Internet. Now you can find digitized versions of the census microfilm online; even better, most of them have indexes that link directly to the image. Although indexers still make mistakes, it takes a fraction of the time to search. Another bonus is that some sites provide links to other record sets that your ancestor may be in, which gives you even more evidence to substantiate your research. Finding primary sources is what online genealogy is all about. You can see the representation of the original record and draw your own conclusions as to what the record really indicates.
Millions of records are now available online. This chapter focuses on introducing some of the larger collections and gives you guidance on how to search for records using these sites. The searches that we conduct in this chapter are more general; for searches that focus on particular types of records, see Chapters 4 and 5.
If you need help in selecting a person to search for and in gathering information to help you in your search, take a quick look at Chapter 2.
 There is a lot of duplication of record sets on subscription sites. Make sure that you carefully look at the collections on each site before making a decision regarding a subscription. Sometimes there are special collections that are unique to a site. If you won’t be using the collection often, you might consider a short term subscription just to get the records that you need. You can always check back later when new records are added and re-subscribe.
Touring Ancestry.com
A commercial site that has perhaps the most varied collection of genealogical resources is Ancestry.com. Over time, Ancestry.com has amassed its collection by acquiring several websites, genealogical software, and other data and print resources. The company, which started as a publisher of genealogical research books, now includes the Ancestry.com, Ancestry24 (a site with South African records), Ancestry Academy, Genealogy.com, FindAGrave.com, RootsWeb.com, Fold3.com, and Newspapers.com websites. It also owns the research company ProGenealogists. Although the majority of the Ancestry.com websites require a subscription, a great deal of resources are available to use for free. This section provides an overview of the resources and shows how to use the general search function. We refer to Ancestry.com in other portions of this book as well, when we talk about specific types of online sources.
Trying Ancestry.com for free
If you don’t have a subscription to Ancestry.com, perhaps the first thing to do is register for a free two-week trial. Using the free trial, you can experience all the areas of the site that we cover in this book. It will also give you a chance to see if the site will fulfill your immediate research needs. To begin the free trial, do the following:
-
Point your web browser to
www.ancestry.com.In the upper-right corner of the home page is a Free Trial link.
-
Click the Free Trial link.
The resulting page contains a table with three subscription options, as shown in Figure 3-1.
-
In the Monthly Membership column, click a radio button corresponding to the collection that interests you.
 We suggest that you select the monthly membership option because Ancestry.com bills you after the free trial ends if you don’t cancel in time (by the last day of your membership). The six-month membership is billed in a single payment, so the least amount of risk is in the monthly membership. As we will cover other Ancestry.com sites later in this book, you might consider the All Access free trial.
 -
Click the Start Free Trial button to continue.
The Start Free Trial button is located just to the right of the membership options. The Create Your Account or Enter You Payment Details page appears (depending upon whether you are already logged into an account).
-
If you haven’t registered previously, enter your first name, last name, and email address, create a password, and click the Continue button. If you’re already registered, simply click the Sign In link at the top of the page just under the Create Your Account heading.
The payment details screen appears. Fill in the account information, including your street address, city, state or province, zip or postal code, country, and phone number. Also, fill in future payment information, including the card type, card number, expiration date, and security code fields.
In the right column, note the description of the 14-day free trial cancellation process so that you can use it at the end of the trial period if you decide you don’t want to continue with a subscription. Print this page and put the expiration date of the free trial on your calendar so that you remember when to cancel, if you choose to do so. -
Click the Start Your Free Trial button.
A page entitled What’s the Key to Making Discoveries at Ancestry appears.
-
Click the Begin button at the bottom of the page.
The Search page appears, and you can start using Ancestry.com.
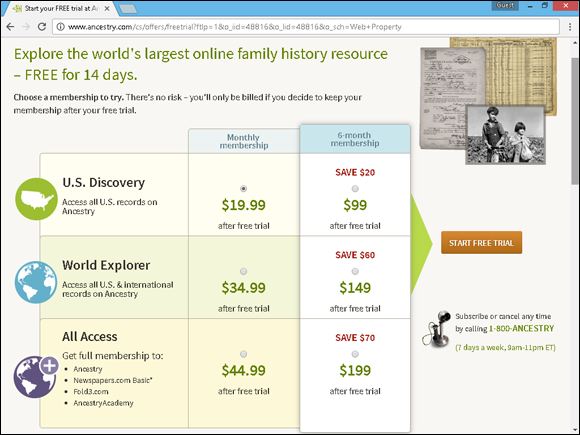
FIGURE 3-1: The subscription options page at Ancestry.com.
Searching Ancestry.com’s vast collection
The most efficient way to search Ancestry.com is by using the main search form. This allows you to receive results from all collections rather than from only a single record set. Follow these steps to search for an ancestor:
-
Point your web browser to
www.ancestry.com,the Ancestry.com home page, and click the Search button in the toolbar at the top of the page.A drop-down menu appears where you can select the type of collection that you wish to search.
-
Select the collection.
If you are not sure what you are looking for, just select All Collections.
-
In the Search section at the top of the page, type a name into the First & Middle Name(s) and Last Name fields.
We entered the name William Henry and Abell in these fields.
-
Type a place where your ancestor lived in the field labeled A Place Your Ancestor May Have Lived.
Because the field is a type-ahead field, it suggests locations as you type letters into the field. To select a location, scroll down to the location and click it to enter it into the field. Based on the information that we collected in Chapter 2, we put De Witt, Illinois into this field (it populated the field with De Witt County, Illinois, USA). In the Birth Year field, we put 1873 (the date we estimated based on his obituary).
-
If the name you’re searching for is common, you may want to add optional information to distinguish one person from another. You can add life events (such as births, marriages, and deaths) by clicking the Show More Options link.
A new line is created when you click the link, as shown in Figure 3-2.
-
Click on a link next to the Add event label that you know more information about (the events include Birth, Marriage, Death, Lived In, and Any Event — there are additional types under the More drop-down). Enter the year and location of the event.
You can add additional events by clicking the appropriate event link. For example, clicking Marriage adds a line for marriage information. We added a line for Lived In and set the date to 1901 and place to Wapella, De Witt, Illinois USA (this was what the birth record for Edna Abell reflected that we located in Chapter 2). To make sure that we get some records from Kentucky, we added a Death field with his death date and place from the obituary.
-
If you know family members who can be found via your ancestor (such as a parent or spouse), click the optional link next to the label titled Add Family Members.
We clicked on Spouse and added Lizzie Pickerell. Then, we clicked on Child and added Edna.
- To add more search criteria, fill in the other optional fields available on the form.
-
If you’d like, you can limit search results to the exact spelling of the name by selecting the Match All Terms Exactly checkbox that is located on the same row as the Search button.
Use the Match All Terms Exactly option when you know that your ancestor’s name is spelled a certain way. For example, the name of Matthew’s ancestor Herschel is spelled Heruhel in one record set. To find this record quickly, Matthew would use the Match All Terms Exactly option. You can also use this functionality when you’re researching a name that’s spelled multiple ways and you want to find records with only one spelling. For example, you might want to find only records spelled Smythe and not Smith. -
Click the Exact link under the First & Middle Name(s) and Last Name fields if you want to configure more search options.
The options described in these lists restrict the search on the name (see Figure 3-3):
- Sounds like: The Ancestry.com search engine contains phonetic algorithms that determine whether a name sounds like the name you entered into the field.
- Similar: This option is helpful when you search for common first names that are often shortened. For example, Richard is often shortened to Rich, Rick, or Dick.
- Initials: (This option isn’t shown in Figure 3-3; it’s under the First & Middle Name(s) Exact link.) Use this handy option when you search for people who are often referred to by their initials in records, such as W.H. rather than the full name.
- Soundex: The Last Name field has an additional choice to restrict the result to Soundex matches — for a way of coding names according to the way their consonants sound. If we search for Abell with this checkbox selected, we receive matches for names with the Soundex code of A140, including Abel, Able, Appel, and Apple, for example.
Another feature you can use is a wildcard symbol. You can use the asterisk (*) symbol to match any number of characters. For example, if we didn’t know whether a record for William was under Abel or Abell, we could search for “Abel*”. The question mark (?) wildcard is used to replace just one character. For example, a search for “Ab?ll” would bring back results for Aball and Abell. You can use the wildcards together and anywhere in your search. However, your search must contain at least three letters.
-
Click the Exact link under the Location field if you’d like to restrict the search to only the location you entered.
This option is helpful when you’re searching for a common name and you know the location where your ancestor lived. The search then focuses on that person in the context of the location, greatly reducing the number of results.
When you type a place-name in the field, additional choices appear, including limiting your search to the county, county/adjacent counties, state, state/adjacent states, or country. Using adjacent counties is particularly helpful when you’re searching counties that were later divided into other counties. The adjacent-counties search picks up the new counties if they’re adjacent to the old county. -
Enter a term into the Keyword field, should you want to limit your search to a specific criterion.
You can use a keyword to search specific items not covered in the other fields. For example, if you know that your ancestor lived near a specific post office or served in a specific regiment, you can enter that term into the field.
-
Click the down arrow in the Gender field and select the appropriate gender, if restricting the search this way is beneficial to you.
Choosing the gender is useful when you’re searching for an ancestor who has a name that can be either male or female, such as Kelly.
-
Complete the Race/Nationality field if race or nationality is a helpful factor for your ancestor.
This field is helpful when you search census records in which, depending on the census year, either race or nationality was recorded.
-
Set the Collection Focus by clicking the arrow on its drop-down menu if you want to set preferences for some of the search criteria.
The Collection Focus menu tells the search engine to give preference in the results to records from a particular country or ethnic group. You can use this option when an ancestor immigrated to a particular country and you want to focus the search on the new country.
-
Use the checkboxes under Collection Focus to limit searches to only certain resource types if you desire.
We often use the functionality to limit searches to only historical records. This way, the results contain only records that we can use as evidence — rather than to someone’s interpretation of a record in a family tree. -
After you finish setting all search options, click the Search button.
The search results page appears, as shown in Figure 3-4.
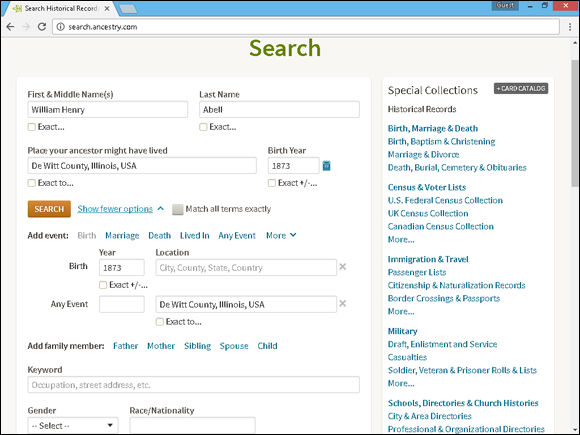
FIGURE 3-2: An additional life event for birth.

FIGURE 3-3: Options under the Exact link.

FIGURE 3-4: Search results from Ancestry.com.
Sifting through the results
Executing the search is only half the battle. When we search for William Henry Abell with the criteria mentioned in the previous section, we received 80,079 results. Of course, only a small percentage of these pertain to the William Abell we are interested in. The next part is going through the search results to find useful information on your particular ancestor. The search results page contains several sections, including
- Search Filters: This section is located in the left column and lists the search criteria you used, along with sliders that you can use to adjust the filters.
- All Categories: This section contains categories for displaying results. For example, you can select Census & Voter Lists to limit the results to those types of records.
- Results: The Results section lists the number of matches and how they’re sorted along the top of the right column.
It’s important to be able to manage the results in order to avoid spending a lot of time going through records that aren’t pertinent to your research. Here are some ways to navigate and view the results:
-
On the search results screen, take a look at the results in the right column.
If your search term matches a person in a family tree, that result appears first in the list. For example, in Figure 3-4, you see that a William Henry Abell with a close birth date and a spouse with a similar name as our search is found in a family tree. In addition to the information similar to our search, you can also see additional details pulled from the family tree (if available), such as marriage date and place, death date and place, and parent names. Along with family tree results, you can see matching records from other sources, including public member photos and scanned documents.
If additional family trees contain information similar to your search, click the See More Like This link on the right side of the Matching Person heading. -
Hover the cursor over the link containing the result name.
If the result is an Ancestry.com record, the Preview box appears. The Preview box shows key elements of the record and, possibly, a thumbnail of the record, if it’s digitized. This is a real timesaver, in that you can immediately judge whether the record pertains to your person without additional clicks.
-
Sort search results by clicking the Categories tab in the upper-right corner.
This view contains the general record categories followed by the top five sources within these categories, as shown in Figure 3-5.
To see all results for sources in a particular category, click the See All Results link at the bottom of the category. -
To restrict search results to a particular type of record, click a category in the All Categories section in the left column of the page.
This view contains the general record categories followed by the top five sources within these categories, as shown in Figure 3-5.
For example, if you select the Census & Voter Lists category, the results screen is filtered to include only the matches to the search that fit that category. Notice there’s a list of subcategories of the census listed by year beneath the category. -
Click a record group in the right column that might contain records on your ancestor.
In our case, we clicked the 1940 United States Federal Census. A new page appears with names fitting the search criteria that are located in the record group. For example, Figure 3-6 shows a record for Wm H Abell indexed in the 1850 census. The record appears as the third one in the list. The record is indexed with a spouse named Betty and is located in Larue, Kentucky — consistent with the information that we collected on William in Chapter 2.
-
Click View Record.
If there are other details about the record, you can see them on the Record view. In our case, the record for William includes the names and ages of household members, shown in Figure 3-7.
Note the box in the right column containing links to suggested records. These are records in other groups that meet the search criteria. This can be a shortcut to finding several records for the same individual without executing another search. -
If the Record view contains a thumbnail image with a View button, click the thumbnail.
The resulting page launches a viewer to show the digitized image of the primary source. Figure 3-8 shows the 1940 census record for William Henry Abell; notice that we’ve zoomed in on the record, so you can see the name better.
-
Click the Tools menu to control the image.
If you need to rotate, flip, or invert the color of the image, you can use the Tools menu. The Tools menu is accessed by clicking on the Tools button — the third button down along the right side of the image.
If the handwriting is hard to read due to faded or smeared ink, sometimes you can read it easier by inverting the color of the image. -
To print this image, click the Tools button and then select Print.
The Print Options page appears. Click Continue to send the image to your printer. It’s a good idea to check the box Also print index and source data — that way you have the source information along with the image. Note that just above the Continue button is a box suggesting the best page orientation to print the record. -
To share the image, click Tools button, click the Share drop-down, button then the Facebook, Google+, Twitter, or email link.
Clicking any link launches a new pop-over box with further instructions.
-
If you have an online family tree, click the Save button in the upper-right corner of the screen to add the image to your tree.
In the dialog box that opens, select the Save to Person in Your Tree option. (See Chapter 1 for details on creating an online family tree at Ancestry.com.) The Save to Person in Your Tree pop-over box appears.
-
Select the tree name in the Tree drop-down box and type the name in the Person in Tree field.
As you type, the name may prepopulate, if a match already exists in the family tree. If the person is not in the tree, click the Add to a New Person link.
-
Click the Save button.
The Add New Information to Your Tree page appears with two columns, as shown in Figure 3-9. The left column contains information from the census record, and the right contains information from your family tree.
-
Select the checkboxes with the information you would like to import into your online family tree and click the Save to Your Tree button.
The page for the individual to which you attached the record is displayed. You can click the Facts and Sources tab to see the information added from the record.
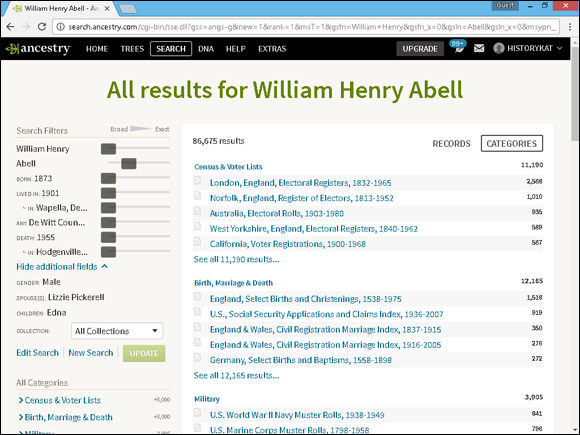
FIGURE 3-5: The Categories view.
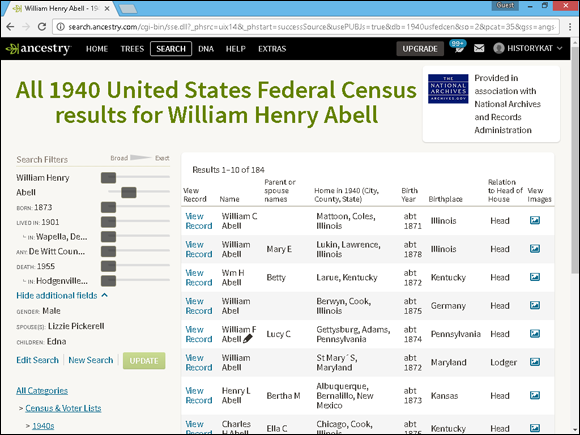
FIGURE 3-6: The results for William Henry Abell in the 1940 census.

FIGURE 3-7: The Record view on Ancestry.com.
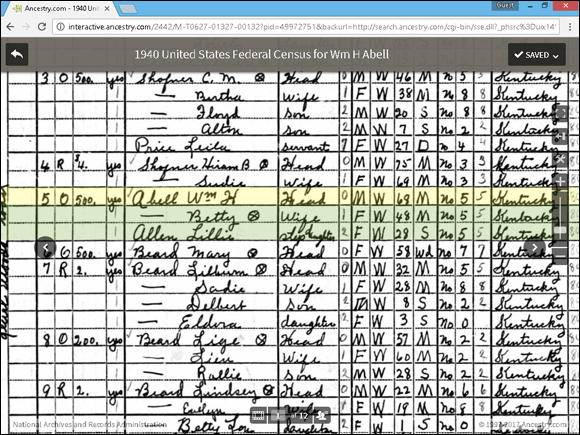
FIGURE 3-8: The digitized census record for William Henry Abell.
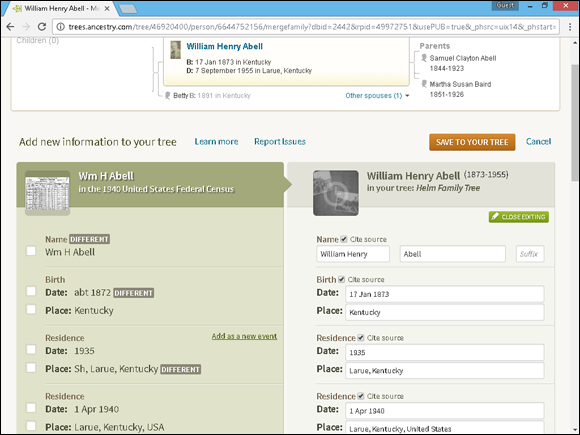
FIGURE 3-9: The Add New Information to Your Tree page.
RootsWeb.com at a Glance
RootsWeb.com is a well-established online community for genealogists. It’s been around for a long time and has gone through various renditions. Several years ago, it became part of the Ancestry.com family and has remained closely associated with Ancestry. Whereas Ancestry.com relies heavily on subscriptions to keep its collection growing, RootsWeb.com relies heavily on the generosity of its users to give their time, energy, and personal resources to make free genealogical data available for all to use.
Users can contribute to RootsWeb.com by submitting transcriptions of books and records, sharing their family trees in the WorldConnect Project (a database of family trees that now has more than 640 million names in it), participating in the RootsWeb Surname List, or RSL (a registry of surnames being researched worldwide and how to contact those researching the names), and posting messages and responses to the message boards and mailing lists hosted by RootsWeb.com. RootsWeb.com also offers web hosting, where you can build your own genealogy website.
To experience RootsWeb.com, point your browser to http://home.rootsweb.ancestry.com/. The directory on the home page gives you a quick and comprehensive look at what RootsWeb.com has to offer. Click any of the links to discover how you can contribute to the various RootsWeb.com projects.
Investigating FamilySearch
FamilySearch is the largest nonprofit genealogical website. It’s sponsored by The Church of Jesus Christ of Latter-day Saints, but you don’t have to be a member of the church to use it. The free resources available on the site include a photo collection area, an online family tree, and a collection of records containing more than four billion names.
Creating a free account
To make sure that you can use all the functionality of FamilySearch, it’s a good idea to create a free account. To do so, follow these easy steps:
-
Set your web browser to
www.familysearch.org.The FamilySearch home page appears.
-
In the upper-right corner of the screen, click the Sign In link.
The Sign In page appears.
-
Click the Free Account button in the upper-right corner of the page.
The Account Information page appears. Type in your first and last name, username and password (twice).
-
Click Continue.
Enter an email address or a mobile number to recover the account, should you forget your username or password.
-
Click Continue.
Type a contact name (that everyone will see), gender, country, birth date, and whether you are a member of the Church of Jesus Christ of Latter-day Saints. Enter the letters in the picture (to ensure you are not a computer filling out the form) and check the box agreeing to the terms and privacy policy (after reading them).
-
Click Create an Account.
A box appears requesting a verification code. If you put in an email address check your email. If you typed a cell phone number, check your phone for the code.
-
Enter the verification code and click Verify.
If the code was correct, you see a new button marked OK, I’m Done.
-
Click the OK, I’m Done button.
A sign in page appears.
FamilySearching records
Here’s how you search in FamilySearch:
-
Sign into the FamilySearch site.
You can use the same username and password that you created in the previous section.
-
Click the Search link at the top of the page.
The Search page appears as shown in Figure 3-10. To search for records on the site, fill in the First Names and Last Names fields. Note the checkboxes next to the First Names and Last Name fields. When you select the checkboxes, the search results match the name exactly. We entered William Henry Abell.
-
Enter information in the Life Event fields.
As you click the links to each of these filters, the field appears onscreen. You can choose to enter information on birth, marriage, residence, death, or any place that your ancestor might be associated with. Note that you can put in a date range for the event.
Consider using date ranges anytime that you conduct a search on FamilySearch. For example, if you know the birth date was 1873, put a date range between 1870 and 1875, just in case the date of birth or age calculation for a particular record is incorrect. That way you won’t miss any records. We entered the estimated birth date, added a residence in De Witt County, Illinois between 1895 and 1905 (based on the birth date of Edna in 1901), and put in William’s death date and place. -
Enter names related to your ancestor if you want the search to restrict results by associated names.
As you click the links to each of these filters under the heading Search with a Relationship, the field appears onscreen. You can choose to enter names for spouse, parents, or another person associated with your ancestor. We entered Lizzie Pickerell from the information that we gathered in Chapter 2.
-
Enter optional information in the Location, Type, Batch Number, and Film Number fields.
As you click the links to each of these filters, the field appears onscreen. The Batch Number and Film Number fields are for advanced searches and are useful when you have seen a reference to a particular data set on a website or in a book. Because we are expecting records from both Illinois and Kentucky, we did not restrict the location.
-
Select the checkbox to make the search match all terms exactly, if you need to limit the count in the results.
We suggest you use this only if you try the search and receive too many results that aren’t relevant to your ancestor.
-
Click the Search button.
The search results page appears, as shown in Figure 3-11.
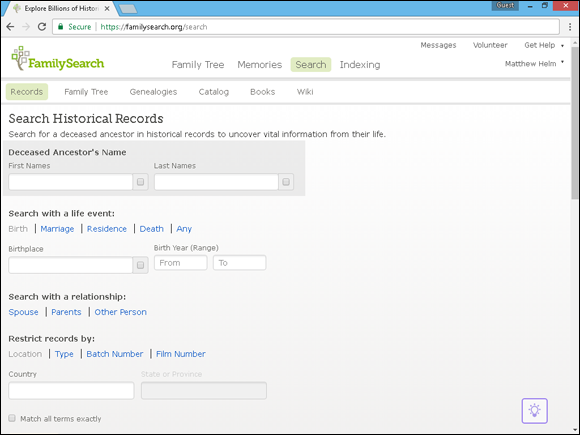
FIGURE 3-10: The FamilySearch Search page.

FIGURE 3-11: The FamilySearch search results page.
Using FamilySearch results
Although you may not receive as many results in FamilySearch as in Ancestry.com, it’s still important that you know how to navigate the results to save you time. The search results page is divided into two columns. The left column contains filters that you can use to limit the search results. The right column lists the results. The most relevant results appear near the top. Other records that might have relevance appear under the blue box titled “The following results don’t strongly match what you searched for, but may be of interest.”
Each search result is divided into four columns: Name, Events, Relationships, and View. The Name column includes the Name of the person and the name of the collection where the person is found. A camera icon in the View column indicates that the collection includes images.
If your search in the previous section generated some promising leads, follow these steps to explore the results:
-
Click the name of the individual in the Name column.
A row appears below the record with more information, as shown in Figure 3-12. In our case, additional information is shown about William Henry Abell including his residence and birth date.
-
To sort your search results by record category, click the Collections tab.
The Collections view appears as shown in Figure 3-13. The top five collections are displayed under each category. You can filter multiple categories by selecting the checkbox to the left of each collection. The maximum number of collections that you can select is 25.
-
You can filter the results on the Records tab at the bottom of the first column, if you desire.
The filters include collections, birthplace, birth year, marriage place, marriage year, residence place, residence year, death place, death year, other place, other year, and gender.
-
If an image is available (as noted in the right column), click the Image link.
The image viewer is launched, as shown in Figure 3-14. You can use the floating toolbar on the right side of the screen to zoom in and out, rotate, invert the color, save, and print the image.
-
Click the Print icon in the floating toolbar.
The web browser print window appears, allowing you to select options for printing.
- Close the browser window to return to the record view. Click on the “X” in the upper-right corner to return to the search screen.
-
If you have an online family tree at FamilySearch, click the Attach to Family Tree button.
Note that this is a different online family tree than the one we created at the Ancestry.com site in Chapter 1.
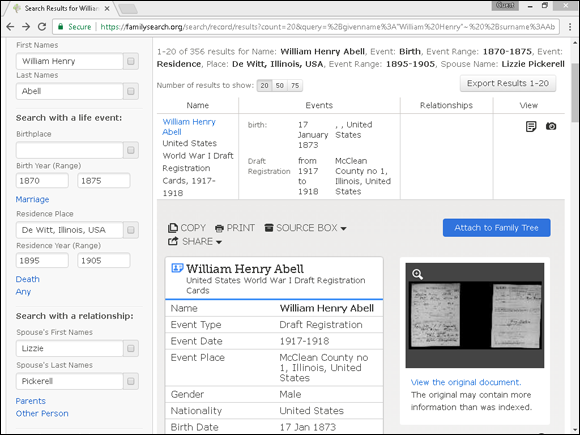
FIGURE 3-12: The name is selected in the FamilySearch results.

FIGURE 3-13: The Collections view in FamilySearch results.
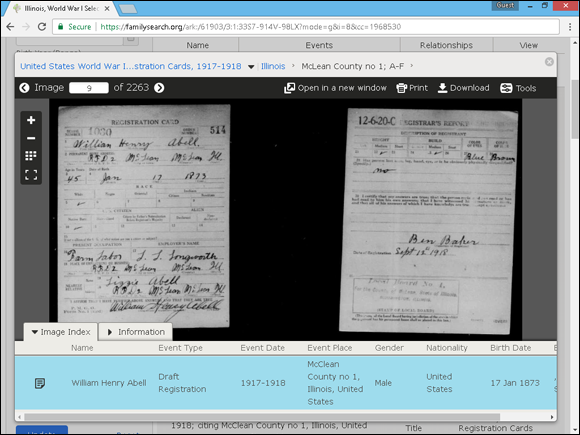
FIGURE 3-14: A draft registration card on FamilySearch.
Other FamilySearch search functions
A few other search pages on FamilySearch are well worth mentioning. These include Genealogies, Catalog, and Books. You can reach each of these by clicking their tabs at the top of the Search page; refer back to Figure 3-10.
The Genealogies search page searches the entries submitted by users to the Ancestral File and Pedigree Resource File. These are not primary sources; rather, they contain information submitted by other genealogists. The information contained within them has not been vetted, and you should take extra steps to verify all information. The two files are useful in providing hints on areas to investigate and can help jump-start your research.
You can explore the catalog of genealogical materials held by the Family History Library using the Catalog search. The resources referenced in the catalog have not necessarily been digitized, but several of them have been microfilmed and can be loaned to local Family History.
The third search function is the Books search. Here you can search a focused collection of 325,000 family history publications. Note that some of the publications contained within this collection are also found on websites such as the Internet Archive (www.archive.org).
Giving Back through FamilySearch Indexing
FamilySearch Indexing is a project through which volunteers help transcribe records from all over the world and submit them for posting on the website so that others can access them for free. It’s a simple process. FamilySearch obtains the records and digitizes them. You download copies of the digital images to your personal computer. Then, using special online software, you index the data in the digital records. The result — a searchable index — is made available to the public free of charge. So far, more than one billion records have been indexed by more than 70,000 volunteers.
For more information about the FamilySearch Indexing project, go to https://familysearch.org/indexing/.
Saluting Fold3
Fold3 was originally named Footnote.com but was renamed shortly after being acquired by Ancestry.com. Fold3 is still run as a separate website and contains some content not found on Ancestry.com. Fold3 focuses primarily on military records, but also contains other records found on National Archives and Records Administration microfilm. In fact, the name of the site comes from the traditional flag-folding ceremony in which the third fold of the flag symbolizes the remembrance of veterans who have served in defense of the country. In addition to military records, the site has homestead records, city directories, passport applications, and census records.
Creating a trial account
Follow these steps to sign up at Fold3 (if you signed up for an all access account to Ancestry.com you may already have a Fold3 account):
-
Set your web browser to
https://www.fold3.com/.The Fold3 home page appears.
-
Click the Join Now link in the upper-right corner of the page.
The Membership choices page appears.
-
Click the Start Free Trial button in the left column.
The registration page appears.
-
Fill out the email address and password fields. Then click the Continue button.
Be sure to click the Terms & Conditions link and read the Fold3 Terms of Use page so that you understand what you can and cannot do with the material on the Fold3 site. The page specifies what Fold3 does with information you provide as you use the site. -
Complete the payment information, including cardholder name, card number, expiration date, billing zip code, country, and phone number. Select the I Have Read and Agree to the Fold3 Terms & Conditions checkbox.
Fold3 requires credit card information to initiate the seven-day free trial, but you aren’t billed until the trial periods ends. If you don’t want to be billed for a subscription, don’t forget to cancel the account before the seven days have passed. -
After all fields are complete, click the Start Free Trial button.
The Welcome to Your Fold3 Free Trial page appears.
-
To continue using the Fold3 site, select the Start Searching Fold3 button.
The Search Fold3 page opens.
Searching at Fold3
You can search for military and other government records at Fold3 using the following steps:
-
Go to
www.fold3.comand sign in.The Fold3 home page appears.
-
Click the Advanced link (a box with a plus sign in it) located to the right of the Search form near the top of the page.
The advanced search form appears, as shown in Figure 3-15.
-
Type the first name and last name of the person you’re researching into the appropriate fields.
We entered William Henry Abell.
-
Enter a keyword or place if you want to limit your results. You can also search in specific year range or limit results to material added to the site during a particular time frame.
Every piece of information you add to the search reduces the number of results you receive. If you execute a search and receive few or no results, omit optional search criteria to try to improve your search results. We typed Illinois in the Place field, and set the date range from 1873 to 1955 to reflect the information that we collected on William in Chapter 2.
-
Click the Search button.
The search results page appears, as shown in Figure 3-16. The far left column shows the number of results that appear in each record category. The center column provides filters to limit your search. The far right column shows the actual results based on the filters.
-
To change the date range, move the sliders left or right, under the timeline section, depending on your preferred date range and then click the Update button.
Note that the date changes in the fields as you move the sliders. You can omit records without dates by deselecting the Include No-Date Matches checkbox.
-
Select a state, under the heading U.S. States, if you wish to limit the results by location.
You can select a state by clicking the map or by selecting the checkbox next to the state name. The search results automatically update when you add a state filter.
-
Select a result type or select an Added in the Past radio button.
The search results update as you enable filters.
-
Click a record title.
The image viewer slides in from the right of the screen, displaying the digitized record, as shown in Figure 3-17.
-
Click the View Larger button.
This enlarges the image viewer to full screen, as shown in Figure 3-18. The first time you access the viewer, you may encounter a pop-over box with a tutorial. You can run through the tutorial quickly to learn about the functionality of the viewer.
- Click the buttons on the toolbar on the right of the image to change the view of the image.
-
Zoom In/Zoom Out: To see the image more closely (to zoom in), click the plus sign (+) on the vertical bar on the left side of the image. Click the minus sign (–) to zoom out.
To see the full context of the information you’re viewing, zoom out of the image when you first open it. Then zoom in closer to see elements more clearly. If the image is too high or too low onscreen when you zoom in and out of it, click the scroll bar on the far right side of the screen to reposition the image. - Fit to Window: See the document at its full width onscreen.
- Rotate: Move the image 90 degrees clockwise. This button shows a curved arrow next to a tilted rectangle.
- Brightness and Contrast: Change the brightness and contrast of the image. You can also invert the color of the image by selecting the Invert checkbox. The button is a shining sun icon.
- Fullscreen: View the image at its maximum size onscreen. Press the Esc key on your keyboard or click the Full Screen button again to exit Full Screen mode.
-
-
Move to another image in the collection.
There are two methods to do this:
- Click the arrow at the bottom of the image to move to the next image in the collection.
- Click the Show/Hide Filmstrip button at the bottom of the page to open a window showing the few images on either side of the image you’re looking at; see Figure 3-19. Click any thumbnail image to view the full image. To see more images in either direction, click the arrow on either side of the filmstrip.

FIGURE 3-15: The advanced search page on Fold3.

FIGURE 3-16: The search results page at Fold3.

FIGURE 3-17: The Fold3 image viewer displaying a record.
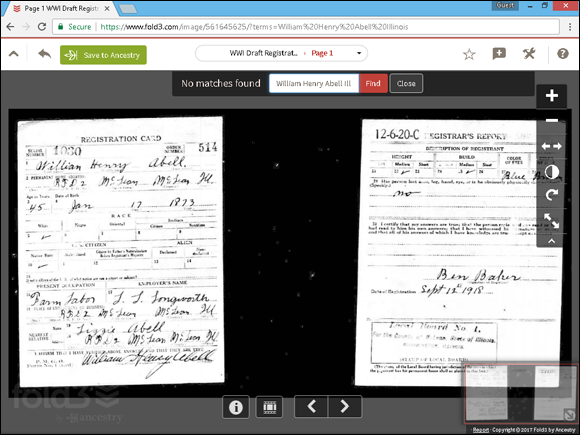
FIGURE 3-18: Full-screen window in the image viewer.
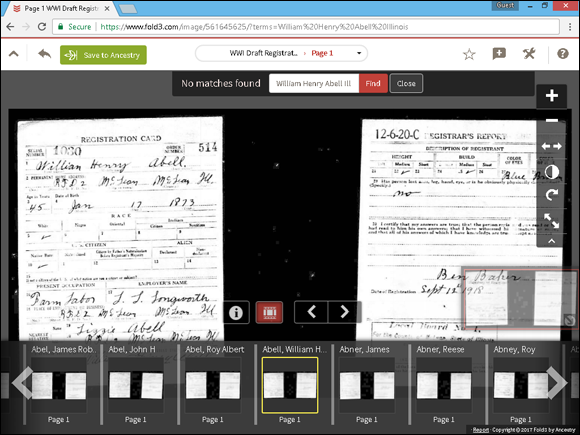
FIGURE 3-19: The Filmstrip view in Fold3.
Finding Your Past
Findmypast.com is one of a few sites owned by Brightsolid Online Publishing. It focuses on records from the United States, United Kingdom, Ireland, Australia, and New Zealand. You can find census records, census substitutes, vital records, newspapers, military records, and some passenger lists. A recent collection includes millions of Catholic Church records as part of the Catholic Heritage Archive. Some of the record sets are just textual, and others are a digitized image. There is also an online family tree application on the site.
You can get a 14-day free trial by following these steps:
-
Set your web browser to
https://www.findmypast.com/pay?isfreetrialrequest=true.The findmypast.com free trial page appears.
-
Click the Start Free Trial button.
The button is located in the two columns that contain the one-month and twelve-month subscription periods. We suggest that you select the one-month column to limit the amount of charges, should you forget to cancel the subscription during the free-trial period.
-
Fill out the registration form and click the Register to Start Free Trial button.
The Payment Details page appears.
-
Complete the payment details fields and then click the Start your free trial button.
The Free Trial Successfully Started Page appears. Click on the Start searching link located in the third column near the bottom of the Discover Your Ancestors box. The search form appears.
-
Complete the First Name and Last Name fields.
We typed in William Henry Abell.
-
If you want to limit the results based on time and location, complete the When and Where fields.
The When field has a drop-down menu that contains Born, Died, and Other event choices. You can also add a date range from the field next to the year field. It defaults to the –/+ 2yrs setting. The Where field has a drop-down menu in which you can choose one of four countries, or you can broaden your search and choose the World. To further refine your results, you can type in a location. We typed in 1873 for the birth year and 1955 for the death year, and we selected United States & Canada from the drop-down and typed Illinois in the field.
-
Click the Search United States & Canada button.
Your button may say something different if you selected a different collection. The search results page appears as seen in Figure 3-20. The left column contains filters that you can use to focus the results. The right column lists the search results.
-
To filter the results, click a category (or categories) in the left column.
Details about the specific record appear in the search result.
-
Click the Transcription icon (paper icon) or the Image icon (camera icon).
If you click the Transcription icon, the transcription page containing textual information taken from the record displays.
If you click the Image icon, the image viewer appears, as shown in Figure 3-21. For our example, we click the Image icon.
-
Click the Download button.
Your web browser downloads the image as a .jpg file.
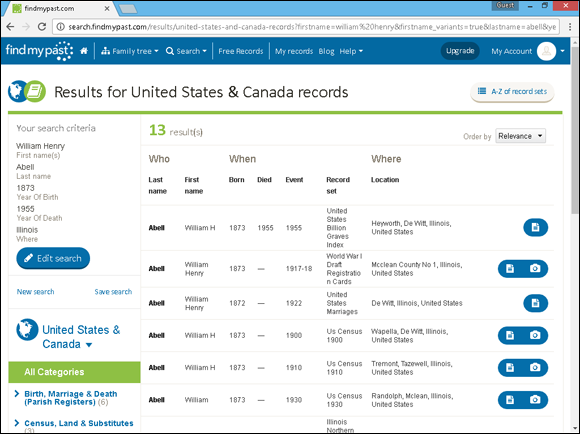
FIGURE 3-20: The search results page for findmypast.com.
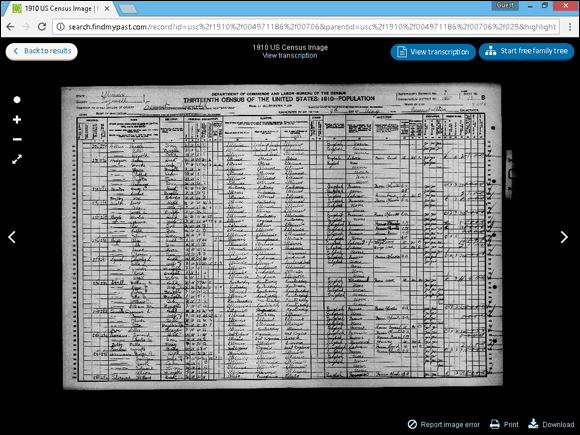
FIGURE 3-21: The image viewer on findmypast.com.
Exploring MyHeritage
MyHeritage offers access to over 7 billion historical records and over 35 million family trees. Also, the company also offers DNA research services, an online family tree, and desktop and mobile applications to organize your research.
MyHeritage prefers new users create an online family tree or buy a DNA test. However, you can get a 14-day free trial to search their records by following these steps:
-
Point your web browser to
https://www.myheritage.com/research.The MyHeritage SuperSearch page appears.
-
Click the Advanced search link on the right side of the search box just below the picture of a magnifying glass.
More search options appear in the box.
-
Type your ancestor’s name into the name boxes, and select a gender.
We typed William Henry Abell and selected male. Note that there are drop-down boxes under both name fields where you can control how the search will treat the names that you enter.
-
Optionally, enter an event and relatives.
We typed selected birth from the drop-down box and entered 1873 for the year and Kentucky for the place. There are drop-down boxes with options to fine tune your search under each the date and place fields. We also entered death information and residence information from 1901 (that we learned when gathering information in Chapter 2). We also added Lizzie Pickerell as a spouse.
-
Click Search.
The results page appears (see Figure 3-22). Similar to other subscription sites, the results appear in the right column and filters appear in the left.
-
Optionally, filter the list of results by selecting a category from the left column.
The page refreshes with filtered results.
-
Click on a name to see more about the tree or record.
A Start Your Free 14-Day Trial pop-over box appears.
-
Enter your first and last name and email address and click the Continue button.
The Payment page appears.
-
Enter your first and last name and email address and click the Continue button.
The Payment page appears.
-
Complete payment information and click the Begin Free Trial button.
The final confirmation page appears.
-
Fill out the area code and phone number and click the Call Me Now button.
An automated service calls your phone with a confirmation number.
-
Enter the confirmation code and click Next.
The record or family tree entry appears as in Figure 3-23.

FIGURE 3-22: The MyHeritage search results page.
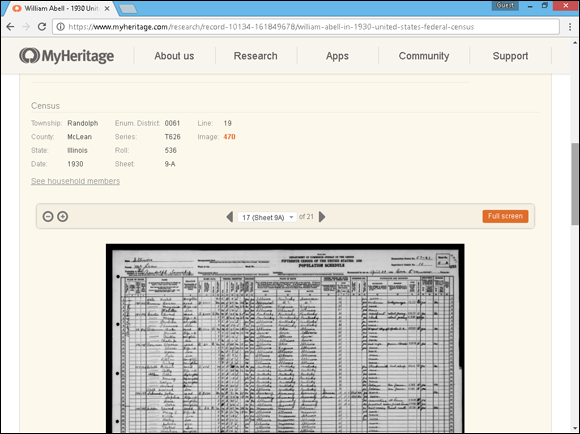
FIGURE 3-23: The MyHeritage search results page.