
Chapter 1
Beginning Your Ancestral Journey
IN THIS CHAPTER
![]() Generating a family history timeline
Generating a family history timeline
![]() Getting familiar with a genealogical database
Getting familiar with a genealogical database
![]() Creating an online family tree
Creating an online family tree
![]() Entering data with an app
Entering data with an app
Ready to dive into your family history? We certainly hope so! The best way to learn how to research is to jump right into it. We help you find the resources you need to be successful along the way.
If you’re new to genealogy, we strongly suggest that you begin your journey with this chapter. (That’s why we made it Chapter 1.) In this chapter, we walk you through the basics of recording genealogical data by starting with a very familiar person — you! We explore different methods of recording your research so you can see which way is best for you. Also, throughout the chapter, we provide some tried-and-true advice to keep you out of genealogical “hot water” in the future.
It’s About Time(line)
 Late one night, you decide to start looking for information on your great-great-grandfather Absalom Looney. After booting up your computer and connecting to the Internet, you put good old Absalom’s name into your favorite search engine. Within a couple of seconds, a page appears telling you there are more than 51,000 results for Absalom Looney. How can you possibly sift through all the Absaloms onscreen and find the one you’re looking for? Well, before you go any further, we should let you in on a little secret: Instead of starting your journey with Absalom, it’s better to begin with the information you have about someone you know better — yourself.
Regardless of what your spouse thinks, we’re convinced that you know you best! You know your birth date, place of birth, parents’ names, and where you’ve lived. (We recognize that not everyone knows all this information; adoptions or other circumstances may require you to do the best you can with what you know until you can discover additional information about yourself.) Knowing some things about yourself, it’s time to start recording the events of your life and to start learning the good research skills that help you delve into the lives of others. An easy way to see your life at a glance is with a timeline. A timeline is a simple way to show the events of your life chronologically.
When working on your timeline, we recommend beginning with current events and working back through your life. This is the method you’ll likely use when researching an ancestor. First, note the basics: the dates you were married, started a job, or moved to your current house or apartment. Then move back to your last residence, occupation, and so on until you arrive at your birth date. Make sure you include milestones such as children’s birth dates, marriage dates, military service dates, educational experience, religious events, participation in organizations and sports, and other significant events in your life. If you prefer, you can cover your life by beginning with your birth and working forward to the present. Either way is fine, as long as you list all the important events.
You have several ways to store your timeline. Some people prefer to start with index cards, placing one event on each card. If you want to use a digital tool, you can store notes in a product such as Evernote (www.evernote.com) or Microsoft’s OneNote (www.onenote.com). Of course, there are products specifically designed to help you create a timeline. If you are somewhat computer savvy and like to keep your timeline on your computer, you can use products such as Timeline Maker Pro (www.timelinemaker.com) or Tiki-Toki (www.tiki-toki.com/desktopapp). In the next section, we walk you through the use of an online timeline resource made specifically for genealogists.
 The timeline that you create now becomes an important research tool for your descendants who decide to conduct research about you in the future. So, when you have the time, turn that timeline into a full-blown autobiography. This way, your descendants not only know the facts about your life, but also gain some insight as to why you chose the paths you did throughout your life.
Crafting an online timeline
If you’re looking for an online way to create a family history timeline, then Twile (https://twile.com) may be the answer. Twile allows you to put events and photographs on a timeline, including the details that might give context to the event, such as the location of the event, who was present, and so on. You can share your timeline with other members of the family and view a growing collection of historical timelines to see what events were going on at the same time as the events in your life (or your ancestors’ lives).
Twile permits you to add unlimited milestones and photos and allows you to import information from a GEDCOM file (see Chapter 14 for more on GEDCOM) and from the FamilySearch website (we talk more about FamilySearch later in this chapter). Also, it allows you to share your timeline with the family. When you are a member of Twile, you will receive emails asking questions that prompt you to add other memories to your timeline.
To begin your free timeline on Twile, follow these steps:
- Point your browser to
https://twile.com/. -
Click the green Get Started button in the center of the resulting page, or click the green Register button in the top-right corner.
Either path allows you to register for free.
-
Fill out the personal information form, including your first and last name, email address, and password.
You can sign in using your Facebook account, if you have one and if you prefer to have the two applications linked. Also, make sure you read the terms and privacy policy so you know how your information will be used.
-
Click the Sign Up button.
A page appears asking how you would like to start your timeline.
-
Select Create a New Timeline.
A page appears to walk you through adding your first milestone — your birth.
-
Select your birth day, month, and year from the drop-down boxes. Check the appropriate box for your gender. You can optionally add your maiden name (if you select the female gender) and a photo of yourself. When finished, click the green Next button.
A new page appears with questions about your father.
-
Fill in your father’s name and birthdate, and indicate whether he is deceased. Then click the green Next button.
If you click on the Deceased? box, the date of death information appears. Also, if you prefer not to enter information on your father, you can click the Skip for Now link at the bottom of the page.
You guessed it: After submitting this page, you are taken to a page about your mother.
-
Fill in your mother’s name, birthdate, and maiden name, and indicate whether she is deceased (and enter date of death, if applicable). Then click the green Next button.
You can also choose not to enter this information by clicking the Skip for Now link. A new page appears asking about the wedding of your parents.
-
Enter the date of your parent’s wedding using the drop-down boxes and click the green Finish button.
If you don’t know the date or prefer not to enter it, simply click the Skip for Now link. You are taken to the timeline page displaying the milestones that you just entered, with a pop-up window asking whether you’d like to take a look at the milestones you’ve entered so far.
-
Click on the green Take a Look button to view your timeline.
The timeline looks similar to the example in Figure 1-1. You may also see a message under the Add button prompting you to click it to add more milestones.
-
Click the Add button and select to Add a Milestone.
Twile walks you through the process of adding a milestone. For example, you might wish you add a significant birthday, your marriage information, or emigration information.
-
Click on the green Next button.
Twile updates your timeline.
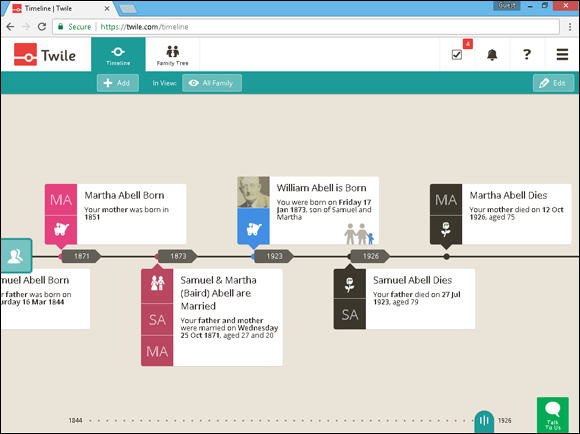
FIGURE 1-1: The Twile timeline.
Within a milestone, Twile gives you the ability to add extra information, such as location, photographs, and documents related to the milestone. For example, for the marriage milestone you can add information on the reception venue, best men, bridesmaids, and ushers. Be sure to use the words and documents features to provide evidence of the event and to cite your sources. To reach these features, try the following:
-
From the Timeline view, click on a milestone.
If you are not already on the Timeline view, click the Timeline button in the upper-left corner of the screen. On the Timeline page, the milestones appear above and below the timeline. For example, if you entered your birthdate, a milestone titled [Your Name] Born should appear. Grab your birth certificate and click anywhere on the milestone to see the pop-up box with further information.
Before going any further — if you are concerned about privacy, please take a quick look at the last paragraph of this section — or use the information from the birth certificate of a relative who is deceased.
-
Select Add Birth Weight from the Extra Information section.
The Extra Information section is located on the left side of the screen. A pop-up box with pounds and ounces fields appears. The birth certificate probably contains your birth weight, so feel free to enter it.
-
Enter your birth weight in the two fields and click on the green Save button.
The weight now appears in the Extra Information section.
-
If you have a baby picture of yourself that you want to include, click on the Photos button.
The Photos button appears on the right side of the screen under the title Add Something. After clicking on the Photos button, a dialog box appears.
-
Select a photo on your computer to upload and click the Open button.
When it has uploaded, the photo appears on the screen.
-
If you would like to add anecdotal information about your birth, click the Words button.
The Words button appears on the right side of the screen under the title Add Something. A pop-up box appears asking you to add a memory or comment. You might want to add a story your mother told you about the day you were born, or provide information on historical events from that day.
-
Enter a memory or comment and click the green Save button.
The memory or comment appears on the page.
-
Select the Document button.
To add a copy of the birth certificate as evidence of the event, click the Document button. A dialog box appears.
-
Select a document on your computer to upload and click the Open button.
When it has uploaded, the document appears on the screen.
-
Click the Add a Location button.
The Add a Location button appears on the right side of the screen under the Add Something box. After you click it, a pop-up box appears.
-
Type a location into the box and click on a location match.
As you begin typing, Twile tries to match a location to the text you’re typing. When a match appears, click on it. A map of the location then appears on the page. An example of a completed page appears in Figure 1-2.
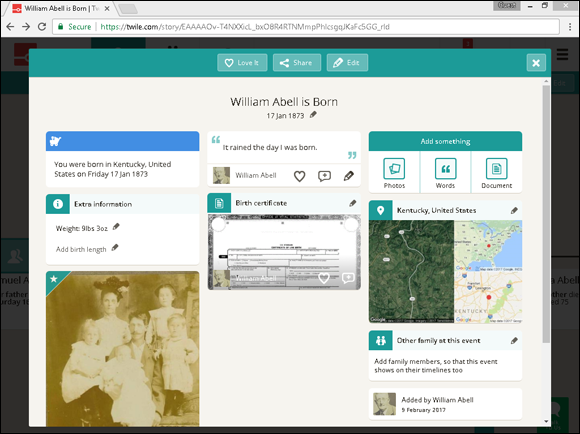
FIGURE 1-2: A completed milestone information page.
You can choose to share milestones from Twile on Facebook. There are a lot of other features within Twile. We encourage you to experiment with adding and editing milestones to learn them.
 Please keep in mind that the information you are entering is being stored online in another location. Although Twile does its best to secure all the information uploaded on its site, it’s still a good idea to carefully read the Privacy Policy. If you are concerned about privacy, consider only posting information that you wouldn’t mind other people seeing if it were inadvertently disclosed.
Learning about Sources
As we just talked about using your birth certificate as evidence in the last section, now is a good time to talk about using sources in your family history research.
If you’re like most people, you think you know a lot about yourself. If we ask you what your birthday is, you can tell us without batting an eye. But how do you know the birth date? You were obviously there, but you weren’t in a condition to be a reliable witness, given that you were a newborn and most likely not fully aware of what was going on. This is where primary sources come in handy. Most likely, witnesses were present who helped create a record of the event.
Primary sources are documents, oral accounts — if the account is made soon after the actual event and witnessed by the person who created the account — photographs, or any other items created at the time of an event. Some primary sources include birth and marriage certificates, deeds, leases, diplomas or certificates of degree, military records, and tax records.
For example, a primary source for your birth date is your birth certificate. Typically, a birth certificate is prepared within a few days of the actual event and is signed by one or more witnesses to the birth.
The timeliness and involvement of direct witnesses makes the information contained on the record (such as the time, date, and parents’ names) a reliable firsthand account of the event. It’s important to recognize that just because a record was prepared near the time of an event doesn’t mean that every fact on the record is correct. Typographical errors can occur or incorrect information can be provided to the creator of the record. Often, these errors are not caught when the record is created. For example, in the case of a birth certificate, new parents are preoccupied with things other than government paperwork during their stay at the hospital. When our youngest child was born, the birth certificate application was created and presented to us for signature. After reading it, we discovered three pieces of incorrect data. Fortunately, we were able to correct the birth certificate before it was submitted to the county clerk — even though the hospital clerk wasn’t too happy about re-creating the document multiple times. So, it’s always a good idea to try to find other primary records that can corroborate the information found in any record.
Secondary sources are documents, oral accounts, and records that are created some length of time after the event or for which information is supplied by someone who wasn’t an eyewitness to the event. A secondary source can also be a person who was an eyewitness to the event but recalls it after significant time passes. You might encounter records such as a Delayed Report of Birth or an affidavit that contain a birth date that is based upon a person’s recollection of when a birth occurred. Some of these records may have a witness who testifies that a birth occurred thirty years earlier.
Some records may be considered both primary and secondary sources. For example, a death certificate contains both primary and secondary source information. The primary source information includes the death date and cause of death. These facts are primary because the certificate was prepared around the time of death, and the information is usually provided by the medical professional who pronounced the person dead. The secondary source includes the birth date and place of birth of the deceased individual. These details are secondary because the certificate was issued at a time significantly later than the birth (assuming that the birth and death dates are at least a few years apart).
Secondary sources don’t have the degree of reliability of primary sources. Often, secondary source information, such as birth data found on death certificates, is provided by an individual’s children or descendants who may or may not know the exact date or place of birth and who may be providing information during a stressful situation. Given the lesser reliability of secondary sources, we recommend corroborating your secondary sources with reliable primary sources whenever possible.
Although secondary sources are not as reliable as primary sources, that doesn’t mean secondary sources are always wrong or aren’t useful. A good deal of the time, the information is correct, and such records provide valuable clues to locating primary source information. For example, in the case of a birth date and birthplace on a death certificate, the information provides a place and approximate timeframe you can use as a starting point when you search for a birth record.
You can familiarize yourself with using primary sources by collecting some records that document the milestones that you created in Twile in the previous section. Try to match primary sources for each event in your timeline. If you can’t locate primary source documents for each event in your life, don’t fret! If you remember an event and provide details about it on the timeline, it can serve as a primary source document — because you write it about yourself.
For additional information on primary sources, see Using Primary Sources at the Library of Congress website for teachers at www.loc.gov/teachers/usingprimarysources.
We should also mention tertiary sources. Tertiary sources are compilations of primary and secondary sources, such as articles found online or in encyclopedias or almanacs.
For comparisons of primary, secondary, and tertiary sources, and examples of each, see James Cook University’s overview of primary, secondary, and tertiary sources at http://libguides.jcu.edu.au/scholarlysources.
Or check out William Madison Randall Library’s guide for identifying primary, secondary, and tertiary sources at https://library.uncw.edu/guides/primary_secondary_and_tertiary_sources.
For strategies on using primary sources online, see the Reference and User Services Association (of the American Library Association) page at www.ala.org/rusa/sections/history/resources/primarysources.
Using Genealogical Applications
You can use an online timeline to document your life (as described in the It’s About Time(line) section earlier in this chapter), but a full-featured option is to use a tool of the genealogy trade from the beginning — a genealogical application. Over time, you’ll collect a lot of information on your ancestors. You need something to help you keep everything straight and make sense of it all. Not only can a genealogical application keep track of the names, dates, and places of your ancestors, but it can also show you the gaps in your research and point you where to go next.
Nowadays, you encounter two different flavors of genealogical applications — those installed on your personal computer and those available on online family trees. Each type of application has pros and cons, so over the course of the rest of the chapter, we look at both types to illustrate them. Of course, you don’t have to pick one or the other — you could be like us and use both kinds at the same time!
Both types of applications can store and manipulate your genealogical information. They typically have some standard features in common. For instance, most serve as containers for family facts and stories, have some reporting functions to see the data contained within them, and have export capabilities so that you can share your data with other family historians (or with another application). Each application may have a few unique features that make it stand out from the others. For example, one might have the capability to take information out of the application and generate online reports at the click of a button or integrate with data stored on subscription genealogical websites. Here’s a list of some simple features to look for when evaluating applications:
- How easy to use is the application? Is it reasonably intuitive how and where to enter particular facts about an ancestor?
- Does the application generate a view of its data so that you can take the next step in your research? For instance, if you’re partial to Family Group Sheets, does this application display information in that style?
- Does the application allow you to export and import a GEDCOM file? What other formats does it export to? GEDCOM is a file format that’s widely used for genealogical research. For more info about GEDCOM, see the sidebar in Chapter 14 titled “GEDCOM: The Genealogist’s Standard.”
-
What are the limitations of the application? Make sure the application can hold an adequate number of names, documents, and photographs (and accompanying data) to accommodate all the ancestors about whom you have information.
Keep in mind that your genealogy continues to grow over time. - Can your current computer system support this application? If the requirements of the application cause your computer to crash every time you use it, you won’t get very far in your genealogical research.
- Does this application provide fields for citing your sources and keeping notes? Including information about the sources you use to gather your data — with the actual facts, if possible — is an important and a sound genealogical practice. Take a look at the section “Learning about Sources,” earlier in this chapter, for more information about the importance of citing sources and understanding how to do so.
- Does this application have features that warn you of incorrect or incomplete data? For example, some applications check the place-name that you enter against a database of locations and suggest a standard way of spelling the location.
- Does the application integrate with genealogical websites? Integrating content between websites and genealogical software is an easy way to build your genealogical database, as well as to share your findings with others.
When importing information from genealogical websites directly into your application, keep in mind that you need to take the extra step to verify the information and attach sources to the imported information. Some sites do not attempt to verify the information they contain, and without proper vetting you may download incorrect data.
Entering Information into RootsMagic Essentials
To help you get a better idea of how genealogical software installed on your personal computer can help you organize your records and research, and to help you figure out what features to look for in particular software packages, this section examines how to use RootsMagic, a popular genealogy program.
You can download a free trial version of RootsMagic Essentials software and install it on your computer:
- Open your web browser and go to the RootsMagic site at
www.rootsmagic.com/Products. - Scroll down to the RootsMagic Essentials section and click the Free Download button.
- Complete the information fields, including your name and email address. Enter your email address again in the Verify E-mail field shown in Figure 1-3.
- Select the checkbox if you want to receive emails from RootsMagic.
-
Click Download.
The instructions for downloading the product appear. Be sure to click on the correct version for your computer’s operating system. There are two versions — one for Windows and the other for Mac.
-
Click the RootsMagic Essentials Installer link.
The software downloads to a directory on your computer.
-
To begin the installation, double-click the downloaded file.
When we installed it, the filename was RM7Setup.exe. The RootsMagic Setup wizard pops up with a license agreement.
-
Read through the licensing agreement. If you agree to its terms, click the I Accept the Agreement option and then click Next.
In the window that appears, choose where to have the RootsMagic Essentials software stored on your computer.
-
Identify where to store the application and then click Next.
The Select Start Menu Folder field appears. This enables you to identify where to put shortcuts for the program. The default location is a folder called
RootsMagic 7. - If you want the shortcuts listed in
RootsMagic 7, leave the default location in the field. If you prefer to have shortcuts in another folder, browse and select the folder or enter the location. -
Click Next.
The Select Additional Tasks window opens. If you want to set up any additional tasks (such as creating a desktop icon for the program or downloading a place database for geocoding and gazetteer components), select the appropriate checkbox.
-
Click Next.
The final information for the installation appears.
-
Review the installation information and, if everything looks correct, click Install.
When the software has finished installing, the Completing the RootsMagic Setup Wizard box appears.
-
If you want to open RootsMagic now, select the Launch RootsMagic checkbox and click the Finish button.
A window opens welcoming you to the software and asking you to identify which version of the product you’re opening.
- Click the RootsMagic Essentials — Free Version link.
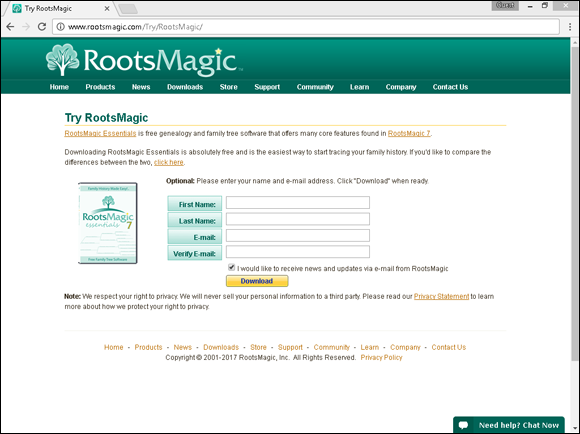
FIGURE 1-3: Information fields for the RootsMagic install.
Now that you have the RootsMagic Essentials software installed on your computer, let’s get down to the nitty-gritty and start entering data. When you open the application for the very first time, you get a RootsMagic News window containing links to various announcements and stories of interest to RootsMagic users. If you want to read any of these, you can click the links; otherwise, just click Close.
When the RootsMagic News box closes, you see a Welcome to RootsMagic screen. To begin your family tree, follow these steps:
-
Click Create a New File.
A box appears, enabling you to do several things:
- Identify the new filename.
- Determine the location for the file.
- Set options, including the date format for the file, whether to display a number after a name, whether to display surnames in all capital letters, and whether to set up and support some additional fields for the Latter-day Saints and FamilySearch family tree support.
- Choose whether to start a file from scratch or import data from another program.
-
Enter the new filename in the New File Name box, set any of the optional formatting items, and identify whether you’re starting a new file or importing an existing one; then click OK.
In our case, we’re starting a family tree for the Abell family, so we entered Abell as the filename. We set the date format and selected the option for starting a new file.
-
Click OK.
The database is created and the Pedigree view opens, as shown in Figure 1-4.

FIGURE 1-4: The Pedigree tab.
You can start entering information about yourself in the Pedigree page (presuming that you choose to start with yourself). Then you can add information for four additional generations.
Completing the Pedigree Page
Usually, it’s easiest to enter information about yourself, your spouse, and your children, and then work backward through your parents, grandparents, great-grandparents, and so on. After you complete your direct lines back as far as you can, enter information about each of your siblings, nieces and nephews, cousins, and other relatives. Always enter as much information as you can in each of the fields in the Add Person dialog boxes. Follow these steps to fill in the Pedigree page:
-
Select the Click to Add a Person box in the Pedigree page.
The Add New Person dialog box appears, and then you can fill in details about yourself or an ancestor.
-
Complete the Add New Person box and click OK.
Type the first and middle names in the Given Name(s) field and the last name in the Surname field. Then complete the remaining fields to the extent that you know the biographical facts about that person. Remember to use your maiden name if you’re female — regardless of your marital status. Of course, we want to set a good example in this book when it comes to privacy for living relatives, so rather than typing information about one of us, we type in Matthew’s great-grandfather, William Henry Abell.
After you click OK, the Edit Person dialog box appears.
-
Complete the Edit Person dialog box and click Save.
You can add more facts about yourself or an ancestor by clicking these buttons in the Edit window — Notes, Sources, Media, and Address. You can also add or delete facts by clicking the appropriate button and then following the prompts in the Fact Types box that appears. After you finish adding the details, click Save.
Make sure that you use the four-digit year when you enter dates in RootsMagic. If you inadvertently use only two numerals for the year, the software accepts the year as is, leaving it ambiguous for anyone who references your database in the future. - Click Close.
After you’ve entered your first person, you can click the next person box you want to complete or click the Add People to the Database icon on the toolbar and enter information for people related to the individual, such as spouse, children, and parents. You can keep track of family units by clicking the Family tab. We add more people to RootsMagic and discuss how to source information in Chapter 2.
Creating the Virtual You
If you’re going to be researching using a variety of computers, you may prefer to use an online family tree rather than an application stored on one computer. Several companies have created online family tree applications, including Ancestry.com (http://trees.ancestry.com), My Heritage (www.myheritage.com), and Findmypast (https://www.findmypast.com/family-tree). To give you a taste of what online family trees can offer, we look here at one full-featured application at Ancestry.com. In this application, not only can you enter genealogical information, but you can also upload media files and integrate your data with the content found on the Ancestry.com subscription site through the Hints function.
To get started, try the following:
-
Point your web browser to
http://trees.ancestry.com/.The Ancestry.com online family tree page appears.
-
Near the top of the page, enter your first name and last name, select your gender, age and a person to search for (father or mother), and click Start Your Tree.
A new page appears labeled Father’s Information.
-
Type in as much information as you know and click on the Search for Records button.
The searchable information includes first and last name, birth year and place, and the names of his father and mother. You can choose to enter additional information by selecting grandparent information from the drop-down box. When you click the Search for Records button, a pop-up box appears asking you to provide your email address to register.
-
Enter your email address and click on the Save & View button.
The searchable information includes first and last name, birth year and place, and the names of his father and mother. The resulting page shows the search results for your father, as well as notifies you that your family tree has been saved and login information emailed to you. Certain items are marked with Preview buttons indicating that a subscription is required. Other items have a View button showing that it is free content.
-
Click Trees in the black menu bar.
The menu bar is located at the top of the page next to the Ancestry logo.
-
Click on the [Your Name] Family Tree.
The resulting page shows a three-generation ancestor view with you as the first person at the bottom; see Figure 1-5.
-
Add the name of a family member to the tree by clicking the Add Father link or the Add Mother link.
In the pop-over box that appears, enter the first and middle names, maiden (or last) name, gender, birth date, birthplace, and, if applicable, death date and death place. A pop-over box is similar to a dialog box except that you must complete its fields and click a button to make it disappear. When you begin to enter a location in the Birthplace field, a list of potential matching locations appears beneath the field. You can select from the list to enter the information more quickly. You can also use this list to standardize the location that makes searches easier in the Ancestry.com database.
-
Click Save.
The new individual now appears on the family tree. If there is information on the individual in the Ancestry.com database, a shaky leaf will appear.
-
Click the leaf symbol to see the hint. When you finish reading the hint, click the gray Return to Tree box.
After clicking the leaf symbol, click on the Ancestry hints button in the upper-right corner of the pop-over box (next to the large leaf). Not every individual triggers a hint, so don’t be concerned if you don’t see one. If you follow a hint that leads to part of the paid subscription database, the site prompts you to subscribe to the Ancestry.com site.
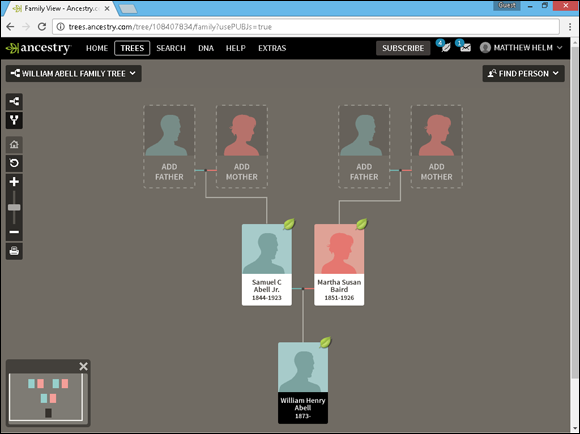
FIGURE 1-5: A three-generation ancestor view to fill in with your ancestors.
Giving Your Ancestors Some Privacy
Now that you have started your family tree, you might consider privatizing it — at least until you are comfortable with opening it up to the public. Keep in mind that by default the online family tree on Ancestry.com is set to be viewed by the public. This means that unless you make it private, the content you place there can be searched and read by anyone. To make your online family tree private (meaning that no one can view your tree without your permission), walk through these steps:
-
Click on the Trees menu item on the Ancestry.com page.
A drop-down box appears with the name of your online family tree and the option to Create & Manage Trees. You can find the Trees link in the black navigation bar at the top of the page.
-
Select the Create & Manage Trees option from the drop-down box.
A page appears with a list of online family trees associated with your account.
-
Click the Manage Tree link under the name of your online family tree.
The Tree Settings page opens.
-
Choose Privacy Settings from the menu.
The menu options are located just under the Tree Settings heading. You will find Privacy Settings between the Tree Info and Sharing menu options.
-
Click on the Private Tree radio button and then the Save Changes button.
You also have the option to prevent your tree from being found in searches. That means that no one will know to contact you to request access to see your online family tree.
Beefing Up Your Profile
Just like your ancestors’ lives, your life is a lot more than just names and dates. To get a better picture of you, or your ancestor’s life, you need to include details about important events such as marriages, buying a house, starting a new job, moving to a new town, and so on. To add some facts, try the following:
-
If your family tree isn’t onscreen, place the mouse cursor over the Trees menu item at the top of the Ancestry.com home page. A secondary menu drops down showing the family tree you created. Click the family tree name to display your family tree.
Your family tree is displayed with the Pedigree page.
-
Place the mouse cursor over the name of a person on your family tree and click on the box.
A pop-over box appears with more information about the person on your family tree.
-
Select Profile.
You may encounter a pop-over box with more information about the Facts view. You can click on the Next and Explore Your Family Story buttons if you are interested in reading the hints, otherwise click on the “x” button in the top right corner of the pop-over box. Several tabs are available on the Facts screen: Lifestory, Facts, Gallery, and Hints. The Facts tab, shown in Figure 1-6, shows a summary of facts, sources, and family members associated with the person. The Facts page contains some basic facts that you already entered, such as birth and death.
-
Click the Add a Fact link in the dotted box in the left column of the screen (under the Facts column).
The Add a New Fact or Event pop-over box appears.
-
Select the event type from the drop-down box, as shown in Figure 1-7.
One or more fields appear on the page depending on the event that you selected.
-
Fill out the fields and click Add.
The information that you entered now appears in the Facts column.
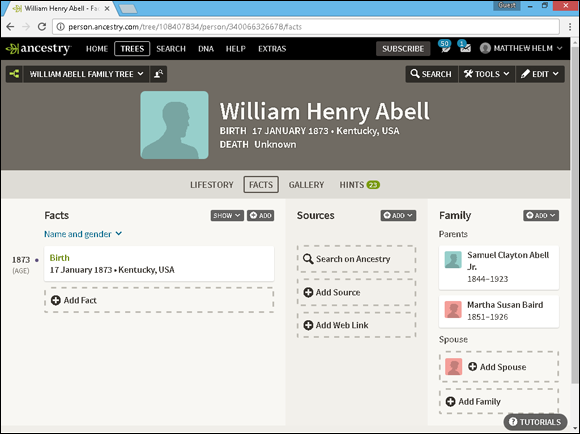
FIGURE 1-6: The Facts tab.
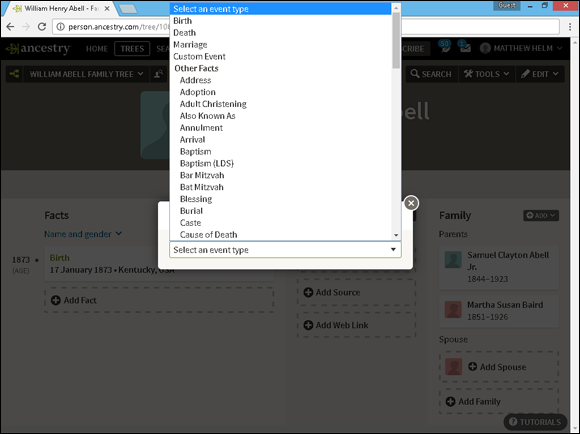
FIGURE 1-7: The Add Fact or Event drop-down box.
Citing Your Sources
A source is any material (book, document, record, or periodical, for example) that provides information for your research — for more information on sources see Learning about Sources earlier in this chapter. We strongly encourage you to cite the sources of all facts and information that you enter into profiles on your family tree.
Keeping track of sources helps you remember where you discovered the information and helps other researchers retrace your steps. If you find conflicting information later, returning to the source can help you sort out the reliability of your information.
Follow these steps to cite a source for a fact you’ve added to your tree:
-
Display the profile page for the person you want to cite a source for.
Follow Steps 1 through 3 in the earlier section “Beefing Up Your Profile.”
-
Click the Add Source link.
The link is located in the dotted box in the middle column under Sources. The Create Source Citation Information page appears, as shown in Figure 1-8.
-
Click the Create a New Source link under Step 1 onscreen.
The link appears just below the Select a Source drop-down box. The Create a New Source page appears.
-
Fill out fields for the source of the information.
You don’t have to fill out all fields. The only required field is Title.
-
Near the bottom of the page, click the Create a New Repository link.
A repository is a place that holds the source you’re citing, such as a library or a person’s house, in the case of the location of family photos. The Create a New Repository page appears.
-
Fill out the fields to describe the repository. When you’re finished, click the Save Repository button to save the repository and return to the Create a New Source page.
Note that after you’ve created a repository once, it’s then available for you to use in future citations.
-
Click the Save Source button.
The source title is now reflected in the drop-down box under Step 1 on the Create Source Citation Information page.
-
Complete the fields under the Citation portion of the source (Step 2 on the Create Source Citation Information page).
The Detail field is the only required field in this section.
- Under Step 3 on the Create Source Citation Information page, select the box next to the fact or event that you want the source to document.
- Click the Submit button.
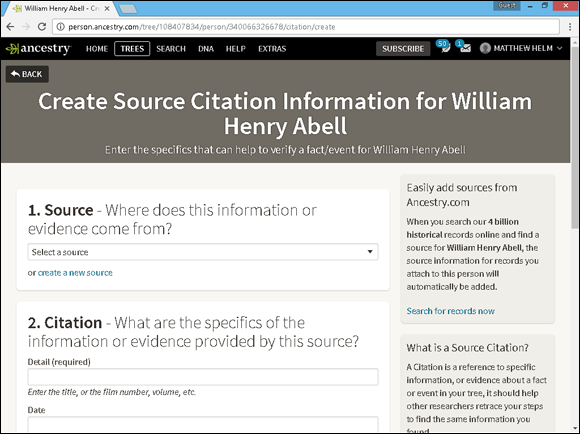
FIGURE 1-8: Create Source Citation Information page.
Getting the Full Media Experience
To provide a rich experience for your sources, consider adding media. For example, you can scan a birth record of an ancestor and add the image of the actual record as part of your source citation.
Follow these steps to add media to your Ancestry.com family tree:
- Display your family tree and open the personal profile to which you want to add media.
- Click the Gallery tab.
-
Click the Upload Media image in the middle of the screen.
The Upload Media page appears.
-
Click the Content Submission Agreement link.
We think it is always a good idea to read the submission agreement so that you know the terms and limitations of posting content to the Ancestry.com site. Click the back arrow on your web browser to return to the Upload Media screen.
-
Drag the photo that you want to upload onto the dotted box labeled Drag or click here to upload.
Alternatively, you can click on the green Choose Files button that launches a dialog box and select a file. While the files are uploading, the progress bar appears on your screen. After the upload is complete, the photo appears, along with some fields to fill out including Title and Details.
To select multiple files to upload at the same time, hold down the Ctrl key in Windows or the Command key on a Mac. -
Replace the title of the image in the Title field.
The Title field must be filled in. The default title is the filename of the imported image. The filename isn’t always a descriptive title, so feel free to make the name more meaningful.
- Change the media type in the drop-down box (under Details).
- Fill in the Date, Place, and Description fields if you have this information.
-
If you want to attach media to additional people in your family tree, click the Add link and enter the person’s name in the box that appears.
For example, if you want to attach a photo of a family to each of the people in the photo who are included in your family tree, attach the photo to the names of the appropriate individuals.
When you begin typing, the name begins to fill in based on the people in your family tree. -
Click the Done button.
The photo shows up as a thumbnail image in the Gallery.
You can add the photo to a Fact entry by clicking the Facts link in the menu bar, selecting the fact, and clicking on the Edit link in the upper-right corner of the fact box. Then select the Media link in the left column of the pop-over box. Click the plus button next to the photo to add it to the fact.
Reaching Out to Others
At some point, you might decide to make your research results available to the public. To clarify some information that you put into the database, you might want to create a comment about a particular ancestor.
It’s important to know that comments placed on records of living individuals will not be viewable to the public unless you specifically give permission for others to see living individuals in your tree.
To post a comment:
- Display your family tree in Pedigree page, and then open the personal profile to which you want to add a comment.
- Select the Tools drop-down box in the upper-right corner of the screen (between the Search and Edit boxes).
- Click View Comments.
- Type your comment in the box and click the Submit button.
Hinting Around about Your Ancestors
A special function in the online family tree is the Ancestry Hint. Ancestry Hints are designed to search through the names that you enter and match them to records available on the Ancestry.com website. Even if you don’t have an Ancestry.com subscription, you can use the Hints to point you to record sets that you may be able to find in other repositories.
To see what Hints might offer for an ancestor, follow these steps:
- Display your family tree and then open the personal profile for which you want to review Hints.
-
Click the Hints tab.
The Hints page shown in Figure 1-9 appears, listing record sources that contain a potential match with your ancestor:
- The first column is the name of the record source.
- The second column contains information about the particular record containing your ancestor’s name. Note that this column doesn’t provide all the information that might be contained within the record; however, it gives you an idea of the type of information that matched the record with your ancestor.
-
Click the Review Hint button to take a closer look at the record.
If you have a subscription to Ancestry.com, you see more information about the record. If you don’t have a subscription, you see a splash page that advertises membership and explains how to start a free, two-week trial.
- If the Hint isn’t valid for your ancestor, click the Ignore Hint link.

FIGURE 1-9: The Hints page.
Ignoring the Hint doesn’t delete it from the profile. The Hint is moved to the Ignored Hints page, where you can review it again by clicking the Ignored Hints link.
Giving Your Ancestors Some Mobility
If you’re one of those people who are always on the go, and always need to access your family history, perhaps a good solution for you is a genealogy app. App is short for application, and typically can run on your smartphone or tablet. Apps on the market generally come in three flavors — free companions to genealogical software packages such as RootsMagic, apps that view online family trees, and apps that you enter data into through the app itself.
With the free Family Tree app from FamilySearch, you can build a new family tree directly in the app or you can link to an online family tree that you’ve already started on the FamilySearch website.
When entering information and attaching memories in the Family Tree app, keep in mind that you are contributing to a public database — a database that can be seen by millions of people and that will be preserved in the FamilySearch vaults “forever.”
The Family Tree app is available on the Apple App Store and Google Play.
The following steps show how to use the Family Tree app to add information to your family tree in an iPad. Although these steps apply specifically to an iPad, using the app on another type of device is similar.
-
Turn on your iPad and locate the Family Tree app icon.
The icon has a white background with FamilySearch logo (a tree with leaves in the shape of boxes). If you haven’t downloaded and installed the app on your iPad before, use the instructions that came with the device to find and download the app from the iTunes App Store.
-
Tap the Family Tree app icon once.
A page appears explaining that information added in the app is contributing to a single public family tree, that hints are used for finding records, and you can save memories.
-
After swiping through the three introduction pages, tap Done at the bottom of the page.
A What Is New box appears.
-
Tap OK.
A login screen appears.
-
Tap Create Account.
Type in your first and last name, username, and password (twice).
-
Tap Continue.
Enter an email address or a mobile number to recover the account, should you forget your username or password.
-
Tap Continue.
Type a contact name (that everyone will see), gender, country, birth date, and whether you are a member of the Church of Jesus Christ of Latter-day Saints. Enter the letters in the picture (to ensure you are not a computer filling out the form) and check the box agreeing to the terms and privacy policy (after reading them).
-
Tap Create an Account.
A box appears requesting a verification code. If you put in an email address, check your email. If you typed a cell phone number, check your phone for the code.
-
Enter the verification code and tap Verify.
If the code was correct, you see a new button marked OK, I’m Done.
-
Tap the OK, I’m Done button.
A sign-in page appears.
-
Close out the window and return to the Family Tree app.
Type in the username and password you just created.
-
Tap Sign In button.
The Pedigree page appears with a box containing your name and two boxes above it representing your parents. (See Figure 1-10.)
-
Tap the box with your name on it.
The person page appears with the information that you have already entered when you registered. You can elect to enter information on your spouse and parents by clicking on the appropriate menu item.

FIGURE 1-10: Family Tree app pedigree page.
Telling Your Story
Family historians can be very good at telling the stories of their ancestors. If you have ever been to a family reunion and were “trapped” by one, you know what we mean. However, sometimes they forget to document their own lives — leaving a hole for their descendants. For example, not long after Matthew’s mother passed away, Matthew was sorting through her papers and discovered elaborate timelines of events from the lives of his mother’s parents and siblings, but nothing on herself. Although he could piece together some items from the other timelines, there was still a significant void because she didn’t tell her own story.
Now you might think that your story is boring and no one would want to hear it. But family historians sometimes wonder why a person made a certain decision or are interested in first-hand accounts of events that happened in the past. There are some applications for your computer, such as Personal Historian (www.rootsmagic.com/Personal-Historian), that assist you in writing your story. You can also find apps for your phone or tablet that record your memories — for example, Memories by FamilySearch. If you need some prompting to write your story, why not participate in the #52Stories project (https://familysearch.org/blog/en/52stories). The goal of the project is for you to write a story every week for a year, so that at the end of the year you have 52 stories of your life.