
Chapter 7. Serving and receiving assets and forms
- Serving static files such as those needed to view a website
- Handling HTML forms, including file uploads
- Working with raw multipart messages
If you think about it, the original web service was serving files. This is what was first created back in 1991 when the web began. The interaction we enjoy today wasn’t there at the beginning. When interaction came, it did so through web forms. These constructs, created decades ago, are still synonymous with the modern web and foundational to modern web applications.
This chapter starts by presenting methods to serve static files for your Go application. Because Go is a web server, rather than running behind a web server such as Apache or Nginx, you need to set up how you want files such as Cascading Style Sheets (CSS), JavaScript, images, or other files to be served. You’ll learn several ways to store and serve files that provide solutions for varying applications.
From there, we move into form handling. Form handling with Go may seem fairly straightforward, and for simple cases it is. Yet, cases such as handling files as multipart form data can require tapping into parts of Go not often touched or understood. This is especially true if you want to work with large files.
File serving and form handling combined with template handling from the previous chapter lay a foundation for building web applications in Go. You can use these techniques with your front-end technologies of choice to build rich web applications.
7.1. Serving static content
A website or web application built with Go doesn’t need to sit behind a web server. Instead, it handles serving all of the content with its web server, whether that content is application pages or static files, such as CSS, images, or JavaScript. Figure 7.1 illustrates the difference between a Go application and one using a separate web server.
Figure 7.1. A Go application communicating over HTTP compared to a common web server model

Although Go is typically run as a server that serves all content, it can be used with a Common Gateway Interface (CGI) or FastCGI server. The net/http/cgi package works with the CGI interface, and the net/http/fastcgi package works with a FastCGI interface. In this environment, static content may be served by another web server. These packages are intended for compatibility with existing systems. CGI starts up a new process to respond to each request, which is less efficient than typical Go serving. This is a setup we don’t recommend using.
To handle static files, the http package in the standard library has a series of functions that deal with file serving. Before you look into a few techniques to serve files within an application, it’s important to know a little about the functionality built into the http package, shown in the next listing.
Listing 7.1. http package file serving: file_serving.go

The FileServer handler in the http package is a semi-smart file server. From a directory on the local filesystem, FileServer will serve files following proper permissions. It’s capable of looking at the If-Modified-Since HTTP header and responding with a 304 Not Modified response if the version of the file a user already has matches the one currently being served.
When you want to write your own handler to serve files, the ServeFile function in the http package is useful, as shown in the next listing.
Listing 7.2. Serve file with custom handler: servefile.go

This example takes a different approach to serving a file. A basic web server has a single handler to serve all paths. This readme handler serves the content of a file located at ./files/readme.txt by using the ServeFile function. ServeFile takes a file or directory as its third argument to serve. And like FileServer, ServeFile looks at the If-Modified-Since HTTP header and responds with a 304 Not Modified response if possible.
This functionality, along with some of its underpinnings, enables you to serve content by using a variety of techniques.
Technique 39 Serving subdirectories
A common practice, used in many frameworks and applications, is to serve files from the local filesystem where the application resides. This allows other applications to mount external filesystems as if they were local or have them local.
Problem
You want to serve a directory and its subdirectories from the filesystem as part of your web application.
Solution
Use the built-in file server or the file-serving handlers to serve the files from the local filesystem. For intimate control over error pages, including the case of a file not being found, you need to implement your own file server.
Discussion
An easy way to understand file serving is to look at a simple example. Take the directory example_app/static/ and serve it from the path example.com/static/. This may seem fairly straightforward, and for some cases it is, but if you want intimate control over the experience, you’ll see in a moment that you need to bypass some of the built-in file serving to have that control. First, let’s look at a simple example.
Listing 7.3. Serving a subdirectory

Here, the built-in web server is serving the ./files/ directory at the path /static/ by using the file server from the http package. The directory on the filesystem could be any directory and doesn’t need to be within the source for the application. Strip-Prefix is used to remove any prefix in the URL before passing the path to the file server to find. When serving a subpath in your application, this is needed to find the right files.
This approach has two gotchas that you should be aware of. The first has to do with generating error pages, which includes the common 404 Not Found error. You may want to customize these pages in your website or application. It’s common to have stylized or even specialized error pages to help end users. FileServer and ServeFile return a basic error message as text. It’s not a web page, but rather English text that browsers display on a white background. There’s no opportunity to change how these are displayed or what language they’re displayed in while using FileServer or ServeFile. Technique 40 provides a method to make these changes.
The second gotcha when serving a directory of files is simpler to work around. When serving a directory and its subdirectories, you need a path-resolution method that will work for subdirectories. For example, if the path package is used in order to resolve wildcard paths, you’d be limited to the base directory. Paying attention to path resolution is important if your application serves files and generates other content. To illustrate the problem, let’s look at the pathResolver from listing 2.17 along with the following main function in listing 7.4.
Tip
Wildcard path routing is covered in chapter 2. Listing 2.17 provides a simple example relating to the problem described here.
Listing 7.4. Using path package path resolution
func main() {
     pr := newPathResolver()
     pr.Add("GET /hello", hello)

     dir := http.Dir("./files")
     handler := http.StripPrefix("/static/", http.FileServer(dir))
     pr.Add("GET /static/*", handler.ServeHTTP)

     http.ListenAndServe(":8080", pr)
}
This code is set up to serve both content and files. A file in the files directory will be served, but any subdirectories of files won’t have their files served. This is because the * used as a wildcard in the path package stays at one directory level. The solution is to use a different method for path resolution, such as the regular expression method described in chapter 2.
Technique 40 File server with custom error pages
The built-in file server in the Go standard library generates error pages, including the common 404 Not Found error for you. This is presented as English text, rather than a web page, and can’t be changed.
What if you’re building an application for those who don’t know English? Or what if you want to build response pages to help people find the content they’re looking for when they ended up with a Not Found error? These are common situations.
Problem
How can you specify your own error pages, including a response to a file not being found, when your application is serving files?
Solution
Use a custom file server that allows you to specify handlers for error pages. The github.com/Masterminds/go-fileserver package provides functionality to complement the built-in file server while enabling custom error handling.
Discussion
FileServer and ServeFile both rely on the function ServeContent in the http package. That function calls private functions within the package that use the functions Error and NotFound to produce these responses. Error handling is baked in at the lowest levels. To alter these, you need to build your own file server. This can either be something entirely new or a fork of the file server from the standard library.
The package github.com/Masterminds/go-fileserver is a fork of the file server in the standard library. This fork adds the ability to use custom error handlers, including the common 404 Not Found response. It’s designed to be used alongside the http package in the standard library, only providing file-serving elements not already in the standard library. To illustrate how this file server works, let’s look at the following listing.
Listing 7.5. Custom file server error pages: file_not_found.go

This example is similar to the file server in the standard library, with a couple of differences. First, a handler function is set for the case when no file is found. Anytime a file isn’t found, this function will write the response. Although it’s not used here, a custom function can be set for all error responses as well. The setup to serve a directory of files is the same as the file server in the standard library. An http.Dir instance is created for the directory of files to serve. The second difference has to do with serving the files. Rather than using http.FileServer, the function fs.FileServer is used. This function will make sure the proper error handlers are called.
Note
github.com/Masterminds/go-fileserver was created for this book. Because of the size of the codebase, which would have spanned many pages, and the useful nature of the file server, it was released as a package to be used in applications.
Technique 41 Caching file server
In some cases, it’s too time-consuming to read a file from the filesystem or other file source each time you want to serve it. Instead, it would be faster to cache and serve some files from memory, skipping calls to disk altogether.
Speedy file serving can eliminate slowdowns on high-traffic websites. Web caches such as Varnish have become popular and are used on many of the most popular websites and applications. You could put a web cache in front of a Go application to cache files such as images, CSS, and JavaScript to serve them from memory. In some cases, a useful alternative to an external application is to store files in memory in your Go application and serve the files yourself.
Problem
Instead of serving static files from the filesystem each time they’re requested, you want to cache files in memory in order to quickly serve responses to requests.
Solution
Store files in memory when they’re first requested and serve responses using ServeContent rather than a file server.
Discussion
Most of the time, it’s appropriate to use a reverse proxy, such as the popular open source project Varnish, to handle caching and serving of files quickly. For those occasions, it’s appropriate to cache commonly used files in memory. The following listing shows how to load a file from disk and serve it from memory.
Listing 7.6. Load and serve static files from memory: cache_serving.go


This example opens with a data structure to hold the content in memory. When serving the data, the time and the content are important. The time can be sent to browsers and used as part of the If-Modified-Since HTTP header. Although it’s not covered here, a time value can be used to look over the cache and clear old items from the cache. Monitoring the memory use of the cache and removing stale items can be useful.
Inside the server handler function serving the files, the first step is to try to get the file from the in-memory cache. Go’s multiple return handling on a map allows you to find out whether an item was in the cache and get the value from the cache. Around the lookup, mutex.RLock and mutex.RUnlock calls are made as part of the setup to prevent race conditions by parallel requests modifying the cache. These calls are on a RWMutex object from the sync package. RWMutex enables an arbitrary number of readers or one writer to have access at a time. RLock and RUnlock are for readers. You’ll see the writer in a moment.
If the file wasn’t stored in the cache, the process begins to load the file and populate the cache. Because cache will be updated and you don’t want parallel requests updating the same cache item, mutex.Lock is called. This waits for any current readers or writers to complete while blocking any future ones. Releasing the lock so that readers and other writers can access cache is done by deferring the mutex.UnLock call.
After the lock is in place, an attempt is made to load the file from the filesystem, with the closing of the file being deferred to the exit of the function. If the file isn’t found or another error occurs, the 404 Not Found message is displayed. This is a place where you could optionally cache File Not Found responses and log the error messages.
The content of the file is copied into Buffer, and then the bytes are transferred into a Reader instance. This happens because Buffer can be written to. The content of the File can be copied into it. Reader implements both the io.Reader and io.Seeker interfaces needed by ServeContent. To take advantage of the If-Modified-Since HTTP header, the last modified time is retrieved from the file and stored in the cache alongside the content itself.
Finally, the cached file is served using ServeContent. This function does a lot of work for you. Looking at the requested filename, it attempts to figure out the MIME type and set the proper headers. It looks at the last modified time and sets the headers to provide 304 Not Modified HTTP responses where appropriate. When it serves the content, it figures out information such as the content length to set the appropriate headers.
Tip
Using a memory-caching service such as groupcache (https://github.com/golang/groupcache) can provide a shared memory cache between servers. This is useful when the file storage isn’t local, a common situation in file serving at scale.
Serving files from memory is something that should be done with care. Loading many files into memory without monitoring runtime memory or cleaning up can cause problems. These should be monitored and managed, and what’s kept in memory should be optimized for your use cases. You don’t want a server running out of memory or an application’s memory footprint to grow unwatched or unregulated.
Technique 42 Embedding files in a binary
Sometimes you’ll want to include assets right inside the application binary. Then, instead of looking for them on the filesystem, they’re included in the application binary. This can be useful when distributing an application. The binary is the only thing needing to be distributed, rather than a collection of files to accompany it.
Problem
You want to include static assets, such as images or stylesheets, in a Go binary.
Solution
Store the assets as data assigned to variables in your application. Serve files from these variables instead of the filesystem. Because of the intricate nature of converting files’ bytes and referencing them within your code, use the github.com/GeertJohan/ go.rice package and command-line application to automate this process for you.
Discussion
The idea is simple. Convert a file into bytes, store those bytes and the related information in a variable, and use the variable to serve the file via ServeContent from the http package. Implementing a conversion process yourself while taking into account the changing state of those files during development, testing, and builds isn’t straightforward. That’s why we recommend using a package, such as go.rice, to handle this process for you.
go.rice enables you to work with files from the filesystem during development (for example, when using go run), to use files embedded in the built binary, and to build files into binaries. The following listing showcases simple file serving using go.rice.
Listing 7.7. Embedding files in binaries with go.rice: embedded_files.go

Using go.rice has a similar style to serving from the filesystem. Instead of using http.Dir to specify the directory, rice.MustFindBox is used with the filesystem location. Serving of the files happens using the built-in FileServer from the http package. Instead of passing in an http.Dir object, an HTTPBox object is passed in. HTTPBox provides the http.FileSystem interface that’s needed for FileServer.
If this code is run using go run, it will get the files from the filesystem. Building a binary with the files included takes an extra step. For this extra step, you’ll need the rice tool that can be installed from a command line as follows:
$ go get github.com/GeertJohan/go.rice/rice
After this tool is installed, you can build a Go binary with the following two commands:
$ rice embed-go
$ go build
The first command, rice embed-go, converts the real filesystem elements into a virtual filesystem inside Go files. This includes the content of the files. It’s important to know that this command uses os.Walk, which doesn’t walk symlinks. The go build command builds a binary normally. This binary will include the rice-built Go files containing the virtual filesystem.
Tip
Using minification techniques on the files being embedded, such as removing unneeded whitespace from CSS and JavaScript files, can reduce the size of the Go binary that’s generated.
The go.rice package can be used with templates. The following listing provides an example of loading a template from a box.
Listing 7.8. Templates as embedded files

The go.rice package provides other helpers for the process of working with embedded files. The documentation at https://github.com/GeertJohan/go.rice gets into the specifics of what you can do with the helper functionality.
Technique 43 Serving from an alternative location
At times you’ll want to store and serve the files separately from the application. A common example is serving a web application’s JavaScript, CSS, and other assets from a content delivery network (CDN).
Problem
Instead of serving files through the same server as your application, you want to serve files through an alternative location. The alternative location needs to work with multiple environments such as your production, testing, and development environments.
Solution
Serve the files from alternative locations, such as a CDN in production. For each environment, manage the deployment of files alongside the application and pass the location into the application as configuration. Use the location within your template files to tell browsers where to get the files from.
Discussion
In each environment, you’ll want to have a copy or a representative copy of the application’s assets. Although these files may be served separately from the application pages, they shouldn’t be used from a single source for all environments. This clean separation, illustrated in figure 7.2, allows any testing environments to be full testing environments, allows developers to be creative in development environments, and enables safe development and testing whereby a slip-up in development or testing doesn’t impact production users.
Figure 7.2. A browser fetches a different application and asset set in each environment.

When the location of the files is different in each environment, the location needs to be passed into the application as configuration. This can happen via a shared configuration service such as etcd, in configuration files, as arguments passed into the application at startup time, or some other means of passing configuration. The following listing provides a basic example of passing a location in as a command-line argument.
Listing 7.9. Passing a URL location to a template

This rudimentary example takes a command-line argument for a location and uses it within a template. When no value is passed into the application, a default is used.
This example serves to illustrate the idea. In production software, you’d use something more complicated:
1. Pass the location in as configuration. See chapter 2 for multiple ways you can do this, including configuration files, etcd, and command-line arguments.
2. If no value is passed in, it should be logged and possibly cause a panic. The lack of a configuration value shouldn’t allow production, and testing before that, to serve content pointing to an invalid URL.
3. The location can be attached to a global configuration object and reused across responses in the application.
If the server handling these files is only serving the files, it should be optimized for serving static files. For example, if you’re using an Apache web server, you can turn off modules you don’t need.
HTTP/2, the most recent version of the HTTP specification, provides features that may cause you to consider serving files along with application pages. For example, when a browser requests a page, an HTTP/2 server can respond with the page and any associated files for the page. The associated files can be sent to the browser even before it requests them, and all of the files can be sent over the original connection requesting the page. For this to happen, the server needs to serve the application and files.
Note
The HTTP/2 specification is documented in RFC 7540 by the Internet Engineering Task Force. You can read it at https://tools.ietf.org/html/rfc7540.
Serving content is only half of the process for modern interactive applications. To complete the cycle, the server needs to handle interaction from users.
7.2. Handling form posts
Working with HTML forms and POST or PUT requests in general is common in web applications and websites. Go provides much of what you need in the http package within the standard library. Although the functionality is available under the hood, it’s not always obvious how you should use it. The following patterns highlight methods for working with data, whether it’s a form submission or a multipart POST or PUT request.
7.2.1. Introduction to form requests
When a request is made to a server and it contains form data, that request isn’t processed into a usable structure by default. Most of the request handling across most Go programs doesn’t need to work with form data, so it’s a feature you need to opt into. Opting in is fairly straightforward. The following example shows the simplest way to parse form data and get access to it:
func exampleHandler(w http.ResponseWriter, r *http.Request) {
     name := r.FormValue("name")
}
Behind this call to FormValue, a lot is going on. FormValue starts by parsing the form data into a Go data structure. In this case, it’s looking to parse text form data and multipart form data, such as files. After the data is parsed, it looks up the key (form field name) and returns the first value for the key, if one exists. If there’s nothing with this key, an empty string is returned.
Although this case makes it look easy, a lot is going on that you may not want, and there are features that you can’t access here. For example, what if you want to skip looking for multipart form data and trying to parse it because you know it won’t be present? Or what if a form field has multiple values, and you want to get at all of them?
The first step to work with form data is to parse it (see listing 7.10). Inside a request handler are two methods on the Request object that can parse form data into a Go data structure. The ParseForm method parses fields that contain text. If you need to work with binary data or files from the form, you need to use ParseMultipartForm. As its name suggests, this method works on multipart form data (a form containing content with different MIME content types). ParseMultipartForm is called by FormValue in the preceding example if parsing hasn’t happened yet.
The form data is parsed into two locations:
- The Form property on the Request object will contain the values from the URL query along with the values submitted as a POST or PUT body. Each key on Form is an array of values. The FormValue method on Request can be used to get the first value for a key. That’s the value sitting in the 0 key of the array on Form.
- When you want the values from the POST or PUT body without those from the URL query, you can use the PostForm property on the Request object. Like FormValue, the PostFormValue method can retrieve the first value from PostForm for a key.
Listing 7.10. Parsing a simple form response

This listing contains the handling for a simple form. This simple example works for forms with only text fields. If a file field were present, it wouldn’t be parsed or accessible. And it works only for form values that have a single response. HTML forms allow for multiple responding values. Both of these are covered in the following techniques.
Technique 44 Accessing multiple values for a form field
Form fields can have more than one value for a name. A common example is check boxes on a form. You can have a multiple select list using check boxes that, in the HTML, all have the same name.
Problem
FormValue and PostFormValue each return the first value for a form field. When you have multiple values, how can you access all of them?
Solution
Instead of using FormValue and PostFormValue to retrieve a field value, look up the field on the Form or PostForm properties on the Request object. Then iterate over all the values.
Discussion
When a form field has more than one value, you’ll need to do a little more work to access it. The following listing shows how to parse a form and retrieve multiple values for a field.
Listing 7.11. Parsing a form with multiple values for a field

The HTTP handler function opens by defining a number for the maximum amount of memory to use when parsing a multipart form. In this case, the number is 16 megabytes. When ParseMultipartForm is called, the maximum amount of memory for storing file parts needs to be specified. Parts of files larger than this number will be stored to disk. The default number used when FormValue or PostFormValue needs to call ParseMultipartForm is 32 megabytes.
Instead of using FormValue or PostFormValue to obtain the first value for a form field, all the values of the names form field are iterated over. The names field on the PostForm property is used, limiting the values to just those submitted in the POST or PUT body.
Tip
When presenting forms to users and processing forms, use security elements such as a cross-site request forgery (CSRF) token. For more information, see https://en.wikipedia.org/wiki/Cross-site_request_forgery.
7.2.2. Working with files and multipart submissions
After you move from text handling into file handling and multipart submissions that contain more than one type of content, the way you handle the processing changes. In its simplest form, you can see this when you upload a file via an online form. The file has a content type, such as an image, and the other text fields on the form. That’s at least two types of content that need different handling.
In this section, you’ll explore the handling of multipart submissions often thought of as file handling. These submissions can come in via simple and fast file uploads or large files that need special handling.
Technique 45 Uploading a single file
Working with files is different from working with the input from text fields. Each file is a binary file with surrounding metadata.
Problem
When a file is uploaded with a form, how to you process and save it?
Solution
When a file is uploaded, process the form as a multipart form by using Process-MultipartForm on the Request object. This picks up the file parts. Then use the FormFile method on the Request object to access and file fields, uploading a single file. For each file, you can access the metadata and a file object that’s similar to File objects from the os package.
Discussion
Handling a file is nearly as straightforward as handling text form data. The difference lies in the binary file and the metadata surrounding it, such as the filename. The following listing presents a simple file-upload form.
Listing 7.12. A form with a single-value file-upload field

This form has some important parts. The form method is POST, and its encoding is in multipart. Being multipart allows the text part of the form to be uploaded and processed as text, while the file is handled using its own file type. The input field is typed for a file, which tells browsers to use a file picker and upload the contents of the file. This form is served and processed by the handler function for the http package in the following listing.
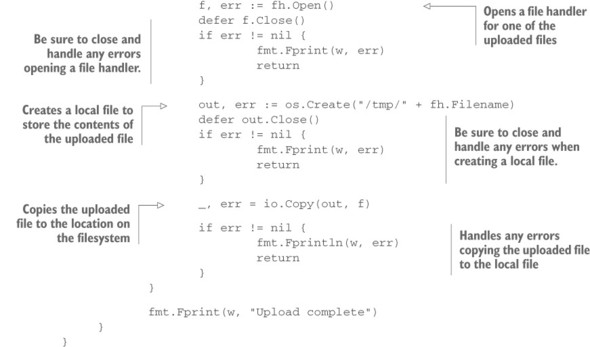
Listing 7.13. Handle a single file upload


This handler, meant to be used with the web server in the http package, handles both displaying the form and processing the submitted form. It opens by detecting the method for the request. When a GET request is submitted, it returns the form from listing 7.12. When another HTTP method is used, such as a POST or PUT request, the form submission is processed.
The first step used to process the file field is to retrieve it by using the FormFile method on the Request. If the form hasn’t been parsed, FormFile will call ParseMultipartForm. FormFile then returns a multipart.File object, a *multipart .FileHeader object, and an error if there is one. The *multipart.FileHeader object has a Filename property that it uses here as part of the location on the local filesystem to store the upload. To save the file locally, a new file is created on the filesystem and the contents of the upload are copied into this new file.
This solution works well for a field with a single file. HTML forms allow for multivalue fields, and this solution will pick up only the first of the files. For multivalue file uploads, see the next technique.
Technique 46 Uploading multiple files
File fields on forms can optionally have the multiple attribute. When this attribute is on the input element, any number of files can be uploaded. In this case, using FormFile won’t work to process the form. It assumes there’s only one file per input field and will return only the first file.
Problem
How do you process the files when multiple files are uploaded to a single file-input field on a form?
Solution
Instead of using FormFile, which handles single files, parse the form and retrieve a slice with the files from the MultipartForm property on the Request. Then iterate over the slice, individually handling each file.
Discussion
An input field handling multiple files needs to have only the multiple attribute on it. For example, the difference between the following listing and the single file-upload form in listing 7.12 is the multiple attribute.
Listing 7.14. A form with a multiple value file-upload field

This form, with the multipart encoding, has an input to handle multiple files. The multiple attribute turns a single file-input field into one accepting multiple files. The following listing processes this form to handle multiple files.
Listing 7.15. Process file form field with multiple files

This listing contains a handler function for the web server in the http package. It opens by presenting the form if the request is a GET request rather than one posting a form. When a request other than a GET request occurs, it handles the form submission.
Before you can work with the form fields, the form needs to be processed. Calling ParseMultipartForm on the Request object causes the form to be parsed. This is handled internally by methods such as FormFile used in previous techniques. The value passed in sets the amount of memory to use for holding form data in memory to 16 MB and the rest of the files will be written to disk as temporary files.
After the form has been parsed, the fields are available on MultipartForm. The uploads to the file-input field with the name files are available on the File property of MultipartForm as a slice of values. Each value is a *multipart.FileHeader object.
Iterate over the files to process each of them. Calling the Open method on a *multipart.FileHeader object returns File, a handler for the file. To save the file to disk, you need to create a new file somewhere to save the contents. The name of the uploaded file is available in the Filename property on the *multipart.FileHeader. After you have a local location to store the contents, copy the uploaded file to the local file by using io.Copy.
This solution requires moving a level lower in the package API. In doing so, you open up a little more power while needing to handle a little more on your own.
Technique 47 Verify uploaded file is allowed type
When a file is uploaded, it could be any type of file. The upload field could be expecting an image, a document, or something else altogether. But is that what was uploaded? How would you handle an improper file being uploaded?
Client-side detection is sometimes seen as an option. For example, input fields with a type of file can have an accept property with a list of extensions or MIME types, also referred to as content types. Unfortunately, the accept property isn’t implemented in all browsers. Even in the browsers where it works, the ability to easily alter the value makes it unreliable. Type checking needs to happen in your application.
Problem
How can you detect the type of file uploaded to a file field inside your application?
Solution
To get the MIME type for a file, you can use one of a few ways, with varying degrees of trust in the value:
- When a file is uploaded, the request headers will have a Content-Type field with either a specific content type, such as image/png, or a general value of application/octet-stream.
- A file extension is associated with a MIME type and can provide insight into the type of file being uploaded.
- You can parse the file and detect the content type based on the contents of the file.
Discussion
The three solutions have varying degrees of trust. The Content-Type field is set by the application doing the uploading, and the file extension is set by the user uploading the file. These two methods rely on outside parties for accuracy and trust. The third solution requires parsing the file and knowing what to look for to map to a content type. This is the most difficult method and uses the most system resources, but is also the most trusted one. To understand how to use these methods, you’ll look at each of them.
When a file is uploaded, as you saw in techniques 45 and 46, a *multipart.FileHeader object is available to interact with. This is the second of the responses from FormFile on the Request object. The *multipart.FileHeader object has a property named Header with all of the uploaded header fields including the content type. For example:
file, header, err := r.FormFile("file")
contentType := header.Header["Content-Type"][0]
Here FormFile is called on a field with the name file. Header fields can be multivalue. In this case, you’ll need to get the first one, even if there’s only one value. The content type here will either be a specific MIME type, such as image/png, or a generic value of application/octet-stream when the type was unknown.
An alternative to the uploaded header value, the filename’s file extension can provide insight into the type of file. The mime package includes the function TypeBy-Extension that attempts to return the MIME type based on the file extension. For example:
file, header, err := r.FormFile("file")
extension := filepath.Ext(header.Filename)
type := mime.TypeByExtension(extension)
Determining the type based on the file extension provides only some degree of accuracy. File extensions can be changed. The standard library contains a limited extension to MIME type mapping but is capable of reaching out to the operating system to retrieve a larger list.
Another option is to parse the file and determine the type from the file itself. You can perform this type of operation in two ways. The http package contains the function DetectContentType, capable of detecting the type for a limited number of file types. These include HTML, text, XML, PDF, PostScript, common image formats, compressed files such as RAR, Zip, and GZip, wave audio files, and WebM video files.
The following example showcases the DetectContentType function:
file, header, err := r.FormFile("file")
buffer := make([]byte, 512)
_, err = file.Read(buffer)
filetype := http.DetectContentType(buffer)
The buffer is only 512 bytes because DetectContentType looks at only up to the first 512 bytes when determining the type. When it isn’t able to detect a specific type, application/octet-stream is returned.
The limited list of content types DetectContentType can detect means you’ll need another method if you want to detect other common formats such as Microsoft Word documents, MP4 files, or many other common formats. To parse and detect these other formats, the easiest method is to integrate with an external MIME sniffing library such as the widely used libmagic. At the time of writing, several Go packages provide bindings to libmagic, making it easy to use from within Go.
Note
A specification to sniff MIME types is available at http://mimesniff.spec.whatwg.org/.
7.2.3. Working with raw multipart data
The previous file-handling techniques work well when you’re dealing with small files or files as a whole, but limit your ability to work with files while they’re being uploaded. For example, if you’re writing a proxy and want to immediately transfer the file to another location, the previous techniques will cache large files on the proxy.
The Go standard library provides both high-level helper functions for common file-handling situations, and lower-level access that can be used for the less common ones or when you want to define your own handling.
The handler function for a request is executed when a request begins, rather than when a request is completed. Many requests happen quickly, and the helper functions account for any delay. If you work with, for example, large files, you have an opportunity to act while uploads are happening.
Instead of using the ParseMultipartForm method on the Request object inside an http handler function, you can access the raw stream of the request by accessing the underlying *multipart.Reader object. This object is accessible by using the MultipartReader method on the Request.
The following technique uses the lower-level multipart handling. This illustrates how it works in addition to handling some common cases.
Technique 48 Incrementally saving a file
Imagine that you’re building a system meant to handle a lot of large file uploads. The files aren’t stored on your API server but are instead stored in a back-end service designed for files. Using ParseMultipartForm is going to put those files into the temporary files directory on your API server while the uploads are in progress. To support large file uploads with ParseMultipartForm handling, your server would need a large disk cache for the files and careful handling to make sure it doesn’t get full while parallel uploads are happening.
Problem
You want to save the file, as it’s being uploaded, to a location of your choice. That location could be on the server, on a shared drive, or on another location altogether.
Solution
Instead of using ParseMultipartForm, read the multipart data from the request as it’s being uploaded. This can be accessed with the MultipartReader method on the Request. As files and other information are coming in, chunk by chunk, save and process the parts rather than wait for uploads to complete.
Discussion
Using an API server as a pass-through for data on its way to a final destination is a common model. You’ll often see nonfile data being stored in a database. Large file handling or handling a lot of files concurrently presents a problem in local resources, in storing that much information as a cache on its way to the final location. An easy solution is to pass the problem on to the final destination, which should already be able to handle storing large files. Don’t cache them locally if you don’t need to.
The way to access the multipart stream directly, which is what ParseMultipartForm does, is to retrieve the reader from the Request with MultipartReader. After you have the reader, you can loop over the parts and read each one as it comes in.
When you process a multipart form, you’ll often want to process file fields along with text fields. The following listing contains a simple form with a text field, file field, and Submit button.
Listing 7.16. HTML form containing a file and text field

The next listing contains an http handler function to display and process the form in listing 7.16. This handler function displays the form, processes the form, and incrementally saves the file.
Listing 7.17. Incrementally save uploaded files


This code opens with an http handler function. When it receives a GET HTTP request, it responds with an HTML form. When that form is posted, it processes the form.
Because the handler function parses the form, instead of relying on Parse-MultipartForm, you have a few elements to set up before working with the form itself. For access to the data on the form as it comes in, you’ll need access to a reader. The MultipartReader method on the Request object returns *mime.Reader, which you can use to iterate over the multipart body of the request. This reader consumes input as needed. For the form fields not being handled as files, you need a place to store the values. Here a map is created to store the values.
After the setup is complete, the handler iterates over the parts of the multipart message. The loop starts by attempting to retrieve the next part of the multipart message. If there are no more parts, an io.EOF error is returned and the function breaks out of the parsing loop. EOF stands for the end of the file.
The parsing loop can now start handling the parts of the message. It first checks for the name of the form field by using the FormName method and continues the loop if there’s no name. Files will have a filename in addition to the name of the field. This can be retrieved by using the FileName method. The existence of a filename is a way to distinguish between file and text-field handling.
When there’s no filename, the handler copies the value of the content of the field into a buffer and decrements a size counter that starts at 10 megabytes. If the size counter runs down to 0, the parser returns and provides an error. This is put in place as a protection against text-field content being too large and consuming too much memory. 10 MB is quite large and is the default value inside ParseMultipartForm as well. If no errors occur, the content of the text form field is stored in the values map previously created and the parsing loop continues on the next part.
If the parsing loop has reached this point, the form field is a file. A file on the operating system is created to store the contents of the file. At this point, an alternative location such as cloud storage could be used to write the file to. Instead of creating a file on the operating system, a connection to another storage system could be opened. After the destination is opened, the handler loops over the content of the part, iteratively reading it as it comes in. Until a notification of the end of the part, designated with an io.EOF error, comes in, the bytes are written to the destination as they arrive. For example, if you use this to upload a large file, you can watch the data slowly being written to the output file while the upload is happening. After the loop completes, the files are all available on disk and the text fields are available on the values map.
7.3. Summary
Serving files and working with forms are common elements in any web application. They’re staples of the web, and their use goes back decades. This chapter covered methods to use them while taking advantage of Go’s helper functionality and power. These include the following:
- Uploading files to users from a Go server in a variety of ways, depending on your needs
- Using the Go helper functions for quick and easy access to form submissions
- Working with the underlying parts of the Go form parser and output it provides
- Getting access to the underlying multipart form handling and using it to parse and manipulate submissions
In the next chapter, you’ll learn about working with REST APIs. You’ll learn about building them, versioning them, and other characteristics needed to build stable, production-ready APIs that your applications can consume and that you can expose to others.