Search and view locations in Google Earth
Mark the places you’ve seen with placemarks
Use Google Earth navigation tools to take guided tours of the earth
Add polygons and paths to your satellite images
Select the right version of Google Earth for your personal or business needs
It is not often in life that access to a completely new kind of information enters our lives, and changes them forever. This is what Google Earth has done for many people around the world. Google Earth provides simple, powerful, and rapid access to the entire Earth via satellite imagery, some of it captured in such high resolution that you can clearly see the shadows of the people on the ground and even make out the make and model of cars parked in front of houses.
The Google Earth images are being used for quite a number of different applications. Now, when you get driving directions you can see more than artistically drawn map, you can actually see landmarks, large trees, you can even see what buildings look like from above. Amazing fly-throughs have been created for large events, like air shows, to show people what the events look like, and where certain displays are located. Annotated Google Earth maps provide location information for businesses, national parks, clubs and World Heritage Sites.
Unlike many of Google’s applications, this one requires you to download and install a client application. The Google Earth client, when launched, communicates with the Google Earth servers to retrieve satellite imagery. To get started, download the free version. Point your browser to http://earth.google.com.
Before you head to the Web site you should read through the next section to find out about the different versions that are available.
Google Earth has several different versions, from the free version to the enterprise version. This chapter helps you with some information to make the best choice on a version. Each has different features, but all use the same satellite imagery.
Click the Get Google Earth link in the upper-right portion of the Google Earth Web page. After you install it on your computer you are ready to begin seeing the Earth from a new perspective—from outer space.
The most important thing to remember when selecting a version of Google Earth, particularly one that costs money, is that the satellite images in all the versions are identical. Only the capabilities of the software vary.
The free version of Google Earth has almost all the power you’ll ever need to entertain and amuse yourself and others for hours. This version is for personal use only but still has very few limitations on its functionality. When you need Google Earth for business purposes, check out Google Earth Pro.
The free version of Google Earth lets you search, locate fly-through, save, and print locations all around the globe.
The Plus license can be had for a very nominal fee. The added features include the ability to print at higher resolution. You can also create and add paths and polygons, as discussed earlier in this chapter. You can import up to 100 different address points from Comma Separated Value (CSV) files. I used this to map the Starbucks Coffee locations in a ten-square-block-area in my hometown (wink). Of greater importance is the ability to import GPS data. If you own a GPS device, you can import the data from your GPS and map locations, paths, trips you’ve taken, property lines, and any other place you can think to use your GPS. You can now integrate the power of GPS with the terabytes of satellite imagery at Google.
Upgrading to Google Earth Pro is more expensive than Google Earth Plus but as a business tool, it falls in the category of not very expensive. The Plus version gives you faster image load times, but the Pro version gives you the fastest load time. While it has lots of extra features, the main reason to upgrade to the Pro version is that you can use it for business purposes, while the free and Plus versions are for personal use only.
One of the cool features offered by the Pro version is the ability to export movies of your tours and fly-throughs. They are exported in compressed format, which is easy to send along to others. You can make great sales and training tools with this feature.
Of particular interest to many businesses is the ability of Google Earth Pro to import data from Geographic Information Systems (GIS). For example, you can import demographic data that has been coded for GIS applications.
The location import feature handles up to 2,500 locations compared to the 100 locations supported by the Plus version.
Google Earth Enterprise is the ultimate business client server software and hardware solutions for mapping and satellite imaging solutions. Google Earth Fusion program is part of Google Earth Enterprise and allows you to integrate your business data, GIS data, terrain, and data point information into a single application.
There are two levels of Enterprise functionality. The Pro version consists of a massively scalable Google Earth Enterprise server that streams data to Google Earth Enterprise Client software. Use this hardware and software combination to host and integrate all your own data with terabytes of geodata and the power of Google Earth. The LT version allows you to host your own data layers locally while fusing it with the basemap data hosted by Google.
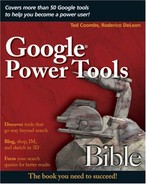
When you first launch the Google Earth client, or simply Google Earth, you are shown an impressive zoom-in from outer space onto the Earth and shown a view (see Figure 13.1) of the continental United States.
This is the default view shown each time you load Google Earth. You can change the default location, and that is covered later in the chapter. Of course, you must be connected to the Internet to use Google Earth, and it’s highly recommended that you be connected over a fast connection, rather than dial-up. You can still use Google Earth over dial-up—it just takes a bit of time to transfer the large image files to your computer.
Before you begin exploring the Earth, a good place to start is with Google Earth. The better you know how to use this fun tool the easier it will be to explore the rest of the planet.
In the upper-left corner of the Google Earth window are three tabs, each containing search boxes to help you locate points on the Earth. The three tabs are:
Fly to: Type a physical address or latitude and longitude coordinates.
Find Businesses: Two search boxes appear; type the name or type of business in the top box and the location in the bottom box.
Directions: Two search boxes appear; type a beginning location in the top box and a destination in the bottom box.
After you type the information in the search box or boxes click the search button (the magnifying glass next to the search box) to have Google find your requested locations. In the event that a pop-up message appears that tells that your search returned no results, first check your spelling. If everything looks okay, then Google cannot find the location as you described it. Try a more general location, such as the street name without the number, or simply the name of a town.
When you type the location correctly, Google Earth begins panning to your location and, when it finds it, zooms partially in on the location.
Google Earth gives you the ability to mark the places you “visit” with special marks, making it easier to return to the same places in the future. Each time you mark a location by adding a special icon known as a placemark, a reference to it is saved in the Places panel. The Places panel appears below the Search panel.
You may want to organize your placemarks, making them easier to find. Before you begin creating the placemark, select a folder from the Places panel on the left, or choose to create a new folder in the panel.
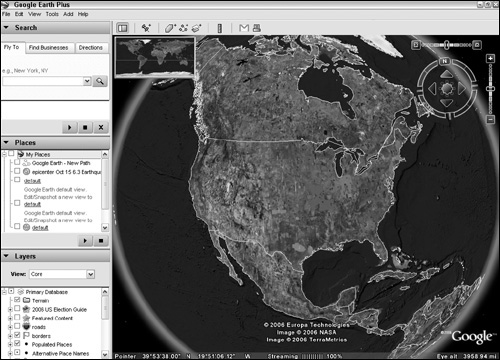
To create a placemark, select Placemark from the Add menu or click the small pushpin icon in the toolbar above the display. This launches the New placemark window (see Figure 13.2). Get started by typing a meaningful name for the new placemark. For example, if you are marking the location of your favorite restaurant, a good name for the placemark might be the name of the restaurant.
Type a description for the placemark in the Description box found in the Description tab. Adding a description is optional but when you are marking the location of your favorite fishing spot, you can describe which types of fish you can catch in this location or describe the monsters you caught there in the past.
Select an icon for your placemark. Clicking the pushpin button next to the place name launches a window of icons to choose from. There is a large selection; or you can click Add Custom Icon along the bottom of this window to include your own custom icon. You can also elect to have no icon by clicking No Icon, also found along the bottom of the window.
After you save your placemark, it appears over the satellite image. It also appears in the Places panel, along with the icon you select. You can check a single or multiple places in the list then click the Play button below. Google Earth will display each place in a ‘tour’, slideshow style. By double-clicking on a place, Google Earth displays the location in the map.
To customize your placemark select it in the Places panel so that it is highlighted (not simply checked). Select Properties from the Edit menu and the Edit Placemark window appears, as shown in Figure 13.2. Or you can right-click the placemark and select Properties from the menu.
Select a color for the text label and icon by first selecting the Style, Color tab. Set the color for the label (the text that appears next to the placemark) by clicking the small color box and selecting a new color from the palette that appears. You can also change the color of your icons by clicking the color box in the Icons section. Change the scale (size) of both the label text and the icon by clicking either the Scale button and moving the slider or typing a scale value.
Opacity is the ability to see through something. When something is 100 percent opaque you cannot see through it. 0 percent might be something like clear glass. You can change the level of opacity for both the icon and the label. In heavily marked areas, it helps to have more important labels and icons at 100 percent, with less important labels at some lower opacity so they do not completely block the more important placemarks.
You can move a placemark in several ways. The easiest, but least accurate, way is to launch the Edit window. You notice that a yellow rectangle appears around the placemark. You can then click inside the yellow rectangle and drag it to its new location.
Another way to change the placemark location is by resetting the latitude and longitude settings. Click the View tab in the placemark Edit window. Click the Location tab and type new coordinates.
Try locking the placemark in the center of your view and moving the Earth under it. This is great for moving the placemark long distances. In the Location tab, select Center Placemark in View. This locks the placemark in the center. You are then free to move the Earth.
By default, all the locations are on the ground. But, you can put placemarks at different altitudes, either relative to the ground, or from sea level (absolute). You can optionally have Google Earth draw a line from the placemark to the ground making it easier to see when the image is tilted. Without the image tilted, you really can’t tell if a placemark is attached to the ground or in midair.
Tip
Creating placemarks with very high altitudes is one way to mark satellites in geosynchronous orbit.
The Places panel also includes default view, the one that appears when you launch Google Earth, you can easily change the default location by first navigating to the point on the Earth, and setting the altitude, tilt, and direction you want to see as your default. Find default in the list of places. Right-click on the entry and choose Snapshot view from the menu. This sets the values in the saved location to those you are currently viewing. From that point on, each time you load Google Earth you navigate to this new place. You can change it as often as you want.
The Places panel also includes a sightseeing selection that, when expanded, displays a number of preconfigured locations you can visit. If you are new to Google Earth, this can be a fun way to explore the Earth. Double-click the name to have Google Earth move to this new location.
To take a tour of your saved places, select the places you want to tour and click the Play Tour button in the bottom-right corner of the Places panel.
Tip
Try stopping the tour, making adjustments to saved locations. Adjust the altitude, tilt, and rotational direction to make the tour more interesting.
Pressing Ctrl+F causes a search box to appear in the bottom of the Places panel. Search for a saved place by typing search terms in this box.
Google Earth gives you a wide variety of tools you can use to “move around” while you explore the satellite images. This section helps you become familiar with the way to use your mouse or keyboard to navigate around the satellite image.
The mouse cursor, when placed over the satellite image appears as a hand. This means you can “grab” the image and move it in any direction you like. When you click the left mouse button you will see the fingers grab the image. In the grab position, you can move your mouse and the image moves in the direction of your mouse. This is particularly useful for making fast moves in a particular direction.
You can also grab the image and “toss it” in a particular direction. Grab the image, move it in a direction, and let the mouse button up while the mouse is still moving. This causes the image to continue moving in the direction you toss it. To stop the image from moving, simply click once on the image. This is great for viewing large sections of a map without needing to use the navigational buttons or continually grabbing and pulling the image. Be careful. You can toss too hard and the image can start moving rather rapidly.
When the mouse cursor is over an informational icon, it changes to an arrow, meaning that you can click for more information. When you right-click, the hand changes to an up and down arrow cursor. While depressing the right mouse button you can easily zoom in and out by moving the mouse up and down.
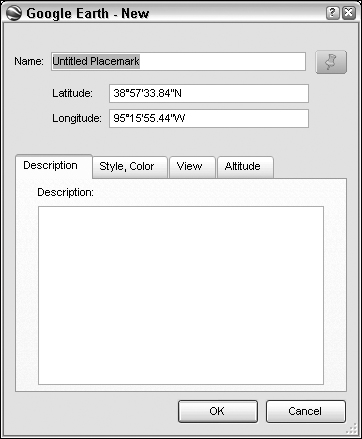
In the upper-right corner of the satellite image, you find a number of controls floating over the image (see Figure 13.3). Placing your cursor over the compass causes hidden controls to display that allow you to move the image in straight lines, rotate the image in a 360° circle, tilt the image, and zoom in.
The up, down, left, and right arrows cause you to move in a direction that can best be described as parallel to the ground. By default, clicking the up arrow moves you in a northerly direction, the down arrow toward the south and so on. But, once you use the rotation ring, which rotates the image, the up arrow moves you in an up direction in the image, which is not necessarily associated with north. You can refer to the compass to determine which direction you are heading by using these navigational keys. To use the rotation ring, click anywhere on the compass circle and drag this ring in either direction to rotate the image. You can also use the small gear-like icon in the center of the ring to rotate the Earth in any direction by clicking on it with your mouse and pulling it in the direction you want to travel.
Tip
The up-, down-, left-, and right-arrow keys on your keyboard provide the same function as the controls displayed in Google Earth.
The tilt slider (horizontal slider along the top) causes the satellite image to appear as though you are looking at the image from an angle. Because Satellite imagery is taken from directly above, it is not possible to view features such as mountains or buildings in 3-D. However, there are overlays that allow you to see representations of buildings and terrain in 3-D, making the tilt feature very useful. Tilt the image in either direction using the slider. In the default view of the image, you are looking straight down. The tilt-up direction of the slider does nothing until the image is tilted down using either the slider or the tilt-down button on the right side of the slider. You can reset the tilt to directly overhead by double-clicking the tilt-up button found to the left of the tilt slider.
The vertical slider on the right side of the Navigation tools (see Figure 13.3) consists of the zoom buttons and zoom adjustment slider. Using these buttons, you can zoom in or out. For example, clicking the + button causes the image to zoom in; click the – button to zoom out. This changes the appearance of altitude. As you zoom in, you appear to be viewing the scene from a lower altitude. You can view your apparent altitude in the status bar located along the bottom of the image.
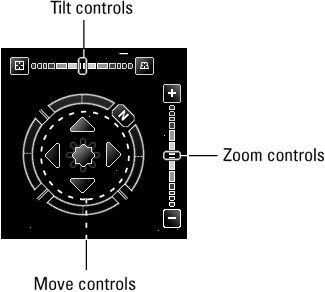
Google Earth provides a status bar that is superimposed over the bottom of the satellite image. It contains three essential pieces of information, as shown in Figure 13.4. On the left side of the bar you can read the latitude and longitude of the location over which the mouse cursor is hovering. Move the mouse cursor and you see the latitude and longitude in the status bar change as well.
The center of the bar displays the status of the image being streamed to your computer. This means that the images are sent to the Google Earth program running on your computer in stages. At first, before streaming has completed, you are able to view a lower-resolution image. As the data from the Google server streams to your computer, the image resolution slowly improves until it reaches 100 percent, meaning that the image you see is at its maximum resolution.
Note
The streaming speed depends on the speed of your Internet connection. Upgrading to Google Plus also helps with streaming speed.
The Eye alt status on the right side of the status bar shows you the apparent elevation over the Earth depending on your level of zoom. Clicking the zoom buttons or moving the zoom slider causes this value to change. It’s not an exact measurement but a good approximation. The maximum distance you can zoom out is 39,353.69 miles from the Earth. The closest distance you can zoom in is around 28 feet, but the resolution of even the best image is relatively poor at that elevation. The measurement changes from miles to feet at an altitude of ten miles above the Earth.
You can change how you view the satellite imagery in Google Earth. Some of the things you can do are include an overview map, change the appearance of the status bar and compass on the image, optionally display latitude and longitude lines, and plan a tour.
Google Earth has a small inset overview map that can appear above the satellite image. To launch the overview map, select Overview Map from the View menu. A red indicator square appears above a view of the entire Earth in Mercator projection rather than as a globe. As you zoom in and out, the square indicates the amount of area you are viewing. When the area is too small to represent with a box, it changes to a red indicator cross over the spot you are viewing.
You can make large changes in location by double-clicking on a location within the overview map and the satellite image changes to display the area where you clicked.
Zoom in and out of the satellite image by right-clicking in the overview map and dragging the cursor up or down. Right clicking changes the mouse cursor to an up and down arrow. Drag the cursor up to zoom out; down to zoom in.
Close the overview map by deselecting it from the View menu. You can adjust the size and various features of the overview map in the Google Earth options. This topic is covered in the section “Customizing Google Earth” later in this chapter.
You can cause the compass, which appears to be hovering in the upper-right corner of the satellite image, to appear and disappear. The same is true for the status bar along the bottom of the image. Select and deselect these options from the View menu. When you turn off the compass display, place your mouse cursor over the area where the compass would normally appear to reveal the navigational controls. Moving your mouse away from the compass area causes the compass and navigational controls to disappear once again.
You may want to turn these features on while finding a location, and then later turn them off when viewing your image without these features in the way. Also, if you save the image while the tools are displayed they appear in your saved image. You may want to have features, such as the status bar and compass, appear in your saved image to further describe your image. The same is true for the overview map. When the overview map appears in the display while saving an image, it is saved as part of the satellite image.
You can superimpose latitude and longitude lines over the satellite image. A display of the latitude and longitude are included over some of the lines. As you zoom in and out of the image, the latitude and longitude lines increase and decrease in accuracy resolution. For example, at lower altitudes (zoomed in) the display reads in degrees, minutes, and seconds. Zooming out the display changes to degrees and minutes and finally to just degrees. The Equator, Tropic of Cancer, Tropic of Capricorn, Arctic Circle, and Antarctic Circle lines are marked in yellow.
A small but visually appealing feature is the display of the atmosphere. When you zoom out so that you are looking at the globe you see that a blue haze, which represents the atmosphere, appears around the Earth. Zooming in and then tilting the image so that you can see the sky shows the sky as blue unless the atmosphere is turned off, in which case it appears black. Turn the atmosphere on and off in the View menu.
Without layers, Google Earth is little more than an interesting view of the Earth from space. Layers are data points of geographic interest. They mark locations such as roads, restaurants, hotels, borders, and more. Google Earth provides a variety of preinstalled layers along with the ability to build your own layers or include layers created by other people. Some of the preinstalled layers include:
Lodging: Locate hotels, motels, inns and other places to spend the night.
Roads: See highways, streets, and roads.
Terrain: See terrain, like mountains and hills in 3-D.
Dining: Find restaurants.
Borders: See where all the national, state, and provincial borders are.
Buildings: See 3-D buildings rendered in the location of the actual buildings.
Select other layers from the Layers panel in the lower-left corner of the Google Earth window by selecting the check box next to the layer name. In the Layers panel is a list of folders designated by a folder icon. You can select the folder by selecting the check box next to it, automatically selecting all the layers within the folder, or open the folder and select individual information types. For example, the Roads folder contains detailed road maps for the U.S. and additional road maps for much of Europe and Canada.
Most importantly, the Google Earth layers include Points of Interest or POIs. For example, the Travel and Tourism folder has a layer called Tourist Spots. Selecting this layer places little camera icons in all the locations where there are tourist POIs. Clicking on the camera icon pops up a bubble that tells you the name of the location, provides a link to more information, and also helps you plot driving directions to and from the location.
Select one or many layers. You may find that selecting too many layers crowds your display with icons and makes viewing of the satellite imagery difficult.
The Google Earth options allow you to customize the way you interact with Google Earth. Unlike many computer programs, where you set options once, you may find that you regularly adjust these options, particularly the 3D View and Touring options.
Select Options from the Tools menu to launch the Google Earth Options window shown in Figure 13.5. In this window, you can set features in the following tabs:
3D View
Cache
Touring
Navigation
General

After you set options in each of these tabs, you can click Apply Settings or Reset to Default and continue editing. If you want to save your changes and close the window, click OK. If you want to close the window without saving any changes, click Cancel.
In the 3D View tab, you can set various options that affect the way Google Earth displays satellite imagery. Set the size of the detail area, the area where satellite imagery is displayed between small (256×256), medium (512×512), and large (1024×1024). Most graphic cards are now designed to handle colors in 32 bits. Still, you can change this setting. Set the texture colors between 16-bit and 32-bit colors and whether you want that data compressed or not. These settings are useful when using Google Earth over a lower-bandwidth Internet connection.
Note
Some Macintosh displays have a problem that requires you to set the display size to small (256×256).
Anisotropic filtering is a smoothing technique particularly useful when viewing the image when it has been tilted. Tilting causes pixels in the distance to become distorted. Using anisotropic filtering, the pixels in the distance appear smoothed. This type of filtering is very graphic intensive and therefore your graphics card must be equipped with a minimum of 32MB of graphics memory in order to use this feature. The default setting for anisotropic filtering is Off.
You can set the default size for labels and icons marking Points of Interest. You can increase and decrease the size of your placemarkers on an individual basis by editing the Labels/Icon Size configuration settings.
You can set the Graphics Mode between OpenGL (default) and DirectX. The only reason to select DirectX is when your graphics card and software driver do not support OpenGL. You can contact the maker of your graphics card for more information about OpenGL support. It’s possible you can upgrade your graphics card driver to support OpenGL. For more information about OpenGL, see www.opengl.org.
Select options for the display of latitude and longitude information. Choose among Degrees, Minutes, and Seconds, just Degrees, or the Universal Transverse Mercator (UTM). The UTM is a coordinate system used to define points over a Mercator projection similar to the view of the earth shown in the overview map. Changing this selection changes how location information appears in the Google Earth status bar.
You can choose to display elevation in Feet, Miles or Meters, Kilometers. Also, select the primary and secondary fonts for labels and text displayed over the satellite image.
You can view terrain in 3-D by selecting the Terrain layer from the Layers panel. Set how you view the terrain by setting the terrain options. You can set options to view the terrain very smoothly, causing more data to transfer and the image to load slower. Slide the terrain slide bar to the right for more detail, or slide it to the left for less-detailed terrain images and faster load times. You can also choose to exaggerate the terrain, either positively or negatively, by setting the ratio. A 1:1 (one to one) ratio represents no change, while 2:1 represents a doubling of displayed altitudes, and .5:1 is a halving of altitudes. Positive terrain changes can show marked differences in elevation where, for example, at 1:1 you may not see the elevation change.
The last option in this tab is the size and zoom ratio of the overview map. Change the size of the map by sliding the slider between small and large. Set the zoom relation between 1:1 (one to one) and 1 to infinity.
Cache is temporary computer storage space. The options in the Cache tab allow you to tell Google when to stop using the computer memory and when to start using disk cache. Using more disk cache slows performance while freeing computer memory for other purposes. The memory size you can allocate is limited to the amount of memory your computer is equipped with, and the disk cache is limited to the amount of free space you have on your hard drive.
There are buttons for clearing both the memory cache and the disk cache. When you log out from the Google Earth server you can also delete the cache file on your hard drive.
The touring options allow you to configure how Google Earth moves through the images as you navigate to various points, whether manually or by playing a tour of selected places.
The Fly-To-Speed affects how quickly Google Earth jumps to the next position. By default it slowly flies from one point to another. By increasing this speed you can cause Google Earth to move between points much more quickly, even nearly instantaneously. Okay, not quite that fast.
Control how quickly Google Earth flies through tours. By default, the tour speed is set fairly slow. You can also set how long Google Earth pauses at each location in the tour. The default is one second. You can also control how many times the tour plays, from one time to 60 times.
Driving directions can be displayed as a fly-through. Create driving directions in the Search panel. The options for moving through the driving directions include Camera tilt angle, the camera range, and the speed. By varying these, you can appear closer to the ground to look more forward or have more of a view from above. The speed (in approximate miles per hour) gives you an idea of how long it might take you to get someplace and controls how quickly the tour moves through the directions.
The navigation options help you control how you move through the imagery. The mouse settings control the sensitivity of your mouse and the mouse zoom direction. Remember that moving down zooms out and moving up zooms in. There are also three navigation option settings:
Pan and Zoom (Ctrl+T)
Flight Control (Ctrl+G)
Click and Zoom
Select one of these options or change it using one of the speed key combinations.
The General settings allow you to set many of the miscellaneous Google Earth options. On the display you can choose to show tooltips or not when you mouse over certain icons. You can also choose to show Web results in an external browser, instead of using Google Earth to display Web results. This is recommended.
You can change the display language from System default to German, English, Spanish, French, Italian, or Japanese. Google Earth defaults to the language you specified when first installing the software.
Send usage statistics to Google by selecting this option. Remember that no personal identifying information is sent to Google when you elect to send usage statistics. Your privacy remains safe.
KML Error handling options configure how Google handles errors that it encounters while loading Google Earth map files (KML files). By default, it is designed to be tolerant and silently accept unknown data, and continue loading the file. You can also be prompted when an error is encountered or simply have the load fail once an error is encountered.
Select an e-mail program from the list or be prompted for which e-mail program you want to use when you are ready to send an e-mail message from within Google Earth. Lastly you have the option of disabling any on-screen advertising.
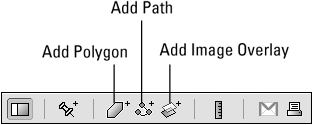
The Google Earth Toolbar (shown in Figure 13.6) contains several useful tools. Access the tools discussed in this section by clicking the icons in the toolbar that appears above the satellite image detail area. When the toolbar is not visible, choose Toolbar from the View menu, or press Ctrl+Alt+T.
Note
The Add Polygon and Add Path tools are only active when you purchase the Google Earth Plus version.
Click the Add Polygon icon from the toolbar to begin adding interesting shapes to Google Earth. The Add Polygon window launches allowing you to name your polygon and add a description in the Description tab. Use polygons to define areas, or 3D polygons to simulate structures.
Click the Style, Color tab to define the color, width, and opacity of the lines that define your polygon. Additionally, you can determine when your polygon is filled with color, what color, and the opacity of the fill color. Try changing the opacity to less than 100 percent to see features within the polygon.
You can type the view information manually or navigate to the view where you want your polygon to appear, and click the Snapshot current view button in the View tab.
When you want your polygon to have a 3-D appearance, click the Altitude tab and move the slider from the ground position on the left toward Space, the right side. Click Extend Sides to Ground to have the polygon appear as a 3-D object from ground to your altitude setting. You can change the vertical position of the polygon above the ground by changing the drop-down from Clamped to Ground to either Relative to Ground or Absolute, and type values in the altitude box.
After you set these values, click in the satellite image detail area and begin drawing your polygon. You can grab the sides of your polygon, dragging them to new locations when the mouse pointer is placed over the line and changes to double parallel lines. You can drag the small change points to change the shape of the polygon. When you finish drawing, click OK in the Add or Edit Polygon window.
Create a path by clicking the Add Path icon from the toolbar. Set the path name and optionally set the path description in the Description tab. The Style, Color tab allows you to set the color, thickness, and opacity of the line that shows your path.
You can manually set the view in the View tab by typing the latitude, longitude, range, heading, and for the view of the path you are creating, or simply navigate to the location, set the altitude and tilt, and then click the Snapshot current view button.
Set the Altitude of your path if you want it to appear above the ground or, like a wall, extended to the ground. This is a particularly nice feature in viewing images from an angle. It allows you to easily see the path on an angle.
Begin creating the actual path by clicking your mouse along the path over the satellite image. You can move the individual points with your mouse by clicking and dragging them to new locations. When you finish creating your path, click OK in the Add or Edit Path window.
Image overlays are graphic images that can be placed over the surface of the satellite imagery giving additional details. The images can be mapped to the terrain or float above it and must be in one of the following formats:
JPG
BMP
TIFF
TGA
PNG
Note
Overlays saved in PNG format should be modified making opaque features such as image boundaries transparent. This allows the underlying satellite imagery to show through.
The images that you use for your overlays should be aerial views, either photographic or drawn such as weather and topographical maps. Aerial and satellite photographs can also be used as overlays. Some of these overlays are created by and shared among the Google Earth community on its bulletin board. See the Google Earth Community section at the end of this chapter for more information.
To map the overlay onto a specific geographic area, the image must have north at the top of the image and use a special projection known as equirectangular projection (Plate Carrée). See Wikipedia’s description of equirectangular projection for more information (http://en.wikipedia.org/wiki/Equirectangular_projection).
Overlays are given a name, like a placemark, path, or polygon. Select the path to the image you want to use as your overlay. The path can be a local path on your hard drive or a URL to a remote image.
Set the transparency by moving the slider from completely transparent on the left to completely opaque on the right. It is probably best to allow some transparency so you can see the satellite image below the overlay.
The Description, View, Altitude, and Location tabs are pretty much the same as for creating a placemark. The Refresh tab has settings that tell Google Earth when to refresh the image. Images can be refreshed based on time or change in view. The Web Mapping Service Parameters can be set by clicking WMS Parameters. See Wikipedia for more information about WMS at http://en.wikipedia.org/wiki/Web_Map_Service.
Once your overlay image is specified in the Link field, you can position it within the detail area using the green positioning marks that appear once you select Add Image Overlay. These marks allow you to reposition and resize the image. Grab the corner or side marks with your mouse to stretch the image to a new shape and size. The crosshair marker in the center allows you to reposition the image. The small offset triangle mark is used to rotate the image.
Save the image overlay by clicking OK in the New Image Overlay window. You can edit the image overlay by right-clicking on it in the Places tab and selecting Properties from the pop-up menu.
Cross-Ref
See Chapter 33 for information about adding SketchUp 3D models to Google Earth.
The ruler allows you to measure distances by clicking on points on the map. Click the Ruler icon to open the Ruler window. The line tab allows you to select two points on the satellite image and the distance can be read out in a number of different measures including:
Centimeters
Meters
Kilometers
Inches
Feet
Yards
Miles
Nautical Miles
Smoots
If you’re wondering what a smoot is, don’t feel bad that you don’t know. A smoot is a nonstandard unit of length named for Oliver Smoot who in 1958 was rolled head over heels by his Lambda Chi Alpha fraternity brothers to measure the length of the Harvard Bridge. A smoot is equal to his height, 5 feet, seven inches. Interestingly, Oliver Smoot later became chairman of the American National Standards Institute (ANSI) and president of the International Organization for Standardization (ISO). Isn’t Google fun?
You can send people e-mail about what you see or create in Google Earth. There are three ways to share this information:
Graphic of 3D View: Google Earth saves a graphic image of the detailed image area and saves it as a JPG file that is automatically added as an attachment to the e-mail message that is created.
Snapshot of 3D View: Rather than take a photograph, Google Earth saves all the information necessary to launch this same view in someone else’s copy of Google Earth. This information is saved as an attachment to the e-mail.
Selected Placemark / Folder: Send a placemark or folder to someone else so he or she can open it in Google Earth. This is great when sending party invitations. Let people create their own driving directions right to your house.
Select one of these three options and click the Email button. Depending on your e-mail settings, your selected e-mail program launches and create a new, unaddressed e-mail message containing either a graphic or the Google Earth file that allows the recipient to open and view the information in Google Earth. Add your own personal message along with the default message created by Google Earth, or just type an e-mail address and click Send.
When you click the Print icon in the toolbar you are given three options based on the type of information you want to print. These are:
Graphic of 3D View: Print the graphic information in the detailed satellite image area.
Most recent search results: Print your most recent search results.
Selected Placemark in My Places: Print the textual description information for the selected placemarks in the Places panel.
Printing continues as normal, allowing you to select and configure your printer.
Join the Google Earth Community. There are a large number of people all over the Earth interested in building upon the foundation of Google Earth to create imaginative and useful information. The community runs a bulletin board on the keyhole.com Web site, where it shares information and map information such as overlays and 3-D models.
Point your Web browser to http://bbs.keyhole.com.
After you sign up to participate (see Figure 13.7), you can share your own creations or try out some of the interesting things other people have created.
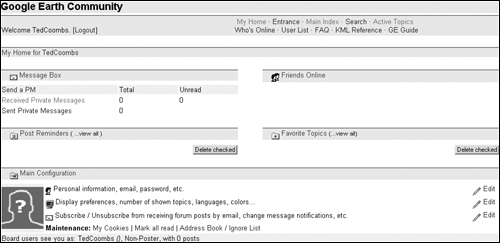
The bbs.keyhole.com site also hosts the KML (Keyhole Markup Language) reference for creating XML-based mapping items such as points, lines, and polygons.
Google Earth is one of the coolest Internet applications to come along since...well, Google. It’s simple to use, yet a very powerful tool for viewing satellite imagery that can show you enough detail to see the shadows people cast on the ground. Combine this high-resolution image data with other layers of information, such as road maps, business locations, terrain data, and a host of other information, and you can have hours of fun or one of the most powerful business tools of its kind.
Google Earth can be used for free, or you can pay a small license fee to use extra features that let you add polygons and trace your route manually or by importing GPS data. There are also several business versions that allow you to build applications with nearly an unlimited number of uses for geographically visualizing data. See where your customers live. Normal business data would never be able to show you that 87 percent of your customers live in valleys and at least 15 miles from the nearest road. Add this information with other business data and you learn that customers who live on hills watch Channel 9 and drive four-wheel drive vehicles and are most likely to try your product.
Most of all, Google Earth is fun and interesting. I don’t know anyone who hasn’t looked up his or her house on Google Earth and maybe even e-mailed me a copy of the picture. Now that you’ve seen what the Earth looks like, find out what’s happening there by reading the next chapter about Google News.