Learn the basics of blogging
Using Blogspot to read other people’s blogs
Create your own blog
Configure, format, and publish your blog
Blog with your cell phone
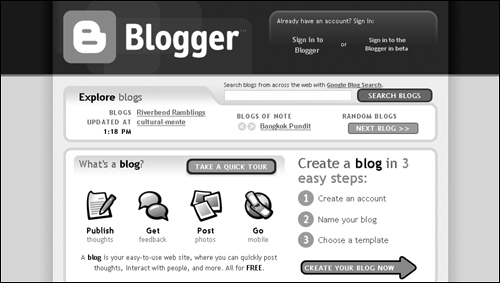
Blogger is Google’s blog site. For an introduction and background to blogs, see Chapter 24. Briefly, blogs are Weblogs, or information posted to the Web on a regular basis, like a journal or an online public diary. To make creating and publishing your blog simple, several companies have created powerful software to create and manage your blog. Google’s Blogger Web site at www.blogger.com shown in Figure 25.1 does just that and more.
One of the reasons the Blogger Web site does not look like the Google sites you are used to seeing is that Google purchased Blogger in February 2003. It was already a very popular Web site, becoming extremely popular after the attacks on the World Trade Center towers in 2001. There was no need to change the look and feel of an already popular site.
Reading the blogs that people write is easy and entertaining. Visit the Blogger main page, and you see several ways to find blogs that you may like to read in the section of the page labeled Explore blogs. Notice the rapidly scrolling list of updated blogs. This information on blogs that have been recently updated comes from a special service called Weblogs.com. Each blog, as it scrolls by, appears as a link. Clicking the name of the blog takes you directly to the blog, opening the page in a new window.
To the right of the scrolling, updated, blog list, you see BLOGS OF NOTE. You can click the blog link listed there or use the left and right arrows to the left to advance to the next or previous “blog of note.” When you find a blog that interests you, click the title and the blog opens in a new window.
RANDOM BLOGS presents you with a NEXT BLOG button. Clicking this button takes you to a completely random blog. This blog does not open in a new window, but replaces the Blogger main page. You can use your browser’s Back button to return to the main page.
Each of the features in the Explore blogs section takes you to blogs within the Blogger site. When you want to find blogs that appear anywhere on the Internet, you can use the Google Blog Search box. See Chapter 24 for detailed information on using Google Blog Search. Type a search term, and click SEARCH BLOGS. You can review the search results and find blogs that may or may not appear on the Blogger site.
Blogs are hosted on the Blog*Spot Web site. This can be a little confusing. You may create your blog on the Blogger.com site, but the blog address actually reads yourblogname.blogspot.com. Blogger blogs have a blogspot.com address.
Each blog page is designed by the author of the blog. There are, however, a few things common to all the pages. These all appear in the dark blue bar across the top of the blog page.
To search through the blog you are reading, type keywords or phrases in the search box located on the left side of the top bar. Click Search this blog to start your search. You also can search through all the blogs hosted on the Blogger site by clicking SEARCH ALL BLOGS. Either of these launches a search results page that lists each location within the blog that contains your search term. Read the snippet containing the search term, and then click either the posting title to go directly to the post, or click the blog URL listed below each result snippet to go to the blog home page.
Clicking GET YOUR OWN BLOG takes you to the main Blogger page where you can start creating your own blog. You can read more about this later in the chapter.
The FLAG? button is for alerting Google to possible objectionable content. Remember that Google’s SafeSearch can be used to search through blogs, and Google doesn’t make it a point to censor blogs. If the blog is seriously objectionable, it may be delisted and made available only over the Web, but not removed. Only illegal and spam blogs may be reviewed for removal based on Blogger’s Use Policies.
Each post on a Blogger page includes the following information:
Post title
Date and time of posting
Post content (text and graphics)
Author of the post
The content of the post is completely up to the author. Some posts are reviewed (moderated) before they appear in the blog. This is covered in more detail in the section “Managing your blog.”
When you read blog postings, you can comment on them. Below each posting is a POST A COMMENT link. Clicking this link launches a page where you can add a comment to the post. Type your post in the text box. You can even use HTML tags when creating your comment to enhance your text or even add a link. For example, see the formatting in this fictitious comment:
Hah! You think <b>that's</b> bad. You should see what they wrote about
that in <a href="http://www.blogger.com/myblogpost">this guy's
blog.</a>
Each comment includes the identity of the comment poster. The choices are to use your Blogger identity or another identity or to post the comment anonymously. While you can read blogs without logging in, you need to log in to your Blogger account to post a comment.
Blog authors have the choice of displaying detailed profile information about themselves. This information can include everything from their name to their astrological sign. The author of the blog has complete control over how much or how little is displayed on the blog page. Most templates are designed to display the About Me profile item. Many blog authors have at least this information available, so it doesn’t appear blank in their blogs. When you create your own blog, refer to the profile information in this chapter to help you create your profile.
You can log in to the Blogger site using your Google account. Type your userid and password, or choose to create a new account. After you log in, you can begin creating or posting to your own blog. You may notice that after you log in to the Blogger site, your Web browser establishes a secure connection. This means that your communications to and from Blogger are encrypted and safe from prying eyes.
To begin putting your thoughts into a blog, click the large orange CREATE YOUR BLOG NOW button on the Blogger main page. This takes you to Step 1, typing your display name and accepting the terms and conditions. The display name is what people who read your blog will see. If you don’t want your actual name displayed, type your pseudonym here. After you read the Terms of Service (by clicking the blue Terms of Service link), check the box and click CONTINUE.
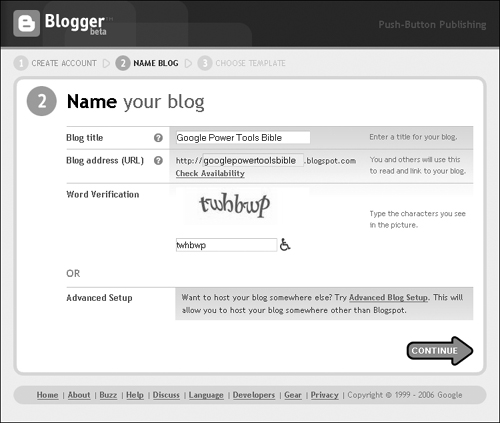
Step 2, shown in Figure 25.2, asks you to name your blog and come up with a possible URL for your blog. There are no guarantees that the URL you choose is available. You can click the Check Availability link to see if your proposed URL is available. If you try to type a URL that is currently taken, this error message appears: Sorry, this blog address is not available. Click CONTINUE when you finish adding your blog name and URL.
The next page may appear a little confusing; it lists Step 1 as NAME BLOG and Step 2 as CHOOSE TEMPLATE. The step numbers may change at some point. The next step in creating a blog is definitely CHOOSE TEMPLATE.
In the CHOOSE TEMPLATE page, you choose a look and feel for your blog. There are a dozen different templates to choose from. Scroll down to see all the thumbnails.
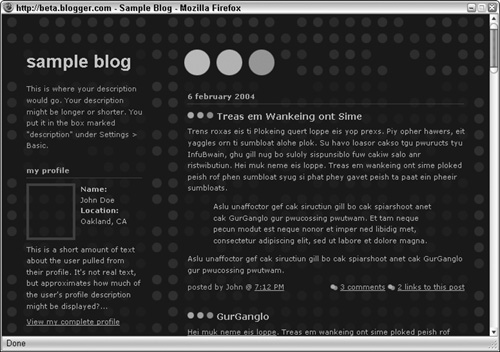
Below each thumbnail, is a preview template link. Click this link to see an actual-size sample of how your blog would look using this template. One such preview is shown in Figure 25.3. Of course, the text of the preview is written in dead languages. It’s just there to show you how a sample blog appears.
After looking at each of the templates provided for you, if you just hate them all (and it’s okay to hate them), you still need to select one to move on to the next step. Just pick the one you hate the least. You can change the template, or create your own after your blog creation process is complete. So, you’re not stuck with your choice in this step. For more templates, you can visit http://blogger-templates.blogspot.com.
To easily create your own template, you can use the template creation utility found at www.wannabegirl.org/firdamatic/.
Adding a custom template happens after you create your blog. For now, clicking CONTINUE completes the blog creation step. Click START POSTING to move on to the next step because empty blogs are boring.
Managing a blog isn’t a huge amount of work. After you set up your profile and settle on a look and feel, the fun part begins—adding posts to the blog. You may choose to moderate the comments posted to your blog and whether other people can post there. If you’ve just created your first blog, you are probably staring at a screen that looks like the one in Figure 25.4.
The page shown in Figure 25.4 is the one that appears after your blog has been created. This is where all the fun happens. You can immediately begin posting to your blog by typing a post title and the content of your post. Before posting, you may want to begin by viewing and configuring your blog.
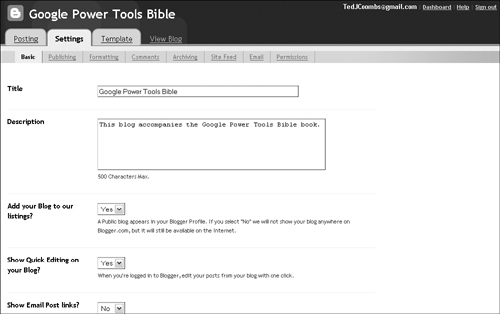
Figure 25.4 shows the Settings tab. This launches the configuration settings form. By default it starts on the Basic tab.
The title you set for your blog when you first created it appears in the Title box. You can change your blog title anytime you like.
The description box allows you to add information about your blog. Why did you start the blog? What kind of information can people expect to find in the blog? When published, this description appears below the blog’s title. Don’t try to write your blog in the description. You have 500 characters (including spaces and punctuation) in which to describe your blog.
Several drop-down lists ask you yes-and-no questions, including these:
Add your Blog to our listings? (Yes / No): Selecting No makes your blog private. It is available on the Internet, but no public record or index of it is available through Google or Blogger.
Show Quick Editing on your Blog? (Yes / No): Selecting Yes makes editing your posts simple by allowing you to edit posts right from your blog.
Show Email Post links? (Yes / No): Selecting Yes allows visitors to your blog to e-mail your posts to others.
At the bottom of the Basic tab is one global configuration setting that allows you to choose to use a WYSIWYG (What-You-See-Is-What-You-Get) editor for creating your blog posts. To use this editor, set Show Compose Mode for all your Blogs to Yes.
When you finish configuring the settings in the Basic tab, click Save Settings.
Beneath the Save Settings button is a Delete This Blog button for permanently deleting the current blog.
Clicking the Publishing tab allows you to set two configuration settings: the Blog*Spot address and whether to notify Weblogs.com.
The Blog*Spot address is the URL that people can use to visit and read your blog. By default, it is set to the URL that you set up when you created the blog. Changing it is fine as long as the new URL is available. There is no availability link on this Settings page to see if the URL is available.
The second configuration setting in this tab allows you to choose whether to update Weblogs.com. Chapter 24 explains how Weblogs.com is used as a notification service for programs like Google’s Blog Search. If you want your blog indexed and noticed by the maximum number of people, set this value to Yes. Click Save Settings to save any changes you make to this page. If you try to navigate away from one of the pages with unsaved changes, Blogger lets you know and allows you to save the changes.
The settings that affect the way your blog appears to others are set in the Formatting tab. Begin by determining how many posts should appear on the main page of your blog. The default is seven, but you can increase and decrease that amount. You also can change this to show a specific number of days rather than posts. Be aware that whether you set the number of posts or the number of days, the maximum number of posts that can appear on your Blogger main page is 999.
A date appears in the header of your blog posts. You can easily set the style in which this date is displayed. Choose one of 13 styles from the drop-down list to set the date style. By default, the date appears as day of the week, month, day, year. The other date formats are basically shorter date formats. For example, dates can appear as 9/21/2006, 9.21.2006, 20060921, 2006-09-21, and so on.
Another date setting is the Archive Index Date Format, usually appearing in the sidebar of your blog. Because these dates represent a month, week, or day of posts, rather than a single post, you can choose the way in which that date period is represented. Here are some examples:
09/01/2006 – 10/01/2006
09/2006 – 10/2006
09/2006
09.06.2006
There are 14 ways to display the archive date. Simply select it from the drop-down list.
Similar to the date options, you also can choose a timestamp display option. Choose between displaying the time in 12-hour or 24-hour format, and choose to display or not display the date with the time.
After setting the time format, you also want to select your time zone so that your posting times accurately reflect your local time. Select your time zone from the Time Zone drop-down list.
Set the blog language to one of the many languages supported by Google. Choose a language from the drop-down list.
The Encoding drop-down contains a list of various text-encoding types widely used around the world. For example, for Russian blogs, you may select one of the Cyrillic encoding types to display your blog. Universal (Unicode UTF-8), which is the default, is the most widely used.
The Convert line breaks setting affects what happens when you press Return (causing a line break) while editing your blog or when others add comments to your blog page. Selecting No causes Blogger to ignore your line breaks when displaying your blog. Because your blog is displayed using HTML, selecting Yes causes Blogger to insert the <br> HTML tag. Text typed after this appears on the next line. Pressing Return more than once causes additional <br> tags to be added.
Select whether not to display the Title field on your blog page by selecting either Yes or No from the drop-down list. The default is Yes. You also can configure whether a link field is displayed. The link Field makes it easy to find links in your blog when you regularly link to other articles. In this case, the default for Show Link Field is No. If you set Show Link Field to Yes and you create your own template, include the following lines of code in your template:
<BlogItemURL>
 <a href="<$BlogItemURL$>">Link</a>
</BlogItemURL>
The Post Template preformats the post editor. This allows you to maintain a style for the appearance of your posts.
Select the Comments tab to configure commenting in your blog. Your first selection in this tab allows you to hide the comments section of your blog page. You can hide and unhide the comments without affecting the comments that have already been written. Why hide the comments? Maybe you’re trying to impress that special someone and you’d rather not have him or her read what the last special someone said about you in your blog. Select the Show or Hide radio button.
When comments are displayed in your blog, you can choose who can post comments; you have these choices:
Only Registered Users: To leave a comment, the person must be logged in to Blogger.
Anyone: Even the Pope can comment on your blog, if he’s an avid reader.
Only Member of this Blog: Members of a team blog can leave comments.
The Comments Default for Posts setting determines Blogger’s behavior when creating new posts. By default, all new posts have comments turned on. If you’d rather decide which posts get comments and which don’t, set this to New Posts Do Not Have Comments.
The Back Links setting lets visitors know what other blogs have linked to the post they are reading. This is to create a more interconnected experience. You can choose to hide or show them in your blog. You also can set the default for new posts, selecting either to allow back links for new posts or not to allow them by default and turn them on for individual posts.
Set the Comments Timestamp to one of the formats in the drop-down list. Then you can choose Yes or No to a series of settings:
Show comments in a popup window? This opens a new browser window that allows you to read and post comments.
Enable comment moderation? This lets you choose to allow all comments or approve them before publishing them.
Show word verification for comments? This causes people to retype the funny graphic characters to defeat spam robots.
Show profile images on comments? This allows you to get a look at who is posting comments to your blog.
The last setting in this tab is the e-mail address where you want to be notified when someone posts a comment to your blog. You can choose to type your e-mail address or leave this blank so that you are not notified.
Make sure you click Save Settings when you finish editing this settings page.
Blogs normally archive posts, particularly in blogs that are posted to regularly. Configure archiving by clicking the Archiving tab. The limit for the number of posts on the main page is 999. You can choose to archive your posts monthly, daily, weekly, and not at all. You may have only a small number of posts and want them to remain on the main page, so you may choose not to archive your posts. Archived posts appear in the sidebar labeled by the date formatted in the Formatting tab. Select an archive frequency by choosing from the drop-down list.
The Enable Post Pages? setting allows you to configure Blogger to display your posts on their own Web pages in addition to displaying them on your main blog page. Selecting Yes causes each post to appear on its own page. Click Save Settings.
The first selection in the Site Feed tab is a link to switch to Advanced Mode. The two basic settings are Allow Blog Feed and Feed Item Footer. When you want your full posts included in the site syndication services, select Full from the drop-down list. When you want a brief (maximum of 255 characters) portion of your new post sent out as part of the site feed, select Short. When you do not want your blog included in the feed, select None from the list. The default is Full.
The Feed Item Footer appends whatever you type into the text box to the post that is sent to the feed.
Select the Email tab to set the e-mail addresses associated with your blog, and set the following items:
BlogSend Address: Send your blog to this e-mail address whenever you publish your blog.
Mail-to-Blogger Address: Post to your blog by e-mail using this address.
Clicking the Permissions tab allows you to set who can post to your blog and who can read your blog. The section of the Permissions tab labeled Blog Authors lists the people who currently have permission to post to the blog. You should appear in this section labeled as the Admin. Clicking ADD AUTHORS opens a text box where you can add the e-mail addresses of the people you want to invite to post to your blog. Type e-mail addresses separated by commas. When you finish creating your list, click INVITE. After you click this button, a list appears showing the e-mail addresses of the people you’ve invited to post. They are labeled as open invitations. You can then manage these invitations by inviting again or removing the invitation. The date of the invitation appears next to the e-mail address.
The Blog Readers section of this tab allows you to choose who can read your blog. You have these choices:
Anybody: All people can read your blog.
Only people I choose: Select the people who can read the blog.
Only blog authors: Limit the blog to people you added in the first section of this tab.
When you select Only people I choose, a text box appears that allows you to add a list similar to the earlier one, where you can add e-mail addresses of the people you are inviting to read your blog. A list similar to the author’s list appears with the e-mail addresses of the people you invite to read your blog. Below this list is an ADD READER button. Click this to add more people to your invitation list.
Note
If you invite people to read your blog and later change to Anybody, your list of readers is saved in the event that you want to switch back to Only people I choose.
This is the only tab that does not have a Save Settings button. These settings are saved automatically.
You can tell people as much about yourself as you like, or you can choose to remain mysterious. You can tell people quite a bit about yourself by completing the profile section included in Blogger. To edit your profile, click the Dashboard link at the top right of the page next to your login name. This launches the Dashboard page shown in Figure 25.5.
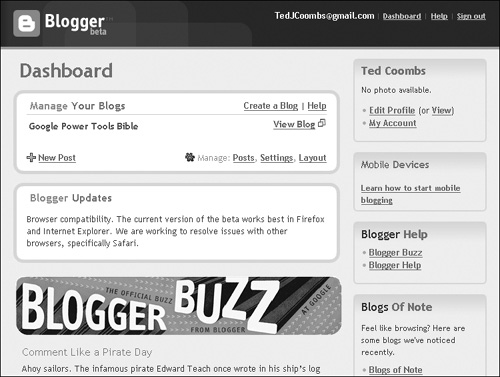
In the top-right box, you find an Edit Profile link. This launches the Edit User Profile page. Table 25.1 lists the profile options with explanations.
Table 25.1. Profile Options in the Edit User Profile Page
Profile Option | Description |
|---|---|
Share my profile | When this is selected, the items in your profile appear on your blog’s main page. |
Show my real name | When you select this, your first and last names, as typed in your profile, appear in your blog. |
Show my email address | When this is selected, the e-mail address typed in your profile is displayed. |
Show my blogs | Click the Select blogs to display link to select the blogs you want listed in your user profile page. |
Username | Your username is displayed for information purposes and cannot be edited. |
Email Address | This is the e-mail address that is displayed in your profile when you select Show my email address. |
Display Name | This name is displayed when you are not displaying your real name. |
First Name | This is your real first name or whatever you want people to call you. |
Last Name | This is your last name. The first and last names appear in your blog page when you have Show my real name selected. |
Photo URL | Type a URL to your photo. If you want, Google offers free photo hosting at www.hello.com. |
Audio Clip URL | Post an audio file. See the section “AudioBlogger” later in this chapter for more information about how you can easily add audio to your blog. |
Gender | Choose Male, Female, or other (not specified). |
Birthday | Type your birthday. You can leave the year blank if you don’t want people knowing how old you are. It’s also a good way to dissuade identity theft. |
Homepage URL | This is the URL to your personal or business Web page. |
Wishlist URL | It’s not quite like registering at Macy’s, but you can create a wish list using Froogle and then point to it here. |
IM Username | Type your instant messenger username, and select the instant messenger you use from the drop-down list. If you use more than one, select the one you prefer. |
City/Town | Type the city or town you live in. |
Region/State | Type the state your city or town is in. |
Country | Select your country from the drop-down list. |
Industry | Select the industry in which you are employed from the drop-down list. |
Occupation | Type your specific occupation. |
Interests | In this text box, you can add a list of your interests. Separate interests with commas. |
About Me | Here is where you can wax eloquent about yourself, at least up to 1200 characters’ worth. |
Favorite Movies | Add a comma-separated list of your favorite movies. |
Favorite Music | Add a list of your favorite genre, artist, performers, songs, albums, ripped tracks, or Hispanic Hip Hop artists. |
Favorite Books | This list should start with Google Power Users Bible, followed by any of your other favorite books. |
Random Question | Can those little red lasers really hurt your eyes? and other equally odd and random questions are asked here. Select the Give me a new question check box when you are ready for your next question. |
Click Save Profile when you finish editing your profile. Your changes take effect immediately.
Cell phones and other Internet-ready mobile devices have become one of the biggest leaps in communication since, well, communication. I was recently in the Netherlands and took pictures of the wonderful countryside and emailed them from my phone to my friends in Hawaii. In addition to the ability to immediately show friends what I was seeing you have the amazing ability to post these pictures and text and even audio from the phone to your blog. It’s a truly amazing communications ability.
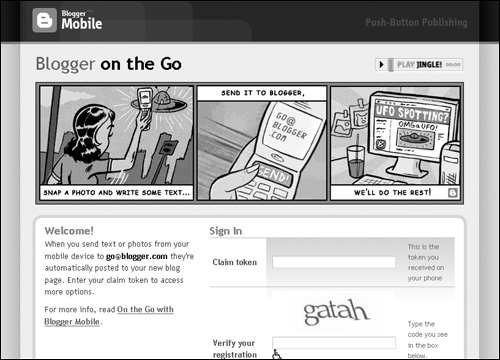
When you send text or photos from your mobile phone or handheld computer to [email protected], they are automatically posted to your blog. If you don’t already have a blog, one is created for you and Blogger responds to you by telling you the address of the blog so you can have others start viewing it immediately.
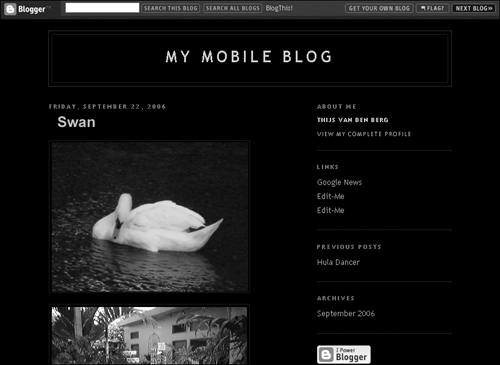
When Blogger creates a new blog for you, it is automatically given the title My Mobile Blog. To “claim your blog,” as Blogger calls it, log in to the Web site http://go.blogger.com, as shown in Figure 25.6, and type the verification text sent to your mobile device.
After you log in to claim your blog, you can give it a custom template and modify it the same way you can modify any Blogger-hosted blog. Send photos or text right to the blog, as shown in Figure 25.7.
You can leave audio posts in your blog from any phone in the world. AudioBlogger is a Listenlab service offered in partnership with Blogger that allows you to record and post audio messages to your blog completely free. To get started, visit www.audioblogger.com.
You must have a blog at www.audioblogger.com in order to leave audio posts. Create one before continuing, if you don’t already have one. Follow these steps to get started posting audio messages to your blog:
Log in to www.audioblogger.com.
Type your Blogger userid and password. Your primary telephone number and pin will identify you in the future.
Call the U.S.-based telephone number 1-415-856-0205 (worldwide numbers soon to come). Enter your phone number and pin.
Create your AudioBlogger posting.
Note
The number you call is not toll-free. You will incur toll charges, or you will be charged for the minutes used on mobile phones. Also, the service does not work with the beta version of Blogger.
Each audio post can be 5 full minutes long. If you have some concern that the file size will be so great that people cannot download and listen to it, the good news is that the file size is about 1KB per minute that you are yacking away. So the maximum size of an audioblogger post is less than the size of most tiny graphic icons. If 5 minutes is not long enough, you can create a new post at the end of 5 minutes.
After you create an audio post, you see a link to your AudioBlogger post accompanied by an icon and timestamp. Users can easily click the link and hear your post.
Whether you read other people’s blogs on Blog*Spot or create and manage your own blog on Blogger.com, you will enjoy the clean and simple way to access Weblogs. This chapter showed you how to create your own blog, customize it, and publish it to close friends or to the world. Now, you can even post to your blog using your cell phone or mobile device. Send text and pictures to your blog, or create a new one automatically. You can even use the third-party AudioBlogger service to leave voice blog posts on your site. An entire book could be written about using all the features, writing templates, adding money-making things like Google’s AdSense, and more. This chapter gave you a good overview of blogging with Blogger.
You may want to put a reminder in your Google Calendar to send a post to your blog. Learn more about Google Calendar in the next exciting chapter.