Learn to install Google Toolbar for both Internet Explorer and Firefox
Discover the features that make your Web surfing more productive
Customize the Toolbar with your personal preferences
The Google Toolbar has become an important addition to the two most popular Web browsers, Internet Explorer and Firefox. There are different toolbars for Internet Explorer and Firefox. The features of the two toolbars are not the same, and this chapter helps you learn about those differences. But whether you use the Toolbar for IE or for Firefox, installing the Toolbar in your browser will make your Internet life easier.
Pointing your Web browser to http://toolbar.google.com takes you to a different start page depending on which browser you use to access the site. Your browser is automatically detected and the appropriate page appears.
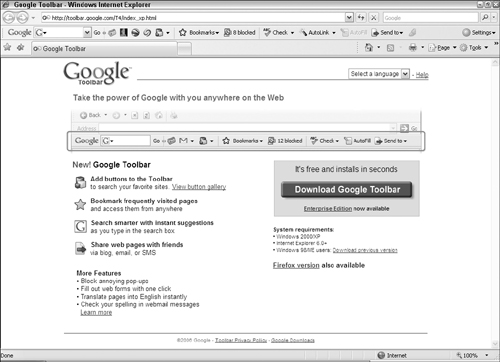
Using Internet Explorer, point your Web browser to http://toolbar.google.com and click Download Google Toolbar, as shown in Figure 31.1. There also are links to the Enterprise version of the Toolbar, which is discussed in Chapter 37. This download is for Internet Explorer version 6 or greater and those using Windows Vista, Windows XP, or Windows 2000 operating system. For users of Windows 98 or Windows Me, click the Download Previous Version link.
Note
Click the Firefox version link to download the Firefox version even if you are using IE. The Firefox page also has a link to the IE Google Toolbar page.
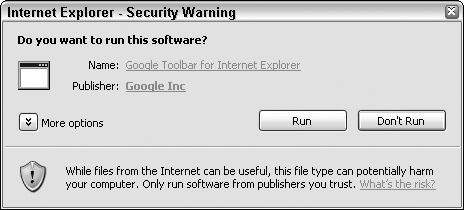
Clicking Download Google Toolbar starts the immediate download of the GoogleToolbarInstaller.exe file. You can choose to run this program or save it to your hard drive to run later. You may receive a security warning similar to the one shown in Figure 31.2. Click Run.
The installer, shown in Figure 31.3, appears and gives you three installation options:
Set Google as the default search in Internet Explorer and notify me of changes
Help Google improve the Toolbar by sending us usage statistics
Close all Internet Explorer windows to ensure a conflict-free installation
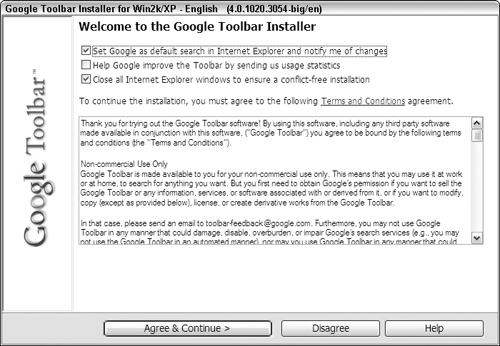
The first setting determines whether you want Google set as your default search. If the answer is yes, select the check box. The Toolbar also tells you if some other search program tries to change this setting, possibly without your knowledge. This keeps viruses and other sneaky programs from making settings to your computer without your knowledge.
The second setting sends anonymous usage statistics to Google about how the Toolbar is being used. Google does not use this feature to collect personal information about you.
The third option is an installation-only option, asking if the installer can close all open Internet Explorer windows to avoid any program conflicts. If you have important pages open you should save or complete your work before continuing the installation. It’s recommended that you allow the installer to close any open IE windows, including the one you used to download the Toolbar.
Read the license agreement, and if you agree click Agree & Continue. The next page asks that you read it carefully as it is not the usual yada yada. For Google’s PageRank technology to work, information about the pages you visit must be sent to Google. Once again, no personally identifying information is sent to Google. Your privacy is important to the people at Google.
You must choose to either enable or disable PageRank before you can continue. Click Finish to complete the installation. A Web page appears in IE letting you know that your toolbar has been installed. It should appear along the top of your IE Web browser. If for some reason it does not appear, try choosing View ![]() Toolbars and selecting Google, or if your menu is not visible you can right-click on the IE toolbar and select Google from the pop-up menu. In the event that Google does not appear in either menu, try restarting your Web browser, and if that doesn’t work restart your computer. If it still does not appear, try downloading and reinstalling the Toolbar.
Toolbars and selecting Google, or if your menu is not visible you can right-click on the IE toolbar and select Google from the pop-up menu. In the event that Google does not appear in either menu, try restarting your Web browser, and if that doesn’t work restart your computer. If it still does not appear, try downloading and reinstalling the Toolbar.
The process for installing Google Toolbar for Firefox is similar to installing the Toolbar for IE. Click Download Google Toolbar to get started. The requirements for installing the Toolbar for Firefox are that you must be running Firefox 1.5 or greater and one of the following operating systems:
Windows Vista
Windows XP
Windows 2000 SP3+
Mac OS X 10.2+
Red Hat Linux 8.0+
There are no installation options for the Firefox Installation. You are simply asked to agree to the license terms by clicking Agree and Install. When the installation is complete, close all Firefox windows and restart them to view the Google Toolbar.
If you click Agree and Install and your installation does not start, it’s possible that Firefox is blocking the Toolbar installation. You’ll know because Firefox displays a message that the installation is blocked. To unblock the installation, follow these steps:
Click Edit Option on the right side of the Firefox block message.
In the box that asks for Address of Web site, type toolbar.google.com and click Allow.
Click OK to continue the installation.
In the event that you must unblock the installation, you are asked to click Agree and Install again.
Both Google Toolbar for IE and the one for Firefox have the familiar Google search box. Typing your search term in this box allows you to quickly search Google without visiting a Web page, such as Google’s main search page. The Google Toolbar for IE also includes the ability to add custom buttons that, when configured, allow you to launch all types of Web pages in a single click from your toolbar.
The results of the Google search are displayed in the normal Google results Web page. If you are currently viewing a Web page, it is replaced with your search results unless you configure the Toolbar to open a new tab.
The small vertical line, with left and right arrows on either side found to the right of the search box, can be clicked and dragged with your mouse and moved left or right, making the Google search box larger or smaller. This does not affect the amount of text that can be typed in the box, only the amount of text you can see without scrolling.
Note
When you increase the size of the search box some Toolbar icons may no longer fit. A small arrow appears on the right side of the Toolbar, which signifies that more icons can be seen by clicking this arrow.
The next icon in the Toolbar allows you to search Google News for articles. Clicking the small newspaper icon causes the Toolbar to search for the terms you typed into the search box. The Google News page launches with the results of your search.
The PageRank icon displays the ranking given to the Web page you are viewing based on the calculations made by Google’s PageRank technology. When no PageRank information exists for a page, the icon displays a blank white line.
Spell-check the information you type into a Web page. For example, if you want to check the spelling of your Blogger posts or things you are putting on your Google Pages Web page, click the Spell Check icon.
Caution
Information you type into Web forms is sent to Google for spell checking. Make sure you understand the privacy implications of using this feature.
Clicking the AutoLink button on the Toolbar causes Google to search for any postal mailing addresses, shipping information, or other types of items where Google can provide extra information and turns the display of that information into a hyperlink. You can click the hyperlink and get, for example, a Google Map displaying the location of an address or tracking information on shipped packages.
Automatically fill in Web forms with your saved, personal information by clicking the AutoFill button. The Google Toolbar does its best to figure out what form fields match corresponding saved personal information. Google relies on the form field names used by the Web page author. So, when field names are fname for first name, or city, these are easily recognized by Google. When the field names are unintelligible, such as nm1 or cty, Google will have less luck placing the right information in these fields.
When Web pages provide an Atom or RSS feed you can subscribe to the contents of the page by clicking the buttons or links setup by the site’s creator to enable this feature. For example, news.google.com has both RSS and Atom links on the left panel of the page. You are then able to view the contents of this Web page in Google Reader (www.google.com/reader) or other feed reader programs.
You can toggle whether you want your search terms highlighted in a Web page by clicking the Highlight button. It is sometimes easier to locate information within a Web page when the search term you use is highlighted within the page. Multiple search terms are highlighted in different colors making it easy to distinguish them. Once you locate the information, having the words highlighted can be annoying. Click the Highlight button again and the highlighting disappears.
Your last search terms are saved in the Toolbar, making it easy to find them again in the same or different Web pages. In the Firefox version of the Toolbar, the words are displayed in the Toolbar itself. In the IE version, you must click the down arrow on the search box and select the search terms from the drop-down menu.
There is also a button only on the IE Toolbar for adding or accessing Google Bookmarks. But instead of putting this topic in the IE-Only Options, it is included here because you can still use Google Bookmarks with Firefox and other Web browsers. It’s just made simpler in the IE version of the Toolbar by having a button. See the additional steps later in this section for adding Bookmarks to the Firefox version.
In the IE Toolbar, you find a blue star. Clicking that star launches a window where you can log in to your Google account, enabling you to access Google Bookmarks. Clicking the Bookmarks button then allows you to:
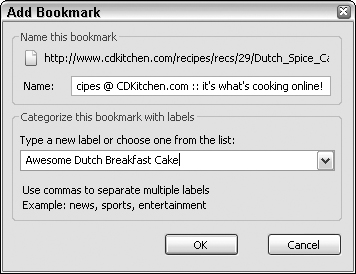
Bookmark the current page (see Figure 31.4)
Manage your bookmarks
Launch a Web page from the list of bookmarks
Refresh the list of bookmarks from your stored bookmarks
Import your IE favorites into Google Bookmarks, enabling you to access all your bookmarked “favorite” pages from any computer by simply logging into your Google Bookmark page
From that point on, use Google Bookmarks to bookmark a page rather than setting a bookmark in IE. You also have Google Bookmark functionality using other browsers; it is just handled differently.
Using Firefox, or other Web browsers, follow these steps to add Google Bookmark functionality:
Point your browser to www.google.com/bookmarks. The first time you go there, you see a Google Bookmark button. Click and drag it to your browser’s bookmark menu, adding Google Bookmark to your list of favorites.
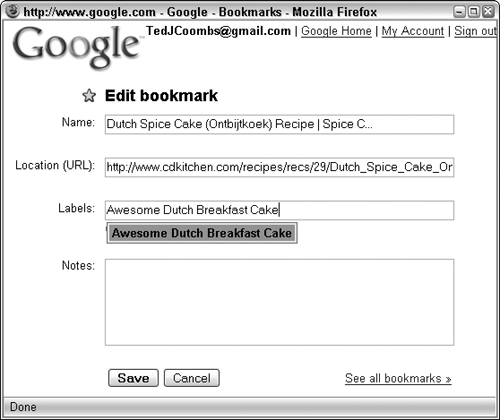
Next time you want to bookmark a page, add it to your Google Bookmarks by selecting Google Bookmarks from your browser’s bookmarks/favorites list. A bookmark window like the one shown in Figure 31.5 appears.
The name and destination are added to the bookmark window automatically; you need to add a label and optional description and then click Save.
Once bookmarks have been saved to your Google Bookmark account, they can be accessed in two ways: in IE using the Bookmarks button or by logging in to Google Bookmarks (www.google.com/bookmarks) and clicking the link to your bookmarked Web destination (see Figure 31.6).

The Google Bookmarks page also allows you to sort your bookmarks by title, label, or date. And, of course, you can search through your bookmarks using the search boxes located at the top and bottom of the page.
You can add new bookmarks from the Google Bookmarks page by clicking the Add bookmark link in the left column. The Manage labels link allows you to remove bookmarks and rename them.
There are options available in the Internet Explorer version of the Google Toolbar that are not available in the Firefox version. One of these is the Google Earth button, which simply takes you to the Google Earth home page. It does not launch Google Earth on your computer.
Click Search your own computer to launch the Google Desktop search page. If you have Google Desktop installed and indexing your content, you can click this button to access the search page. This is particularly useful when you don’t have Google Desktop docked to the side of your screen.
Cross-Ref
See Chapter 11 for more information about Google Desktop.
In Figure 31.7 you see a button you won’t see on other installations of the Google Toolbar. It’s actually a very tiny image of the author. Clicking that little custom button launches the author’s home page. You can create custom buttons and install them here or load other people’s custom buttons to enhance your Toolbar.
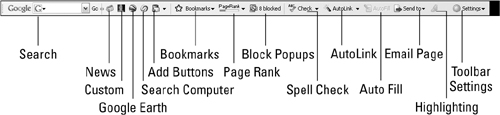
The Blocked button allows you to block or unblock pop-ups for a particular Web page. When you visit a Web site where you want the pop-ups to appear, click the Blocked button and it changes to “Popups ok.” From that point on, pop-ups are allowed for that site only.
Customize the Google Toolbar to personalize it for your own use. The IE and Firefox versions of the Toolbar have different options and thus launch different option windows. If you use both browsers, you need to set the options for each of your browsers. Setting them for one browser type does not affect the settings for the other.
In the Internet Explorer version of the Toolbar click the Settings icon and select Options from the menu. This launches the Toolbar Options window, as shown in Figure 31.8.
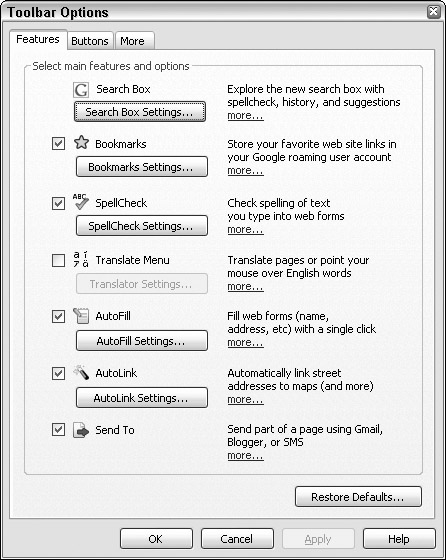
The Google Toolbar for IE allows you to set Features, Buttons, and More by selecting the applicable tab in the Toolbar Options window. In the Features tab, you can customize the Search Box, Bookmarks, SpellCheck, Translate, AutoFill, AutoLink, and SendTo settings.
The Buttons tab allows you to choose which buttons appear on your toolbar by selecting or deselecting them. This is also the place where you can add custom buttons. Download custom buttons from the Google Toolbar Custom Button Gallery found at toolbar.google.com/buttons.
For information on creating custom buttons, see toolbar.google.com/buttons/apis/howto_ guide.html.
Once you’ve downloaded a button from the gallery, or created your own custom button, save the custom button code to your hard drive, then click Add, selecting the custom button you want added. The new button will then appear in your Toolbar.
The More tab allows you to select a number of various Toolbar features and additional buttons not included in the Buttons tab.
In the Firefox version of the Toolbar, clicking the Options button launches the Google Toolbar Options window, as shown in Figure 31.9.
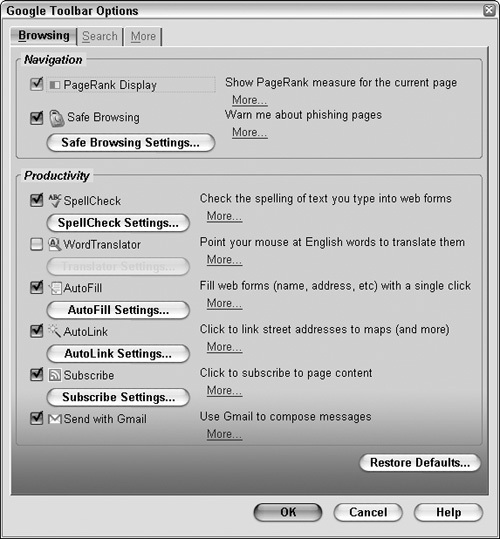
The Firefox version of the Google Toolbar allows you to customize settings in the Browsing, Search, and More tabs. In the Browsing tab, select which navigation features you want to appear in the Toolbar and set the Safe Browsing settings.
Also in the Browsing tab, you can select and configure a number of various productivity tools such as SpellCheck, WordTranslator, AutoFill, AutoLink, Subscribe, and Send with Gmail. The AutoFill settings are particularly important because AutoFill will not work unless you add your personal information.
The Search tab has settings that allow you to configure the Toolbar search box settings, add custom search buttons, and add Google Search buttons for searching through sites such as Froogle, Google Groups, and more.
The More tab has a variety of settings and options, including the ability to switch between icons only, icons with text, or text only. You can also create your own custom Toolbar layout.
The Google Toolbar is one of the easiest of all the Google applications to integrate with the way you already access the Internet. Rather than creating a new way to do things, it enhances what you already do. You no longer need to go to the Google home page to do a Google search—you can use the search box in the Toolbar. Use the buttons on the Toolbar to quickly access commonly used Google features, or create custom buttons when using Internet Explorer to access anything you want. Visit the Google Toolbar Gallery to find all the buttons you can possibly imagine to customize your Google Toolbar.