
Organizing images
Managing photo folders and albums
Cataloging and organizing pictures
Editing pictures
Distributing and printing images
Creating collages and posters
If you check out the software installed on the average computer, you are sure to find one or more image-management programs. Depending on the hardware and peripheral devices you use with your computer, such as scanners and cameras, you are sure to have more management software of some sort. The problem with software bundled with input devices is that the program may offer limited features or may be difficult to use with images other than those created by the hardware.
Instead of relying on proprietary software, you can turn to one of many image-management programs. Image management is usually bundled with manipulation and editing software that may or may not meet your needs-the software may be too complex, or may not offer other types of output than single images.
In this chapter, you learn how to use Picasa2 as an image-management program. Available as a free download from Google, Picasa2 is ideal for general image collection, editing, distribution, and archiving needs.
Use Picasa2 for:
Collecting and organizing: Configure Picasa2 to search for pictures on your hard drive when the program is started. Images are sorted into albums using a configurable naming structure.
Editing: Picasa2 offers a selection of common editing functions, such as brightening images, extending a color range, and sharpening images. Other editing features let you apply effects to your images, ranging from applying soft focus to color tints.
Distributing: Picasa2 lets you choose from a range of different types of output varying from simple e-mails to making collages and posters. The Web Albums feature provides an easy-to-use image upload and download system.
Archiving: Easily burn images and collections to a CD or DVD for long-term storage, or copy images to a removable flash drive for easy transporting.
How many hundreds of images do you have on your hard drive? Do you know where they are and how to access them? Are they arranged in a way that makes it easy to locate them? Or are you stuck with many folders having mysterious names like DSN00393?
The simplest way to keep track of the images from Uncle Pete’s birthday, the 300 snapshots of your baby’s first birthday, and your class reunion is to build a uniform collection. Picasa2 offers a simple and easy-to-use method.
The first time Picasa2 opens, the program scans your entire computer or designated folders for images to include in its library.
Follow these steps to scan your computer for images:
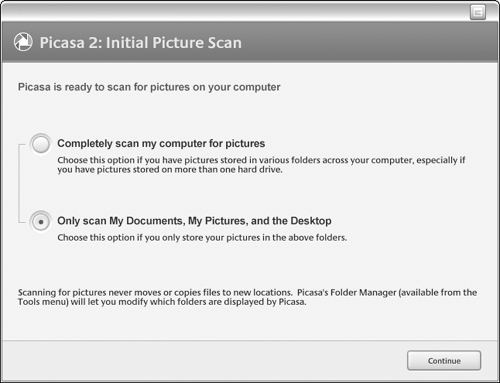
Open Picasa2. The window shown in Figure 21.1 appears.
Select one of two options for locating images on your computer based on your usual method of storing pictures:
Completely scan my computer for pictures. Select this option if you have images scattered all over your computer, have images on more than one hard drive, or can’t remember where you have stored pictures!
Only scan My Documents, My Pictures, and the Desktop. Select this option if you routinely store pictures in these folders, or use default settings for input devices, such as cameras, as the settings usually place images into named subfolders in the My Documents or My Pictures folders.
Once you make your selection, click Continue. The dialog box closes, the Picasa2 window opens, and you see the contents of your computer’s folders examined and image and other files collected. Files are placed in folders according to their dates.
Click OK to close the message that displays at the end of the importing process. The number of folders and image files that have been located are listed on the message.
Picasa2 recognizes and catalogs a range of file types including movies, images, and RAW image data files. The file types supported include:
Images: Picasa2 recognizes JPG, BMP, GIF, PNG, PSD, and TIF files
Movies: Files using AVI, MPG, WMV, ASF, MOV formats
RAW: Camera files supported include Nikon, Minolta, Pentax, Canon, and Kodak. Picasa2 automatically recognizes proprietary camera formats from many cameras as RAW file formats. File types include Nikon NEF, Canon CRW and CR2, Olympus ORF, Pentax PEF, Kodak DCR, Sony SRF, Minolta MRW, and Fuji RAF.
The Picasa2 program window is composed of several sections (Figure 21.2). The main components of the program include:
| ||
| ||
| ||
| ||
| ||
|
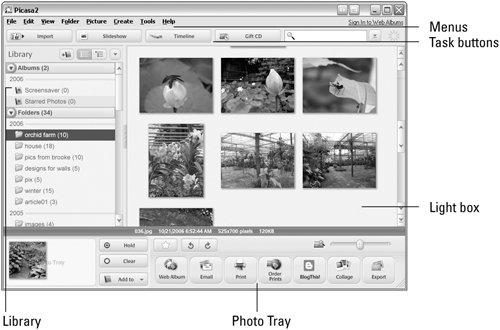
Table 21.1. Summary of Picasa2 Menu Contents
Menu label | Included features |
|---|---|
File | Open, find, and save elements used in the program, including files, folders, and albums; export content using print, e-mail, and online features |
Edit | Find commands for common actions, such as Cut, Copy, and Paste; includes commands for using effects and making selections |
View | Show the image content in several ways, including thumbnails, Timeline, slideshow, or keywords |
Folder | Specify how the images are seen, such as thumbnail sizes; specify how the thumbnails are displayed, such as black and white, or indexed color; choose a caption type for the images |
Picture | Select images or folders and choose commands for batch editing, such as renaming and adjusting contrast or color |
Create | Choose a product type to create from a group of images, such as a collage or a screensaver |
Tools | Choose program preferences, manage and configure program features |
Help | Access online Help for Picasa2, program support, and user forums |
You can add new content into existing folders of the Picasa2 Library or as new folders. Importing photos and video clips into Picasa2 uses the same process. Additional images can be imported into your collections from other folder or drive locations, from external media such as a CD or flash card, or directly from devices such as cameras and scanners.
You use the same method whether you are importing one file or all the images from a flash card or drive.
To import photos into Picasa2 from a camera drive, follow these steps:
Click Import to display the Import screen. The Import screen doesn’t open as a separate dialog box; instead, it replaces the Picasa2 interface except the main menu.
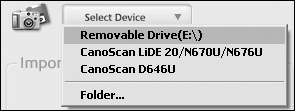
Click Select Device to open a menu. The contents of the menu, shown in Figure 21.3, vary based on the devices you have enabled and installed on your system.
Select the device from the list. The device’s drive opens, and existing content is shown as thumbnails in the Import Tray.
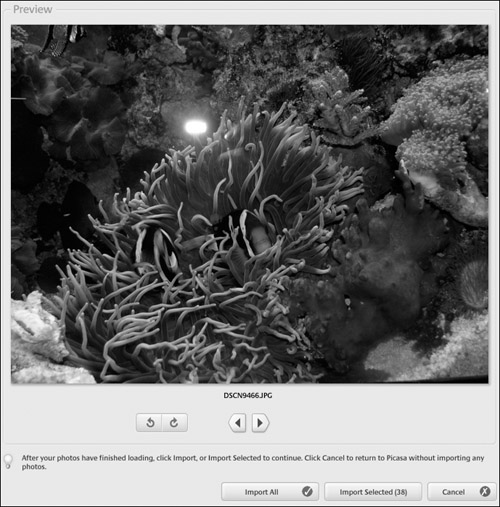
Preview the images on the drive by clicking the Previous and Next arrows below the Preview image, as seen in Figure 21.4.
If necessary, click the Rotate Clockwise or Rotate Counterclockwise buttons to rotate an image.
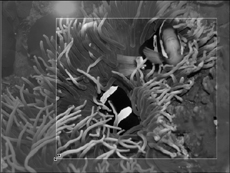
Shift-click/Control-click the thumbnails to select a subset of the files to import. The selected files’ thumbnails are framed with a bounding box, as shown in Figure 21.5.
Click Import Selected to import a subset, or click Import All to import the entire set of images from the drive.
On the Import All or Import [##] Item(s) dialog box that opens, choose from these settings:
Type a name for the folder.
Click Browse and specify a location in which to store the files; select an existing folder if you want to add more pictures to it. On Windows, the default location is a folder in My Pictures.
Add additional information, such as the place, description, and a date
Choose a camera or flash card action after copying the files-leave the source files alone, perform a safe delete to remove copied pictures, or delete all pictures on the card or camera.
Click Finish to close the dialog box and import the images into Picasa2. The Import screen is replaced by the regular program interface.

Note
If you change your mind about importing, click Cancel to close the dialog box and return to the program window without importing any images.
You can repeat the process of importing image files into existing folders as you work with your photo collections. Any thumbnail displayed in the Import Tray showing an X indicates an image that is already included in the Picasa2 library.
Unless you have established a uniform way of naming and organizing your images, you usually notice discrepancies in naming files and folders after bringing them together in the Picasa2 Library. Fortunately, Picasa2 offers a number of ways to organize your Library contents.
Before you start rearranging the contents of your image collections, choose the Library view that is the most convenient, depending on whether you are adjusting individual images, or images and folders. Configure the view from the Library panel, or by choosing View ![]() Folder View and choosing a command.
Folder View and choosing a command.
From the Library panel, choose from these different types of views:
| |
| |
|
To use the Folder Tree Structure view, follow these steps:
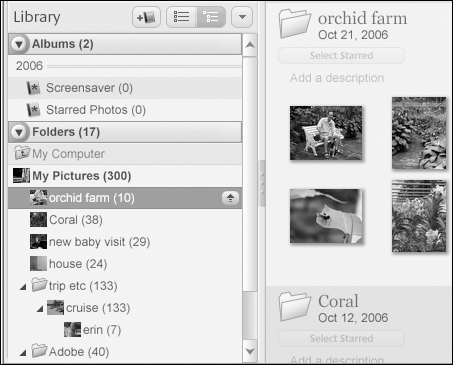
Click Set view to show folder tree structure at the top of the Library panel to reorder the contents of the Library (see Figure 21.6). The folders are reordered according to the highestlevel folders, such as My Pictures and My Computer.
To open subfolders, click the small arrows to the left of a folder name. You see the folders arranged in a nested hierarchy; all high-level folders show a folder icon, with a thumbnail showing nested contents.
Click the name of the folder you want to work with to display its images in the Lightbox. The folder’s name is highlighted in the Library, and a button showing an up arrow appears.
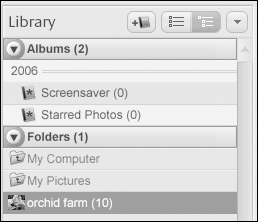
Click the up-arrow button to collapse the Folders list. The selected folder is listed outside the collapsed hierarchy of folders (see Figure 21.7).
The Picasa2 interface contains several features to readily organize the contents of your folders and files. For image files, you can:
Rename individual images
Rename a batch of images at one time
To rename an individual image, follow these steps:
In the Lightbox, select the image thumbnail.
Choose File
 Rename to open the Rename Files dialog box.
You can also press F2 to open the dialog box.
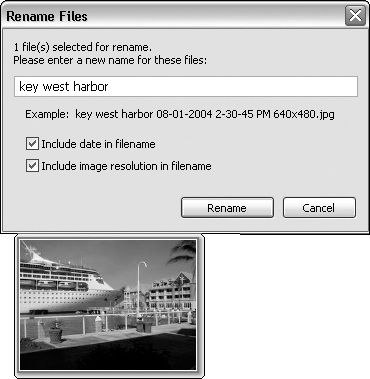
Type a name for the file in the text field on the dialog box. Include the date and image resolution in the file name by selecting the appropriate checkboxes shown in Figure 21.8.
Click Rename to close the dialog box and change the file’s name.
Instead of changing image names one by one, save some time and rename the files as a batch by following these steps:
Select the folder containing the images to rename. You can also select thumbnails if you want to change only some of the images in a folder. Shift-click to select contiguous files; Ctrl-click to select noncontiguous files.
Choose Picture
Batch Edit Rename to open the Rename Files dialog box (refer to Figure 21.8). Type a name, and choose options to include the date and image resolution if desired.Click Rename to close the dialog box and rename the files.
Note
If you type a batch name, such as winter, without including date or resolution information in the name, a number suffix is included automatically to give each image a unique name, such as winter-1, winter-2, and so on.
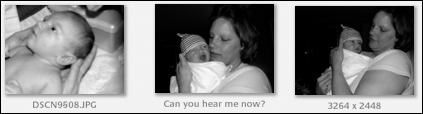
The filename and resolution choices can be used in the Lightbox as a thumbnail caption as well as in the image’s name. Choose View ![]() Thumbnail Caption and select an option. The default choice is None; you can also choose Filename, Caption, or Resolution. Examples of these options are shown left to right in Figure 21.9.
Thumbnail Caption and select an option. The default choice is None; you can also choose Filename, Caption, or Resolution. Examples of these options are shown left to right in Figure 21.9.
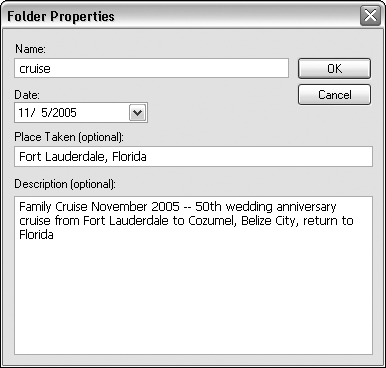
Each folder contains basic information that includes its name and a date, either the date when the images within the folder were captured, or a date assigned when the folder is created. To change the folder information, double-click the folder’s name in the Library panel, or choose Folder ![]() Edit Description to open the Folder Properties dialog box, as shown in Figure 21.10. Type the changes you want to make, and click OK to close the dialog box.
Edit Description to open the Folder Properties dialog box, as shown in Figure 21.10. Type the changes you want to make, and click OK to close the dialog box.
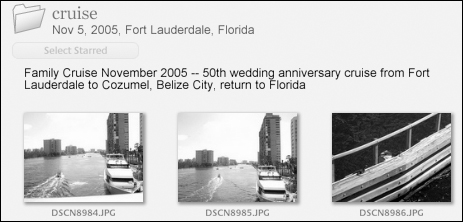
Changes made to a folder’s information are shown in the Lightbox below the folder’s name. As you can see in Figure 21.11, the information entered for the Description is shown in the Lightbox as well.
Tip
Save a few mouse clicks when adding a description. Instead of opening the Folder Properties dialog box, click Add a description below the folder’s label in the Lightbox. The label is replaced by a blinking I-beam cursor. Type the description and press Enter or click off the area to finish.
All the folders listed in Picasa2 are included as folders on your hard drive, with the exception of Albums. You can rename, move, combine, or delete folders from the Library panel, just as you do on your hard drive. And, like the method used on your hard drive, you can easily move files from one folder to another.
Click the thumbnail or thumbnails in the Lightbox and drag to the receiving folder. Release the mouse. Click Yes in the Confirm Move dialog box. The dialog box closes and the file is moved.
Click the thumbnail or thumbnails in the Lightbox and press Delete or choose Delete from Disk from the File or shortcut menus. Click Yes in the Confirm Delete dialog box when it asks if you want to delete the file. The dialog box closes and the file is deleted.
Locate and select the folder in the Library and press Delete, or choose Delete from the File or shortcut menus. Click Yes in the Confirm Delete dialog box when it asks if you want to delete the file. The dialog box closes and the file is deleted. In some circumstances, an Info dialog appears that states the images can be removed but the folder can’t be deleted because it contains files other than the images.
Don’t worry if you delete a folder from the hard drive when you intended to delete the folder from Picasa2 instead. Files aren’t permanently deleted from your system using Picasa2 commands-you’ll find the folders and images in your Recycle Bin.
Choose Folder ![]() Remove from Picasa. In the Confirm dialog box that appears, click Yes to confirm the folder’s removal from the program’s database.
Remove from Picasa. In the Confirm dialog box that appears, click Yes to confirm the folder’s removal from the program’s database.
Display the thumbnails for the images you want to separate from an existing folder. Select the file(s) in the Lightbox and choose Move to New Folder from the shortcut menu, or choose File ![]() Move to New Folder to open the Folder Properties dialog box. Name the folder, and click OK. The dialog box closes, and the files are moved into their new folder.
Move to New Folder to open the Folder Properties dialog box. Name the folder, and click OK. The dialog box closes, and the files are moved into their new folder.
Splitting a folder works similarly to creating a new folder. Right-click the thumbnail in the Lightbox that identifies where you want the list of files split and choose Split Folder Here to open the Folder Properties dialog box. Name the folder, and click OK to move the files into the new folder.
You can add folders to the Hidden Folders collection in the Library. A password used to hide the contents from view within Picasa2 has no bearing on the files on your hard drive. A password can be added any time you add a folder to the Hidden Folders collection and applies to the entire collection, not just the folder in which you specified the password.
You can password-protect and hide content of selected folders. Follow these steps:
Right-click the folder’s name in the Library panel. Choose Hide Folder to open the Add Password dialog.
Click Yes to continue with the password process. Open the Password Entry dialog box.
If you don’t want to use a password, click No to close the Add Password dialog box and add the folder to the Hidden Folders collection.
Type a password in the field shown on Figure 21.12. Click OK.
The dialog box is renamed Password Verify. Retype the password and click OK again. The folder is moved to the Hidden Folders collection listed in the Library. The listing shows a red arrow to the left of the label, rather than the green arrow used with other collection listings.

When you want to view the contents of a hidden folder, click the Hidden Folders label in the Library to open the Password Entry dialog box. Type the password and click OK. After you finish working with the files, be sure to collapse the collection’s label again. Otherwise, when you close and reopen the program, the Hidden Folders are listed for display.
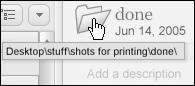
Select a folder in the Library panel and choose File ![]() Locate on Disk, Folder
Locate on Disk, Folder ![]() Locate on Disk, press Ctrl+Enter, or simply double-click the folder’s name in the Lightbox. If you want to see where the folder is located, hover the mouse over the folder’s icon in the Lightbox to display the folder path in a tooltip, as shown in Figure 21.13.
Locate on Disk, press Ctrl+Enter, or simply double-click the folder’s name in the Lightbox. If you want to see where the folder is located, hover the mouse over the folder’s icon in the Lightbox to display the folder path in a tooltip, as shown in Figure 21.13.
An album is a named grouping you create with Picasa2 that exists only within the program. The contents of the albums can be located in any number of folders on your hard drive. You can create an album to use as a storage folder when you are assembling images for a project like a collage, or want to make a slideshow, or upload them to a Web Album.
Picasa2 includes the Screensaver and Starred Photos albums that can’t be renamed or deleted. When you tag an image with a star it is included automatically in the Starred Photos album. The files copied to the Screensaver album are used for a system screensaver.
Click Create a new album on the Library panel to open the Album Properties dialog box, identical to the Folder Properties dialog box shown in Figure 21.10. Name the album and add other information as desired, and click OK to close the dialog box and add the album to the Library.
Select a thumbnail in the Lightbox and drag it to the album to which you want to add it. A new instance, or copy, of the image is created when you add it to an album. You can save one photo in multiple albums without having to save multiple copies of the file itself. In the Library panel shown in Figure 21.14, for example, the new album contains the same four images as the Starred Photos default album. The images are also located in their source folders.

When you initially set up Picasa2 on your computer, you select the folders that contain image files to include in the Library. Over time, you are sure to add more images to your computer that should be included in the Library. Fortunately, Picasa2 includes a Folder Manager used for locating and adding files.
To add content to the image database, follow these steps:
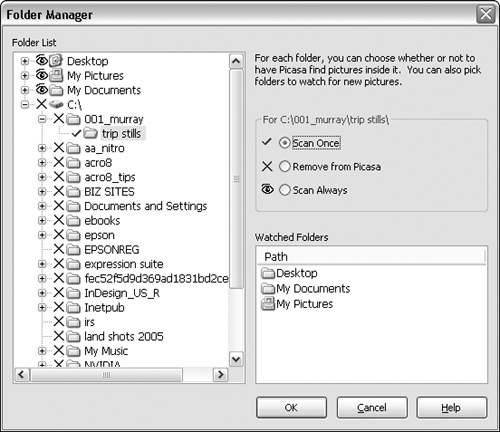
Choose Tools
Folder Manager to open the dialog box shown in Figure 21.15.Select an option for the selected folder:
Select Scan Once to check the content of the folder and import any image or video files into the Library as a single task
Select Remove from Picasa to remove a selected folder from the folder list; the folder’s icon changes to the X icon
Select Scan Always to include the selected folder as one of the Watched Folders. A Watched Folder is checked for new images each time the program is opened, and is a convenient way to automatically add content to the Library.
Archiving Images
If your images are critical to a workflow or project, be sure to back them up. Follow these steps to use the backup system offered in Picasa2:
Choose Tools
Backup Pictures to open the Backup your photos screen.In Step 1 of the backup process, create a set of records. Use the default My Backup Set or select an existing backup you have used previously. The Backup Set records where the file copies are stored, as well as which files are already stored.
In Step 2 of the backup process, select the files you want to back up. Picasa2 lists the folders and images that aren’t backed up. Save time and click Select All to select all the files you haven’t preserved.
Click Burn to burn the backup record to a CD or DVD following your CD or DVD device procedures.
Click OK to close the Folder Manager dialog box. Any folders marked as Scan Once are checked and new files are imported into the Library.
A major benefit of cataloging images using a system like that found in Picasa2 is the ability to search for specific files or groups of files quickly.
In Picasa2, you can catalog images by adding a star, a keyword, or multiple keywords. Any image can include both a star and keywords.
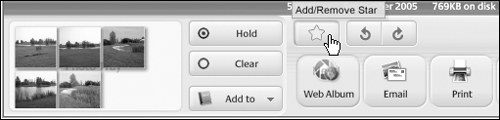
To tag an image with a star, select the image or images in the Lightbox. In the Photo Tray, click the Add/Remove Star button, as shown in Figure 21.16.
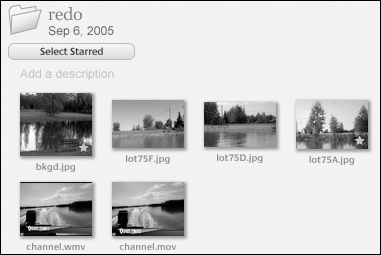
To locate any of the starred images, simply click the Starred Photos album in the Library to display all starred images in the Lightbox. If you have a folder containing both starred and unstarred images, click Select Starred in the Lightbox to automatically select the starred images, like the two shown in Figure 21.17.
Keywords are terms you use in a collection of images to describe its contents. Keywords are used to search for a specific image or images in your Library.
To add a keyword to an image, follow these steps:
Select the image or images in the Lightbox. If you are applying the same keyword to a group of images, you can select them all at once.
Choose View
Keywords to open the Picasa: Keywords dialog box.You can also use press Ctrl+K to open the dialog box.
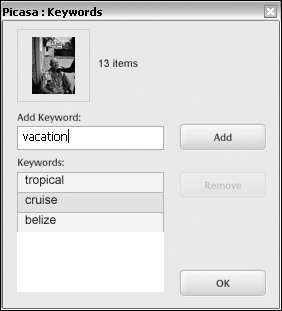
Type the text in the Add Keyword text field and click Add, or press Enter to move the word to the Keywords list, as shown in Figure 21.18.
Add more keywords to the list and click OK to close the dialog box when you finish.
To add more keywords, select the images within the larger group and repeat Steps 2 to 4.
Continue selecting images and adding keywords until you define the images in the group as precisely as you require in a normal search.
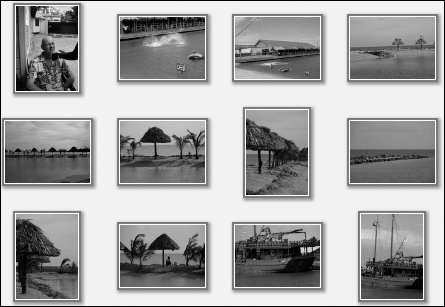
You can search a large number of images quickly for a subset of images when a system of carefully designed keywords has been applied. For example, the group of 12 images shown in Figure 21.19 has an assortment of keywords applied. All images use the keywords tropical, vacation, cruise, and belize. Of that group of images, nine images include the keyword beach; six images include the keyword palapa; two images include the words pirate and ship, and one image includes the words braid and beard. When a search is performed, all images are returned using the term tropical while only two images are returned using the term pirate.
For added interest, and a really cool addition to your image collection, tag your images to a specific location using Google Earth. The GPS (Global Positioning System) data is embedded into the photo’s metadata, letting you see the photo on a rendered map in Google Earth.
Cross-Ref
Read about using Google Earth in Chapter 13.
Follow these steps to geotag an image:
Select your photo or photos in Picasa2.
Choose Tools
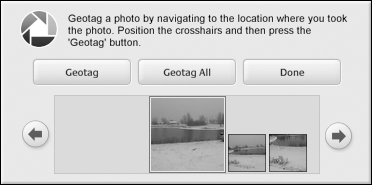
Geotag Geotag with Google Earth. Google Earth opens, and a small Picasa2 window overlays the bottom right of the program window. You see the images you selected in the Picasa2 window, as shown in Figure 21.20.Display the locale corresponding to your first image. The locale is defined in one of two ways:
If you previously typed information in the Place Taken field of the Picasa2 folder description (refer to Figure 21.10) the locale is shown automatically in the Google Earth program.
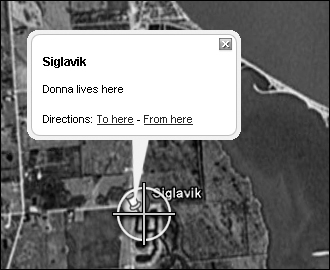
If the location hasn’t been identified, use the navigation tools in Google Earth to specify the locale by placing it below the large crosshairs that overlay the map, as shown in Figure 21.21.
Once the correct location is identified, click Geotag on the Picasa2 window.
Select the next image in the Picasa2 overlay window and repeat Steps 3 and 4.
If all the pictures use the same location, click Geotag All to set each image’s locale simultaneously.
Click Done when you finish tagging the files to add the information to the images.
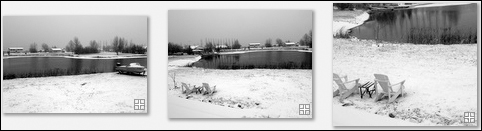
In Picasa2, thumbnails of images that are geotagged are identified by a crosshair icon in the Lightbox, such as the images seen in Figure 21.22.
If you want to remove the geotag, choose Tools ![]() Geotag
Geotag ![]() Clear Geotag info. The information is removed from the image’s metadata, the icon is removed from the photo’s thumbnail, and the photo is removed from Google Earth.
Clear Geotag info. The information is removed from the image’s metadata, the icon is removed from the photo’s thumbnail, and the photo is removed from Google Earth.
On the Web
Download Google Earth at http://earth.google.com/downloads.html.
Picasa2 lets you view an image’s Exchangeable Image File Format (EXIF) metadata, which includes different types of information about the content and structure of a file. EXIF is a standard for storing interchange information in image files. Most digital cameras now use EXIF and store information such as the camera and flash settings.
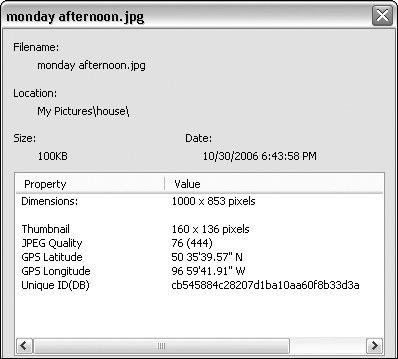
You can see basic metadata for a file by selecting an image in the Lightbox and choosing Properties from the shortcut menu or the Picture menu to open the dialog box shown in Figure 21.23. The available information varies according to the type of image and the camera data attached to the file. When you geotag an image, you see the GPS information, shown as the locale’s longitude and latitude, included with other EXIF metadata.
You can scroll through the Lightbox to locate images that are included in the Library if you don’t have too many images. On the other hand, looking for specific images among thousands of image files is tiresome and time consuming. Fortunately, you can use different types of search methods to quickly locate images in the Library.
You can use the Search function in a number of different ways to locate images in the Library. Choose View ![]() Search Options to open the Search Options, or click the arrow to the right of the Search field at the top right of the program window shown in Figure 21.24.
Search Options to open the Search Options, or click the arrow to the right of the Search field at the top right of the program window shown in Figure 21.24.

Follow these steps to search the contents of your Library based on specific criteria:
Click one of the buttons on the Search Options to filter the contents of your Library:
Click Starred to display only the images to which you have applied a Star.
Click Movies to list only the movie files included in the Library.
Click Uploaded to list only the files that have been uploaded to a Web Album.
To narrow the results further, filter the initial results based on a date range. Drag the Date Range slider left to include older content, and right to include newer content.
When you finish searching, click Exit Search to close the dialog box, or click Show/Hide Search Options to toggle the dialog box closed.
If you intend to search further, click the button selected in Step 1 to deselect it, and continue with your search.
To search for images based on keywords, follow these steps:
Click the Search field to activate it. Type a keyword or keywords. As you type, Picasa2 completes the words using text that has been typed previously, and displays the results as you add letters.
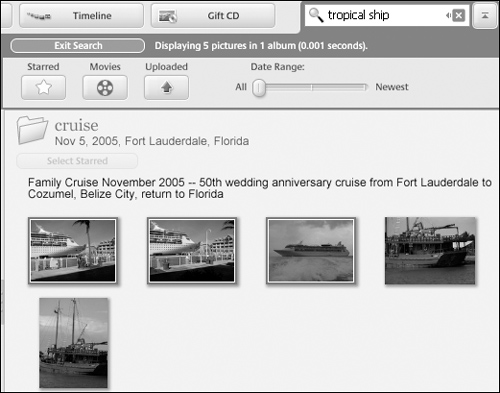
In the example, the term tropical is added first, narrowing the displayed results to include the group of images shown in Figure 21.19. When the term ship is typed, the results are narrowed to the images shown in Figure 21.25.
Add or remove keywords as necessary to locate the images for which you are searching.
To start a new search, click the X icon that displays at the right of the text entry field as soon as you start typing a search term.
The contents of the search field are cleared, and you can start a new search.
When you finish searching, click Exit Search to close the dialog box, or click Show/Hide Search Options to toggle the dialog box closed.
Rather than looking through folders and thumbnails in the Library and Lightbox, you can find images using the Timeline. If you can remember roughly when an image was taken, and know you took some images of a specific subject or in a specific location, you may be able to pinpoint the folder quickly in the Timeline window.
Follow these steps to look through your Library in the Timeline screen:
Click the Timeline task button to open the Timeline screen, as shown in Figure 21.26. You can also choose View
Timeline, or press Ctrl+K.Drag thumbnails to locate a folder.
Click one of the columns on the Timeline shown at the bottom right of the window. The Timeline is dated according to the oldest and newest images in the Library.
After you make a selection on the Timeline, the thumbnails representing the folders in the Library slide to the left to show a newer folder, or to the right to show an older folder. The folder’s name and date are shown in the background, as is a grayscale version of the first image in the folder.
To find other folders in the Library, choose one or more of these options:
Click the Previous or Next buttons to show the folder older or newer than the currently selected folder.
Drag the thumbnails left to find an older folder, or right to find a newer folder than the currently selected folder.
Once you locate the folder, click the Close button at the lower left of the Timeline screen to return to the Picasa2 program window. The selected folder is active in the Lightbox.

Scrolling through thumbnails in the Lightbox lets you view your pictures, but reviewing images within a folder or your entire Library using a full-screen-sized image in a Slideshow offers a hands-free way to scan your pictures, change their orientation, and assign a star rating.
To start a Slideshow, click the Slideshow task button, choose View ![]() Slideshow, or press Ctrl+4 to display the Slideshow screen, as shown in Figure 21.27.
Slideshow, or press Ctrl+4 to display the Slideshow screen, as shown in Figure 21.27.
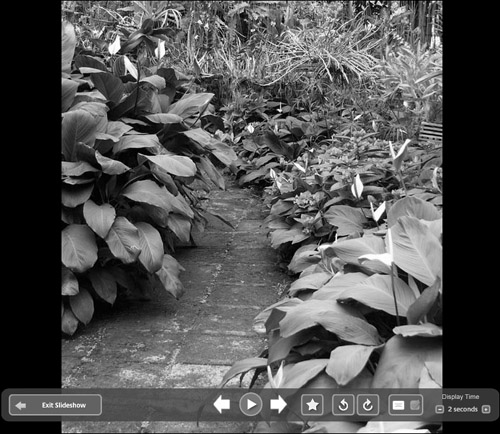
The Slideshow screen shows the first image or a selected image in an active collection with a toolbar overlay. Move the mouse cursor away from the toolbar area to hide the toolbar; move the cursor into the toolbar area to display the toolbar again. The tools available in the Slideshow screen are described in Table 21.2.
Table 21.2. Slideshow screen tools
Command | Button | Explanation |
|---|---|---|
Exit Slideshow | Click to exit the Slideshow screen and return to the program window. | |
Navigate controls | Click the left arrow to reverse the playback; click the right arrow to advance to the next image; click the center arrow to play the slides automatically. | |
Star | Click to apply a star to the image to use for sorting and locating images. | |
Rotate image | Click the left button to rotate the image counterclockwise; click the right button to rotate the image clockwise. | |
Show captions | Toggle the captions on or of by clicking the Captions button. The captions aren’t shown if the Slideshow is using Automatic mode. | |
Set time | Click the (-) button to decrease the time each slide is displayed; click the (+) button to increase the time each slide is displayed. The current delay is shown in seconds. |
In addition to organizing and sorting images, Picasa2 also contains features for editing, both for correcting flaws and adding some basic effects.
Most pictures need some degree of touch-up, whether you are capturing images of your son’s soccer game or the cover of a glamour magazine. Picasa2 offers the Edit Picture screen to work with the appearance of your photos.
Follow these steps to begin editing an image:
Double-click an image for editing in the Lightbox to open the Edit Picture screen. You can also choose View
Edit View, or press Ctrl+5.A full-size image appears in the Edit Picture screen and is highlighted in the thumbnail strip at the upper right of the Edit Picture screen.
To view a different image from the active folder or album, click the left or right arrows at the ends of the thumbnail strip, as shown in Figure 21.28.
Note
The Basic Fixes tab appears by default at the left of the Edit Picture screen, offering correction tasks that are applied automatically. For controlling the light in an image, click the Tuning tab and work with the sliders. Add special effects such as color tints and glows using choices on the Effects tab. Read about using each of the different sets of edit tools in the next section.
Click Make a caption! below the image to activate an I-beam cursor and type a caption for the image, as shown in Figure 21.29. Click the Caption icon at the left of the preview area to toggle the caption visible and hidden; click the Trashcan at the right of the preview area to delete the caption.
Click Back To Library at the upper left to close the Edit Picture screen and return to the program interface. You can also click Slideshow at the upper left of the Edit Picture screen to view the sequence of images in a Slideshow view.

The simplest types of edits are also the ones you use the most-isn’t that convenient? It’s simple for the lighting in your photos to be incorrect, the image may be crooked, or the background may be too dark.
In the Picture Edit screen, use one of seven tools included on the Basic Fixes tab to correct common image flaws.
Picasa2 displays your images at a size that fits on the Edit Picture screen. You can make changes to the magnification and view using the tools displayed below the preview area, as shown in Figure 21.30.
The tools include the following
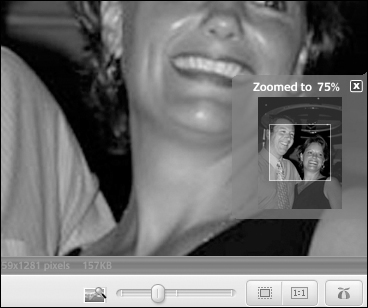
Zoom slider: Drag the slider to the right to increase the magnification of the image. As you drag the slider, an overlay shows you the portion of the image that is showing in the preview area.

Fit photo to viewing area: Click the button to show the image at a size that fits within the Edit Picture screen’s preview area.

Display photo at actual size: Zooms in or out to show the image at its actual size. The entire image is shown in an overlay view with the viewed area highlighted.

Show/Hide Histogram and Camera Information: Click to show a graph of the color distribution in the image. Read more about the histogram in the section “Viewing color information in a histogram.” Depending on the source of the image, you also see camera data such as the focal length and ISO setting.
Three of the Basic Fixes tools are applied with a single mouse click. To return to the original image state, click Undo I’m Feeling Lucky. You can apply, reverse, and redo several fixes in sequence.
The one-click corrections you can perform include:
I’m Feeling Lucky: Click I’m Feeling Lucky to adjust the image’s color and contrast to the ideal balance based on the image’s color information.
Auto Contrast: Click Auto Contrast to adjust the contrast in your picture in Picasa. Click Undo Auto Contrast to reverse the contrast change.
Auto Color: Click Auto Color to adjust the color levels in your picture automatically. Click Undo Auto Color to reverse the color adjustments.
The Crop tool lets you remove a section of the picture that you don’t want to keep. Follow these steps to crop an image:
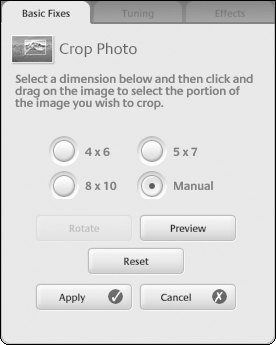
Click Crop in the Basic Fixes tab to display the Crop Photo screen, as shown in Figure 21.31.
Click one of the choices in the Crop Photo screen to use a preconfigured image size for the crop dimensions. If you don’t make a selection, the Manual option is selected by default.
Drag the mouse over the image to draw a crop box, as seen in Figure 21.32. Release the mouse and make adjustments as required.
You can click and drag a corner of the box to proportionally resize it, drag a side of the box to resize it dimensionally, or drag the entire box to reposition it over the image.
Click Preview to see how the crop appears after it is applied.
The image is shown cropped in the preview area, and then returns to the full-sized image again automatically.
Click Apply to crop the image and return to the Basic Fixes tab.
It’s simple to have your camera angled slightly when taking a picture. When you don’t want to keep the tilted angle for effect, follow these steps to straighten your image:
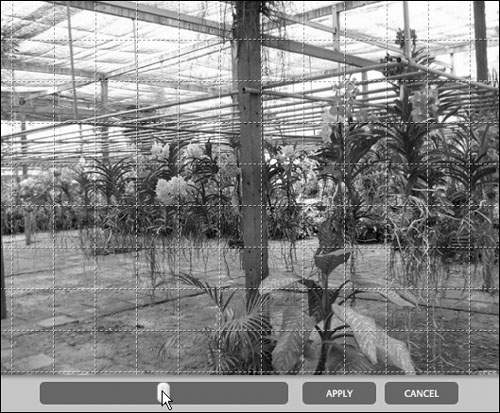
Click Straighten on the Basic Fixes tab to display the Straighten Picture view.
Drag the slider to align the picture (Figure 21.33). Watch the image rotate as you move the slider; your goal is to have the content in the image align with the grid.
Click Apply to make the correction and return to the Basic Fixes tab.
A common image flaw is a red eye appearance, resulting from the reflection of the camera’s flash on the eye’s retina. Click the Red Eye button on the Basic Fixes; then drag a rectangle around the red areas in the subject’s eye. You can repeat the process for as many red eyes as you need to repair in your image. When you are finished, click Apply to modify the color and return to the Basic Fixes tab.
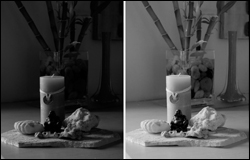
Drag the Fill Light slider to balance the light in an image’s foreground and background. In Figure 21.34, for example, the image on the left before applying the Fill Light feature; the one on the right shows the results of dragging the slider to its halfway point.
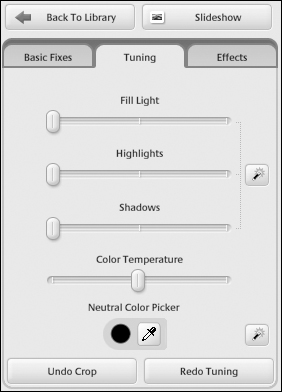
The Tuning tab contains a number of sliders, including another Fill Light slider similar to the one just described. Use the sliders on the tab to adjust different aspects of the image’s lighting and color. In addition to adjusting values using a slider, you can also use automatic light and color correction options using the buttons shown on the tab in Figure 21.35.
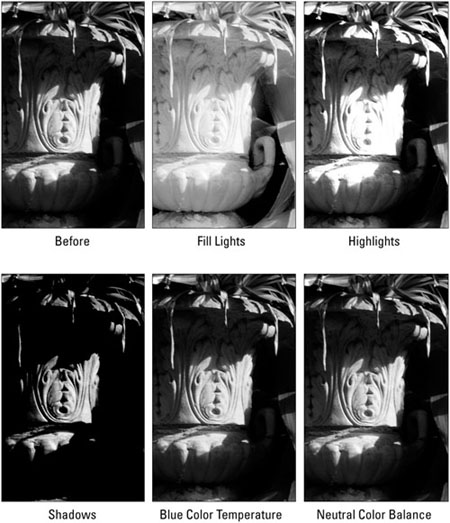
To demonstrate how different options produce their effects, the tools are applied to the same image, shown in its original state in Figure 21.36. Labels on the figure identify the impact of using the sliders at a defined setting. In some effects, such as adjusting shadows, it’s easy to see the difference between the before and after images. Tuning tools that didn’t produce any change in the image are not shown in Figure 21.36.
Note
In some cases, because the figures in the book are in grayscale, it’s hard to tell the difference between the original and the one with adjustments. When you experiment with making color and light adjustments yourself, display the color histogram overlay window to see how adjusting the sliders modifies the amounts of color shown in the graph.
The Tuning tools include:
Fill Light: Use the Fill Light slider to balance the light in the foreground and background of a picture. The example shows the effect of using 90 percent fill light.
Highlights: Drag the slider to the right to add areas of brightness in the image. The example shown in Figure 21.36 uses Highlights applied at 100 percent.
Shadows: Drag the slider to darken and expand dark areas of the image. The example shows Shadows applied at 100 percent.
Lighting auto fix: Click the Lighting auto fix button to the right of the Highlights slider to automatically adjust and balance areas of light and dark in the image. Applying the tool to the example image had no effect as it is already balanced.
Color Temperature: Drag the slider to the left to make the image cooler or bluer; drag the slider to the right to make the image warmer or redder. In the example, dragging the Color Temperature slider to the far left produces a strong blue tint to the image. Dragging the slider to the extreme right has very little effect as the original image uses a strong red cast in its color.
Neutral Color Picker: Click the Neutral Color Picker and click to sample a pixel on the image that identifies an area that is considered neutral. Picasa2 balances the colors in the image against the color chosen. Instead of using a manual choice, click the Color auto fix button to the right of the Neutral Color Picker to balance the color automatically. In the example, using the Color auto fix produces a strong shift toward the blue tones, cooling the image and giving it a blue-green cast.
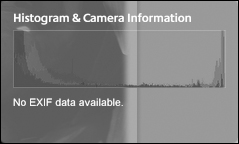
Camera data and color information called the RGB (Red/Green/Blue) histogram are derived from the image’s data. The RGB histogram is a real-time graph that shows the intensity of colors in your picture and how they change when you make edits in Picasa2.
With an image displayed in the Edit Picture screen, click Show/Hide Histogram & Camera Information on the Photo Tray to display the histogram in an overlay window, such as the one shown in Figure 21.37. The histogram shows the color and light distributions for the image used in Figure 21.36. Although you can’t identify different color bands in a grayscale image, you can see that the concentration of information is at both the lower (left) end of the color and brightness spectrum and at the upper (right) end of the color and brightness spectrum. The histogram’s display identifies the high contrast settings used in the image.
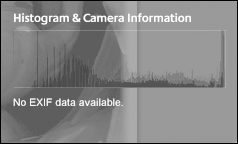
Making adjustments to the color and amounts of light in the image produce visible changes in the histogram’s distribution. For example, Figure 21.38 shows the same histogram as that in Figure 21.37 as it appears when the Fill Light slider is set at 90 percent in the Tuning tab (you can see the image with the Fill Light setting in Figure 21.37). Now you see that the color bands have shifted to the right, as have the brightness bands. In fact, there is no color or light pixel information in the lower range of the graph at all.
Click the Effects tab to display a set of 12 effects that can be applied alone or in combination with other effects. Thumbnails of the image displayed in the Picture Edit screen show samples of the different effects, as seen in Figure 21.39.

Select the effect on the Effects tab to apply it to the image shown in the preview area. For some simple effects, such as B&W, an image is either black and white or it isn’t-there aren’t any adjustments to make. The top five effects in the Effects tab are simple effects, indicated by the 1 shown in the bottom right of the effect button’s thumbnail. The other effects open a settings tab with one or more sliders or tools to make adjustments. Effects are added in progressive layers, and you can always undo or redo the effects you make at any time.
After you choose and configure an effect, if you try to return to the Library or click another tab on the Edit Picture screen, the screen blurs and a Confirm Edit message asks if you want to apply the filter-in itself an interesting effect! Click Yes or No.
Note
The simple effects, as well as the basic Auto Contrast, Auto Color, and I’m Feeling Lucky effects, can be applied as a batch. Choose the pictures to modify, choose Picture ![]() Batch Edit, and then select the effect to apply.
Batch Edit, and then select the effect to apply.
Here are the effects you can use to improve your pictures in Picasa2:
Sharpen: Makes the edges of objects in your pictures crisper.
Sepia: Strips the color from the image and applies a brownish red tone.
B&W: Desaturates the image by removing all the color, leaving only the grayscale image.
Warmify: Warms the color in an image, adding more red tones to replace blue tones; the effect is often used to improve skin tones.
Film Grain: Applies a grainy film look to an image.
Tint: Removes the color from the image. On the Tint tab, drag the Color Preservation slider to define how much of the original image color should remain, from 0 to 100 percent. Click the eyedropper to show a Tint tab, and use the dropper to sample a color from the swatches or the color display to apply to the picture. In the image shown in Figure 21.40, the coral and the crab are lovely shades of magenta.
Saturation: Drag the Saturation Amount slider left to remove color from the image, or right to increase the depth of color in the image.
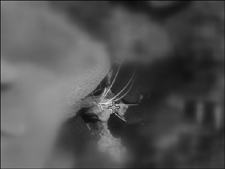
Soft Focus: The Soft Focus effect uses two sliders. Drag the Size slider to increase or decrease the size of the focus area in the image; drag the Amount slider to increase or decrease the amount of blur in the image. In Figure 21.41, you see crosshairs over the image. Drag the crosshairs to set the center point of the effect.
Glow: Add a soft glow to your image by adjusting the Intensity slider to define the glow’s brightness and the Radius slider to define the size of the brightened area on the image.
Filtered B&W: The color is removed when the effect is applied. In the Filtered B&W tab, choose a color from the color picker that is applied like a color filter to the image. Depending on the color in the original image and the color of the filter chosen, areas of the image appear to darken or lighten.
Focal B&W. The Focal B&W effect first desaturates the image. Define the size of the colored area by dragging the Size slider; define the sharpness of the boundary of the focus area by dragging the Sharpness slider. Move the crosshairs to identify the center of the image, like the example shown in Figure 21.42.
Graduated Tint: Add a gradient using a color you select from a color picker. Drag the Feather slider to adjust the sharpness or softness of the color changes; drag the Shade slider to define how much of the color is used in the gradient.

Caution
Edits made in Picasa2 aren’t stored in the original image. If you want to change the original, use an external editing program. Display the image in the Lightbox. Right-click and choose Open With from the shortcut menu. The list of available programs depends on your system configuration. Select the alternate editor to open and edit the image.
Picasa2 doesn’t save images in the same way as other common photo processing software. When an image is saved, the original version of the image is copied into a subfolder named Originals. The saved image in the folder is actually the edited copy.
Tips to keep in mind when using edited Picasa2 images:
Edited files are saved only as JPG files at 85 percent quality, regardless of their original format.
The original and saved copies of the image use the same size.
Any time a change is made to an image, the Save Changes button is active on the Lightbox, as shown in Figure 21.43.
To save your edits to a specific location other than the default subfolder, choose File
Save As and specify the storage location.The edited versions of your images are used for e-mailing, slide shows, and Web Albums.
Once your images have been edited, it’s time to share them.

Picasa2 offers different ways to send images from within the program, which saves time and effort. For example, you can export images directly to e-mail, save them to a portable storage device, or send them to your blog.
You can select the images you want to distribute in a number of ways, including:
Selecting a folder containing the images
Adding stars to a number of images and selecting the Starred folder
Selecting and holding images in the Photo Tray.
Selecting folders of images has been described elsewhere. To select and hold images in the Photo Tray, follow these steps:
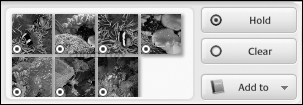
Locate and select the first image to include from the Lightbox. A thumbnail of the image is shown in the Photo Tray holding area.
Click Hold on the Photo Tray. The thumbnail displays a small target icon at its lower-left edge, meaning it is attached to the Photo Tray.
If you don’t use the Hold feature, each time you make a selection, you replace the image currently in the holding area.
Locate and select the next image from the Lightbox. Its thumbnail is placed in the Photo Tray next to the first thumbnail.
Click Hold on the Photo Tray again to store the second thumbnail.
Continue selecting and holding images until you assemble all the images you want to work with, like the set of seven thumbnails shown in Figure 21.44.
If you add and hold an image but then change your mind, select the thumbnail and click Clear to remove the Hold from the image and delete it from the Photo Tray.
After you finish selecting your photos-either using the previous steps or by selecting folders-use one of the methods available from the Photo Tray to send the images.
Picasa2 automatically resizes and attaches pictures to e-mail messages at convenient sizes. The default e-mail client is Gmail. To change the e-mail settings, choose Tools ![]() Options, and click the E-Mail tab. Make your choices and click OK to close the dialog box and change the preferences.
Options, and click the E-Mail tab. Make your choices and click OK to close the dialog box and change the preferences.
You can choose from these options:
Select a program from the list: You can use Outlook, Gmail, Picasa Mail, or choose each time you send pictures.
Specify a size for sending multiple images ranging from 160px to 1024px in width.
Choose to send individual images as their original sizes or using the specified resize width.
Define whether to send the first frame or the entire sequence when sending a movie.
If you use Outlook as the e-mail client, specify whether to send the images as an HTML storybook attachment.
After selecting the images you want to send, follow these steps to e-mail the images:
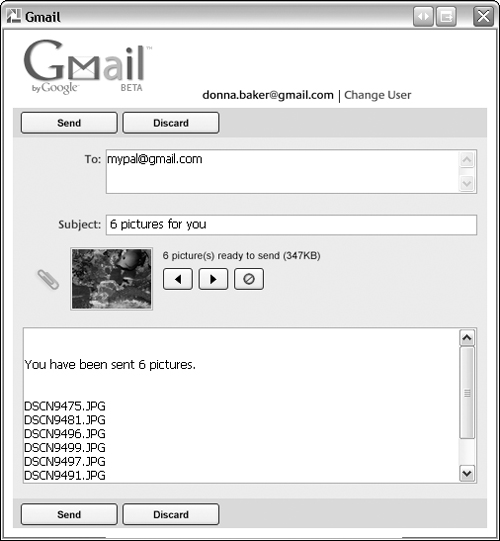
Click Email on the Photo Tray to open the Gmail dialog box shown in Figure 21.45.
Type the recipient’s name in the To: text box. The Subject and body of the e-mail are already complete. Select the text and replace it if you want.
Review the selected images on the dialog box. Scroll through the set of photos to review them using the left and right arrow buttons; click Remove to the right of the arrow buttons, or Discard at the bottom of the dialog box to delete the image visible as the thumbnail.
Click Send to close the dialog box and e-mail the images via the specified e-mail client.
Depending on how your system is configured, the e-mail message may be sent directly or open further dialog boxes with more instructions.
If you have a blog at Blogger, use the Blog This! command to automatically transfer your selected pictures and text to your blog.
Cross-Ref
Read how to set up, customize, and maintain a blog using Blogger in Chapter 25.
Select the images to upload, and then follow these steps to transfer images to your Blogger blog:
Click Blog This! on the Photo Tray to open the Picasa: Blog This! dialog box.
Follow the instructions for creating a new blog, or sign in to your account.
Select the blog where you want to display the images.
Choose a layout and an image size. For the layout, select None, Left, Center, or Right. Specify an image size of Small, Medium, or Large.
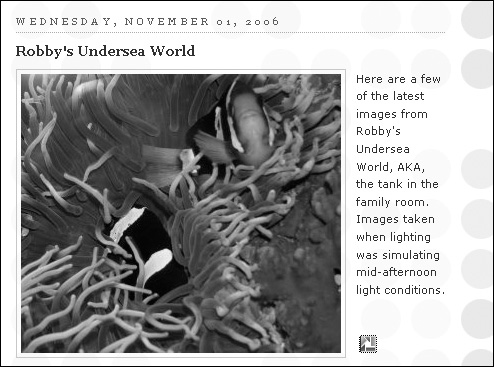
Click Save Settings to pass the content to your blog’s input page. Type the title and text for the posting and click Publish.
Back in Picasa2, the images are processed and uploaded to your blog. Check the results online, like the page shown in Figure 21.46.
If you want to take photos with you on a portable device, such as a removable hard drive or flash drive, you can export them in a single step. Select the images in Picasa2, and click Export on the Photo Tray to open the Export to Folder dialog box. Make the choices for export and click OK to process the files and save them.
Choose from these options:
Specify the folder where you want to send the images. The folder can be on a hard drive or a portable drive.
Type a name for the exported folder if you don’t want to use the default folder name.
Resize the image to a specified dimension or use the original image sizes.
Specify the image quality, or leave the default Automatic quality option selected.
For movie files, specify whether to export the entire movie or only the first frame.
Use the Picasa2 print commands for printing your images directly from the program.
Follow these steps to send a batch of images to your printer:
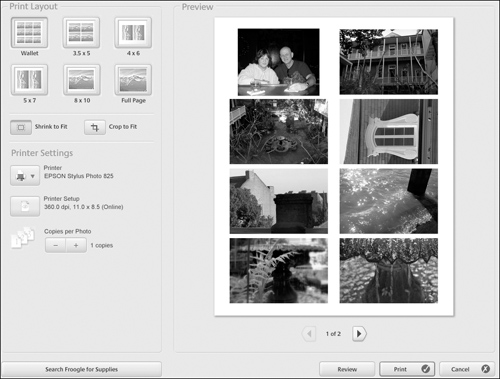
Select the images you want to print and click Print on the Photo Tray to open the Print Screen, as shown in Figure 21.47.
Click the size for the prints in the Print Layout area. You can only use one size of image for each printing process.
Click either Shrink to Fit or Crop to Fit to size the images proportionally.
Check the printer settings. Click Printer to open a list of printers configured for your system if you don’t want to use your default printer.
Click Printer Setup to open your printer’s dialog boxes to configure the settings.
Change the number of copies of each photo by clicking the Copies per Photo (-) and (+) buttons. The print settings use one copy as the default.
Click the directional arrows below the Preview to view other pages if there are more images than those that fit on a single page.
Click Review to open an information dialog box that lists the names and resolutions of the images you selected. Click OK to close the dialog box again.
Click Print to send the images to your printer.
Adjusting the Photo Tray Layout
If you want to reconfigure the task buttons on the Photo Tray, choose Tools ![]() Configure Buttons. Add, remove, and reorder buttons, and click OK to close the dialog box and revise the layout. Reopen the dialog box and click Reset to Defaults to restore the original button display, as shown in the figure.
Configure Buttons. Add, remove, and reorder buttons, and click OK to close the dialog box and revise the layout. Reopen the dialog box and click Reset to Defaults to restore the original button display, as shown in the figure.

Use the default arrangement of tasks on the Photo Tray or adjust them to suit how you work in the program.
Note
You can change the available print sizes offered in the Print screen. Choose Tools ![]() Options and click Printing. In the Available Print Sizes section of the dialog box, click the drop-down lists and choose from a wide range of image sizes, including metric values.
Options and click Printing. In the Available Print Sizes section of the dialog box, click the drop-down lists and choose from a wide range of image sizes, including metric values.
While you are in the options, choose a high-quality Printer setting if you find you are changing the settings every time you print images. You can also change the print resampler quality from the default General to Extra Sharp. Click OK to close the Options dialog box.
Rather than printing images at home, many people prefer to send their photo files to an online service. You can export files directly from Picasa2 for processing by one of those services by following these steps:
Select the images you want to upload and click Order Prints on the Photo Tray to open the Picasa2 Prints & Products screen.
Choose the Location from the drop-down list if you don’t live in the United States.
Click Choose to select the service provider you want to use for ordering prints.
Follow the instructions from the chosen service provider to access your account and upload areas.
Use the tools and features in Picasa2 to showcase your photos in interesting ways. Some of the types of output are used on your computer while others can be shared with the rest of the world.
A Web Album is a separate online account stored at Google that you use for loading and displaying albums of images. The first time you attempt to upload a set of images you see a dialog box asking you to register for the service.
On the Web
To see the album created in this section, visit http://picasaweb.google.com/donna.baker.
Follow these steps to create your Web Album:
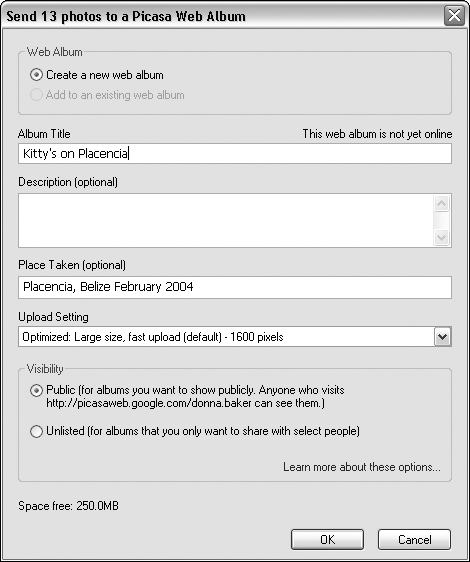
Select the images you want to use and click Web Album on the Photo Tray. The Send [xx] photos to a Picasa Web Album dialog box opens, as shown in Figure 21.48.
Choose an option to Create a new Web album or Add to an existing Web album.
Type a name for the Album Title. The default name uses the folder’s name where the selected images are located on your computer.
If you want, add information in the Description and Place Taken sections.
Choose an Upload Setting. The default setting, Optimized: Large size, fast upload (default) - 1600 pixels, is used in the example. Click the down arrow and choose Medium size, fastest upload, or Slowest upload, largest size option, if you prefer.
Choose a Visibility option. The default is to make the album Public. If you prefer, you select Unlisted and restrict access to the album.
Click OK to close the Web Album dialog box. The Upload Manager dialog box opens, and shows the progress of the upload process.
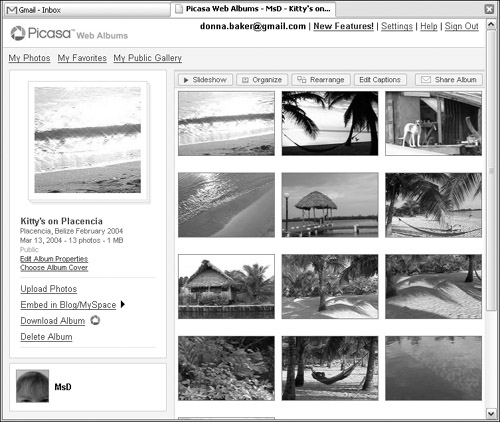
Click View Online in the Upload Manager dialog box to open your Web Album. On the main page for the Web Albums, named My Public Gallery, click the name of the Web Album to open it, as shown in Figure 21.49.

Back in Picasa2, close the Upload Manager dialog box. In the Lightbox, images that have been uploaded to a Web Album are identified with a green arrow at the corner of the thumbnail.
On the Web
Picasa2 offers two Mac uploaders. Use the Picasa Web Albums Exporter for iPhoto to upload images from iPhoto. The Picasa Web Albums Uploader is a separate uploading program. Find the Mac uploaders at http://picasa.google.com/web/mac_tools.html and click Free Download. If you prefer, upload images one at a time using your Web browser.
Some images are made to be very, very large. You can create a poster from within Picasa2 and specify the tiling pattern. A poster can be sized up to 1000 percent larger than the original image.
Caution
If you intend to print a large image, make sure it is of sufficient size and resolution to print clearly-test the image to be sure.
To create a poster, follow these steps:
Select the image you want to use for the poster and choose Create
Make a Poster to open the Poster Settings dialog box.Choose the Poster size from the drop-down list. The percentage options range from 200 percent to 1000 percent.
Click the Paper size down arrow and choose either 4x6 or 8.5x11 as the paper size.
To allow for overlap, click Overlap tiles.
Click OK to close the dialog box. The image tiles are processed and added to the folder containing the original image, as shown in Figure 21.50.

You can produce your own movies, rather than storing and sharing your images as static pictures.
Follow these steps to create and configure a movie:
Select the images you want to include in the movie.
Choose Create
Movie to open the Create Movie dialog box.Click the Delay between pictures down arrow and choose a time. The choices range from 1 Second to 5 Seconds, or choose Just Raw Frames.
Choose a Movie size. You can select Small, Large, or Widescreen. Small is the default movie size.
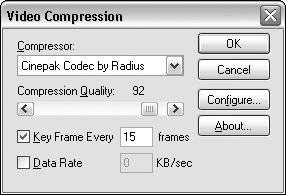
Click OK to close the Create Movie dialog box and open the Video Compression dialog box. The Full Frames (Uncompressed) option is used as the default Compression setting.
Click the Compression down arrow and choose either the Cinepak or Indeo codecs, as shown in Figure 21.51.
Choose from these options:
Specify the movie quality by dragging the Compression Quality slider from 0 to 100 percent.
Select the Key Frame option and type a number for the Key Frame Every x frames value. The default option is to use the key frame set at every 15 frames.
Click Data Rate and type a number to specify the minimum number of KB of data that can be transmitted per second of video.
Click Configure to open further configuration settings to specify how the codec deals with transparency, color, and so on.
Click OK to close the Video Compression dialog box when you have finished choosing settings. The movie is rendered and saved in your default folder location.
If you have a large number of images to assemble, consider using a slide show. Picasa2 includes a feature to create a slide show Gift CD.
Create a Gift CD following these steps:
Click the Gift CD task button below the main menu on Picasa2 to open the Create a Gift CD dialog box.
In Step 1 on the dialog box, choose folders to include in the Gift CD.
Also in Step 1, click the Photo Size down arrow to choose from a list of image sizes if you don’t want to use the default Original Size.
In Step 2 on the dialog box, type a name for the Gift CD. The name must be 16 characters or less.
If you don’t want to include Picasa2 on the Gift CD, deselect the Include Picasa option.
Click Burn Disc. Your files are processed and passed to your CD or DVD program for production.
Any number of images can be assembled as a collage-no scissors or glue are required! The collage is based on a selected group of images, and can be used as either a single image or as a screensaver.
Follow these steps to produce a collage:
Select the images you want to include in the project.
Click the Collage button on the Photo Tray or choose Create
Picture Collage to open the Make Collage dialog box.Choose the collage template. Click the Type down arrow and choose Picture Pile, Picture Grid, Contact Sheet, or Multi-Exposure. The four types of collage are shown in Figure 21.52.
Choose a storage folder from the Location drop-down list. The options include:
Save as Desktop Picture
Current Folder
Screensaver Picture Folder
Choose a Folder, which then prompts you to locate a folder location on your hard drive.
Click Create to build the collage.

You can export any of your folders or Albums as a Web page. Using the method in Picasa2 is a convenient way to produce Web pages for your Web sites.
Follow these steps to produce a Web page:
Select an Album and choose Album
Export as HTML Page, or select a folder and choose Folder Export as HTML Page.In the Export as HTML Page dialog box that opens, choose the features of the Web page. You can choose from these options:
Choose a size from the Export pictures at this size option, ranging from the Original Size to 320 pixels.
Type the name for the Web page’s title if you want to use a name other than the folder’s or Album’s name.
Click Browse to locate a folder to store the Web page if you want to use a location other than the default location. By default, the Web page and its pictures are stored at My DocumentsPicasa HTML Exports[Album or folder name].
Click Next at the bottom of the Export as HTML Page dialog box to open the Select a Web Page Template dialog box.
Select one of the seven templates from the Template Name list. Read the short description below the list of templates, and view a preview. The choices include:
Template 1, 2-page grey background; Template 2, 2-page black background; and Template 3, 2-page white background. These choices use different colored backgrounds, and all include two separate pages. The first page shows thumbnails linked to a full-size image shown on a separate page.
Template 4, 1-page grey background; Template 5, 1-page black background; and Template 6, 1-page white background. These choices use different colored backgrounds, and all include a list of thumbnails at the left and a full-sized picture at the right of the page.
XML Code. This template converts the Web page into simple XML code to be used in another page or application.
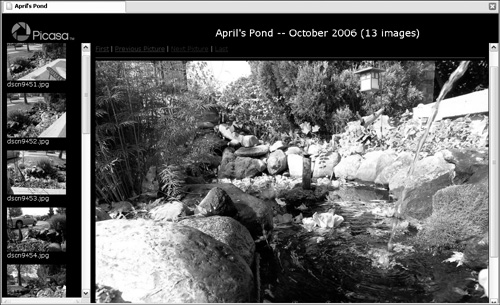
Click Finish to close the dialog box and process the files. When the Web page is created, it opens in your browser automatically, as shown in Figure 21.53.
Uploading Images to an FTP Server
One new feature included as experimental in Picasa2.5 allows you to upload files from Picasa2 to your FTP server. Choose Tools ![]() Experimental
Experimental ![]() Publish via FTP.
Publish via FTP.
Required information for the upload process includes:
The size of the image
The title for the Web page
The folder where the Web page and photos are to be saved
The template to apply
Where to display the Web page
Picasa2 is a convenient, easy-to-use, and free image-management program you can use to take care of your photos. In this chapter, you learned how to assemble images and collections using Picasa2’s import features. After the images are cataloged, they can be stored and named according to your project requirements.
Picasa2 offers ways to correct common image issues such as sharpening and color, either automatically or by making manual adjustments. You can also use some special effects to enhance your image presentation.
You can distribute and share images in numerous ways, ranging from e-mail to burning CDs. Images can be printed or uploaded to a photo service. Picasa2 offers methods for producing special types of image products that you can share, such as movies, posters, and Web Albums.
Speaking of sharing, what about sharing information and insight with others? Read how to confer with a group of like-minded peers using Google Groups, coming up in the next chapter.