Getting started creating your Web page in Page Creator
Adding text and graphics to your Web page
Learning how to correct your mistakes
Seeing and editing the underlying HTML code
Publishing your page to the World Wide Web
Using Page Creator to make pages hosted on other Web sites
Managing your Web pages using Page Manager
Google has a product still in the Google Labs that allows you to easily create graphically compelling Web pages with no previous Web page creation abilities. Most of the Google Labs products are covered in Chapter 40, but this product is being used by many people and deserves its place among all the other graduates of Google’s Product Labs.
Creating your own Web page is fun and can be very useful for communicating with friends, associates, or complete strangers around the world. Your Web page is your “home on the Internet” that people can visit to learn more about you. To get started using Google Page Creator, point your Web browser to http://pages.google.com.
You are asked to log in to your Google account when you visit http://pages.google.com. The first time you log in, select the check box in the lower left that affirms that you agree to the terms and conditions and then click I’m ready to create my pages or the I’m ready to create my pages link in the upper-right corner of the page to get started using Page Creator.
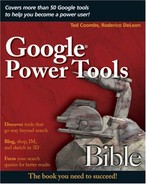
The page editor appears showing you the default page layout, as shown in Figure 23.1. This list shows the different editing features you find on the Page Creator Edit page:
Image: Add a graphic to your page.
Link: Add a clickable hyperlink into the page.
Bold: Change text to Bold.
Italics: Change text to Italics.
Bullet list: Organize information into a bullet list.
Text color: Change the text color.
Font: Change the text font style.
Text size: Make the text larger or smaller.
Text alignment: Align text to the left, center, or to the right.
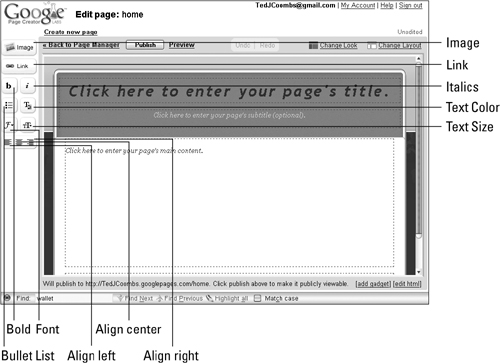
Heading (shown in Figure 23.2): Create a large text heading.
Subheading (shown in Figure 23.2): Create a medium-sized text heading.
Minor heading (shown in Figure 23.2): Create a smaller-sized text heading.
Normal (shown in Figure 23.2): Change the font to normal size.
Create a new page: Create another page.
Back to Page Manager: Return to the Page Manager.
Publish: Publish your Web page so that it appears on the Web.
Preview: See what your page looks like before publishing.
Undo | Redo: Undo and Redo your actions.
Change Look: Change the color scheme of your page.
Change layout: Change the way the new Web page is organized.
Page title: Create a title for your Web page.
Page subtitle (optional): Create a subtitle for your Web page.
Page footer (optional, appears at the bottom of your page): Add a footer to your page.
Begin creating your Web page by adding a page title. Your page title can be anything such as your name, your business name, My Home Page, or anything you want in big bold letters at the top of your Web page. Don’t worry about saving your page. Google saves your page automatically every few moments. You can, however, choose to save your page immediately by clicking the save now link in the upper right of the Edit page. Google lets you know the exact time of its last auto-save.
You can begin creating your Web page using the default design or choose a different layout, and you can change it later if you like. It’s usually best to create the page in the layout you want it published in, so you can preview it as you create it. Sometimes, changing the appearance of the page after you create it is difficult.
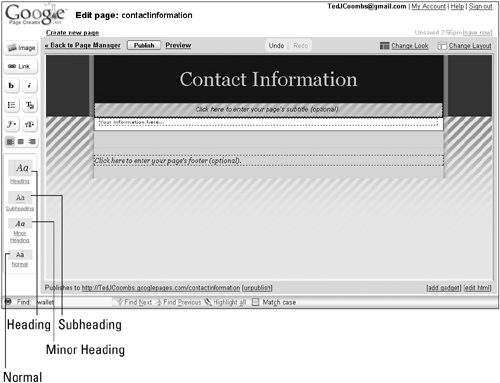
See Figure 23.3 to see the different layouts you can choose from. The first and default layout is great for single Web pages. But if you want to include any type of navigation between the Web pages on your site, you may want to choose any of the other layouts. For example, the second and third layouts allow you to select smaller columns on either the left or right, which are perfect for putting links to your other pages, thus creating a menu. The editor even tells you that the sidebar is a great place to link to any other pages you create.
The three-column layout is great for creating online newsletters. Text you type in each column automatically wraps around, creating a “newspaper” effect.
Many people have created third-party gadgets. Google has many gadgets you can add to your Web page, so visitors to your page find interesting and useful features. Click the add gadget link at the bottom of the page to add gadgets to your page. You may receive a warning like the one shown in Figure 23.4. Click OK to continue adding the gadget.
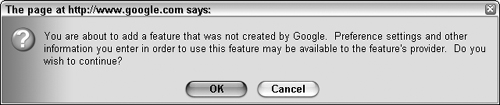
As the warning says, many gadgets require setup. Some, like the Wikipedia search box gadget, only require that you select a language for your search box.
You can click and drag your gadget to a new location on the page. Click the gadget while editing your page, and a blue box appears below your gadget that allows you to edit the gadget’s preferences or remove the gadget completely from the page. Click Edit to access the preferences, or click Remove Gadget to remove it from your page.
You can add several kinds of things to your Web page using Page Creator, including text, links, and images.
To add text, simply click in the area of the page where you want text to appear and begin typing. You can format this text in a number of ways. You can click one of the text formatting buttons in the Page Creator menu, type your text, and then click the button again to turn off that formatting feature. You also can type text, highlight the text by dragging across it with your mouse, and then click the formatting button once.
The text formatting buttons include b for bold text and i for italics. You also can choose a new font for your text by clicking the f button and choosing a font from the list. The fonts that appear in the list are those that normally appear on all computers. When computers do not have a font that appears in the list, the text appears in the viewer’s default browser text font.
Change the text color from its default black by clicking the T button that appears with a small color palette. Again, you can click the button, select a color, type the text, and then click the button again to change the font to a different color, or you can highlight text you’ve already typed and select a new color for it.
When you want to change the size of your text, you can click the double T button and select a font size: Small, Normal, Large, or Huge. The default size is Normal. You also can change the size of the font by identifying it as a heading, subheading, or minor heading. It’s best to use heading formats for true headings rather than using them to change font sizes within a page.
Add links—clickable text that launches another page—by clicking the Link button. You are prompted to type the text you want to appear on the page and then prompted to specify the type of link you want added. These are your choices:
Your pages: Web pages created using Page Creator and hosted on the
googlepages.comsiteYour files: Files other than Web pages and graphics that you’ve uploaded to the site
Web address: A Web page other than those hosted on your Google site
Email address: A link that launches the viewer’s e-mail program and starts an e-mail message to the address you specify
You can test the link before you add it to make certain that it actually links to another page. Links that do not work are called dead links. You don’t want dead links on your page. Nothing makes a person move from your page faster than encountering a dead link.
You can add images to your page, whether it’s a picture of your smiling face, a candid shot of your favorite pet, vacation photos, or possibly pictures of a logo and products for your business. Click Image to add an image. In the dialog box that appears, you are asked whether the image is one you uploaded previously, one you’d like to upload now, or an image that exists somewhere on the Internet that you want to appear on your page.
Making Web pages is a creative process, and that sometimes means changing your mind. The Undo and Redo links allow you to step backward and forward through your edits. For example, changing the font and making text bold is a two-step process. If you changed your mind, you can click the Undo link. Each time you click Undo, you step back to the previous edit. You can continue clicking Undo until you arrive at the point where your page was either last published or no other changes can be undone. After that, Undo is no longer active (clickable).
If you undo a change and want to change it back again, simply click the Redo link. Redo steps forward through your edits. Redo is active (clickable) only when you have first clicked Undo one or more times.
Follow these steps to get rid of all your changes in the fastest manner:
Click the <<Back to Page Manager link at the top of the Edit page.
Select the page where you want all the changes discarded by selecting the check box.
Select Discard unpublished changes from the More actions drop-down list.
This action returns your page to its previously published (or never before published) state.
When you want to edit the underlying HTML code for your Web page, click the Edit HTML link in the lower-right portion of the Edit page. Working with HTML is not difficult, but does take a little bit of time and patience. One of the advantages is that you can add Web features that are not currently available using Page Creator, including these:
Forms
Frames
Buttons
Tables
Script programming
Some excellent HTML tutorials are available on the Web. You can find a fairly complete, free resource at www.w3schools.com/html/default.asp.
Clicking the Edit HTML link opens a new window that displays the HTML in an editor. Follow these steps to edit the HTML of your Web page:
Make changes by typing HTML commands in the editor.
Test your changes by previewing them.
Click the Preview link/radio button in the tab found in the top-right corner of the HTML editor window. You can switch back and forth by clicking either the HTML or the Preview tabs.
Close the editor and switch back to the graphic version by clicking Save Changes at the bottom of the HTML editor window.
To exit without saving any of your changes, click Cancel. The window closes and returns you to the main Page Creator window.
When you start Page Creator, you create or edit your “home” page. This is the page that people normally first see when visiting your Web site. You can create other Web pages that can appear on your site, but you can only have a single home page.
There are two places within Page Creator that allow you to create new pages. A Create new page link is at the top left of any Edit page. You also can click the Create a new page link in Page Manager.
When you create the new page from either Page Manager or from the Edit page, a text box appears asking you to type the title of the new page (see Figure 23.6). Type a title for the new page, and then click Create and Edit.
Your new page is created with the title filled in. The new page is in the same color scheme and layout as your home page. You can change the layout and look (color scheme) of this page without changing the layout and look of all your pages. Generally, you may want to keep the same color scheme throughout your Web site, and sometimes even the layout. Keeping the same look and feel can make a Web site easier to navigate and makes it more visually pleasing to your site’s visitors. Your new page is ready for editing.
When you create new pages, you have a choice about how people navigate to the new page. If you want people to move to the new page from your home page, place a link to the new page on your home page. You can create this link in the form of a menu, but placing a link anywhere on the page works just as well.
As you create your Web pages in Page Creator, they are stored on the Google site in a place not viewable by Web visitors. Only after you are ready to have the world see your creation should you publish your pages, meaning that Google moves a copy of your page to a publicly available place on its servers. The address of your Web site is your Google ID, followed by a dot and googlepages.com.
You do not need to publish your page to see what it looks like. You can preview the page as though it had been published. This way, any pages that you have already published on the Web site remain unchanged until you are ready to update them. This means that visitors to your page won’t see your page slowly change as you edit and save changes.
To preview your page, click the Preview link found to the right of the Publish button in the blue bar along the top of the editor window. A new window opens that shows you how your new page will appear when published. An orange bar appears across the top of the previewed page telling you that this page is just a preview and has not yet been published. The page may have been published in the past, but the version you are previewing has not.
When you finish viewing the preview page, click the X in the upper-right corner of the window to close it.
When you are satisfied that your creation is ready to be made public, click Publish located at the top of the Edit page. Google makes a copy of your page and places it in your public directory. Visitors to your Web site see your new page. If you have been editing a page and have republished it by clicking Publish, visitors see your changes.
Note
When you publish your changes while someone is viewing your site, your visitor may not see your changes until he closes and restarts his Web browser. Web browsers often keep cached versions of Web pages to speed the display of pages. Normally, but not always, this cache refreshes when the browser is closed and reopened, and the browser cache is updated with your changed pages.
After you click Publish, Page Creator displays an orange bar telling you that your page has been published and contains links that let you View it on the Web or Tell your friends. View it on the Web lets you see the page as other Web visitors will see it. Tell your friends lets you send a Gmail message containing a link to your updated page to your friends so they can see your changes.
Sometimes, you may need to remove a page from your public site, but you don’t want to delete the page completely from the Page Manager. You can “unpublish” a page—remove it from your public site—by clicking the [unpublish] link found at the bottom of the Edit page. The page is still available for you to edit and republish. See the nearby Note about browser caches. When you remove a page, it may appear temporarily while visitors view your site. This may continue until the visitor’s browser cache is updated.
When you visit a Web site, the pages are stored on a computer that is publicly accessible via the Internet. Pages are delivered by a special program called a Web server. Your Web browser, whether it is Internet Explorer, Opera, Firefox, AOL, or some other browser, contacts the Web server and asks that it deliver a particular Web page. The page is then delivered by the Web server to your browser, which loads it and displays it to you.
Each Web server has an Internet address identified in the URL. In the case of Google’s Web site hosting, your pages are hosted by the Web server found at googlepages.com.
Note
Web servers may actually consist of many computers and Web servers to handle large traffic loads. These are known as server farms. They do not affect how visitors view your site.
Web pages for your site are stored in a particular folder located on the Web server. This folder is identified by the first part of the URL: Yoursitename.googlepages.com.
This directory is created by Google automatically using your Google ID. Individual pages are identified by their page names. The page names appear after googlepages.com and are separated by a forward slash like this: http://yoursitename.googlepages.com/newpage.
Note
You may notice that your home page does not display a page name in the URL. This is because a standardized default name (usually index) is used to name your home page. Web servers know to look for an index page when no page name is specified by the Web browser. So going to www.somesite.com, for example, actually loads www.somesite.com/index.
You don’t have to be hosting your Web page on Google in order to use Page Creator. When your site is hosted by a different Web hosting service, you can create your pages using Page Creator and then copy the HTML into files that you deliver to your Web hosting service. Web hosting services vary. Some hosting services have Web-based editing capabilities, in which case, you have three choices:
Edit the HTML of your pages made with Page Creator.
Copy and paste the HTML from Page edit into the Web-based editor provided by your hosting service.
Save the changes in your hosting service editor.
Some Web services require that you transfer completed files to them via some file transfer utility. Sometimes, that transfer utility is FTP (File Transfer Protocol), or you may have to use an HTML upload utility. In either case, you should copy the HTML (according to the steps listed previously) into a text file. Save the text file with the filename you want to transfer to your Web site.
Web pages normally have a file extension. File extensions used on the Web may vary depending on the technology used to create them. The file extension used mostly with HTML pages is .html or .htm. These extensions do not normally appear using the Google hosting service. For this reason, you may need to manually change any links created by Page Creator to have a file extension expected by other Web servers.
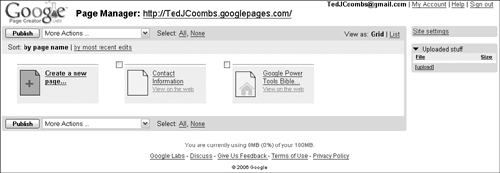
The Page Manager allows you to easily manage your entire Web site, so that you can quickly move between pages you want to edit, delete pages, lose changes, or publish pages. The Page Manager also allows you to easily create a new page on your site. To access the Page Manager, click the Page Manager link found at the top left of any Page Creator page.
Page Manager lists each of your created Web pages, as shown in Figure 23.7. If you are just starting, you may see only your home page, identified with a small “home” icon. You also can click the green page associated with the Create a new page link to create a new page and launch the Edit page.
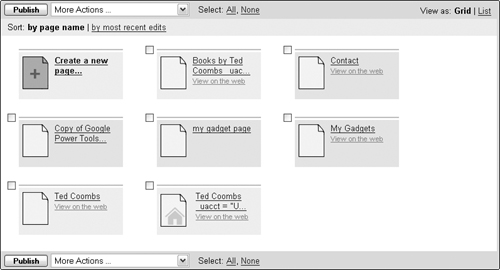
View your Web pages in Page Manager as a grid (the default) or change to a list view. To change between views, click the List link or Grid link in the upper-right corner of the Page Manager page.
The pages are listed in either page name order (alphabetical order) or by the most recently edited page first and the oldest edits last. You can easily switch between these different page orders by selecting one of the links next to Sort in the upper left of the page. Click either by page name or by most recent edits.
You can take many actions from the Page Manager. Select the page you want to take action on by selecting the check box next to the page. A shortcut for selecting all pages, particularly if you are taking advantage of all the free Web hosting and have created many pages, is to use Select All, located in the top blue bar. To deselect all the pages, click None.
After you select one or more pages, you can quickly publish them all by clicking Publish. Or you can take other actions by selecting them from the drop-down list. These are your choices:
Tell your friends
Discard unpublished changes
Unpublish
Duplicate
Delete
When you have published new pages to your site, you may want your friends and associates to know so they can look at your updated pages. In Page Manager, select the pages you want to tell your friends about by selecting the check boxes associated with the pages you’ve updated. Don’t click the page titles because that loads the pages into the editor. Selecting a check box launches a new Gmail message already complete with a link to the page and an announcement that your friends should see your new page. Simply add the e-mail addresses of the desired recipients.
Return pages to their unedited state by choosing to discard unpublished changes. This returns the page to the state it was in the last time it was published, even if you’ve chosen to save your changes while editing.
Remove a page from the publicly viewable Web site by selecting Unpublish from the drop-down list. Pages are not deleted; they are just removed from public view. The page is still viewable in Page Manager and can be republished or edited at any time.
To save time creating new pages that contain many of the same features or content, you can choose to create a new Web page by duplicating another page. Some people even create an unpublished template page that they use over and over again by using the Duplicate feature. This is particularly handy when you create menus or other complex layout features.
The Delete feature removes the page from Page Manager and any copies that exist on the public Web site. When you select this feature, the computer warns you that your actions will permanently delete the selected Web pages. If you accidentally delete a file, there is no recovering it, nada, zip, not a chance, gone forever.
Click the Site Settings link found in the Page Manager to set some of your Web site’s features, such as the text that appears in the title bar when people access your page. By default, the Site name is your Google account name.
You can see your Web site’s URL for easy reference, but after you create a site, Google assigns the URL where it is published, and you can’t change that.
There is an Image Upload check box. When it is selected, Google automatically optimizes the size of uploaded images, thereby reducing the download time of large images for people viewing your Web page. If you want to upload large images and not have Google optimize them, deselect this box.
Because Page Creator is still in Google Labs, you must decide whether you want the experimental features activated. Be aware that these beta features may work with unpredictable results. When Page Creator graduates from the labs, these features will have been fully tested and the experimental features button will no longer exist.
When you click the Experimental Features button, a page appears that explains the unpredictable nature of these experimental features and asks you whether you are certain this is what you want to do. To return without enabling the experimental features, click No (sounds scary). To enable the features, click Yes (I understand what I’m getting myself into). If you click Yes, a red notice appears telling you that experimental features are enabled. The button changes to Disable experimental features. From that point on, in the Edit page you also see a notice at the top of the page reminding you that experimental features are enabled with a Send feedback link next to this notice. Google Labs wants to know when things need fixing or they would love your comments to improve their products.
If your content is not suitable for minors, you can let people know by selecting the check box under Adult Content. The terms and conditions of using the Google service state that when displaying adult content, you must check this box.
Page Creator is a simple-to-use Web page creation and editing tool. With no previous Web page creating experience, you easily can create and publish Web pages to your own free Google Web site. All you need is a Google account and something to say.
Choose from many different colors and layouts to create a compelling and professional-looking Web page the very first time. Create as many pages as you want (within the 100MB limit). Upload images and files that you can drop anywhere you like on your page.
You are not limited to the things Page Creator does for you easily; you can edit the underlying HTML. When you finish, simply publish the page with a single click of the Publish button or copy the HTML to another hosting service for display on another Web site. When you complete your Web site, Google helps you tell your friends by sending them an e-mail announcement using your Gmail account. Speaking of friends, when you have lots more to say, you might consider creating a Weblog, or blog, to share with your friends or everyone else in the world. The next chapter covers blogging.