Starting a new Google Calendar
Managing your Google Calendar with Event Management
Getting around Google Calendar
Creating Public Calendars and controlling access to them
Adding Google Calendar to your Web page
Importing events into Google Calendar from other popular calendar programs
Customizing your reminders and notifications
Checking Google Calendar by mobile phone
Google Calendar is a free, online, shareable calendar service provided by Google. This service helps you to keep track of events in your day-to-day life. And you can share these events with your friends, business associates, or family. You also can search the Web for events that you may want to attend. This simple service can help you organize your events or important meetings in just a couple of minutes. Gone are the days when you must search through tiny scraps of paper to remind you of the day’s events.
The Google Calendar is feature rich and integrates well with many of the other Google programs. You can expect these features:
Share your calendar with others across the Internet.
Integrate your calendar with your Gmail account.
Search the Internet for Web events you can add to your calendar.
Create events and invite others to join you.
Publish your events so that others can see them.
Access your calendar by sending SMS message commands from your mobile phone.
The first step in getting started is to go to the Google Calendar page at http://calendar.google.com and sign up.
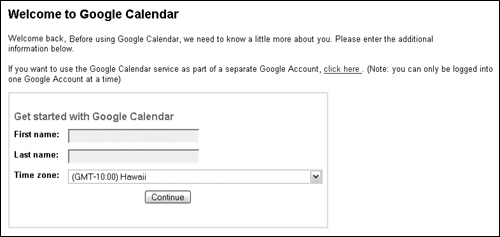
The first time you access Google Calendar, you are prompted to sign up. Type your first and last names, and select your local time zone from the list shown in Figure 26.1. Then click Continue.
After you type your name and time zone, your first calendar appears, as shown in Figure 26.2. Today’s date is automatically highlighted, and events for the day are displayed. When you first launch Google Calendar, no events appear, of course.
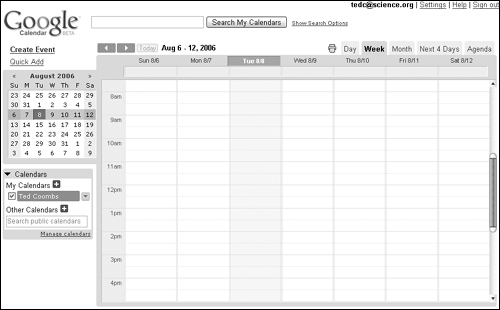
Scrolling through the day is possible using the toolbar to the right of the calendar.
Other than knowing what day it is, the Google Calendar is pretty useless until you add events. Events are appointments, things to do, reminders, and anything else you may want to schedule on your calendar.
Managing events on the Google Calendar is the most important capability. Adding, changing, synchronizing, coordinating, and deleting events makes your calendar extremely useful to you and to others with whom you may want to share your calendar.
You can add events to your calendar in a number of ways. They all add the same event, so use the method that you find most simple.
Depending on which of the calendar tabs you are viewing (Day, Week, Month, Next 4 Days), what you type and where you click may change slightly. While viewing the calendar by Day, click the time of your event. Remember, you can scroll up and down using the scroll bar on the right to see times that may not appear on the screen. A bubble appears, like the one shown in Figure 26.3.
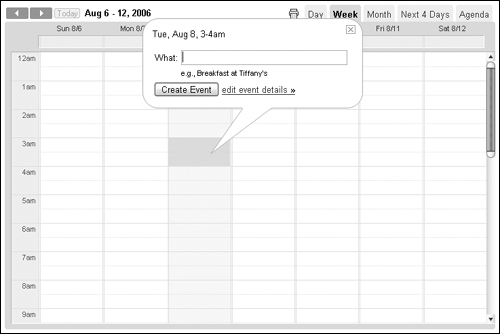
The simple and quick way to add an event is to type information about the event in the text box labeled What and click Create Event. Alternately, you can click the edit event details link, which opens a new window allowing you to manage the event in considerable detail (see Figure 26.4).
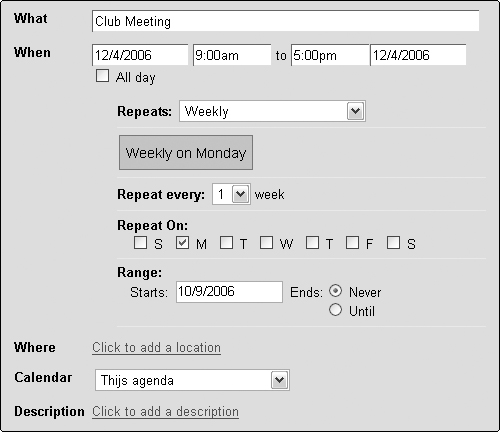
When viewing your calendar from the Week view, you can follow the same procedures for adding an event. In this view, you can add events for different times and days within a one-week time period. You can even add events in the past. This is particularly useful if you use Google Calendar to track your time for billing purposes or if you have other reasons for tracking your whereabouts.
Adding events in the Month view is where things change just a little. Clicking the small box that represents a single day causes an event bubble similar to the one in Figure 26.3 to appear, but it does not display the time after the date. When adding an event in this view, you have two options: You can type the time as part of the event information like this: 3PM Appointment with broker, or click the edit event details link. This causes the edit event form to appear. When choosing the latter option, the All day check box is selected by default, expecting that you are trying to add an event that lasts all day. To add a time period for the event rather than leave it as an all-day event, deselect this box and type begin and end times.
Adding events using the Next 4 Days tab is similar to that when viewing the calendar in the Week tab. Click the time of the event, and fill in the event information in the bubble that appears.
Rather than clicking on the calendar to create an event, you also can click the Create Event link found in the top left below the Google Calendar logo. Just click the Create Event link in the left column of your calendar to bring you to a page where you can type as much information as you want about your event. On this page, you also can add guests, change a reminder setting, and publish your event to other users. After you type the appropriate information and select the desired settings, click Save.
In the Calendars box in the left column, click the down arrow next to the appropriate calendar. Then select Create event on this calendar from the drop-down menu to launch the detailed event creation form.
Another way to add an event is by clicking the Quick Add link feature. Click the Quick Add link or press Q, and type the information for your event. You need to be specific about the information you add in this fashion.
You can type text, and Google does its best to figure out what you mean. For example, typing noon lunch on Saturday with Michelle in the Quick Add box creates an event on the next Saturday at 12PM with the event labeled “lunch with Michelle.” The order of the words is unimportant.
When Google doesn’t understand a time—for example, Google does not understand late morning—the event is created, but it appears along the top in the day’s events that have no time associated with them. This is the location on the calendar where all-day events are displayed.
One of the powerful features of the Google Calendar is the ability to invite guests to your events. Whether it’s a beach party, a business meeting, or an online seminar, you can easily invite others to attend. Google Calendar also helps you keep track of comments, responses, and RSVPs.
To invite others, edit the event details. This is the detailed event information accessible when you create the event or later when you click on the event. In the right column, you see a section titled Guests. To add guests, click the + Add Guests link. In the box that appears, type the e-mail addresses of all the guests you want to attend your event. Separate e-mail addresses by commas.
You can allow your guests to do two things: You can allow the guest to invite others to the event, and you can allow your invited guest to see your guest list.
Your invited guests receive an e-mail asking them to attend. They can choose to see the event details and respond in the following ways: Yes, they are coming; No, they are not coming; or Maybe. They have the option to send a long a comment that you see when you manage your guest list. If you allow them to invite guests, they can also specify how many guests they intend to bring. Google Calendar keeps track of who has and has not responded and how many guests you can expect at your event.
You may occasionally want to make an event private in a calendar you share with others. This allows you to be specific about who can see this event in a calendar where the default is that all events are viewable.
To set the privacy options, click the down arrow next to Options in the right column of the Event Details form. This causes the event options to appear.
“Clearing your calendar” takes on new meaning with Google Calendar. Now you can simply and easily remove all the events from your calendar without having to step through each day looking for events to delete. To clear all the events on your primary calendar, follow these steps:
Click the Manage calendars link at the bottom of the blue Calendars box on the left side of the Calendar page. This launches the Calendar Settings form in the Calendars tab.
Click the small trash can icon on the far right next to the calendar you want to clear.
Click Delete when asked if you are sure you want to delete all the events on this calendar.
When Google finishes clearing your calendar you are returned to the calendar page. The calendar should appear empty.
You may need more than one calendar. You may have one calendar that you want to share with the world, another you share with just family and friends, and a third that is completely private. You also can create a calendar for your business appointments while keeping your social calendar completely separate. Follow these steps:
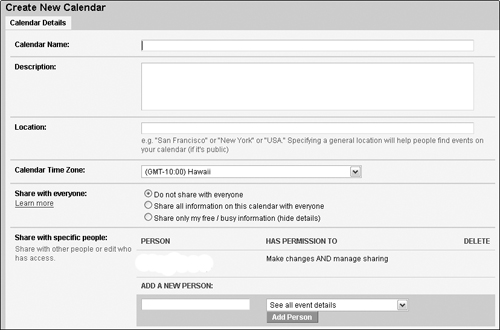
Click the + button next to My Calendars to launch the Create New Calendar form shown in Figure 26.5.
Type a name for your calendar. It should be a meaningful name so you and others easily know what may be found on this calendar. You can then type a full text description of the calendar if the name isn’t enough to identify it.
Type your location, particularly if you intend to make this calendar public and searchable. That way, people looking for events in a specific place can easily find your calendar by geographical location.
The time zone setting is already set to your time zone if you’ve set it within Google, but you can change it, if necessary. Perhaps you are going to post your vacation calendar in New Zealand and want everyone to know what time your events are scheduled in local New Zealand time, or wherever in the world you happen to be.
Select who you want to see this calendar. By default, the calendar is private, for your eyes only. The second choice is the most public. Share all the events with everyone. The third choice is a little more restrictive. It shares only information about your free and busy periods. It does not share the details of what you’ll be doing. This is a good feature if you want people to check your calendar before trying to schedule you in a meeting, but you really don’t want them to know that the time you have blocked each morning is for your Swedish massage.
Type the name or e-mail address of a person you want to give access for making changes and managing your calendars. Select the level of access you want to give him from the drop-down list. These are your choices:
Make changes AND manage sharing.
Make changes to events.
See all event details.
See free/busy information (no details).
Click Create Calendar at the bottom after you complete the form. You are returned to your primary calendar. Your new calendar appears in the list of calendars in the blue Calendars box on the left.
Printing your calendar allows you to conveniently share you calendar with others who may not have access to Google Calendar, or you may just want to stuff it in your pocket for quick reference during the day. To print your calendar, click the small printer icon to the left of the calendar’s view tabs. This launches a printable preview of the calendar. You may notice that the preview is in Adobe PDF with all the same controls available in Acrobat Reader. With these features, you can save, print, or e-mail a PDF version of your calendar.
To print, click the printer icon. This usually launches your printer’s dialog box, where you can select which printer, if you have more than one, to send this document to and choose paper and color settings before clicking OK to print your calendar.
Getting around the Google Calendar is pretty simple. The tabs along the top of the calendar allow you to see the calendar in a number of different views, including Day, Week, Month, Next 4 Days, and the Agenda view. Click a tab to change the view.
Change the day or dates you are viewing by clicking the left and right arrows in the upper-left corner of your calendar. In the Day view, clicking the arrows increments the calendar by a single day. In the Week view, the calendar advances by a week. The Month view advances by a month, and the calendar advances by four days when the Next 4 Days view is selected. In the Agenda view, the number of events that increment or decrement with the arrow keys varies by the number of events you have entered.
Notice that, as you change views by clicking the different tabs, various portions of the mini-calendar in the left column are highlighted. For example, when the Day view is selected, only a single day is highlighted in the mini-calendar. Highlighting a different number of days presents a custom view. For example, if you highlight two weeks, then two weeks are displayed in the main calendar on the right. In this example, clicking the left and right arrow keys decrement or increment the calendar by two weeks at a time.
Use the month view located in the pane to the left of the large calendar to jump to different days, months and years. Simply click on the date in the small calendar to view that day or week in the larger view on the right.
By default, you start using Google Calendar with only a single calendar. As you create new calendars or add shared calendars, additional calendars appear in the Calendars list on the left side of the page. To choose which calendars are visible, select the check boxes next to the calendar names in the Calendars list.
More than one calendar can be visible at a time. This means that you still view a single calendar onscreen, but the events of all the calendars you select are visible in the calendar displayed on-screen. This is particularly useful when it comes to integrating public calendars.
In addition to creating your own calendars, there are many public calendars shared on the Internet. These can include tour dates of your favorite band, public holiday calendars from many countries, sport events, club events, chili cook-offs, and whatever else you can think of.
The simplest way to add a public calendar is to click the + sign next to Other Calendars in the Calendars box on the left. Clicking + launches the Add Other Calendar form, which has four tabs:
Search Public Calendars
Friends’ Calendars
Holiday Calendars
Public Calendar Address
To find a club, sports team, or other calendar, search for it by clicking Search Public Calendars and typing in the name of the club, team or other search term that might identify a public calendar. When your search results in a list of calendars, click the preview link and the calendar displays on-screen. If you want to include this calendar within your list of calendars, click the Subscribe link at the bottom right of the previewed calendar. You are prompted as to whether you want to add the calendar. If you want to add the calendar to your list, click Yes, add this calendar. To cancel click No, do not add this calendar.
To find a calendar that your friend may be sharing, click the Friends’ Calendars tab and type your friend’s e-mail address. If your friend has allowed you to view the calendar, you can add it to your list.
To view holiday calendars from around the world first click Other Calendars from the left sidebar. This launches the Add Other Calendar page. Scroll down through the calendars listed in the Holiday Calendars: section. Click Add Calendar next to any of these calendars that you want to include. You will never forget a holiday again!
When you know the URL of a calendar available in iCal format, you can type the address in the Public Calendar Address tab. The iCal format (RFC-2445) is an Internet standard way of publishing calendars. Several calendars, including the widely used Microsoft Outlook Calendar, publish calendars using this format.
You can create your own public calendar. Perhaps you are part of a group, a musician, member of a sports team, or you just want to share your busy social life with everyone else. Now you can easily create a calendar that appears when people perform Google searches on topics you may have scheduled in your public calendar.
Creating a public calendar is no different from creating a calendar as shown earlier in this chapter. The key to making your calendar public is to select the Share all information on this calendar with everyone option in the form you used to create a new calendar. You are prompted, more than once, to be certain that you want to share this information with everyone, even people doing Google searches.
To change the amount of the information from your calendar that is shared with others, you can click the down arrow in the left column next to the appropriate calendar and then select Share this calendar.
Google Calendar offers you three ways to share your calendar:
Share all information on this calendar with everyone: When you select this option, your calendar—along with all its public events—appears in the search results of Google Calendar. Additionally, others can view the calendar and its public events at the calendar’s address or by adding the calendar to their Calendars list.
Share only my free / busy information (hide details): If you select this option, your calendar information does not appear in the search results of any Google Calendar search. Additionally, only the free/busy information is visible to those who access your calendar at its address or by adding it to their Calendars list.
Do not share with everyone: This option offers the most privacy. If you select this option, your calendar does not appear in the search results of any Google Calendar search and no information is accessible via the calendar’s address. The calendar remains private to everyone except the people that you add in the Share with specific people section.
One of the fun things you can do with Google Calendar is to make it available from your Web site. This turns your Web site into more of a portal and gives people a reason to come back and visit your page regularly to see your updated calendar. If you run a business, club, or organization, this is a great way to display your business calendar.
To add the Google Calendar to your Web site, you need enough Web site editing skills to create a link to your Google Calendar. To create the link to your calendar, follow these steps:
Click the down arrow in the Calendars box on the left side of the page. This is the down arrow next to the calendar you want to place a link to on your Web site.
Select Calendar Settings to launch the details for that calendar.
Next to Calendar Address, click the blue HTML icon, which displays the URL you need to embed in your page (see Figure 26.6). If you do not need Google’s help to create the HTML, skip the rest of these steps. Simply use the URL you were given in this dialog box. Click OK to finish.
Optionally, have Google create the HTML for you. In the dialog box that displays your URL, click the configuration tool link to launch the Google Embeddable Calendar Helper.
Add a title to your calendar. This becomes the calendar’s public title.
Select the appropriate radio button to choose whether you want Google to display the navigation controls with the logo and title, without the logo and title, or no controls at all.
Choose either Month view or Agenda view; the Day and Week views are not available in this form.
Google places your calendar in a special frame known as an iFrame. You can choose the size of the iFrame so that it fits into a particular location on your Web site, or you can use the default size that Google selects.
You can select how many events for each day are shown in your calendar. This also determines the size of the calendar. If you have only one event per day, such as a concert, change to one event per day by choosing the selection from the drop-down list. You can select up to nine events per day.
Enter the background color of the calendar. This normally is the same background color as your Web page so the calendar maintains your site’s look and feel. Enter the color as a hex color. For more information on hex colors, see the hex color chart at www.tbi.univie.ac.at/TBI/hex_color_chart.html.
Click Update URL to update the URL found in the box below this form. You can preview your calendar by scrolling further down the Web page.

Most people today have some sort of electronic calendar at least partially filled in with family birthday reminders. Rather than retyping the information or calling your cousin Ed to ask him when his birthday is, again, you can import information you’ve exported from other calendar programs, or in some cases, you are able to simply migrate from one calendar program to the Google Calendar. You can use either iCal format, commonly used by popular calendar software programs, or comma-separated value (CSV) files to import data into the Google Calendar.
Before you can import a calendar file, you must first have an exported calendar. See your calendar software about exporting either iCal or CSV file format, and export the file. It is then ready to import into Google Calendar. To import events from iCal or CSV files, follow these steps:
To migrate your events and information from Outlook Calendar to Google Calendar, follow these steps:
Launch Microsoft Outlook.
Choose File
 Import and Export to launch the Import and Export Wizard.
From the action list in the wizard, select Export to a file.
Click Next.
In the Export to a File dialog box, select the type of file to be exported. This should be Comma Separated Values (Windows).
From the folder list, select Calendar.
Specify a name and file location for your exported file. You can click Browse to help you locate where you are saving the file.
By default, Export “Appointments” from folder: Calendar is selected. You can optionally map custom fields at this time. These are special information fields where you may have stored custom information in Outlook. Click Finish.
Now select the date range of events you want to include in your Google Calendar. Click OK after entering start and stop dates. Your calendar is exported to the location you specified.
Close Microsoft Outlook, and import the exported file into Google Calendar by clicking the Import Calendar tab on the Calendar Settings form. Click Browse to navigate to the exported file. Choose the calendar to import into, and click Import.
When the import process is complete, you are notified how many events were added to your calendar.
Yahoo! Calendar is another Web-based calendar similar to Google Calendar. If you’ve started creating your online calendar in Yahoo! and now you want to migrate your calendar to Google to take advantage of the Google features, follow these steps:
Sign in to your Yahoo! account, and start your Yahoo! Calendar by clicking the Calendar tab.
Click the Options link in the upper-right corner of the page.
In the Management column of the Calendar Options, select Import/Export.
Select Export to Outlook to export your file as a CSV file.
After you download the file, follow the instructions in the preceding section to import your CSV file into Google Calendar.
You can receive reminders of upcoming events via your cell phone or pop-up messages on the Google Calendar Web page. Or you can choose to receive notifications of upcoming events and other Google Calendar events via e-mail messages. Select the option that bests suits your needs. To customize the reminder settings, click the Settings link at the top of your Google Calendar Web page.
Click the Notifications tab in the Calendar Settings form to display the many notification and reminder options. First, choose when you want to be notified. You can select times between ten minutes before an event and one week before an event by choosing from Event reminders drop-down list. You can be reminded of events by e-mail, SMS, and Pop-up messages. Google reminds you of upcoming events only by pop-up. All the notifications are by e-mail or SMS only. These notifications include the following:
New Invitations: This option notifies you when someone invites you to an event.
Changed Invitations: This option notifies you when someone changes her mind about event details.
Cancelled Invitation: This option notifies you when someone cancels an event or cancels your invitation to the event.
Invitation Replies: This option notifies you when someone replies to your invitation to attend your event.
Daily agenda: This option sends your agenda to you via e-mail but not via SMS.
Before you can use the SMS feature, you must first set up Google Calendar with your cell phone. Type the phone number of your cell phone, select the carrier from the drop-down list, and click Send Verification Code. When you receive the code via SMS message on your cell phone, you need to return to this page and type the verification code in the text box provided. Then click Finish Setup. The page displays a message that your phone number was successfully validated.
When you want to stop receiving Calendar e-mail notifications in your Gmail or other e-mail account, disable them by changing the settings set in the preceding section. Simply deselect the box next to the notification type, and you will stop receiving the notification. Be sure to click Save when you finish changing your notification methods.
One of the most ubiquitous technologies in use around the world is the cell phone. Not all of them are equipped with Web browsers, but most of them allow you to send SMS text messages. This feature allows you to check your Google Calendar with your cell phone.
Sending a quick text message allows you to query your calendar. This is much better than shoving a piece of paper in your pocket.
You must first register your cell phone number in your Google Calendar account before using this service. After you log in to your Google Calendar, click Notifications on the Settings menu.
After your cell phone number is registered, send special text message commands to receive calendar information. Send the SMS text message to GVENT 48368. You can send these commands:
next: Returns your next scheduled event
day: Returns all scheduled events for the present day
nday: Returns all your events for the following day
Remember that the calendar information is available only for events 24 hours in advance.
The GVENT 48368 feature on Google Calendar is currently only available with the U.S. mobile carriers listed in Table 26.1.
Watch the Google Calendar site for other providers added in the future.
Calendars have become a fundamental computer tool. Meetings, anniversaries, birthdays, parties, and other events are now easily remembered. Even more difficult, particularly now where companies have become global, is the job of planning a meeting. Google Calendar makes that much simpler with its ability to send out invitations and manage user responses. There are certainly many other calendars that give you that feature, but they tend to be expensive and certainly not as globally accessible as Google. You don’t need a guru systems administrator to manage what was once considered complex software. Now, Google manages it for you.
Accessibility is the key. In fact, you can even check your Google calendar by sending SMS messages through your cell phone to query your upcoming agenda. The next chapter goes much deeper into using Google applications with your mobile phone.