Creating your AdWords account and your first ad
Learning about selecting keywords for ad search matching
Setting your budget for advertising
Discovering the tools Google provides to manage your ad campaigns
Creating an ad step by step
Configuring reports to help you maximize your ad performance
Managing your AdWords account and launching your ads
If you search Google, you’ve seen the sponsored links that appear above and beside your query results. People actually click those links and visit the sponsored sites. That’s how your business and Google make money. It’s a great partnership.
When your business depends on people finding you on the Internet, there is no better tool than using Google AdWords to advertise your site. You pay Google each time someone clicks your link to land on your Web page. The rest is up to your Web site to compel visitors to buy your products or use your services.
This chapter helps you create an advertising campaign using Google AdWords, teaches you how to use the tools Google provides to select keywords people will use to find your site, helps you plan the financial side of advertising with Google, assists you in ad creation, and helps you read the reports to see how well your campaign worked.
As in any ad campaign, there is no guarantee that it won’t need some tweaking along the way to improve performance. Google’s AdWords provides immediate feedback on your campaign’s performance and allows you to make ad hoc changes to drive more traffic to your Web site.
Your first steps have nothing to do with computers, Google, or the Internet. They have to do with your business and how people find you. You also need to create an advertising budget for your business or at least carve out part of your existing ad budget for Google advertising. It also doesn’t hurt to figure out how you’re going to know if your ad campaign is successful so you’re not just throwing away money on Google advertising just because you think Google is a cool company.
Because this is the first chapter that talks about how Google makes money, you should know that taking your money for no good reason goes against the Google Code of Conduct and Google’s informal motto of “Don’t be evil.” If you want to know whether Google is the kind of company you want to invest your money in, in the hopes of making money yourself, perhaps it would be a good idea to read the Google Code of Conduct, which can be found at http://investor.google.com/conduct.html.
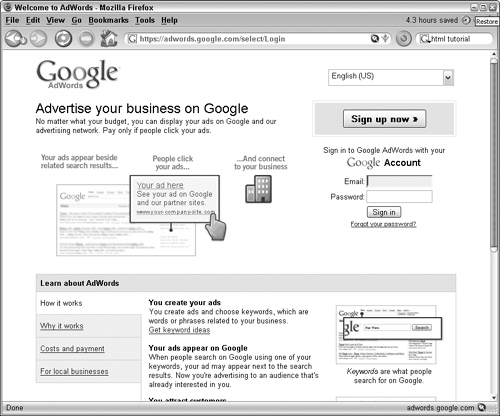
After you do your homework and decide that Google AdWords is the right place to spend your money and you have an idea about how much money that is, take the next step and point your Web browser to http://adwords.google.com (see Figure 34.1).
Click Sign up now. A new page launches, and you’re given the choice of signing up for the Starter Edition for single product or service offerings with simplified options, or the Standard Edition with the full range of AdWords features and functionality. This chapter discusses the Standard Edition. You can find the information you need in this chapter to help you explore the Starter Edition if that is the edition you select. Table 34.1 compares the various options between the two editions.
Table 34.1. Starter versus Standard AdWord Account Comparison
AdWords Feature | Starter Edition | Standard Edition |
|---|---|---|
Simplified signup | Yes | No |
Single product, single set of keywords | Yes | Yes |
Multiple products, ad campaigns, and sets of keywords | No | Yes |
Single-page reporting | Yes | No |
Advanced and custom reporting | No | Yes |
Single-target customers | Yes | Yes |
Multiple-target customers | No | Yes |
Advanced cost control | No | Yes |
Advanced planning tools such as conversion tracking | No | Yes |
Site targeting | No | Yes |
After you select either the Starter or Standard edition, click Continue. You are now ready to begin creating your first ad campaign in Google AdWords.
You first want to target your customers by the languages they speak. People who live in other locations around the world search Google in their own languages. When you want your ad to appear in Google searches by users within those countries, specify the language associated with those countries. Select languages from the What language(s) do your customers speak? drop-down list. You can select multiple languages from the list by Ctrl-clicking or Command-clicking the selection with your mouse.
Continue targeting your customers by specifying their geographic locations. You can select from three possible area sizes:
Countries and territories: Your ads appear in the countries and territories you specify.
Regions and cities: Your ads appear in the region or cities you specify.
Customized: Your ads appear in browsers of people searching within a specific distance from your business.
Select an area, and click Continue. The next page that appears depends on the previous area selection.
When you select Countries and territories, you are asked to select the specific countries from a list. Click Add to move them into a list of selected countries.
When you select Regions and cities, first select the country of interest from the drop-down list. The available areas box below the drop-down is populated with specific regions for the country you select. You can select regions only from a single country. Selecting a new country clears any regions you may have previously selected.
When you select Customized, you are asked to specify the location of your business, either by typing a physical address or by pointing out its position on a map for this purpose provided by Google. Move the map pointer by dragging the map. The pointer stays in the middle. Then you are asked to define an area by specifying the number of miles from your business that defines the area in which you want your ads to appear. (You also can specify your area in kilometers by clicking the change to kilometers link.) If you happen to know the latitude and longitude of your business, you are welcome to enter it here. If you’re curious about what your latitude and longitude might be, type your physical address and click the Map this location link. Then click Select a point on the map. You see your latitude and longitude displayed.
Note
Identifying the location of a Web searcher is not an exact science. Google recommends specifying a custom area at least 20 miles or 35 kilometers from your business location.
You must first click the Map this location link before specifying the custom area. The maximum size of your custom area is 500 miles.
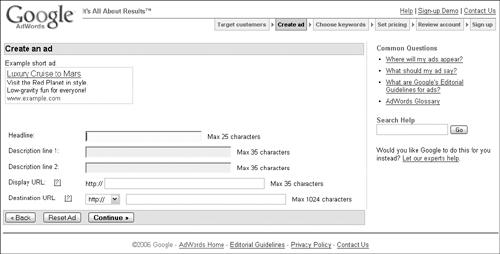
The Web form shown in Figure 34.2 is one that should make you sit back and scratch your head. What you put in this simple little form can mean the complete success or abject failure of your ad campaign. Okay, here’s the good news. If your ad campaign fails and no one clicks your sponsored ad, it won’t cost you a nickel. Still, the point is to have people clicking your ad to see what’s in store for them on your Web page.
Tip
Advanced Web developers know how to use the “referrer” to know when visitors land on their Web site from a Google search. They can then customize the Web site for the Google visitor.
The first thing you must create is the headline for your ad. This is what appears in bold letters and attracts the attention of the Google searcher. What you place here is very important. A poor headline can mean poor performance for your ad; no pressure or anything. So, rather than a generic “Discount Sporting Goods,” think about your specialty and what people are going to buy over the Internet. Remember that you can change this later, so you might consider a seasonal ad, “Surfboards—Kitesurf Gear.” You have only 25 characters to work with. If you’re the kind of person who makes up personalized license plates in your head for fun, you’ll do fine.
You get two more description lines, 35 characters each. They appear in normal text below the headline. Here you can go into a little more detail, amplifying what you put in the headline. The description lines are a good place for “Sports gear guaranteed low price” and on the second description line, “Free shipping w/in continental US.” Certainly you can come up with better ad material than this, but you get the idea. Give people a reason to click your ad. If you get stumped and you need some inspiration, do Google searches on various keywords associated with your business and see what other people have written. You need to research keywords that identify your business anyway.
Type a Web address in Display URL. This is a URL identifying your site. It does not have to be the URL of the actual page on which the Google searcher lands. You can put www.sportinggoodsforless.com here while the actual page the user lands on is www.sportinggoodsforless.com/surfcatalog.htm. Specify the actual destination in the Destination URL field. Your display URL can be only 35 characters long, while the actual destination URL can be 1024 characters long (a small book). Notice that your destination URL also can be a secure site by selecting HTTPS:// from the drop-down list. Of course, your site must actually have a secure page that uses an HTTPS connection. For more information about HTTPS, visit http://en.wikipedia.org/wiki/Https.
As you type your ad, you can watch it take shape in the example ad shown in the upper-left portion of the Create an ad page.
Creating a compelling ad that people want to click for more information is important, but you also want to make certain that your ad actually appears when people do Google searches looking for your kind of business. This happens by selecting the right keywords to associate with your ad. After creating your ad, the next step in the Google AdWords wizard is to type keywords. Naturally, the keywords you type here should be directly related to your service or merchandise.
Your keywords can be single words or entire phrases. Don’t make your phrases too long or they become so specific that the chance of someone typing the exact phrase becomes slight. Type one word or phrase per line in the box provided on the Choose keywords page.
Tip
Choose keywords that are general enough to have your ad displayed but not so general that they appear too often. You don’t want people who are not truly looking for your service clicking to see your Web page.
Google helps you think of keywords by providing a service that displays all the related keywords you might consider using. To use this service, type a keyword in the Want more? box, and click Search. A list of additional possible keyword selections appears. Click Add next to the selection to add it to your list.
Type up to 20 keywords, one per line. When you finish, click Continue to move to pricing.
Later, you can edit important keyword options using the tools in your online AdWords account or in the AdWords Editor software discussed later in this chapter. One of the parameters you want to set for each keyword is match type. This determines how closely you want the match to be between your keywords and those used in a search. These are the choices:
Broad: This choice returns the highest and least selective number of matches.
Phrase: This choice matches when the entire phrase matches.
Exact: The keyword must be an exact match to the one typed by the Google searcher.
You also can set the maximum Cost Per Click (CPC) for each individual keyword. This allows you much greater flexibility than setting one CPC for all keywords in your campaign. The next section discusses how to set the pricing.
We’re not talking about the pricing of your goods and services to your customer; it’s the price you agree to pay to Google for displaying your linked ads and having visitors land on your Web page. There is no set fee. You can set your own prices, limits, and budget. This is a topic you want to play close attention to. Mistakes here can be costly, but done correctly, Google’s AdWords can be a very cost-effective way of driving potential business to your site.
The first selection in the next wizard page asks you to choose a currency. This is usually not a big choice, but make certain you make the right choice because you can’t change this at a later date. Google usually sets the currency to your computer’s actual location by default, but you can change this by selecting a different currency from the list.
You set your daily budget. There is no minimum spending requirement. Tell Google how much you want to spend on average per day. The amount you spend is completely up to you. When you reach your daily average limit, your ad stops displaying for that day. Your budget controls how many times people can view or click your ad.
Your budget is something you can control, raising it and lowering it as often as you like. At first, you may want to set it just a little high to see what kind of new traffic your site receives. If you find that your ad is very successful and you experience new cash flow, you may want to maintain this level or even raise it.
Google charges a nominal one-time activation fee. Other than the fees you agree to pay for clicks on your ad, you will not expect to pay additional fees or hidden costs.
Setting the Cost Per Click affects your position in the list of sponsored ads that appear. This setting allows you to compete for the “top spot” against your business competitors. This particular setting is a ceiling or maximum amount you want to pay per click. Your actual amount could be lower, as explained later. You can quickly do the math, thinking about your daily budget divided by the maximum CPC to figure out the minimum number of times per day someone might be able to view your ad.
Google doesn’t make you guess; it provides tools to help you make this critical decision. Would you like to know what it would cost to appear at the top of the list given the keywords you entered? Warning: You may want to be sitting down when you see the number. Click the Want to purchase the most clicks possible? link to see what Google estimates as your suggested budget and Cost Per Click.
A more useful tool is the traffic estimator, which shows you a list of your keywords, their predicted status, the estimated average CPC, the estimated ad position, the estimated number of clicks per day you might expect to receive, and a calculation of your cost per day. These estimates are all based on the costs and click-through rates of current Google AdWords customers.
When you finish configuring your initial ad campaign, Google displays a summary of the things you entered so you can double-check your entries before continuing. You can edit many of these selections right from this page. Here is a list of the items for your review:
Campaign name
Languages
Locations
Currency
Daily budget
Ad group name
Your ad
Keyword list
Maximum CPC
Google asks if you would want extra help. Select either or both of the following options for more assistance. They are selected by default. So if you do not want extra assistance, you need to deselect these by clicking in the check box to remove the check mark.
Send me personalized ideas for improving my ad performance.
Send me AdWords newsletters with tips, surveys, and best practices.
Google asks a question similar to one you might consider putting on your own Web page. How did you hear about Google AdWords? Answering this helps Google figure out its own advertising policy. Create a small form on your own Web page that asks the question “How did you hear about us?” And, of course, put Google in the list of ways people used to land on your site. This helps you figure out how many of the people who click your ad filled out your form or purchased your product.
In the next step, you actually create your AdWords account. Up to this point, you’ve been creating a potential account but have not actually signed up. Signing up is simple. Follow these steps:
Choose to use your current Google account or tell Google that you do not use the other Google services.
If you want to use your current Google account for AdWords, you can select I’d like to use my existing Google account for AdWords. Because most of the Google services do not involve money or your personal financial information, you may want to set up a different login and password just for AdWords. For security reasons, this is recommended.
To set up a new login and password for this account only, select I’d like to choose a new login name and password just for AdWords.
Click Continue, and Google begins creating your AdWords account. When your account setup is complete, a new page appears alerting you to the fact that your account has been created, but you’re not finished.
Click the Sign into your AdWords account link to continue to the next step (detailed in the following section).
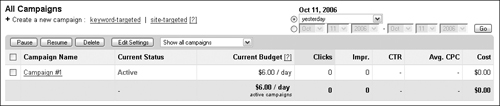
After setting up your initial ad, you are presented with the primary AdWords management page. Notice in Figure 34.3 that two messages in large boxes appear at the top of the page. This is the location that Google AdWords will post any important messages concerning your ads or your account. The initial messages tell you that your account has not been activated yet, and the second message tells you about the AdWords Editor. You can learn more about the AdWords Editor later in this chapter. Here is an easy-to-view look at how an AdWords account is organized:
Account: You can have only a single AdWords account. | |||
Campaign(s): Each account can have multiple ad campaigns. | |||
Ad Group(s): Each ad campaign can have several ad groups. | |||
Keywords: Each ad group can have one or more keywords. | |||
Good campaign management is the key to getting results from your AdWords account. From the Campaign Management tab, you can select a campaign to edit or see information about each of your campaigns. View the following about each of your campaigns:
Current status of your campaigns
Budget for each of your campaigns
Number of clicks and impressions for each campaign
Statistics such as the CTR (Click Through Ratio) and Avg. CPC (Average Cost Per Click)
Your actual cost for each campaign
When viewing the information about your campaigns, similar to that shown in Figure 34.3, you can select the time period from which the statistics are compiled. Two radio buttons are located above the statistics. One button allows you to select a present period from a drop-down list ranging from today through all time. Of course, that means from the time you first started your AdWords account. You also can select the radio button that allows you to specify a date range by typing begin and end dates. Click Go after specifying your date range. Selecting a period from the drop-down list automatically adjusts the campaign statistics for the newly specified date range.
In addition to viewing statistics about a campaign, you can edit your campaign or create new campaigns.
Each of the campaigns listed in the Campaign Management tab appears as a link. Clicking the campaign name launches a list of Ad Groups, displayed as links, for that campaign. An Ad Group is a group of keywords. To see the keywords associated with a particular Ad Group, click the Ad Group name. Three tabs are displayed, each giving you specific information about your ad group.
The Summary tab displays an overall look at how your ad group is performing. You can see performance in the Google + Search Network. These are the results of your ad group in Google search pages and on Google partner search pages. You also can see its performance in the Content network or impressions on relevant Google partner Web sites.
The Keywords tab presents information about all the keywords within the ad group. Each keyword is listed along with its status; your current bid (maximum CPC); the number of clicks, impressions, and the click-through ratio; average CPC; cost; and the average position among the ads when the ad was displayed. This gives you a good idea of how well a particular keyword is working for you. You can see the cost associated with the keyword, see how often it was displayed, and compare that to the number of times people clicked the ad. Low click-through ratios can mean that the ad may not be of interest to people searching on that particular keyword. Consider either removing the keyword or changing the wording of the ad to make it more applicable to people searching on the keyword performing poorly.
The Ad Variations tab allows you to view and manage your display ads. You can change your ad’s content, see performance statistics, and choose to create a new ad.
To begin creating a new ad campaign, you must first select the type of campaign you want to create. Choose between keyword-targeted and site-targeted campaigns. Your ad may appear the same, but how and when it appears and how you are charged are very different.
Keyword-targeted ads can appear in Google search pages and on other Web sites within the Google network. You can tell Google where you want your ads to appear. Your ads appear when someone uses keywords to perform a search that matches the keywords you specified for your ad campaign.
Site-targeted ads appear on specific Web sites within the Google network that you specify. Your ad appears each time someone visits the site, and you are charged based on how many times your ad is viewed, rather than by how many times someone clicks your ad. This is an important distinction between keyword-targeted ads and site-targeted ads.
The steps for creating a keyword-targeted ad are the same as when you first set up your AdWords account: targeting the customer, choosing keywords, setting the price, reviewing your campaign, and saving it.
Creating a site-targeted ad begins by configuring the ad for your target customer. Creating a site-targeted ad campaign differs from the keyword-targeted ad in the next step where you select the sites on which you want your ad to appear. You can select sites based on these characteristics:
Category: Select sites based on the category of site such as animals, home & garden, lifestyles, recreation, or one of the other many categories listed. After you select a category, a list of sites appears. Click Add to select a site location for your ad. You easily can see what type of ad formats each site accepts and what your expected impression rate might be.
Topic: Describe the topic of your targeted site by typing topic keywords. This is not exactly like keyword-targeted ads, but similar in idea. A list of sites containing your specified keywords appears, allowing you to select all or specific Web sites.
List URLs: Specify Web sites that are already part of the Google network (hosting Google ads on their Web pages). You can type a URL to see if it is part of the network. This is the most specific way to specify where your ad appears.
You can try each method of selecting Web sites to host your ad until you find the method that offers you the best selection of sites. When you finish selecting Web sites (they appear in the Selected Sites column on the right), click Continue.
The next step is to type your daily budget. Remember that you are charged based on impressions, not clicks on your ad. Impressions are the number of times someone views your ad. Type the maximum amount you are willing to pay per impression. This affects your position in the list of ads placed by your competitors. Clicking Continue again allows you to review your ad, the list of Web sites on which your ad will appear, and the pricing you set up. You can then choose to create another Ad Group for this campaign or simply save your campaign. After your account is set up with Google, your ad begins appearing on your selected sites.
Google AdWords provides you with a number of tools for creating, editing, customizing, and tracking your ad’s performance. These are some of the tools you can use while creating or modifying your ad:
Keyword tool: This tool allows you to add new keywords, view performance, and view important details such as advertising competition and search volume.
Negative Keyword tool: This tool allows you to specify keywords that indicate you do not want your ad displayed when these keywords are included in the user’s search. This can save you lots of money by eliminating unwanted clicks on your ad.
Traffic Estimator tool: This is another keyword tool that helps you determine how well a particular keyword will perform for you. It is an invaluable tool when selecting keywords.
Site Exclusion tool: This tool lets you designate sites in the Google network on which you do not want your site-targeted ad to appear. For example, you may not want your ad appearing on your competitor’s Web site, or maybe you do.
When determining the performance of your ad campaign, Google AdWords provides several other important tools, including these:
Ads Diagnostic tool: This tool lets you know if your ads are appearing for a particular search. It helps you adjust keywords or your CPC bid.
Disapproved Ads tool: This tool informs you of the reasons some of your ads may not have been approved. For example, certain keywords and phrases are disallowed.
My Change History tool: This tool lets you see all the changes you’ve made to your account over the last three months. This helps you see things you’ve tried and measure performance against your efforts. It’s a great tool for improving your ad strategy.
Conversion Tracking tool: Find out how many of the people that click your ad actually buy your product or use your services. This is covered in more detail in the next section.
When an ad is working for you and you are pleased with its performance, it may not require any tweaking. But you may want to play with it from time to time to see if you can improve its performance, or you may want to create new ads that supplement the ones that are already working for you. These tools assist you in focusing and managing that ad’s performance.
Conversions occur when someone clicks your ad, visits your Web site, and then possibly buys a product, reads something you wrote, or took some other action that you consider a successful visit to your Web site. Google has a special process by which it can drop a cookie on the user’s machine. You tell Google which page visit is considered a success—for example, an online receipt for a purchase the visitor makes on your site or the “congratulations, you’ve signed up for my newsletter” page. When this page is reached, Google tallies a successful conversion. Conversions help you decide if your ad is attracting the people who will buy your product or use your service.
You have two tracking options:
AdWords campaign tracking of existing campaigns
Cross channel tracking of campaigns using other providers
To get started, you must have an ad already approved and running in Google AdWords. Choose from Google’s two conversion tracking products: basic and custom. The basic conversion tracking product allows you to quickly and easily start using conversion tracking. As the name suggests, you get basic number of clicks compared to how many successes you had.
The customized conversion tracking option gives you greater flexibility. This option allows you to select one of the four types of conversion tracking:
Purchase or sale tracking
Lead tracking
Signup tracking
Page view tracking
To begin conversion-tracking setup, set the format and background color of the small box that appears on your conversion confirmation page. The conversion confirmation page is the one that says, “Thanks for buying my product.” Next, set the language and security level of your page.
For custom tracking, you can assign a conversion value, either a constant or a variable. Use a constant when you have a set value that you will receive from the conversion. For example, everyone who views your site’s video product pays $5. Your constant would then be $5. Variables include things like purchase prices of many different products. You need to know how to find that price in your Web site’s shopping cart to use variable conversion value tracking.
When you finish configuring your conversion tracking, copy the HTML that Google creates for you and paste it into the Web page you consider the “success” or conversion confirmation page.
Visit your conversion confirmation page to see that the Google Sites text box appears there. Then visit the conversion statistics page (in about an hour) to see that your test conversion has been tracked.
You can choose to view standard conversion tracking reports, such as the conversion ratio, or select custom reports to receive additional metrics, such as your cost of conversion. You can find conversion tracking right down to the keyword level.
When installing the Google AdWords Editor, you can make the application available to everyone or “Just me.” For security reasons, select Just me. Remember that editing your AdWords can affect the amount of money you need to pay Google.
When you finish your AdWords Editor installation, you can launch it from your Start menu. Choose Programs ![]() Google AdWords Editor
Google AdWords Editor ![]() AdWords Editor, as shown in Figure 34.4.
AdWords Editor, as shown in Figure 34.4.
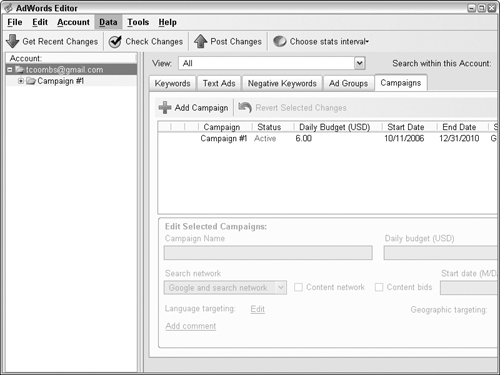
When you first launch the AdWords Editor program, you are prompted to type your account information so the editor software can communicate with your existing Google Ad Worlds account. The Add New AdWords account dialog box appears and requests the e-mail address and password you configured to access your AdWords account. Remember that this may be different from your Google account. After you add your login information in the dialog box, it closes and the AdWords Editor downloads your AdWord campaign information.
The AdWords Editor main window has five tabs: Keywords, Text Ads, Negative Keywords, Ad Groups, and Campaigns.
Edit and add keywords in the Keywords tab. Change the text of the keyword. Select the Match Type, Broad, Phrase, or Exact, the maximum cost per click, and the destination URL. Setting the destination URL for each keyword gives you the greatest flexibility in determining on which page people land when they click your ad. By default, there is one destination URL per ad. Consider how you might construct your Web site to take advantage of this ability to target specific customers.
You can add a comment for each keyword by clicking the Comment link.
The Advanced Max CPC Changes link launches a window that allows you to set how your Cost Per Click bids are handled. You can choose to increase and decrease them by percent or by actual monetary amounts. You can raise inactive keywords to their minimum CPC levels to reactivate them, or you can remove the keyword-specific CPC and return to the Ad Group’s maximum CPC level set when you created the Ad Group. You also can set additional maximum and minimum CPC constraints in this window.
Take finer control over your destination URL by launching the Advanced URL Changes window. Here, you can set the specific URL for the keyword and add text to an existing URL, such as a directory name or URL parameter. And you can remove certain URL parameters that you do not want associated with this keyword.
Add and edit existing text ads (see the section “Creating an Ad” for more information on creating text ads). You also can add a comment for your ad, replace text in an ad for faster editing, and make advanced URL changes as discussed previously for keywords.
Add special keywords, known as negative keywords, in the Negative Keywords tab. Negative keywords are those that when matched, keep your ad from displaying. For example, if you are selling puppies, but you never sell Yorkshire terrier puppies, your negative keyword may be Yorkshire terrier. That way, if someone types Yorkshire terrier puppies into a Google search box, your ad does not appear.
In the Ad Groups tab, you can add new ad groups and do these additional things:
Change the Maximum CPC
Change the Maximum Content CPC
Change the status of the ad group among Active, Paused, or Deleted
The Campaigns tab has features that allow you to add a new ad campaign, change the name of the campaign, set the daily budget, set the status, select the search network, set content bids, and set start and end dates for ad campaigns with time constraints, such as seasonal ads or sale ads. Set the language and geographic location of your target customers and add a comment.
When you finish modifying keywords, ads, ad groups, and campaigns, click the Post Changes menu icon along the top of the main window. Your changes are transferred to your AdWords account.
There was a time when the only type of ad you could place in Google was a text ad. That is no longer true; now, you can place full multimedia presentations within the Google network, or you can choose to stick with the tried-and-true text ad. In a wireless world, your ad also can appear on mobile devices and cell phones. Here are the types of ads you can create:
Text
Image
Mobile text
Local business
Video
Most of the parameters for creating ads are the same. You definitely need a destination URL for any type of ad so that, after viewing your ad, the user can click it and purchase or experience your site’s offering.
The steps for creating a text ad are the same as the steps you took when first setting up your account. To create the text ad, type the following information:
Headline
Description line 1
Description line 2
Display URL
Destination URL
Click Save Ad when you finish creating your ad.
Image ads are exactly what they sound like: graphic images rather than boring old text. The advantage of graphic image ads is that they are eye-catching. The disadvantage is that you can say so much more in a text ad. You need to decide how best to attract people to your ad: content or pizzazz. Your image ads can be formatted in the styles listed in Table 34.2.
The image you select for your ad can be a maximum of 50KB in size. Display ads must be in one of these file types: JPEG, GIF, PNG, or SWF.
Tip
Make sure to use a good-quality graphics editor to create your image. Poor-quality images do not attract people to your Web site.
Browse your computer to find the image you want to upload for your ad. Type a name for the image. This should be a descriptive name that makes viewing its performance in reports simple. Like text ads, the display ads also have a display URL and an actual destination URL. Type these two URLs. Google also asks for your permission (by clicking the check box) to adjust any of your image ads to an appropriate size. Click Save Ad when you finish creating your ad.
If you want your ads to appear on cell phones and other mobile devices when someone does a search that matches your selected keywords, create a mobile text ad. It’s similar to creating normal text ads, except that due to size constraints you are limited to only 18 characters in the headline and a single description line, also only 18 characters long.
You can choose how people respond to your ad. You can link them to your business via your phone number, making it simple to call you rather than read about you on the Web. This is great for services such as towing where you want them to call you immediately. You can link your ad to a mobile Web page (a Web page designed for viewing on a small display) or both of these options.
When linking to a mobile Web page, type the display URL, the one they see, and an actual destination URL. You are limited to only 20 characters for the display URL and 200 characters for a destination URL. Remember that your destination URL must point to a Web page designed to appear on mobile devices and designed using a mobile protocol. Specify the mobile protocol used to create your mobile Web page from this list: WML, XHTML, CHTML, and PDA-compliant.
Finally, you can specify which mobile carriers display your ad. Your choices are: All carriers and select specific carriers from the list. You may want to select specific carriers if you are selling mobile goods and services designed for specific carriers. Click Save Ad to complete your mobile ad creation.
Local business ads are listed in Google Maps business listings for a particular area. They appear on the map with a distinctive location marker. You must first be listed in the Google Maps business listings. To add your business to the local listings, point your Web browser to www.google.com/local/add.
Your local business listing can include your location, your phone number and contact person, a description of your business, your hours of operation, and payment methods. Adding your local business listing is free. You should consider adding your listing even if you are not going to run a local business ad.
To create a local business ad, you only need to type your business name and its location. Google looks in its local business listings to find your entry. Make sure you correctly type your full address or Google Maps does not correctly display your ad.
When a video ad first appears on a Web page, it appears as a static image until someone clicks it. Then your video begins playing. You must supply both the initial static image and the video. Your video ad should conform to one of the styles listed in Table 34.3.
Select the static image you want to appear initially from your computer. You can use the Browse button to locate it on your computer. Then select a video you want to use in your video ad.
Type the display and destination URLs in the text boxes provided. The display URL can be 35 characters long and the destination URL 1,024 characters. Finally, create a name for your ad. This is how the ad will appear in your reports. Click Save Ad when you finish creating your video ad.
To view reports of your ad campaign’s performance, click the Reports tab when you log in to your AdWords account. If it’s your first time in the Reports tab, you’ll want to first create a report by clicking the Create a Report now link.
The Create Report page contains everything you need to create powerful custom reports. Begin by selecting the type of report you want to create from these choices:
Keyword Performance: See how each of your keywords is performing.
Ad Performance: See reports on the overall performance of all your ads.
URL Performance: See performance based on the destination URLs you’ve specified in your ads.
Ad Group Performance: View performance at the Ad Group level rather than at the campaign level.
Campaign Performance: See reports on the performance of all your Ad Campaigns.
Account Performance: See the performance of your entire AdWords account.
After you select the type of report you want to create, you must select the type of report based on time. For example, you may create a summary report, or daily, weekly, monthly, quarterly, or yearly reports.
Specify a date range by either selecting a range from the drop-down list or by typing a range with begin and end dates. Typing your own range is particularly important when specifying your company’s fiscal year, which may begin and end midyear.
Select which of your campaigns you want included in the report—all or selections from a list of campaigns. After you select which campaigns, you have the choice of altering which columns appear in the report and filtering the report. You can filter based on a number of criteria such as whether the ads are content- or search-type ads, whether keywords are active or have some other status, the level of keyword matching you’ve set up, a particular keyword, the level of average position ads have maintained, clicks, cost, average Cost Per Click (CPC), Click Through Ratio (CTR), and number of impressions.
After you finish building your report, you need to give it a meaningful name. It’s probably not a good idea to give it a name such as Report #1 or My AdWords Report. Give the report a meaningful name, such as Fiscal Year Performance–All Campaigns.
Select whether this report you are creating is a template from which you can create future reports, possibly specifying different date ranges or selecting different ad campaigns. Then tell Google how often you want the report run; these are your choices:
Every day
Every Monday
First day of every month
You can choose to be notified by e-mail when the report runs or even receive the report via e-mail. When receiving a report via e-mail, you need to select the format in which it is sent to you. You can choose formats that easily allow you to include them in spreadsheets, such as CSV files, or you can send them out to company-wide reader programs that expect an XML format or for easy viewing in HTML. Click Create Report to create your report or template.
In addition to viewing your reports in e-mail, you also can click the Reports tab to view reports that have been run. Click the Report Center link in the Reports tab to view existing reports.
Cross-Ref
Learn more about how to analyze your ad’s performance using Google Analytics in Chapter 36.
You may be wondering why the My Account section comes at the end of the chapter. It was important for you to understand how AdWords works and all the tools Google provides for creating and managing your ad before you enter your financial information and launch your ad campaign. You could have just as easily typed your text ad, blindly added a few keywords, turned over your credit card number, and been done with things. But you don’t need to rush into spending money when there are so many tools to help you maximize your success for each dollar you spend.
There are four sections in the My Account tab. Billing Summary gives you a quick look at your recent billing. Billing Preferences is where you set up your billing arrangements with Google. Access is where you can add or edit the list of users who have access to your AdWords account. And the AdWords Account Preferences section is where you can set some basic information about how you access and view your AdWords account.
The Billing Preferences section is where you type your billing style, form of payment, billing address, any backup payment details, and any promotional codes you may have received to start an AdWords account.
The billing payment types allowed are based on your currency and billing location. Normally, you need to enter your credit card information. When you enter a credit card, this activates Post-Pay billing, which means that when you receive clicks or impressions, your credit card is debited.
Type your credit card information in the Primary Payment Details section. There are a large number of credit card types accepted by Google. You also can add backup payment details. This is important in case your trip to Rome causes your credit card to hit its upper limit and you don’t want your ads to stop running. You can specify a backup credit card that is billed automatically when charges to your primary card are declined.
Finally, redeem any Google coupons by typing the promotional code and clicking Redeem.
By default, your Google AdWords account ID is the only one authorized to access your AdWords account. When you want others to have access to your account, click the Invite other users link. You are then prompted to type a list of names and e-mail addresses for the invited people. Click Continue to continue, or click the Invite more users link to add additional users.
After adding the list of users, Google asks you to format the personalized message that will be sent by e-mail to the people you are inviting. They must accept your invitation before they can have access to your account. The last section allows you to monitor your awaited invitation responses.
Your AdWords account preferences allow you set some basic information about your account and your business. You can change which of your Google accounts you will use to access your AdWords account. When you first set up your account, you had the choice of using your existing Google account or selecting a new userid and password to access just the AdWords account. This is where you can change that information.
Set your language and notification options. These are your options:
Display Language: This is the language in which your AdWords account pages are displayed, not your ads.
Disapproved ads email notification: Tell Google if you want to be notified by e-mail when your ads are disapproved so you can take immediate action.
Account performance suggestions: Decide if you want Google to send you suggestions in e-mail on improving your ad performance.
Newsletters: Opt in or out of receiving the Google AdWords newsletter in e-mail.
Google Market Research: Choose whether you want to participate in Google market surveys or product tests.
Special Offers: Tell Google whether you want to receive special AdWords promotional offers.
Click Save Changes to save your language and notification option selections.
There are a few more settings you can modify in the account preferences. Set the time zone of your location. Select your business type in the About Your Business section. When running pharmaceutical ads, you need to enter your PharmacyChecker ID.
The Tracking section allows you to turn auto-tagging on or off. Auto-tagging is turned on by default and allows Google to create performance reports and analyses using Google Analytics by adding a URL parameter called glcid into the URL used to access your Web site.
Note
Some Web sites do not allow arbitrary URL parameters such as the glcid. In that case, you need to turn auto-tagging off.
It’s recommended that you keep auto-tagging turned on unless it is critical that it be turned off. Without auto-tagging, you can’t receive important tracking statistics on your ad performance.
Finally, click the printer-friendly document link to view/print the Google AdWords Terms and Conditions.
When world consumers go to Google to find information, you want to make sure they find you when they are looking for whatever it is you’re selling, whether it’s a service or a product. Pay Google as little or as much as you want, and experience what many have already experienced: growth in their business.
Use the many tools that Google AdWords provides to update your ad campaigns, track their performance, see when ads have been disallowed, view performance against competitors, and suggest and create new keywords.
Entire books are being written about Google AdWords. This chapter gives you the essential information on launching ad campaigns and discovering the Google tools that help you manage those campaigns and track their performance. You can learn more about partnering with Google and becoming part of the Google network in the next chapter.