
11 Starter packs: From zero to CD
- identifying the basic elements of an effective CD pipeline
- finding and fixing the missing elements in existing CD pipelines
- setting up effective CD pipelines for new projects from day one
- adding useful CD automation to legacy projects without needing to solve everything at once
Knowing where to get started with continuous delivery (CD) can be hard, especially when you’re starting from having no automation at all, when you’re making something brand-new, or when you have a pile of legacy code already built up. This chapter will help you avoid getting overwhelmed by showing you where to start and how to get the most value quickly from your CD pipelines—whether you’re starting from scratch or you have 20 years of legacy code to deal with.
Starter packs: Overview
In this chapter, we’ll take a look at how you can improve CD for your project, regardless of where you’re starting from. The chapter is divided into three sections:
-
Recap—First we’ll spend a few pages looking back at the kinds of tasks that you’d expect to see in any CD pipeline, which we’ve been looking at in detail so far in this book. We’ll look at how these can fit together into prototypical CI and release pipelines. It’s all well and good to know what a CD pipeline could look like, but it’s another thing to know how to apply that to your projects. So the rest of the chapter is dedicated to making CD pipeline improvements in two very different but very common scenarios.
-
Greenfield—The first kind of project we’ll look at is the greenfield project, in which little to no code has been created yet, and you have the opportunity to start the project off with best practices right from the get-go. We’ll look at a startup called Gulpy, which has been operating only for a couple of months, so some code has been written, but not so much that it’s hard to make changes. We’ll walk through going from no CD automation at all to a complete set of tasks and pipelines.
-
Legacy—Every greenfield project will eventually become a legacy project, so chances are pretty good that the project you’re working on is a legacy project. For these projects, so much code and automation likely exists already that thinking about trying to modernize it can be overwhelming. We’ll take a look at a company with a legacy codebase, Rebellious Hamster, and how an incremental approach to improving its CD can net big wins right away.
![]() Vocab time
Vocab time
Greenfield projects are brand-new and so have a lot of freedom in the way they operate. These are contrasted with legacy projects (sometimes called brownfield projects), which have been around for long enough that they’ve built up a lot of code and making substantial changes to it has become hard.
Recap: Universal CD pipeline tasks
No matter what kind of software project you’re working on, the basic tasks that make up a complete CD pipeline are the same. (However, you may see differences in the quantity of each type of task and the order in which they are run.) In chapters 1 and 2, you got a glimpse of these basic tasks:
-
Linting is the most common form of static analysis in CD pipelines.
-
Unit and integration tests are forms of tests.
-
To use most software, you need to build it.
-
Many kinds of software will need to be published in order to be used.
-
To update a running service to use the newly built artifact, you must deploy it.
You’ve seen linting, testing, building, and deploying throughout this book. In chapter 6, you saw the specific kinds of testing tasks that you’ll want to include in your pipelines:
-
Unit tests
-
Integration tests
-
End-to-end tests
Chapter 2 categorized these tasks as either gates or transformations for code. These are the gates and transformations that make up a complete CD pipeline:

Prototypical release pipeline
Chapters 9 and 10 covered build and deployment automation and triggering. For the moment, I’m going to assume that you will want to trigger your build and deployment pipeline separately from your CI pipeline (but you don’t have to, and there are benefits not to—you’ll learn more in chapter 13 on pipeline design). Your release pipeline will contain your transformation tasks and look something like this:

Prototypical CI pipeline
Your CI pipeline will contain your gating tasks. But as you saw in chapter 7, it is valuable to use the same tasks (or, ideally, even pipelines) that you use to build and deploy within your CI pipeline, to make sure what is being tested is as close as possible to what is going to production. Therefore, this pipeline is likely to contain transformation tasks as well and look something like this:

Both pipelines with triggering
Figuring out what to include in your CI pipeline isn’t the whole story; you still need to run it at the right times. In chapter 7, you saw multiple points in the life cycle of a change where you’d want to run the CI portions of your pipelines in order to prevent bugs. Combining CI pipelines with triggering, the complete picture of CD pipelines looks something like this:

This is what you want to aim for, but the way you’ll get there (and whether you need to get all the way there—remember from chapter 1 that CD is a practice) will depend on the type of project you’re working on.
![]() What if I don’t run a service?
What if I don’t run a service?
The example pipelines in this chapter focus on software that is provided as a service and therefore needs to be deployed somewhere. In chapter 1, we spent some time looking at various kinds of software we can deliver (libraries, binaries, configuration, images, and services).
The biggest difference between pipelines that are run for software that is delivered by running it as a service and software that isn’t (e.g., libraries and binaries) is the deploy task. Most of the CI tasks are universal: linting and various kinds of testing can be applied to all software—even configuration.
If you are delivering tools and libraries, you can leave the deploy task out of both your CI and your release pipeline:

If your software is intended to be run as a service by your users (but you don’t host it for them), your CI pipeline should still include the deploy task (because you need to deploy to fully test it), but your release pipeline will not. See the chart in chapter 1 for more on what delivery includes for each kind of software—i.e., which elements you would need to include in your pipeline and which you wouldn’t.
Greenfield: Getting to CD
Now that we have the basic CD pipeline concepts fresh in our minds, we’ll look at these pipelines in action for two projects that are at similar points in their life cycle, a greenfield project and a legacy project. When setting up CD pipelines and automation, working with a greenfield project is the ideal, best case scenario.
When the codebase is small, making wide sweeping decisions that can be applied universally is easy (e.g., enforcing new linting rules). And the earlier you can set up the automation to enforce policies (e.g., minimum 80% unit test coverage), the better the chances that this will be maintained across the project as it grows.
Greenfield projects have the opportunity to make tiny course corrections that will reap huge benefits as the years pass and the project transitions from greenfield to legacy—which is the inevitable fate of all projects.
We’ll be looking at a principle that applies equally to all project types, but first we’ll see what it’s like to apply this principle when starting from scratch:
Get as much signal as possible as quickly as you can.
When we’re starting with no existing automation, we’ll need to figure out which aspects of the CD pipeline can give us the most useful signal the fastest, focus on those, and expand from there.
We’ve talked about signal and noise in the context of tests in chapter 5, and in chapter 7 we looked at all the places in a pipeline where we need to get the signal that a bug has been introduced. As we improve (or create from scratch) our CD pipelines, we get the most out of them if we focus on how to increase the signals that we get from them, i.e., the information that we need in order to make sure our codebase stays in a releasable state and we can release as quickly as we need to.
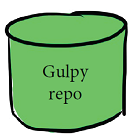
Gulpy
I’ll start with a greenfield project at a start-up called Gulpy. Gulpy’s goal is to make life easy for fish owners by streamlining online orders for fish food and supplies.

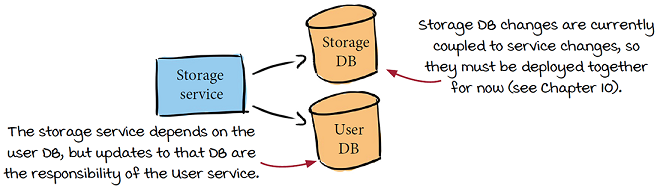
Gulpy has been operating for only a couple of months, so a bit of code is in its codebase but not much, and the engineers haven’t yet set up any CD pipelines or automation. Their architecture is quite simple, just one service and one database:

The code they’ve created so far—which at this point can display a front page, allow a user to create an account, and not do much else (yet!)—lives in just one repo.
Should Gulpy create a more complex architecture off the bat?
In chapter 3, Sarah and Sasha designed a more complex architecture for their start-up before writing a single line of code. Their approach and Gulpy’s approach (which is focused on getting something working quickly) are both valid; Sarah and Sasha’s is probably a bit more future proof. But it comes down to looking at your project, deadlines, and goals, and making the right decision for you.
Greenfield: Zero to CD
When trying to figure out what CD automation to add to a project, the overall goal is the same whether you’re talking about a greenfield or a legacy project:
Get as much signal as possible as quickly as you can.
The concept of signal versus noise—specifically maximizing signal and minimizing noise—applies to CI as a whole:
CI is the process of combining code changes frequently, with each change verified on check-in.
The verification piece of CI is the signal that you’re looking for: the signal that your code is in a releasable state and that any changes you add will keep it in a releasable state. This goal suggests that when evaluating CD for a project, it’s most effective to focus on improving the CI first. This makes sense because before you start making your releases faster and more frequent, you want to make sure it’s safe to do so!
For a greenfield project, build up the CD pipeline automation by incrementally adding CD tasks in this order:
-
Set up your initial automation and add a task to ensure that your code can build.
-
Set up your codebase for high quality by adding linting as early as you can.
-
Fix any existing linting violations to make your code crystal clean.
-
Start verifying your functionality (and writing cleaner code) with unit tests.
-
Get an immediate idea of what your unit test needs are by measuring coverage.
-
Add the tests you need to get to your coverage goals.
-
Now that you’ve set up your initial CI, start on your release pipeline by adding logic to publish what you’re building.
-
Complete your release pipeline with deployment automation.
-
With most of your basic elements in place, you can now focus on adding integration and end-to-end testing.
You can absolutely adjust the order of the preceding steps. Just remember, the overall goal is to start getting as much signal as you can, as quickly as you can. This is why some phases that take a bit longer (e.g., setting up end-to-end testing) are left until later; if you tackle these off the bat, you’ll have to wait longer before you get any signal at all.
First step: Does it build?
The most basic thing to verify about your codebase is that you can build it into whatever form you need it to be in to actually use it. If you can’t build your code, you probably can’t do much else with it: it’s unlikely that gating tasks such as testing and linting will even be able to complete successfully, and you certainly won’t be able to release it.
Getting this signal in place from your CI pipeline right away sets the foundation for everything else you want to do in your CD pipelines, which is why this is the first step for a brand-new codebase:
1. Set up your initial automation and add a task to ensure that your code can build.
Gulpy’s codebase is written in Python, and the engineers run their service in a Docker container, so the very first task they’ll use (and the start of their CI pipeline) is a task that will build that container image.
With these humble beginnings, Gulpy has gone from having no CD automation to having its first CD pipeline!
Just automating building is quite an accomplishment!
As mentioned briefly in chapter 1, the earliest CD systems had one simple goal: building the software. The other automation (testing, linting, deploying, etc.) all came later. And this is why CD systems are often called build systems, and tasks in CD pipelines are still commonly called builds. So don’t undervalue having automation in place to build for you, as just accomplishing that used to be a huge feat on its own!
Picking a CD system
In the same way that starting a software project with an initial milestone (minimum viable product, or MVP) that is scoped way down is a great way to lay the foundation for adding future features, setting an easy initial goal for your CD pipeline such as building allows you to initially focus on getting the initial automation up at the same time.
See appendix A for features across popular CD systems.
Gulpy has an initial (one-task) pipeline, but that doesn’t do the company any good unless that pipeline is getting triggered and running. And before the engineers can set up any of that, they need to pick a CD system. There are two big questions to answer to help you narrow your search. Here’s the first:
-
Do you want to use an existing CD system or build your own?
You probably want to use an existing system, again to save on the cost (and complication) of building and maintaining your own. If you have special requirements for the way your code is built, tested, and deployed that aren’t supported by existing CD systems, then there’s likely no escaping building your own. (Fortunately, this is unlikely to be the case this early on in a project, unless you are in a field that has special regulatory requirements you already know about.) Assuming you can use an existing system, here’s the second question:
-
If you’re using an existing system, do you want it to be hosted by a third party or do you want to host it yourself?
Your best bet (especially early on) is usually to use an existing hosted service. This will help you get up and running easily, and won’t require you to set up and pay for a team of people to maintain your system.
For many projects, the source code will be private. To use an existing CD system with private code, you’ll need to either use a CD system that can be configured to safely access it, or host your own instance.
Building your own CD system doesn’t need to mean starting completely from scratch. In the appendices, you’ll see some CD systems that exist as platforms and building blocks you can use to put together your own systems. As your project scales, maintaining your own CD system may become more of a reasonable proposition, so that you can easily enforce constraints on multiple projects across your organization and create exactly the automation that works for your business and customers.
Setting up the initial automation
Gulpy wants to set up an initial CD pipeline that builds the Gulpy container image, and is triggered by three events (see chapter 7 for more on these events and why they are important):
-
When a PR is opened or updated
-
When the PR is ready to be merged and is being verified by the merge queue
-
Periodically every hour

The Gulpy engineers want to keep their source code private, but they don’t have any reasons to build their own CD system. They’re already using private repositories on GitHub, so they decide to use GitHub Actions for their automation.
To create their (one-task) pipeline in GitHub Actions and set up the triggering, all they need to do is create a workflow file (ci.yaml) and commit it to their repo in the .github/workflows directory:
name: Gulpy Continuous Integration
on:
  pull_request:                 ❶
 push:
    branches:
   —gh-readonly-queue/main/**   ❷
  schedule:
 —cron: '0 * * * *'             ❸
jobs:
  build:                        ❹
  ...
❶ Tells GitHub Actions to trigger on PR updates
❷ Tells GitHub Actions that the merge queue should run this workflow before merging
❸ Tells GitHub Actions to trigger every hour
❹ The workflow (triggered by the preceding three events) has one job called “build.” The details aren’t included here, but this could be defined inline or could be a reference to a GitHub Action defined elsewhere.
Their CD pipeline is up and running! There’s still a lot to add, but now they’ll get a signal right away if a change is proposed to the repo that would put the codebase in an unreleasable state (via PR and merge queue triggering) or (via the periodic tests) if something nondeterministic in the build process has snuck in that causes the build to stop working (see chapter 9).
State of the code: Linting
Now that you have your automation set up and you’re making sure your project can build, the next thing to focus on is the code itself. This early in the project, a huge amount of code doesn’t exist yet, so this is a great time to clean it up and set the foundation for maintaining high standards for the rest of the project’s lifetime.
In chapter 4, you saw how useful linting can be: it not only keeps your codebase clean and consistent, but also catches real bugs. You also saw how challenging it can be to apply linting to a legacy codebase, and how you’re unlikely at that point to ever get to the ideal, which is as follows:
The linter reports zero problems when run against your codebase.
When you’re starting with a new codebase, though, this is attainable. And if you set up the automation to support this from the start, you can keep it going.
The later you add linting, the harder it is to enforce it evenly, so for a new project this is a great step toward improving the code itself. That’s why the second thing to add incrementally when setting up CD pipelines for greenfield projects is this:
2. Set up your codebase for high quality by adding linting as early as you can.
Gulpy adds linting automation to its pipeline:

As soon as the engineers start running the linting task, it identifies a number of existing violations in their codebase. They decide to fix these right away, so initially they configure the pipeline to allow the linting task to to fail while they fix the problems, taking on the third incremental step in building up their CD pipeline:
3. Fix any existing linting violations to make your code crystal clean.
jobs:
  lint:
    continue-on-error: true ❶
  build:
  ...
❶ This stops the workflow from failing when this task fails. Once the engineers get the codebase cleaned up, they can remove this option so that future changes will be blocked until they meet the linting requirements.
State of the code: Unit tests
Gulpy now has a pipeline that verifies that the codebase can build, and it has linting requirements in place to keep the code consistent (and catch common bugs). The next thing to start tackling is verifying the functionality itself—i.e., the business logic (and all the code supporting it) that is really the motivation for creating any software project. We verify the functionality of software by using tests, and the fastest tests to create (and run) are unit tests.
![]() Vocab time
Vocab time
Business logic is the whole reason we write software at all! It’s the rules that we translate into code that make our libraries and services worth using. It’s the logic that our users come to our project for, and if we’re making software for profit, it’s the logic that delivers business value and makes us money.
This early in the project, you may have some unit tests already, but even if you don’t, adding the automation to start executing them sets you up for success when you do add them (which we’ll be doing next). With the automation in place, you’ll start getting feedback immediately, as soon as you add the tests:
4. Start verifying functionality (and writing cleaner code) by adding unit tests. (a)
(a) To write effective unit tests, your code has to be structured to be unit testable—which usually means highly cohesive, loosely coupled, and all kinds of other good stuff. Without unit tests, it’s easier not to focus on the structure of the code itself, and it becomes harder and harder to add unit tests.
Gulpy doesn’t have any unit tests yet, so the unit-test task that the engineers add just passes immediately (no tests found = no tests failed). Their CD pipeline now looks like this:

Integration tests and end-to-end tests are also extremely useful, but we’re not going to try to add them right away because they take longer to get up and running. Not to mention that the earlier you introduce unit tests, the easier it will be to hit and maintain coverage goals. Remember: most of your tests should be unit tests!
State of the code: Coverage
Now that Gulpy has the automation in place to run unit tests (when they’re added), a reasonable next step is to add coverage measurement—which will currently be 0%! No tests means no coverage. Since the project is new, and there isn’t much code to cover, this is a good time to focus on getting the coverage level that you want. Then, going forward in the project, all you have to do is maintain this level! Therefore, here’s Gulpy’s next step:
5. Get an immediate idea of what your unit test needs are by measuring coverage.
Setting any arbitrary threshold means that occasionally you’ll find yourself writing tests that aren’t valuable—for example, if you require 80% coverage and you currently have 79.5%. But the cost of a couple of extra tests is usually worth the ease of automating an explicit goal.
In chapter 6, when Sridhar added coverage measurement for Dog Picture Website, he had to build logic to keep track of the coverage level and make sure it didn’t go down. This is an effective way to increase coverage in a legacy project incrementally, but brand-new projects that have little to no code can instead define an arbitrary threshold and write the tests required to meet that threshold right off the bat. The engineers update the unit test task to also measure coverage and to fail if the coverage is less than 80%:

The task, of course, immediately starts failing, which blocks any new changes from being introduced. The Gulpy engineers next focus on adding unit tests until they meet their 80% coverage goal:
6. Add the tests you need to get to your coverage goals.
They temporarily remove the 80% requirement while they add tests. Otherwise, they’d have to make one big PR with all the tests and add it back once their tests are in place.
What is a good coverage threshold?
A good coverage threshold depends on your codebase. Start at something like 80% coverage and see what that looks like. This is lenient enough to allow you to leave some lines uncovered if the tests that would cover those lines aren’t valuable, and high enough to ensure that most lines are covered. Adjust up or down from there.
Moving past CI: Publishing
Gulpy now has a pipeline with basic CI elements in place that will ensure that the code works (i.e., is releasable) and that the company continues to meet the linting and unit-test coverage goals established early in the project. This is enough for the engineers to feel reasonably confident that they’ve met their initial CI goal:
CI is the process of combining code changes frequently, with each change verified on check-in.
Feeling confident enough in their CI (for now!), they can move on to the rest of the CD pipeline, starting with doing something with the container image that they’re already building:
7. Now that you’ve set up your initial CI, start on your release pipeline by adding logic to publish what you’re building.
Some tools for building artifacts will combine building and pushing into one command.
Since they have the freedom to choose their deployment methodology right from the start, the engineers decide to start using continuous deployment right away. They start a separate pipeline that uses the same build task as their CI pipeline and is triggered on successful merges to main (you’ll learn more in chapter 13 about the tradeoffs involved in using multiple pipelines):

Deployment
Next up for Gulpy is automating deployments. The engineers have already deployed a few times, but they’ve been doing it manually by running a script that updates instances of their service running in the popular cloud offering RandomCloud. So here’s the next step:
8. Complete your release pipeline with deployment automation.
Already having a script defined to do some of their deployment can make automating deployments easier. However, it’s easier to be flexible about deployment decisions this early in the product’s lifetime, and starting from scratch may not make a huge difference. This is especially true if you decide to lean on an existing tool that does deployment automation for you (see chapter 10 for types of deployment strategies you might want to consider).
The Gulpy engineers decide they want to use canary deployments. They decide to use Deployaker, a popular tool for automating deployment strategies. They also decide to use continuous deployment, so they update their existing release pipeline with a task that calls out to Deployaker to kick off a canary deployment:

This early in the project is also a great time to introduce and try continuous deployment. This sets an excellent precedent for your project moving forward, and it’s early enough that this is relatively risk free, giving you a chance to decide later if it isn’t right for your project.
Expanding testing
Gulpy now has the basics in place: a CI pipeline that verifies building, linting, and unit tests (with 80% coverage) and a release pipeline that uses continuous canary deployments. The last step in completing these pipelines is to complete the testing story. Remember the test pyramid from chapter 6:

As useful as the unit tests are, they can still miss a lot, and need to be complemented by a set of end-to-end and/or integration tests that test the individual units together:
9. With most of your basic elements in place, you can now focus on adding integration and end-to-end testing.
Getting these tests up and running is the last phase in setting up the initial CD pipelines because of the following:
-
These tests—and the setup required to run end-to-end tests—take a lot longer to initially get up and running.
-
You can reuse some or all of your build, publish, and deploy logic in triggering these tests.
Tasks for integration and end-to-end tests
While designing their end-to-end tests, the engineers at Gulpy look at their release pipeline and decide what they can reuse. They are to use the build and publish tasks as-is, passing in different parameters that allow them to control the name of the image built to indicate it’s just for testing (for example, gulpy-v0.2.3-testing).
For the deploy task, they have a choice to make: do they want to use Deployaker for their test deployments? If they do, it has the advantage of testing their deployment configuration as well. But a big downside is that using Deployaker in testing requires an instance, and engineers can’t as easily use this same logic while they are developing. So the engineers decide to write a new task for deploying, which simply starts the service running as a container directly.

The engineers create a suite of end-to-end tests that execute against a running instance of the Gulpy website, just as a customer would, and they create a few integration tests.

To get their end-to-end tests to run, they need one more thing: somewhere to deploy to and test against, i.e., the system under test (SUT) environment. Gulpy creates a task that will start a VM to run the container on:
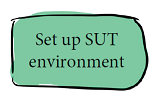
You might not need to set up a separate system under test at all (for example, you might just start a container directly as part of your end-to-end tests). It really depends on the design of your system and the number of components you need to bring up in order to test. Consult a book on testing for more.
Completing the CI pipeline
To run their integration tests, all the Gulpy engineers have to add to their existing CI pipeline is the one task that runs those tests. These tests take a bit longer to run than the unit tests but don’t require any special setup:

Adding their end-to-end tests into the CI pipeline is a bit more complicated. They need to add an entire pipeline worth of tasks:

Gulpy’s complete pipelines
Putting everything together, Gulpy has created the following two pipelines, both triggered separately:

They may decide to make some adjustments as they move forward with adding more features, but in general these initial pipelines should meet their CD needs quite well! These are examples of the ideal elements you’ll want to aim for in your own pipelines (give or take a couple of tasks, depending on the needs of your project and the tools you use).
Legacy: Getting to CD
In reality, most of the time you are not working on greenfield projects, so you won’t have the luxury of getting all the elements you want in place while the codebase is still small. Instead, you’re much more likely to be working with a legacy project.
Every greenfield project will become a legacy project at some point. When exactly that point is reached is debatable, but one indication of a legacy project is the amount of work involved with suddenly introducing blocking CD tasks like some you just saw: for example, requiring 80% coverage, or requiring linting to pass. As you’ve seen in previous chapters, putting guidelines like this in place for legacy projects is trickier.
The approach you just saw is still useful because it highlights the elements you want in place for all of your projects, including legacy projects. However, the order you approach adding them in is a bit different, and there’s a good chance you won’t be able to get everything you want (and that’s okay!).
Whether you’re dealing with legacy or greenfield projects, when it comes to adding CD, the goal is the same:
Get as much signal as possible as quickly as you can.
And again you want to focus on CI first, because it lays the foundation for everything else you might want to do:
CI is the process of combining code changes frequently, with each change verified on check-in.
This can be especially true for legacy code if CI has been neglected up until this point—who knows what the state of the code is! Without CI, it’s very hard to know what will happen if you start adding release automation and releasing more frequently and faster. It makes sense to be hesitant to do this until you are confident in the state of your code.
Rebellious Hamster
Now I’ll focus on how to improve CD for a legacy project by taking a look at Rebellious Hamster. This company provides backend services for video games. It has a large codebase developed over the last five years, but hasn’t set up any CD automation—or at least Rebellious Hamster hasn’t set it up consistently across projects. Where should they start?

The code that supports these services is spread across several repositories:

Each repo is more or less owned by a different team, so while some have no CD setup at all, others sometimes have a bit of testing and automation. No consistency exists between the projects, and each team has different standards.
First step: Prioritize incremental goals
Dealing with legacy projects can be overwhelming, especially if you set the bar too high. Instead, set incremental goals that will start immediately, giving you a return on your investment, such that you can stop at any point in the journey and still be in a better place than you started. And remember that you don’t need to do it all to get value! The two broad areas to improve align with the two pieces of CD:
-
You can safely deliver changes to your software at any time (CI).
-
Delivering that software is as simple as pushing a button.
Focus first on making sure you can safely deliver your software at any time, i.e., know when things are broken:
-
Add enough automation to know whether the code can build.
-
Isolate the parts of the codebase you want to improve from parts that aren’t worth investing in, so you can divide and conquer (fixing everything will likely be too expensive, and your return on investment will diminish quickly).
-
Add tests, including coverage measurement.
Once you feel you’re getting enough of a signal that it will be safe to start releasing more frequently, or at least faster, do the following:
-
Decide whether you want to concentrate on automating your existing processes or start from scratch with a new approach (e.g., using a third-party tool).
-
If automating existing processes, incrementally automate them one part a time.
-
If switching to a third-party tool, design safe low-impact experiments to move from your current processes to the new tool.
The great news is that any improvement is an improvement. Even if you never get further than a small incremental change, you’ve still improved your CD!
Where did the linting go?
You may have noticed the preceding goals talk about testing but don’t mention adding linting. When dealing with a greenfield codebase, I recommended adding linting first, largely because doing so is so easy when there is very little code and it sets you up to write consistent code from the start. However, adding linting to a legacy codebase is significantly more work (see chapter 4), and you can get more value sooner from adding tests and deployment automation. Therefore, for legacy codebases, linting can often be the icing on the cake, to be added later if you have time.
Focusing on the pain first
While deciding on how to approach incrementally improving your CD, also take into account where the existing pain is in the process. This might make you adjust the order in which you tackle things. (And remember, as mentioned in chapter 6, if something hurts, do it more frequently!)
Focusing on what is painful in your current processes can also help you motivate multiple teams to buy into the work required to set up consistent CD pipelines. Highlighting and focusing on reducing the pain they experience can unite teams behind a common goal. Also, focusing on whatever is most painful first will ensure that whatever you do delivers value, even if you run out of time and can’t complete all of your CD goals.
What do you mean by “pain”?
It’s hard to define exactly but you can think of pain in CD processes as something that is avoided because dealing with it causes some kind of problem. For example, it blocks progressing feature work, requires people to work outside of their regular hours, or is something that is regularly postponed. Often the best way to find pain in the process is to look for activities that are done the most rarely: e.g., deploying only once every three months can be a sign that there is pain in the deployment process. A closely related concept, described in Google’s Site Reliability Engineering (O’Reilly, 2016), is toil—work that is repetitive, manual, and lacks enduring value is often a source of pain in CD.
What if I can’t get all the teams to buy in?
You may want to improve CD for all teams at your company, but there’s a good chance you won’t be able to get them all to align—at least right away. In this case, an effective approach (which is still useful, even if you can’t convince everyone) is to start with one team or project and use that to model what you’re suggesting. Seeing the work in action and its benefits can be the most persuasive argument you can make. This will be especially effective if you can back this up with metrics: collect metrics around the pain points and show how, with better CD, they improve (DORA metrics covered in chapters 8 and 10 can be a great starting point).
New projects are an easy starting point
On the whole, you might be dealing with legacy software, but there’s a good chance that new projects still start from time to time. New projects are a great place to show off the benefits of best practices, and set standards that older projects can incrementally adopt. Treat the new project as a greenfield and set excellent standards (including linting) from the very beginning!
Pain at Rebellious Hamster
The pain points at Rebellious Hamster are fairly well aligned with the approach suggested a couple of pages back. The pain is pretty well summed up in how the engineers approach deployments:
-
Deployments are rare and sporadic (no more frequent than every three months).
-
All services are deployed at the same time.
-
Before deployments, an all-hands-on-deck testing phase is done in a staging environment, during which many bugs are caught.
-
Finding bugs after deploying is still common, and the period after deployments involves long hours and frantic patching.
Because so many bugs are surfaced after deployment, deployments have become infrequent. And while the pain is centered around deployments, it isn’t the deployment processes themselves that are the root cause; it’s the state of the code being deployed:
-
Until a deployment happens, there is little to no signal indicating whether the code in a repo is safe to deploy.
-
Until deployment, there is no signal ensuring that the multiple services provided by Rebellious Hamster can actually integrate together successfully.
-
The deployments themselves are completely manual, but again this problem is dwarfed by the pain of dealing with all the bugs encountered after deployment.
Looking at what is causing pain at Rebellious Hamster, it makes sense to follow the general approach for adding CD to legacy software: start with improving CI, and then move on to improving deployment automation when it is safe to do so.
Know when things are broken
Rebellious Hamster decides to tackle its CI problem first, and starts with the first steps:
-
Add enough automation to know whether the code can build.
-
Isolate the parts of the codebase you want to improve from parts that aren’t worth investing in, so you can divide and conquer.
-
Add tests, including coverage measurement.
The engineers decide to set initial goals for all repos:
-
Know that the service or library in the repo can build successfully.
-
Measure test coverage and fail the CD pipeline if it goes down.
They create an initial pipeline, parameterized so that it can be reused for each repo (see chapter 13 for more details) that builds each service (or in the case of the user account library, builds the library), runs the unit tests if they exist, and fails if the unit test coverage goes down:

The coverage results vary quite wildly across each repo:
-
The analytics and user library repos have no coverage at all.
-
API gateway and storage coverage is less than 40%.
-
The leaderboard and matchmaking repos already have coverage above 60%.
Regardless of having different starting points, ensuring that coverage doesn’t go down means that each project will naturally start increasing its coverage as time goes on.
Isolate and add tests
Now that they have met their initial goals and are getting a signal for each repo around whether the contents are broken, the Rebellious Hamster engineers look again at the recommended approach for improving legacy CI:
-
Add enough automation to know whether or not the code can build.
-
Isolate the parts of the codebase you want to improve from parts that aren’t worth investing in, so you can divide and conquer.
-
Add tests, including coverage measurement.
They next decide to tackle improving the state of their tests by increasing the baseline test coverage across the board, but only where it is worth investing in. They also decide that they’ll invest in adding an initial end-to-end test as well, since so many of their bugs are revealed only after all the services are deployed together. They first target the repos with the worst coverage:
-
The analytics and user library repos have no coverage at all.
-
API gateway and storage coverage is less than 40%.
Instead of trying to get to 70–80%+ coverage for all the code in each repo, they look at the code in each repo that is actually changing regularly. Several packages and libraries in each repo haven’t changed in years, so they leave those alone (see chapter 4 for an approach to isolating code that you don’t want to enforce CI standards on).
Writing great unit tests often means refactoring code to be unit testable. In legacy codebases, doing this kind of refactoring up front can be expensive, so the Rebellious Hamster engineers add pure unit tests when they can, and from time to time fall back to integration tests when refactoring the code under test doesn’t feel worth the effort. This gives them a reasonable return on investment, and still lays the groundwork for an approach of leaving the code better than you found it, which can be used to do this kind of refactoring gradually over time.
This time we’re investing in end-to-end tests right away?
When approaching greenfield projects, we left end-to-end tests until last. For legacy projects, you may want to invest in end-to-end tests earlier in your process because adding unit tests at this stage is more difficult (and you may already have a fair number of them), and adding even one end-to-end test when there have been none before can give a really valuable signal. Rebellious Hamster in particular suffers because nothing tests all of the services working together until a deployment happens. Adding an end-to-end test will give the company a signal regarding whether the services can successfully work together much earlier.
Legacy pipeline with more tests
By isolating code in the API gateway, analytics, storage, and user library repos that doesn’t change, and by increasing coverage for the rest of the code (sometimes using integration tests when unit tests would require significant refactoring), Rebellious Hamster increases the test coverage in its repos. For code that is frequently updated, all repos have coverage above 60%
The engineers also invest in writing a few end-to-end tests that operate on the entire deployed system, with all services. This is a fairly significant investment because they have no deployment automation at all. Figuring out how to deploy each service is a lot of work, let alone figuring out how to add enough automation that it can be done quickly as part of a test in a pipeline.
However, they quickly find the work is well worth the investment. The new end-to-end test is able to catch several bugs between services during the first few weeks of operation.

How would I set up the SUT for an end-to-end test like this?
It can be overwhelming to try to figure out how to start writing a task that deploys your software (for an end-to-end test), especially if you have no existing automation to go by. For some software, this might not be feasible, in which case it makes sense to focus on improving deployments first, and then return to end-to-end tests later. One avenue worth exploring is using container images. If you can create a container image for each of your services, you might be able to start all of these images together on one machine, creating a test environment that isn’t very production-like but may be enough to catch glaring bugs in service interaction.
Make deployments more automated
Now that Rebellious Hamster has a solid CI pipeline in place, the engineers feel safe switching their focus to improving deployment:
-
Evaluate third-party deployment tools: decide if you want to concentrate on automating and improving your existing processes, or start from scratch with a new approach.
-
If automating existing processes, incrementally automate them one part a time.
-
If switching to a third-party tool, design safe, low-impact experiments to move from your current processes to the new tool.
The first thing they need to decide is whether to go with a third-party solution for deployment right off the bat, or concentrate on automating and improving their current processes. Switching to a third-party tool can be a good choice if you know you want to start experimenting with more advanced deployment techniques like blue-green and canary (see chapter 10). At Rebellious Hamster, the engineers want to do this one day but would rather focus on improving their immediate situation before they do. These steps will help Rebellious Hamster incrementally automate their manual approach:
-
Document what is being done manually.
-
Turn that documentation into one or more scripts or tools.
-
Store the scripts and tools in version control (i.e., introduce config as code).
-
Create automated triggering for deployments (e.g., a web interface with a button, kicked off in response to a merge event).
Their current process involves manually installing binaries on machines, and they decide (especially based on the success of a container-based approach in their end-to-end tests) that as part of this overhaul they’ll also start packaging their binaries in container images, and run them as containers.
What if I do want to start using a third-party tool right away?
You can’t go wrong to start with an experiment, and this is true of most changes you might want to make with deployment automation. Identify the lowest-risk project for trying out a new deployment technique (even better if it’s a brand-new project) and use it to try the third-party tool or other new deployment automation. Once you’ve figured out how to make it work for that project, roll it out to the rest of your projects.
Creating a release pipeline
Rebellious Hamster decides to start with the Storage service, since this has a similar architecture to most of the other services, and the additional complication of being backed by a database:
-
Document—The storage team members create a document that describes their deployment process in detail. First the storage service is built into a binary, which is uploaded to Rebellious Hamster’s artifact registry. Someone on the team then manually applies any DB schema updates to the storage DB, and then manually updates the binary installed on the VM running the storage service.
-
Turn documentation into scripts—The storage team creates three scripts: one to build the storage service into a container image and upload it to their image registry, another to update the database schema, and finally a script to update the running version of the image on the VM to the latest.
-
Introduce config as code—All three scripts are committed to version control in the same repo as the storage service and schema code.
-
Create automated triggering—They create a pipeline that runs the scripts and add triggering to run the pipeline in response to a new version being tagged in the repo. This will allow triggering to be automated but remain under manual control.
Rebellious Hamster’s release pipeline
The pipeline that the storage team creates ends up looking like this:

This same release pipeline can be used across all of the Rebellious Hamster repos, with a few tweaks for services that don’t have a database backing them.
Should I automate deployment and make big changes at the same time?
Rebellious Hamster decided to move to container-image-based deployments and automate deployments at the same time. A slower, more incremental approach would be to automate what they are already doing, and only then make the switch to using container images. The approach you take depends on the amount of risk you can accept: changing more than one thing at once is riskier, but can get you to your end goal faster.
Rebellious Hamster’s complete pipelines
Once these pipelines are rolled out across the company, each repo at Rebellious Hamster now has two pipelines, each triggered separately. The increased automation has made it safe to deploy each service independently, and Rebellious Hamster now can feel safe experimenting with more frequent deployments, and later with more sophisticated deployment strategies.

When adding CD to legacy projects, it’s important to meet a project where it is and accept that the pipelines you create will not be perfect and may not include everything you want. For example, in the preceding two pipelines, a disconnect exists between how services are built and deployed to production compared to how they are built and deployed for end-to-end testing.
This can be improved incrementally in the future, but instead of focusing on that, focus on how the state of the projects has improved. Even if they don’t revisit these pipelines for the next several years, the engineers at Rebellious Hamster can now be comparatively quite confident that their code is in a releasable state, and deployments are now easier than they’ve ever been.
Conclusion
Where do Gulpy and Rebellious Hamster go from here? Improving CD never stops! There will always be something that can be improved in their CD pipelines, which could be as easy to identify as looking at the basic pipelines at the beginning of the chapter and looking for what’s missing, or might be something more subtle that is identified in a future postmortem.
Summary
-
The most basic elements of (one or more) effective CD pipelines are linting, unit tests, integration tests, end-to-end tests, building, publishing, and deploying.
-
In greenfield codebases, set high standards early so they can be maintained (and tweaked) throughout the life of the project.
-
In legacy codebases, get the most bang for your buck by focusing on improving CI in the code that is actually changing instead of trying to fix it all at once.
-
Accept that you might never get to everything, and that’s okay! Improving the state of your CD pipelines is still worthwhile, and even little changes can add a lot of value.
-
To keep improving CD, pay attention where the pain is and prioritize it by bringing it forward. The longer you put it off, the worse it gets!
Up next . . .
In the next chapter, I’ll show a basic CD pipeline building block that we haven’t yet looked at in much detail. This component rarely gets as much attention as it deserves: the humble script.