
Chapter 2. Getting started
- Connecting to HBase and defining tables
- The basic commands for interacting with HBase
- Physical and logical data models of HBase
- Queries over compound rowkeys
The goal of the next couple of chapters is to teach you how to use HBase. First and foremost, you’ll become comfortable with the features HBase provides you as an application developer. You’ll gain a handle on the logical data model presented by HBase, the various modes of interacting with HBase, and the details of how to use those APIs. Our other goal is to teach you HBase schema design. HBase has a different physical data model from the relational data systems you’re likely used to. We’ll teach you the basics of that physical model so that you can take advantage of it while designing schemas optimized for your applications.
To accomplish all these goals, you’ll build an application from scratch. Allow us to introduce TwitBase, a simplified clone of the social network Twitter, implemented entirely in HBase. We won’t cover all the features of Twitter and this isn’t intended to be a production-ready system. Instead, think of TwitBase as an early Twitter prototype. The key difference between this system and the early versions of Twitter is that TwitBase is designed with scale in mind and hence is backed by a data store that can help achieve that.
This chapter starts with the basics. You’ll see how to create HBase tables, populate them with data, and read it back again. We’ll introduce the basic operations HBase provides for working with data as well as the fundamental components of the data model. Along the way, you’ll learn a little about how HBase works under the hood. This knowledge is fundamental to making good decisions in your schema designs. This chapter is the launch-point for your study of HBase and the rest of this book.
All the code used in this chapter and throughout the book is available at https://github.com/hbaseinaction/twitbase.
2.1. Starting from scratch
At its core, TwitBase stores three simple data elements: users, twits, and relationships. Users are the center of TwitBase. They log into the application, maintain a profile, and interact with other users by posting twits. Twits are short messages written publicly by the users of TwitBase. Twits are the primary mode of interaction between users. Users have conversations by twitting between themselves. Relationships are the glue for all this interaction. A relationship connects one user to another, making it easy to read twits from other users. This chapter will focus on users and twits. We’ll save relationships for a later chapter.
The vast majority of code used in this book is written in Java. We use pseudo-code here and there to help teach concepts, but the working code is Java. Java is a practical reality of using HBase. The entire Hadoop stack, including HBase, is implemented in Java. The HBase client library is Java. The MapReduce library is Java. An HBase deployment requires tuning the JVM for optimal performance. But there are means for interacting with Hadoop and HBase from non-Java and non-JVM languages. We cover many of these options in chapter 6.
2.1.1. Create a table
You’ll start building TwitBase by laying the foundations for storing its users. HBase is a database that stores data in tables, so you’ll begin by creating a users table. To do that, you’ll pick up where you left off, at the HBase shell:
$ hbase shell
HBase Shell; enter 'help<RETURN>' for list of supported commands.
Type "exit<RETURN>" to leave the HBase Shell
Version 0.92.0, r1231986, Mon Jan 16 13:16:35 UTC 2012

hbase(main):001:0>
The shell opens a connection to HBase and greets you with a prompt. With the shell prompt ahead of you, create your first table:
hbase(main):001:0> create 'users', 'info'
0 row(s) in 0.1200 seconds

hbase(main):002:0>
Presumably 'users' is the name of the table, but what about this 'info' business? Just like tables in a relational database, tables in HBase are organized into rows and columns. HBase treats columns a little differently than a relational database. Columns in HBase are organized into groups called column families. info is a column family in the users table. A table in HBase must have at least one column family. Among other things, column families impact physical characteristics of the data store in HBase. For this reason, at least one column family must be specified at table creation time. You can alter column families after the table is created, but doing so is a little tedious. We’ll discuss column families in more detail later. For now, know that your users table is as simple as it gets—a single column family with default parameters.
2.1.2. Examine table schema
If you’re familiar with relational databases, you’ll notice right away that the table creation didn’t involve any columns or types. Other than the column family name, HBase doesn’t require you to tell it anything about your data ahead of time. That’s why HBase is often described as a schema-less database.
You can verify that your users table was created by asking HBase for a listing of all registered tables:
hbase(main):002:0> list
TABLE
users
1 row(s) in 0.0220 seconds

hbase(main):003:0>
The list command proves the table exists, but HBase can also give you extended details about your table. You can see all those default parameters using the describe command:
hbase(main):003:0> describe 'users'
DESCRIPTION                                      ENABLED
 {NAME => 'users', FAMILIES => [{NAME => 'info', true
  BLOOMFILTER => 'NONE', REPLICATION_SCOPE => '0
 ', COMPRESSION => 'NONE', VERSIONS => '3', TTL
 => '2147483647', BLOCKSIZE => '65536', IN_MEMOR
 Y => 'false', BLOCKCACHE => 'true'}]}
1 row(s) in 0.0330 seconds

hbase(main):004:0>
The shell describes your table as a map with two properties: the table name and a list of column families. Each column family has a number of associated configuration details. These are the physical characteristics we mentioned earlier. For now, don’t worry about these details; we’ll examine them all in due course.
The HBase shell exposes a wealth of features, though it’s primarily used for administrative purposes. Being implemented in JRuby, it has access to the entire Java client API. You can further explore the shell’s capabilities using the help command.
2.1.3. Establish a connection
The shell is well and good, but who wants to implement TwitBase in shell commands? Those wise HBase developers thought of this and equipped HBase with a complete Java client library. A similar API is exposed to other languages too; we’ll cover those in chapter 6. For now, we’ll stick with Java. The Java code for opening a connection to the users table looks like this:
HTableInterface usersTable = new HTable("users");
The HTable constructor reads the default configuration information to locate HBase, similar to the way the shell did. It then locates the users table you created earlier and gives you a handle to it.
You can also pass a custom configuration object to the HTable object:
Configuration myConf = HBaseConfiguration.create();
HTableInterface usersTable = new HTable(myConf, "users");
This is equivalent to letting the HTable object create the configuration object on its own. To customize the configuration, you can define parameters like this:
myConf.set("parameter_name", "parameter_value");
HBase client applications need to have only one configuration piece available to them to access HBase—the ZooKeeper quorum address. You can manually set this configuration like this:
myConf.set(“hbase.zookeeper.quorum”, “serverip”);
Both ZooKeeper and the exact interaction between client and the HBase cluster are covered in the next chapter where we go into details of HBase as a distributed store. For now, all you need to know is that the configuration parameters can be picked either by the Java client from the hbase-site.xml file in their classpath or by you setting the configuration explicitly in the connection. When you leave the configuration completely unspecified, as you do in this sample code, the default configuration is read and localhost is used for the ZooKeeper quorum address. When working in local mode, as you are here, that’s exactly what you want.
2.1.4. Connection management
Creating a table instance is a relatively expensive operation, requiring a bit of network overhead. Rather than create a new table handle on demand, it’s better to use a connection pool. Connections are allocated from and returned to the pool. Using an HTablePool is more common in practice than instantiating HTables directly:
HTablePool pool = new HTablePool();
HTableInterface usersTable = pool.getTable("users");
... // work with the table
usersTable.close();
Closing the table when you’re finished with it allows the underlying connection resources to be returned to the pool.
What good is a table without data in it? No good at all. Let’s store some data.
2.2. Data manipulation
Every row in an HBase table has a unique identifier called its rowkey. Other coordinates are used to locate a piece of data in an HBase table, but the rowkey is primary. Just like a primary key in a table in a relational database, rowkey values are distinct across all rows in an HBase table. Every interaction with data in a table begins with the rowkey. Every user in TwitBase is unique, so the user’s name makes a convenient rowkey for the users table; that’s what you’ll use.
The HBase API is broken into operations called commands. There are five primitive commands for interacting with HBase: Get, Put, Delete, Scan, and Increment. The command used to store data is Put. To store data in a table, you’ll need to create a Put instance. Creating a Put instance from a rowkey looks like this:
Put p = new Put(Bytes.toBytes("Mark Twain"));
Why can’t you store the user’s name directly? All data in HBase is stored as raw data in the form of a byte array, and that includes the rowkeys. The Java client library provides a utility class, Bytes, for converting various Java data types to and from byte[] so you don’t have to worry about doing it yourself. Note that this Put instance has not been inserted into the table yet. You’re only building the object right now.
2.2.1. Storing data
Now that you’ve staged a command for adding data to HBase, you still need to provide data to store. You can start by storing basic information about Mark, such as his email address and password. What happens if another person comes along whose name is also Mark Twain? They’ll conflict, and you won’t be able to store data about them in TwitBase. Instead of using the person’s real name as the rowkey, let’s use a unique username and store their real name in a column. Putting (no pun intended!) it all together:

Remember, HBase uses coordinates to locate a piece of data within a table. The rowkey is the first coordinate, followed by the column family. When used as a data coordinate, the column family serves to group columns. The next coordinate is the column qualifier, often called simply column, or qual, once you’re versed in HBase vernacular. The column qualifiers in this example are name, email, and password. Because HBase is schema-less, you never need to predefine the column qualifiers or assign them types. They’re dynamic; all you need is a name that you give them at write time. These three coordinates define the location of a cell. The cell is where HBase stores data as a value. A cell is identified by its [rowkey, column family, column qualifier] coordinate within a table. The previous code stores three values in three cells within a single row. The cell storing Mark’s name has the coordinates [TheRealMT, info, name].
The last step in writing data to HBase is sending the command to the table. That part is easy:
HTableInterface usersTable = pool.getTable("users");
Put p = new Put(Bytes.toBytes("TheRealMT"));
p.add(...);
usersTable.put(p);
usersTable.close();
2.2.2. Modifying data
Changing data in HBase is done the same way you store new data: create a Put object, give it some data at the appropriate coordinates, and send it to the table. Let’s update Mark’s password to something more secure.
Put p = new Put(Bytes.toBytes("TheRealMT"));
p.add(Bytes.toBytes("info"),
  Bytes.toBytes("password"),
  Bytes.toBytes("abc123"));
usersTable.put(p);
2.2.3. Under the hood: the HBase write path
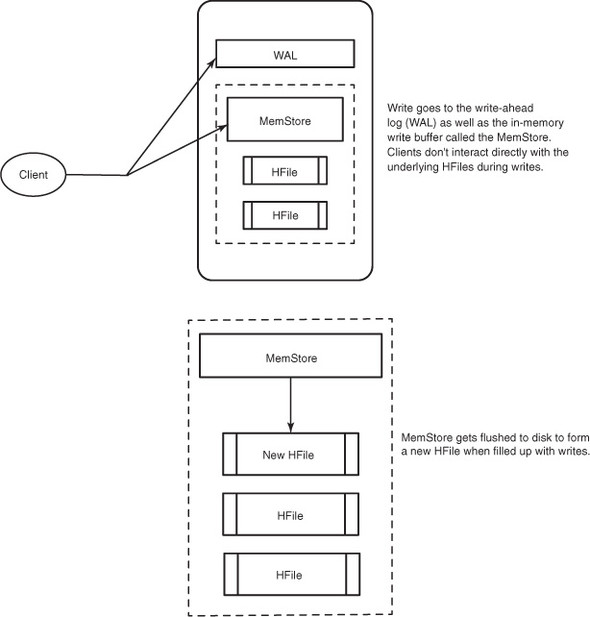
Whether you use Put to record a new row in HBase or to modify an existing row, the internal process is the same. HBase receives the command and persists the change, or throws an exception if the write fails. When a write is made, by default, it goes into two places: the write-ahead log (WAL), also referred to as the HLog, and the MemStore (figure 2.1). The default behavior of HBase recording the write in both places is in order to maintain data durability. Only after the change is written to and confirmed in both places is the write considered complete.
The MemStore is a write buffer where HBase accumulates data in memory before a permanent write. Its contents are flushed to disk to form an HFile when the MemStore fills up. It doesn’t write to an existing HFile but instead forms a new file on every flush. The HFile is the underlying storage format for HBase. HFiles belong to a column family, and a column family can have multiple HFiles. But a single HFile can’t have data for multiple column families. There is one MemStore per column family.[1]
1 The size of the MemStore is defined by the system-wide property in hbase-site.xml called hbase.hregion.memstore.flush.size. You’ll learn more about the various configurations in chapter 9.
Figure 2.1. HBase write path. Every write to HBase requires confirmation from both the WAL and the MemStore. The two steps ensure that every write to HBase happens as fast as possible while maintaining durability. The MemStore is flushed to a new HFile when it fills up.
Failures are common in large distributed systems, and HBase is no exception. Imagine that the server hosting a MemStore that has not yet been flushed crashes. You’ll lose the data that was in memory but not yet persisted. HBase safeguards against that by writing to the WAL before the write completes. Every server that’s part of the HBase cluster keeps a WAL to record changes as they happen. The WAL is a file on the underlying file system. A write isn’t considered successful until the new WAL entry is successfully written. This guarantee makes HBase as durable as the file system backing it. Most of the time, HBase is backed by the Hadoop Distributed Filesystem (HDFS).
If HBase goes down, the data that was not yet flushed from the MemStore to the HFile can be recovered by replaying the WAL. You don’t have to do this manually. It’s all handled under the hood by HBase as a part of the recovery process. There is a single WAL per HBase server, shared by all tables (and their column families) served from that server.
As you can imagine, skipping the WAL during writes can help improve write performance. There’s one less thing to do, right? We don’t recommend disabling the WAL unless you’re willing to lose data when things fail. In case you want to experiment, you can disable the WAL like this:
Put p = new Put();
p.setWriteToWAL(false);
Note
Not writing to the WAL comes at the cost of increased risk of losing data in case of RegionServer failure. Disable the WAL, and HBase can’t recover your data in the face of failure. Any writes that haven’t flushed to disk will be lost.
2.2.4. Reading data
Reading data back out of HBase is as easy as writing. Make a Get command instance, tell it what cells you’re interested in, and send it to the table:
Get g = new Get(Bytes.toBytes("TheRealMT"));
Result r = usersTable.get(g);
The table gives you back a Result instance containing your data. This instance contains all the columns from all the column families that exist for the row. That’s potentially far more data than you need. You can limit the amount of data returned by placing restrictions on the Get instance. To retrieve only the password column, execute addColumn(). The same can be done per column family using addFamily(), in which case it’ll return all the columns in the specified column family:
Get g = new Get(Bytes.toBytes("TheRealMT"));
g.addColumn(
  Bytes.toBytes("info"),
  Bytes.toBytes("password"));
Result r = usersTable.get(g);
Retrieve the specific value and convert it back from bytes like so:
Get g = new Get(Bytes.toBytes("TheRealMT"));
g.addFamily(Bytes.toBytes("info"));
byte[] b = r.getValue(
  Bytes.toBytes("info"),
  Bytes.toBytes("email"));
String email = Bytes.toString(b); // "[email protected]"
2.2.5. Under the hood: the HBase read path
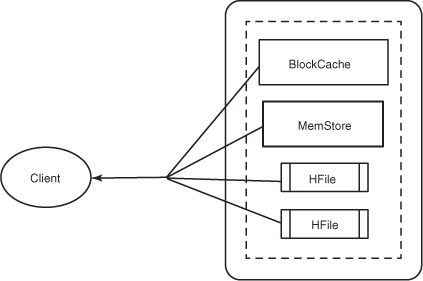
As a general rule, if you want fast access to data, keep it ordered and keep as much of it as possible in memory. HBase accomplishes both of these goals, allowing it to serve millisecond reads in most cases. A read against HBase must be reconciled between the persisted HFiles and the data still in the MemStore. HBase has an LRU cache for reads. This cache, also called the BlockCache, sits in the JVM heap alongside the MemStore. The BlockCache is designed to keep frequently accessed data from the HFiles in memory so as to avoid disk reads. Each column family has its own BlockCache.
Understanding the BlockCache is an important part of understanding how to run HBase at optimal performance. The “Block” in BlockCache is the unit of data that HBase reads from disk in a single pass. The HFile is physically laid out as a sequence of blocks plus an index over those blocks. This means reading a block from HBase requires only looking up that block’s location in the index and retrieving it from disk. The block is the smallest indexed unit of data and is the smallest unit of data that can be read from disk. The block size is configured per column family, and the default value is 64 KB. You may want to tweak this value larger or smaller depending on your use case. If you primarily perform random lookups, you likely want a more granular block index, so a smaller block size is preferred. Having smaller blocks creates a larger index and thereby consumes more memory. If you frequently perform sequential scans, reading many blocks at a time, you can afford a larger block size. This allows you to save on memory because larger blocks mean fewer index entries and thus a smaller index.
Reading a row from HBase requires first checking the MemStore for any pending modifications. Then the BlockCache is examined to see if the block containing this row has been recently accessed. Finally, the relevant HFiles on disk are accessed. There are more things going on under the hood, but this is the overall outline. Figure 2.2 illustrates the read path.
Figure 2.2. HBase read path. Data is reconciled from the BlockCache, the Mem-Store, and the HFiles to give the client an up-to-date view of the row(s) it asked for.
Note that HFiles contain a snapshot of the MemStore at the point when it was flushed. Data for a complete row can be stored across multiple HFiles. In order to read a complete row, HBase must read across all HFiles that might contain information for that row in order to compose the complete record.
2.2.6. Deleting data
Deleting data from HBase works just like storing it. You make an instance of the Delete command, constructed with a rowkey:
Delete d = new Delete(Bytes.toBytes("TheRealMT"));
usersTable.delete(d);
You can delete only part of a row by specifying additional coordinates:
Delete d = new Delete(Bytes.toBytes("TheRealMT"));
d.deleteColumns(
  Bytes.toBytes("info"),
  Bytes.toBytes("email"));
usersTable.delete(d);
The method deleteColumns() removes a cell entirely from the row. This is a distinct method from deleteColumn() (notice the missing s at the end of the method name), which operates on the content of a cell.
2.2.7. Compactions: HBase housekeeping
The Delete command doesn’t delete the value immediately. Instead, it marks the record for deletion. That is, a new “tombstone” record is written for that value, marking it as deleted. The tombstone is used to indicate that the deleted value should no longer be included in Get or Scan results. Because HFiles are immutable, it’s not until a major compaction runs that these tombstone records are reconciled and space is truly recovered from deleted records.
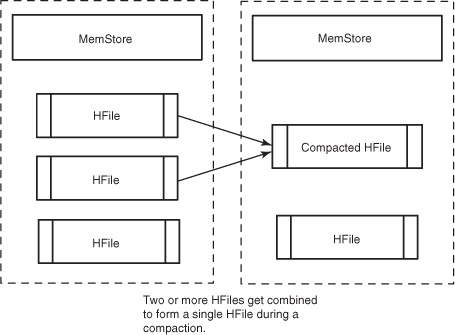
Compactions come in two flavors: minor and major. Both types result in a consolidation of the data persisted in HFiles. A minor compaction folds HFiles together, creating a larger HFile from multiple smaller HFiles, as shown in figure 2.3. Restricting the number of HFiles is important for read performance, because all of them must be referenced to read a complete row. During the compaction, HBase reads the content of the existing HFiles, writing records into a new one. Then, it swaps in the new HFile as the current active one and deletes the old ones that formed the new one.[2] HBase decides which HFiles to compact based on their number and relative sizes. Minor compactions are designed to be minimally detrimental to HBase performance, so there is an upper limit on the number of HFiles involved. All of these settings are configurable.
2 As you can imagine, this process can require a lot of disk IO. What’s less clear is that it can also cause network IO. See appendix B for an explanation of the HDFS write path for further details.
Figure 2.3. Minor compaction. Records are read from the existing HFiles and combined into a single, merged HFile. That new HFile is then marked as the new canonical data on disk, and the old HFiles are deleted. When a compaction is run simultaneously over all HFiles in a column family, it’s called a major compaction.
When a compaction operates over all HFiles in a column family in a given region, it’s called a major compaction. Upon completion of a major compaction, all HFiles in the column family are merged into a single file. Major compactions can also be triggered for the entire table (or a particular region) manually from the shell. This is a relatively expensive operation and isn’t done often. Minor compactions, on the other hand, are relatively lightweight and happen more frequently. Major compactions are the only chance HBase has to clean up deleted records. Resolving a delete requires removing both the deleted record and the deletion marker. There’s no guarantee that both the record and marker are in the same HFile. A major compaction is the only time when HBase is guaranteed to have access to both of these entries at the same time.
The compaction process is described in greater detail, along with incremental illustrations, in a post on the NGDATA blog.[3]
3 Bruno Dumon, “Visualizing HBase Flushes and Compactions,” NGDATA, www.ngdata.com/site/blog/74-ng.html.
2.2.8. Versioned data
In addition to being a schema-less database, HBase is also versioned. For example, you can look back in time for the original password:
List<KeyValue> passwords = r.getColumn(
  Bytes.toBytes("info"),
  Bytes.toBytes("password"));
b = passwords.get(0).getValue();
String currentPasswd = Bytes.toString(b); // "abc123"
b = passwords.get(1).getValue();
String prevPasswd = Bytes.toString(b); // "Langhorne"
Every time you perform an operation on a cell, HBase implicitly stores a new version. Creating, modifying, and deleting a cell are all treated identically; they’re all new versions. Get requests reconcile which version to return based on provided parameters. The version is used as the final coordinate when accessing a specific cell value. HBase uses the current time[4] in milliseconds when a version isn’t specified, so the version number is represented as a long. By default, HBase stores only the last three versions; this is configurable per column family. Each version of data within a cell contributes one KeyValue instance to the Result. You can inspect the version information in a KeyValue instance with its getTimestamp() method:
4 That is, the current time in milliseconds of the RegionServer that received the operation. Thus it’s important to keep the clocks on all machines in your HBase cluster in sync. You’ll learn more about these concerns in chapter 9.
long version =
  passwords.get(0).getTimestamp(); // 1329088818321
When a cell exceeds the maximum number of versions, the extra records are dropped during the next major compaction.
Instead of deleting an entire cell, you can operate on a specific version or versions within that cell. The deleteColumns() method (with the s) described previously operates on all KeyValues with a version less than the provided version. If no version is provided, the default of now is used. The deleteColumn() method (without the s) deletes a specific version of a cell. Be careful which method you call; they have identical calling signatures and only subtly different semantics.
2.2.9. Data model recap
This section covers a lot of ground, both in terms of data model and implementation details. Let’s pause momentarily to recap what we’ve discussed thus far. The logical entities in an HBase schema are as follows:
- Table—HBase organizes data into tables. Table names are Strings and composed of characters that are safe for use in a file system path.
- Row—Within a table, data is stored according to its row. Rows are identified uniquely by their rowkey. Rowkeys don’t have a data type and are always treated as a byte[].
- Column family—Data within a row is grouped by column family. Column families also impact the physical arrangement of data stored in HBase. For this reason, they must be defined up front and aren’t easily modified. Every row in a table has the same column families, although a row need not store data in all its families. Column family names are Strings and composed of characters that are safe for use in a file system path.
- Column qualifier—Data within a column family is addressed via its column qualifier, or column. Column qualifiers need not be specified in advance. Column qualifiers need not be consistent between rows. Like rowkeys, column qualifiers don’t have a data type and are always treated as a byte[].
- Cell—A combination of rowkey, column family, and column qualifier uniquely identifies a cell. The data stored in a cell is referred to as that cell’s value. Values also don’t have a data type and are always treated as a byte[].
- Version—Values within a cell are versioned. Versions are identified by their timestamp, a long. When a version isn’t specified, the current timestamp is used as the basis for the operation. The number of cell value versions retained by HBase is configured via the column family. The default number of cell versions is three.
These six concepts form the foundation of HBase. They’re exposed to the user via the logical view presented by the API. They’re the building blocks on which the implementation manages data physically on disk. Keeping these six concepts straight in your mind will take you a long way in understanding HBase.
A unique data value in HBase is accessed by way of its coordinates. The complete coordinates to a value are rowkey, column family, column qualifier, and version. These coordinates are covered in more detail in the next section.
2.3. Data coordinates
In the logical data model, the version number is also part of the coordinates of a piece of data. You can think of a relational database as storing a piece of data in a table in a 2D coordinate system based first on row and second on column. By that analogy, HBase stores a piece of data in a table based on a 4D coordinate system. The coordinates used by HBase, in order, are rowkey, column family, column qualifier, and version. Figure 2.4 illustrates these coordinates in our users table.
Figure 2.4. The coordinates used to identify data in an HBase table are  rowkey,
  column family,
  column qualifier, and
  version.
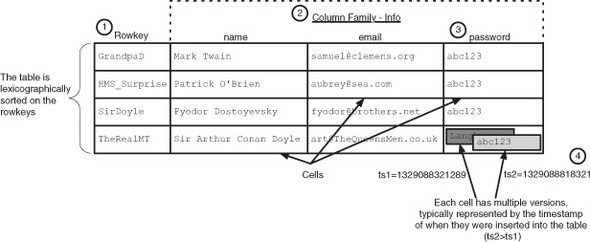
Considering the full set of coordinates as a unit, you can think of HBase as a key-value store. With this abstraction of the logical data model in mind, you can consider the coordinates as a key and the cell data as the value (see figure 2.5).
Figure 2.5. HBase can be considered a key-value store, where the four coordinates to a cell act as a key. In the API, the complete coordinates to a value, plus the value itself, are packaged together by the KeyValue class.

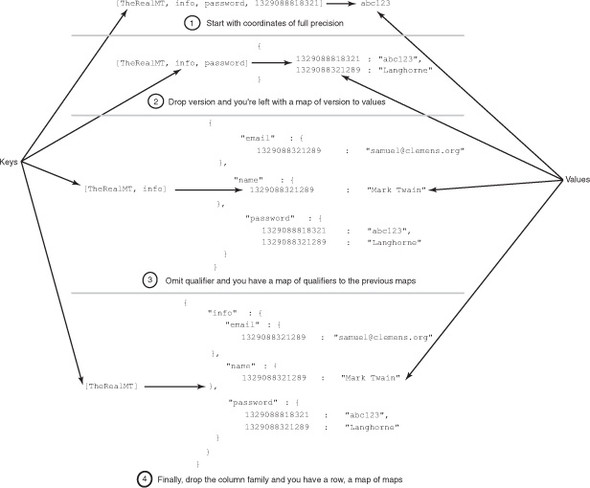
The HBase API is built such that you aren’t required to provide the entire coordinate path when requesting data. If you omit the version in your Get request, HBase provides you with a map of version to value. By providing decreasingly specific coordinates in your request, HBase allows you to request more data in a single operation. In that way, you can think of HBase as a key-value store where the value is a map, or a map of maps. Figure 2.6 illustrates this idea.
Figure 2.6. Alternate views of HBase as a key-value data store. Decreasing the precision of your cell coordinates results in larger groups of KeyValues as the resulting values.
We’ll discuss this concept in more detail when we explain the HBase data models, later in this chapter.
2.4. Putting it all together
Now that you’ve seen how to interact with HBase, let’s assemble what you know into a working example. To start, define a simple model object for the User instances, as in the next listing.
Listing 2.1. User data model
package HBaseIA.TwitBase.model;

public abstract class User {

  public String user;
  public String name;
  public String email;
  public String password;

  @Override
  public String toString() {
    return String.format("<User: %s, %s, %s>", user, name, email);
  }
}
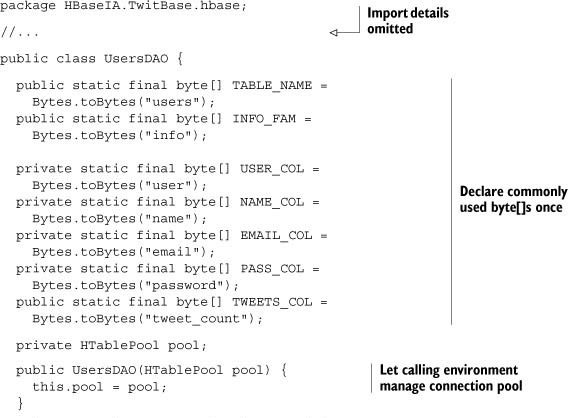
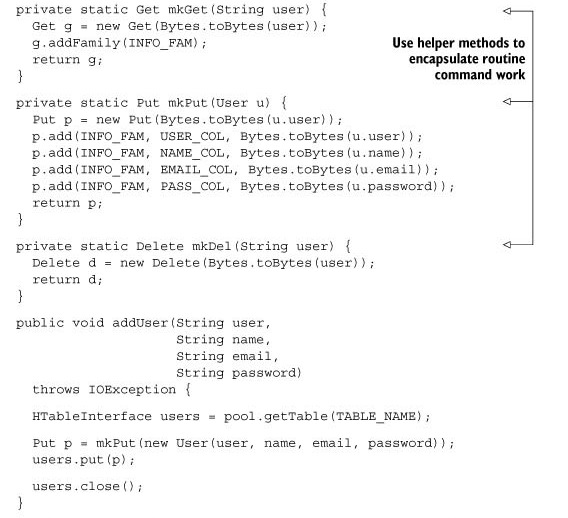
Let’s wrap all the user-centric HBase interactions in a single class. Start by declaring the commonly used byte[] constants. Then define some helper methods to encapsulate command creation. Follow that with the public interfaces and a private implementation of the User model, as shown next.
Listing 2.2. CRUD operations in UsersDAO.java
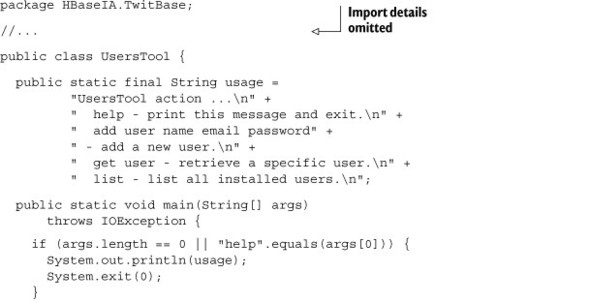
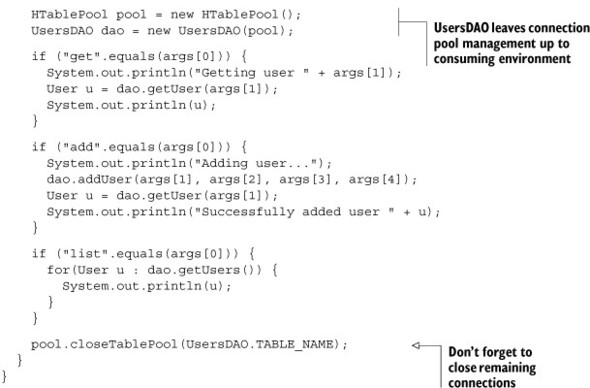
The last piece of this puzzle is a main() method. Let’s make a UsersTool, shown in the next listing, to simplify interaction with the users table in HBase.
Listing 2.3. UsersTool, a command-line interface to the users table
With all the code available, you can try the whole thing. In the root directory of this book’s source code, compile the application jar:
$ mvn package
...
[INFO] -----------------------------------------------------
[INFO] BUILD SUCCESS
[INFO] -----------------------------------------------------
[INFO] Total time: 20.467s
This produces a twitbase-1.0.0.jar file in the target directory.
Using UsersTool to add Mark to the users table is easy:
$ java -cp target/twitbase-1.0.0.jar
  HBaseIA.TwitBase.UsersTool
  add
  TheRealMT
  "Mark Twain"
  [email protected]
  abc123
Successfully added user <User: TheRealMT>
You can list the contents of your table:
$ java -cp target/twitbase-1.0.0.jar
  HBaseIA.TwitBase.UsersTool
  list
21:49:30 INFO cli.UsersTool: Found 1 users.
<User: TheRealMT>
Now that you’ve seen a little of how to interact with HBase, let’s better understand the logical and physical data models present in HBase.
2.5. Data models
As you’ve seen, the way HBase models data is a little different from the relational systems with which you’re familiar. These systems require strict rules around tables, columns, and data types—the shape of your data. Data conforming to these strict requirements is called structured data. HBase is designed for data without such a strict shape. Records can have divergent columns, variance in field size, and so on. This kind of data is said to have a semistructured shape.
The propensity of a data system toward structured or semistructured data at the logical model influences decisions in the physical model. Relational systems assume all records in a table to be structured and highly regular. They use this to their advantage in physical implementations, optimizing on-disk formats and in-memory structures accordingly. Likewise, HBase takes advantage of the semistructured shape of the data it stores. As systems evolve, these assumptions in the physical model influence the logical. Because of this tight relationship, a strong understanding of both logical and physical models is required to make optimal use of a data system.
In addition to focusing on semistructured data, HBase has another primary concern: scale. The loose coupling of data components in a semistructured logical model has the benefit of being easier to physically distribute. The physical model in HBase is designed with physical distribution in mind and that decision also influences the logical model. On the other hand, this physical model forces HBase to give up some features provided by relational systems. In particular, HBase can’t enforce relational constraints or provide multirow transactions.[5] These next couple topics are influenced by this relationship.
5 Not yet, anyway. Rudimentary support for multirow transactions over data on a single host is provided by a future HBase release. You can track the progress of this feature via https://issues.apache.org/jira/browse/HBASE-5229.
2.5.1. Logical model: sorted map of maps
There are a number of valid descriptions for the logical data model used in HBase. Figure 2.6 illustrated that model as a key-value store. The next model we’ll consider is a sorted map of maps. Presumably you’re familiar with a map or dictionary structure from your favorite programming language. Think of HBase as an unlimited, persisted, nested version of that structure.
We’ll start with this map of maps idea. You’ve seen the coordinate system HBase uses to identify data in a cell: [rowkey, column family, column qualifier, version]. For an example, take Mark’s record from the users table (figure 2.7).
Figure 2.7. Sorted map of maps. HBase logically organizes data as a nested map of maps. Within each map, data is physically sorted by that map’s key. In this example, "email" comes before "name" and more recent versions come before older ones.
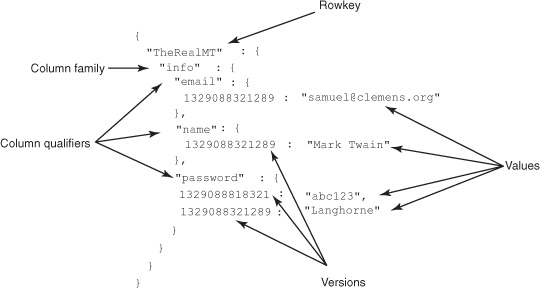
While thinking of this map of maps, consider those coordinates from the inside out. You can think of a cell as a map keyed on version with the stored data as the value. One layer up, a column family is a map keyed on column qualifier with the cell as the value. At the top, a table is a map keyed on rowkey to the column family. Described in Java, you’d have this monstrosity: Map<RowKey, Map<ColumnFamily, Map<ColumnQualifier, Map<Version, Data>>>>. It’s not pretty, but it’s simple.
Notice also we said it’s a sorted map of maps. The example shows only a single record, but even there the sorting is present. Notice the two versions in the password cell. The newest version is sorted before the later versions. HBase sorts the version timestamp in descending order so the newest data is always on top. This physical design decision results in slightly faster access to recent versions. The other map keys are sorted in ascending order. The current example doesn’t display this behavior, so let’s insert a couple records and see what it looks like:
$ java -cp target/twitbase-1.0.0.jar
  HBaseIA.TwitBase.UsersTool
  add
  HMS_Surprise
  "Patrick O'Brian"
  [email protected]
  abc123
Successfully added user <User: HMS_Surprise>

$ java -cp target/twitbase-1.0.0.jar
  HBaseIA.TwitBase.UsersTool
  add
  GrandpaD
  "Fyodor Dostoyevsky"
  [email protected]
  abc123
Successfully added user <User: GrandpaD>

$ java -cp target/twitbase-1.0.0.jar
  HBaseIA.TwitBase.UsersTool
  add
  SirDoyle
  "Sir Arthur Conan Doyle"
  [email protected]
  abc123
Successfully added user <User: SirDoyle>
Now you can list the users table again and see:
$ java -cp target/twitbase-1.0.0.jar
  HBaseIA.TwitBase.UsersTool
  list
21:54:27 INFO TwitBase.UsersTool: Found 4 users.
<User: GrandpaD>
<User: HMS_Surprise>
<User: SirDoyle>
<User: TheRealMT>
This sorting business turns out to be a critical consideration when designing HBase table schema in practice. This is another point where the physical data model influences the logical. Understanding this detail allows you to design your schema to take advantage of this feature.
2.5.2. Physical model: column family oriented
Like a relational database, tables in HBase consist of rows and columns. In HBase, the columns are grouped together in column families. This grouping is expressed logically as a layer in the map of maps. Column families are also expressed physically. Each column family gets its own set of HFiles on disk. This physical isolation allows the underlying HFiles of one column family to be managed in isolation of the others. As far as compactions are concerned, the HFiles for each column family are managed independently.
Records in HBase are stored in the HFiles as key-value pairs. The HFile itself is a binary file and isn’t human-readable. Mark’s user data stored on disk in an HFile looks something like figure 2.8.
Figure 2.8. HFile data for the info column family in the users table. Each record is a complete entry in the HFile.

Notice that Mark’s row consumes multiple records in the HFile. Each column qualifier and version gets its own record. Also, notice there are no unused or null records. HBase doesn’t need to store anything to indicate the absence of data. For this reason, storage in the column family is column-oriented, just like in any other column-oriented database. Data from a single column family for a single row need not be stored in the same HFile. Mark’s info data could be spread across any number of HFiles. The only requirement is that within an HFile, data for a row’s column family is stored together.
If the users table had another column family and Mark had data in those columns, Mark’s row would have records in those HFiles as well. Using separate HFiles for each column family means HBase doesn’t need to read all the data for a row when performing a read. It need only retrieve data for the requested column families. Being column-oriented means HBase need not read over placeholder entries when looking for a specific cell. These two physical details make for efficient storage and fast reads of particularly sparse datasets.
Let’s say you add another column family to the users table for storing activity on the TwitBase site; it will result in more HFiles. The complete set of tooling that allows HBase to host a single row is illustrated in figure 2.9. For reasons we’ll cover in the next chapter, HBase refers to this machinery as a region.
Figure 2.9. A region in the users table. All data for a given row in the table is managed together in a region.

As you can see in figure 2.9, interacting with data in different column families involves completely separate MemStores and HFiles. This allows data in the activity column family to grow without adversely affecting performance of the info column family.
2.6. Table scans
You likely noticed the lack of a query command of any kind. You won’t find one, at least not today. The only way to access records containing a specific value is by using the Scan command to read across some portion of the table, applying a filter to retrieve only the relevant records. As you might imagine, the records returned while scanning are presented in sorted order. HBase is designed to support this kind of behavior so it’s fast.
To scan the entire contents of a table, use the bare Scan constructor:
Scan s = new Scan();
Often, however, you’re only interested in a subset of the entire table. Perhaps you only want users with IDs starting with the letter T. Provide the Scan constructor with start and end rows:
Scan s = new Scan(
  Bytes.toBytes("T"),
  Bytes.toBytes("U"));
This is a contrived example, perhaps, but you get the idea. How about a practical example? You need to store twits. Further, you know you’ll want to access the most recent twits from a particular user. Let’s start there.
2.6.1. Designing tables for scans
Just as you would when designing a relational schema, designing schema for HBase tables requires that you consider the data shape and access patterns. Twits are a different kind of data with different access patterns than users, so let’s put them in their own table. For kicks, you’ll create the new table using the Java API instead of the shell. Table manipulation is performed using an instance of the HBaseAdmin object:
Configuration conf = HBaseConfiguration.create();
HBaseAdmin admin = new HBaseAdmin(conf);
Making an HBaseAdmin instance explicitly requires a Configuration instance, a detail hidden from you by the default HTable and HTablePool constructors. That’s simple enough. Now you can define a new table and create it:
HTableDescriptor desc = new HTableDescriptor("twits");
HColumnDescriptor c = new HColumnDescriptor("twits");
c.setMaxVersions(1);
desc.addFamily(c);
admin.createTable(desc);
The HTableDescriptor object lets you build up the description of the new table, starting with its name: twits. Likewise, you build up the column family, also named twits, using the HColumnDescriptor. As with the users table, you only need one column family here. You don’t need twit versioning, so you’ll limit the retained versions to one.
With a fancy new twits table, you can begin storing twits. A twit consists of a message and the date and time it was posted. You’ll need a unique value for the rowkey, so let’s try the username plus the timestamp. Easy enough; let’s store twits like this:
Put put = new Put(
  Bytes.toBytes("TheRealMT" + 1329088818321L));
put.add(
  Bytes.toBytes("twits"),
  Bytes.toBytes("dt"),
  Bytes.toBytes(1329088818321L));
put.add(
  Bytes.toBytes("twits"),
  Bytes.toBytes("twit"),
  Bytes.toBytes("Hello, TwitBase!"));
Well, almost like this. First, notice that the user ID is a variable-length string. This can cause you some hassle when using a compound rowkey because you need to split on a delimiter of some kind. An alternative approach is to hash the portion of the rowkey that is of variable length. Choose a hashing algorithm that produces values of constant size. MD5 is a good choice because you want twits to be stored in groups by user. Those groups can be stored in any order. Within the group, appending the postdate orders the twits chronologically. MD5 is a one-way hash; don’t forget to also store the unen-coded user ID in a column if you need it later. Writing to the twits table looks something like this:
int longLength = Long.SIZE / 8;
byte[] userHash = Md5Utils.md5sum("TheRealMT");
byte[] timestamp = Bytes.toBytes(-1 * 1329088818321L);
byte[] rowKey = new byte[Md5Utils.MD5_LENGTH + longLength];
int offset = 0;
offset = Bytes.putBytes(rowKey, offset, userHash, 0, userHash.length);
Bytes.putBytes(rowKey, offset, timestamp, 0, timestamp.length);
Put put = new Put(rowKey);
put.add(
  Bytes.toBytes("twits"),
  Bytes.toBytes("user"),
  Bytes.toBytes("TheRealMT");
put.add(
  Bytes.toBytes("twits"),
  Bytes.toBytes("twit"),
  Bytes.toBytes("Hello, TwitBase!));
You know you’ll want the most recent twits first. You know that HBase stores rows in sorted order by rowkey in its physical data model. You take advantage of that feature. By including the timestamp of the twit in the rowkey and multiplying it by -1, you have the most recent twits first.
This point we can’t stress enough: HBase rowkeys are the number one most important thing to think about when designing a table. We cover this in much greater detail in chapter 4. We mention it now so you can keep it in mind as you pursue the examples. The first question you should always ask yourself when looking at an HBase schema is, “What’s in the rowkey?” The next question should be, “How can I use the rowkey more effectively?”
2.6.2. Executing a scan
Using the user as the first portion of the twits rowkey turns out to be useful. It effectively creates buckets of data by user in the natural ordering of rows. All data from one user is in continuous rows. What does the Scan look like? More or less the same as before, just with more complexity in calculating the stop key:
byte[] userHash = Md5Utils.md5sum(user);
byte[] startRow = Bytes.padTail(userHash, longLength); // 212d...866f00...
byte[] stopRow = Bytes.padTail(userHash, longLength);
stopRow[Md5Utils.MD5_LENGTH-1]++;                      // 212d...867000...
Scan s = new Scan(startRow, stopRow);
ResultsScanner rs = twits.getScanner(s);
In this case, you create the stop key by incrementing the value of the last byte of the user ID portion of the rowkey. Scanners return records inclusive of the start key and exclusive of the end key, so this gives you twits for only the matching user.
Reading twits off the ResultScanner is a simple loop:
for(Result r : rs) {
  // extract the username
  byte[] b = r.getValue(
    Bytes.toBytes("twits"),
    Bytes.toBytes("user"));
  String user = Bytes.toString(b);
  // extract the twit
  b = r.getValue(
    Bytes.toBytes("twits"),
    Bytes.toBytes("twit"));
  String message = Bytes.toString(b);
  // extract the timestamp
  b = Arrays.copyOfRange(
    r.getRow(),
    Md5Utils.MD5_LENGTH,
    Md5Utils.MD5_LENGTH + longLength);
  DateTime dt = new DateTime(-1 * Bytes.toLong(b));
}
The only work done in the loop is fixing the timestamp value and converting byte[] values back to their proper data types. Voila! You’ll have something like this:
<Twit: TheRealMT 2012-02-20T00:13:27.931-08:00 Hello, TwitBase!>
2.6.3. Scanner caching
A scan can be configured to retrieve a batch of rows in every RPC call it makes to HBase. This configuration can be done at a per-scanner level by using the setCaching(int) API on the scan object. This configuration can also be set in the hbasesite.xml configuration file using the hbase.client.scanner.caching property. If the caching value is set to n, the scanner will return n rows with every RPC call and they will be cached at the client side while it works through them. The default value of this configuration is 1, which basically means that when you scan through a table, only one row is returned per RPC call that the client makes to HBase. That’s a conservative number, and you can tune it for better performance. But setting the value too high would mean that the client’s interaction with HBase would have longer pauses, and this could result in timeouts on HBase’s side.
The ResultScanner interface also has a next(int) call that you can use to ask it to return the next n rows from the scan. This is an API convenience that doesn’t have any relation to the number of RPC calls the client makes to HBase to get those n rows. Under the hood, ResultScanner makes as many RPC calls as necessary to satisfy the request; the number of rows returned per RPC call is solely dependent on the caching value you configure for the scanner.
2.6.4. Applying filters
It’s not always possible to design a rowkey to perfectly match your access patterns. Sometimes you’ll have use cases where you need to scan through a set of data in HBase but return only a subset of it to the client. This is where filters come in. Add a filter to your Scan object like this:
Filter f = ...
Scan s = new Scan();
s.setFilter(f);
A filter is a predicate that executes in HBase instead of on the client. When you specify a Filter in your Scan, HBase uses it to determine whether a record should be returned. This can avoid a lot of unnecessary data transfer. It also keeps the filtering on the server instead of placing that burden on the client.
The filter applied is anything implementing the org.apache.hadoop.hbase.filter.Filter interface. HBase provides a number of filters, but it’s easy to implement your own.
To filter all twits that mention TwitBase, you can use a ValueFilter in combination with a RegexStringComparator:
Scan s = new Scan();
s.addColumn(Bytes.toBytes("twits"), Bytes.toByes("twit"));
Filter f = new ValueFilter(
  CompareOp.EQUAL,
  new RegexStringComparator(".*TwitBase.*"));
s.setFilter(f);
HBase also provides a class for filter construction. The ParseFilter object implements a kind of query language used to construct a Filter instance for you. The same TwitBase filter can be constructed from an expression:
Scan s = new Scan();
s.addColumn(TWITS_FAM, TWIT_COL);
String expression = "ValueFilter(=,'regexString:.*TwitBase.*')";
ParseFilter p = new ParseFilter();
Filter f = p.parseSimpleFilterExpression(Bytes.toBytes(expression));
s.setFilter(f);
In either case, your regular expression is compiled and applied in the region before data ever reaches the client.
This is a simple example of using a filter in your applications. Filters in HBase can be applied to rowkeys, column qualifiers, or data values. You can also compose multiple filters together using the FilterList and WhileMatchFilter objects. Filters also allow you to page over data, limiting the number of rows returned by the scanner. We cover the bundled filters in more depth in chapter 4.
2.7. Atomic operations
The last command in the HBase arsenal is the Increment Column Value (ICV). It’s exposed as both the Increment command object like the others but also as a method on the HTableInterface. Let’s use the HTableInterface version because it offers slightly more intuitive semantics. Using it to keep count of the number of twits per user looks like this:
long ret = usersTable.incrementColumnValue(
  Bytes.toBytes("TheRealMT"),
  Bytes.toBytes("info"),
  Bytes.toBytes("tweet_count"),
  1L);
This command allows you to change an integral value stored in an HBase cell without reading it back first. The data manipulation happens in HBase, not in your client application, which makes it fast. It also avoids a possible race condition where some other client is interacting with the same cell. You can think of the ICV as identical to Java’s AtomicLong.addAndGet() method. The increment value can be any Java Long value, positive or negative. We’ll cover atomic operations in more detail in the next section.
Notice also that you’re not storing this data in the twits table but instead in the users table. You store it there because you don’t want this information as part of a scan. Keeping it in the twits table would upset the common access pattern of that table.
Like Java’s Atomic family of classes, the HTableInterface also provides checkAndPut() and checkAndDelete() methods. They allow for more fine-grained control while maintaining the atomic semantics. You could implement the incrementColumn-Value() method using checkAndPut():
Get g = new Get(Bytes.toBytes("TheRealMT"));
Result r = usersTable.get(g);
long curVal = Bytes.toLong(
  r.getColumnLatest(
    Bytes.toBytes("info"),
    Bytes.toBytes("tweet_count")).getValue());
long incVal = curVal + 1;
Put p = new Put(Bytes.toBytes("TheRealMT"));
p.add(
  Bytes.toBytes("info"),
  Bytes.toBytes("tweet_count"),
  Bytes.toBytes(incVal));
usersTable.checkAndPut(
  Bytes.toBytes("TheRealMT"),
  Bytes.toBytes("info"),
  Bytes.toBytes("tweet_count"),
  Bytes.toBytes(curVal),
  p);
This implementation is quite a bit longer, but you can do it. Using checkAndDelete() looks much the same.
Following the same patterns as before, you can now easily build a TwitsTool. The model, DAO, and command-line implementations look similar to what you’ve seen for the users table. An implementation is provided in the source code accompanying this book.
2.8. ACID semantics
If you’ve worked with database systems, you’ve heard about the ACID semantics that various systems provide. ACID is a set of properties that are important to be aware of when building applications that use database systems for storage. Using these properties, you can reason the behavior of your application when it comes to interacting with the underlying store. For the sake of simplicity, let’s again define ACID. Keep in mind that ACID is different from CAP, which we briefly touched on earlier:
- Atomicity—Atomicity is the property of an operation being atomic, or, in other words, all or nothing. If the operation succeeds, the entire operation succeeds. If the operation fails, it fails in its entirety and the system is left in exactly the same state as it was in before the operation started.
- Consistency—Consistency is the property of an operation taking the system from one valid state to another. If the operation makes the system inconsistent, it won’t be performed or it will be rolled back.
- Isolation—Isolation means that no operation interferes with any other operation in the system. For instance, no two writes to a single object will happen at the same time. The writes will happen one after the other, but not at the exact same moment.
- Durability—Durability is something we talked about earlier. It means that once data is written, it’s guaranteed to be read back and not lost in due course of normal operation of the system.
2.9. Summary
In case you missed something along the way, here is a quick overview of the material covered in this chapter.
HBase is a database designed for semistructured data and horizontal scalability. It stores data in tables. Within a table, data is organized over a four-dimensional coordinate system: rowkey, column family, column qualifier, and version. HBase is schema-less, requiring only that column families be defined ahead of time. It’s also type-less, storing all data as uninterpreted arrays of bytes. There are five basic commands for interacting with data in HBase: Get, Put, Delete, Scan, and Increment. The only way to query HBase based on non-rowkey values is by a filtered scan.
HBase isn’t an ACID-compliant database. But HBase provides some guarantees that you can use to reason about the behavior of your application’s interaction with the system. These guarantees are as follows:
- Operations are row-level atomic. In other words, any Put() on a given row either succeeds in its entirety or fails and leaves the row the way it was before the operation started. There will never be a case where part of the row is written and some part is left out. This property is regardless of the number of column families across which the operation is being performed.
- Interrow operations are not atomic. There are no guarantees that all operations will complete or fail together in their entirety. All the individual operations are atomic as listed in the previous point.
- checkAnd* and increment* operations are atomic.
- Multiple write operations to a given row are always independent of each other in their entirety. This is an extension of the first point.
- Any Get() operation on a given row returns the complete row as it exists at that point in time in the system.
- A scan across a table is not a scan over a snapshot of the table at any point. If a row R is mutated after the scan has started but before R is read by the scanner object, the updated version of R is read by the scanner. But the data read by the scanner is consistent and contains the complete row at the time it’s read.
From the context of building applications with HBase, these are the important points you need to be aware of.
6HBase’s ACID semantics are described in the HBase manual: http://hbase.apache.org/acid-semantics.html.
The data model is logically organized as either a key-value store or as a sorted map of maps. The physical data model is column-oriented along column families and individual records are stored in a key-value style. HBase persists data records into HFiles, an immutable file format. Because records can’t be modified once written, new values are persisted to new HFiles. Data view is reconciled on the fly at read time and during compactions.
The HBase Java client API exposes tables via the HTableInterface. Table connections can be established by constructing an HTable instance directly. Instantiating an HTable instance is expensive, so the preferred method is via the HTablePool because it manages connection reuse. Tables are created and manipulated via instances of the HBaseAdmin, HTableDescriptor, and HColumnDescriptor classes. All five commands are exposed via their respective command objects: Get, Put, Delete, Scan, and Increment. Commands are sent to the HTableInterface instance for execution. A variant of Increment is also available using the HTableInterface.incrementColumnValue() method. The results of executing Get, Scan, and Increment commands are returned in instances of Result and ResultScanner objects. Each record returned is represented by a KeyValue instance. All of these operations are also available on the command line via the HBase shell.
Schema designs in HBase are heavily influenced by anticipated data-access patterns. Ideally, the tables in your schema are organized according to these patterns. The rowkey is the only fully indexed coordinate in HBase, so queries are often implemented as rowkey scans. Compound rowkeys are a common practice in support of these scans. An even distribution of rowkey values is often desirable. Hashing algorithms such as MD5 or SHA1 are commonly used to achieve even distribution.