
Chapter 14
Beyond Static HTML
Key Skills & Concepts
• Understand the Concept and Uses of JavaScript and HTML5 APIs in Web Pages
• Understand the Purpose of the Following New HTML5 Features: Multitasking, Storage, Offline, Geolocation, Canvas
While HTML enables you to create static, or unchanging, web pages, tools like JavaScript extend the capabilities of HTML, enabling you to create dynamic pages, which either change or react to users’ input. The combination of JavaScript and cascading style sheets (CSS) gives us what’s commonly called Dynamic HTML, or DHTML.
Taking it one step further, the W3C has added one key element and several specifications for application programming interfaces—or APIs—that allow HTML to work in conjunction with other tools like JavaScript. The understanding and use of the canvas element and those APIs can get pretty complex pretty quickly. So this section is not intended to teach you everything about the canvas, JavaScript, or the HTML5 APIs.
Moreover, this chapter gives a brief introduction into the how and why of the HTML5 canvas, as well as how JavaScript works with HTML, and then focuses on the presentation of a few typical examples of using dynamic content in a web page. If this whets your appetite for basic web scripting and you want to learn more, don’t miss the great additional resources listed at the end of the chapter.
Understand the Concept and Uses of JavaScript and HTML5 APIs in Web Pages
Contrary to what its name implies, JavaScript is not the same as Java. Sun Microsystems created the Java programming language, while Netscape developed JavaScript. Unlike Java, which can run on its own as a mini-application, JavaScript is built into web browsers and cannot stand on its own. Essentially, it’s just a set of statements, or scripts, that are instructions for the browser. As such, JavaScript is built into all modern web browsers. However, users can turn off support for JavaScript from within their personal browser. This means you should use caution when relying on JavaScript to transfer important information to users.
NOTE
In 2012, Google released a stand-alone, high-performance JavaScript engine, called V8, with its Chrome browser. Check out http://code.google.com/p/v8 if you’re interested in learning more.
When you write JavaScript, it’s actually placed right within the HTML on your page. This means you can learn JavaScript from your favorite web sites, just as you can with HTML, by viewing the HTML source from within the browser.
But, before you can do that, you have to know what JavaScript looks like and where to look for it. The following is a basic example:

The opening and closing
script tags are HTML, while everything in between them is written in JavaScript. This is an important distinction because JavaScript is quite different from HTML in several ways:• JavaScript is case-sensitive; some forms of HTML are not.
• In JavaScript, quotes are required; in some forms of HTML, quotes are optional.
• JavaScript has a distinct format that must be adhered to; most forms of HTML are forgiving about spacing and formatting.
• JavaScript is considered to be a programming language, whereas HTML is called a markup language.
Given those restrictions, troubleshooting JavaScript can be a bit tricky. Whenever you copy a script from a web site or a book, be sure to copy it exactly as written, unless otherwise specified. For example, placing a line break in the middle of the previous example could produce an error when the page is viewed in a browser.

Troubleshoot JavaScript
If you are using a modern browser, you likely have a great way to troubleshoot your JavaScript right within the browser. For example, in Firefox you can choose Tools | Web Developer | Error Console to display any error information associated with recent web browsing. (If you’ve visited any web sites recently, chances are good you’ll see plenty of errors, as I did when I took this screen capture!)

You can use this console to view errors on your pages, or even to test strings of code, by typing them into the console and clicking Evaluate.
In Google Chrome, choose View | Developer | JavaScript Console. Safari users can choose Develop | Show Error Console. In Opera, choose View | Developer Tools | Error Console.
If you’re using Internet Explorer, you’ve probably seen a small warning icon displayed in the bottom-left corner of the browser at one time or another. This occurs when a page displays with errors. (You may even see a statement such as “Done, but with errors on page” along the bottom edge of the browser window.) Click the icon to the left of the statement to reveal information about the error(s).
TIP
Firefox users can download a great add-on called Firebug from https://addons.mozilla.org/en-US/firefox/addon/1843. This popular tool allows you to edit, view, and troubleshoot not only JavaScript, but also CSS and HTML in live web pages.
Terminology
You should learn several new terms before you use any JavaScript. The following examines the most common.
NOTE
Many web sites and other books contain the official JavaScript specifications. Refer to the section “Learn More” at the end of this chapter for details.
Objects and Methods
To understand these terms, let’s first look back at the preceding example and identify the pieces.

NOTE
Semicolons can be omitted on single-statement lines like this, but must be included on all lines with multiple statements. I made it a habit to always include them when I was first learning to avoid forgetting them when they were required.
In this example,
document is a JavaScript object. Quite simply, an object is anything that can be manipulated or changed by the script. In this case, the object document tells the browser the code directly following it refers to the HTML document itself.Objects can have methods, which are actual things that happen to the objects (in this case, a document is written to). For example, the object “car” might have a method called “drive.” Along those lines, what other methods might you imagine for the car object? (How about “clean” or “park”?) Methods are followed by a set of parentheses containing any specific instructions on how to accomplish the method. In the previous example, the text inside the parentheses is written within the current document.
Certain JavaScript methods can work together with HTML5 to extend the capabilities of your web pages. For example, the getCurrentPosition() method finds the geographic location of the user. This can be particularly useful when performing actions like showing restaurants near the user or displaying a custom weather forecast. We’ll look more specifically at these types of methods later in the chapter.
Properties
Just as an object, such as a car, has features (tires, brakes, and so forth) in the real world, JavaScript objects can have properties. This is useful if, for example, you want to manipulate a specific section of a document. Objects and properties are separated by periods. When you want to specify the value of a property, such as the color of the background, you add the value after the property, as in the following example:

NOTE
An object can even have a property that is, in itself, another object. For example,
document.location.href includes a document object, its location (an object itself and a property of document), and an href (a property of location).Variables, Operators, and Functions
In JavaScript, a variable is something you specify for your own needs. You might think of variables as labels for changeable values used within a single script. To define a variable, type var, followed by the one-word name of the variable:
TIP
Remember, JavaScript is case-sensitive. If you capitalize a letter when you first define a variable, you must also capitalize that letter every time you refer to it.
An operator does something, such as a calculation or a comparison between two or more variables. The symbols used to do this (listed in Table 14-1) should look familiar because they are also used in simple mathematics. One place you can use operators is in defining values of variables, as in the following example.
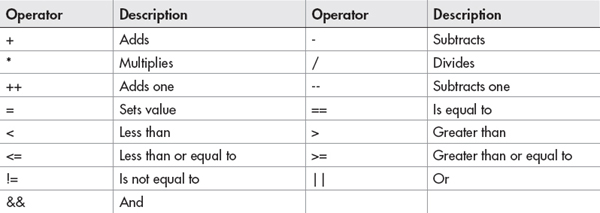
Table 14-1 JavaScript Operators

Likewise, a function is a group of commands to which you give a name so that you can refer to the group later in the page. To create a function, type function, followed by the function name and a set of parentheses. Then, type the commands that are part of the function below the name and enclosed in curly brackets. This is shown in the following example:

You can’t use just any name for a variable or a function, because there’s a list of reserved words that have a special meaning in either JavaScript or Java. If you use one of these words (shown in Table 14-2) as a function or a variable, users may encounter errors when viewing your pages.
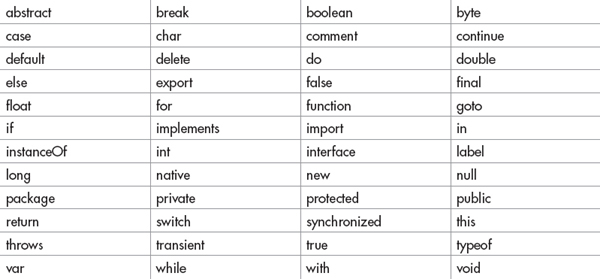
Table 14-2 Common Reserved JavaScript Words
Event Handlers
By contrast with the other terms discussed here, event handlers needn’t be placed within the opening and closing
script tags. These pieces of JavaScript can actually be embedded within HTML to respond to a user’s interaction and make a page dynamic. For example, placing the event handler onclick within an a tag (<a>) causes the event to occur when the user clicks the link. So, if I wanted to change the page’s background color when a link was clicked, I could use the following code:
Table 14-3 lists popular event handlers, but is just a few of the many possible. Check out www.w3schools.com/html5/html5_ref_eventattributes.asp for a list of all event handlers in HTML5.

Table 14-3 Common Event Handlers in JavaScript
Ask the Expert
Q: What is AJAX and how does it relate to JavaScript?
A: AJAX officially stands for asynchronous JavaScript and XML. However, since the term was first coined, its explanation has evolved somewhat so that XML is no longer required. In essence, AJAX is JavaScript that accomplishes tasks by working with the server behind the scenes, so as to not interfere with the rest of the page. In addition, because it works in the background, it doesn’t require the page to be reloaded when something changes. AJAX is not a new programming language, but rather a different way to use existing technologies. I To learn more, check out the Mozilla Developer Network’s AJAX section: https://developer.mozilla.org/en-US/docs/AJAX.
JavaScript Logic
Given that scripts are essentially a set of instructions to the browser, you can often read them logically as a series of commands. For example, in the following script, I am telling the browser to write one thing if the user has Internet Explorer and something else if the user doesn’t have IE:

These types of if … then statements are called conditionals and tell the browser to do one thing if x is true, and to do something else if x is false. Notice the actual instructions on what to do are included within curly brackets: {}. The spacing here is important because it should be consistent. As with HTML and CSS coding, there are several different spacing methods a developer can use. I recommend you pick one and stick with it to avoid confusing yourself, or others who might need to maintain the code. I prefer to keep the opening curly bracket on the same line as the
if or else. The closing curly bracket is then on a line by itself, after the instructions end. In addition, all statements (instructions) end with semicolons. The following is a simple example of the layout:
It could also appear in the following form, which, although less common, easily splits the conditions from each other:

We’ve just scratched the surface of a very complex topic. For more information, refer to the resources listed at the end of this chapter.
New and Notable
HTML5 introduces several new features that allow it to work more seamlessly with JavaScript. In this section, we’ll take a quick look at those features and the benefits they offer.
Multitasking
JavaScript was intended to work on a single task at a time. Given the extensive opportunities JavaScript affords web developers, it is now being pushed to do more. HTML5 brings us something to help JavaScript handle multiple tasks at once.
Appropriately named, these Web Workers can handle several different JavaScript activities without slowing down the page display or causing errors. Here’s a brief example of how a Web Worker is invoked:
In this instance, a new Worker is created to handle the contents of an external JavaScript file named script.js. You can learn much more about Web Workers here: www.html5rocks.com/en/tutorials/workers/basics.
Storage
For many years, the only way to store information about a user’s experience on your web site was through the use of cookies. Even aside from some concerns over privacy, cookies continue to cause headaches for many web developers, due to their tendency to slow down traffic, their inability to transmit data securely, and their limited storage capabilities.
Thankfully, HTML5 introduces two new storage mechanisms: local storage and session storage. Local storage has no official size limit, although the W3C has made some recommendations regarding the limitation of disc space. (As of this writing, the topic was still being discussed. Refer to http://dev.w3.org/html5/webstorage/#disk-space for more information.) It is conceivable, however, that local storage could be used to store the contents of a user’s webmail inbox, for example. And, because it is not limited to a single session or site visit, the data doesn’t have to be transmitted each time the user accesses it. This saves both download time and speeds up general access to the content.
By contrast, session storage is intended to provide a temporary place for the browser to store critical information for a page’s script. And because the session storage is tied to a particular instance of the browser window, web developers can actually allow users to run a script in multiple browser windows at the same time, which wasn’t possible with cookies. This can be quite helpful if you want to make two different transactions at the same web site in two different browser windows, such as might be the case if you’re searching for airfare to different airports at the same time. Check out the HTML5Rocks resources for additional information: www.html5rocks.com/en/features/storage.
Offline
In conjunction with the storage capabilities I just discussed, the ability to cache applications in HTML5 means we could effectively take the Web offline. Lest you think this sounds counter-intuitive, consider the following scenarios:
• Gaming Instead of having to download games that are then stored on one particular desktop computer, users can download an instance of the game to play online (if connected) as well as offline (when the Internet connection is not accessible) on whatever device is readily available. Because session information can also be stored locally, the user can pick up where he left off in mere seconds.
• Calendaring Users could track tasks or make other changes to an “offline” calendar that are then queued to “publish” all at once when reconnected.
• Image editing When users want to upload images, either to a social media site like Facebook or an online photo storage tool like Flikr, they often need to perform a certain amount of basic editing—like rotating, cropping, adding a frame, adding titles, and so on—to the images first. An offline app could handle all of those features and then queue the images for publishing when back online.
These are just a few very brief examples where HTML5’s offline features can really benefit both the developer and the user. For much more on these concepts check out www.html5rocks.com/en/features/offline.
Ask the Expert
Q: I’ve heard it said that HTML5 is a Flash-killer. Why?
A: As you’ve learned, HTML5 has built-in methods for handling audio and video. In a few minutes, you’ll also read about the canvas element, which enables us to add illustration, animation, and interactivity right within the HTML page. All of these features remove the need for an external application, like Flash, to display them to site users. And because HTML5 can be uniformly supported across a variety of browsers without the need for a helper application, it is better suited to reaching desktop and mobile users alike. In other words, sites built with HTML5 and its related technologies are more likely to be supported by a larger audience, regardless of what type of device is used. So while many developers have created Flash and non-Flash versions of their apps, they can now create an HTML5 version to serve both audiences.
Geolocation
One of the most popular new APIs of HTML5 is its built-in capacity to handle geolocation. Or, to say it more plainly, developers love that they can access a user’s geographical location and use it in their pages. How is this information used? You’ve probably already encountered plenty of instances but perhaps didn’t realize exactly what was happening.
Figure 14-1 shows how the browser requests permission before retrieving the user’s location. If you’ve ever been prompted by a similar alert, either in your desktop browser or on a mobile device, you’ve seen geolocation in use.
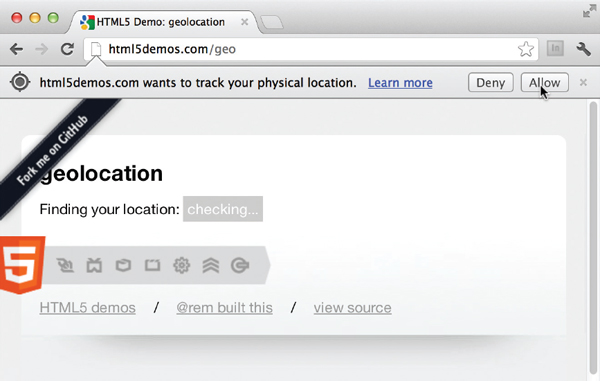
Figure 14-1 Before retrieving a user’s location, the browser requests permission.
The browser typically seeks to identify your location through one of several possible avenues. Mobile users are found either by pulling the longitude and latitude coordinates from your device’s GPS, or triangulating based on Wi-Fi or cell IDs. Desktop user locations are typically identified by interpreting geographical data from IP addresses or Wi-Fi signals. Although none of these methods are foolproof, they are usually pretty close.
After the user’s location has been identified, we can perform a variety of tasks, everything from simply displaying the location on the screen to retrieving job listings within a ten-mile radius and displaying each one’s typical commute. Check out a few more ideas here: https://developers.google.com/maps/location-based-apps. We’ll take a look at a sample script in the following section.
Canvas
Prior to HTML5, there was no built-in method for adding stuff like animation and interactivity to your web pages. Sure, you could create all sorts of scripts and multimedia with external applications and then link to them, but developers craved a way to create such interactivity right from within the HTML page so they could manipulate that data on the fly and in response to a user’s interaction. This is where the new canvas element comes in.
By adding one simple line of code to your pages, you open them up to a whole new world of coding. Let me show you what I mean:
This tells the browser to open a blank canvas, named myCanvas, with a width of 600 pixels and a height of 400 pixels. That is the easy part. It’s what comes next that means you’ll need a bit more training to fully take advantage of this powerful new element.
NOTE
When you don’t specify otherwise, the canvas size defaults to 300 pixels in width and 150 pixels in height.
Suppose you wanted to do something really simple, like draw a rectangle and then fill it with a solid color. In HTML5, you can create your blank canvas and then use JavaScript to dictate how to display that shape. After the
canvas element is created, here’s what the script might look like to draw a blue rectangle in the upper-left quarter of the canvas:
In essence, this little script tells the browser to locate the myCanvas element, switch to the 2d context, and then draw a blue rectangle. With canvas, the word context refers to whether we’re working with a two- or three-dimensional drawing space. Because there is no fully functioning and fully supported three-dimensional context yet, as of this writing, 2d is the context in use by the majority of canvas users.
The size of the rectangle is dictated by the dimensions listed in the context.fillRect() statement. In this case, I told the browser to start the shape at the top-left corner of the canvas (as indicated by the 0 and 0 starting dimensions) and then finish 300 pixels across and 200 pixels down. The result is shown in Figure 14-2.

Figure 14-2 JavaScript is used to draw this blue rectangle on the page.
After the shape has been created, there are tons and tons of things we can do to it. For example, JavaScript includes an API for adding shadows to shapes. In the following example, I’ve changed the box color to yellow and added a gray drop shadow behind it:

You may have noticed the various descriptions of the shape are actually listed before the shape’s dimensions. If we were to translate this into plain English, it would be like saying the adjectives before the noun. In other words, you provide the shape’s characteristics prior to declaring the shape itself.
The Shadow API has four possible properties:
• shadowOffsetX Sets the horizontal offset
• shadowOffsetY Sets the vertical offset of the shadow
• shadowBlur Assigns the amount of blur on the shadow in pixels
• shadowColor Specifies the shadow color (in the same way CSS colors are specified)
In this case, the shadow color is black (0, 0, 0 in RGB), and 50 percent transparent (listed as 0.5 for the RGB’s alpha channel), as shown in Figure 14-3.
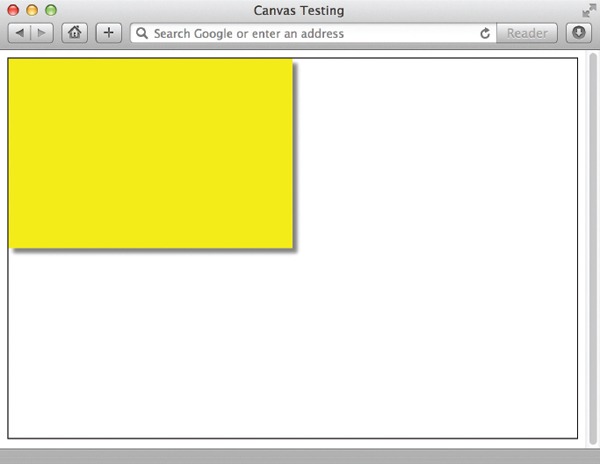
Figure 14-3 The Shadow API enables us to add drop shadows like this to canvas elements.
This is just one of many, many JavaScript APIs you can use to draw on your new HTML5 canvas. After drawing a variety of lines and shapes, you can then use other APIs to manipulate those pieces, either as a result of the user’s interaction, or simply based on a time sequence. If JavaScript and the canvas element interest you, I encourage you to pursue the additional resources listed at the end of the chapter to learn more. In the meantime, check out these great examples of what developers are doing right now with the new
canvas element:• True 8-bit Color Cycling with HTML5 www.effectgames.com/demos/canvascycle
• The Cloth Simulation www.andrew-hoyer.com/andrewhoyer/experiments/cloth
• The Wilderness Downtown (an Interactive Film) www.thewildernessdowntown.com
Sample Scripts
The next few sections include sample scripts for you to try in your web pages. Remember, these are provided as examples only purely to get you started with JavaScript. They might not work in every situation. Because it’s beyond the scope of this book to teach you JavaScript at the same level you’ve learned HTML, please refer to the additional resources at the end of this chapter for more help.
Add the Current Date and Time
The most basic way to add the current date and time to a web page is shown in the following script. Once you learn more about JavaScript, you can customize this script. For example, you might tell the browser to print only the month and day, or to print the month, day, and year in 00/00/00 format.
Place this script within the body of your web page wherever you want the date to appear:

Format a New Window
While you learned in previous chapters that you could use the
target attribute to load links into another browser window, you cannot control the size and style of that browser window with standard HTML. Instead, you can use JavaScript to open the window and then specify settings such as how large or small that window should be and whether the scroll bars are present.Some of the characteristics you can specify include
•
toolbar=yes or no Turns the browser toolbar—Back, Stop, Reload, and so on—on or off in the new window.•
location=yes or no Turns the browser location bar on or off in the new window.•
status=yes or no Turns the browser status bar on or off in the new window.•
menubar=yes or no Turns the browser menus—File, Edit, View, and so on—on or off in the new window.•
resizeable=yes or no Specifies whether users can resize the new window.•
scrolling=yes, no or auto Allows or prevents scrolling, or leaves it up to the browser to decide as needed.•
width=# Specifies the width of the new window in pixels.•
height=# Specifies the height of the new window in pixels.Instructions and Script
Place this script in the header of your page (between the opening and closing
head tags). The bolded text highlights pieces of the script you should customize.In the beginning of the script, we see
function NewWindow(link). This part identifies the function we use to open the new window so we can reference it later. The end of the script—MonthWindow.focus()—brings the window named MonthWindow to the front of the screen.
Then, in the body of your page, reference the function created in the previous script from within the appropriate link. You can use the following code to load other links in
NewWindow, simply by changing the URL listed in the parentheses:
If you want to give users the option of closing the window easily, you can add the following code to the bottom of the page that’s loaded into the new window:
NOTE
If you try this script and run into trouble, check the security settings in your browser. Some browsers block new windows from being opened by default.
Create a Dynamic Navigation Bar
In Chapter 6, I mentioned how you can actually have hidden layers of content within your web page. While the layers can be created and hidden with CSS, you use JavaScript to make them visible when a user interacts with the web page. The most common use of this in web pages is for dynamic navigation bars, where a submenu or drop-down menu appears after you click a link, providing additional link choices without refreshing the HTML page itself.
These dynamic navigation bars can become extremely complex, but the core concept is relatively simple, and that’s what this section discusses—a bare-bones method for invoking submenus. For more on how to make your navigation bar “bigger and better,” refer to the resources section at the end of this chapter. Figures 14-4 and 14-5 show this nav bar in action, and the code used to accomplish this task is included in the following section.
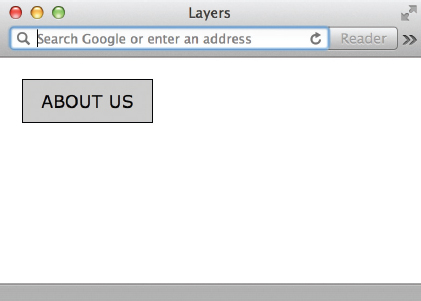
Figure 14-4 This shows the navigation button before it’s been clicked.
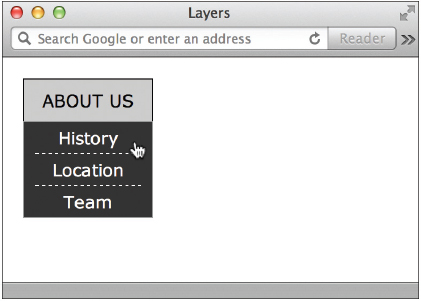
Figure 14-5 This shows how the hidden layer is made visible after I clicked the About Us button.
Instructions and Script
Place this JavaScript in the header of your page between the opening and closing
head tags. The bolded text highlights pieces of the script you should customize.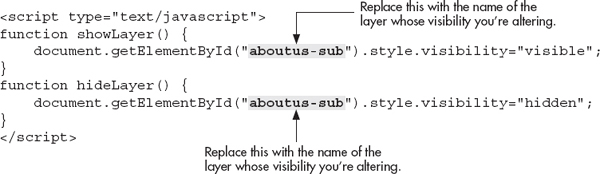
Next, adjust your style sheet to format the visible navigation button/link and the hidden submenu. Be sure to set the positioning so that the submenu displays below the top menu. What follows is the style sheet I used to create the menus shown in Figures 14-4 and 14-5.

The final piece to this code is the actual HTML for the content, which is placed between the opening and closing
body tags:
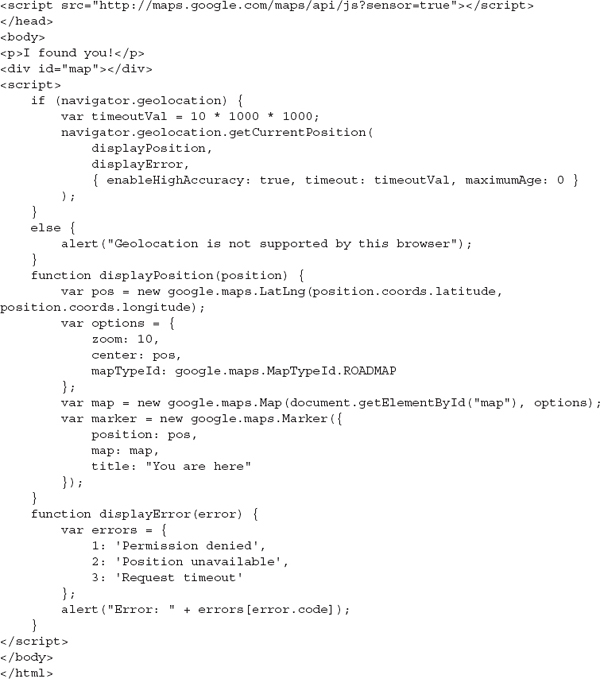
Display a User’s Location on a Map
In this practice script, we’ll display the user’s location within Google Maps. There are three main components to finding a user’s location on a map. First, we must check for browser support. Second, we read the user’s location. Last, we access a mapping tool like Google Maps to display the location.
Instructions and Script
Before we can get to any of the embedded JavaScript, we need to link to the external Google Maps API, like this:
In this case, we are telling the browser to use sensing techniques (such as a GPS locator) for determining the user’s location. If you did not want to use a sensor, simply change the end part of the URL to sensor=false.
NOTE
This basic API is free for personal use. If you end up wanting something a bit more customized or complex, or if you need to use the API for a business, check Google’s guidelines for licensing details: https://developers.google.com/maps/documentation/business/guide. You likely just need to register your business and receive a custom application key to use it legally.
After that, we need to add some internal scripting to determine whether the user’s browser supports geolocation. If browser support exists, we start laying the groundwork for what’s to come.


For browsers that don’t support geolocation, we let them know:

Now, we get to the real meat of the JavaScript. While we told the browser to run the
displayPosition function if it supported geolocation, here is where we identify what should happen when the displayPosition function is run. This is where we identify the user’s location and display it on the map. After that, the map options are set, such as the zoom level and how it is centered.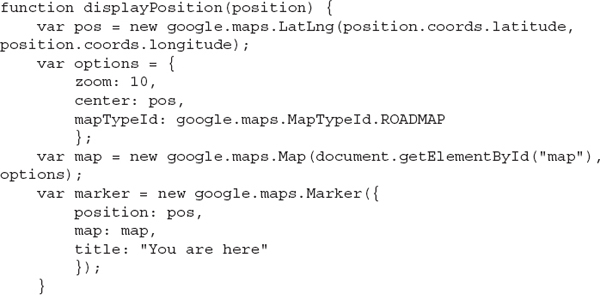
Then, we need to also explain the
displayError function for some basic error handling:
After that, we can add a tiny bit of CSS to make the map fill the screen and a single line of text to tell the user, “I found you!” Here’s how the code looks all together. (See Figure 14-6 for a screen shot of the final product.)
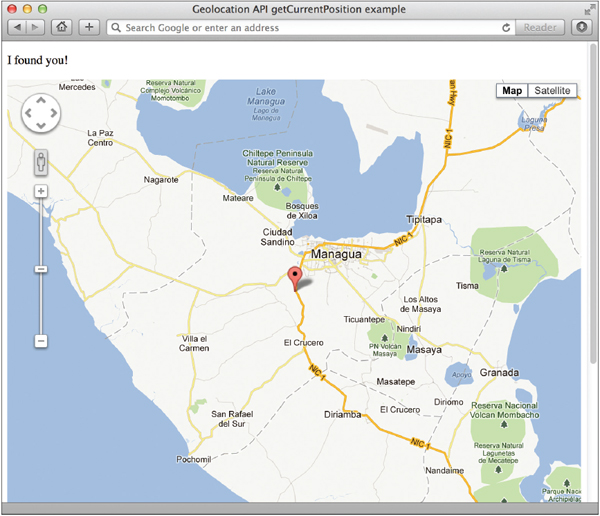
Figure 14-6 Our sample script causes the browser to display the user’s location in a Google Map.

As mentioned previously, this really is just the tip of the iceberg regarding what is possible. If it’s inspired you to want to do more with JavaScript, HTML, and CSS, don’t miss the section “Learn More” at the end of this chapter.
| Try This 14-1 | Use JavaScript to Launch a New Browser Window |
JavaScript can add much to a web site that wouldn’t otherwise be possible with HTML. Many of the popular JavaScript techniques used on the Web make a site seem more dynamic. In this project, we use JavaScript to launch a new browser window from a link on one of your site’s pages. The goal for this project is to use JavaScript to launch and control a new browser window.
1. First, locate your business or organization on Google Maps (maps.google.com). Copy the address of the page from the top of the browser window so you can link to it.
2. Then, open one of the pages already completed in your text or HTML editor.
3. Add the necessary JavaScript to the header of the page to set up a function for launching a new browser window.
4. Name the window MapWindow.
5. Title it ‘Map’.
6. Turn the menu bar, the status bar, the toolbar, and the location off in the new window.
7. Set the scrolling to
auto.8. Format the new window to be 500 × 500 pixels in size.
9. Create a link to the Google Maps page you identified in Step 1 somewhere within the text. Using JavaScript, specify that the link should open in the MapWindow.
10. Save the file.
11. Open your web browser and choose File | Open Page (or Open File or Open, depending on the browser you’re using). Locate the file you just saved. Click the link to verify that the linked page opens in a new browser window with the appropriate customizations.
12. If you need to make changes, return to your text editor to do so. After making any changes, save the file and switch back to the browser. Choose Refresh or Reload to preview the changes you just made.
TIP
Do you get an error or see nothing in the new browser window? Make sure the link to Google Maps is correct. If you receive other errors, try comparing your code against the following example, or using your browser’s JavaScript console for troubleshooting.

Here’s an example of what the code for your Google Maps link might look like:
Although JavaScript isn’t the same as HTML, the two can be used together to make web pages more dynamic in nature. This project gave you a chance to practice one JavaScript technique—controlling browser windows.
Learn More
While I didn’t expect this chapter would teach you everything you need to know about JavaScript or the new HTML5 APIs, I hope it gave you a basic understanding of what types of things these scripts can do. If you’d like to learn more, many sources of additional information are available on this topic. The following section lists some of the most popular.
Also, the sites listed here offer many free scripts that you may borrow and use on your own site. This is considered perfectly normal, so long as you give credit to the original author(s) in your code.
Online References and Scripts
• HTML5Studio Access demos of the latest and greatest of HTML5, JavaScript, and CSS3 (http://studio.html5rocks.com).
• HTML5 Canvas Element Guide Learn the history of this exciting new element and the basics of how to use it in your pages (http://sixrevisions.com/html/canvas-element/).
• Canvas Tutorial This tutorial, from the Mozilla Developers Network, covers all you need to know to get started with the canvas element (https://developer.mozilla.org/en-US/docs/Canvas_tutorial). It also includes links to some helpful examples.
• SitePoint.com This site contains DHTML and JavaScript articles (www.sitepoint.com/subcat/javascript), as well as a whole blog about this stuff (www.sitepoint.com/tag/html5-dev-center).
• Web Reference JavaScript Articles This web site (www.webreference.com/programming/javascript) includes tutorials, tips, and reviews of tools.
• Mozilla Developer Center This section of the Mozilla Developer Center (https://developer.mozilla.org/en-US/docs/HTML/HTML5) is specifically geared toward anyone developing with HTML5 and includes helpful documentation and support communities.
• javascripts.com You can find thousands of free scripts and information about how to use them.
• The Code Player Prefer to learn visually? Check out these video tutorials for all things related to HTML5, JavaScript, and CSS3 (http://thecodeplayer.com).
NOTE
Always look for the most recent references you can find when working with JavaScript and HTML. The reason is this: Older scripts were written for older browsers and may or may not be valid today. Often, those older browsers required web developers to use special workarounds, called hacks, in their JavaScripts and HTML. Many of those hacks are no longer necessary, and in some cases they can even “break” in modern browsers.
Chapter 14 Self Test
1. Fill in the blank: JavaScript is case- ____________.
2. Name two ways JavaScript differs from standard HTML.
3. What is an API?
4. Fill in the blank: In the following code, __________ is the JavaScript object.
document.write("This is a text!");5. True/False: A plus sign (+) is an example of a JavaScript variable.
6. When placed within the header of an HTML file, which opening and closing tags surround all JavaScripts?
7. Fill in the blank: Objects can have ___________, which are actual things that happen to the objects, such as “write” in the following statement:
document.write("I can write JavaScript");.8. What term is given to an aspect of JavaScript that you specify for your own needs, which is used as a label for a changeable value?
9. Fill in the blank: A(n) _________________ is a group of commands to which you give a name so that you can refer to it later in the script.
10. Which aspect of JavaScript is embedded within the page’s HTML and responds to a user’s interaction?
11. How are conditionals used in JavaScript?
12. What does the following JavaScript do when added to an a tag on a web page? 
13. How do you specify that a new browser window should not have any scroll bars?
14. What punctuation ends all JavaScript statements?
15. What does
onFocus do when used in JavaScript?..................Content has been hidden....................
You can't read the all page of ebook, please click here login for view all page.