Chapter 2
Document Setup
Key Skills & Concepts
• Create an HTML File
• Preview an HTML File in a Browser
• Describe and Apply the Basic HTML Document Format
• Use Character Entities to Display Special Characters
• Add Comments to an HTML File
Now that you know a little about the Web and what to think about before creating a web page, let’s talk about the basic setup of an HTML page.
Create an HTML File
At their very core, HTML files are simply text files with two additional features:
• HTML files have an .html or .htm file extension. A file extension is an abbreviation that associates the file with the appropriate program or tool needed to access it. In most cases, this abbreviation follows a period and is three or four letters long.
• HTML files have tags. Tags are commands or code used to tell the computer how to display the page content.
NOTE
You might also see other types of pages on the Internet, such as files ending with .php, .asp, or .xml. For the most part, these are beyond the scope of the traditional HTML page, and therefore not covered in this book.
Naming Conventions
Remember the following few points when naming your HTML files:
• Although in most cases it doesn’t matter whether you use .html or .htm, you should be consistent to avoid confusing yourself, the browser, and your users.
NOTE
Wondering why some people use .html and some use .htm? Older systems such as Windows 3.1 and DOS could not understand four-letter file extensions, so anyone creating web pages on those systems used .htm as the extension. In any case, because the first three letters of .html and .htm are the same, those systems simply ignored the “I” and recognized the file type without any problems.
• Some web servers are case-sensitive, so remember this when naming and referencing filenames and try to be consistent. If you name your file MyPage.html, and then reference it later using mypage.html, you may end up with a broken link. One good technique is to use only uppercase or lowercase to name your files. This way, if you see a file with a letter in it that doesn’t match, you know instantly that file is probably the problem. Even the pros run into case-sensitivity problems on an almost daily basis.
• Use simple filenames with only letters and numbers. Don’t use spaces, punctuation, or special characters other than hyphens (-) and underscores (_). Good examples might be home.html, my-story.html, and contactme.html.
TIP
While it’s perfectly acceptable to use an underscore (_) in a file or folder name, I suggest using a hyphen instead. Underscores can easily become confused with an underline, especially when displayed as a link on a web page (because links are usually underlined).
These same recommendations hold true for any folder names you use. If you were creating a web site that had your favorite links, family photos, and résumé, you might find it useful to put each of those things in a separate folder.
TIP
If you decide to use Microsoft Word or WordPad to type your HTML, you need to choose the file type “Text Document” or “Text Only” and give the file an .html extension the first time you save it. This is because both of those programs default to saving “Word for Windows” or “Microsoft Word” documents with a .doc or .docx extension.
Preview an HTML File in a Browser
You can view HTML files located on your personal computer within your own web browser. It isn’t necessary for your files to be stored on a web server until you are ready to make them visible on the Internet.
When you want to preview a page, open your web browser and choose File | Open File (or Open Page or simply Open, depending on your browser), and then browse through your hard drive until you locate the HTML file you want to open. (Note: If you don’t see any File menus in IE, try pressing the alt key to reveal those menus. Also, Windows users can right-click the file and choose Open With and then choose the browser name.)
If you’re going to make frequent changes to the HTML file in an editor without a preview tool and then switch back to a web browser to preview the page, keeping both programs (a text editor and a web browser) open at the same time makes sense. When using a basic text editor, the steps to edit and preview HTML files are as follows:
1. Open/return to your HTML file in an editor.
2. Edit your HTML file in an editor.
3. Save your HTML file in an editor.
4. Open/return to your HTML file in a web browser.
5. Click the Refresh or Reload button in your web browser to update the HTML page to reflect the changes you just made to it.
By keeping your HTML file open in both an editor and a browser, you can easily make and preview changes. I’ll have you give this a try shortly.
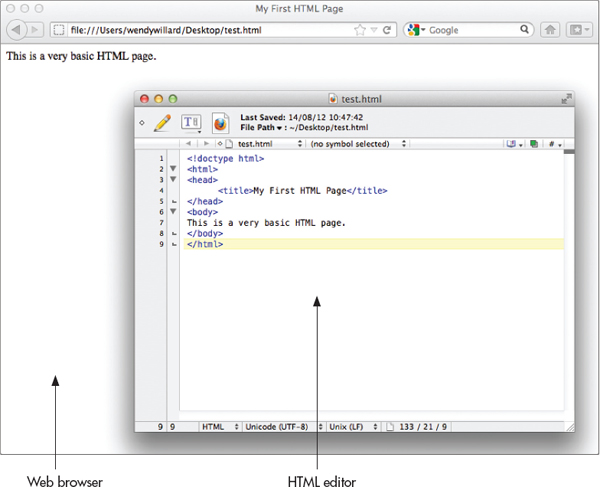
If you’re using a graphical or WYSIWYG editor, the ideal steps are slightly different because these types of programs include a browser preview option. For example, Adobe Dreamweaver offers three ways to work with an HTML file. One option is to view only the code, as you would in a basic text editor. Another option is to work in the preview mode, moving page elements around on the page by clicking and dragging. Finally, you can use a combination, where the code is visible on part of the screen and the browser preview is visible on the rest (as shown in Figure 2-1).

Figure 2-1 Accessing both the code and browser preview at once with Adobe Dreamweaver
Describe and Apply the Basic HTML Document Format
An HTML element is used to tell the browser how to display content on a page. HTML elements have opening and closing tags to tell the browser when to start and stop applying commands. These commands are similar to what happens behind the scenes when you highlight some text in a word processor and click the Italic button to make the text italicized.
With HTML, instead of clicking a button to make text italicized, you can type a tag before and after the text you want to emphasize, as in the following:
You can easily recognize tags because they are placed within brackets (< >), or less-than and greater-than symbols.
Did you notice that the tag to emphasize text and make it italic is em? Given that piece of information, can you guess the tags to add a paragraph or create items in a list?

Now do you believe me when I say HTML is not rocket science? Don’t worry—most of the elements are pretty intuitive and easy to remember. We will work through each of these tags, and plenty more, throughout the course of the book.
Types of Elements
Most HTML tags fall into one of several main categories. While the actual category names vary according to who you ask, for the purposes of this book I group them like this:
• Document Setup Elements in this category include those necessary to set up a basic HTML page. For example, html, head, and title might all be included in this category. We’ll talk about these types of elements in this chapter.
• Text-Level Semantics These elements help the browser understand the meaning behind bits of text content. We’ll cover this category in Chapters 4 and 6.
• Sectioning Elements used to section large chunks of content and divide up the page belong in this category. Examples include section, div, and header, all of which are covered in Chapter 5.
• Grouping Elements used to section smaller chunks of content, like lists and paragraphs, fall into this category. Lists are explained in Chapter 10, while paragraphs are covered in Chapter 3.
• Embedding Often times, we need to embed content from other sources into a web page. Examples include images (discussed in Chapter 8), audio and video (explained in Chapter 9), and other interactive elements (some of which are discussed in Chapter 14).
• Tables Those elements useful for managing tabular data can easily be grouped together. We’ll go over those in Chapter 11.
• Forms Any element used in the development of a web form falls into this category. I’ll discuss these in Chapters 12 and 13.
Josh Duck has a great interactive example on his web site that can really help us visualize the various types of elements and how they work together to create web pages. Figure 2-2 shows a screen shot, but be sure to visit www.joshduck.com/periodic-table.html to see it live.

Figure 2-2 This interactive “Periodic Table of Elements” helps us visualize all the HTML5 elements together.
Block-Level vs. Inline
Beyond those basic categories, there are two other types of elements I want to touch on before we go any further. Of those HTML elements that are added to the body of a web page, most can be classified as either a block-level or inline, or text-level, element by default.
Generally speaking, block-level elements have the following key differences from inline elements:
• They can contain other block-level elements, as well as inline elements.
• They are formatted to start on blank lines by default.
• They are styled as “boxes” on the page.
By contrast, inline elements cannot contain other block-level elements and do not begin on new lines. In addition, inline elements cannot be fully styled the same way block-level elements are formatted. We’ll discuss more about those differences when we get to some of the affected elements.
The following list identifies all the elements typically considered to be block-level in nature. Even though you may not recognize many of these elements yet, I’m providing this list as a reference to help you style the elements appropriately when you get to that point.

Types of Tags
In HTML, many elements actually have two types of tags: one used for opening an element and another for closing it. For example, if you use
<p> as an opening tag to signify where to start a new paragraph, you have to use a closing tag to signify where that paragraph ends (unless you want your entire page to be contained within one paragraph). To do so, add a forward slash before the element name: </p>.Having said that, HTML5 does not require all elements to have both opening and closing options. This means some elements have only one type of tag. Such elements are referred to as being empty because they stand alone and do not contain any other content.
Attributes
Many tags have additional aspects that you can customize. These options are called attributes and are placed after the element name, but before the final bracket. Specific attributes for each element are discussed as we move through the book. But to give you an idea of how attributes work, let’s look at an example using the
img element:In this example, the base element is img, which tells the browser I want to insert an image at this spot. The attributes are
src, width, height, and alt. Each attribute has a value, which comes after an equal sign (=) and is placed within quotation marks. The whole thing—from the left angle bracket to the right angle bracket—is referred to as the tag.There’s no need to repeat the
img tag, because multiple attributes can be included in a single tag. When you add attributes to a tag, you only put them in the opening tag. Then, you only need to close the tag (not the attributes), if necessary. (Note that this tag is one that doesn’t have a separate closing tag in HTML5.)Required Tags
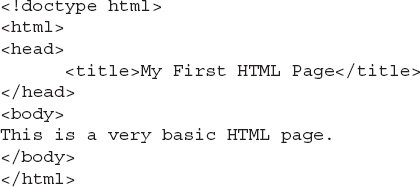
All HTML pages need to have the
html, head, title, and body tags, along with the doctype identifier. This means, at the very least, your pages should include the following (which are also outlined in Table 2-1):
Table 2-1 Required HTML Page Elements
Here is the result of this page when displayed in a browser.

To test this basic HTML page for yourself, try the following:
1. Open a basic HTML editor, such as the free versions of TextWrangler (Mac) or CoffeeCup (PC).
2. Copy the preceding code into a new document.
3. Save it and name it test.html.
4. Launch your browser and choose File | Open File or File | Open.
5. Browse your hard drive to locate the test.html file, and you’re off and running!
NOTE
If you’re using IE7+ and don’t see the File menus, press alt to reveal those menus.
Doctype
The
doctype element is used to tell the browser which type of coding or scripting language is used in the document. In versions prior to HTML5, this element specified which variation of HTML/XHTML should be used by the browser to interpret the page.Thankfully the W3C greatly simplified this element in HTML5, which also makes it somewhat obsolete. At this point, all you need to do is to include the following brief tag at the top of each page to prevent the browser from using an older interpretation method:
HTML
The
html element contains all of the remaining HTML elements. That means all the HTML of your page—except for the html and doctype elements—should be placed in between the opening and closing html tags.
Head
The
head element is used to tell the browser about the page, as opposed to including the content that will display on the page. There are a few other elements that belong in between the opening and closing head tags to help tell about the page. Those elements include•
title Specifies the page title.•
meta Specifies additional information about the page, such as which character set is used in the page.•
style Defines internal style information.•
link Defines a link to an external file needed to process the content of this page.•
script Specifies non-HTML script content.Note that of those five elements, only the
title element is required. We’ll discuss these elements further in later sections.Body
The body element contains all of the HTML elements that define the content displayed on the page, including the tags necessary to format text, links, images, and so on. The bulk of the next few sections and chapters will outline exactly what to do in the body section of your pages.
Capitalization
Original versions of HTML were case-insensitive and, in fact, very forgiving. This means all of the following examples would be considered the same by the browser:
•
<html>•
<HTML>•
<HTml>But then HTML4 and XHTML came along, with all its restrictions, requiring all tags to be lowercase. This means of the three preceding examples, the browser might properly interpret only the first.
Thankfully, HTML5 returns to being case-insensitive, where pretty much anything goes in terms of capitalization. But given the differences between the various versions of HTML currently in use, I still recommend using all-lowercase tags.
Ask the Expert
Q: I typed the preceding HTML into a text file, but when I tried to preview the page in my browser, nothing happened. Why?
A: There are several possible reasons why your page might appear blank. First, review the code in the preceding example and compare it line by line with the code you typed. Forgetting a closing tag or maybe just a forward slash (/) is easy. Sometimes it’s helpful to take a quick break before returning to scrutinize your page. If you do make a change, be sure to save the file in your text editor before clicking Refresh or Reload in your web browser.
If you’re certain the code in your page matches the example, try resaving your file under a new name. Close your browser, and then relaunch your web browser and open the page in the browser again.
Additional troubleshooting techniques are located in Appendix C.
Quotation Marks
Earlier versions of HTML also required all values to be placed within straight quotation marks, as in the following example:

I suggest continuing this practice, for continuity and usability reasons.
Nesting
The term nesting appears many times throughout the course of this book and refers to the process of containing one HTML tag inside another:

You have a proper way and an improper way to nest tags. All tags should begin and end starting in the middle and moving out. Another way of thinking about it involves the “circle rule.” You should always be able to draw semicircles that connect the opening and closing versions of each tag. If any of your semicircles intersect, your tags are not nested properly.
Using the following example, the first one is proper because the
strong tags are both on the outside and the em tags are both on the inside:Even though both may work in some browsers, you need to nest tags the proper way to ensure that your pages display the same across all browsers.
Spacing and Breaks Within the Code
Let’s look closely at some example HTML to identify where proper spacing should occur. (Note that the
a tag and href attribute are used to link something—in this case, text.)
Two places exist within an HTML file where you might like to add breaks:
• In between tags, to help you differentiate between sections of the page
• In between lines of text within the body of the page
Spacing and Breaks Between Tags
The first place you might like to add breaks is in between tags, as in the following example:

Although this is not required, most people use the ENTER or RETURN key to separate tags with line breaks. Others also indent tags that are contained within other tags, as in the preceding example: The
title element is indented to show it is contained or nested within the head element. This may help you to identify the tags more quickly when viewing the page in a text editor.Spacing Between Lines of Text
The second place you add breaks is between the lines of text in the body of the page. If you use the RETURN or ENTER key on your keyboard to add a line break in between two lines of text on your page, that line break will not appear when the browser displays the page.
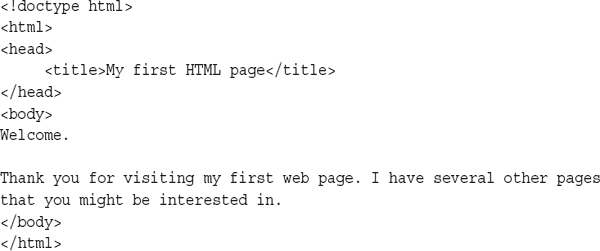
In this code, I pressed the return key twice after the word “Welcome.” In this example, you can see that the browser ignored my returns and ran both lines of text together.

To make those line breaks appear, I’d have to use an HTML element to tell the browser to insert a line break. Two tags are used for breaks in content:
The
br element inserts a simple line break. It tells the browser to drop down to the next line before continuing. If you insert multiple br tags, the browser will drop down several lines before continuing.The
p element signifies a paragraph break. The difference between the two is that paragraph breaks cause the browser to skip a line, while line breaks do not. Also, the p element is considered a container element because its opening and closing tags should be used to contain paragraphs of content. The br and p tags are discussed in more detail in Chapter 5.NOTE
Because the br element doesn’t contain any text, as the p element does, it doesn’t have opening and closing versions. In previous versions of HTML, you were required to place a slash before the closing bracket to “terminate” the tag, as in:
<br />. HTML5 does not require us to close empty tags like this.If I enclose each of these paragraphs in p tags, like the following:

the browser will know to separate them with a blank line. The following illustration shows how the browser displays the text now that I have contained each of the paragraphs in
p tags.
In addition, HTML neither recognizes more than a single space at a time nor interprets a tab space as a way to indent. This means that in order to indent a paragraph or leave more than one space between words, you must use style sheets (see Chapter 5) or special characters.
Use Character Entities to Display Special Characters
As crazy as this sounds, you technically shouldn’t include any characters in your HTML files that you can’t type with only one finger. This means if you have to hold down the SHIFT key to type an exclamation mark or a dollar sign, you are supposed to use a character entity to include that special character in your HTML file.
Even though you might be able to type a certain character on your computer system without any problems, some characters may not translate properly when visitors to your web site view your page. So, I recommend you use character entities to maintain consistency across computer systems.
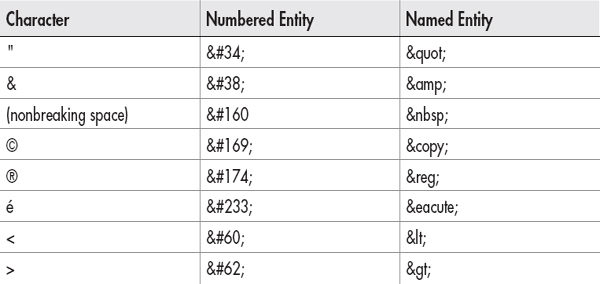
Character entities can be typed as either a numbered entity or a named entity. All character entities begin with an ampersand (&) and end with a semicolon (;). Although every character entity has a numbered version, not every one has a named version. While a full list of special characters is included in Appendix D, a few are listed in the following table to give you an idea of what they look like.
NOTE
A few characters are reserved and given special meaning in HTML. For example, the brackets (< and >) are used to signify HTML tags, while the ampersand (&) is used to begin these entities. If you need to use a bracket within the content of your HTML page, such as when a greater-than symbol is needed, in the case of 3 > 2, you should use the corresponding character entity (>) to do so.
Having now made the case for using character entities, let me just say here that it’s been my experience that certain characters can actually be used in a web page without causing any problems. These include straight—not curly—quotation marks (''), exclamation marks (!), question marks (?), colons (;), and parentheses (). While I haven’t noticed any of these to cause problems in the majority of browsers, you should still test your pages thoroughly when using any special characters.
Here’s an example of how the most commonly used character entity—the non-breaking space—might be used in a code snippet:

Add Comments to an HTML File
Sometimes you might not want your web site visitors to see personal comments or notes you’ve added to your web pages. These notes might be directions to another person or reminders to yourself.
After the opening bracket, an exclamation mark and two hyphens signify the beginning of a comment. A space should appear after the opening comment code, as well as before the closing comment code.
Comments are not restricted in size but can cover many lines at a time. The end comment code (-->) doesn’t need to be on the same line as the beginning comment code. If you forget to close your comment tag, the rest of the page will not appear in your browser. If this happens, don’t be alarmed. Simply go back to the code and close that comment. The rest of the page will become visible when you save the file and reload it in the browser.
NOTE
Comments can be seen by anyone who views the source code of your page, so it is wise to avoid placing any personal or secure information in that space.
| Try This 2-1 | Create the First Page of Your Site |
To continue with the site you began planning for in the first chapter, we now begin the first page in your site. These are the main goals for this project:
• Use all the necessary elements to create a basic web page.
• Use a character entity to add a copyright symbol to the page.
• Save the page as an HTML file that can be read by a web browser.
• Preview the page in a web browser.
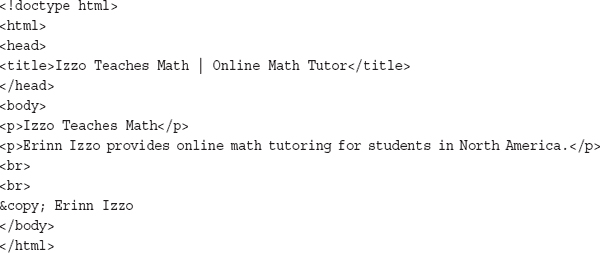
1. Open an HTML editor on your computer. Copy the following code to begin your web page. Feel free to make edits wherever necessary to personalize your site for your organization.

2. After the end of the second paragraph, use the code you learned in this chapter to add two breaks and a copyright symbol (©), followed by the name of the organization. (Example: © Erinn Izzo.)
3. Create a new folder on your hard drive, called mathtutor (or the name of your organization or web site). Save this file as index.html in the folder you just created.
4. Open your web browser and choose File | Open (or Open File, depending on the browser you’re using). Locate the file index.html you just saved.
5. Preview the page. If you need to make changes, return to your HTML editor to do so. Once you have made those changes, save the file and switch back to your web browser. Click the Reload or Refresh button in your browser to update your page according to the changes you just made. The complete code for your page might look like this.
TIP
Does your browser window appear blank when you try to preview your page? If so, return to your HTML editor and make sure you have included all the necessary closing tags (such as
</body> and </html>). In addition, if you are using a basic text editor (as opposed to an HTML editor), don’t forget to save the file as “text only” within an .html file extension. For more tips, see Appendix C.Chapter 2 Self Test
1. What file extensions do HTML files use?
2. The following line of HTML code contains errors. What is the correct way to write this line?
3. At the very least, which tags should be included in a basic HTML page?
4. Identify the tag name, attribute, and value in the following line of HTML code:
5. Fill in the blank: HTML5 is case-__________.
6. Which option is not acceptable for an HTML filename?
A. myfile.html
B. my-file.html
C. my file.html
D. my1file.html
7. What is the named character entity used to add a copyright symbol to a web page?
8. You just created a web page, and you’re previewing it in a web browser when you notice an error. After fixing the error and saving the web page, which button should you click in the browser to view the changes made?
9. The tags in the following line of code aren’t nested properly. Rewrite the code so that the tags are nested properly.
10. How can you rewrite the following text so that it doesn’t display when the page is viewed in a browser?
11. Which two options will the browser ignore when they are coded in a web page?
A.
<p>B. A tab
C.
<br>D.
<br><br>E. Single space with the SPACEBAR
F. Double space with the SPACEBAR
12. Fill in the blank: The
p tag is an example of a __________ tag because it contains sections of text.13. The following line of HTML code contains errors. What is the correct way to write the code?
14. What symbols must start and end all HTML tags?
..................Content has been hidden....................
You can't read the all page of ebook, please click here login for view all page.