
Chapter 15
Publishing Pages
Key Skills & Concepts
• Select Possible Domain Names for Your Site
• Determine the Most Appropriate Type of Hosting for Your Site
• Prepare Your Site for Its Public Debut
• Upload Your Site to a Host Computer
• Test Your Site
• Publicize Your Web Site
Throughout the course of this book, you’ve created and viewed web pages on your personal computer. At some point you’ll undoubtedly want to show your web pages to other people. To do that, your site must be transferred, or uploaded, to a host computer with 24-hour access to the Internet, where it has a suitable URL. Then, to drive traffic to that site, you need to consider submitting your site to search engines and using other marketing techniques.
Select Possible Domain Names for Your Site
Before diving into the actual meat of this chapter, I want to mention domain names briefly. Many people underestimate the power of a guessable and memorable domain name. While it may seem logical to its business owners to purchase a domain name using a shortened version of the business name, this is probably not the first thing a potential customer would guess.
TIP
There are probably thousands of places online where you could research and register a domain. A couple of options include www.networksolutions.com and www.godaddy.com.
Consider my friend’s online tutoring business. The name onlinemathtutor.com would be my first guess, but because that is already taken, I might try onlinemathinstructor.com, onlinemathmaster.com, or even something like skypememath.com. If more than one of those were available, you might even register both. Purchasing multiple domain names is an inexpensive way to bring in some additional customers and build your brand identity online. Whenever appropriate, you might also purchase the same domain name ending with different extensions, such as onlinemathmaster.com and onlinemathmaster.net.
Determine the Most Appropriate Type of Hosting for Your Site
Many different options are available for those who want to publish a site on the Internet. For the purposes of this chapter, I group these options into two categories: personal site hosting and business site hosting.
Personal Site Hosting
When you want to publish a personal web site but you aren’t concerned about having your own domain name (such as wendywillard.com), you have a wide range of free options available. For example, all the following sites offer free web space for personal sites to anyone who asks for it. Your site’s address might be something like this: www.hostcompany.com/wendywillard. If you currently have an email account with any of these, you’re already halfway there.
• Webs (www.webs.com)
• Google Sites (sites.google.com)
• Weebly (www.weebly.com)
• Yola (www.yola.com)
Because these sites are largely targeting beginners, they make uploading and maintaining your web pages a breeze. Most use web-based tools to do so, meaning you don’t even need any additional software.
Blogs
The previous list of suggestions for personal web sites includes companies that provide space on their servers for anyone wishing to upload web pages (although some do offer the option to install additional features, like blogs). But what about those who are looking to “journal” online and don’t want to bother creating custom web pages for that purpose? There are many sites offering free blogs, where you can journal, vent, gossip, or simply share to your heart’s content—with little to no HTML knowledge required.
Ask the Expert
Q: What are the valid characters for a domain name, and how long can a domain name be?
A: According to Network Solutions (www.networksolutions.com), you can use letters and numbers. You can also use hyphens, although they may not appear at the beginning or end of your web address. Spaces or other characters like question marks and exclamation marks are never allowed.
Your complete domain name (including the extension—such as .com, .edu, .net, .org, .biz, .tv, or .info) can be up to 67 characters long. Remember, “www” isn’t included in the domain name you register, so you needn’t count those characters. Having said that, shorter is better … most of us have trouble remembering ten-digit phone numbers (555-555-5555)!
As a bonus, if you can handle coding some HTML (which of course you can, since you’re reading this), you’ll be able to tailor your blog to your specific needs. The following two sites are the most popular free blogging tools online. Both offer tutorials to help you get started, as well as tons of templates for customizing the look of your blog.
• Google’s Blogger (www.blogger.com)
• Wordpress (www.wordpress.com)
While all of these sites offer free hosting to anyone who requests it, remember to check first with your current Internet service provider (ISP). ISPs frequently throw in some free web space with Internet access. If none of these free options suits your purposes, or if you need to register your own domain, move on to the next section about business site hosting.
Even if you don’t want to use your site for journaling or more traditional blogging, you should still consider using a tool like Wordpress. To understand why, consider just a few of the key benefits of building a site with blogging software:
• Easy to build There are thousands of Wordpress themes, as well as add-on features, available for free or minimal cost. The basic process looks like this: arrange for hosting, install Wordpress, select a theme, customize theme, add content, install add-ons, customize add-ons, publish site. Using a tool like Wordpress actually minimizes the amount of hand-coding a developer has to do.
• Easy to maintain Tools like Wordpress store your site’s content separately from its design, which is referred to as its theme. This makes maintenance of both the content and design simple and straightforward. In fact, I often build sites in Wordpress and then transfer them to clients—which typically includes someone who doesn’t know HTML—to maintain.
If you are at all interested in using a blogging tool as the basis for your next web development project, I highly suggest checking out these online resources to learn more:
NOTE
Before you sign up with any ISP, be sure to check the terms of service to verify your site fits within the confines of the ISP’s requirements. For example, the majority of ISPs prohibit sites distributing pornography or illegal copies of computer software. In addition, free ISPs usually limit the amount of space and/or bandwidth you can use. Finally, if you change ISPs, you’ll need to locate a new host. I mention these only to point out that restrictions do exist and you’d be wise to review all terms and details carefully to avoid incurring unexpected fees.
Business Site Hosting
On the business side, your options vary from onsite to dedicated offsite to shared. In the case of onsite hosting, your business purchases a server, its software, and a dedicated Internet connection capable of serving your site to web users 24 hours a day, 365 days a year. For small businesses, this isn’t a viable option because it requires expensive start-up costs and on-staff information technology (IT) talent.
For the majority of small to mid-size businesses, offsite hosting is the most cost-effective and popular solution. This can be on either a shared or a dedicated server. While a shared server can be significantly less expensive than one dedicated to your needs, it may not be possible in all situations. For example, if your site runs custom web applications, requires a high level of security, or needs a large amount of space, a dedicated server is preferred.
Many service levels, and therefore, many price levels, exist within shared offsite hosting. For this reason, be wary of comparing apples to oranges. When you are considering two or more hosting providers, look closely at the fine print to be sure they offer similar services before making a final decision solely on price.
The following are some questions to ask when you look for business hosting:
• How much space on the server will I receive? How much extra do I have to pay if I go over that space?
• How much traffic can my site generate over a month? What are some average traffic rates for some similar sites you host? How much extra will I pay if the site generates more traffic than allowed?
• Is multimedia streaming supported? If so, how much traffic is supported for any given event, and at what point will the system overload? What are procedures for dealing with excess traffic?
• How many email accounts will I receive with this account?
• Can I use my own domain name(s) (as opposed to www.hostcompany.com/mybusiness)? Will you help me register my domain (if you haven’t already registered one)? Will you charge extra if I have multiple domain names for a web site? If so, how much more?
• What kind of access will I have to my web site? For example, is FTP (File Transfer Protocol) access available for uploading files?
• What kind of support do you offer? (For example, if I need help adding password protection to my site, will you help me?) What hours is your support staff available?
• Can I load additional applications (blogging software, database tools, e-commerce tools, and so forth) onto the server? What requirements or restrictions do you have regarding those? Are additional costs involved?
• What additional services do you offer? (For example, can you also host my online store and, if so, how much would it cost me in addition to my current fees?)
• How many Internet connections do you have? (The more connections a host has, the better chance your site has of staying “live” if one connection goes down.)
• How often do you perform backups? How easy is it for me to gain access to a backup if I need one?
• What are the start-up costs? What are the monthly costs? Are there any guarantees?
• Do you offer a service to measure statistics for my site, such as how many people have visited? If so, can I see an example?
• Can you provide references?
Here are a few of my favorite business hosting options:
• Site5 (www.site5.com)
• Yahoo! (http://smallbusiness.yahoo.com)
• HostMonster (www.hostmonster.com)
• Dream Host (www.dreamhost.com)
• BlueHost (www.bluehost.com)
• Weebly (www.weebly.com)
• Webs (www.webs.com)
In the end, you’ll probably get the best ideas about which hosting provider to use by asking friends or business associates.
Prepare Your Site for Its Public Debut
Before you upload your site to a host computer and submit it to search engines, tidying it up a little is best. Consider the following dos and don’ts.
Do
• Make sure all your images have alternative text Directories and engines can’t see the images—they only “look” at the alternative text for descriptions.
• Give your pages descriptive 5- to 13-word titles, using keywords from the page Search engines look at the titles of your pages and often use them to list your site. So “Page 2” would definitely not entice as many visitors as, say, “Lawn Care Products for Sale.”
• Repeat keywords throughout the page On a page entitled “Lawn Care Products for Sale,” you should include those same words in the headlines, body text, and alternative text for images on the page. This increases the relevancy of the page when someone searches for those words.
Don’t
• Stray from the topic If a page is about lawn care products, don’t include information about your favorite links or television shows on that same page. Extraneous information only weakens the relevancy of your pages because search engines typically show pages with the most relevant information at the top of the results list.
• Repeat keywords too many times Search engines are known for dropping sites from their listings because of suspected spamming—a word repeated too many times on a page is a big red flag for spamming. Be realistic and honest. Use the words whenever they seem appropriate and you’ll be fine.
• Use irrelevant keywords just to draw in people Don’t include keywords that aren’t appropriate for your site. Users will get annoyed and complain, causing your site to be dropped from the search engine altogether.
Update Meta Content
There are a variety of HTML elements used in the head section of a page to pass along information to the browser. For example, you can use
meta tags to aid search engines in identifying your content. meta tags are hidden instructions about your page, such as a description and keywords.NOTE
Be aware that some search engines ignore meta tags altogether. For this reason, they shouldn’t be relied on as the “be all and end all” of preparing your site.
These tags should be added to each page on your site between the opening and closing
head tags. The following is an example of how meta tags might be used first to specify the character set, then to list the description and keywords for a page selling handmade children’s clothing:
Customize the content of the latter two tags to identify a description that properly explains the purpose of your site in a sentence or two (20 to 40 words is a good place to start) and keywords that parallel what users will probably search for. Because most users search for words in lowercase, you can avoid using capital letters in your keywords. The number of keywords you can use varies somewhat according to the search engine or directory; make sure your most important keywords are listed first because many limit the contents of your keywords to 900 characters.
TIP
There are many other types of meta tags you can use. Check out www.html-5.com/metatags for a more detailed list of the options available.
Troubleshoot the Code
Testing pages on a variety of different computer environments is a whole lot easier with the addition of validation and inspection tools built into all the modern browsers. For example, to find them in Firefox, select Tools | Web Developer.

NOTE
In IE9+, press F12 to reveal the developer tools. In all other modern browsers, you can simply right-click (or control-click on the Mac) any page element and choose Inspect Element.
There you will find everything from a console for identifying page errors and a tool for editing page styles, to a code inspector and a preview of how different browser window sizes affect your designs. The latter —called Responsive Design View in the Web Developer menu and shown in Figure 15-1—helps you get an idea how your pages might be visible on small mobile devices, medium tablets, and large-screen desktop monitors.
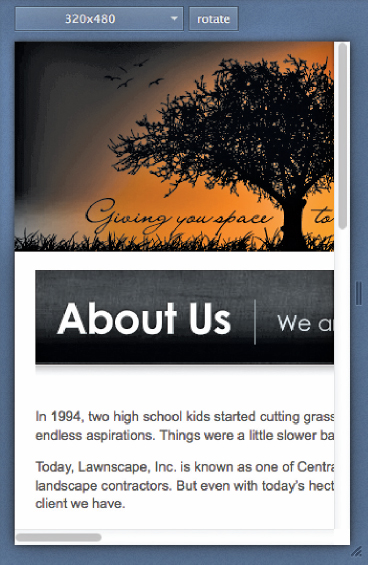
Figure 15-1 Firefox’s Responsive Design View helps you preview pages in different window sizes.
Firefox’s Inspector tool is accessible either from the Tools | Web Developer menu, or simply by right-clicking a particular page element and choosing Inspect Element. The result will look something like Figure 15-2, where everything except that element is dimmed, with the related HTML code shown at the bottom and the corresponding styles to the right. (Note: Either of those can be toggled on or off as needed.)

Figure 15-2 Firefox’s Inspector puts robust testing tools right at your fingertips.
The reason these tools are so robust is this: You can actually turn various styles on and off to see how they affect the page display. In Figure 15-3, I toggled off the text-transform: uppercase declaration for the top menu, and the browser immediately updated the display to change the case of the letters. This can make sure work of troubleshooting a nasty bug you just can’t figure out.

Figure 15-3 Here, the text-transform option has been toggled off, causing the links to switch to lowercase.
TIP
Want to learn more about Firefox’s Web Developer tools? Check out www.howtogeek.com/105320/how-to-use-firefoxs-web-developer-tools.
Figure 15-4 shows how Chrome arranges its inspection tools. Even though they display a tad bit differently than Firefox’s, they function the same.

Figure 15-4 Chrome’s Inspector makes it super easy to troubleshoot your page elements.
Validate the Code
Along with troubleshooting your pages, it’s a good idea to run them through a validator. Tools like the one located at validator.w3.org compare your code against the official HTML specification to look for errors or missteps. Because those errors can lead to pages being misinterpreted—and poorly displayed—by browsers, it’s important to fix anything that doesn’t validate.
When you validate your pages, the tool actually compares it to whichever HTML spec you’ve specified as being used in your page. How does it know? That’s where the doctype identifier comes into play. Remember this little line of code?
Including that at the top of every HTML file you create tells the browser to compare your code against the HTML5 spec. Leaving that out is not only illegal in HTML terms, but will ultimately prevent your page from being validated.
Preview on Mobile Devices
As the statistics on mobile web use rise almost daily, it’s important for us to plan for and test our sites in various mobile environments. But what if you don’t own all those different mobile devices your site visitors might use? In addition to the resources listed in the previous section, there are a variety of other mobile-specific options available to help:
• iPadPeek (www.ipadpeek.com) gives you a preview of how your page might display on an iPad, iPod, or iPhone simply by changing the viewing space and using an appropriate frame around your page display.
• Mobilizer (www.springbox.com/mobilizer) is a downloadable tool that shows a preview of your web site when viewed on several different mobile phones. Figure 15-5 shows the White House web site previewed through Mobilizer on the iPhone 4 and a Blackberry.

Figure 15-5 Mobilizer enables you to preview a web site on several different mobile phones.
• Opera’s Mobile Emulator (www.opera.com/developer/tools/mobile) is another downloadable tool for emulating mobile web browsing on a desktop computer. The difference is Opera also offers additional testing and troubleshooting tools that can be paired with its Mobile Emulator. This makes Opera an ideal environment for developing mobile-friendly web sites. Figure 15-6 shows the White House web site previewed through this emulator on Samsung Galaxy X and Kindle Fire tablets.
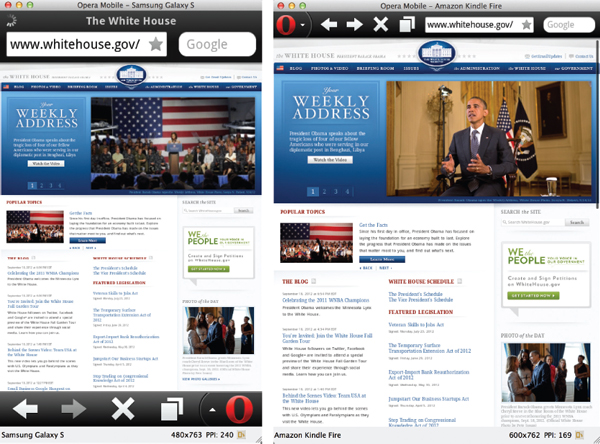
Figure 15-6 Opera’s Mobile Emulator offers previews of many tablet and phone environments.
• Finally, Adobe’s entry into the mobile site development arena is called Shadow (www.adobe.com/shadow). It is both a downloadable tool and a Chrome extension. It’s worth noting that Shadow does require you to actually have the mobile device on which you want to test. Instead of showing you what a live site might look like on a mobile device, Shadow syncs your browsing on a desktop computer and all mobile devices on the same network that have the Shadow app installed. In fact, you can make edits in Chrome’s inspection tool and check out the results of those edits immediately in any paired mobile device.
TIP
For more on making sites mobile-friendly, check out www.html5rocks.com/en/mobile/mobifying.
Preview in Other Browsers
Just as it’s important to know what your site looks like on mobile devices, it’s also worthwhile to check it on other desktop computers. (Remember: Alternative browsers, operating systems, and monitors can all cause a page to display differently.) But it’s not necessary to own a bunch of different computers to do so, thanks to a few pieces of software.
Here are a few of my favorite tools for previewing sites in other browsers:
• Browsercam (www.browsercam.com)
• Browsershots (www.browsershots.com)
• Adobe Browser Lab (browserlab.adobe.com)
Of those three, Adobe’s Browser Lab is the only one accessible from both inside Dreamweaver as well as from within the browser. In Figure 15-7, you can see an example of the onion skin feature, which lets you preview how a page looks in two different browser scenarios—in this case, Safari 5.1 on Mac OS X is shown beneath IE 9.0 in Windows—at the same time. Here, you can see how the dimensions of the layout are slightly off from one user scenario to the other. However, because the alignment issues from one browser to the other do not prevent the page content from being read and understood, it doesn’t concern me.
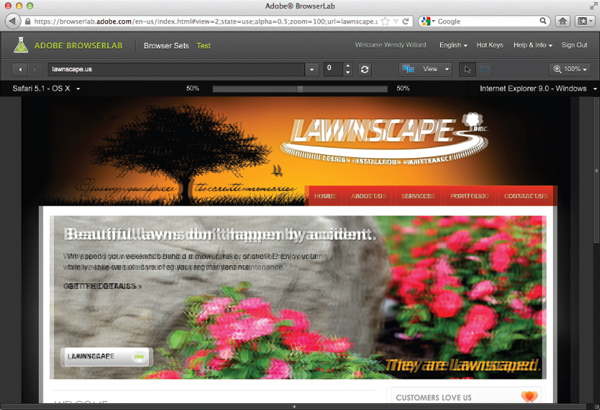
Figure 15-7 Opera’s Mobile Emulator offers previews of many tablet and phone environments.
Upload Your Site to a Host Computer
After your site is finished and you’re ready to make it “live,” or accessible by visitors on the Web, it’s time to transfer the pages to the host computer. You can use File Transfer Protocol (FTP) programs to do so.
The concept of using an FTP program is similar to moving things around on your own personal computer. The key difference is instead of moving files from one folder to another on your computer, you’re actually moving them from one folder on your computer to another folder on a different computer.
Just as you can change settings and information about who has access to view or edit a file on your own computer, you can also make these changes on a host computer. For information about how these settings might work, checking with your ISP or host company is best.
Depending on what type of computer you have and who’s hosting your site, you may use one of many different types of desktop FTP programs. Or you might use an FTP tool that comes with your HTML editor, such as the built-in FTP capabilities with Adobe Dreamweaver. The next sections outline a few popular options.
Desktop FTP Programs
Just about all of the HTML editors discussed previously include some method of FTP. But if you’d prefer a stand-alone tool, there are tons and tons of desktop FTP programs (just Google FTP program to see what I mean). Some are free; many are not. One of the most popular cross-platform free FTP programs is FileZilla. It is available for download from www.filezilla-project.org. The following overview outlines how to use this particular tool, but the basic steps are the same, regardless of which FTP program you select.
After the program is downloaded and installed, double-click the app’s icon to get started. To begin, you must choose which computer you want to access. If you want to upload your files to your web server, enter that computer’s information in the spaces provided at the top of the screen (Host, Username, Password) before clicking Quickconnect.
NOTE
You should receive all the necessary information when you sign up for hosting service. If you’re unsure, check your host company’s web site or call its customer support line for assistance.
If your connection is successful, FileZilla displays the company you’re accessing, referred to as the Remote Site, in the right window. The files on your local computer are visible in the left window.
You can transfer files between these two computers in a couple of different ways. The simplest transfer method is to double-click the file you want to transfer. To be more specific with your actions, you can right-click (CTRL-click on the Mac) the file and select from one of the available options (Figure 15-8).

Figure 15-8 Right-clicking a file in FileZilla displays this context menu, providing access to download the file or perform other necessary actions.
You can also navigate through the directory structure of either computer by clicking the folder names to expand or condense them. Right-click (CTRL-click on the Mac) to quickly add a new folder or to delete an existing one.
TIP
You can transfer files in two different ways: ASCII or binary. HTML and text files should be transferred in ASCII mode, while graphic, multimedia, and most other file types should be transferred in binary mode. FileZilla (and most FTP programs) uses the “auto” mode by default, whereby the program tries to determine the best transfer method for each file type.
That covers the most basic method of FTP—the transfer of files from one computer to another. If you have an FTP site you plan to visit often, you can store that server’s login information in FileZilla’s Site Manager to save you time (see Figure 15-9). To access the Site Manager, click the first button in the upper-left corner of the main FileZilla window. When the Site Manager displays, choose New Site and add the necessary login information before clicking OK to save the information or Connect to save and also connect to the remote site immediately.

Figure 15-9 Use FileZilla’s Site Manager to store usernames and passwords for frequently accessed FTP sites.
For more information about using FileZilla, visit www.filezilla-project.org. Or, if you prefer, try one of these other great FTP programs:
• CoffeeCup Free FTP (www.coffeecup.com/free-ftp)—Windows
• SmartFTP (www.smartftp.com)—Windows
• FTP Voyager (www.ftpvoyager.com)—Windows
• WS-FTP (www.ipswitch.com)—Windows
• YummyFTP (www.yummyftp.com)—Mac
• Fetch (www.fetchsoftworks.com)—Mac
• VicomsoftFTP (www.vicomsoft.com)—Mac
• Transmit (www.panic.com)—Mac
Web-Based FTP
If you are using a free service to host your web page, you probably have FTP capabilities through that company’s web site. This is called web-based FTP because you don’t need any additional software to transmit the files—in fact, you transmit the files right from within your web browser.
Even if your host company doesn’t offer web-based FTP, if you use the Firefox web browser, you have an even better option. While I typically use the built-in FTP capabilities in Dreamweaver, since that’s my preferred HTML development tool, I sometimes have a need for file transfer outside of Dreamweaver. If so, I use a powerful Firefox add-on called FireFTP.
To install FireFTP (or another web-based FTP tool for Firefox), open Firefox and visit https://addons.mozilla.org. Search for FTP. Locate the FTP app you want to add, and click the corresponding Add To Firefox button.
After the FTP app is installed, you can locate it under the Tools menu in Firefox. Similarly to how the previously discussed FTP programs function, FireFTP displays your local files on the left and the remote files on the right. Take a look at Figure 15-10 to see what I mean.

Figure 15-10 Web-based FTP is a super easy way to upload your files to a web server.
Test Your Published Site
After your site is uploaded to the server, you’ll want to run through each page once more in order to verify everything transferred as expected. In addition, test to make sure all the links work and images appear.
Once you’ve made a cursory check, it’s time to check for cross-browser and cross-platform consistency. Throughout the book, I have mentioned the importance of checking your pages in multiple browsers and on multiple computer systems to make sure they appear as you intended. Earlier in this chapter, I mentioned a few tools to help you test in a variety of potential user situations. However, if you weren’t able to do so before for whatever reason, now’s your last chance.
After your site is uploaded to the host computer, you should run through each page once more to verify that everything transferred as expected. Then, consider the following notes:
• Do all the page titles accurately reflect the content? If you bookmark them, do the titles work to help the user remember the page and its content?
• Does the text content display in an easily readable fashion?
• Do all the images display as intended?
• Do all the other media elements display and function as intended?
• Do all the links function as expected?
• Turn off the image display in your browser. Do all images contain alternate text explanations that accurately reflect their content?
• Does the layout flow as expected no matter the size of the browser window?
TIP
Finding errors? Remember to check out Appendix C in regard to troubleshooting.
Even if you don’t have more than one type of computer or browser, now that your pages are live, you can ask friends or family to test them for you. Have them record what type of browser they’re using, what size monitor they have, what size screen resolution they’re using, and what computer operating system they’re running. That way, when they report bugs or errors on your pages, you’ll have help in determining the problem.
Publicize Your Web Site
After your site is live, you can begin submitting its URL to search engines. The process typically involves entering the URL of your web site and, perhaps, a contact e-mail address. You should look for a link labeled “Add URL” or “Add a Site.” Your listing typically appears within a few days, but it may take as long as a week or so.
The different types of search engines vary greatly according to how they index your site. Because most give results based on how relevant pages are to search terms, you might rank 10th on one day or 1,000th on another. Another key aspect to keeping your site in the top of the search engines is to make it popular. Unfortunately, this may seem a bit like the chicken-and-egg syndrome.
TIP
A great way to find out where you should list your site to increase its popularity is to check your competition. If you enter link:competitor.com into Google (where competitor.com is replaced with the URL of your competitor’s web site), you can see all the sites that link to your competitor. Chances are good that if you want to acquire some of those customers from the competition, you could benefit by having links from those same sites.
Your site needs to be clicked in the search results to become “popular” by search engine standards, but if your site is at the bottom of the search list because it’s new, few people may ever find it to click it! This is why paid ads on search engines are such a big deal these days. Ever searched on Google and seen little ads appear on the right side that seem to be selling exactly what you searched for? These businesses are doing just that—they pay to “sponsor” certain search terms. So a summer camp might pay to appear each time a user searches for “summer camp” in Google. Theoretically, you’ll only need to pay for these ads for a short time, provided they work and get people to click your web site link. Ideally, once your site becomes popular in Google, it will naturally rise to the top of the search results. Check out adwords.google.com to learn more.
NOTE
Unfortunately, you can’t just click your own site’s link a thousand times to increase its popularity in Google. The search engine not only records the number of times a link is clicked, but also the computer’s address from which it was clicked. It will ignore any links clicked from your computer if it identifies potential fraud. Sorry!
One of the most common questions I receive from web site owners is this: How can I increase my page’s ranking in the search engines? The answers to that question vary widely according to who’s being asked. Search engine optimization (SEO) has become a niche market, and companies and consultants who specialize in SEO are hired to assist throughout the development of a web site.
As I mentioned previously, on the Web, content is king. So when trying to increase your site’s ranking in a search engine, first and foremost you must review your content. Next, when you have intriguing, meaningful, quality content, it’s time to advertise and promote your content to encourage others to link to it. Earning links from other web sites not only increases your traffic, but also betters your search engine ranking.
TIP
Always remember that search engine optimization doesn’t happen overnight! It requires patience and diligent work to be successful.
Because the ins and outs of SEO can be difficult to navigate, I typically recommend businesses hire an SEO expert. When looking for an SEO consultant, consider the following:
• Be skeptical of firms that send you emails stating they visited your site and noticed you’re “not listed in the top search engines.” These are usually scams.
• Avoid agencies that claim they can make your site #1 on any particular search engine. This is simply not possible.
• Thoroughly research the companies being considered. Using a search engine is a great place to start.
• You’re paying for their time, not placement costs. Reputable search engines do not accept money to increase your listing. Having said that, it is acceptable to incur temporary advertising fees if you choose to advertise on a search engine (such as with Google AdWords).
Finally, a few links to help you get started with SEO:
• Search Engine Land (www.searchengineland.com)
• The Official Google Analytics Blog (analytics.blogspot.com)
• Web Analytics Demystified (www.webanalyticsdemystified.com)
NOTE
Because many search engines have their own sets of rules and guidelines, reading through any tips or help files they provide before submitting your site is important. For example, on some sites, if you submit your site too often, they actually remove it from their listings altogether.
Marketing Tips
In addition to submitting your site to search engines and search directories, you can do many other things to promote your web site on- and offline:
• Exchange links with related sites Consider asking sites with related content for links in exchange for a link to their site from yours. Don’t forget about organizations you belong to, like your local chamber of commerce or an industry association. These are great places to exchange links. Another place you can exchange links is with a group of related sites, called a web ring. Visit www.webring.com for some examples.
• Create newsworthy content Everyone loves free publicity, and with the thousands of media outlets both on- and offline, you should be able to get a little publicity yourself. If you have an interesting product or a new twist on an old idea, tell someone! Email news agencies, send out a press release, write to your local paper, contribute to an association’s newsletter … and don’t forget to plug your web site.
• Use your customers and tell everyone you know Give out free pins, bumper stickers, pens, or anything with your web site address to your existing customers. If your services and products are good, they’ll have no problem telling others about them. In addition, spread the word through industry events where you can network and sell your business.
• Don’t forget traditional advertising If you have stationery, add your web site address. If you already run radio or print ads, include your web site address. Consider running a special ad promoting your new or revamped web site.
• If you have the budget, consider paid online advertising Banner ads and paid listings in directories can be beneficial if targeted toward the right audience. Sometimes a less-expensive alternative might be to sponsor a related nonprofit web site. For example, if you sell school supplies, consider sponsoring a nonprofit homework help site. Another alternative is to sponsor free email or Internet service providers. But by and large, the best bang for your buck these days is likely either Google ads (adwords.google.com) or Facebook ads (ads.facebook.com). And because users provide demographic information when they sign up for a Facebook account, you can target specific users with your advertising.
• Most important, create useful content If your site is boring or otherwise useless, people won’t come and they won’t help you promote it. While the best marketer for your business is a satisfied customer, the best marketer for your competition is a dissatisfied one.
Make the Site Live!
As a final step in creating your web site, research possible hosting solutions. Refer to the beginning of the chapter for links and tips on finding personal and business hosting.
TIP
If you simply want to test the pages you created to learn HTML in this book, I suggest signing up for a free site with one of the hosts mentioned at the beginning of this chapter.
After selecting a hosting provider, use an FTP program to transfer your web site to the server. Test the pages in several browsers and on different computer systems to confirm you successfully created and uploaded your web site. For practice, try making a change to one of the pages after viewing it live. Then, reupload the page and choose Refresh or Reload in your browser to review the change.
If appropriate, add your site to search engines and search directories, and continue with other marketing techniques. Remember, promoting your web site is an ongoing task and requires frequent maintenance.
Congratulations! If you’ve successfully uploaded your pages to a server and made them live, you certainly should be proud. Keep practicing what you’ve learned, and you’ll surely be on your way to creating some stellar web sites.
Chapter 15 Self Test
1. Fill in the blank: ISP stands for _______________________________________.
2. Including the extension, what is the limit for characters in a domain name?
3. Which type of business hosting is used when your business purchases its own server, software, and a dedicated Internet connection capable of serving your site to web users 24 hours a day, 365 days a year?
4. Mobilizer is a tool that allows you to preview your pages in what type of user situation?
5. True/False: Some search engines ignore
meta tags. 6. Why is it important to include the following line of code at the start of all your HTML pages?
7. Where are
meta tags placed within a web page? 8. True/False: All search engines use the same set of standards for indexing web pages.
9. Fill in the blanks: When testing a web site, you should test for cross-______________ and cross-________________ consistency.
10. What does FTP stand for?
..................Content has been hidden....................
You can't read the all page of ebook, please click here login for view all page.