
Chapter 9
Working with Multimedia
Key Skills & Concepts
• Understand How Plug-ins Are Used with Web Browsers
• Link to Different Types of Media from a Web Page
• Embed Different Types of Media into a Web Page
• Style Multimedia Content
On the Internet, the term multimedia is used to refer to presentations of various types of media, such as audio, video, text, graphics, or animation, which are integrated into a single file format. You may have seen multimedia presentations on news or weather sites, where they are used to display audio, video, and text to viewers. Other sites use multimedia to entertain viewers, often in the form of a cartoon or an animated story.
Many forms of multimedia enable visitors to interact with the presentations. For example, a visitor might be watching an animated story and then click the individual characters to learn more about them before continuing.
The Web itself is often considered multimedia because any web page can contain several different types of media files in it. By default, however, for many years web browsers were only capable of understanding HTML files, graphics files such as GIF and JPEG, and plain text documents (.txt). Any other file types needed to be handled through a plug-in, or helper application. Sometimes these types of controls came preinstalled in the browser, but other times they had to be downloaded by the user.
Thankfully, HTML5—and modern browsers that support it—gives us a built-in way to handle audio and video files without requiring the user to install anything. The caveat is that, as of this writing, the browsers have not yet caught up to this part of the standard and don’t uniformly support the same file format. So while we still need to use helper applications for certain multimedia files, as well as for audio and video to be displayed in older browsers, things have gotten much easier in this realm. We’ll go over the details of those new elements later in this chapter.
Understand How Plug-ins Are Used with Web Browsers
Until modern browsers uniformly support the popular multimedia formats, plenty of folks will still need help displaying audio and video files in certain browsers and on certain devices. A helper application is an additional piece of software or code that attempts to do something the browser cannot, whereas a plug-in (or an ActiveX control, as Microsoft calls theirs) extends the browser capabilities. If you thought of yourself as the browser, then a helper might be someone who mows your lawn for you, while a plug-in is a ride-on mower that helps you do it yourself. A plug-in enables the browser to do something itself, as opposed to the helper application performing the operation for the browser.
NOTE
ActiveX is a brand name used by Microsoft to reference its various technologies that offer added functionality to web browsers.
For example, if your web browser doesn’t know how to display a certain type of video file, it first looks for a plug-in capable of doing so. If your web browser doesn’t find a plug-in, it might prompt you to download one or look for a helper application loaded on the computer that could display the video. If the browser cannot find a suitable plug-in or helper application, and one isn’t downloaded, then it won’t be able to display the file. For this reason, I do not recommend including essential information in files requiring plug-ins or helper applications, unless you also provide an alternative text-only version.
Helpers are stand-alone programs, separate from your browser, that you can purchase for your computer. By contrast, plug-ins are usually free and can be easily downloaded from the Internet. In some cases, web browsers even come with certain plug-ins. When you download a plug-in, you should receive instructions on how to install it, if necessary.
Many times, the plug-in installs itself and you only need to close and reopen your web browser. Other times, you’re asked to place the plug-in in the appropriate folder on your computer and then restart your browser. Once you agree to download a plug-in or ActiveX control, the browser downloads and installs the control, usually without relaunching the browser.
Identify the Installed Components
You can find out which plug-ins are installed under your browser in a few different ways. For example, the most rudimentary way to check for installed components is to look in the “plug-ins” directory in your browser’s application folder. Firefox users can choose Tools | Add-Ons and then click the Plugins tab.
If you’re using Internet Explorer, choose Internet Options from the Tools menu in your browser. Next, click the Programs tab, and then click the Manage Add-ons button to view a list of all add-ons (including ActiveX controls and plug-ins) used by Internet Explorer.
Recognize File Types, Extensions, and Appropriate Plug-ins
You may want to link or embed many different file types in your web pages, but Appendix E lists some of the more popular ones. Most file types can be “played” with at least one plug-in or helper application and, quite often, with more than one. If you want to be helpful to your visitors, list the plug-in or helper application they might use to open your files. You could also provide a link to download the appropriate plug-in.
For example, Flash, a file type requiring a plug-in, is popular enough that it ships with most browsers. Even so, you might have visited a web site and noticed a window pop-up saying something about “downloading the Flash player.” Flash files enjoy widespread use because they’re small (which translates as “quick to download!”) and can include sound, video, interactivity, and animation. Another reason Flash is so popular is that the plug-in used to display Flash files is widely available on a large variety of platforms and browsers.
NOTE
Some plug-ins and helper applications aren’t available for multiple computer systems and browsers. Refer to Appendix E at the back of the book for a list of file types, extensions, and descriptions.
When you’re ready to include multimedia files in your HTML pages, consider how you want to include them. Do you want to link to them so that your visitors can choose whether to download them or view them now? Or do you want to embed them within your page, so they appear right within the web browser window? The rest of this chapter focuses on linking to and embedding several different types of multimedia.
Link to Different Types of Media from a Web Page
A link to a multimedia file is essentially the same as any other link. While embedding a file can sometimes be problematic (as discussed in the next section), a link to a file can be especially useful because links are understood by all web browsers. Figure 9-1 shows how the following code is displayed in a browser, while Figure 9-3 shows the result of clicking the video link.

Figure 9-1 A link to a multimedia file is the same as any other link because it also uses the
a tag and the href attribute.
TIP
Including the proper file extension for your media file is important so that the browser and operating system can understand and display it. If you’re unsure as to which file extension to use, check Appendix E in this book.
Clicking the link shown in Figure 9-1 would cause one of three things to happen, depending on how the system was set up:
• It may prompt the user to download the file and either view it now or save it for later (see Figure 9-2).

Figure 9-2 When the browser doesn’t recognize a file type as one it should “play” within the browser, it may prompt the user to download the file.
• If the browser recognizes the file as one it is set up to display automatically, it may take over and do just that (see Figure 9-3).

Figure 9-3 When the link is clicked, the browser may be able to play the video itself if the appropriate plug-in or ActiveX control is installed.
Knowing that many systems may handle your multimedia files differently, try to offer your visitors as much guidance and instruction as possible. For example, list the size of the file you’re asking them to download, so they can consider whether they want to wait for it to load to their system. In addition, provide alternative ways of getting the information, and include it within the multimedia files wherever possible.
Embed Different Types of Media onto a Web Page
When you embed multimedia files instead of linking to them, they appear right within the context of your page. As long as the appropriate plug-in or ActiveX control is installed on the user’s computer, or the media file is supported natively, the file will load and play along with anything else that might be on that page.
The original method for embedding multimedia was to use the
embed element. However, that was a proprietary tag created by Netscape. As a result, the W3C created its own object element as a method for embedding various types of media, from images to Flash movies and more. It was supported by version 3 (and later) of Internet Explorer, as well as all current versions of Mozilla-based browsers (such as Safari and Firefox).Even though the object element finally brought some unity to the method by which media files were embedded, there lacked a built-in format for adding multimedia files to a web page. Now, with HTML5, we have the addition of several new elements designed to natively handle the process of embedding audio and video:
• <audio> Embeds audio content
• <video> Embeds video content
• <source> Specifies multiple sources for audio and video content
• <track> Specifies text explanations for audio and video content
• <embed> Specifies content to be played in older browsers
Start with the audio and video Elements
The development of these new elements means you can insert audio and video files almost as simply as image files. It all begins with the
audio and video elements. Here, let’s look at a basic example:In this case, each element includes just three supportive attributes. First, the
src attribute works the same as it does with the img element in that it identifies the source file to be displayed. The controls attribute, when present, tells the browser to make the audio or video controls visible to the user by default. The preload attribute, when included, requests the browser to preload the media file in an effort to reduce the chance users might have to wait for it to start even after pressing play.Customize with Attributes
As with the majority of HTML elements, the customization happens with the attributes. The three from the previous example, as well as other commonly used attributes, are listed in Tables 9-1 and 9-2. The following code example shows how a few more of these attributes can be used to customize an embedded video:

Table 9-1 Attributes for the audio Element

Table 9-2 Attributes for the video Element
NOTE
Most mobile browsers ignore the autoplay and preload attributes to avoid unsolicited downloads over cellular networks at the user’s expense.
Specify Sources
The final step in the audio and video embed process is to specify a variety of file format options. But wait, you might say, I thought the audio and video elements were introduced to make things easier? That is certainly the plan, but as with any new feature, everyone has to get up to speed first.
Audio and video file formats are the big sticking point here. The current HTML5 draft does not specify exactly which file formats should be included, but leaves that up to browser developers. As luck would have it, the browser developers are not in agreement regarding which formats should be standard. So that brings us to codecs and containers.
Codecs and Containers
In Chapter 8, you learned that JPEG offers file compression for still images. The method by which a file is compressed to lower file size is referred to as its codec. For many years, the most common video codec has been MPEG. Over the past decade and a half, the MPEG codec has been revised and refined, and additional codecs have been developed. Generally speaking, the newer codecs offer better compression and image quality, but are not as widely supported as the older codecs.
In addition to the codec, or compression method, we must deal with the container format. You might consider the container to be the wrapper, or packaging, of the audio or video content, as well as its codec. Sometimes, the codec and container have a particularly close relationship, but other times not.
To make things a bit more confusing, either the codec or the container name can be used as the file suffix. For instance, a file called movieFile.mov is simply a packaged file that happens to be in the QuickTime container format. But it could contain any number of different audio or video codecs with the content inside. Likewise, moviefile.mp4 uses the MPEG-4 codec, but could be packaged in a variety of different file containers.
So why haven’t we standardized on a set of codecs and containers? The primary reason mostly has to do with money. (Doesn’t it always?) More specifically, some codecs—such as H.264/MPEG4—are patent-protected and require licenses (and fees) to be used by developers. Other codecs—like the Ogg and WebM formats—do not require licenses to use. Because of that, many browser developers are pushing for the open formats to be adopted as standard. However, as of this writing, no official determination has been made by the W3C.
What that means to us, as web developers, is this: We typically must save our audio and video content in at least two different file formats (and sometimes more) in order to reach the widest possible audience. Table 9-3 outlines the most common codecs and containers (listed under the File Format column) and the corresponding browser support.

* Google indicated it would remove support of these file formats from Chrome, but as of this writing they are still supporting them.
** Does not include iOS Safari support.
Table 9-3 Audio and Video File Format Support
The big black hole, so to speak, of native audio support is in the Android browser. Because there are so many variants of that browser, it is almost impossible to specify exactly how many Android users will be able to hear these audio files. Because the market is so splintered, and the different options offer so little audio support, it is wise to offer alternative methods for these users to access your content. Flash is currently supported in Android browsers, although that support is expected to go away in favor of HTML5 codecs. Hopefully, the HTML5 support will be uniform by that time.
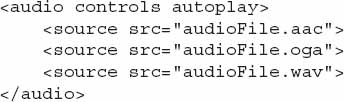
List Multiple Sources
To include multiple sources, we actually pull the source out of the audio or video element, instead listing it through its own source element. The following example shows three possible sources for a single instance of audio in a page. First, the browser is told to look for an .aac file. If the browser cannot play that first file, then it looks at the second source, and the third source, in that order. As soon as the browser finds a file it can play, it stops searching and will not load any of the other source files.
TIP
Notice in Table 9-3 that if you provide media in both MPEG-4 and Ogg formats, you will reach a pretty wide audience among HTML5-supporting browsers.
Because files can be referenced by either their codec or container file extension, it’s important to include the
type attribute with the source element. This helps the browser decide whether it can play the media, without having to actually load the content.
If necessary, you can even include the codecs parameter inside of the type attribute to identify the exact version of the codec needed to play the file:
Provide Fallback Options
If the browser is incapable of playing any of the specified formats, there are two more bits of code to add to help those users. First, you can include the
object element, which was the preferred method of embedding audio and video prior to HTML5. This means any browser not supporting HTML5’s video element can likely display the content using the object element. Then, for anyone else, a simple link to a text transcript can be included before the closing video tag.
More About the object Tag
As mentioned, prior to HTML5 the
object element was the preferred method of embedding audio and video. I’m including a brief review of that element here because it is still in use for non-HTML5–supporting browsers.When you use the
object tag, the type and data attributes are used to tell the browser what type of file you are embedding and where to locate that file:Then, after the opening
object tag, you add any properties you want to specify using the param tag (short for parameters). (Note that the object element enables you to specify the height and width attributes either in the object tag or in param tags, depending on the plug-in employed.)Finally, you close the
object tag.Table 9-4 lists some commonly used attributes for the
object element. Note that some of these attributes work only with certain file formats. When using the object element to embed multimedia, I recommend checking the developer documentation for the particular media type.
Table 9-4 Commonly Used Attributes for the
object ElementTIP
Whenever you embed audio within a web page, it’s always considered good practice to display at least some portion of the controls. This lets visitors turn off the sound or adjust the volume as they see fit.
Java Applets
You can also use the
object tag to embed Java applets in your web page. Java applets are mini-applications (which is where we get the term applet) written in the Java programming language that can run within your browser window. Web developers use these mini-applications to do things that aren’t easily accomplished through HTML or other means.TIP
You can learn much more about embedding Flash files by visiting an online tutorial, such as www.w3schools.com/flash.
Java applets can be used to add functionality to your web pages, whether through a realtime clock, a mortgage calculator, a stock ticker, or an interactive game.
TIP
Visit http://docs.oracle.com/javase/tutorial/deployment/applet/ to learn more about developing Java applets.
The following is an example of how to embed these applets using the
object element:
Add Text Tracks
In recent years, there has been an increased initiative to ensuring all multimedia content is made accessible to nontraditional users. One example of this might be including captions for audio and video content. HTML5 has introduced the track element for just that purpose.
NOTE
As of this writing, the track element is only supported by IE 10+ and Chrome 18+. However, it only works in Chrome 18 if the track element is enabled by the user from the chrome://flags options page. (Type chrome://flags in the browser’s address bar and scroll to find the “Enable <track> element” section.)
When placed inside an
audio or video element, track tags provide links to text-based files in one or more languages. Those files can contain any of the following five kinds of tracks, which are specified inside the kind attribute. Table 9-5 lists possible values of the kind attribute, as well as the other attributes for the track element.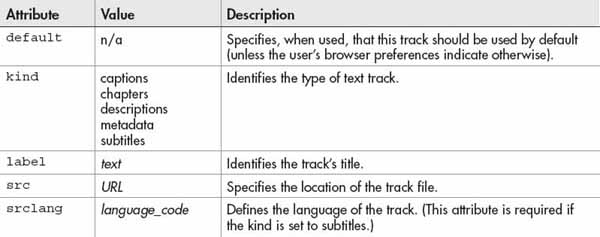
Table 9-5 Attributes for the
track ElementHere’s a code example showing tracks for subtitles in two different languages:

WebVTT Tracks
Web Video Text Tracks, or WebVTT for short, are the new standard for multimedia track files. Essentially, a track file is a series of cues, which are each composed of a time stamp and the text to be displayed onscreen. Here’s an example of what a small portion of a WebVTT file might look like:
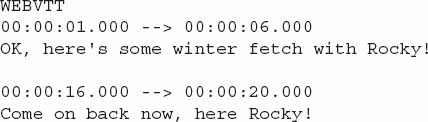
Figure 9-4 shows how the first bit of text translates when displayed in Chrome. Note it is not possible to test tracks like this locally on your computer. In other words, you must upload them to a live web server in order to test the captions. Eventually, when this element garners wider browser support, users will be able to select between the available language tracks.

Figure 9-4 Contents of this English subtitles track when displayed in Chrome
In the meantime, the formatting of the time stamp is extremely important and must follow this format: hours:minutes:seconds.milliseconds, where hours, minutes, and seconds each have two digits and milliseconds has three.
TIP
Here’s a site where you can validate your WebVTT file to make sure it is formatting correctly: http://quuz.org/webvtt. And for more on writing WebVTT files, visit http://dev.w3.org/html5/webvtt.
Use embed for Non-native Multimedia Content
The expectation is that most of your multimedia content can be handled through the audio and video elements in HTML5. But for those instances where you must include content not supported in that way, we have the embed element. This new element works well for content requiring an external helper application or plug-in, such as Adobe Flash.
In this example, the embed tag includes all four of the attributes listed in Table 9-6 to help the browser appropriately display the media file. Because the embed element is empty, there is no need to include a closing tag.

Table 9-6 Attributes for the
embed ElementStyle Multimedia Content
Because the new methods for adding multimedia content are native HTML5 elements, they can be styled with CSS the same way other page elements can. For example, we can use styles to change the opacity of a video, add borders, or even change the look and feel of the controls.
Figure 9-5 shows a sample custom controller from the Safari Developer Library. To see what it might look like to pull something like this off, check out http://developer.apple.com/library/safari/#samplecode/HTML5VideoPlayer
/Introduction/Intro.html#//apple_ref/doc/uid/DTS40008930.
/Introduction/Intro.html#//apple_ref/doc/uid/DTS40008930.

Figure 9-5 This video controller has been styled with CSS to match the look and feel of the rest of the web site.
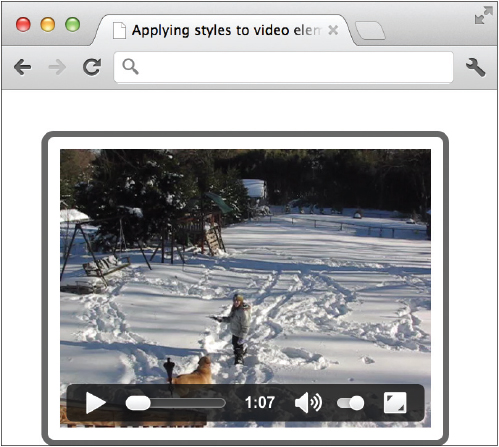
Even if you’re not quite ready to tackle a full-scale player overhaul, there are plenty of quick and easy style changes you can make to help your media files integrate into your site’s design. For example, you could add some padding and margin space and then enclose the video inside a border, as I did in the following illustration.
You can also play around with some new CSS styles not yet fully functional, but nevertheless exciting. In August 2012, the W3C released a new draft for applying filters to HTML elements. (Read more here: https://dvcs.w3.org/hg/FXTF/raw-file/tip/filters/index.html.) This means you could change the hue and saturation of a video, for instance, through the browser without having to go back and re-render the actual video footage. Figure 9-6 shows an example of the result of using the following code to do just that:

Figure 9-6 The hue and saturation of this video have been altered through the use of a CSS filter style. (The image on the right is mostly yellow in blue, while the one on the left is normal.)

Even though this screen capture makes it look like CSS filters are ready to use, I’m afraid we still have a little way to go yet in terms of browser support. During testing, I found the video controller disappeared when a filter was applied to the video, even with the controls set to display. So if you decide to experiment with CSS filters—which I certainly suggest doing—just be sure to thoroughly test your files in a variety of end-user situations before making them live for the general population.
| Try This 9-1 | Add Multimedia to a Web Page |
Now you’re going to create a link to a video file. You can use any video file just for practice. Try searching your computer for video files to see what you have available. If you cannot find anything on your personal computer, find your favorite YouTube video and click the link to embed the video. Then, follow the directions to use YouTube’s code to embed the video in your page. For extra credit, try to adjust their code to use the HTML5 elements discussed in this chapter.
1. Open your text or HTML editor and then one of the pages saved from a previous Try This exercise.
2. Add a video file to the page in the most appropriate location.
3. Float the video to the left of the text content around it.
4. Add ten pixels of margin space to the right of the video.
5. Save the file.
6. Open your web browser and choose File | Open Page (or Open File or Open, depending on the browser you’re using). Locate the file you just saved. Make sure the link works and the movie plays.
7. If you need to make changes, return to your text editor to do so. After making any changes, save the file and switch back to the browser. Choose Refresh or Reload to preview the changes you just made.
Multimedia can add a lot of interest to a web page. This project gave you practice embedding a multimedia file. Because multimedia support varies so widely, be sure to test your page in a variety of browsers and situations before making it live for the general public.
Chapter 9 Self Test
1. What’s the difference between a plug-in and a helper application?
2. Which element does the W3C recommend for embedding video in a web page?
3. How can users determine which plug-ins are installed on their computers, and how they can download new plug-ins?
4. What are two ways to include multimedia files in a web site?
5. True/False: Clicking a link to a sound file automatically downloads the file and saves it for later listening.
6. What are two ways to specify the height and width of multimedia files embedded with the
object tag?7. Fix the following code:
8. Add the appropriate code here to link to wendy.mov. Note that the movie is in the same folder as the HTML file.

9. Which attribute can cause a video to play even before the user clicks the play button?
10. Which element can be used to provide subtitles for a video?
11. True/False: A link to a multimedia file is the same as any other link because it also uses the a element.
12. What is the purpose of the
poster attribute?13. Which element tells the browser where to find the actual audio or video content?
14. Which element is used to add Flash files to a web page coded with HTML5?
..................Content has been hidden....................
You can't read the all page of ebook, please click here login for view all page.