
Hour 4. A Closer Look at HTML5 Page Structure
What You’ll Learn in This Hour:
![]() How to use semantic tags to indicate header and footer content
How to use semantic tags to indicate header and footer content
![]() How to use semantic tags to indicate navigational and secondary content
How to use semantic tags to indicate navigational and secondary content
![]() How to use semantic tags to better structure body content
How to use semantic tags to better structure body content
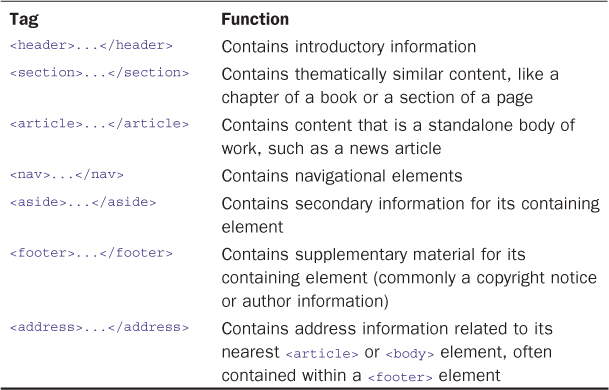
As you learned in Hour 2, “Structuring an HTML Document,” HTML5 includes tags that enable you to enhance the semantics—the meaning—of the information that you provide in your marked-up text. In this hour, you take a closer look at six elements that are fundamental to solid semantic structuring of your documents: <header>, <section>, <article>, <nav>, <aside>, and <footer>.
Throughout the remainder of this book, you will see these tags used appropriately in the code samples, so this lesson makes sure that you have a good grasp of their meaning before we continue.
Conceptualizing the Page
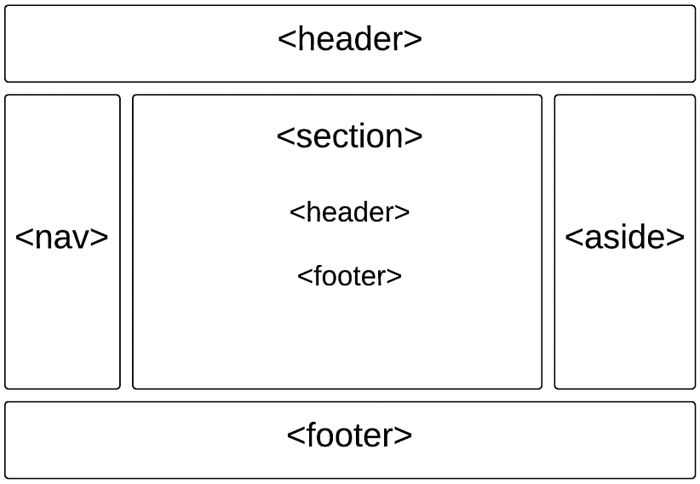
One of the best ways to understand the HTML5 semantic elements is to see them in action, but that can be a little difficult when the primary purpose of these elements is to provide meaning rather than design. That’s not to say that you can’t add design to these elements—you most certainly can, and you will in later lessons. But the “action” of the semantic elements is to hold content and provide meaning through doing so, as in Figure 4.1, which shows a common use of semantic elements for a basic web page.
Initially, you might think, “Of course, that makes total sense, with the header at the top and the footer at the bottom,” and feel quite good about yourself for understanding semantic elements at first glance—and you should! A second glance should then raise some questions: What if you want your navigation to be horizontal under your header? Does an aside have to be (literally) on the side? What if you don’t want any asides? What’s with the use of <header> and <footer> again within the main body section? And that’s just to name a few! Another question you might ask is where the <article> element fits in; it isn’t shown in this example but is part of this chapter.
This is the time when conceptualizing the page—and specifically the page you want to create—comes into play. If you understand the content you want to mark up and you understand that you can use any, all, or none of the semantic elements and still create a valid HTML document, then you can begin to organize the content of your page in the way that makes the most sense for it and for you (and, hopefully, for your readers).
Note
Although you do not need to use semantic elements to create a valid HTML document, even a minimal set is recommended so that web browsers and screen readers can determine the structure of your document. Screen readers are capable of reporting a deeper meaning to users, thus increasing the accessibility of your material.
(If this note were marked up in an HTML document, it would use the <aside> element.)
Let’s take a look at the elements used in Figure 4.1 before moving on to a second example and then a deeper exploration of the individual elements themselves. In Figure 4.1, you see a <header> at the top of the page and a <footer> at the bottom—straightforward, as already mentioned. The use of a <nav> element on the left side of the page matches a common display area for navigation, and the <aside> element on the right side of the page matches a common display area for secondary notes, pull quotes, helper text, and “for more information” links about the content. In Figure 4.2, you’ll see some of these elements shifted around, so don’t worry—Figure 4.1 is not some immutable example of semantic markup.

Something you might be surprised to see in Figure 4.1 is the <header> and <footer> inside the <section> element. As you’ll learn shortly, the role of the <header> element is to introduce second example and then a deeper exploration of the individual elements themselves. In Figure 4.1, you see a <header> at the top of the page and a <footer> at the bottom—straightforward, as already mentioned. The use of a <nav> element on the left side of the page matches the content that comes after it, and the <header> element itself does not convey any level in a document outline. Therefore, you can use as many as you need to mark up your content appropriately; a <header> at the beginning of the page might contain introductory information about the page as a whole, and the <header> element within the <section> element might just as easily and appropriately contain introductory information about the content within it. The same is true for the multiple appearances of the <footer> element in this example.
Let’s move on to Figure 4.2, which shifts around the <nav> element and also introduces use of the <article> element.
In Figure 4.2, the <header> and <nav> elements at the beginning of the page, and the <footer> element at the bottom of the page, should make perfect sense to you. And, although we haven’t talked about the <article> element yet, if you think about it as a container element that has sections (<section>s, even!), and each of those sections has its own heading, then the chunk of semantic elements in the middle of the figure should make sense, too. As you can see, there’s no single way to conceptualize page content—there’s the conceptualization that you should do of each individual page’s content.
If you marked up some content in the structure shown in Figure 4.2, it might look like Listing 4.1.
LISTING 4.1 Semantic Markup of Basic Content
<!DOCTYPE html>
<html lang="en">
<head>
<title>Semantic Example</title>
</head>
<body>
<header>
<h1>SITE OR PAGE LOGO GOES HERE</h1>
</header>
<nav>
SITE OR PAGE NAV GOES HERE.
</nav>
<article>
<header>
<h2>Article Heading</h2>
</header>
<section>
<header>
<h3>Section 1 Heading</h3>
</header>
<p>Section 2 content here.</p>
</section>
<section>
<header>
<h3>Section 2 Heading</h3>
</header>
<p>Section 2 content here.</p>
</section>
<footer>
<p>Article footer goes here.</p>
</footer>
</article>
<footer>
SITE OR PAGE FOOTER HERE
</footer>
</body>
</html>
If opened this HTML document in your web browser, you would see something like Figure 4.3—a completely unstyled document, but one that has semantic meaning (even if no one can “see” it).
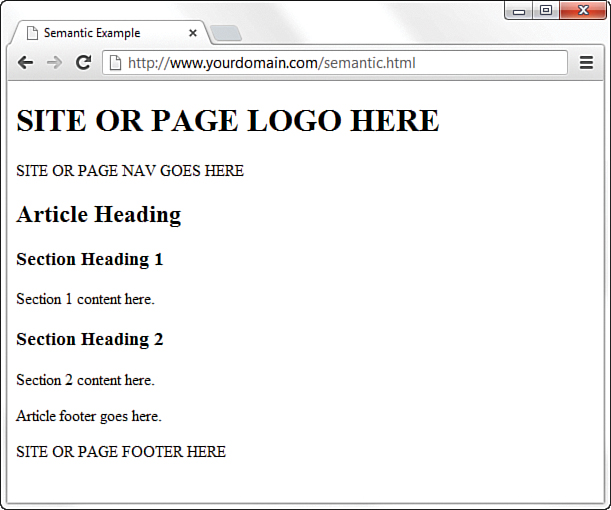
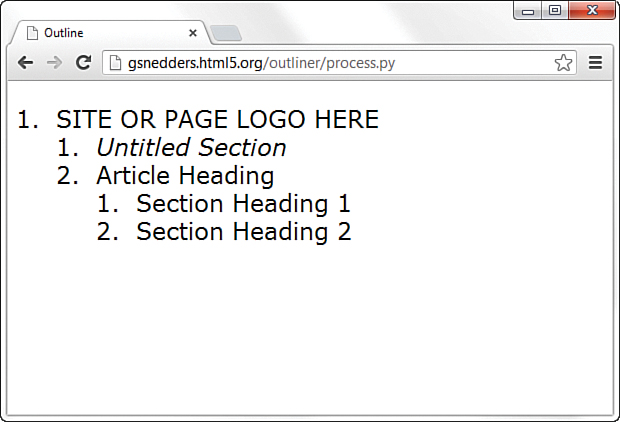
Just because there is no visible styling doesn’t mean the meaning is lost; as noted earlier in this section, machines can interpret the structure of the document as provided for through the semantic elements. You can see the outline of this basic document in Figure 4.4, which shows the output of this file after examination by the HTML5 Outline tool at http://gsnedders.html5.org/outliner/.
Now that you’ve seen some examples of conceptualizing the information represented in your documents, you’re better prepared to start marking up those documents. The sections that follow take a look at the semantic elements individually.
Tip
Using the HTML5 Outline tool is a good way to check that you’ve created your headers, footers, and sections; if you examine your document and see “untitled section” anywhere, and those untitled sections do not match up with a <nav> or <aside> element (which have more relaxed guidelines about containing headers), then you have some additional work to do.
Using <header> in Multiple Ways
At the most basic level, the <header> element contains introductory information. That information might take the form of an actual <h1> (or other level) element, or it might simply be a logo image or text contained within a <p> or <div> element. The meaning of the content should be introductory in nature, to warrant its inclusion within a <header></header> tag pair.
As you’ve seen in the examples so far in this lesson, a common placement of a <header> element is at the beginning of a page. When used in this way, containing a logo or an <h1>-level title makes sense, such as here:
<header>
<img src="acmewidgets.jpg" alt="ACME Widgets LLC"/>
</header>
Or even:
<header>
<img src="acmewidgets.jpg" alt="ACME Widgets LLC"/>
<h1>The finest widgets are made here!</h1>
</header>
Both snippets are valid uses of <header> because the information contained within them is introductory to the page overall.
As you’ve also seen in this hour, you are not limited to only one <header>. You can go crazy with your <header> elements, as long as they are acting as containers for introductory information—Listing 4.1 showed the use of <header> elements for several <section> elements within an <article>, and this is a perfectly valid use of the element:
<section>
<header>
<h3>Section 1 Heading</h3>
</header>
<p>Section 2 content here.</p>
</section>
<section>
<header>
<h3>Section 2 Heading</h3>
</header>
<p>Section 2 content here.</p>
</section>
The <header> element can contain any other element in the flow content category, of which it is also a member. This means that a <header> could contain a <section> element, if you wanted, and be perfectly valid markup. However, when you are conceptualizing your content, think about whether that sort of nesting makes sense before you go off and do it.
Note
In general, flow content elements are elements that contain text, images, or other multimedia embedded content; HTML elements fall into multiple categories.
If you want to learn more about the categorization of elements into content models, see www.w3.org/TR/2011/WD-html5-20110525/content-models.html.
The only exceptions to the permitted content within <header> are that the <header> element cannot contain other <header> elements, nor can it contain a <footer> element. Similarly, the <header> element cannot be contained within an <address> or <footer> element.
Understanding the <section> Element
The <section> element has a simple definition: It is “a generic section of a document” that is also “a thematic grouping of content, typically with a heading.” That sounds pretty simple to me, and probably does to you as well. So you might be surprised to find that if you type “difference between section and article in HTML5” in your search engine of choice, you’ll find tens of thousands of entries talking about the differences because the definitions trip people up all the time. We first discuss the <section> element and then cover the <article> element—and hopefully avoid any of the misunderstandings that seem to plague new web developers.
In Listing 4.1, you saw a straightforward example of using <section> within an <article> (repeated here); in this example, you can easily imagine that the <section>s contain a “thematic grouping of content,” which is supported by the fact that they each have a heading.
<article>
<header>
<h2>Article Heading</h2>
</header>
<section>
<header>
<h3>Section 1 Heading</h3>
</header>
<p>Section 2 content here.</p>
</section>
<section>
<header>
<h3>Section 2 Heading</h3>
</header>
<p>Section 2 content here.</p>
</section>
<footer>
<p>Article footer goes here.</p>
</footer>
</article>
But here’s an example of a perfectly valid use of <section> with no <article> element in sight:
<section>
<header>
<h1>Super Heading</h1>
</header>
<p>Super content!</p>
</section>
So, what’s a developer to do? Let’s say you have some generic content that you know you want to divide into sections with their own headings. In that case, use <section>. If you need to only visually delineate chunks of content (such as with paragraph breaks) that do not require additional headings, then <section> isn’t for you—use <p> or <div> instead.
Because the <section> element can contain any other flow content element, and can be contained within any other flow content element (except the <address> element), it’s easy to see why, without other limitations and with generic guidelines for use, the <section> element is sometimes misunderstood.
Using <article>
Personally, I believe that a lot of the misunderstanding regarding the use of <section> versus <article> has to do with the name of the <article> element. When I think of an article, I think specifically about an article in a newspaper or a magazine. I don’t naturally think “any standalone body of work,” which is how the <article> element is commonly defined. The HTML5 recommended specification defines it as “a complete, or self-contained, composition in a document, page, application, or site and that is, in principle, independently distributable or reusable,” such as “a forum post, a magazine or newspaper article, a blog entry, a user-submitted comment, an interactive widget or gadget, or any other independent item of content.”
In other words, an <article> element could be used to contain the entire page of a website (whether or not it is an article in a publication), an actual article in a publication, a blog post anywhere and everywhere, part of a threaded discussion in a forum, a comment on a blog post, and as a container that displays the current weather in your city. It’s no wonder there are tens of thousands of results for a search on “difference between section and article in HTML5.”
A good rule of thumb when trying to figure out when to use <article> and when to use <section> is simply to answer the following question: Does this content make sense on its own? If so, then no matter what the content seems to be to you (for example, a static web page, not an article in the New York Times), start by using the <article> element. If you find yourself breaking it up, do so in <section>s. And if you find yourself thinking that your “article” is, in fact, part of a greater whole, then change the <article> tags to <section> tags, and find the beginning of the document, and surround it from there with the more appropriately placed <article> tag at a higher level.
Implementing the <nav> Element
The <nav> element seems so simple (<nav> implies navigation), and it ultimately is—but it can also be used incorrectly. In this section, you learn some basic uses and also some incorrect uses to avoid. If your site has any navigational elements at all, either site-wide or within a long page of content, you have a valid use for the <nav> element.
For that site-wide navigation, you typically find a <nav> element within the primary <header> element; you are not required to do so, but if you want your navigational content to be introductory (and omnipresent in your template), you can easily make a case for your primary <nav> element to appear within the primary <header>. More important, that is valid HTML (as is <nav> outside a <header>)—a <nav> element can appear within any flow content, as well as contain any flow content.
The following code snippet shows the main navigational links of a website, placed within a <header> element:
<header>
<img src="acmewidgets.jpg" alt="ACME Widgets LLC"/>
<h1>The finest widgets are made here!</h1>
<nav>
<ul>
<li><a href="#">About Us</a></li>
<li><a href="#">Products</a></li>
<li><a href="#">Support</a></li>
<li><a href="#">Press</a></li>
</ul>
</nav>
</header>
You are not limited to a single <nav> element in your documents, which is good for site developers who create templates that include both primary and secondary navigation. For example, you might see horizontal primary navigation at the top of a page (often contained within a <header> element), and then vertical navigation in the left column of a page, representing the secondary pages within the main section. In that case, you simply use a second <nav> element, not contained within the <header>, placed and styled differently to delineate the two types visually in addition to semantically.
Remember, the <nav> element is used for major navigational content—primary and secondary navigation both count, as does the inclusion of tables of content within a page. For good and useful semantic use of the <nav> element, do not simply apply it to every link that allows a user to navigate anywhere. Note that I said “good and useful” semantic use, not necessarily “valid” use—it’s true that you could apply <nav> to any list of links, and it would be valid according to the HTML specification because links are flow content. But it wouldn’t be particularly useful—it wouldn’t add meaning—to surround a list of links to social media sharing tools with the <nav> element.
When to Use <aside>
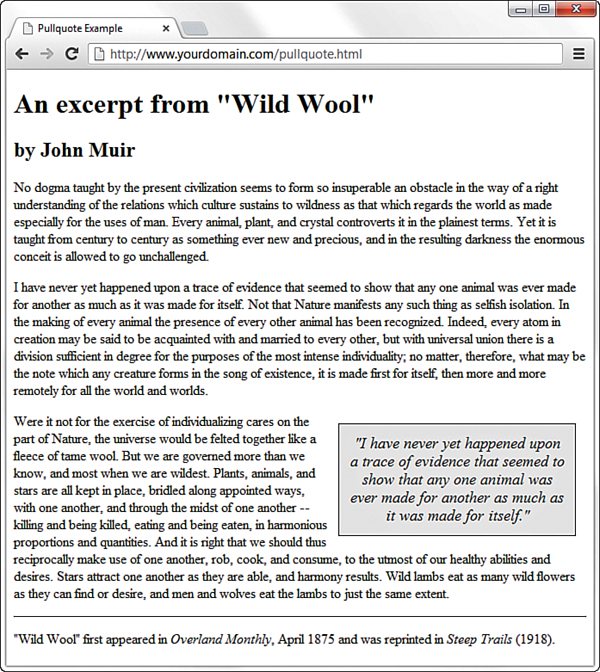
As you’ll see by the number of tips and notes from me throughout this book, I’m a big fan of the type of content that is most appropriately marked up within the <aside> element. The <aside> element is meant to contain any content that is tangentially related to the content around it—additional explanation, links to related resources, pull quotes, helper text, and so on. You might think of the <aside> element as a sidebar, but be careful not to think of it only as a visual sidebar, or a column on the side of a page where you can stick anything and everything you want, whether or not it’s related to the content or site at hand.
In Figure 4.5, you can see how content in an <aside> is used to create a pull quote, or a content excerpt that is specifically set aside to call attention to it. The <aside>, in this case, is used to highlight an important section of the text, but it could also have been used to define a term or link to related documents.
When determining whether to use the <aside> element, think about the content you want to add. Is it related directly to the content in which the <aside> would be contained, such as a definition of terms used in an article or a list of related links for the article? If your answer is an easy “yes,” that’s great! Use <aside> to your heart’s content. If you’re thinking of including an <aside> outside a containing element that is itself full of content, just make sure that the content of the <aside> is reasonably related to your site overall and that you’re not just using the <aside> element for visual effect.
Using <footer> Effectively
The counterpart to the <header> element, the <footer> element, contains additional information about its containing element. The most common use of the <footer> element is to contain copyright information at the bottom of a page, such as here:
<footer>
<p>© 2013 Acme Widgets, LLC. All Rights Reserved.</p>
</footer>
Similar to the <header> element, the <footer> element can contain any other element in the flow content category, of which it is also a member, with the exception of other <footer> or <header> elements. Additionally, a <footer> element cannot be contained within an <address> element, but a <footer> element can contain an <address> element—in fact, a <footer> element is a common location for an <address> element to live.
Placing useful <address> content within a <footer> element is one of the most effective uses of the <footer> element (not to mention the <address> element) because it provides specific contextual information about the page or section of the page to which it refers. The following snippet shows a use of <address> within <footer>:
<footer>
<p>© 2013 Acme Widgets, LLC. All Rights Reserved.</p>
<p>Copyright Issues? Contact:</p>
<address>
Our Lawyer<br/>
123 Main Street<br/>
Somewhere, CA 95128<br/>
<a href="mailto:[email protected]">[email protected]</a>
</address>
</footer>
As with the <header> element, you are not limited to only one <footer>. You can use as many <footer> elements as you need, as long as they are containers for additional information about the containing element—Listing 4.1 showed the use of <footer> elements for both the page and an <article>, both of which are valid.
Summary
This hour introduced you to six semantic elements that help you better indicate header and footer content, navigational and secondary content, and generic body content in your documents. You also learned how to conceptualize your overall document structure before beginning to mark it up so that when you do, you are using the appropriate elements to help convey additional meaning to your readers.
Table 4.1 summarizes the HTML tags covered in this hour.
Q&A
Q. Do I have to use semantic markup at all? Didn’t you say throughout this lesson that pages are valid with or without it?
A. True, none of these elements is required for a valid HTML document. You don’t have to use any of them, but I urge you to think beyond the use of markup for visual display only and think about it for semantic meaning as well. Visual display is meaningless to screen readers, but semantic elements convey a ton of information through these machines.
Q. I’m still completely befuddled about when to use <section> and when to use <aside>. Can you make it more clear?
A. I don’t blame you. There’s a resource available at the HTML5 Doctor website that is one of the best I’ve seen to help eliminate the confusion. It’s a flowchart for HTML5 sectioning, found at http://html5doctor.com/downloads/h5d-sectioning-flowchart.png. This flowchart asks the right questions about your content and helps you determine the correct container element to use.
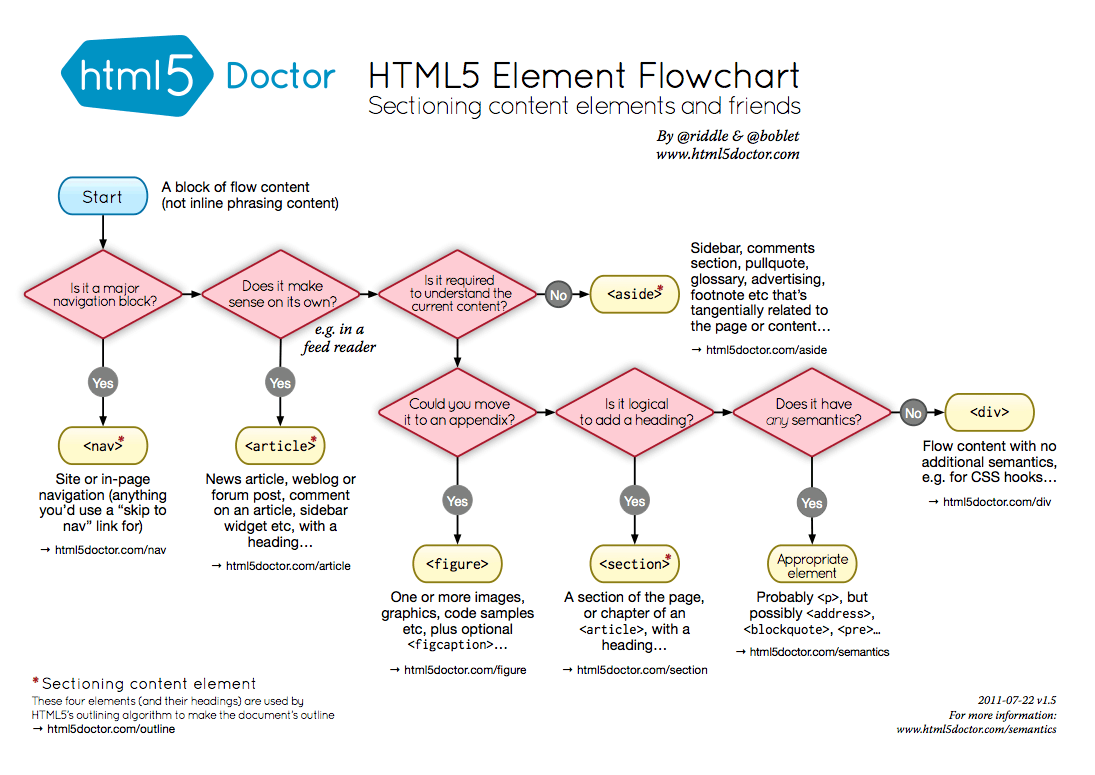
Workshop
The Workshop contains quiz questions and exercises to help you solidify your understanding of the material covered. Try to answer all questions before looking at the “Answers” section that follows.
Quiz
1. Which of the semantic elements discussed in this hour is appropriate for containing the definition of a word used in an article?
2. Do you have to use an <h1>, <h2>, <h3>, <h4>, <h5>, or <h6> element within a <header> element?
3. How many different <nav> elements can you have in a single page?
Answers
1. The <aside> element is appropriate for this.
2. No. The <header> element can contain any other flow content besides another <header> element or a <footer> element. However, a heading element (<h1> through <h6>) is not required in a <header> element.
3. You can have as many <nav> elements as you need. The trick is to “need” only a few (perhaps for primary and secondary navigation only); otherwise, the meaning is lost.
Exercises
![]() In Hour 2, one of the exercises had you create a personal web page. Return to that document and add all the relevant semantic elements you learned about in this hour.
In Hour 2, one of the exercises had you create a personal web page. Return to that document and add all the relevant semantic elements you learned about in this hour.
![]() Building off the single page, create a few more related pieces of content. Remember that some of your pages might contain
Building off the single page, create a few more related pieces of content. Remember that some of your pages might contain <article> elements with no sections, but others might contain <section> elements with <header> and <footer> elements as well.