
Hour 5. Working with Text Blocks and Lists
What You’ll Learn in This Hour:
![]() How to align text on a page
How to align text on a page
![]() How to use the three types of HTML lists
How to use the three types of HTML lists
![]() How to place lists within lists
How to place lists within lists
In the early days of the web, text was displayed in only one font and one size. However, as you’ve learned in the first few hours of lessons, a combination of HTML and CSS now makes it possible to control the appearance of text and how it is aligned and displayed on a web page.
This hour shows you the basics of text alignment and guides you through the next steps: the use of lists. Because lists are so common, HTML provides tags that automatically indent text and add numbers, bullets, or other symbols in front of each listed item. You’ll learn how to format different types of lists, which are part of the many ways to display content in your website.
Try It Yourself: Preparing Sample Text
![]() Any type of outline, bullet points from a presentation, numbered steps, a glossary, or a list of textual information from a database makes good material to work with.
Any type of outline, bullet points from a presentation, numbered steps, a glossary, or a list of textual information from a database makes good material to work with.
![]() Any text will do, but try to find (or type) some text you want to put onto a web page. The text from a company brochure or from your résumé might be a good choice.
Any text will do, but try to find (or type) some text you want to put onto a web page. The text from a company brochure or from your résumé might be a good choice.
![]() If the text you’ll be using is from a word processing or database program, be sure to save it to a new file in plain-text or ASCII format. You can then add the appropriate HTML tags and style attributes to format it as you go through this lesson.
If the text you’ll be using is from a word processing or database program, be sure to save it to a new file in plain-text or ASCII format. You can then add the appropriate HTML tags and style attributes to format it as you go through this lesson.
![]() Before you use the code introduced in this hour to format the body text, add the set of skeleton HTML tags you’ve used in previous hours (the
Before you use the code introduced in this hour to format the body text, add the set of skeleton HTML tags you’ve used in previous hours (the <!DOCTYPE> plus <html>, <head>, <title>, and <body> tag pairs).
Aligning Text on a Page
It’s easy to take for granted the fact that most paragraphs are automatically aligned to the left when you’re reading information on the web. However, there certainly are situations in which you might choose to align content to the right or even the center of a page. HTML gives you the option to align a single HTML block-level element, such as text contained within a <p></p> or <div></div> tag pair. Before we get into the details of aligning block elements, however, let’s briefly note how attributes work.
Using Attributes
Attributes provide additional information related to an HTML tag. Attributes are special code words used inside an HTML tag to control exactly what the tag does. They are very important in even the simplest bit of web content, so it’s important to be comfortable using them.
Attributes invoke the use of styles, classes, or IDs that are applied to particular tags. If you define a particular class or ID in a style sheet—as you learned in Hour 3, “Understanding Cascading Style Sheets”—then you can invoke that class or ID using class="someclass" or id="someid" within the tag itself. When the browser renders the content for display, it looks to the style sheet to determine exactly how the content will appear according to the associated style definitions. Similarly, you can use the style attribute to include style information for a particular element without connecting the element to an actual style sheet—this is the inline style format you learned about in Hour 3.
For example, when you begin a paragraph with the <p> tag, you can specify whether the text in that particular paragraph should be aligned to the left margin, the right margin, or the center of the page by setting the style attribute. If you want to associate that particular paragraph with an existing class or ID, you set the class or id attribute.
In the following example, each paragraph can be left-aligned:
<p style="text-align: left;">Text goes here.</p>
<p class="leftAlignStyle">Text goes here.</p>
<p id="firstLeftAlign">Text goes here.</p>
In the first paragraph, the style appears directly in the style attribute—this is useful for debugging or for short-term formatting tests, but not so much for ongoing maintenance of your web content. In the second paragraph, the paragraph will be left-aligned if the style sheet entry for the leftAlignStyle class includes the text-align statement; remember, using a class means that other tags can reuse the class. Similarly, the third paragraph will be left-aligned if the style sheet entry for the firstLeftAlign id includes the text-align statement; remember, using an id means that these styles can be applied to only the one identified tag.
Aligning Text in Block-Level Elements
To align text in a block-level element such as <p> to the right margin without creating a separate class or ID in a style sheet, simply place style="text-align:right" inside the <p> tag at the beginning of the paragraph (or define it in a class or id). Similarly, to center the text in the element, use <p style="text-align:center">. To align text in a paragraph to the left, use <p style="text-align:left">.
The text-align part of the style attribute is referred to as a style rule, which means that it is setting a particular style aspect of an HTML element. You can use many style rules to carefully control the formatting of web content.
The text-align style rule is not reserved for just the <p> tag. In fact, you can use the text-align style rule with any block-level element, which includes semantic elements such as <section> and <header>, as well as <h1>, <h2>, the other heading-level tags, and the <div> tag, among others. The <div> tag is especially handy because it can encompass other block-level elements and thus allow you to control the alignment of large portions of your web content all at once. The div in the <div> tag is for division.
Tip
Every attribute and style rule in HTML has a default value that is assumed when you don’t set the attribute yourself. In the case of the text-align style rule of the <p> tag, the default value is left, so using the bare-bones <p> tag has the same effect as using <p style= "text-align:left">. Learning the default values for common style rules is an important part of becoming a good web page developer.
Listing 5.1 demonstrates the style attribute and text-align style rule with different block-level elements. Figure 5.1 displays the results.
LISTING 5.1 The text-align Style Rule Used with the style Attribute
<!DOCTYPE html>
<html lang="en">
<head>
<title>Bohemia</title>
</head>
<body>
<section style="text-align:center">
<header>
<h1>Bohemia</h1>
<h2>by Dorothy Parker</h2>
</header>
</section>
<section>
<p style="text-align:left">
Authors and actors and artists and such<br />
Never know nothing, and never know much.<br />
Sculptors and singers and those of their kidney<br />
Tell their affairs from Seattle to Sydney.
</p>
<p style="text-align:center">
Playwrights and poets and such horses' necks<br />
Start off from anywhere, end up at sex.<br />
Diarists, critics, and similar roe<br />
Never say nothing, and never say no.
</p>
<p style="text-align:right">
People Who Do Things exceed my endurance;<br />
God, for a man that solicits insurance!
</p>
</section>
</body>
</html>
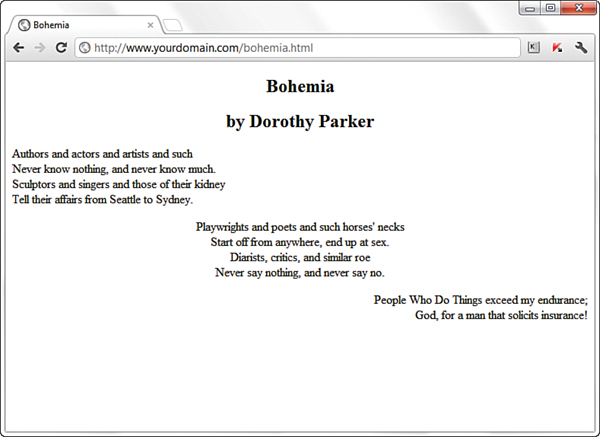
The use of <section style="text-align:center"> ensures that the content area, including the two headings, are centered. However, the inline styles applied to the individual paragraphs within the <section> override the setting and ensure that the text of the first paragraph is left-aligned, the second paragraph is centered, and the third paragraph is right-aligned.
The Three Types of HTML Lists
For clarity, it’s often useful to present information on a web page as a list of items. Three basic types of HTML lists are offered. Figure 5.2 shows all three, and Listing 5.2 reveals the HTML used to construct them:
![]() Ordered list—An indented list that has numbers or letters before each list item. The ordered list begins with the
Ordered list—An indented list that has numbers or letters before each list item. The ordered list begins with the <ol> tag and ends with a closing </ol> tag. List items are enclosed in the <li></li> tag pair, and line breaks appear automatically at each opening <li> tag. The entire list is indented.
![]() Unordered list—An indented list that has a bullet or other symbol before each list item. The unordered list begins with the
Unordered list—An indented list that has a bullet or other symbol before each list item. The unordered list begins with the <ul> tag and closes with </ul>. As with the ordered list, its list items are enclosed in the <li></li> tag pair. A line break and symbol appear at each opening <li> tag, and the entire list is indented.
![]() Definition list—A list of terms and their meanings. This type of list, which has no special number, letter, or symbol before each item, begins with
Definition list—A list of terms and their meanings. This type of list, which has no special number, letter, or symbol before each item, begins with <dl> and ends with </dl>. The <dt></dt> tag pair encloses each term, and the <dd></dd> tag pair encloses each definition. Line breaks and indentations appear automatically.

LISTING 5.2 Unordered Lists, Ordered Lists, and Definition Lists
<!DOCTYPE html>
<html lang="en">
<head>
<title>How to Be Proper</title>
</head>
<body>
<article>
<header>
<h1>How to Be Proper</h1>
</header>
<section>
<header>
<h1>Basic Etiquette for a Gentlemen Greeting a Lady
Acquaintance</h1>
</header>
<ul>
<li>Wait for her acknowledging bow before tipping your hat.</li>
<li>Use the hand farthest from her to raise the hat.</li>
<li>Walk with her if she expresses a wish to converse; Never
make a lady stand talking in the street.</li>
<li>When walking, the lady must always have the wall.</li>
</ul>
</section>
<section>
<header>
<h1>Recourse for a Lady Toward Unpleasant Men Who Persist in
Bowing</h1>
</header>
<ol>
<li>A simple stare of iciness should suffice in most
instances.</li>
<li>A cold bow discourages familiarity without offering
insult.</li>
<li>As a last resort: "Sir, I have not the honour of your
acquaintance."</li>
</ol>
</section>
<section>
<header>
<h1>Proper Address of Royalty</h1>
</header>
<dl>
<dt>Your Majesty</dt>
<dd>To the king or queen.</dd>
<dt>Your Royal Highness</dt>
<dd>To the monarch's spouse, children, and siblings.</dd>
<dt>Your Highness</dt>
<dd>To nephews, nieces, and cousins of the sovereign.</dd>
</dl>
</section>
</article>
</body>
</html>
Note the use of semantic elements (<article>, <section>, and <header>) in Listing 5.2 to provide a better sense of the content outline, including how the chunks of text relate to one another. Each of these elements could have their own styles applied to them, which would provide further visual separation of the elements.
Note
Remember that different web browsers can display web content quite differently. The HTML standard doesn’t specify exactly how web browsers should format lists, so users with older web browsers might not see exactly the same indentation you see. You can use CSS to gain precise control over list items, which you learn about later in this hour.
Placing Lists Within Lists
Although definition lists are officially supposed to be used for defining terms, many web page authors use them anywhere they’d like to see some indentation. In practice, you can indent any text simply by putting <dl><dd> at the beginning of it and </dd></dl> at the end, and skipping over the <dt></dt> tag pair.
Because of the level of control over the display of your items that you have when using CSS, there is no need to use nested lists to achieve the visual appearance of indentation. Reserve your use of nested lists for when the content warrants it. In other words, use nested lists to show a hierarchy of information, such as in Listing 5.3.
Tip
Nesting refers to a tag that appears entirely within another tag. Nested tags are also referred to as child tags of the (parent) tag that contains them. It is a common (but not required) coding practice to indent nested tags so that you can easily see their relationship to the parent tag.
Ordered and unordered lists can be nested inside one another, down to as many levels as you want. In Listing 5.3, a complex indented outline is constructed from several unordered lists. Notice in Figure 5.3 that the web browser automatically uses a different type of bullet for each of the first three levels of indentation, making the list very easy to read. This is common in modern browsers.
LISTING 5.3 Using Lists to Build Outlines
<!DOCTYPE html>
<html lang="en">
<head>
<title>Vertebrates</title>
</head>
<body>
<section>
<header>
<h1>Vertebrates</h1>
</header>
<ul>
<li><strong>Fish</strong>
<ul>
<li>Barramundi</li>
<li>Kissing Gourami</li>
<li>Mummichog</li>
</ul>
</li>
<li><strong>Amphibians</strong>
<ul>
<li>Anura
<ul>
<li>Goliath Frog</li>
<li>Poison Dart Frog</li>
<li>Purple Frog</li>
</ul>
</li>
<li>Caudata
<ul>
<li>Hellbender</li>
<li>Mudpuppy</li>
</ul>
</li>
</ul>
</li>
<li><strong>Reptiles</strong>
<ul>
<li>Nile Crocodile</li>
<li>King Cobra</li>
<li>Common Snapping Turtle</li>
</ul>
</li>
</ul>
</body>
</html>

As Figure 5.3 shows, a web browser normally uses a solid disc for the first-level bullet, a hollow circle for the second-level bullet, and a solid square for all deeper levels. However, you can explicitly choose which type of bullet to use for any level by using <ul style="list-style-type:disc">, <ul style="list-style-type:circle">, or <ul style="list-style-type:square"> instead of <ul>, either inline or in a specific style sheet.
You can even change the bullet for any single point within an unordered list by using the list-style-type style rule in the <li> tag. For example, the following codes displays a hollow circle in front of the words extra and super, and a solid square in front of the word special:
<ul style="list-style-type:circle">
<li>extra</li>
<li>super</li>
<li style="list-style-type:square">special</li>
</ul>
The list-style-type style rule also works with ordered lists, but instead of choosing a type of bullet, you choose the type of numbers or letters to place in front of each item. Listing 5.4 shows how to use Roman numerals (list-style-type:upper-roman), capital letters (list-style-type:upper-alpha), lowercase letters (list-style-type:lower-alpha), and ordinary numbers in a multilevel list. Figure 5.4 shows the resulting outline, which is nicely formatted.
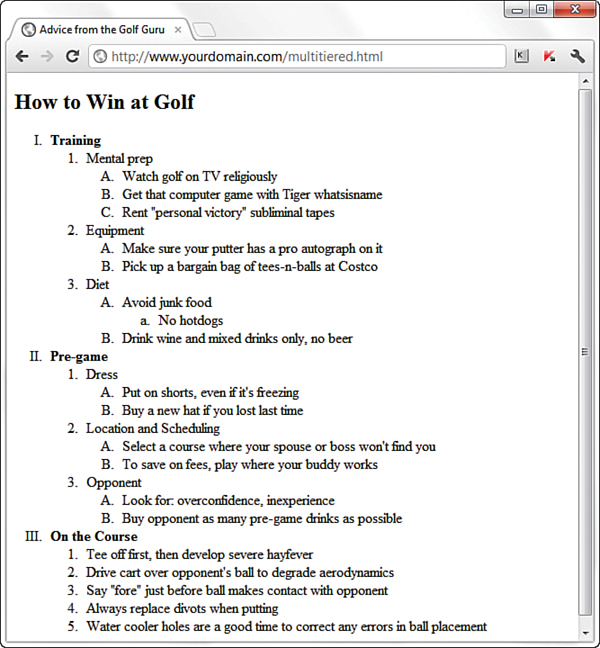
Although Listing 5.4 uses the list-style-type style rule only with the <ol> tag, you can also use it for specific <li> tags within a list (though it’s hard to imagine a situation when you would want to do this). You can also explicitly specify ordinary numbering with list-style-type:decimal, and you can make lowercase Roman numerals with list-style-type:lower-roman.
LISTING 5.4 Using the list-style-type Style Rule with the style Attribute in Multitiered Lists
<!DOCTYPE html>
<html lang="en">
<head>
<title>Advice from the Golf Guru</title>
</head>
<body>
<article>
<header>
<h1>How to Win at Golf</h1>
</header>
<ol style="list-style-type:upper-roman">
<li><strong>Training</strong>
<ol>
<li>Mental prep
<ol style="list-style-type:upper-alpha">
<li>Watch golf on TV religiously</li>
<li>Get that computer game with Tiger whatsisname</li>
<li>Rent "personal victory" subliminal tapes</li>
</ol>
</li>
<li>Equipment
<ol style="list-style-type:upper-alpha">
<li>Make sure your putter has a pro autograph on it</li>
<li>Pick up a bargain bag of tees-n-balls at Costco</li>
</ol>
</li>
<li>Diet
<ol style="list-style-type:upper-alpha">
<li>Avoid junk food
<ol style="list-style-type:lower-alpha">
<li>No hotdogs</li>
</ol>
</li>
<li>Drink wine and mixed drinks only, no beer</li>
</ol>
</li>
</ol>
</li>
<li><strong>Pre-game</strong>
<ol>
<li>Dress
<ol style="list-style-type:upper-alpha">
<li>Put on shorts, even if it's freezing</li>
<li>Buy a new hat if you lost last time</li>
</ol>
</li>
<li>Location and Scheduling
<ol style="list-style-type:upper-alpha">
<li>Select a course where your spouse or boss won't find
you</li>
<li>To save on fees, play where your buddy works</li>
</ol>
</li>
<li>Opponent
<ol style="list-style-type:upper-alpha">
<li>Look for: overconfidence, inexperience</li>
<li>Buy opponent as many pre-game drinks as possible</li>
</ol>
</li>
</ol>
</li>
<li><strong>On the Course</strong>
<ol>
<li>Tee off first, then develop severe hayfever</li>
<li>Drive cart over opponent's ball to degrade aerodynamics</li>
<li>Say "fore" just before ball makes contact with opponent</li>
<li>Always replace divots when putting</li>
<li>Water cooler holes are a good time to correct any errors in
ball placement</li>
</ol>
</li>
</ol>
</article>
</body>
</html>
Summary
In this hour, you learned that attributes are used to specify options and special behavior of many HTML tags. You learned to use the style attribute with CSS style rules to align text. You also learned how to create and combine three basic types of HTML lists: ordered lists, unordered lists, and definition lists. Lists can be placed within other lists to create outlines and other complex arrangements of text.
Table 5.1 summarizes the tags and attributes discussed in this hour. Don’t feel like you have to memorize all these tags—great references are available for both HTML and CSS, such as the guides at the Mozilla Developer Network. See https://developer.mozilla.org/en-US/docs/Web/HTML/Element and https://developer.mozilla.org/en-US/docs/Web/CSS for guides to HTML and CSS, respectively.

Q&A
Q. I’ve seen web pages that use three-dimensional little balls or other special graphics for bullets. How do they do that?
A. That trick is a little bit beyond what this hour covers. You’ll learn how to do it yourself in Hour 11, “Using Images in Your Website.”
Q. How do I “full-justify” text so that both the left and right margins are flush?
A. You can use text-align:justify in your style declaration.
Workshop
The Workshop contains quiz questions and activities to help you solidify your understanding of the material covered. Try to answer all questions before looking at the “Answers” section that follows.
Quiz
1. How would you center all of the text on an entire page?
2. How would you indent a single word and put a square bullet in front of it?
3. What would you use to create a definition list to show that the word glunch means “a look of disdain, anger, or displeasure” and that the word glumpy means “sullen, morose, or sulky”?
Answers
1. If you thought about putting a <div> styled with "text-align:center" immediately after the <body> tag at the top of the page, and </div> just before the </body> tag at the end of the page, that is one correct answer. However, the text-align style is also supported directly by the <body> tag, which means you can forgo the <div> tag or other container elements, and apply text-align:center directly to the <body> tag either inline or in a style sheet. Presto, the entire page is centered!
2. You use this code:
<ul style="list-style-type:square">
<li>supercalifragilisticexpealidocious</li>
</ul>
(Putting style="list-style-type:square" in the <li> tag, or defining either in the style sheet, gives the same result because there’s only one item in this list.)
3. You use this code:
<dl>
<dt>glunch</dt><dd>a look of disdain, anger, or displeasure</dd>
<dt>glumpy</dt><dd>sullen, morose, or sulky</dd>
</dl>
Exercises
![]() Use the text alignment style attributes to place blocks of text in various places on your web page. Try nesting your paragraphs and divisions (
Use the text alignment style attributes to place blocks of text in various places on your web page. Try nesting your paragraphs and divisions (<p> and <div>) to get a feel for how styles do or do not cascade through the content hierarchy.
![]() Try producing an ordered list outlining the information you want to put on your web pages. This gives you practice formatting HTML lists and also gives you a head start on thinking about the issues covered in later hours of this book.
Try producing an ordered list outlining the information you want to put on your web pages. This gives you practice formatting HTML lists and also gives you a head start on thinking about the issues covered in later hours of this book.