
Hour 6. Working with Fonts
What You’ll Learn in This Hour:
![]() How to use special characters
How to use special characters
![]() How to use boldface, italics, and special text formatting
How to use boldface, italics, and special text formatting
![]() How to use text effects
How to use text effects
![]() How to tweak the font
How to tweak the font
![]() How to use web fonts
How to use web fonts
In the early days of the web, text was displayed in only one font and one size, but those days are long gone. A combination of HTML and CSS makes it possible to control all aspects of the appearance of text. In this hour, you learn how to change the visual display of the font—its font family, size, and weight—and how to incorporate boldface, italics, superscripts, subscripts, and strikethrough text into your pages. You also learn how to change typefaces and font sizes.
Working with Special Characters
Before we rush headlong into font changes, let’s talk for a minute about special characters within fonts. Most fonts include special characters for European languages, such as the accented é in Café. You’ll also find a few mathematical symbols and special punctuation marks, such as the circular • bullet.
Note
When viewing other designers’ web content, you might notice methods of marking up text that are different than those this book teaches. Some telltale signs of the old way of formatting text include the use of the <b></b> tag pair to indicate when a word should be bolded, the <i></i> tag pair to indicate when a word should be in italics, and the <font></font> tag pair to specify font family, size, and other attributes. However, this method is being phased out of HTML, and CSS is considerably more powerful.
You can insert these special characters at any point in an HTML document using the appropriate codes in Table 6.1. You’ll find an even more extensive list of codes for multiple character sets at http://www.webstandards.org/learn/reference/named_entities.html.
For example, you can produce the word café using either of the following methods:
café
café
Although you can specify character entities by number, each symbol also has a mnemonic name that is often easier to remember.
Tip
Looking for the copyright (©) and registered trademark (®) symbols? Those codes are © and ®, respectively.
To create an unregistered trademark (™) symbol, use ™.
HTML uses a special code known as a character entity to represent special characters such as © and ®. Character entities are always specified starting with & and ending with ;. Table 6.1 lists the most commonly used character entities, although HTML supports many more.
Table 6.1 includes codes for the angle brackets, quotation, and ampersand. You must use those codes if you want these symbols to appear on your pages; otherwise, the web browser interprets them as HTML commands.
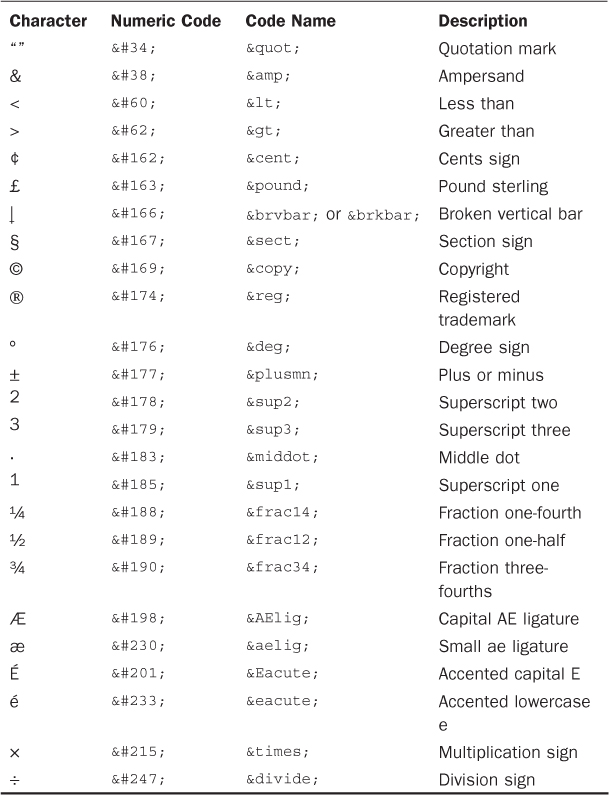
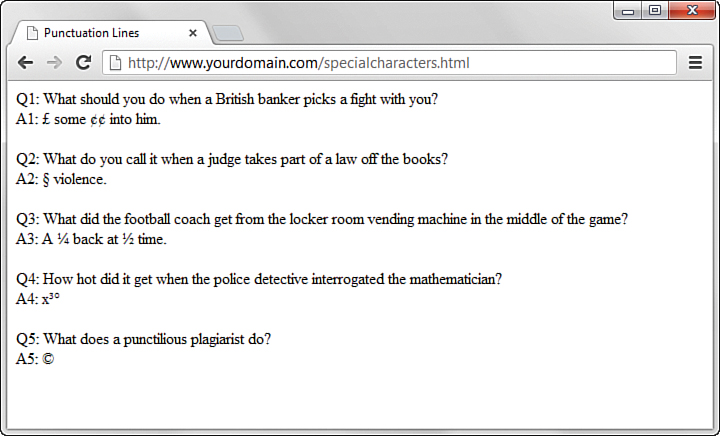
Listing 6.1 and Figure 6.1 show several of the symbols from Table 6.1 in use.
LISTING 6.1 Special Character Codes
<!DOCTYPE html>
<html lang="en">
<head>
<title>Punctuation Lines</title>
<style type="text/css">
section {
margin-bottom: 20px;
}
</style>
</head>
<body>
<section>
Q: What should you do when a British banker picks a fight
with you?<br />
A: £ some ¢¢ into him.
</section>
<section>
Q: What do you call it when a judge takes part of a law
off the books?<br />
A: § violence.
</section>
<section>
Q: What did the football coach get from the locker room
vending machine in the middle of the game?<br />
A: A ¼ back at ½ time.
</section>
<section>
Q: How hot did it get when the police detective interrogated
the mathematician?<br />
A: x³°
</section>
<section>
Q: What does a punctilious plagiarist do?<br />
A: ©
</section>
</body>
</html>
Boldface, Italics, and Special Text Formatting
Way back in the age of the typewriter, we were content with a plain-text display and with using an occasional underline to show emphasis. Today boldface and italic text have become de rigueur in all paper communication. Naturally, you can add bold and italic text to your web content as well. Several tags and style rules make text formatting possible.
Note
Although you want to use styles wherever possible to affect presentation, an alternative to style rules when it comes to bold and italic text involves the <strong></strong> and <em> </em> tag pairs. The <strong> tag does the same thing as the <b> tag in most browsers, whereas the <em> tag acts just like the tag <i> by formatting text as italics. Of course, you can style these tags however you’d like, but those are the defaults.
The <strong> and <em> tags are considered an improvement over <b> and <i> because they imply only that the text should receive special emphasis; they don’t dictate exactly how that effect should be achieved. In other words, a browser doesn’t necessarily have to interpret <strong> as meaning bold or <em> as meaning italic. This makes <strong> and <em> more fitting in HTML5 because they add meaning to text, along with affecting how the text should be displayed.
The old-school approach—discussed briefly here because invariably you will see it in the source code of many websites, if you choose to look—to adding bold and italic formatting to text involves the <b></b> and <i></i> tag pairs. For boldface text, you wrap the <b> and </b> tags around your text. Similarly, to make any text appear in italics, you enclose it in <i> and </i> tags. Although this approach still works fine in browsers, it isn’t as flexible or powerful as the CSS style rules for text formatting and should be avoided.
Part III, “Advanced Web Page Design with CSS,” covers CSS style rules in more depth, but a little foreshadowing is appropriate here just so that you understand some basic text formatting options. The font-weight style rule enables you to set the weight, or boldness, of a font using a style rule. Standard settings for font-weight include normal, bold, bolder, and lighter (with normal being the default). Italic text is controlled via the font-style rule, which you can set to normal, italic, or oblique. You can specify style rules together as well if you want to apply more than one, as the following example demonstrates:
<p style="font-weight:bold; font-style:italic">This paragraph is bold and
italic!</p>
In this example, both style rules are specified in the style attribute of the <p> tag. The key to using multiple style rules is that they must be separated by a semicolon (;).
You aren’t limited to using font styles in paragraphs, however. The following code shows how to italicize text in a bulleted list:
<ul>
<li style="font-style:italic">Important Stuff</li>
<li style="font-style:italic">Critical Information</li>
<li style="font-style:italic">Highly Sensitive Material</li>
<li>Nothing All That Useful</li>
</ul>
You can also use the font-weight style rule within headings, but a heavier font usually doesn’t have an effect on headings because they are already bold by default.
Caution
In the past, a <u> tag was useful in creating underlined text, but you don’t want to use it now, for a couple reasons. First, users expect underlined text to be a link, so they might get confused if you underline text that isn’t a link. Second, the <u> tag is obsolete, which means that it has been phased out of the HTML language (as has the <strike> tag). Both tags are still supported in web browsers and likely will be for quite a while, but using CSS is the preferred approach to creating underlined and strikethrough text.
Although using CSS enables you to apply rich formatting to text, a few other valid HTML5 tags are good for adding special formatting to text when you don’t necessarily need to be as specific as CSS allows you to be. Following are some of these tags; all other text formatting should really be done with CSS. Listing 6.2 and Figure 6.2 demonstrate each tag in action.
• <sup></sup>—Superscript text
• <sub></sub>—Subscript text
• <em></em>—Emphasized (italic) text
• <strong></strong>—Strong (boldface) text
• <pre></pre>—Preformatted (typically monospaced) text, preserving spaces and line breaks
LISTING 6.2 Special Formatting Tags
<!DOCTYPE html>
<html lang="en">
<head>
<title>The Miracle Product</title>
</head>
<body>
<p>
New <sup>Super</sup><strong>Strength</strong> H<sub>2</sub>O
<em>plus</em> will knock out any stain.<br/>Look for new
<sup>Super</sup><strong>Strength</strong> H<sub>2</sub>O <em>plus</em>
in a stream near you.
</p>
<pre>
NUTRITION INFORMATION (void where prohibited)
Calories Grams USRDA
/Serving of Fat Moisture
Regular 3 4 100%
Unleaded 3 2 100%
Organic 2 3 99%
Sugar Free 0 1 110%
</pre>
</body>
</html>
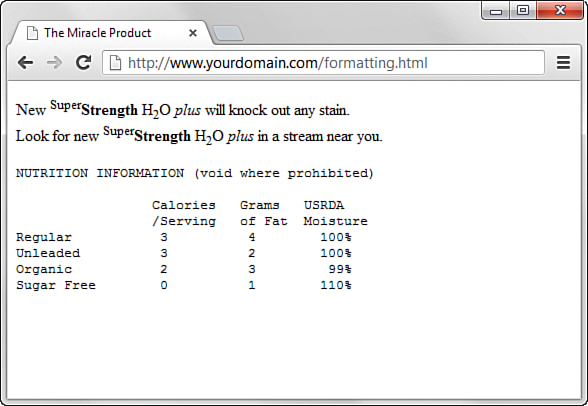
The <pre> tag causes text to appear in the monospaced font—and does something else unique and useful. As you learned in Hour 2, “Structuring an HTML Document,” multiple spaces and line breaks are normally ignored in HTML files, but <pre> causes exact spacing and line breaks to be preserved. For example, without <pre>, the text at the end of Figure 6.2 would look like the following:
calories grams usrda /serving of fat moisture regular
3 4 100% unleaded 3 2 100% organic 2 3 99% sugar free 0 1 110%
Even if you added <br /> tags at the end of every line, the columns wouldn’t line up properly. However, when you put <pre> at the beginning and </pre> at the end, the columns line up properly because the exact spaces are kept—no <br /> tags are needed. The <pre> tag gives you a quick and easy way to preserve the alignment of any monospaced text files you might want to transfer to a web page, with minimum effort.
CSS provides you with more robust methods for lining up text (and doing anything with text, actually), and you’ll learn more about them throughout Part III.
Tweaking the Font
Sometimes you want a bit more control over the size and appearance of your text than just some boldface or italics. Before I get into the appropriate way to tinker with the font using CSS, let’s briefly look at how things were done before CSS—you might still find examples of this method when you look at the source code for other websites. Remember, just because these older methods are in use doesn’t mean you should follow suit.
Note
I cannot stress enough that the <font> tag is not to be used! It is used here for illustrative and historical purposes only.
Before stylesheets entered the picture, the now-phased-out <font> tag was used to control the fonts in web page text.
For example, the following HTML was once used to change the size and color of some text on a page:
<font size="5" color="purple">This text will be big and purple.</font>
As you can see, the size and color attributes of the <font> tag made it possible to alter the font of the text without too much effort. Although this approach worked fine, it was replaced with a far superior approach to font formatting, thanks to CSS style rules. Following are a few of the main style rules used to control fonts:
• font-family—Sets the family (typeface) of the font
• font-size—Sets the size of the font
• color—Sets the color of the font
The font-family style rule enables you to set the typeface used to display text. You can (and usually should) specify more than one value for this style (separated by commas) so that if the first font isn’t available on a user’s system, the browser can try an alternative.
Note
You learn more about controlling the color of the text on your pages in Hour 7, “Working with Colors and Borders.” That lesson also shows you how to create your own custom colors and control the color of text links.
Providing alternative font families is important because each user potentially has a different set of fonts installed, at least beyond a core set of common basic fonts (Arial, Times New Roman, and so forth). By providing a list of alternative fonts, you have a better chance of your pages gracefully falling back on a known font when your ideal font isn’t found. Following is an example of the font-family style used to set the typeface for a paragraph of text:
<p style="font-family:arial, sans-serif, 'times roman'">
This example has several interesting parts. First, arial is specified as the primary font. Capitalization does not affect the font family, so arial is no different than Arial or ARIAL. Another interesting point about this code is that single quotes are used around the times roman font name because it has a space in it. However, because 'times roman' appears after the generic specification of sans-serif, it is unlikely that 'times roman' would be used. Because sans-serif is in the second position, it says to the browser, “If Arial is not on this machine, use the default sans-serif font.”
The font-size and color style rules are also commonly used to control the size and color of fonts. The font-size style can be set to a predefined size (such as small, medium, or large), or you can set it to a specific point size (such as 12pt or 14pt). The color style can be set to a predefined color (such as white, black, blue, red, or green), or you can set it to a specific hexadecimal color (such as #ffb499). Following is a better version of the previous paragraph example, and with the font size and color specified:
<p style="font-family:arial, 'times roman', sans-serif; font-size:14pt;
color:green">
Note
You’ll learn about hexadecimal colors in Hour 7. For now, just understand that the color style rule enables you to specify exact colors beyond just using green, blue, orange, and so forth.
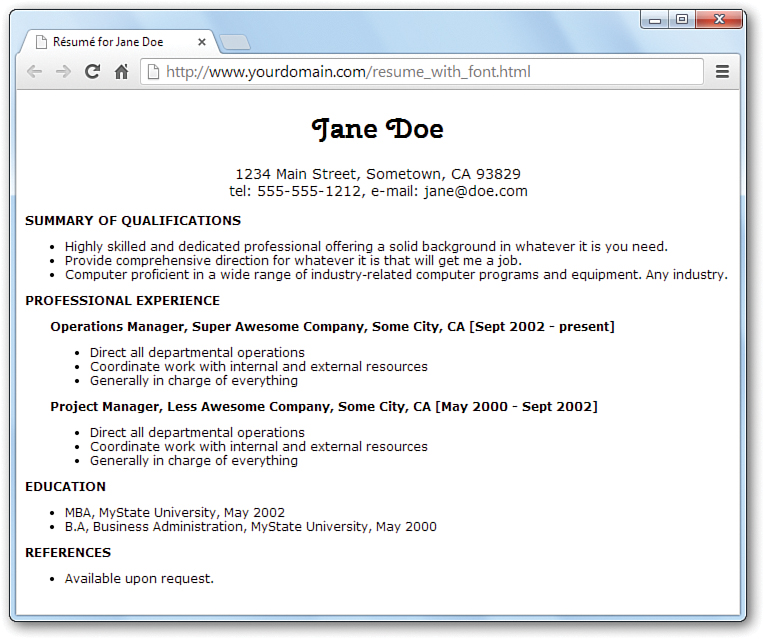
The sample web content in Listing 6.3 and shown in Figure 6.3 uses some font style rules to create the beginning of a basic online résumé.
LISTING 6.3 Using Font Style Rules to Create a Basic Résumé
<!DOCTYPE html>
<html lang="en">
<head>
<title>Résumé for Jane Doe</title>
<style type="text/css">
body {
font-family: Verdana, sans-serif;
font-size: 12px;
}
header {
text-align: center;
}
h1 {
font-family:Georgia, serif;
font-size:28px;
text-align:center;
}
p.contactinfo {
font-size:14px;
}
p.categorylabel {
font-size:12px;
font-weight:bold;
text-transform:uppercase;
}
div.indented {
margin-left: 25px;
}
</style>
</head>
<body>
<header>
<h1>Jane Doe</h1>
<p class="contactinfo">1234 Main Street, Sometown,
CA 93829<br/>
tel: 555-555-1212, e-mail: [email protected]</p>
</header>
<section>
<p class="categorylabel">Summary of Qualifications</p>
<ul>
<li>Highly skilled and dedicated professional offering a
solid background in whatever it is you need.</li>
<li>Provide comprehensive direction for whatever it is
that will get me a job.</li>
<li>Computer proficient in a wide range of industry-related
computer programs and equipment. Any industry.</li>
</ul>
</section>
<section>
<p class="categorylabel">Professional Experience</p>
<div class="indented">
<p><strong>Operations Manager,
Super Awesome Company, Some City, CA [Sept 2002 –
present]</strong></p>
<ul>
<li>Direct all departmental operations</li>
<li>Coordinate work with internal and external
resources</li>
<li>Generally in charge of everything</li>
</ul>
<p><strong>Project Manager,
Less Awesome Company, Some City, CA [May 2000 - Sept
2002]</strong></p>
<ul>
<li>Direct all departmental operations</li>
<li>Coordinate work with internal and external
resources</li>
<li>Generally in charge of everything</li>
</ul>
</div>
</section>
<section>
<p class="categorylabel">Education</p>
<ul>
<li>MBA, MyState University, May 2002</li>
<li>B.A, Business Administration, MyState University,
May 2000</li>
</ul>
</section>
<section>
<p class="categorylabel">References</p>
<ul>
<li>Available upon request.</li>
</ul>
</section>
</body>
</html>
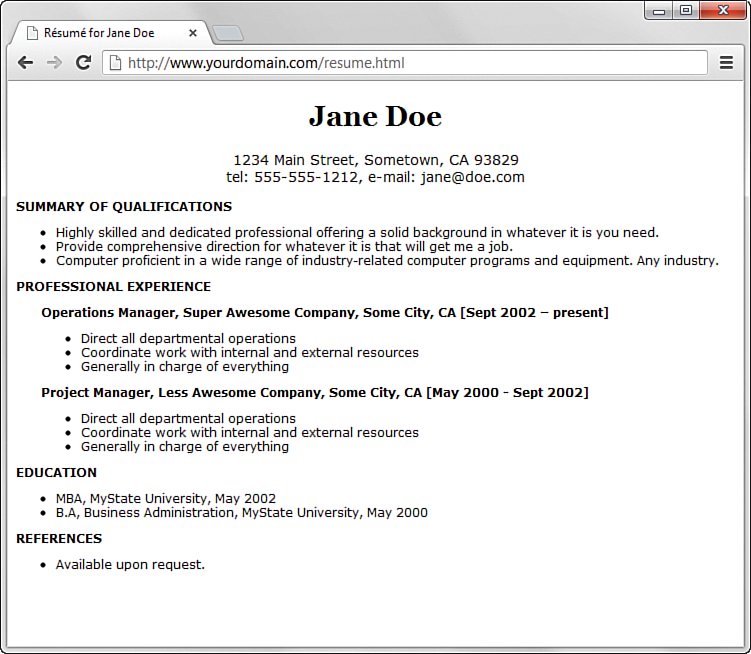
Using CSS, which organizes sets of styles into classes—as you learned in Hour 3, “Understanding Cascading Style Sheets”—you can see how text formatting is applied to different areas of this content. If you look closely at the definition of the div.indented class, you will see the use of the margin-left style. This style, which you learn more about in Part III, applies a certain amount of space (25 pixels, in this example) to the left of the element. That space accounts for the indentation shown in Figure 6.3.
Using Web Fonts
In the previous section, you saw uses of font families that we’re pretty sure reside on everyone’s computers. That is, you can be assured that most computers would render Arial or Times New Roman, or have a go-to default font for serif and sans-serif, if that’s what your stylesheet calls for. But with the inclusion of the @font-face feature in CSS3, you can wield even greater design power over the content you place online.
In brief, the @font-face feature enables you to define fonts for use in your HTML5 markup so that they are displayed to users regardless of whether they have those fonts installed on their computer (and chances are incredibly great that users do not have your selected fancy font on their own computer). The definition of the font can be local (to your web server, if you care to include font files there) or remote (you can link to locations where many fonts are stored).
In your stylesheet, to define a new font for use throughout your page(s), you can simply use the following structure:
@font-face {
font-family: 'some_name_goes_here';
src: url('some_location_of_the_font_file'),
}
After it’s defined, you can refer to the font-family as you would anywhere else in your stylesheet, such as here:
h1 {
font-family:some_name_goes_here;
font-size:28px;
text-align:center;
}
But where do you get fonts, you might ask? You can obtain fonts from many locations—some free, others not. A widely popular location is Google Web Fonts (http://www.google.com/fonts), not only because the fonts are free but because Google is widely recognized as providing a stable platform, which is important if your web typography relies on a font that’s sitting on someone else’s web server. Some other reliable pay sites for obtaining fonts are TypeKit (www.typekit.com/) and Fontspring (www.fontspring.com). Pay sites aren’t necessarily bad—artists have to make money, too; I have a personal TypeKit subscription and am very happy with their service, but I also use Google Web Fonts for many projects.
Note
If you look at the previous link location, you can see that it is Google’s @font-face definition already done for us. Specifically, it says:
@font-face {
font-family: 'Cherry Swash';
font-style: normal;
font-weight: 400;
src: local('Cherry
Swash'), local('CherrySwash-
Regular'), url(http://themes.
googleusercontent.com/
static/fonts/cherryswash/
v1/HqOk7C7J1TZ5i3L-
ejF0vnhCUOGz7vYGh680lGh-uXM.
woff) format('woff'),
}
@font-face {
font-family: 'Cherry Swash';
font-style: normal;
font-weight: 700;
src: local('Cherry Swash
Bold'), local('CherrySwash-
Bold'), url(http://themes.
googleusercontent.com/
static/fonts/cherryswash/v1/-
CfyMyQqfucZPQNB0nvYyHl4twXkwp3_
u9ZoePkT564.woff)
format('woff'),
}
Let’s take a look at modifying the code in Listing 6.3 to include a Google Web Font for the h1 element. If you go to http://www.google.com/fonts and select a font you like, Google gives you code to include in your HTML and CSS. I’ve selected a font called Cherry Swash, Google has advised me to include the following in my HTML template, in the <head> section:
<link href='http://fonts.googleapis.com/css?family=Cherry+Swash:400,700'
rel='stylesheet' type='text/css' />
Now that my code knows where to look for the font, we just refer to it:
h1 {
font-family:'Cherry Swash';
font-size:28px;
text-align:center;
}
Figure 6.4 shows the new résumé with the web font in use.
Summary
In this hour, you learned how to make text appear as boldface or italic and how to code superscripts, subscripts, special symbols, and accented letters. You saw how to make the text line up properly in preformatted passages of monospaced text and how to control the size, color, and typeface of any section of text on a web page. You also learned that attributes are used to specify options and special behavior of many HTML tags, and you learned to use the style attribute with CSS style rules to affect the appearance of text. Finally, you learned how to work with web fonts to enhance the presentation of your pages.
Table 6.2 summarizes the tags and attributes discussed in this hour.
Q&A
Q. How do I find the exact name for a font I have on my computer?
A. On a Windows computer, open the Control Panel and click the Fonts folder—the fonts on your system are listed (Vista users might have to switch to Classic View in the Control Panel). On a Mac, open Font Book in the Applications folder. When specifying fonts in the font-family style rule, use the exact spelling of font names. Font names are not case sensitive, however.
Q. How do I put Kanji, Arabic, Chinese, and other non-European characters on my pages?
A. First of all, users who need to read these characters on your pages must have the appropriate language fonts installed. They must also have selected that language character set and its associated font for their web browsers. You can use the Character Map program in Windows (or a similar program in other operating systems) to get the numerical codes for each character in any language font. To find Character Map, click Start, All Programs, Accessories, and then System Tools. (On a Mac, open Font Book in the Applications folder.) If the character you want has a code of 214, use Ö to place it on a web page. If you cannot find the Character Map program, use your operating system’s built-in Help function to find the specific location.
The best way to include a short message in an Asian language (such as We Speak Tamil-Call Us!) is to include it as a graphics image. That way, every user will see it, even if they use English as their primary language for web browsing. But even to use a language font in a graphic, you will likely have to download a specific language pack for your operating system. Again, check your system’s Help function for specific instructions.
Workshop
The Workshop contains quiz questions and activities to help you solidify your understanding of the material covered. Try to answer all questions before looking at the “Answers” section that follows.
Quiz
1. How can you create a paragraph in which the first three words are bold, using styles instead of the <b> or <strong> tags?
2. How do you represent the chemical formula for water?
3. How do you display © 2013, Webwonks Inc. on a web page?
4. How do you center all of the text on an entire page?
Answers
1. You can use this code:
<p><span style="font-weight: bold">First three words</span> are
bold.</p>
2. You use H<sub>2</sub>O.
3. You can use either of the following:
© 2013, Webwonks Inc.
© 2013, Webwonks Inc.
4. If you thought about putting a <div style="text-align:center"> or another container element immediately after the <body> tag at the top of the page, and using </div> just before the </body> tag at the end of the page, then you’re correct. However, the text-align style is also supported directly in the <body> tag, which means you can forgo the <div> tag and place the style="text-align:center" style directly in the <body> tag. Presto, the entire page is centered!
Exercises
![]() Apply the font-level style attributes you learned about in this chapter to various block-level elements, such as
Apply the font-level style attributes you learned about in this chapter to various block-level elements, such as <p>, <div>, <ul>, and <li> items, as well as some of the semantic elements. Try nesting your elements to get a feel for how styles do or do not cascade through the content hierarchy.
![]() Use the text alignment style attributes to place blocks of text in various places on your web page. Try nesting your paragraphs and divisions (
Use the text alignment style attributes to place blocks of text in various places on your web page. Try nesting your paragraphs and divisions (<p> and <div>) to get a feel for how styles do or do not cascade through the content hierarchy.
![]() Go crazy with web fonts—find some via Google Web Fonts and include them in your stylesheets and, ultimately, the layout of the page itself.
Go crazy with web fonts—find some via Google Web Fonts and include them in your stylesheets and, ultimately, the layout of the page itself.