Now is the time to deploy our application, but before we do this, we need to compress and minify our Aurelia code. Aurelia CLI provides us with the build option to generate these ready-to-deploy files that contain all our application code.
As you might want to build your application for different environments (dev, stage, or prod), this build option comes along with the --env flag. For example, execute the following command in your project:
au build --env prod
The following is a sample output of my-app project:

As the output shows, there are two main files generated: app-bundle.js, which contains our application logic and vendor-bundle.js, which contains third-party dependencies. These two files are generated into the scripts folder in our root application folder.
If you want to run your application and check whether everything is okay with the bundles you recently created, let's install the http-server module using npm. Run the following command in your Terminal:
npm install -g http-server
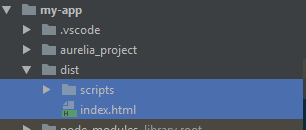
Now, create a dist folder in your application root folder and copy the index.html page and the scripts folder that contain our bundles.
For the last step, get into the dist folder in your Terminal and run the following command:
cd dist
http-server
This command will expose some four URLs where the web server is running; copy the first URL and open it on your web browser, and you should see your application up and running:
