There are several major aspects of deep learning and leveraging GPU-enabled deep learning for Python. We will try to cover the essentials, but feel free to refer to other online documentation and resources as needed. You can also skip these steps and head over to the next section to test whether GPU-enabled deep learning is already active on your server. The newer AWS deep learning AMIs have GPU-enabled deep learning set up.
However, often the setup is not the best or some of the configurations might be wrong, so if you see that deep learning is not making use of your GPU, (from the tests in the next section), you might need to go over these steps. You can head over to the Accessing your deep learning cloud environment and Validating GPU-enablement sections on your deep learning environment to check whether the default setup provided by Amazon works. Then you don't need to go to the trouble of following the remaining steps!
First, you need to check whether the Nvidia GPU is enabled and the drivers for the GPU are properly installed. You can leverage the following commands to check this. Remember, p2.x typically comes armed with a Tesla GPU:
ubuntu@ip:~$ sudo lshw -businfo | grep -i display
pci@0000:00:02.0 display GD 5446
pci@0000:00:1e.0 display GK210GL [Tesla K80]

ubuntu@ip-172-31-90-228:~$ nvidia-smi
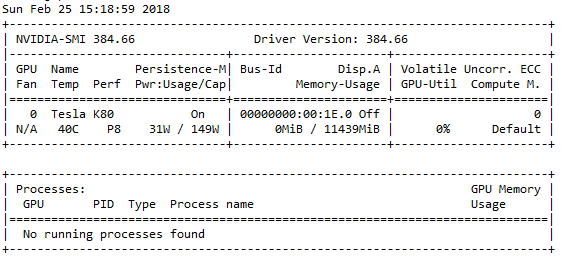
If the drivers are properly installed, you should see an output similar to the following snapshot:

If you get an error, follow these steps to install the Nvidia GPU drivers. Remember to use a different driver link, based on the OS you are using. I have an older Ubuntu 14.04 AMI, for which I used the following:
# check your OS release using the following command
ubuntu@ip:~$ lsb_release -a
No LSB modules are available.
Distributor ID: Ubuntu
Description: Ubuntu 14.04.5 LTS
Release: 14.04
Codename: trusty

# download and install drivers based on your OS
ubuntu@ip:~$ http://developer.download.nvidia.com/compute/cuda/repos/ubuntu1404/ x86_64/cuda-repo-ubuntu1404_8.0.61-1_amd64.deb
ubuntu@ip:~$ sudo dpkg -i ./cuda-repo-ubuntu1404_8.0.61-1_amd64.deb
ubuntu@ip:~$ sudo apt-get update
ubuntu@ip:~$ sudo apt-get install cuda -y
# Might need to restart your server once
# Then check if GPU drivers are working using the following command
ubuntu@ip:~$ nvidia-smi
If you are able to see the driver and GPU hardware details based on the previous commands, your drivers have been installed successfully! Now you can focus on installing the Nvidia CUDA toolkit. The CUDA toolkit in general provides us with a development environment for creating high-performance GPU-accelerated applications. This is what is used to optimize and leverage the full power of our GPU hardware. You can find out more about CUDA and download toolkits at https://developer.nvidia.com/cuda-toolkit.
To install CUDA, run the following commands:
ubuntu@ip:~$ wget https://s3.amazonaws.com/personal-waf/cuda_8.0.61_375.26_linux.run

ubuntu@ip:~$ sudo rm -rf /usr/local/cuda*

ubuntu@ip:~$ sudo sh cuda_8.0.61_375.26_linux.run
# press and hold s to skip agreement and also make sure to select N when asked if you want to install Nvidia drivers

# Do you accept the previously read EULA?
# accept

# Install NVIDIA Accelerated Graphics Driver for Linux-x86_64 361.62?
# ************************* VERY KEY ****************************
# ******************** DON"T SAY Y ******************************
# n

# Install the CUDA 8.0 Toolkit?
# y

# Enter Toolkit Location
# press enter

# Do you want to install a symbolic link at /usr/local/cuda?
# y

# Install the CUDA 8.0 Samples?
# y

# Enter CUDA Samples Location
# press enter

# Installing the CUDA Toolkit in /usr/local/cuda-8.0 …
# Installing the CUDA Samples in /home/liping …
# Copying samples to /home/liping/NVIDIA_CUDA-8.0_Samples now…
# Finished copying samples.
Once CUDA is installed, we also need to install cuDNN. This framework has also been developed by Nvidia and stands for the CUDA Deep Neural Network (cuDNN) library. Essentially, this library is a GPU-accelerated library that consists of several optimized primitives for deep learning and building deep neural networks. The cuDNN framework provides highly optimized and tuned implementations for standard deep learning operations and layers, including regular activation layers, convolution and pooling layers, normalization, and backpropagation! The purpose of this framework is to accelerate the training and performance of deep learning models, specifically for Nvidia GPUs. You can find out more about cuDNN at https://developer.nvidia.com/cudnn. Let's install cuDNN using the following commands:
ubuntu@ip:~$ wget https://s3.amazonaws.com/personal-waf/cudnn-8.0-
             linux-x64-v5.1.tgz

ubuntu@ip:~$ sudo tar -xzvf cudnn-8.0-linux-x64-v5.1.tgz
ubuntu@ip:~$ sudo cp cuda/include/cudnn.h /usr/local/cuda/include
ubuntu@ip:~$ sudo cp cuda/lib64/libcudnn* /usr/local/cuda/lib64
ubuntu@ip:~$ sudo chmod a+r /usr/local/cuda/include/cudnn.h
             /usr/local/cuda/lib64/libcudnn*
Once complete, remember to add the following lines to the end of ~/.bashrc using your favorite editor (we used vim):
ubuntu@ip:~$ vim ~/.bashrc

# add these lines right at the end and press esc and :wq to save and
# quit

export LD_LIBRARY_PATH="$LD_LIBRARY_PATH:/usr/local/cuda/lib64:/usr/local/cuda
                 /extras/CUPTI/lib64"
export CUDA_HOME=/usr/local/cuda
export DYLD_LIBRARY_PATH="$DYLD_LIBRARY_PATH:$CUDA_HOME/lib"
export PATH="$CUDA_HOME/bin:$PATH"

ubuntu@ip:~$ source ~/.bashrc
Typically, this takes care of most of the necessary dependencies for our GPU. Now, we need to install and set up our Python deep learning dependencies. Usually AWS AMIs come installed with the Anaconda distribution; however, in case it is not there, you can always refer to https://www.anaconda.com/download to download the distribution of your choice, based on the Python and OS version. Typically, we use Linux/Windows and Python 3 and leverage the TensorFlow and Keras deep learning frameworks in this book. In the AWS AMIs, incompatible framework versions might be installed, which don't work well with CUDA or might be CPU-only versions. The following commands install the GPU version of TensorFlow that works best on CUDA 8:
# uninstall previously installed versions if any
ubuntu@ip:~$ sudo pip3 uninstall tensorflow
ubuntu@ip:~$ sudo pip3 uninstall tensorflow-gpu

# install tensorflow GPU version
ubuntu@ip:~$ sudo pip3 install --ignore-installed --upgrade https://storage.googleapis.com/tensorflow/linux/gpu/tensorflow_gpu-1.2.0-cp34-cp34m-linux_x86_64.whl
Next up, we need to upgrade Keras to the latest version and also delete any leftover config files:
ubuntu@ip:~$ sudo pip install keras --upgrade
ubuntu@ip:~$ sudo pip3 install keras --upgrade
ubuntu@ip:~$ rm ~/.keras/keras.json
We are now almost ready to start leveraging our deep learning setup on the cloud. Hold on tight!
