Chapter 5. Encapsulation: Keep your privates... private

Ever wished for a little more privacy?
Sometimes your objects feel the same way. Just like you don’t want anybody you don’t trust reading your journal or paging through your bank statements, good objects don’t let other objects go poking around their fields. In this chapter, you’re going to learn about the power of encapsulation, a way of programming that helps you make code that’s safe, flexible, easy to use, and difficult to misuse. You’ll make your object’s data private, and add properties to protect how that data is accessed.
Let’s help Ryan roll for damage
Ryan was so happy with his ability score calculator that he wanted to create more C# programs he can use for his games, and you’re going to help him. In the game he’s currently running, any time there’s a sword attack he rolls 3d6 and uses a formula that calculates the damage. Ryan wrote down how the sword damage formula works in his game master notebook.
Here’s a class called SwordDamage that does the calculation. Read through the code carefully—you’re about to create an app that uses it.


Create a console app to calculate damage
Let’s build a console app for Ryan that uses the SwordDamage class. It will print a prompt to the console asking the user to specify whether the sword is magic and/or flaming, then it will do the calculation. Here’s an example of the output of the app:

0 for no magic/flaming, 1 for magic, 2 for flaming, 3 for both, anything else to quit: 0
Rolled 11 for 14 HP

0 for no magic/flaming, 1 for magic, 2 for flaming, 3 for both, anything else to quit: 0
Rolled 15 for 18 HP

0 for no magic/flaming, 1 for magic, 2 for flaming, 3 for both, anything else to quit: 1
Rolled 11 for 22 HP

0 for no magic/flaming, 1 for magic, 2 for flaming, 3 for both, anything else to quit: 1
Rolled 8 for 17 HP

0 for no magic/flaming, 1 for magic, 2 for flaming, 3 for both, anything else to quit: 2
Rolled 10 for 15 HP

0 for no magic/flaming, 1 for magic, 2 for flaming, 3 for both, anything else to quit: 3
Rolled 17 for 34 HP

0 for no magic/flaming, 1 for magic, 2 for flaming, 3 for both, anything else to quit: q
Press any key to continue...
Let’s double-check some of those calculations, just to make sure we understand the formula. Rolling 11 for a non-magic, non-flaming sword will cause 11 + 3 = 14 HP of damage. Rolling 11 for a magic sword will cause (round down 11 × 1.75 = 19) + 3 = 22. Rolling 17 for a magic flaming sword causes (round down 17 × 1.75 = 29) + 3 + 2 = 34.

Yes! We can build a WPF app that uses the same class.
Let’s find a way to reuse the SwordDamage class in a WPF app. The first challenge for us is how to provide an intuitive user interface. A sword can be magic, flaming, both, or none, so we need to figure out how we want to handle that in a GUI—and there are a lot of options. We could have a radio button or dropdown list with four options, just like the console app gave for options. But we think it would be cleaner and more visually obvious to use a checkbox.
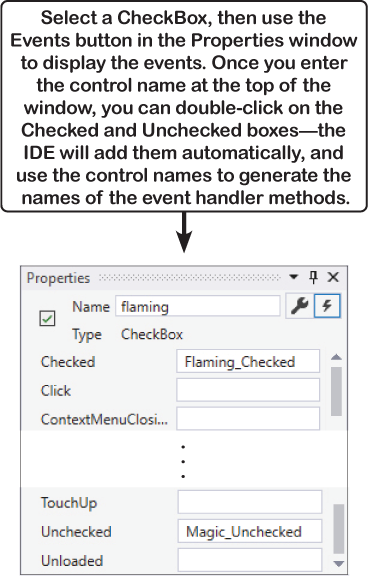
In WPF, checkboxes use the Content property to display the label to the right of the box, just like the Button uses the Content property for the text that it displays. And since we have the SetMagic and SetFlaming, we can use WPF checkboxes’ Checked and Unchecked events, which let you specify methods that get called when the user checks or unchecks the box.
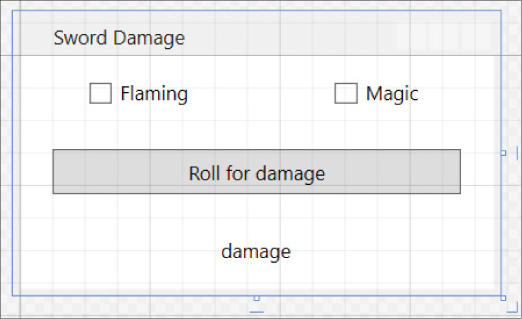
Design the XAML for a WPF version of the damage calculator
Create a new WPF app—give its main window Title="Sword Damage" Height="175" Width="300". It contains a grid with three rows and two columns. The top row has two CheckBox controls labeled Flaming and Magic, the middle row has a Button control labeled “Roll for damage” that spans both columns, and the bottom row has a TextBlock control that spans both columns.
Design this!
Here’s the XAML—you can definitely use the designer to build your form, but you should also feel comfortable editing the XAML by hand:
Note
Name the CheckBox controls magic and flaming, and the TextBlock control damage. Make sure the names appear in the XAML correctly in the x:Name properties.

The code-behind for the WPF damage calculator
Do this!
Add this code-behind to your WPF app. It creates instances of SwordDamage and Random, and makes the checkboxes and button calculate damage.
public partial class MainWindow : Window
{
    Random random = new Random();
    SwordDamage swordDamage = new SwordDamage();

    public MainWindow()
    {
        InitializeComponent();
        swordDamage.SetMagic(false);
        swordDamage.SetFlaming(false);
        RollDice();
    }

    public void RollDice()
    {
        swordDamage.Roll = random.Next(1, 7) + random.Next(1, 7) + random.Next(1, 7);
        DisplayDamage();
    }

    void DisplayDamage()
    {
        damage.Text = "Rolled " + swordDamage.Roll + " for " + swordDamage.Damage + " HP";
    }

    private void Button_Click(object sender, RoutedEventArgs e)
    {
        RollDice();
    }

    private void Flaming_Checked(object sender, RoutedEventArgs e)
    {
        swordDamage.SetFlaming(true);
        DisplayDamage();
    }
    private void Flaming_Unchecked(object sender, RoutedEventArgs e)
    {
        swordDamage.SetFlaming(false);
        DisplayDamage();
    }
    private void Magic_Checked(object sender, RoutedEventArgs e)
    {
        swordDamage.SetMagic(true);
        DisplayDamage();
    }

    private void Magic_Unchecked(object sender, RoutedEventArgs e)
    {
        swordDamage.SetMagic(false);
        DisplayDamage();
    }
}
Note
Read through this code very carefully. Can you spot any bugs before you run it?
Tabletop talk (or maybe... dice discussion?)
It’s game night! Ryan’s entire gaming party is over, and he’s about to unveil his brand new sword damage calculator. Let’s see how that goes.

Jayden: Ryan, what are you talking about?
Ryan: I’m talking about this new app that will calculate sword damage... automatically.
Matthew: Because rolling dice is so very, very hard.
Jayden: Come on, people, no need for sarcasm. Let’s give it a chance.
Ryan: Thank you, Jayden. This is a perfect time, too, because Brittany just attacked the rampaging were-cow with her flaming magic sword. Go ahead, B. Give it a shot.
Brittany: Okay. We just started the app. I checked the Magic box. Looks like it’s got an old roll in there, let me click roll to do it again, and...
Jayden: Wait, that’s not right. Now you rolled 14, but it still says 3 HP. Click it again. Rolled 11 for 3 HP. Click it some more. 9, 10, 5, all give 3 HP. Ryan, what’s the deal?
Brittany: Hey, it sort of works. If you click roll, then check the boxes a few times, eventually it gives the right answer. Looks like I rolled 10 for 22 HP.
Jayden: You’re right. We just have to click things in a really specific order. First we click roll, then we check the right boxes, and just to be sure we check the Flaming box twice.
Ryan: You’re right. If we do things in exactly that order, the program works. But if we do it in any other order, it breaks. Okay, we can work with this.
Matthew: Or... maybe we can just do things the normal way, with real dice?

Let’s try to fix that bug
When you run the program, what’s the first thing that it does? Let’s take a closer look at this method at the very top of the MainWindow class with the code-behind for the window:
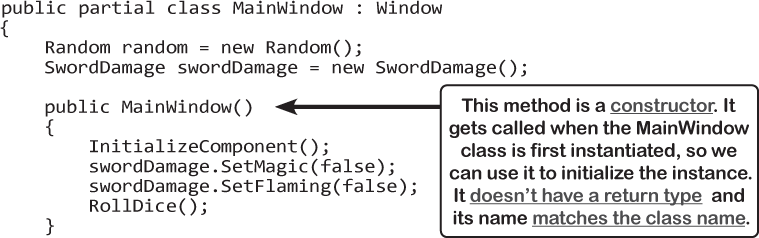

That method is a constructor. When a class has a constructor, it’s the very first thing that gets run when a new instance of that class is created . So when your app starts up creates an instance of MainWindow, first it initializes the fields—including creating a new SwordDamage object—and then it calls the constructor. So the program calls RollDice just before showing you the window, and we see the problem every time we click RollDice, so maybe we can fix this by hacking a solution into the RollDice method. Make these changes to the RollDice method:
Re-do this!

Now test your code. Run your program and click the button a few times. So far so good—the numbers look correct. Now check the Magic box and click the button a few more times. Okay, it looks like our fix worked! There’s just one more thing to test. Check the Flaming box and click the button and... oops! It’s still not working. When you click the button, it does the 1.75 magic multiplier, but it doesn’t add the extra 3HP for flaming. You still need to check and uncheck the Flaming checkbox to get the right number. So the program’s still broken.
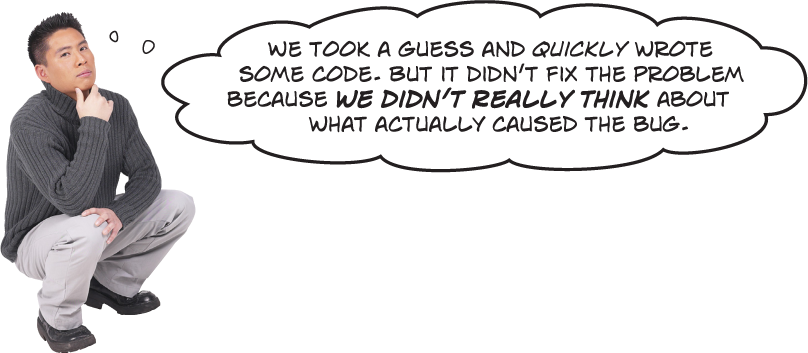
Always think about what caused a bug before you try to fix it.
When something goes wrong in our code, it’s really tempting to jump right in and immediately start writing more code to try to fix it. It may feel like you’re taking action quickly, but it’s really easy to just add more buggy code. It’s always faster to take the time to figure out what really caused the bug and fix it, rather than just try to stick in a quick fix.
Use Debug.WriteLine to print diagnostic information
In the last few chapters you used the debugger to track down bugs. But that’s not the only way developers find problems in their code. In fact, when professional developers are trying to track down bugs in their code, one of the most common things they’ll do first is to add statements that print lines of output, and that’s exactly what we’ll do to track down this bug.
Open the Output Window in Visual Studio by choosing Output (Ctrl+O W) from the View menu. Any text that you print by calling Console.WriteLine from a WPF app is displayed in this window. But you should only use Console.WriteLine for displaying output to your users. Instead, any time you want to print output lines just for debugging purposes you should use Debug.WriteLine. The Debug class is in the System.Diagnostics namespace, so start by adding a using line to the top of your SwordDamage class file:
using System.Diagnostics;
Next, add a Debug.WriteLine statement to the end of the CalculateDamage method:
   public void CalculateDamage()
   {
       Damage = (int)(Roll * MagicMultiplier) + BASE_DAMAGE + FlamingDamage;
       Debug.WriteLine($"CalculateDamage finished: {Damage} (roll: {Roll})");
   }
Now add another Debug.WriteLine statement to the end of the SetMagic, and one more to the end of the SetFlaming method. They should be identical to the one in CalculateDamage, except that they print “SetMagic” or “SetFlaming” instead of “CalculateDamage” to the output.
    public void SetMagic(bool isMagic)
    {
        // the rest of the SetMagic method stays the same
        Debug.WriteLine($"SetMagic finished: {Damage} (roll: {Roll})");
    }

    public void SetFlaming(bool isFlaming)
    {
        // the rest of the SetFlaming method stays the same
        Debug.WriteLine($"SetFlaming finished: {Damage} (roll: {Roll})");
}
Now your program will print useful diagnostic information to the Output window.
Note
You can sleuth out this bug without setting any breakpoints. That’s something developers do all the time... so you should learn how to do it, too!

People won’t always use your classes in exactly the way you expect.
And most of the time those “people” who are using your classes are you! You might be writing a class today that you’ll be using tomorrow. Luckily, C# gives you a powerful tool to make sure your program always works correctly— even when people do things you never thought of. It’s called encapsulation and it’s a really helpful technique for working with objects. The goal of encapsulation is to restrict access to the “guts” of your classes so that all of the class members are safe to use and difficult to misuse. This lets you design classes that are much more difficult to use incorrectly—and that’s a great way to prevent bugs like the one you sleuthed out in your sword damage calculator.
It’s easy to accidentally misuse your objects
Ryan’s app ran into problems because we assumed that the CalculateDamage method would, well, calculate the damage. It turned out that it wasn’t safe to call that method directly because it replaced the Damage value and erased any calculations that were already done. Instead, we needed to let the SetFlaming method call CalculateDamage for us—but even that wasn’t enough, because we also had to make sure that SetMagic was always called first. So even though the SwordDamage class technically works, it causes problems when code calls it in an unexpected way.
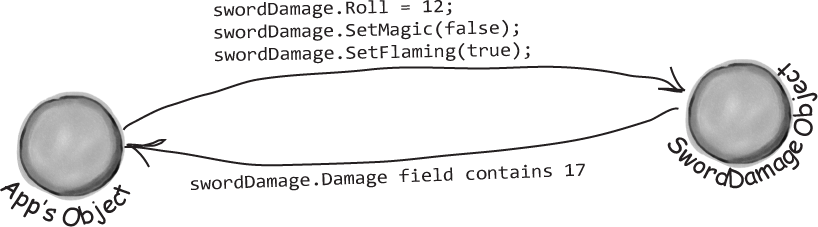
How the SwordDamage class expected to be used
The SwordDamage class gave the app a good method to calculate the total damage for a sword. All it had to do was set the roll, then call the SetMagic method, and finally call the SetFlaming method. If things are done in that order, the Damage field is updated with the calculated damage.
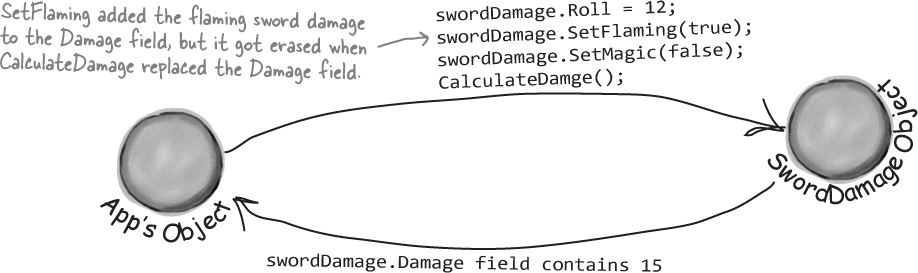
How the SwordDamage class was actually used
But that’s not what the app did. Instead, set the Roll field, then it called SetFlaming, which added the extra damage for the flaming sword to the Damage field. But then it called SetMagic, and finally, it called CalculateDamage, which reset the Damage field and discarded the extra flaming damage.
Encapsulation means keeping some of the data in a class private
There’s an easy way to avoid this kind of problem: make sure that there’s only one way to use your class. Luckily, C# makes it easy to do that by letting you declare some of your fields as private. So far, you’ve only seen public fields. If you’ve got an object with a public field, any other object can read or change that field. But if you make it a private field, then that field can only be accessed from inside that object (or by another instance of the same class).

By making the CalculateDamage method private, we prevent the app from accidentally calling it and resetting the Damage field. Changing the fields involved in the calculation to make them private keeps an app from interfering with the calculation. When you make some data private and then write code to use that data, it’s called encapsulation. And when a class protects its data and provides members that are safe to use and difficult to misuse, we say that it’s well-encapsulated.
Use encapsulation to control access to your class’s methods and fields
When you make all of your fields and methods public, any other class can access them. Everything your class does and knows about becomes an open book for every other class in your program...and you just saw how that can cause your program to behave in ways you never expected.
That’s why the public and private keywords are called access modifiers: they modify access to class members. Encapsulation lets you control what you share and what you keep private inside your class. Let’s see how this works:


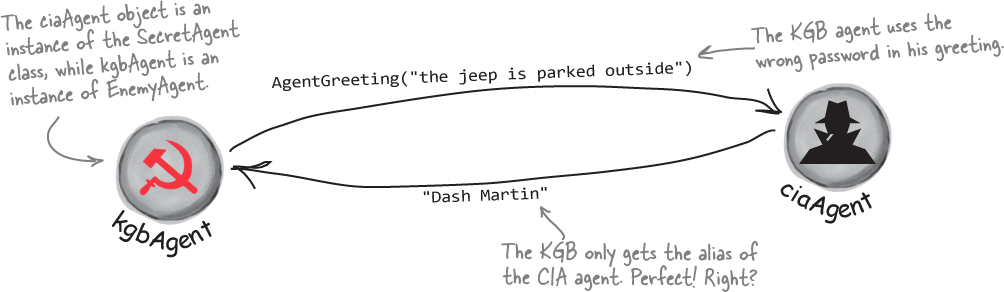
Super-spy Herb Jones is a CIA agent object in a 1960s spy movie app defending life, liberty, and the pursuit of happiness as an undercover agent in the USSR. His
ciaAgentobject is an instance of the SecretAgent class.
Agent Jones has a plan to help him evade the enemy KGB agent object. He added an AgentGreeting method that takes a password as its parameter. If he doesn’t get the right password, he’ll only reveal his alias, Dash Martin.
Seems like a foolproof way to protect the agent’s identity, right? As long as the agent object that calls it doesn’t have the right password, the agent’s name is safe.
But is the RealName field REALLY protected?
So as long as the KGB doesn’t know any CIA agent object passwords, the CIA’s real names are safe. Right? But that doesn’t do any good if that data’s kept in public fields.

What can Agent Jones do? He can use private fields to keep his identity secret from enemy spy objects. Once he declares the realName field as private, the only way to get to it is by calling methods that have access to the private parts of the class. So the KGB agent is foiled!
Note
Just replace public with private, and now the field is hidden from any object that isn’t an instance of the same class. Keeping the right fields and methods private makes sure no outside code is going to change values you’re using when you don’t expect it. We renamed the fields to start with lowercase letters to make our code more readable.
private string realName;
private string password;
Private fields and methods can only be accessed from instances of the same class
There’s only one way that an object can get at the data stored inside another object’s private fields: by using the public fields and methods that return the data. But while KGB and MI5 agents need to use the AgentGreeting method, friendly spies that are also CiaAgent instances can see everything... because any class can see private fields in other instances of the same class.

Note
The only way that one object can get to data stored in a private field inside another object of a different type is by using public methods that return the data.

Because sometimes you want your class to hide information from the rest of the program.
A lot of people find encapsulation a little odd the first time they come across it because the idea of hiding one class’s fields, properties, or methods from another class is a little counterintuitive. But there are some very good reasons that you’ll want to think about what information in your class to expose to the rest of the program.
Note
Encapsulation means having one class hide information from another. It helps you prevent bugs in your programs.
Think of an object as a black box
Sometimes you’ll hear a programmer refer to an object as a “black box,” and that’s a pretty good way of thinking about them. When we say something is a black box, we’re saying that we can only see how it behaves, but we have no way of knowing how it actually works.
When you call an object’s methods, you don’t really care how that method works—at least, not right now. All you care about is that it takes the inputs you gave it and does the right thing.

You could include a lot more controls, like a window that shows you what’s going on inside the box, and knobs and dials that let you muck with its internals. But if they don’t actually do anything that your system needs, then they don’t do you any good and can only cause problems.
Encapsulation makes your classes...
Easy to use
You already know that classes use fields to keep track of their state. And a lot of them use methods to keep those fields up to date—methods that no other class will ever call. It’s pretty common to have a class that has fields, methods, and properties that will never be called by any other class. If you make those members private, then they won’t show up in the IntelliSense window later when you need to use that class.
Easy to maintain
That bug in Ryan program happened because the app accessed a method directly rather than letting the other methods in the class call it. If that method had been private, we could have avoided that bug.
Flexible
A lot of times, you’ll want to go back and add features to a program you wrote a while ago. If your classes are well encapsulated, then you’ll know exactly how to use them later on.
A few ideas for encapsulating classes
Is everything in your class public?
If your class has nothing but public fields and methods, you probably need to spend a little more time thinking about encapsulation.
Think about ways fields and methods can be misused.
What can go wrong if they’re not set or called properly?
What fields require some processing or calculation to happen when they’re set?
Those are prime candidates for encapsulation. If someone writes a method later that changes the value in any one of them, it could cause problems for the work your program is trying to do.

Only make fields and methods public if you need to.
If you don’t have a reason to declare something public, don’t. You could make things really messy for yourself by making all of the fields in your program public—but don’t just go making everything private, either. Spending a little time up front thinking about which fields really need to be public and which don’t can save you a lot of time later.

Exactly! The difference is that the well-encapsulated one is built in a way that prevents bugs and is easier to use.
It’s easy to take a well-encapsulated class and turn it into a poorly encapsulated class: do a search-and-replace to change every occurrence of private to public.
And that’s a funny thing about the private keyword: you can generally take any program and do that search-and-replace, and it will still compile and work in exactly the same way. That’s one reason that encapsulation can be a little difficult for some programmers to really “get” when they first see it.
When you come back to code that you haven’t looked at in a long time, it’s easy to forget how you intended it to be used. That’s where encapsulation can make your life a lot easier!
This book so far has been about making programs do things—perform certain behaviors. Encapsulation is a little different. It doesn’t change the way your program behaves. It’s more about the “chess game” side of programming: by hiding certain information in your classes when you design and build them, you set up a strategy for how they’ll interact later. The better the strategy, the more flexible and maintainable your programs will be, and the more bugs you’ll avoid.
Note
And just like chess, there are an almost unlimited number of possible encapsulation strategies!
Note
If you encapsulate your classes well today, that makes them a lot easier to reuse tomorrow.
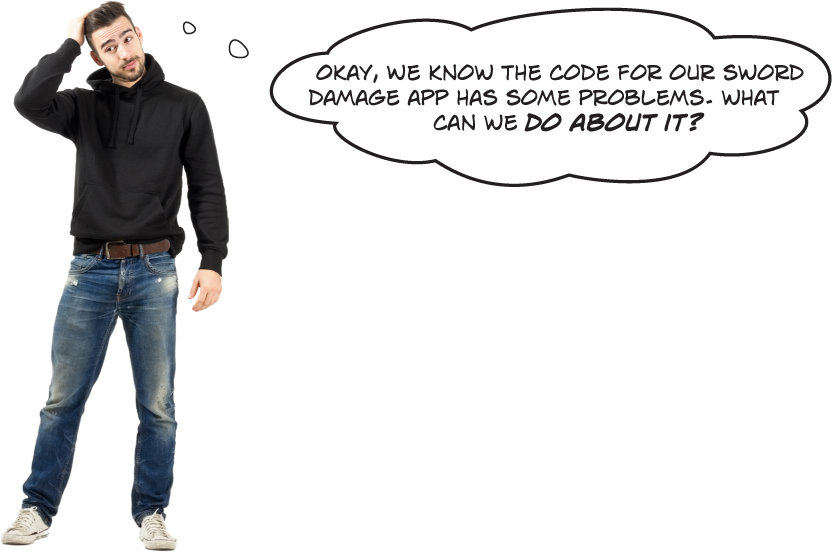

Let’s use encapsulation to improve the SwordDamage class
We just saw some great ideas for encapsulating classes. Let’s see if we can start to apply those ideas to the SwordDamage class to keep it from being confused, misused, and abused by any app that we include it in.
Is every member of the SwordDamage class public?
Yes, indeed. The four fields (Roll, MagicMultiple, FlamingDamage, and Damage) are public, and so are the three methods (CalculateDamage, SetMagic, and SetFlaming). We could stand to think about encapsulation.
Are fields or methods being misused?
Absolutely. In the first version of the damage calculator app, we called CalculateDamage when we should have just let the SetFlaming method call it. And even our attempt to fix it failed because we misused the methods by calling them in the wrong order.
Note
Making members of a class private can prevent bugs caused by other classes calling its public methods or updating its public fields in unexpected ways.
Is there calculation required after setting a field?
Certainly. After setting the Roll field, we really want the instance to calculate damage immediately.
So what fields and methods really need to be public?
That’s a great question. Take some time to think about the answer. We’ll tackle it at the end of the chapter.
Encapsulation keeps your data safe
We’ve seen how you can use the private keyword to protect fields from being written directly to make class members private, and how that can prevent bugs caused by other classes calling methods or updating fields in ways we didn’t expect—like how your GetPot method in the Hi-Lo game gave readonly access to the private pot field, and only the Guess or Hint methods could modify it. This next class works in exactly the same way.
Let’s use encapsulation in a simple class
Let’s build a MachineGun class for a video game where the player can pick up weapons and refill ammo. There are several guns and the ammo for one doesn’t fit any of the others, so we want the class to keep track of the total number of bullets the player has. We’ll add a method to check if the gun is empty and needs to be reloaded. We also want it to keep track of the magazine size. Any time the player gets more ammo we want the gun to automatically reload a full magazine, so we’ll make sure that always happens by providing a method to set the number of bullets that calls the Reload method.

Write a console app to test the MachineGun class
Do this!
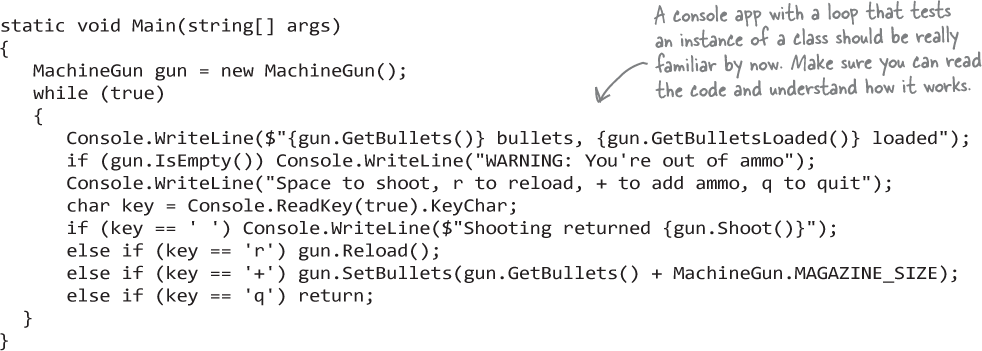
Let’s try out our new MachineGun class. Create a new Console App and add the MachineGun class to it. Here’s the Main method—it uses a loop to call the various methods in the class:
Our class is well-encapsulated, but...
The class works. And we definitely encapsulated it well. The bullets field is protected: it doesn’t let you set a negative number of bullets, and it keeps the bullets and bulletsLoaded fields in sync. The Reload and Shoot methods work as expected, and there don’t seem to be any obvious ways we could accidentally misuse this class.
But have a closer look at this line from the Main method:
else if (key == ’+’) gun.SetBullets(gun.GetBullets() + MachineGun.MAGAZINE_SIZE);
Let’s be honest—that’s a downgrade from a field. If we still had a field, we could use the += operator to increase it by the magazine size. Encapsulation is great, but we don’t want it to make our class annoying or difficult to use.
Is there a way to keep the bullets field protected but still get the convenience of +=?
Properties make encapsulation easier
So far you’ve learned about two kinds of class members, methods and fields. There’s a third kind of class member that makes encapsulation easy A property is a class member that looks like a field when it’s used, but it acts like a method when it runs.
A property is declared just like a field, with a type and a name, except instead of ending with a semicolon it’s followed by curly brackets. Inside those brackets are property accessors, or methods that either return or set the property value. There are two types of accessors:
A get property accessor, usually just referred to as a get accessor or getter, that returns the value of the property. It starts with the
getkeyword, followed by a method inside curly brackets. The method must return a value that matches the type in the property declaration.A set property accessor, usually just referred to as a set accessor or setter, that sets the value of the property. It starts with the
setkeyword, followed by a method inside curly brackets. Inside the method, thevaluekeyword is a read-only variable that contains the value being set.
It is very common for a property to get or set a backing field, which is what we call a private field that’s encapsulated by restricting access to it through a property.
Replace this!
Replace the GetBullets and SetBullets methods with a property
Here are the GetBullets and SetBullets methods from your MachineGun class:
public int GetBullets() { return bullets; }

public void SetBullets(int numberOfBullets)
{
    if (numberOfBullets > 0)
        bullets = numberOfBullets;
    Reload();
}
Let’s replace them with a property. Delete both methods. Then add this Bullets property:

Modify your Main method to use the Bullets property
Now that you’ve replaced the GetBullets and SetBullets with a single property called Bullets, your code won’t build anymore. We need to update the Main method to use the Bullets property instead of the old methods.
The GetBullets method was called in this Console.WriteLine statement:
Update this!
Console.WriteLine($"{gun. GetBullets()} bullets, {gun.GetBulletsLoaded()} loaded");
That’s easy enough to fix—just replace GetBullets() with Bullets and statement will work just like before. But now let’s have a look at the other place where the GetBullets and SetBullets were used:
else if (key == ’+’) gun. SetBullets(gun.GetBullets() + MachineGun.MAGAZINE_SIZE);
This was that messy line of code that looked ugly and clunky. Properties are really useful because they work like methods but you use them like fields. So let’s use the Bullets property like a field—replace that line with this statement that uses the += operator exactly like it would if Bullets were a field:

Here’s the updated Main method:
static void Main(string[] args)
{
    MachineGun gun = new MachineGun();
    while (true)
    {
        Console.WriteLine($"{gun.Bullets} bullets, {gun.GetBulletsLoaded()} loaded");
        if (gun.IsEmpty()) Console.WriteLine("WARNING: You're out of ammo");
        Console.WriteLine("Space to shoot, r to reload, + to add ammo, q to quit");
        char key = Console.ReadKey(true).KeyChar;
        if (key == ' ') Console.WriteLine($"Shooting returned {gun.Shoot()}");
        else if (key == 'r') gun.Reload();
        else if (key == '+') gun.Bullets += MachineGun.MAGAZINE_SIZE;
        else if (key == 'q') return;
    }
}
Debug your MachineGun class to understand how the property works
Use the debugger to really get a good sense of how your new Bullet property works.
Place a breakpoint inside the curly brackets of the get accessor (
return bullets;).Place another breakpoint on the first line of the set accessor (
if (value > 0)).Place a breakpoint at the top of the Main method and start debugging. Step over each statement.
When you step over the Console.WriteLine, the debugger will hit the breakpoint in the getter.
Keep stepping over methods. When you execute the += statement, the debugger will hit the breakpoint in the setter. Add a watch for the backing field
bulletsand thevaluekeyword.
Auto-implemented properties simplify your code
Add this!
A very common way to use a property is to create a backing field and provide simple get and set accessors for it. Let’s create a new BulletsLoaded property that uses the existing bulletsLoaded field as a backing field.

Now you can delete the GetBulletsLoaded method and modify your Main method to use the property:
Console.WriteLine($"{gun.Bullets} bullets, {gun.BulletsLoaded} loaded");
Run your program again. It should still work exactly the same way.
Use the prop snippet to create an auto-implemented property
An auto-implemented property—sometimes called an automatic property or auto-property—is a property that has a getter that returns the value of the backing field, and a setter that updates it. In other words, it works just like the BulletsLoaded property that you just created. But there’s one important difference: when you create an automatic property you don’t define the backing field. Instead, the C# compiler creates the backing field for you, and the only way to update it is to use the get and set accessors.
And Visual Studio gives you a really useful tool for creating automatic properties: a code snippet, or a small, reusable block of code that the IDE inserts automatically. Let’s use it to create a BulletsLoaded auto-property.
Remove the BulletsLoaded property and backing field. Delete the BulletsLoaded property you added, because we’re going to replace it with an auto-implemented property. Then delete the bulletsLoaded backing field (
private int bulletsLoaded = 0;) too, because any time you create an automatic property the C# compiler generates a hidden backing field for you.Tell the IDE to start the prop snippet. Put your cursor where the field used to be, and then type
propand press the Tab key twice to tell the IDE to start a snippet. It will add this line to your code:
The snippet is a template that lets you edit parts of it—the prop snippet lets you edit the type and the property name. Press the tab key once to switch to the property name, then change the name to
BulletsLoadedand press enter to finalize the snippet
Fix the rest of the class. Since you removed the bulletsLoaded field, your MachineGun class doesn’t compile anymore. That’s easy to fix—the bulletsLoaded field appears five times in the code (once in the IsEmpty method, and twice in the Reload and Shoot methods). Change them to BulletsLoaded—now your program works again.
Use a private setter to create a read-only property
Let’s take another look at the auto-implemented property that you just created:
public int BulletsLoaded { get; set; }
This is definitely a great replacement for a property with get and set accessors that just update a backing field. And it’s more readable and has less code than the bulletsLoaded field and GetBulletsLoaded method. So that’s an improvement, right?
But there’s just one problem: we’ve broken the encapsulation. The whole point of the private field and public method was to make the number of bullets loaded read-only. The Main method could easily set the BulletsLoaded property. We made the field private and created a public method to get the value so that it could only be modified from inside the MachineGun class.
Make the BulletsLoaded setter private
Luckily, there’s a very easy way to make our MachineGun class well-encapsulated again. When you use a property, you can put an access modifier in front of the get or set keyword.
You can make a read-only property that can’t be set by another class by making make its set accessor private. In fact, you can leave out the set accessor entirely for normal properties—but not automatic properties, which must have a set accessor or your code won’t compile.
So let’s make the set accessor private:

Now the BulletsLoaded field is a read-only property. IT be read anywhere, but it can only be updated from inside the MachineGun class. The MachineGun class is well-encapsulated again.
What if we want to change the magazine size?
Right now the MachineGun class uses a const for the magazine size:
public const int MAGAZINE_SIZE = 16;
Replace this!
What if we want the game to set the magazine size when the gun is spawned? Let’s replace it with a property.
Remove the MAGAZINE_SIZE constant and replace it with a read-only property.
public int MagazineSize { get; private set; }Modify the Reload method to use the new property.
   if (bullets > MagazineSize)
        BulletsLoaded = MagazineSize;
Fix the line in the Main method that adds the ammo.
else if (key == ’+’) gun.Bullets += gun.MagazineSize;
But there’s a problem... how do we initialize MagazineSize?
The MAGAZINE_SIZE constant used to be set to 16. Now we’ve replaced it with an auto-property, and we if we want, we can initialize it to 16 just like a field by adding an assignment to the end of the declaration:
public int MagazineSize { get; private set; } = 16;
But what if we want the game to be able to specify the number of bullets? Maybe most guns are spawned loaded, but in some rapid onslaught levels we want some guns to spawn unloaded so the player needs to reload before firing. How do we do any of that?
Use a constructor with parameters to initialize properties
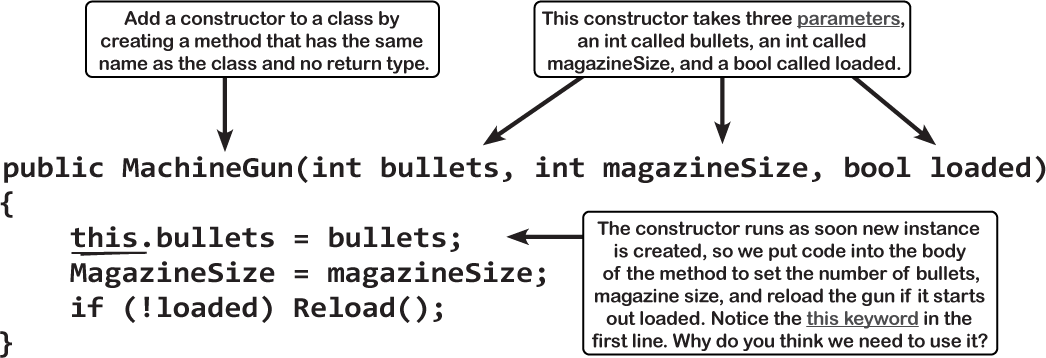
You saw earlier in the chapter that you can initialize an object with a constructor, or a special method that’s called when the object is first instantiated. Constructors are just like any other method—which means they can have parameters. We’ll use a constructor with parameters to initialize the properties.
The constructor you just created in the Q&A answer looks like this: public ConstructorTest(). That’s a parameterless constructor, so just like any other method without parameters the declaration ends with (). Now let’s add a constructor with parameters to the MachineGun class. Here’s the constructor to add:
Uh-oh—there’s a problem. As soon as you add the constructor, the IDE will tell you that the Main method has an error:

What do you think we need to do to fix this error?
Specify arguments when you use the new keyword
When you added the constructor, the IDE told you that the Main method has an error on the new statement (MachineGun gun = new MachineGun()). Here’s what that error looks like:

Read the text of the error—it’s telling you exactly what’s wrong. Your constructor now takes arguments, so it needs parameters. And, in fact, if you start typing the new statement again, the IDE will tell you exactly what you need to add:

You’ve been using new to create instances of classes. So far, all of your classes have had parameterless constructors, so you never needed to provide any arguments.
Now you have a constructor with parameters, and like any method with parameters, you need to specify arguments with types that match those parameters.
Modify this!
Let’s modify your Main method to pass parameters to the MachineGun constructor.
Add the ReadInt method that you wrote for Ryan’s ability score calculator in Chapter 3.
You need to get the arguments for the constructor from somewhere. And you already have a perfectly good method that prompts the user for int values, so it makes sense reuse it here.
Add code to read values from the console input.
Now that you’ve added the ReadInt method from Chapter 3, you can use it to get two int values. Add these four lines of code to the top of your Main method.

Update the
newstatement to add arguments.Now that you have values in variables with types that match the parameters in the constructor, you can update the
newstatement to pass them to the constructor as arguments.MachineGun gun = new MachineGun(numberOfBullets, magazineSize, isLoaded);Run your program.
Now run your program. It will prompt you for the number of bullets, magazine size, and whether or not the gun is loaded. Then it will create a new instance of MachineGun, passing arguments to its constructor that matches your choices.
A few useful facts about methods and properties
Every method in your class has a unique signature.
The first line of a method that contains the access modifier, return value, name, and parameters is called the method’s signature. Properties have signatures, too—they consist of the access modifier, type, and name.
You can initialize properties in an object initializer.
You used object initializers before:
Guy joe = new Guy() { Cash = 50, Name = "Joe" };You can also specify properties in an object initializer. If you do, the constructor is run first, then the properties are set. And you can only initialize public fields and properties in the object initializer.
Every class has a constructor, even if you didn’t add one yourself.
The CLR needs a constructor to instantiate an object—it’s part of the behind-the-scenes mechanics of how .NET works. So if you don’t add a constructor to your class, the C# compiler automatically adds a parameterless constructor for you.
You can keep a class from being instantiated by other classes by adding a private constructor.
Sometimes you need to have really careful control over how your objects are created. One way to do that is to make your constructor private—then it can only be called from inside the class. Take a minute and try it out:
class NoNew {
   private NoNew() { Console.WriteLine("I’m alive!"); }
   public static NoNew CreateInstance() { return new NoNew(); }
}
Add that NoNew class to a console app. If you try to add
new NoNew();to your Main method, the C# compiler gives you an error (’NoNew.NoNew()’ is inaccessible due to its protection level). But theNoNew.CreateInstancemethod creates a new instance just fine.
Note
This is a really good time to talk about aesthetics in video games. If you think about it, encapsulation doesn’t really give you a way to do anything that you couldn’t before. You could still write the same programs without properties, constructors, and private methods—but they would sure look really different. That’s because not everything in programming is about making your code do something different. Often, it’s about making your code do the same thing but in a better way. Think about that when you read about aesthetics. They don’t change the way your game behaves, they change the way the player thinks and feels about the game.
Note
Some developers are really skeptical when they read about aesthetics because they assume that only the mechanics of the game matters. Here’s a quick thought experiment to show how important aesthetics can be. Let’s say you two games with identical mechanics. There’s just one very tiny difference between them. In one game you’re kicking boulders out of the way to save a village. In the other game, you’re kicking puppies and kittens because you are a horrible person. Even if every other aspect of those games is identical, those are two very different games. That’s the power of aesthetics.
Note
You can have a set without a get, or a get without a set (unless it’s an automatic property).
Objectcross
Take a break, sit back, and give your right brain something to do. It’s your standard crossword; all of the solution words are from the first four chapters of the book.

Across
1. Draw one of these for your class before you start writing code
3. Every object has this method that converts it to a string
9. The four whole-number types that only hold positive numbers
13. Looks like a field but acts like a method
15. What not make a class if you want to be able to create instances of it
17. The statement you use to create an object
18. The second part of a variable declaration
19. A variable declared directly in a class that all its members can access
20. What you use to pass information into a method
22. What kind of sequence is or ?
25. An object’s fields keep track of its _______
29. What an object is an instance of
30. A variable that points to an object
32. The kind of collection that happens when the last reference to an object goes away
33. What you’re doing when you use $ and brackets include a value in a string
Down
2. They define the behavior of a class
4. namespace, for, while, using, and new are examples of _________ keywords
5. If a method’s return type is _____, it doesn’t return anything
6. += and -= are ________ assignment operators
7. How a method tells you what to pass to it
8. What you’re doing when you use the + operator to stick two strings together
10. What floats in a float
11. How you start a variable declaration
12. You can assign any value to a variable of this type
14. Where objects live
16. What (int) is doing in this line of code: x = (int) y; 21. Tells a method to stop immediately, possibly sending a value back to the statement that called it
23. If you want to store a currency value, use this type
24. The numeric type that holds the biggest numbers
26. A good method __________ makes it clear what that method does
Objectcross solution
