Chapter 6. Inheritance Your object’s family tree

Sometimes you DO want to be just like your parents.
Ever run across an object that almost does exactly what you want your object to do? Found yourself wishing that if you could just change a few things, that object would be perfect? Well, that’s just one reason that inheritance is one of the most powerful concepts and techniques in the C# language. Before you’re through with this chapter, you’ll learn how to subclass an object to get its behavior, but keep the flexibility to make changes to that behavior. You’ll avoid duplicate code, model the real world more closely, and end up with code that’s easier to maintain.
Calculate damage for MORE weapons
Do this!
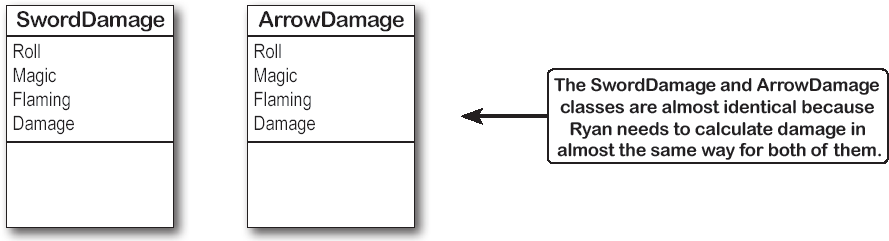
The updated sword damage calculator was huge a hit on game night! Now Ryan wants calculators for all of the weapons. Let’s start with the damage calculation for an arrow, which uses a 1d6 roll. Let’s create a new ArrowDamage class to calculate the arrow damage using the arrow formula in Ryan’s game master notebook.

Most of the code in ArrowDamage will be identical to the code in the SwordDamage class. Here’s what to do to get started building the new app:

Create a new .NET Console App project. We want it to do both sword and arrow calculations, so add the SwordDamage class to the project.
Create an ArrowDamage class that’s an exact copy of SwordDamage. Create a new class called ArrowDamage, then copy all of the code from SwordDamage and paste it into the new ArrowDamage class. Then change the constructor name to ArrowDamage so the program builds.
Change the two constants. The arrow damage formula has different values for the base and flame damage, so let’s rename the BASE_DAMAGE constant to BASE_MULTIPLIER and update the constant values. We think these constants make the code easier to read, so add a MAGIC_MULTIPLIER constant too.

Modify the CalculateDamage method. Now all you need to do to make your new ArrowDamage class work is to update CalculateDamage method so it does the correct calculation.
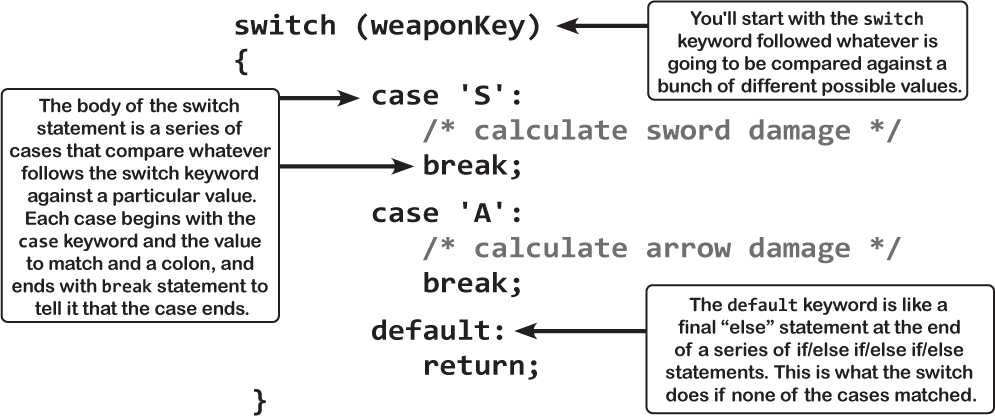
Use a switch statement to match several candidates
Let’s update our console app to prompt the user whether to calculate damage from an arrow or a sword. We’ll ask for a key, and use the static Char.ToUpper method to convert it to uppercase:

We could use if/else if/else statements:
  if (weaponKey == 'S') { /* calculate sword damage */ }
  else if (weaponKey == 'A') { /* calculate arrow damage */ }
  else return;
That’s how we’ve handled input so far. But comparing one variable against many different values is a really common pattern that you’ll see over and over again. It’s so common that C# has a special kind of statement designed specifically for this situation. A switch statement lets you compare one variable against many values in a way that’s compact and easy to read. Here’s a switch statement that does exactly the same thing as the if/else if/else statement above:
One more thing... can we calculate damage for a dagger? and a mace? and a staff? and...
It’s easy enough to make the two classes for sword and arrow damage. But what happens if there are three other weapons? Or four? Or twelve? And what if you had to maintain that code and make more changes later? What if you had to make the same exact change to five or six closely related classes? What if you have to keep making changes? It’s inevitable that bugs would slip through—it’s way too easy to update five classes but forget to change the sixth.


You’re right! Having the same code repeated in different classes is inefficient and error-prone.
Lucky for us, C# gives us a better way to build classes that are related to each other and share behavior: inheritance.
When your classes use inheritance, you only need to write your code once
It’s no coincidence that your SwordDamage and ArrowDamage classes have a lot of the same code. When you write C# programs, you often create classes that represent things in the real world, and those things are usually related to each other. Your classes have similar code because the things they represent in the real world—two similar calculations from the same role-playing game—have similar behaviors.
When you have two classes that are specific cases of something more general, you can set them up to inherit from the same class. When you do that, each of them is a subclass of the same base class.
Build up your class model by starting general and getting more specific
When you build a set of classes that represent things, it’s called a class model. C# programs use inheritance because it mimics the relationship that the things they model have in the real world. Real-world things are often in a hierarchy that goes from more general to more specific, and your programs have their own class hierarchy that does the same thing. In your class model, classes further down in the hierarchy inherit from those above it.

How would you design a zoo simulator?
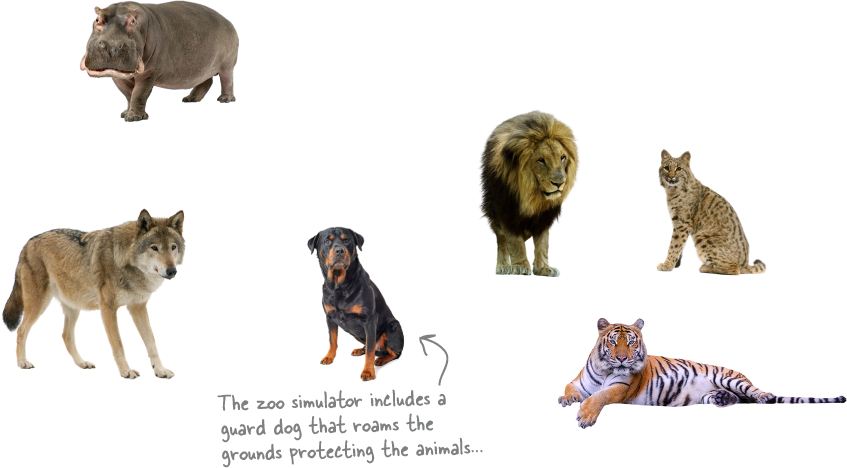
Lions and tigers and bears...oh my! Also, hippos, wolves, and the occasional dog. Your job is to design a game that simulates a zoo. (Don’t get too excited—we’re not going to actually build the code, just design the classes to represent the animals. But we bet you’re already thinking about how you’d do this in Unity!)
We’ve been given a list of some of the animals that will be in the program, but not all of them. We know that each animal will be represented by an object, and that the objects will move around in the simulator, doing whatever it is that each particular animal is programmed to do.
More importantly, we want the program to be easy for other programmers to maintain, which means they’ll need to be able to add their own classes later on if they want to add new animals to the simulator.
Let’s start by building a class model for the animals we know about.
So what’s the first step? Well, before we can talk about specific animals, we need to figure out the general things they have in common—the abstract characteristics that all animals have. Then we can build those characteristics into a class that all animal classes can inherit from.
Note
The terms parent, superclass, and base class are often used interchangeably. Also, the terms extend and inherit from mean the same thing. The terms child and subclass are also synonymous, but subclass can also be used as a verb.
Note
Some people use the term “base class” to specifically mean the class at the top of the inheritance tree...but not the VERY top, because every class inherits from Object or a subclass of Object.
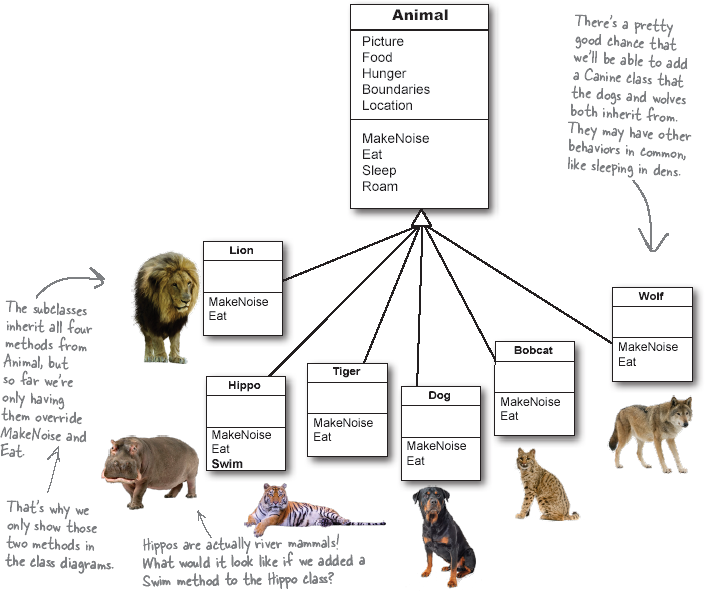
Look for things the animals have in common.
Take a look at these six animals. What do a lion, a hippo, a tiger, a bobcat, a wolf, and a dog have in common? How are they related? You’ll need to figure out their relationships so you can come up with a class model that includes all of them.
Use inheritance to avoid duplicate code in subclasses
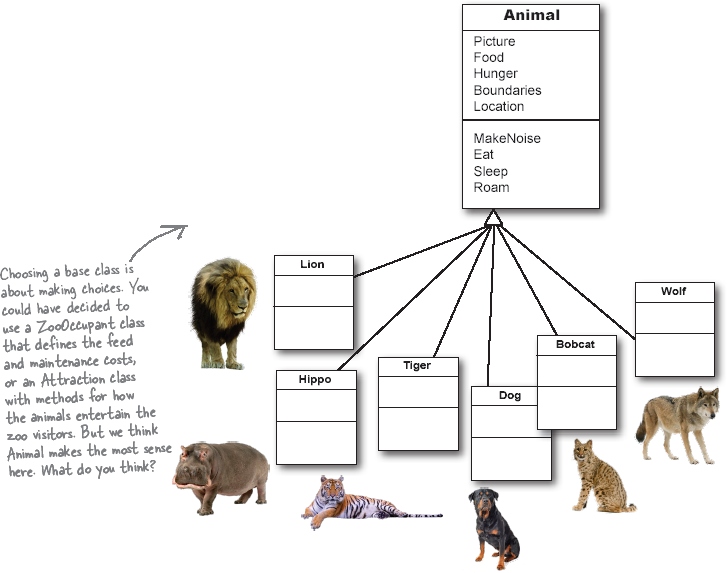
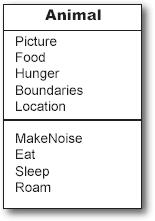
You already know that duplicate code sucks. It’s hard to maintain, and always leads to headaches down the road. So let’s choose fields and methods for an Animal base class that you only have to write once, and each of the animal subclasses can inherit from them. Let’s start with the public fields:
Picture: an image that you can put into a PictureBox.Food: the type of food this animal eats. Right now, there can be only two values: meat and grass.Hunger: anintrepresenting the hunger level of the animal. It changes depending on when (and how much) the animal eats.Boundaries: a reference to a class that stores the height, width, and location of the pen that the animal will roam around in.Location: the X and Y coordinates where the animal is standing.In addition, the Animal class has four methods the animals can inherit:
MakeNoise: a method to let the animal make a sound.Eat: behavior for when the animal encounters its preferred food.Sleep: a method to make the animal lie down and take a nap.Roam: the animals like to wander around their pens in the zoo.
Build a base class to give the animals everything they have in common.
The fields, properties, and methods in the base class will give all of the animals that inherit from it a common state and behavior. They’re all animals, so it makes sense to call the base class Animal.
Different animals make different noises
Lions roar, dogs bark, and as far as we know hippos don’t make any sound at all. Each of the classes that inherit from Animal will have a MakeNoise method, but each of those methods will work a different way and will have different code. When a subclass changes the behavior of one of the methods that it inherited, we say that it overrides the method.
Note
Just because a property or a method is in the Animal base class, that doesn’t mean every subclass has to use it the same way...or at all!
Figure out what each animal does that the Animal class does differently-or not at all.
What does each type of animal do that all the other animals don’t? Dogs eat dog food, so the dog’s Eat method will need to override the Animal.Eat method. Hippos swim, so a hippo will have a Swim method that isn’t in the Animal class at all.
Think about what you need to override
Every animal needs to eat. But a dog might take small bites of meat, while a hippo eats huge mouthfuls of grass. So what would the code for that behavior look like? Both the dog and the hippo would override the Eat method. The hippo’s method would have it consume, say, 20 pounds of hay each time it was called. The dog’s Eat method, on the other hand, would reduce the zoo’s food supply by one 12-ounce can of dog food.
Note
So when you’ve got a subclass that inherits from a base class, it must inherit all of the base class’s behaviors... but you can modify them in the subclass so they’re not performed exactly the same way. That’s what overriding is all about.


Think about how to group the animals
Aged Vermont cheddar is a kind of cheese, which is a dairy product, which is a kind of food, and a good class model for food would represent that. Lucky for us, C# gives us an easy way to do it. You can create a chain of classes that inherit from each other, starting with the topmost base class and working down. So you could have a Food class, with a subclass called DairyProduct that serves as the base class for Cheese, which has a subclass called Cheddar, which is what AgedVermontCheddar inherits from.
Look for classes that have a lot in common.
Don’t dogs and wolves seem pretty similar? They’re both canines, and it’s a good bet that if you look at their behavior they have a lot in common. They probably eat the same food and sleep the same way. What about bobcats, tigers, and lions? It turns out all three of them move around their habitats in exactly the same way. It’s a good bet that you’ll be able to have a Feline class that lives between Animal and those three feline classes that can help prevent duplicate code between them.
Create the class hierarchy
When you create your classes so that there’s a base class at the top with subclasses below it, and those subclasses have their own subclasses that inherit from them, what you’ve built is called a class hierarchy. This is about more than just avoiding duplicate code, although that is certainly a great benefit of a sensible hierarchy. But when it comes down to it, the biggest benefit you’ll get is that your code becomes really easy to understand and maintain. When you’re looking at the zoo simulator code, when you see a method or property defined in the Feline class, then you immediately know that you’re looking at something that all of the cats share. Your hierarchy becomes a map that helps you find your way through your program.
Finish your class hierarchy.
Now that you know how you’ll organize the animals, you can add the Feline and Canine classes.

Every subclass extends its base class
You’re not limited to the methods that a subclass inherits from its base class...but you already know that! After all, you’ve been building your own classes all along. When you add inheritance to a class, what you’re doing is taking the class you’ve already built and extending it by adding all of the fields, properties, and methods in the base class. So if you wanted to add a Fetch method to Dog, that’s perfectly normal. It won’t inherit or override anything—only Dog objects will have that method, and it won’t end up in Wolf, Canine, Animal, Hippo, or any other class.
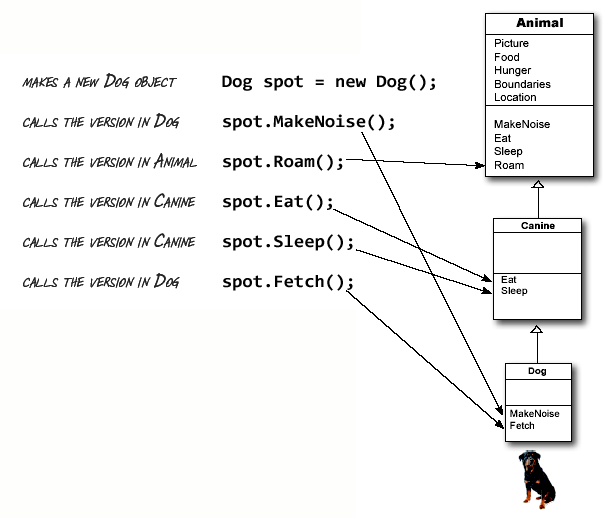
C# always calls the most specific method
If you tell your dog object to roam, there’s only one method that can be called—the one in the Animal class. But what about telling your dog to make noise? Which MakeNoise is called?
Well, it’s not too hard to figure it out. A method in the Dog class tells you how dogs do that thing. If it’s in the Canine class, it’s telling you how all canines do it. And if it’s in Animal, then it’s a description of that behavior that’s so general that it applies to every single animal. So if you ask your dog to make a noise, first C# will look inside the Dog class to find the behavior that applies specifically to dogs. If Dog didn’t have one, it’d then check Canine, and after that, it’d check Animal.
Any place where you can use a base class, you can use one of its subclasses instead
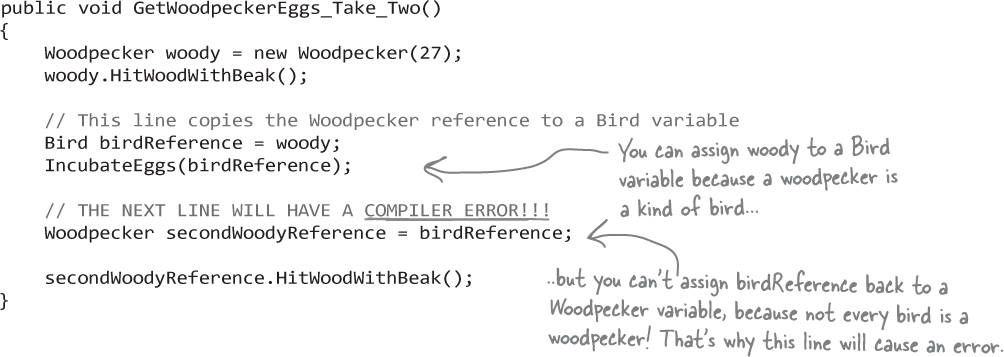
One of the most useful things you can do with inheritance is to use a subclass in place of the base class it inherits from. So if your method takes a Bird object, then you can pass an instance of Penguin. But if you’re treating it like any bird, then you can only ask it to do things that all birds do. So you can ask it to Walk and LayEggs, but you can’t ask it to Swim because only Penguins know how to swim—and your method doesn’t know that it’s specifically a Penguin, just that it’s a more general Bird. It only has access to the fields, properties, and methods that are part of the class it knows about.
Let’s see how this works in code. Here’s a method that takes a Bird reference:
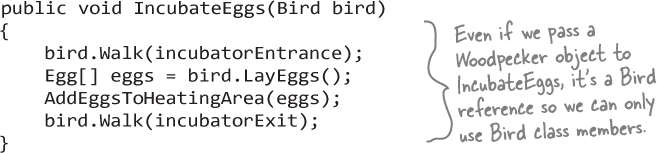
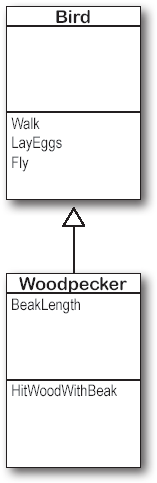
So if you want to incubate some Woodpecker eggs, you can pass a Woodpecker reference to the Incubator method, because a Woodpecker is a kind of Bird—which is why it inherits from the Bird class.
public void GetWoodpeckerEggs()
{
    Woodpecker woody = new Woodpecker(27);
    IncubateEggs(woody);
    woody.HitWoodWithBeak();
}
You can always move down the class diagram—a reference variable can always be set equal to an instance of one of its subclasses. But you can’t move up the class diagram.
Use a colon to extend a base class
When you’re writing a class, you use a colon (:) to have it inherit from a base class. That makes it a subclass, and gives it all of the fields, properties, and methods of the class it inherits from. This Bird class is a subclass of Vertebrate:
Note
When a subclass extends a base class, it inherits all of the fields, properties, and methods in the base class. They’re automatically added to the subclass.

We know that inheritance adds the base class fields, properties, and methods to the subclass...
Inheritance is simple when your subclass needs to inherit all of the base class methods, properties, and fields.

...but some birds don’t fly!
What do you do if your base class has a method that your subclass needs to modify?

Note
Oops—we’ve got a problem. Penguins are birds, and the Bird class has a Fly method, but we don’t want our penguins to fly. It would be great if we could display a warning if a penguin tries to fly.

A subclass can override methods to change or replace members it inherited
Sometimes you’ve got a subclass that you’d like to inherit most of the behaviors from the base class, but not all of them. When you want to change the behaviors that a class has inherited, you can override methods or properties, replacing them with new members with the same name.
When you override a method, your new method needs to have exactly the same signature as the method in the base class it’s overriding. In this case, that means it needs to be called Fly, return void, and have no parameters.
Add the
virtualkeyword to the method in the base class.A subclass can only override a method if it’s marked with the
virtualkeyword. Adding virtual to the Fly method declaration tells C# that subclass of the Bird class is allowed to override the Fly method.
Add the override keyword to a method with the same name in the subclass.
You’ll need to have exactly the same signaturethe same return type and parameters—and you’ll need to use the
overridekeyword in the declaration. Now a Penguin object prints a warning when its Fly method is called.
Note
Use the override keyword to add a method to your subclass that replaces one that it inherited. Before you can override a method, you need to mark it virtual in the base class.

Some members are only implemented in a subclass
All the code we’ve seen so far that works with subclasses has called the methods from outside the object—like how the Main method in the code you just wrote calls LayEggs. But inheritance really shines when the base class uses a method that’s implemented in the subclass. Here’s an example. Our zoo simulator has vending machines that let patrons buy soda, candy, and feed to give to the animals in the petting zoo area.

VendingMachine is the base class for all vending machines. It has code to dispense items, but those items aren’t defined. And the method to check if the patron put in the right amount always returns false. Why? Because they will be implemented in the subclass. Here’s a subclass for dispensing animal feed in the petting zoo:
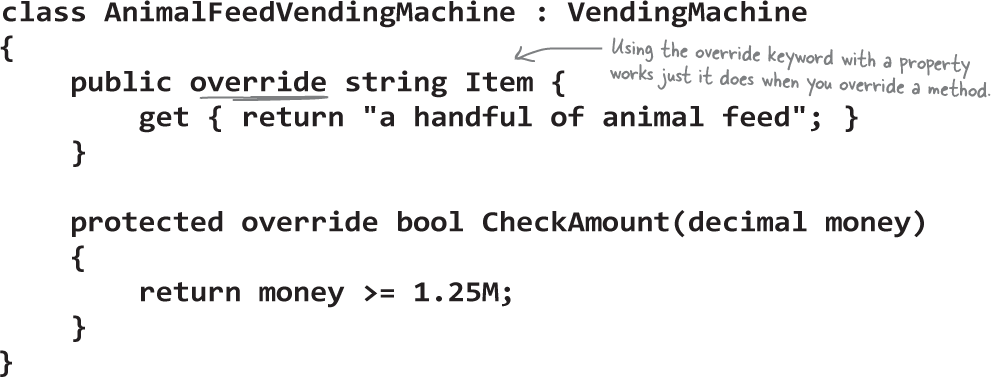
Note
We’re using the protected keyword for encapsulation. The CheckAmount method is protected because it never needs to be called by another class, so only VendingMachine and its subclasses are allowed to access it.
Use the debugger to understand how overriding works
Let’s use the debugger to see exactly what happens when we create an instance of AnimalFeedVendingMachine and ask it to dispense some feed. Create a new Console App project, then do this:
Debug this!
Add the Main method. Here’s the code for the method.
class Program
{
    static void Main(string[] args)
    {
        VendingMachine vendingMachine = new AnimalFeedVendingMachine();
        Console.WriteLine(vendingMachine.Dispense(2.00M));
    }
}
Add the VendingMachine and AnimalFeedVendingMachine classes. Once they’re added, try adding this line of code to the Main method:
vendingMachine.CheckAmount(1F);
You’ll get a compiler error because of the
protectedkeyword, because only the VendingMachine class or subclasses of it can access its protected methods.
Delete the line so your code builds.
Put a breakpoint on the first line of the Main method. Run your program. When it hits the breakpoint, use Step Into (F10) to through every line of code the debugger. Here’s what happens:
It creates an instance of AnimalFeedVendingMachine and calls its Dispense method.
That method is only defined in the base class, so it calls VendingMachine.Dispense.
The first line of VendingMachine.Dispense calls the protected CheckAmount method.
CheckAmount is overridden in the AnimalFeedVendingMachine subclass, which causes VendingMachine.Dispense to call the CheckAmount method defined in AnimalFeedVendingMachine.
This version of CheckAmount returns true, so Dispense returns the Item property. AnimalVendingMachine also overrides this property, it returns
"a handful of animal feed".
Note
You’ve been using the Visual Studio debugger to sleuth out bugs in your code. But it’s also a great tool for learning and exploring C#, like in this “Debug this!” where you can explore how overriding works. Can you think of more ways to experiment with overriding subclasses?

There’s an important reason for virtual and override!
The virtual and override keywords aren’t just for decoration. They make a real difference in how your program works. The virtual keyword tells C# that a member can be extended—without it, you can’t override it at all. And the override keyword tells C# that you’re extending the member. If you leave out the override keyword in a subclass, you’re creating a completely unrelated method that just happens to have the same name.
That sounds a little weird, right? But it actually makes sense—and the best way to really understand how virtual and override work is by writing code. So let’s build a real example to experiment with them.
Note
When a subclass overrides a method in its base class, the more specific version defined in the subclass is always called—even when it’s being called by a method in the base class.
Build an app to explore virtual and override
A really important part of inheritance in C# is extending class members. That’s how a subclass can inherit some of its behavior from its base class, but override certain members where it needs to. And that’s where the virtual and override keywords come in. The virtual keyword determines which class members can be extended. And when you want to extend a member, you must use the override keyword. Let’s create some classes to experiment with virtual and override. You’re going to create a class that represents a safe with valuable jewels—you’ll build a class for some sneaky thieves to steal the jewels.

Create a new console application and add the Safe class.
We’re going to be doing a little experiment with virtual and override. Go ahead and create a new .NET console app, then add this Safe class.
Do this!
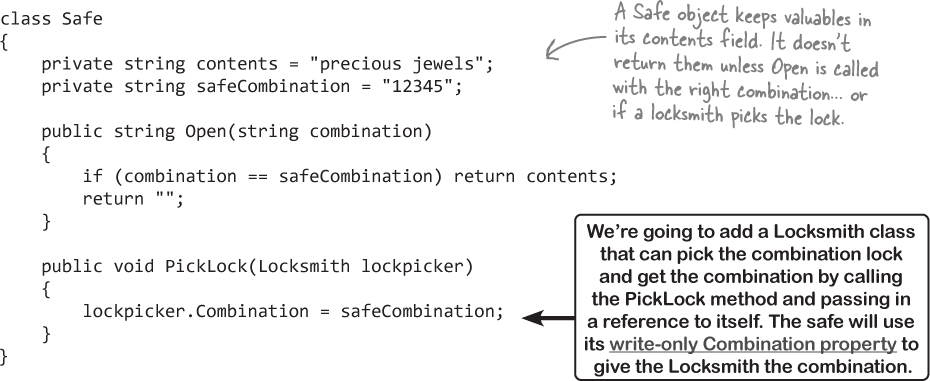
Add a class for the person who owns the safe.
We’ve got a forgetful safe owner who occasionally forgets his extremely secure safe password. Add a SafeOwner class to represent him.
class SafeOwner
{
    private string valuables = "";
    public void ReceiveContents(string safeContents)
    {
        valuables = safeContents;
        Console.WriteLine($"Thank you for returning my {valuables}!");
    }
}
The Locksmith class can pick the lock.
If a safe owner hires a professional locksmith to open your safe, they expect that locksmith to return the contents safe and sound. And that’s exactly what the Locksmith.OpenSafe method does.


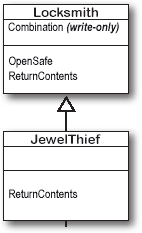
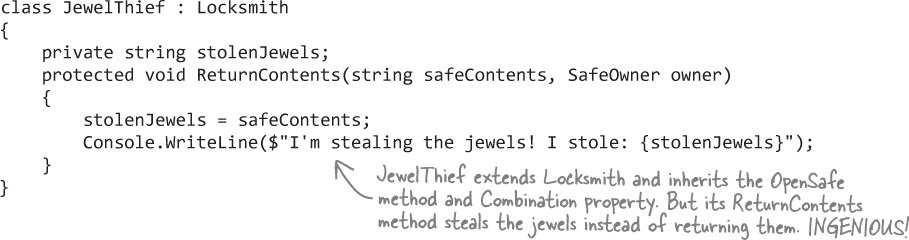
The JewelThief class that wants to steal the valuables.
Uh-oh. Looks like there’s a burglar—and the worst kind, one who’s also a highly skilled locksmith able to open safes. Add this JewelThief class that extends Locksmith.
Add a Main method that makes the JewelThef steal the jewels.
It’s time for the big heist! In this Main method, the JewelThief sneaks into the house and uses its inherited Locksmith.OpenSafe method to get the safe combination. What do you think will happen when it runs?
static void Main(string[] args)
{
    SafeOwner owner = new SafeOwner();
    Safe safe = new Safe();
    JewelThief jewelThief = new JewelThief();
    jewelThief.OpenSafe(safe, owner);
    Console.ReadKey(true);
}
A subclass can hide methods in the superclass
Go ahead and run the JewelThief program. Here’s what you should see:

Did you expect the program’s output to be different? Maybe something like this:
I'm stealing the jewels! I stole: precious jewels
Note
C# is supposed to call the most specific method, right? Then why didn’t it call JewelThief.ReturnContents?
It looks like the JewelThief object acted just like a Locksmith object! So what happened?
Hiding methods versus overriding methods
The reason the JewelThief object acted like a Locksmith object when its ReturnContents method was called was because of the way the JewelThief class declared its ReturnContents method. There’s a big hint in that warning message you got when you compiled your program:

Since the JewelThief class inherits from Locksmith and replaces the ReturnContents method with its own method, it looks like JewelThief is overriding Locksmith’s ReturnContents method. But that’s not actually what’s happening. You probably expected JewelThief to override the method (which we’ll talk about in a minute), but instead JewelThief is hiding it.
There’s a big difference. When a subclass hides the method, it replaces (technically, it redeclares) a method in its base class that has the same name. So now our subclass really has two different methods that share a name: one that it inherits from its base class, and another brand-new one that’s defined in its own class.
Use the new keyword when you’re hiding methods
Take a close look at that warning message. Sure, we know we should read our warnings, but sometimes we don’t... right? This time, actually read what it says: Use the new keyword if hiding was intended..
Note
If a subclass just adds a method with the same name as a method in its superclass, it only hides the superclass method instead of overriding it.
So go back to your program and add the new keyword.
new public void ReturnContents(Jewels safeContents, Owner owner)
As soon as you add new to your JewelThief class’s ReturnContents method declaration, that warning message will go away. But your program still won’t act the way you expect it to!
It still calls the ReturnContents method defined in the Locksmith object. Why? Because the ReturnContents method is being called from a method defined by the Locksmith class—specifically, from inside Locksmith.OpenSafe, even though it’s being initiated by a JewelThief object. If JewelThief only hides the ReturnContents method, its own ReturnContents will never be called.
Use the override and virtual keywords to inherit behavior
We really want our JewelThief class to always use its own ReturnContents method, no matter how it’s called. This is the way we expect inheritance to work most of the time, and it’s called overriding. And it’s very easy to get your class to do it. The first thing you need to do is use the override keyword when you declare the ReturnContents method:
class JewelThief {

    protected override void ReturnContents
          (string safeContents, SafeOwner owner)
But that’s not everything you need to do. If you just add the override keyword to the class declaration, you’ll get a compiler error:

Again, take a really close look and read what the error says. JewelThief can’t override the inherited member ReturnContents because it’s not marked virtual, abstract, or override in Locksmith. Well, that’s an easy error to fix! Just mark Locksmith’s ReturnContents with the virtual keyword:
class Locksmith {

    protected virtual void ReturnContents
          (string safeContents, SafeOwner owner)
Now run your program again. Here’s what you should see the output we’re looking for:
I’m stealing the jewels! I stole: precious jewels

Note
If you want to override a method in a base class, always mark it with the virtual keyword, and always use the override keyword any time you want to override the method in a subclass. If you don’t, you’ll end up accidentally hiding methods instead.
Exactly. Most of the time you want to override methods, but hiding them is an option.
When you’re working with a subclass that extends a base class, you’re much more likely to use overriding than you are to use hiding. So when you see that compiler warning about hiding a method, pay attention to it! Make sure you really want to hide the method, and didn’t just forget to use the virtual and override keywords. If you always use the virtual, override, and new keywords correctly, you’ll never run into a problem like this again!
A subclass can access its base class using the base keyword
Even when you override a method or property in your base class, sometimes you’ll still want to access it. Luckily, we can use base, which lets us access any member of the base class.
All animals eat, so the Vertebrate class has an Eat method that takes a Food object as its parameter.

Chameleons eat by catching food with their tongues. So the Chameleon class inherits from Vertebrate but overrides Eat.

Now we don’t have any duplicated code—so if we ever need to change the way all vertebrates eat, chameleons will get the changes automatically.

When a base class has a constructor, your subclass needs to call it
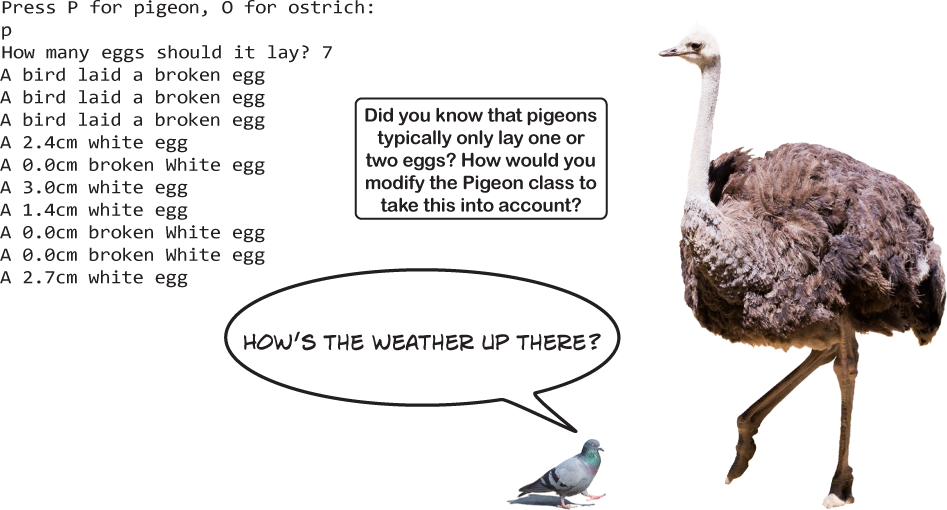
Let’s go back to the code you wrote with the Bird, Pigeon, Ostrich, and Egg class. We want to add a BrokenEgg class that extends egg, and make 25% of the eggs that the Pigeon lays broken. So replace the new statement in Pigeon.LayEgg with this if/else that creates a new instance of a BrokenEgg subclass of Egg:
Add this!
if (Bird.Randomizer.Next(4) == 0)
    eggs[i] = new BrokenEgg (Bird.Randomizer.NextDouble() * 2 + 1, "white");
else
    eggs[i] = new Egg(Bird.Randomizer.NextDouble() * 2 + 1, "white");
Now we just need a BrokenEgg class that extends Egg. Let’s make it identical to the Egg class, except that it has a constructor that writes a message to the console letting us know that an egg is broken:
class BrokenEgg : Egg
{
    public BrokenEgg()
    {
        Console.WriteLine("A bird laid a broken egg");
    }
}
Go ahead and make those two changes to your Egg program.
Uh-oh—looks like those new lines of code caused compiler errors:
The first error is on the line where you create a new BrokenEgg: CS1729 – ’BrokenEgg’ does not contain a constructor that takes 2 arguments
The second error is in the BrokenEgg constructor: CS7036 – There is no argument given that corresponds to the required formal parameter ’size’ of ’Egg.Egg(double, string)’
This is another great opportunity to read those errors and figure out what went wrong. The first error is pretty clear: the statement that creates a BrokenEgg instance is trying to pass two arguments to the constructor, but the BrokenEgg class has a parameterless constructor. So go ahead and add parameters to the constructor:
public BrokenEgg(double size, string color)
That takes care of the first error—now the Main method compiles just fine. But what about the other error?
Let’s break down what that error says.
It’s complaining about
Egg.Egg(double, string)– that’s talking about the Egg class constructor.It says something about
parameter ’size’– which the Egg class needs in order to set its Size propertyBut there is
no argument given– because it’s not enough to just modify the BrokenEgg constructor to take arguments that match the parameter. It also needs to call that base class constructor.
Modify the BrokenEgg class to use the base keyword to call the base class constructor:
public BrokenEgg(double size, string color) : base(size, color)
Now your code compiles. Try running it—now when a Pigeon lays an egg, about a quarter of them will print a message about being broken when they’re instantiated.
A subclass and base class can have different constructors
When we modified BrokenEgg to call the base class constructor, we made its constructor match the one in the Egg base class. But what if we want all broken eggs to have a size of zero and a color that starts with the word “broken”? Modify the statement that instantiates BrokenEgg so it only takes the color argument:
Modify this!
if (Bird.Randomizer.Next(4) == 0)
     eggs[i] = new BrokenEgg("white");
 else
     eggs[i] = new Egg(Bird.Randomizer.NextDouble() * 2 + 1, "white");
When you make that change you’ll get the “required formal parameter” compiler error again—which makes sense, because the BrokenEgg constructor has two parameters, but you’re only passing it one argument.
Fix your code by modifying the BrokenEgg constructor to take one parameter:

Now run your program again. The BrokenEgg constructor will still write its message to the console during the for loop in the Pigeon constructor. But now it will also cause the Egg to initialize its Size and color field, so when the foreach loop in the Main method writes egg.Descripition to the console, it writes this message for each broken egg:
It’s time to finish the job for Ryan
The first thing we did in this chapter was to modify the damage calculator you built for Ryan to roll for damage for either a sword or an arrow. It worked, and your SwordDamage and ArrowDamage classes were well-encapsulated. But aside from a few lines of code, those two classes were identical. And we learned that having code repeated in different classes is inefficient and error-prone, especially if you want to keep extending this program to add more classes for different kinds of weapons But now you have a new tool to solve this problem: inheritance. So it’s time for you to finish the damage calculator app—and you’ll do it in two steps: first you’ll design the new class model on paper, and then you’ll implement it in code.
Building your class model on paper before you write code helps you understand your problem better so you can solve it more effectively.

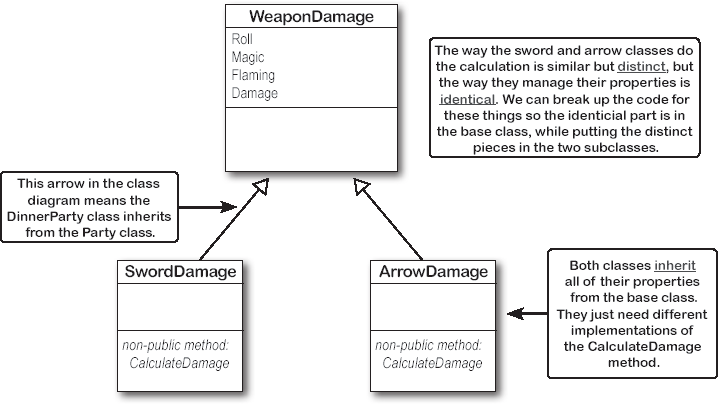
When your classes overlap as little as possible, that’s an important design principle called separation of concerns
When you design your classes well today, they’ll be easier to modify later. Imagine if you had a dozen different classes to calculate damage for different weapons. What if you wanted to change Magic from a bool to an int, so you could have weapons with enchantment bonuses (like a +3 magic mace or +1 magic dagger)? With inheritance, you’d just have to change the Magic property in the superclass. Of course, you’d have to modify the CalculateDamage method for each class—but it would be a lot less work, and there’s no danger of accidentally forgetting to modify one of the classes. (That happens in professional software development all the time!)
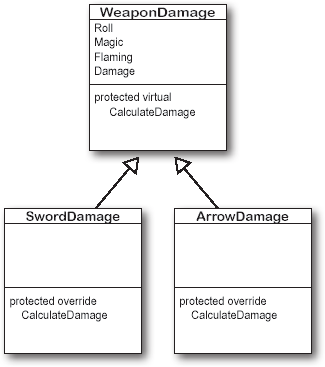
This is an example of separation of concerns, because each class has only the code that concerns one specific part of the problem that your program solves. Code that only concerns swords goes in SwordDamage, code only for arrows goes in ArrowDamage, and code that’s shared between them goes in WeaponDamage.
When you’re designing classes, separation of concerns one of the first things you should think about. If one class seems to be doing two different things, try to figure out if you can split it into two classes.
When your classes are well-encapsulated, it makes your code much easier to modify.
If you know a professional developer, ask them the most annoying thing they’ve had to do at work in the last year. There’s a good chance they’ll talk about having to make a change to a class, but to do that they had to change these two other classes, which required three other changes, and it was hard just to keep track of all the changes. Designing your classes with encapsulation in mind is a great way to avoid ending up in that situation.
Use the debugger to really understand how these classes work
One of the most important ideas in this chapter is that when you extend a class, you can override its methods to make pretty significant changes to the way it behaves. Use the debugger to really understand how that works.
Set breakpoints on the lines in the Roll, Magic, and Flaming setters that call CalculateDamage.
Add a Console.WriteLine statement to WeaponDamage.CalculateDamage. This statement will never get called.
Run your program. When it hits any of the breakpoints, use Step Into to enter the CalculateDamage method. It will step into the subclass—the WeaponDamage.CalculateDamage method is never called.
Note
We’re about to talk about an important element of game design: dynamics. It’s actually such an important concept that it goes beyond game design. In fact, you can find dynamics in almost any kind of app.

Video games are serious business.
The video game industry is growing globally every year, and employs hundreds of thousands of people all over the world. And it’s a business that a talented game designer can break into! There’s an entire ecosystem of independent game developers who build and sell games, either as individuals or on small teams.
But you’re right—C# is a serious language, and it’s used for all sorts of serious, non-gaming applications. In fact, while C# is a favorite language among game developers, it’s also one of the most common languages found in businesses across many different industries.
So for this next project, let’s get some practice with inheritance by building a serious business application.
Build a beehive management system
The queen bee needs your help! Her hive is out of control, and she needs a program to help manage her honey production business. She’s got a beehive full of workers, and a whole bunch of jobs that need to be done around the hive. But somehow she’s lost control of which bee is doing what, and whether or not she’s got the beepower to do the jobs that need to be done. It’s up to you to build a beehive management system to help her keep track of her workers. Here’s how it’ll work:
The queen assigns jobs to her workers.
There are three different jobs that the workers can do. Nectar Collector bees fly out and bring nectar back to the hive. Honey Manufacturer bees turn that nectar into honey, which bees eat to keep working. And finally, the queen is constantly laying eggs, and Egg Care bees make sure they become workers.
When the jobs are all assigned, it’s time to work.
Once the queen’s done assigning the work, she’ll tell the bees to work the next shift by clicking the “Work the next shift” button in her Beehive Management System app, which generates a shift report that tells her how many bees are assigned to each job and the status of the nectar and honey in the honey vault.
Help the queen grow her hive.
Like all business leaders, the queen is focused on growth. But the bee business is hard work! She measures her hive in the total number of workers. Can you help the queen keep adding workers? How big can she grow the hive before it run out of honey and she has to file for bee-nkrupcy?
The beehive management system class model
Here are the classes that you’ll build for the beehive management system. There’s an inheritance model with a base class and four subclasses, a static class to manage the honey and nectar that drive the hive business, and the MainWindow class with the code-behind for the main window.

Note
We’ll give you all of the details you need to write the code for these classes.
The UI: add the XAML for the main window
Create a new WPF app called BeehiveManagementSystem. The main window is laid out with a grid, with Title="Beehive Management System" Height="325" Width="625". It uses the same Label, StackPanel, and Button controls you’ve used in previous chapters, and introduces two new controls. The dropdown list under Job Assignments is a ComboBox control, which lets users choose from a list of options. And the status report under Queen’s Report is displayed in a TextBox control.
The Queen class: how she manages the worker bees
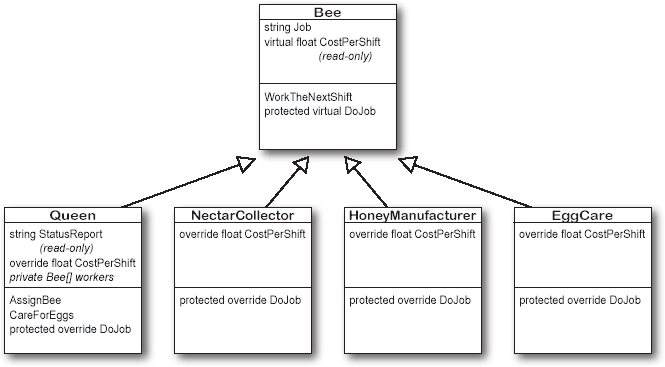
When you press the button to work the next shift, the button’s Click event handler calls the Queen object’s WorkTheNextShift method, which is inherited from the Bee base class. Here’s what happens next:
Bee.WorkTheNextShift calls HoneyVault.ConsumeHoney(HoneyConsumed), using the CostPerShift property (which each subclass overrides with a different value) to determine how much honey she needs to work.
Bee.WorkTheNextShift then calls DoJob, which the Queen also overrides.
Queen.DoJob adds 0.45 eggs to her private
eggsfield (using a const called EGGS_PER_SHIFT). The EggCare bee will call her CareForEggs method, which decreaseseggsand increasesunassignedWorkers.Then it uses a foreach loop to call each worker’s WorkTheNextShift method.
It consumes honey for each unassigned worker. The HONEY_PER_UNASSIGNED_WORKER const tracks how much each one consumes per shift.
Finally, it calls its UpdateStatusReport method.
When you press the button to assign a job to a bee, the event handler calls the Queen object’s AssignBee method, which takes a string with the job name (you’ll get that name from jobSelector.text). It uses a switch statement to create a new instance of the appropriate Bee subclass and pass it to AddWorker, so make sure you add the AddWorker method to your Queen class.
Note
The length of an Array instance can’t be changed during its lifetime. That’s why C# has this useful static Array.Resize method. It doesn’t actually resize the array. Instead, it creates a new one and copies the contents of the old one into it. Notice how it uses the ref keyword—we’ll learn more about that later in the book.

Note
Don’t get overwhelmed or intimidated by the length of this exercise! Just break it down into small steps. Once you start working on it, you’ll see it’s all review of things you’ve learned.

Okay, you got us. Yes, you’re right. This is a game.
Specifically, it’s a resource management game, or a game where the mechanics are focused on collecting, monitoring, and using resources. If you’ve played a simulation game like SimCity or strategy game like Civilization, you’ll recognize resource management as a big part of the game, where you need resources like money, metal, fuel, wood, or water to run a city or build an empire.
Resource management games are a great way to experiment with the relationship between mechanics, dynamics, and aesthetics.
The mechanics are simple: the player assigns workers and then initiates the next shift. Then each bee either adds nectar, reduces nectar/increases honey, or reduces eggs/increases workers. The egg count increases, and the report is displayed.
The aesthetics are more complex. Players feel stress as the honey or nectar levels fall and the low level warning is displayed. They feel excitement when they make a choice, and satisfaction when it affects the game—and then the stress again, as the numbers stop increasing and start decreasing again
The game is driven by the dynamics. There’s nothing in the code that makes the honey or nectar scarce—they’re just consumed by the bees and eggs.
Note
Really take a minute and think about this, because it gets to the heart of what dynamics are about. Do you see any way to use some of these ideas in other kinds of programs, and not just games?
Feedback drives your Beehive Management game
Let’s take a few minutes and really understand how your game works. The nectar conversion ratio has a big impact your game. If you change the constants, it can make really big differences in gameplay. If it takes just a little honey to convert an egg to a worker, the game gets really easy. If it takes a lot, the game gets much harder. But if you go through the classes, you won’t find a difficulty setting. There’s no Difficultly field on any of the classes. Your queen doesn’t get special power-ups to help make the game easier, or tough enemies or boss battles to make it more difficult. In other words, there’s no code that explicitly creates a relationship between the number of eggs or workers and the difficulty of the game. So what’s going on?
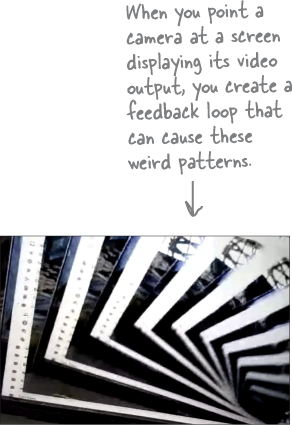
You’ve probably played with feedback before. Start a video call between your phone and your computer. Hold the phone near the computer speaker and you’ll hear noisy echoes. Point the camera at the computer screen and you’ll a picture of the screen inside the picture of the screen inside the picture of the screen, and it will turn into a crazy pattern if you tilt the phone. This is feedback: you’re taking the live video or audio output and feeding it right back into the input. There’s nothing in the code of the video call app that specifically generates those crazy sounds or images. Instead, they emerged from the feedback.
Workers and honey are in a feedback loop
Your Beehive Management game is based on a series of feedback loops: lots of little cycles where parts of the game interact with each other. Here’s an example. Honey manufacturers add honey to the vault, which is consumed by honey manufacturers, who make more honey.

And that’s just one feedback loop. There are many different feedback loops in your game, and they make the whole game more complex, more interesting, and (hopefully!) more fun.

Your game is turn-based... now let’s convert it to a real-time game
A turn-based game is a game where the flow is broken down into parts—in our case, into shifts. The next shift doesn’t start until you click a button, so you can take all the time you want to assign workers. But we can use a DispatcherTimer (like the one you used in Chapter 1) to convert it to a real-time game where time progresses continuously—and we can do it with just a few lines of code.
Add a using line to the top of your MainWindow.xaml.cs file.
We’ll be using a DispatcherTimer to force the game to work the next shift every second and a half. And since DispatcherTimer is in the System.Windows. Threading namespace, you’ll need to add this
usingline to the top of your MainWindow.xaml.cs file:using System.Windows.Threading;
Add a private field with a DisaptcherTimer references.
Now you’ll need to create a new DispatcherTimer. Put it in a private field at the top of the MainWindow class.
private DispatcherTimer timer = new DispatcherTimer();
Make the timer call the WorkShift button’s Click event handler method.
We want the timer to keep the game moving forward, so if the player doesn’t click the button quickly enough it will automatically trigger the next shift. Start by adding
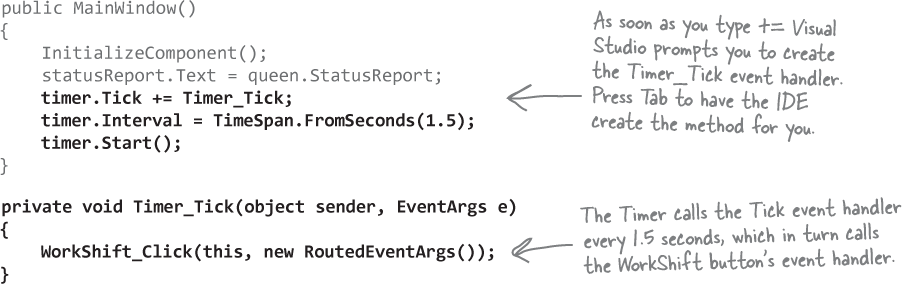
Now run your game. A new shift starts every 1.5 seconds, whether or not you click the button. This is a simple change to the mechanics, but it dramatically changes the dynamics of the game, which leads to a huge difference in aesthetics. It’s up to you to decide if the game is better as a turn-based or real-time simulation.

Yes! The timer changed the mechanics, which altered the dynamics, which in turn impacted the aesthetics.
Let’s take a minute and think about that feedback loop. The change in mechanics (a timer that automatically clicks the “Work the next shift” button every 1.5 seconds) creates a totally new dynamic: a window when players must make decisions, or else the game makes the decision for them. That increases the pressure, which gives some players a satisfying shot of adrenaline, but just causes stress in other players—the aesthetics changed, which makes the game more fun for some people but less fun for others.
Note
There’s a feedback loop here, too. As players feels more stress, they make worse decisions, changing the game... aesthetics feeds back into mechanics.
But you only added half a dozen lines of code to your game, and none of them included “make this decision or else” logic. That’s an example of behavior that emerged from how the timer and the button work together. This whole discussion of feedback loops seems pretty important - especially the part about how behavior emerges.
Feedback loops and emergence are important programming concepts.
We designed this project to give you practice with inheritance, but also let you explore and experiment with emergent behavior that comes not just from what your objects do individually, but also out of the way objects interact with each other. The constants in the game (like the nectar conversion ratio) are an important part of that emergent interaction. When we created this exercise, we started out by setting those constants to some initial values, then we tweaked them by making tiny adjustments until we ended up with a system that’s not quite in equilibrium—a state where everything is perfectly balanced—so the player needs to keep making decisions in order to make the game last as long as possible. And that’s all driven by the feedback loops between the eggs, worker, nectar, honey, and queen.
Note
Try experimenting with these feedback loops. Add more eggs per shift or start the hive with more honey, for example, and the game gets easier. Go ahead, give it a try! The entire feel of the game changes just by making small changes to a few constants.
Some classes should never be instantiated
Remember our zoo simulator class hierarchy? You’ll definitely end up instantiating a bunch of hippos, dogs, and lions. But what about the Canine and Feline classes? How about the Animal class? It turns out that there are some classes that just don’t need to be instantiated...and, in fact, don’t make any sense if they are.
Does that sound weird? Actually, it happens all the time—in fact, you created several classes in Chapter 5 that should never be instantiated.
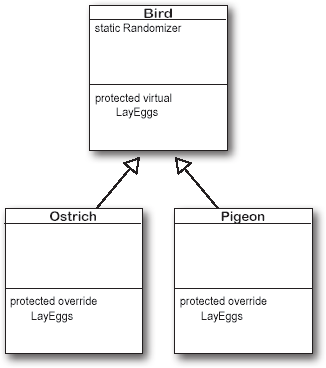
class Bird
{
    public static Random Randomizer = new Random();
    public virtual Egg[] LayEggs(int numberOfEggs)
    {
        Console.Error.WriteLine
             ("Bird.LayEggs should never get called");
        return new Egg[0];
    }
}
Note
Your Bird class was tiny—it just had a shared instance of Random and a LayEggs method that only existed so the base classes could override it. Your WeaponDamage was a lot bigger—it had a lot of properties. It also a CalculateDamage class for the subclases to override, which it called from its WeaponDamage method.
class WeaponDamage
{
     /* ... code for the properties ... */ }

    protected virtual void CalculateDamage()
    {
        /* the subclass overrides this */
    }

    public WeaponDamage(int startingRoll)
    {
        roll = startingRoll;
        CalculateDamage();
    }
}
Note
The Bee class isn’t instantiated anywhere in the Beehive Management System code. It’s not clear what would happen if you tried to instantiate it, since it never sets its cost per shift.
class Bee
{
    public virtual float CostPerShift { get; }

    public string Job { get; private set; }

    public Bee(string job)
    {
        Job = job;
    }

    public void WorkTheNextShift()
    {
        if (HoneyVault.ConsumeHoney(CostPerShift))
        {
            DoJob();
        }
    }

    protected virtual void DoJob() { /* the subclass overrides this */ }
}
Note
The Bee class had a WorkTheNextShift method that consumed honey and then did whatever job the bee was supposed to do—so it expected the subclass to override the DoJob method to actually do the job.
An abstract class is an intentionally incomplete class
It’s really common to have a class with “placeholder” members that it expects the subclasses to implement. They could be at the top of the hierarchy (like your Bee, WeaponDamage, or Bird classes) or in the middle (like Feline or Canine in the zoo simulator class model). They take advantage of the fact that C# always calls the most specific method, like how WeaponDamage calls the CalculateDamage method that’s only implemented in SwordDamage or ArrowDamage, or how Bee.WorkTheNextShift depends on the subclasses to implement the DoJob method.
C# has a tool that’s built specifically for this: an abstract class. It’s a class that’s intentionally incomplete, with empty class members that serve as placeholders for the subclasses to implement. And all you need to do to make a class abstract is add the abstract keyword to the class declaration.
An abstract class works just like a normal class.
You define an abstract class just like a normal one. It has fields and methods, and you can inherit from other classes, too, exactly like with a normal class. There’s almost nothing new to learn
An abstract class is can have incomplete “placeholder” members.
Abstract classes can include declarations of properties and methods that must be implemented by inheriting classes. A method that has a declaration but no statements or method body is called an abstract method, and a property that only declares its accessors but doesn’t define them is called an abstract property. Subclasses that extend it must implement all abstract methods and properties unless they’re also abstract.
Only abstract classes can have abstract members.
If you put an abstract method or property into a class, then you’ll have to mark that class abstract or it won’t compile. You’ll learn more about how to mark a class abstract in a minute.
An abstract class can’t be instantiated.
The opposite of abstract is concrete. A concrete method is one that has a body, and all the classes you’ve been working with so far are concrete classes. The biggest difference between an abstract class and a concrete class is that you can’t use
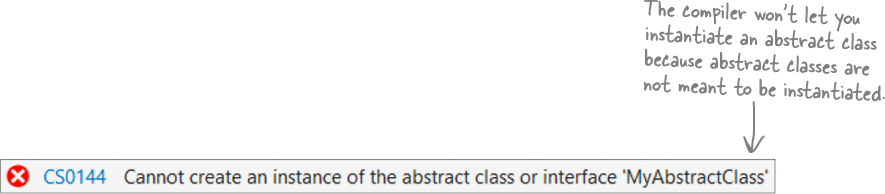
newto create an instance of an abstract class. If you do, C# will give you an error when you try to compile your code.Try it now! Create a new Console App, add an empty abstract class, and try to instantiate it:
abstract class MyAbstractClass { }

class Program
{
    MyAbstractClass myInstance = new MyAbstractClass();
}
The compiler will give you an error, and won’t let you build your code:
Because you want to provide some of the code, but still require that subclasses fill in the rest of the code.
Sometimes bad things happen when you create objects that should never be instantiated. The class at the top of your class diagram usually has some fields that it expects its subclasses to set. An Animal class may have a calculation that depends on a Boolean called HasTail or Vertebrate, but there’s no way for it to set that itself. Here’s a quick example of a class that’s problematic when instantiated...
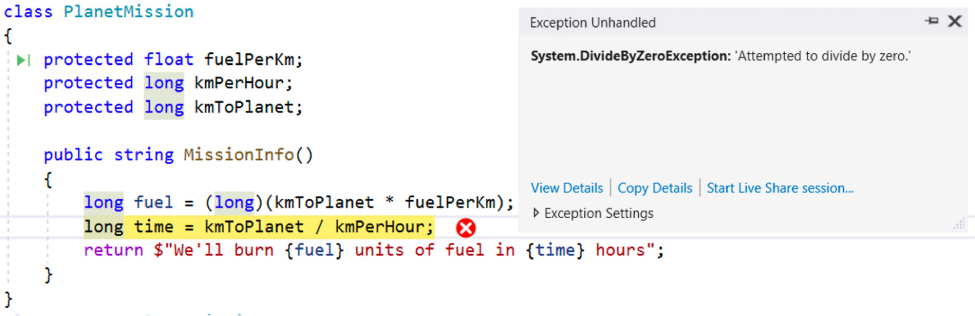
Do this!
class PlanetMission
{
    protected float fuelPerKm;
    protected long kmPerHour;
    protected long kmToPlanet;

    public string MissionInfo()
    {
        long fuel = (long)(kmToPlanet * fuelPerKm);
        long time = kmToPlanet / kmPerHour;
        return $"We’ll burn {fuel} units of fuel in {time} hours";
    }
}
class Mars : PlanetMission
{
    public Mars()
    {
        kmToPlanet = 92000000;
        fuelPerKm = 1.73f;
        kmPerHour = 37000;
    }
}
class Venus : PlanetMission
{
    public Venus()
    {
        kmToPlanet = 41000000;
        fuelPerKm = 2.11f;
        kmPerHour = 29500;
    }
}

class Program
{
    public static void Main(string[] args)
    {
        Console.WriteLine(new Venus().MissionInfo());
        Console.WriteLine(new Mars().MissionInfo());
        Console.WriteLine(new PlanetMission().MissionInfo());
    }
}

Note
Before you run this code, can you figure out what it will print to the console?
Like we said, some classes should never be instantiated
Try running the PlanetMission console app. Did it do what you expected? It printed two lines to the console:
We’ll burn 86509992 units of fuel in 1389 hours
We’ll burn 159160000 units of fuel in 2486 hours
But then it threw an exception.
The problems all started when you created an instance of the PlanetMission class. Its FuelNeeded method expects the fields to be set by the subclass. But when they aren’t, they get their default values—zero. And when C# tries to divide a number by zero...
Solution: use an abstract class
When you mark a class abstract, C# won’t let you write code to instantiate it. So how does that fix this problem? It’s like the old saying goes—prevention is better than cure. Add the abstract keyword to the PlanetMission class declaration:
abstract class PlanetMission
{
   // The rest of the class stays the same
}
As soon as you make the change, the compiler gives you an error:

Your code won’t compile at all—and no compiled code means no exception.
This is really similar to the way you used the private keyword in Chapter 4. Making some members private doesn’t change the behavior. It just prevents your code from building if you break the encapsulation. And the abstract keyword works the same way, keeping your code from building try to instantiate an abstract class.
Note
When you add the abstract keyword to a class declaration, the compiler gives you an error any time you try to create an instance of that class.
An abstract method doesn’t have a body
The Bird class that you built in Chapter 5 was never meant to be instantiated. That’s why it uses Console.Error to write an error message if a program tries to instantiate it and call its LayEggs method:
class Bird
{
    public static Random Randomizer = new Random();
    public virtual Egg[] LayEggs(int numberOfEggs)
    {
        Console.Error.WriteLine
             ("Bird.LayEggs should never get called");
        return new Egg[0];
    }
}
Since we don’t ever want to instantiate the Bird class, let’s add the abstract keyword to its declaration. But that’s not enough—not only should this class never be instantiated, but we want to require that every subclass that extends Bird must override the LayEggs method, because we never want them to leave it out and inherit the version of LayEggs that
And that’s exactly what happens when you add the abstract keyword to a class member. An abstract method only has a class declaration but no method body that must be implemented by any subclass that extends the abstract class. The body of a method is the code between the curly braces that comes after the declaration—and it’s something abstract methods can’t have.
Go back to your Bird project from Chapter 5 and replace the Bird class with this abstract class:
abstract class Bird
{
     public static Random Randomizer = new Random();
     public abstract Egg[] LayEggs(int numberOfEggs);
}
Your program still runs exactly like it did before! But try adding this line to the main method:
Bird abstractBird = new Bird();
and you’ll get a compiler error:

Try to add a body to the LayEggs method:
public abstract Egg[] LayEggs(int numberOfEggs)
{
    return new Egg[0];
}
and you’ll get a different compiler error:

Note
If an abstract class has virtual members, every subclass must override all of those members.
Abstract properties work just like abstract methods
Let’s go back to the Bee class from Chapter 5. We already know that we don’t want the class to be instantiated, so let’s modify it to turn it into an abstract class. We can do that just by adding abstract to the class declaration, and changing the DoJob method to an abstract method without a body.
abstract class Bee
{
   /* the rest of the class stays the same */
   protected abstract void DoJob();
}
But there’s one other virtual member—and it’s not a method. It’s the CostPerShift property, which the Bee. WorkTheNextShift method calls to figure out how much honey the bee will require this shift.
public virtual float CostPerShift { get; }
We learned in Chapter 4 that properties are really just methods that are called like fields. And we can use the abstract keyword to create an abstract property just like we do with a method:
public abstract float CostPerShift { get; }
Abstract properties can have either a get accessor, set accessor, or both get and set accessors. But setters and getters in abstract properties can’t have method bodies. Their declarations look just like automatic properties—but they’re not, because they don’t have any implementation at all. Like abstract methods, abstract properties are placeholders for properties that must be implemented by any subclass that extends their class.
Here’s the whole abstract Bee class, complete with abstract an method and property:
abstract class Bee
{
    public abstract float CostPerShift { get; }
    public string Job { get; private set; }

    public Bee(string job)
    {
        Job = job;
    }

    public void WorkTheNextShift()
    {
        if (HoneyVault.ConsumeHoney(CostPerShift))
        {
            DoJob();
        }
   }

   protected abstract void DoJob();
}
Replace this!
Replace the Bee class in your Beehive Management System app with this new abstract one. It will still work! But now if you try to instantiate a Bee class with new Bee() and you’ll get a compiler error. And even more importantly, you’ll get an error if you extend Bee but forget to implement CostPerShift.
Was this the first time you’ve read through the code that you’ve written for previous exercises?
It may feel a little weird to go back to code you wrote before—but that’s actually something a lot of developers do, and it’s a feeling you should get used to. Did you find things that you would do differently the second time around? Are there improvements or changes that you might make? It’s always a good idea to take the time and refactor your code. And that’s exactly what you did in this exercise: you changed the structure of the code without modifying its behavior. That’s refactoring.
That sounds great! But there’s a problem.
If C# let you inherit from more than one base class, it would open up a whole can of worms. When a language lets one subclass inherit from two base classes, it’s called multiple inheritance. And by giving you interfaces instead, C# saves you from a big fat class conundrum called...
The Deadly Diamond of Death
Note
That’s its real name! Some developers just call it the “diamond problem.”
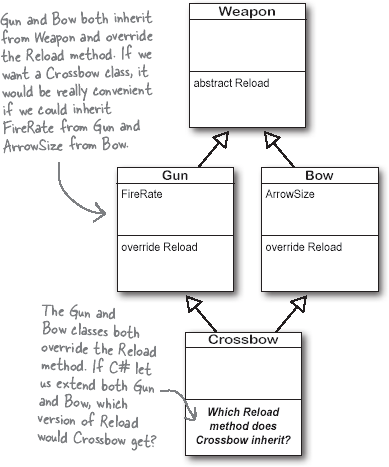
What would happen in a CRAZY world where C# allowed multiple inheritance? Let’s play a little game of “what if” and find out.
What if... you had a class called Weapon that had an abstract method called Reload?
And what if... it had two subclasses: Gun with a FireRate property, and Bow with an Arrow Size property?
And what if... you wanted to create a Crossbow class that inherited both FireRate and ArrowSize?
And what if... C# supported multiple inheritance, so you could do that?
Then there’s only one more question...
Which Reload does Crossbow inherit?
Does it get the version from Gun? Or does it get the version from Weapon? There’s no way to know!
And that’s why C# doesn’t allow multiple inheritance. But wouldn’t it be convenient if we could have something like an abstract class, but gets around the diamond problem so C# lets us extend more than one of them at the same time?