Chapter 8. Enums and Collections Organizing your data

Data isn’t always as neat and tidy as you’d like it to be.
In the real world, you don’t get to handle your data in tiny little bits and pieces. No, your data’s going to come at you in loads, piles, and bunches. You’ll need some pretty powerful tools to organize all of it, and that’s where collections come in. They let you store, sort, and manage all the data that your programs need to pore through. That way, you can think about writing programs to work with your data, and let the collections worry about keeping track of it for you.
Strings don’t always work for storing categories of data
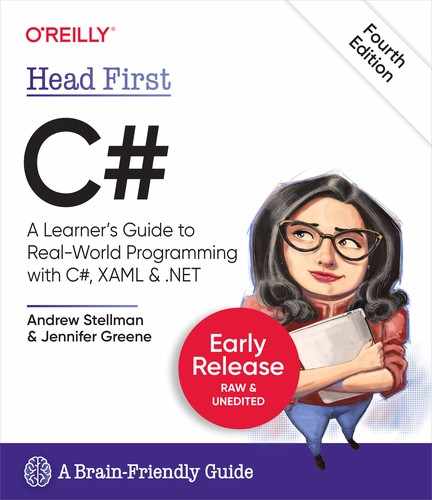
We’re going to be working with playing cards over the next few chapters, so let’s build a Card class that we’ll use. So let’s create a new Card class that has a constructor that lets you pass it a suit and value, which it stores as strings.
class Card
{
    public string Value { get; set; }
    public string Suit { get; set; }
    public string Name { get { return $"{Value} of {Suit}"; } }

    public Card(string value, string suit)

   {
        Value = value;
        Suit = suit;
   }
}
That looks pretty good. We can create a card object and use it, no problem.
Card aceOfSpades = new Card("Ace", "Spades");
Console.WriteLine(aceOfSpades); // prints Ace of Spades
But there’s a problem. Using strings to hold suits and values can have some unexpected results.

We could add code to the constructor to check each string and make sure it’s a valid suit or value, and that would let us handle bad input and throw an exception. But wouldn’t it be better if we could find a way to prevent that bad input in the first place? If we had a way to only allow certain values in the first place, then we could prevent those bugs and avoid those messy, unnecessary exceptions
What we need is a way to say, “Hey, there are only certain values that are allowed here.” We need to enumerate the values that are OK to use.

Enums let you work with a set of valid values
An enum or enumeration type is a data type that only allows certain values for that piece of data. So we could define an enum called Suits, and define the allowed suits:

An enum defines a new type
When you use the enum keyword you’re defining a new type.
You can use an enum as the type in a variable definition, just like you’d use
string, int, or any other type.Suits mySuit = Suits.Diamonds;
Since an enum is a type, you can use it to create an array.
Suits[] myVals= new Suits[3] { Suits.Spades, Suits.Clubs, mySuit
};
Use == to compare enum values. Here’s a method that takes a Suit enum as a parameter, and uses == to check if it’s equal to Suits.Hearts.
void IsItAHeart(Suits suit) {
    if (suit == Suits.Hearts) {
        Console.WriteLine("You pulled a heart!");
    } else {
        Console.WriteLine("You didn't pull a heart.");
    }
}
An enum lets you define a new type that only allows a specific set of values. Any value that’s not part of the enum will break the code, which can prevent bugs later.
But you can’t just make up a new value for the enum. If you do, the program won’t compile—which means you can avoid some annoying bugs.
IsItAHeart(Suits.Oxen);
Here’s the error you get from the compiler if you try to use a value that’s not part of the enum:

Enums let you represent numbers with names
Sometimes it’s easier to work with numbers if you have names for them. You can assign numbers to the values in an enum and use the names to refer to them. That way, you don’t have a bunch of unexplained numbers floating around in your code. Here’s an enum to keep track of the scores for tricks at a dog competition:

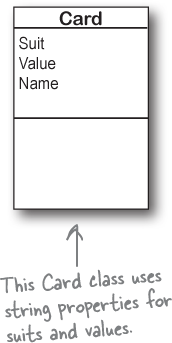
You can cast an int to an enum, and you can cast an (int-based) enum back to an int.
Some enums use a different type, like byte or long—like the one at the bottom of this page—and you can cast those back to their type.
Here’s an excerpt from a method that uses the TrickScore enum by casting it to and from an int value.

You can cast the enum as a number and do calculations with it. And you can even convert it to a string—an enum’s ToString method returns a string with the member name.
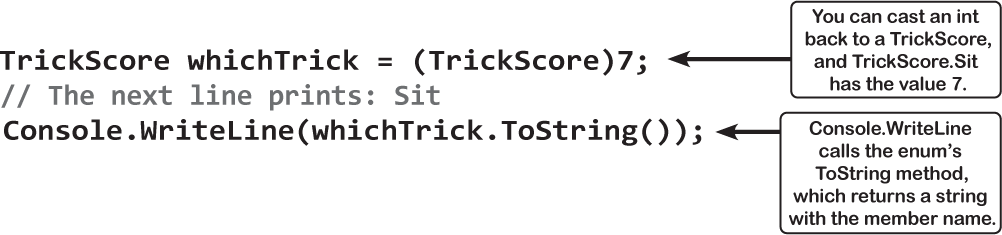
If you don’t assign any number to a name, the items in the list will be given values by default. The first item will be assigned a 0 value, the second a 1, etc. But what happens if you want to use really big numbers for one of the enumerators? The default type for the numbers in an enum is int, so you’ll need to specify the type you need using the colon (:) operator, like this:
We could use an array to create a deck of cards…
What if you want to create a class to represent a deck of cards? It would need a way to keep track of every card in the deck, and it’d need to know what order they were in. A Card array would do the trick—the top card in the deck would be at value 0, the next card at value 1, etc. Here’s a starting point—a Deck that starts out with a full deck of 52 cards.
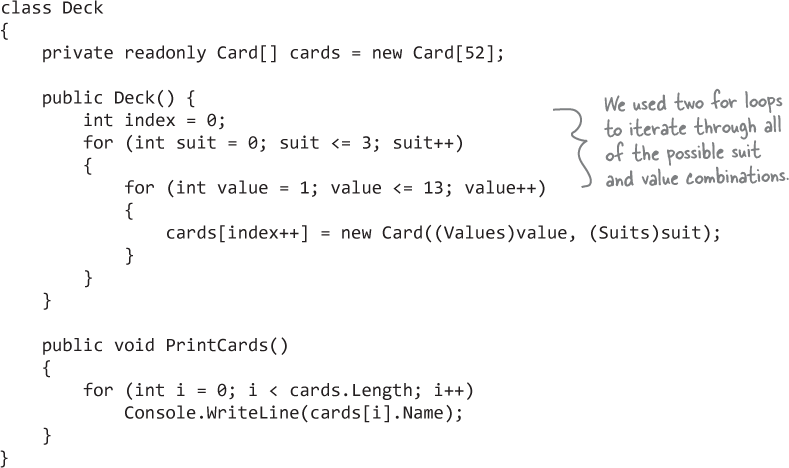
…but what if you wanted to do more?
Think of everything you might need to do with a deck of cards, though. If you’re playing a card game, you routinely need to change the order of the cards, and add and remove cards from the deck. You just can’t do that with an array very easily.
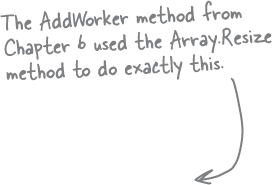
Take another look at the AddWorker method from the Beehive Management System exercise in Chapter 6. To insert a new worker in the middle of the array, you had to resize it at exactly the right index.
Arrays can be annoying to work with
An array is fine for storing a fixed list of values or references. But once you need to move array elements around, or add more elements than the array can hold, things start to get a little sticky.
Every array has a length, and you need to know the length to work with it. You could use null references to keep some array elements empty:

You’d need to keep track of how many cards are being held. So you’d need an int field, which we could call topCard, that would hold the index of the last card in the array. So our three-card array would have a Length of 7, but we’d set topCard equal to 3.

But now things get complicated. It’s easy enough to add a Peek method that just returns a reference to the top card—so you can peek at the top of the deck. But what if you want to add a card? If topCard is less than the array’s Length, you can just put your card in the array at that index and add 1 to topCard. But if the array’s full, you’ll need to create a new, bigger array and copy the existing cards to it. Removing a card is easy enough—but after you subtract 1 from topCard, you’ll need to make sure to set the removed card’s array index back to null. And what if you need to remove a card from the middle of the list? If you remove card 4, you’ll need to move card 5 back to replace it, and then move 6 back, then 7 back…wow, what a mess!
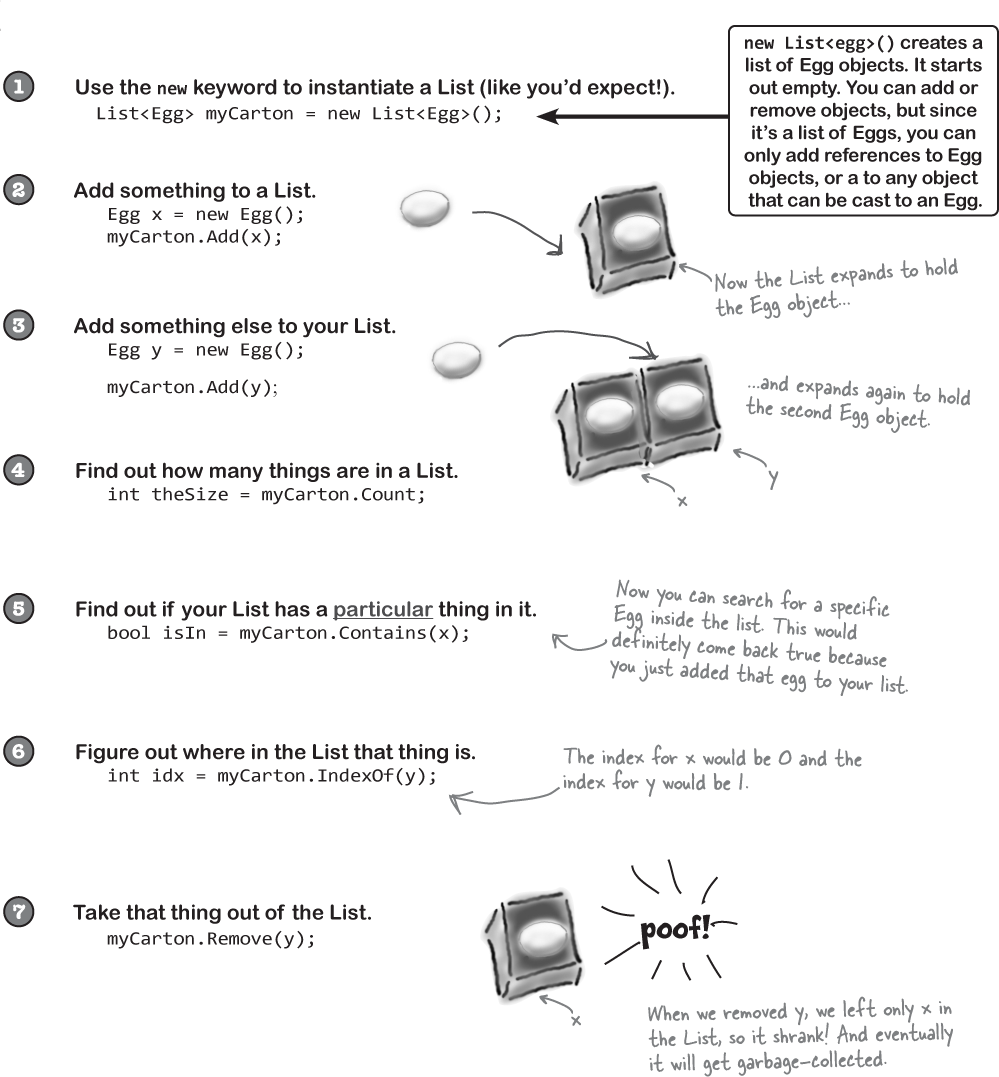
Lists make it easy to store collections of… anything
C# and .NET have a bunch of collection classes that handle all of those nasty issues that come up when you add and remove array elements. The most common sort of collection is a List<T>. Once you create a List<T> object, it’s easy to add an item, remove an item from any location in the list, peek at an item, and even move an item from one place in the list to another. Here’s how a list works:
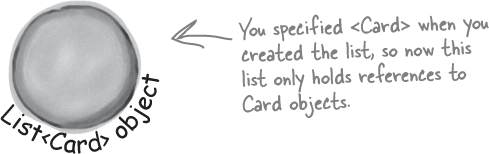
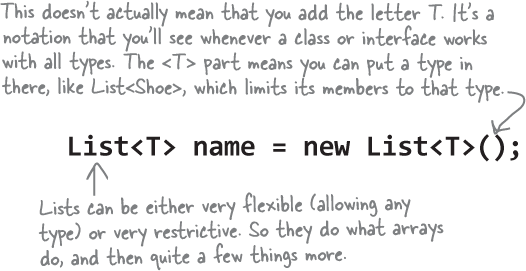
First you create a new instance of List<T>. Every array has a type—you don’t just have an array, you have an
intarray, aCardarray, etc. Lists are the same way. You need to specify the type of object or value that the list will hold by putting it in angle brackets <> when you use thenewkeyword to create it.List<Card> cards = new List<Card>();
Now you can add to your List<T>. Once you’ve got a
List<T>object, you can add as many items to it as you want (as long as they’re polymorphic with whatever type you specified when you created your newList<T>)—which means they’re assignable to the type (and that includes interfaces, abstract classes, and base classes).cards.Add(new Card(Values.King, Suits.Diamonds)); cards.Add(new Card(Values.Three, Suits.Clubs)); cards.Add(new Card(Values.Ace, Suits.Hearts));

Lists are more flexible than arrays
The List class is built into the .NET Framework, and it lets you do a lot of things with objects that you can’t do with a plain old array. Check out some of the things you can do with a List<T>.
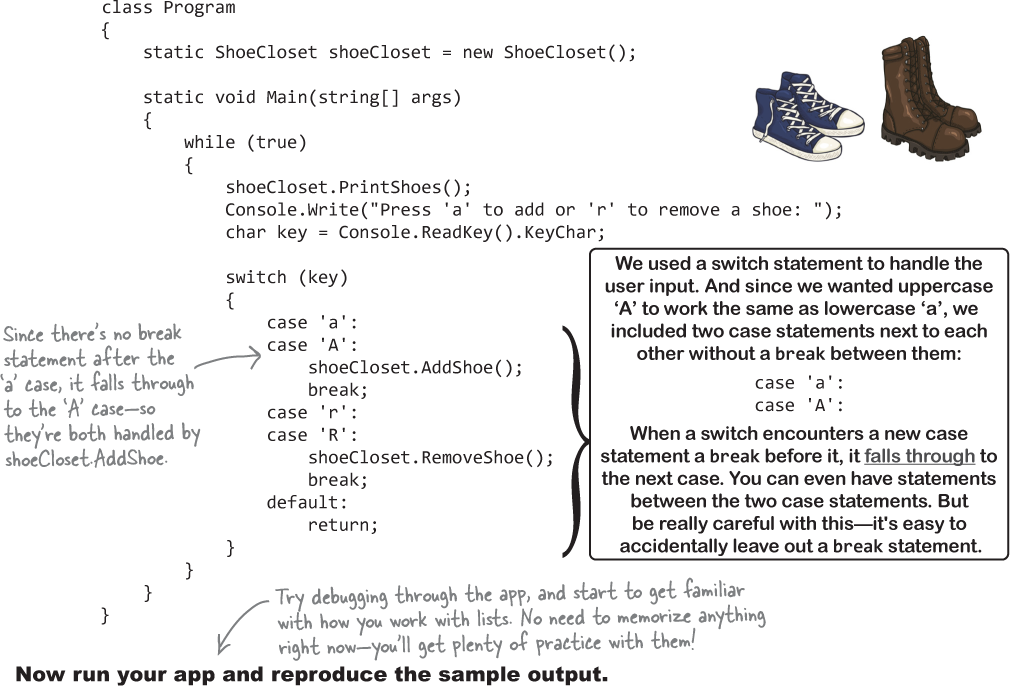
Let’s build an app to store shoes
It’s time to see a List in action. Let’s build a .NET Core console app that prompts the user to add or remove shoes. Here’s an example of what it looks like to run the app, adding three shoes and then removing them:
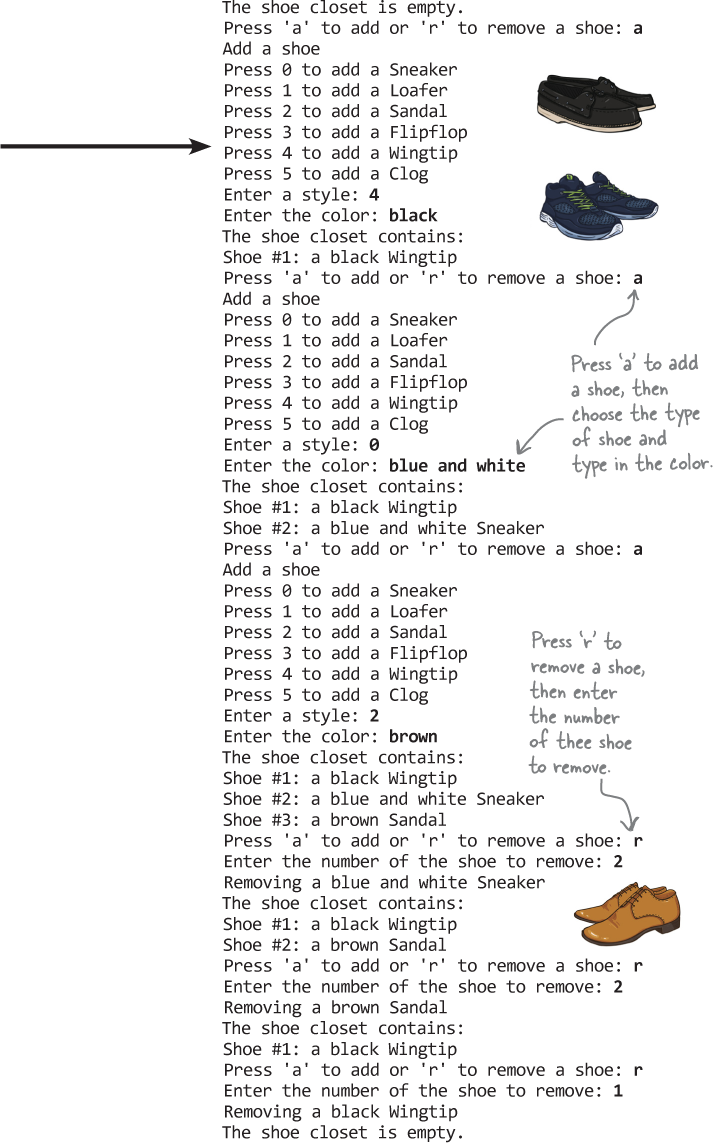
We’ll start with a Shoe class that stores the style and color for a shoe. Then we’ll create a class called ShoeCloset that stores the shoes in a List<Shoe>, with AddShoe and RemoveShoe methods that prompt the user to add or remove shoes.
Do this!
Use an enum for shoe style. Some shoes are sneakers, others are sandals, so an enum makes sense.
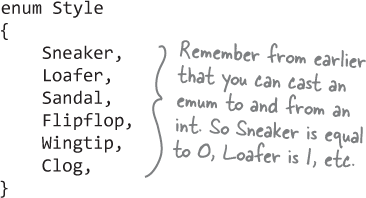
Here’s the Shoe class. It uses the Style enum for the shoe style and s string for shoe color, and works just like the Card class earlier in the chapter:
class Shoe
{
    public Style Style {
       get; private set;
    }
    public string Color {
       get; private set;
    }
    public Shoe(Style style, string color)
    {
       Style = style;
       Color = color;
    }
    public string Description
    {
       get { return $"A {Color} {Style}"; }
    }
}
The ShoeCloset class uses a List<Shoe> to manage its shoes. The ShoeCloset class has three methods: the PrintShoes method prints a list of shoes to the console, the AddShoe method prompts the user to add a shoe to the closet, and the RemoveShoe method prompts the user to remove a shoe.
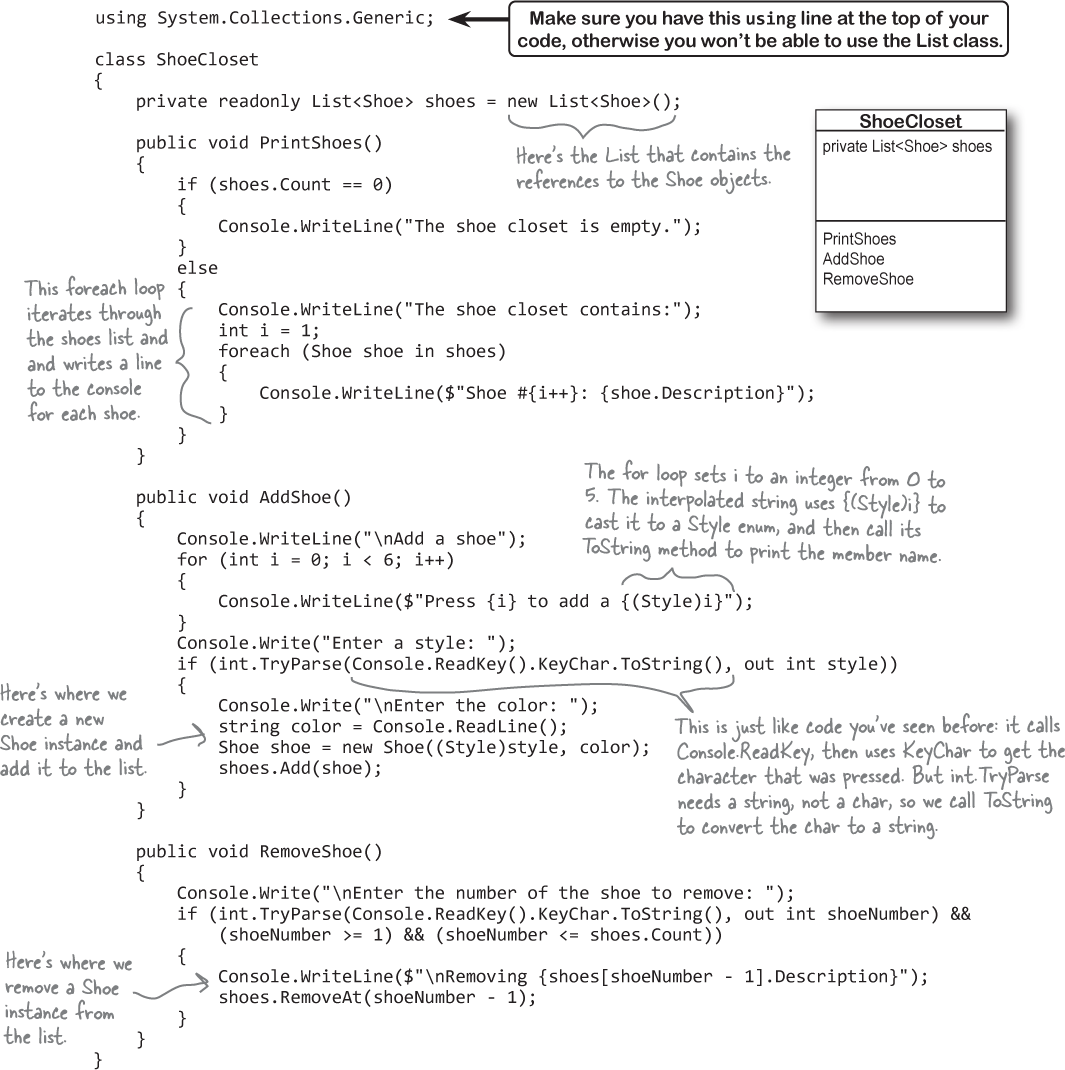
Here’s the Program class with the entry point. Notice how it doesn’t do very much? That’s because all of the interesting behavior is encapsulated in the ShoeCloset class.
Generic collections can store any type
You’ve already seen that a List can store strings or Shoes. You could also make Lists of integers or any other object you can create. That makes a List a generic collection. When you create a new List object, you tie it to a specific type: you can have a List of ints, or strings, or Shoe objects. That makes working with Lists easy—once you’ve created your list, you always know the type of data that’s inside it.
But what does “generic” really mean? Let’s use Visual Studio to explore generic collections. Open ShoeCloset.cs and hover your mouse cursor over List:

There are a few things to notice:
The List class is in the namespace System.Collections.Generic—this namespace has several classes for generic collections (which is why you needed the
usingline).The description says that List provides “methods to search, sort, and manipulate lists.” You used some of these methods in your ShoeCloset class.
The top line says
List<T>and the bottom saysT is Shoe. This is how generics are defined—it’s saying that List can handle any type, but for this specific list that type is the Shoe class.
A generic collection can hold any type of object, and gives you a consistent set of methods to work with the objects in the collection no matter what type of object it’s holding.
Generic lists are declared using <angle brackets>
When you declare a list—no matter what type it holds—you always declare it the same way, using <angle brackets> to specify the type of object being stored in the list.
You’ll often see generics classes (not just List) written like this: List<T> – that’s how you know the class can take any type.
Code Magnets
Can you reconstruct the code snippets to make a working Windows Form that will pop up the message box below when you click a button?

Code Magnets Solution

Collection initializers are similar to object initializers
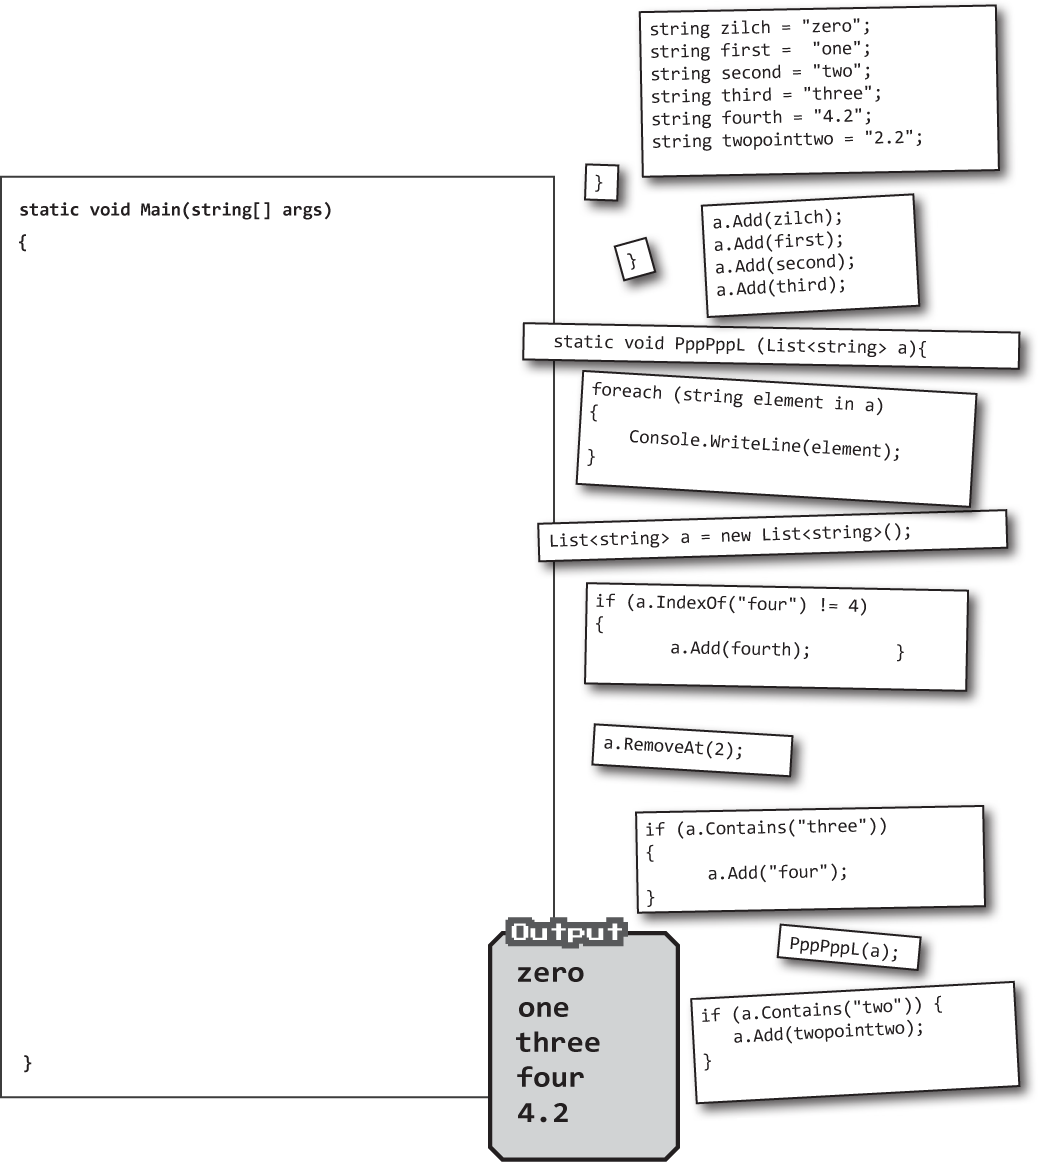
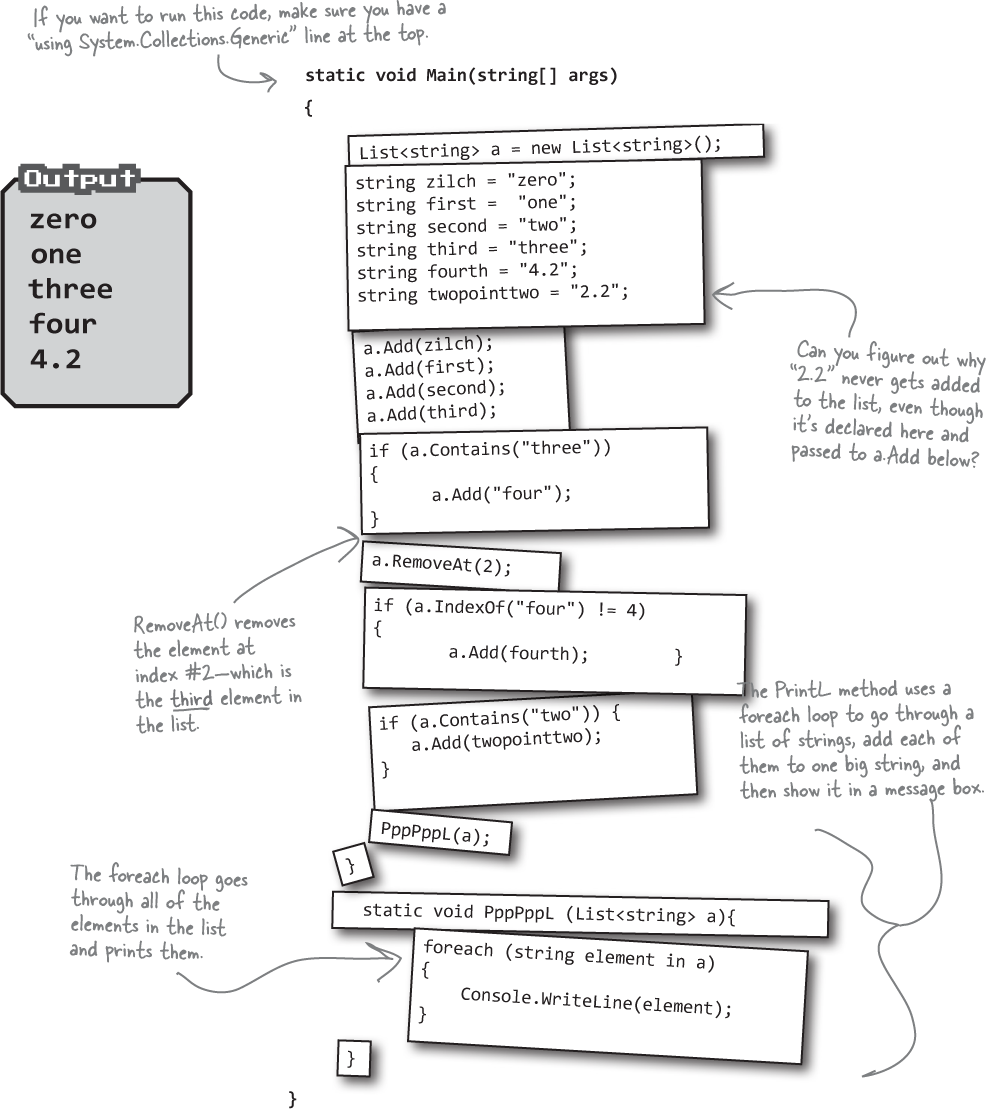
C# gives you a nice bit of shorthand to cut down on typing when you need to create a list and immediately add a bunch of items to it. When you create a new List object, you can use a collection initializer to give it a starting list of items. It’ll add them as soon as the list is created.
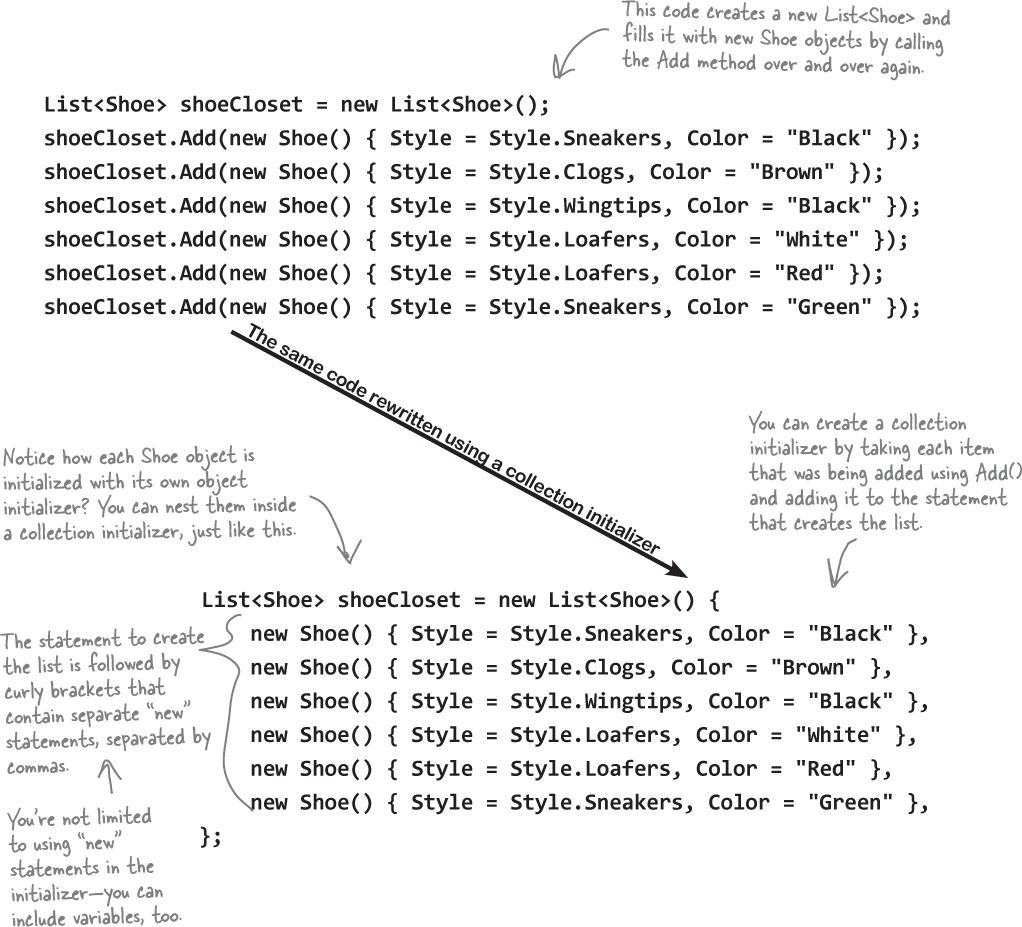
A collection initializer makes your code more compact by letting you combine creating a list with adding an initial set of items.
Do this!
Let’s create a List of Ducks
Here’s a Duck class that keeps track of your extensive duck collection. (You do collect ducks, don’t you?) Create a new Console Application and add a new Duck class and KindOfDuck enum.

Here’s the initializer for your List of Ducks
We’ve got six ducks, so we’ll create a List<Duck> that has a collection initializer with six statements. Each statement in the initializer creates a new duck, using an object initializer to set each Duck object’s Size and Kind field. Make sure this using directive is at the top of Program.cs:
using System.Collections.Generic;
Then add this PrintDucks method to your Program class:
public static void PrintDucks(List<Duck> ducks)
{
    foreach (Duck duck in ducks) {
        Console.WriteLine($"{duck.Size} inch {duck.Kind}");
    }
}
Finally, add this code to your Main method in Program.cs to create a List of ducks and then print them:
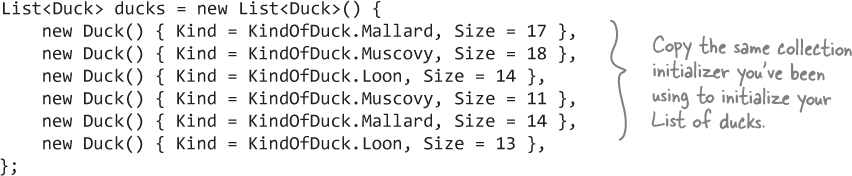
List<Duck> ducks = new List<Duck>() {
    new Duck() { Kind = KindOfDuck.Mallard, Size = 17 },
    new Duck() { Kind = KindOfDuck.Muscovy, Size = 18 },
    new Duck() { Kind = KindOfDuck.Loon, Size = 14 },
    new Duck() { Kind = KindOfDuck.Muscovy, Size = 11 },
    new Duck() { Kind = KindOfDuck.Mallard, Size = 14 },
    new Duck() { Kind = KindOfDuck.Loon, Size = 13 },
};

PrintDucks(ducks);
Run your code—it will print a bunch of ducks to the console.
Lists are easy, but SORTING can be tricky
It’s not hard to think about ways to sort numbers or letters. But what do you sort two objects on, especially if they have multiple fields? In some cases you might want to order objects by the value in the name field, while in other cases it might make sense to order objects based on height or date of birth. There are lots of ways you can order things, and lists support any of them.

Lists know how to sort themselves
Every list comes with a Sort method that rearranges all of the items in the list to put them in order. Lists already know how to sort most built-in types and classes, and it’s easy to teach them how to sort your own classes.
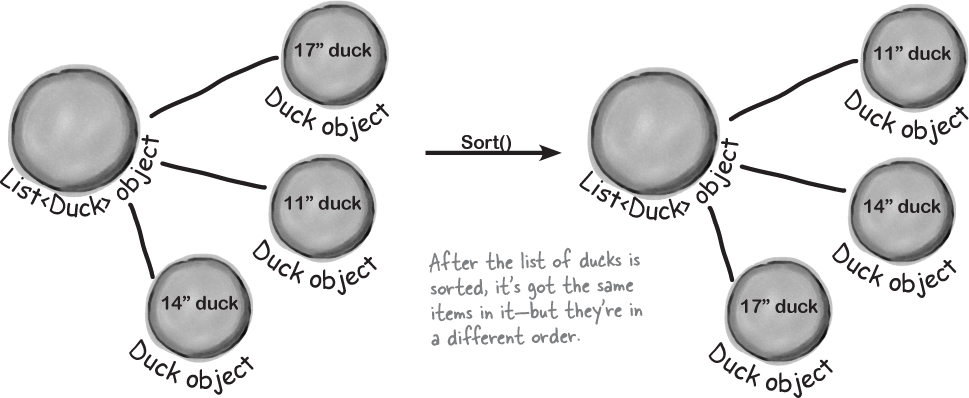
IComparable<Duck> helps your list sort its ducks
If you have a List of numbers and call its Sort method, it will sort the list with the smallest numbers first and largest last. But how does the List know which way to sort your Duck objects? We tell the List.Sort method that the Duck class can be sorted. And we do that the way always indicate that a class can do a certain thing: with an interface.
The List.Sort method knows how to sort any type or class that implements the IComparable<T> interface. That interface has just one member—a method called CompareTo(). Sort() uses an object’s CompareTo method to compare it with other objects, and uses its return value (an int) to determine which comes first.
An object’s CompareTo method compares it to another object
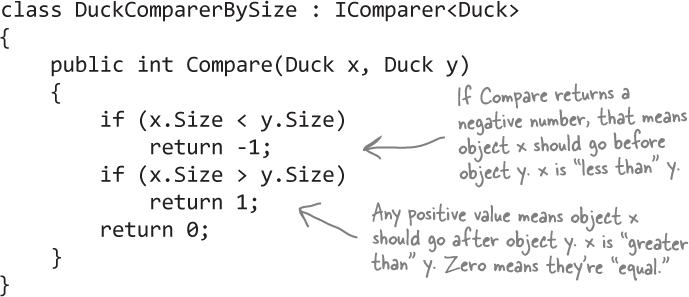
One way to give our List object the ability to sort ducks is to modify the Duck class to implement IComparable<Duck> and add its only member, a CompareTo method that takes a Duck reference as a parameter. If the duck to compare should come after the current duck in the sorted list, CompareTo() returns a positive number.
Update your project’s Duck class by implementing IComparable<Duck> so that it sorts itself based on duck size:

Add this line of code to the end of your Main method just before the call to PrintDucks. This tells your list of ducks to sort itself. Now it sorts the ducks by size before printing them to the console.
ducks.Sort();
PrintDucks(ducks);

Use IComparer to tell your List how to sort
When you typed “List.Sort” into the IDE, did you notice that it has overloads? Have a look:

List.Sort passes pairs of objects to the Compare method in your comparer object, so your List will sort differently depending on how you implement the comparer.
You’ve been calling List.Sort without any arguments. But the IDE says you can also call an overloaded version that takes an IComparer<T> reference, where T will be replaced by the generic type for your list (so for a List<Duck> it takes an IComparer<Duck> argument, for a List<string> it’s an IComparer<string>, etc.). And since pass it an instance of an object that implements an interface, we know what that means: that it does a specific job. And in this case, that job is comparing two ducks (or whatever item is in the list).
The IComparer<T> interface has one member, a method called Compare, and it’s like the CompareTo method in IComparable<T>: it takes two object parameters, x and y, and returns an int. If x is less than y, it should return a negative value. If they’re equal, it should return zero. And if x is greater than y, it should return a positive value.
Add an IComparer to your project
Add the DuckComparerBySize class to your project. It’s a comparer object that you can pass as a parameter to List.Sort to make it sort your ducks by size.
The IComparer interface is in the System.Collections.Generic namespace, so if you’re adding this class to a new file make sure it has the right using directive.
using System.Collections.Generic;
Here’s the code for the comparer class:
Can you figure out how to modify DuckComparerBySize so it sorts the ducks largest to smallest instead?
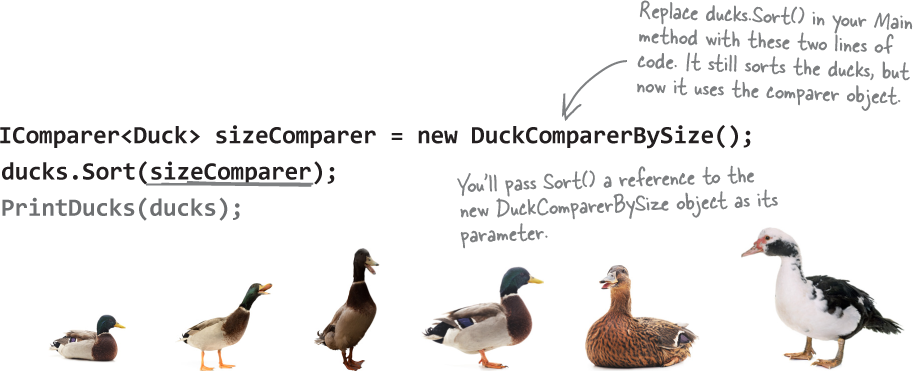
Create an instance of your comparer object
When you want to sort using IComparer<T>, you need to create a new instance of the class that implements it. That object exists for one reason— to help List.Sort() figure out how to sort the array. But like any other (nonstatic) class, you need to instantiate it before you use it.
Multiple IComparer implementations, multiple ways to sort your objects
You can create multiple IComparer<Duck> classes with different sorting logic to sort the ducks in different ways. Then you can use the comparer you want when you need to sort in that particular way. Here’s another duck comparer implementation to add to your project:
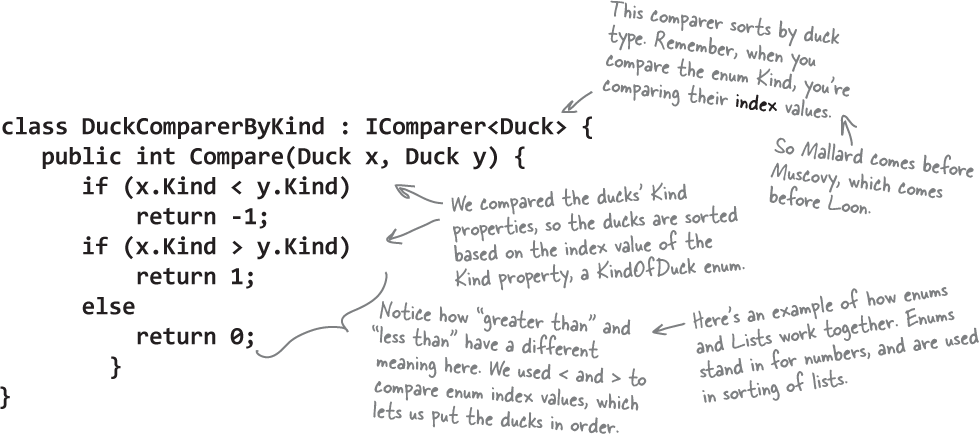
Go back and modify your program to use this new comparer. Now it sorts the ducks by kind before it prints them.
IComparer<Duck> kindComparer = new DuckComparerByKind();
ducks.Sort(kindComparer);
PrintDucks(ducks);
Comparers can do complex comparisons
One advantage to creating a separate class for sorting your ducks is that you can build more complex logic into that class—and you can add members that help determine how the list gets sorted.

Overriding a ToString method lets an object describe itself
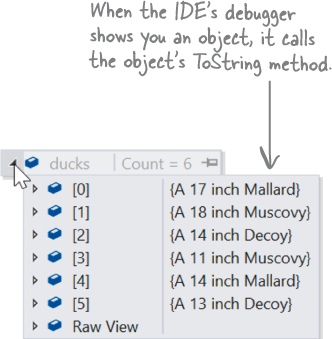
Every object has a method called ToString that converts it to a string. You’ve already used it—any time you use {curly braces} in string interpolation or the + operator to concatenate strings, that calls the ToString method of whatever’s inside them. And the IDE also takes advantage of it. When you create a class, it inherits the ToString method from Object:

The Object.ToString method prints the fully qualified class name, or the namespace followed by a period followed by the class name. Since we used the namespace DucksProject when we were writing this chapter, the fully qualified class name for our Duck class was DucksProject.Duck.
The IDE also calls the ToString method—for example, when you watch or inspect a variable:

Hmm, that’s not as useful as we’d hoped. You can see that there are six Duck objects in the list (“DucksProject” is the namespace we used). If expand a Duck, you can see its Kind and Size values. But wouldn’t it be easier if you could see all of them at once?
Override the ToString method to see your Ducks in the IDE
Luckily, ToString() is a virtual method on Object, the base class of every object. So all you need to do is override the ToString method—and when you do, you’ll see the results immediately in the IDE’s Watch window! Open up your Duck class and start adding a new method by typing override. As soon as you press space, the IDE will show you the methods you can override:

Click on ToString() to tell the IDE to add a new ToString method. Replace the contents so it looks like this:
public override string ToString()
{
   return $"A {Size} inch {Kind}";
}
Run your program and look at the list again. Now the IDE shows you the contents of your Duck objects.
Update your foreach loops to let your Ducks and Cards print themselves
You’ve seen two different examples of programs looping through a list of objects and calling Console.WriteLine() to print a line to the console for each object—like this foreach loop that prints every card in a List<Card>:
 foreach (Card card in cards)
 {
     Console.WriteLine(card.Name);
 }
The PrintDucks method did something similar for Duck objects in a List:
 foreach (Duck duck in ducks) {
     Console.WriteLine($"{duck.Size} inch {duck.Kind}");
 }
This is a pretty common thing to do with objects. But now that your Duck has a ToString method, your PrintDucks method should take advantage of it. Use the IDE’s IntelliSense to look through the overloads for the Console.WriteLine method—specifically this one:

You can pass any object to Console.WriteLine, and it will call its ToString method. So you can replace the PrintDucks method with one that calls this overload:
  public static void PrintDucks(List<Duck> ducks) {
      foreach (Duck duck in ducks) {
          Console.WriteLine(duck);
      }
  }
Replace the PrintDucks method with this one and run your code again. It prints the same output. And now if you want to add, say, a Gender property to your Duck object, you just have to update the ToString method, and everything that uses it (including the PrintDucks method) will reflect that change.
Add a ToString method to your Card object, too
Your Card object already has a Name property that returns the name of the card:
public string Name { get { return $"{Value} of {Suit}"; } }
That’s exactly what its ToString method should do. So add a ToString method to the Card class:

Now your programs that use Card objects will be easier to debug.
You can upcast an entire list using IEnumerable<T>
Remember how you can upcast any object to its superclass? Well, when you’ve got a List of objects, you can upcast the entire list at once. It’s called covariance, and all you need for it is an IEnumerable<T> interface reference.
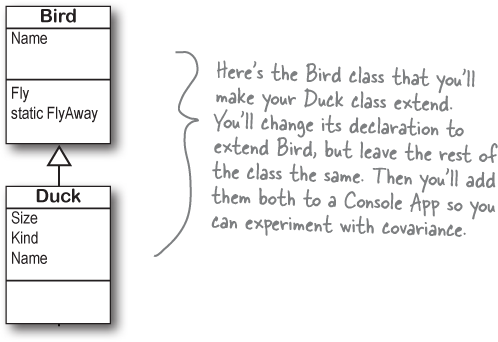
Let’s see how this works. We’ll start the Duck class that you’ve been working with throughout the chapter. Then we’ll add a Bird class that it will extend. The Bird class will include a static method that iterates over a collection of Bird objects. Can we get it it to work with a List of Ducks?
Covariance is really useful when we need to pass a collection of objects to a method that only works with the class they inherit from.
Do this!
Create a new Console Application. Add a base class, Bird (for Duck to extend), and a Penguin class. We’ll use the ToString method to make it easy to see which class is which.

Add your Duck class to the application. Add a base class, Bird (for Duck to extend), and a Penguin class. We’ll use the ToString method to make it easy to see which class is which. Make sure you also add the KindOfDuck enum from earlier in the chapter.

Create the List<Duck> collection. Go ahead and add this code to your Main method— it’s the code from earlier in the chapter, plus one line to upcast it to a List<Bird>.
Bird.FlyAway(ducks, "Minnesota");

Uh-oh—that code won’t compile. And the error message telling you that you can’t convert your Duck collection to a Bird collection. So let’s try assigning the ducks to a List<Bird>:
List<Bird> upcastDucks = ducks;
Well, that didn’t work. You got a different error, but it still says you can’t convert the type.

Which makes sense—it’s exactly like safely upcasting versus downcasting that we learned about in Chapter 6: we can use assignment to downcast, but we need to use the
iskeyword to safely upcast. So how do we safely upcast our List<Duck> to a List<Bird>?Use covariance to make your ducks fly away. And that’s where covariance comes in: you can use assignment to upcast your List<Duck> to an IEnumerable<Bird>. And once you’ve got your IEnumerable<Bird>, you can call its ToList method to convert it to a List<Bird>.
IEnumerable<Bird> upcastDucks = ducks;
Bird.FlyAway(upcastDucks.ToList(), "Minnesota");
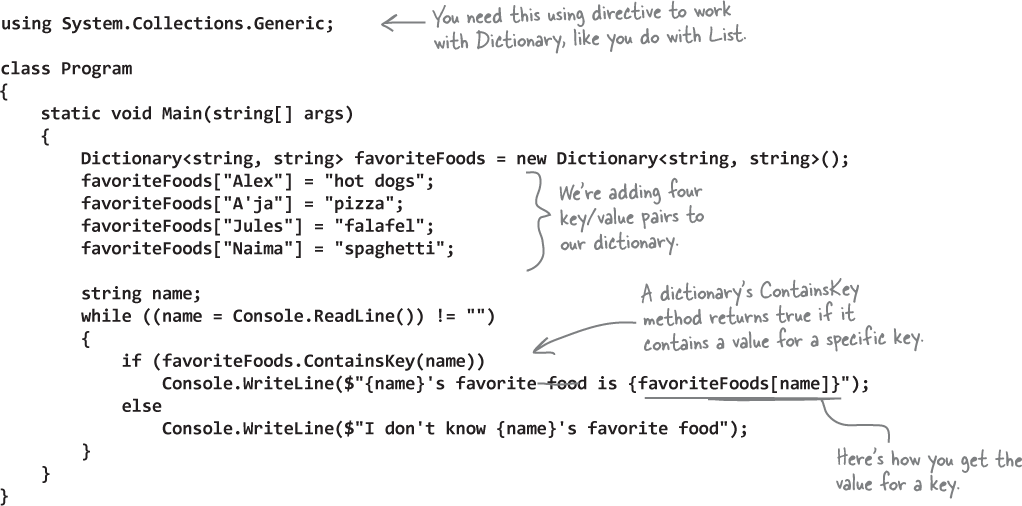
Use a Dictionary to store keys and values
A list is like a big long page full of names. But what if you also want, for each name, an address? Or for every car in the garage list, you want details about that car? You need a dictionary. A dictionary lets you take a special value—the key—and associate that key with a bunch of data—the value. And one more thing: a specific key can only appear once in any dictionary.

Here’s how you declare a Dictionary in C#:

Let’s see a Dictionary in action. Here’s a small console app that uses a Dictionary<string, string> to keep track of the favorite foods for a few friends.
The Dictionary functionalit y rundown
Dictionaries are a lot like lists. Both types are flexible in letting you work with lots of data types, and also come with lots of built-in functionality. Here are the basic Dictionary methods:
Add an item.
You can add an item to a dictionary using its indexer with square brackets:
  Dictionary<string, string> myDictionary = new Dictionary<string, string>();
  myDictionary["some key"] = "some value";
You can also add an item to a dictionary using its add method:
  Dictionary<string, string> myDictionary = new Dictionary<string, string>();
  myDictionary.Add("some key", "some value");
Look up a value using its key.
The most important thing you’ll do with a dictionary is look up values with the indexer—which makes sense, because you stored those values in a dictionary so you could look them up using their unique keys. This example shows a Dictionary<string, string>, so we’ll look up values using a string key, and the Dictionary will a string value.
string lookupValue = myDictionary["some key"];
Remove an item.
Just like a
List, you can remove an item from a dictionary using the Remove method. All you need to pass to the Remove method is the Key value to have both the key and the value removed.myDictionary.Remove("some key");Keys are unique in a Dictionary; any key appears exactly once. Values can appear any number of times—two keys can have the same value. That way, when you look up or remove a key, the Dictionary knows what to remove.
Get a list of keys.
You can get a list of all of the keys in a dictionary using its Keys property and loop through it using a
foreachloop. Here’s what that would look like:
Count the pairs in the dictionary.
The Count property returns the number of key-value pairs that are in the dictionary:
int howMany = myDictionary.Count;
Your key and value can be different types
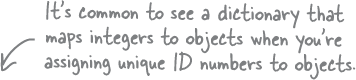
Dictionaries are versatile! They can hold just about anything, not just value types but any kind of object. Here’s an example of a dictionary that’s storing an integer as a key and a Duck object reference as a value.
  Dictionary<int, Duck> duckIds = new Dictionary<int, Duck>();
  duckIds.Add(376, new Duck() { Kind = KindOfDuck.Mallard, Size = 15 });
Build a program that uses a dictionary
Do this!
Here’s a quick program that any New York baseball fan will like. When an important player retires, the team retires the player’s jersey number. Create a new Console app that looks up some Yankees who wore famous numbers and when those numbers were retired. Here’s a class to keep track of a retired baseball player:
class RetiredPlayer
{
    public string Name { get; private set; }
    public int YearRetired { get; private set; }

    public RetiredPlayer(string player, int yearRetired)
    {
        Name = player;
        YearRetired = yearRetired;
    }
}
Yogi Berra was #8 for the New York Yankees, while Cal Ripken Jr. was #8 for the Baltimore Orioles. But in a dictionary only one key can map to a single value, so we’ll only include numbers from one team here. Can you think of a way to store retired numbers for multiple teams?
And here’s the Program class with a main method that adds retired players to a dictionary. We can use the jersey number as the dictionary key because it’s unique—once a jersey number is retired, the team never uses it again. And that’s an important thing to consider when designing an app that uses a dictionary: you never want to discover your key is not as unique as you thought!
And yet MORE collection t ypes…
List and Dictionary objects are two of the built-in generic collections that are part of the .NET Framework. Lists and dictionaries are very flexible—you can access any of the data in them in any order. But sometimes you need to restrict how your program works with the data because the thing that you’re representing inside your program works like that in the real world. For situations like this, you’ll use a Queue or a Stack. Those are generic collections like List<T>, but they’re especially good at making sure that your data is processed in a certain order.
Use a Queue when the first object you store will be the first one you’ll use, like:
Cars moving down a one-way street
People standing in line
Customers on hold for a customer service support line
Anything else that’s handled on a first-come, first-served basis
Use a Stack when you always want to use the object you stored most recently, like:
Furniture loaded into the back of a moving truck
A stack of books where you want to read the most recently added one first
People boarding or leaving a plane
A pyramid of cheerleaders, where the ones on top have to dismount first… imagine the mess if the one on the bottom walked away first!

Generic .NET collections implement IEnumerable
Almost every large project that you’ll work on will include some sort of generic collection, because your programs need to store data. And when you’re dealing with groups of similar things in the real world, they almost always naturally fall into a category that corresponds pretty well to one of these kinds of collections. But no matter which of these collections you use—List, Dictionary, Stack, or Queue— you’ll always be able to use a foreach loop with them because all of them implement IEnumerable<T>.

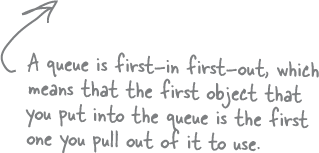
A queue is FIFO—First In, First Out
A queue is a lot like a list, except that you can’t just add or remove items at any index. To add an object to a queue, you enqueue it. That adds the object to the end of the queue. You can dequeue the first object from the front of the queue. When you do that, the object is removed from the queue, and the rest of the objects in the queue move up a position.


A stack is LIFO—Last In, First Out
A stack is really similar to a queue—with one big difference. You push each item onto a stack, and when you want to take an item from the stack, you pop one off of it. When you pop an item off of a stack, you end up with the most recent item that you pushed onto it. It’s just like a stack of plates, magazines, or anything else—you can drop something onto the top of the stack, but you need to take it off before you can get to whatever’s underneath it.


You don’t give up anything when you use a queue or a stack.
It’s really easy to copy a Queue object to a List object. And it’s just as easy to copy a List to a Queue, a Queue to a Stack…in fact, you can create a List, Queue, or Stack from any other object that implements the IEnumerable<T> interface. All you have to do is use the overloaded constructor that lets you pass the collection you want to copy from as a parameter. That means you have the flexibility and convenience of representing your data with the collection that best matches the way you need it to be used. (But remember, you’re making a copy, which means you’re creating a whole new object and adding it to the heap.)


…and you can always use a foreach loop to access all of the members in a stack or a queue!

Getting IDE shortcuts into your muscle memory helps you code.
When you’ve been working on one of the projects in this book, have you had the feeling of time flying by? If you haven’t felt that yet, don’t worry... it’ll come! Developers call that “flow”—it’s a state of high concentration where you start working on the project, and after a while (and if there are no interruptions) the rest of the world sort of “slips away” and you find time passing quickly. This is a real state of mind that psychological researchers have studied—especially sports psychologists (if you’ve ever heard an athlete talk about being “in the zone,” it’s the same idea). Artists, musicians, and writers also get into a state of flow. And getting really familiar with the IDE’s keyboard shortcuts can help you more quickly get into—and stay in—your own state of flow.
Let’s build an app to work with decks of cards
In the next exercise you’ll build an app that lets you move cards between two decks. It will have two ListBox controls that show the cards in each deck. The left deck has buttons that let you shuffle it and reset it to 52 cards, and the right deck has buttons that let you clear and sort it. You’ll use a Grid with two columns and four rows that contain two ListBoxes, four buttons—and two new controls you haven’t seen yet, Label controls, which we’ll use to give your ListBoxes access keys.
Pop up most apps—including Visual Studio—and tap the Alt key. You’ll see underscores display under various buttons, menu items, and other controls. Those are access keys. Hold down alt and tap the key and you jump straight to the control that has it underlined. We’ll use access keys to make your app fully keyboard accessible.

Add a Deck class to hold the cards
Do this!
We want each ListBox to show us a different deck of cards. Here’s how you’ll do that:
You’ll create a Deck class—it will be a collection that holds Card objects
You’ll add two instances of the Deck class to your window’s resources (just like when did with an instance of the Queen class when you added data binding to your Beehive Management System app)
You’ll use data binding to automatically populate each ListBox with the contents of one of the Decks
Create a Deck that extends Obser vableCollection
Start by adding the Suits and Values enums to your project. Then add the Card class. Make sure you use the version that overrides the ToString object. Then add this Deck class:

You’ve worked with several different collections throughout this chapter: Lists, Dictionaries, Queues, and Stacks. Now you’ll use the ObservableCollection class, which is built for data binding. An ObservableCollection is a collection that has that same kind of notification built in, letting the app know whenever items get added, removed, or refreshed (just like the notification you added to your Queen class).
Add a Window.Resources with t wo instances of the Deck class
In Chapter 7 you added a Window.Resources tag to create an instance of the Queen class. Now you’ll do somethig very similar. Add this Window.Resources tag to your xaml, just above the <Grid> tag:
<Window.Resources>
   <local:Deck x:Key="leftDeck"/>
   <local:Deck x:Key="rightDeck"/>
</Window.Resources>
Use Visual Studio to set up data binding
Click on the left ListBox in the designer, then expand Common in the Properties window and click the box next to ItemsSource. Choose Local Resource >> leftDeck from the menu. Then do the same thing for the right ListBox, setting its ItemsSource to rightDeck. Visual Studio will update the XAML to bind each ItemsSource to an instance of Deck:
