Chapter 7. Interfaces, Casting, and “is” Making Classes keep their Promises

Actions speak louder than words.
Sometimes you need to group your objects together based on the things they can do rather than the classes they inherit from. That’s where interfaces come in—they let you work with any class that can do the job. But with great power comes great responsibility, and any class that implements an interface must promise to fulfill all of its obligations…or the compiler will break their kneecaps, see?
The beehive is under attack!
An enemy hive is trying to take over the queen’s territory, and keeps sending enemy bees to attack her workers. So she’s added a new elite Bee subclass called HiveDefender to defend the hive.

But the rest of the worker bees are loyal to their queen, and the ones who can defend the hive will take up arms. The Nectar Collectors are expert navigators, and can spot enemies while they’re making their rounds collecting nectar from flowers. They may not be the elite warriors that their HiveDefender sisters are, but they’ve still got stingers, and they’ll defend their hive.
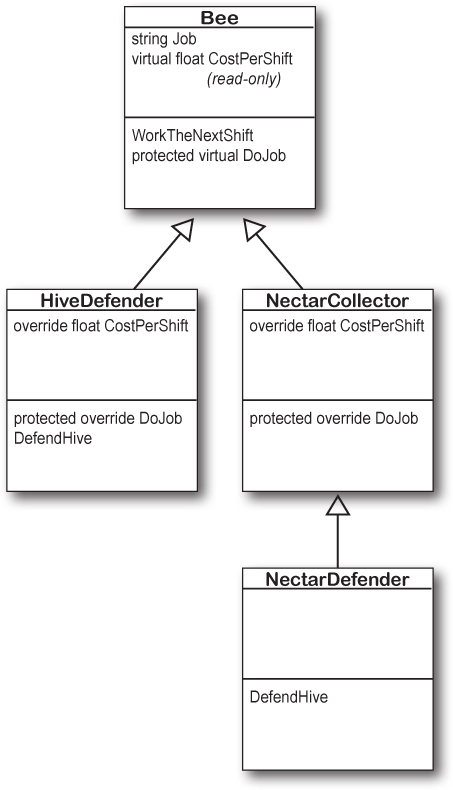
So we need a DefendHive method, because enemies can attack at any time
We can add a HiveDefender to the Bee class hierarchy by extending the Bee class, overriding its CostPerShift with the amount of honey each defender consumes every shift, and overriding the DoJob method to fly out to the enemy hive and attack the enemy bees.
But enemy bees can attack at any time. We want defenders to be able to defend the hive whether or not they’re currently doing their normal jobs.
So in addition to DoJob, we’ll add a DefendHive method to any bee that can defend the hive—not just the elite HiveDefender workers, but to any of her sisters who can take up arms and protect their queen. The queen will call her workers’ DefendHive methods any time she sees that her hive is under attack.
We can use casting to call the DefendHive method...
When you coded the Queen.DoJob method, you used a foreach loop to get each Bee reference in the workers array, then you used that reference to call worker.DoJob. If the hive is under attack, the Queen will want to call her defenders’ DefendHive method. So we’ll give her a HiveUnderAttack method that gets called any time the hive is being attacked by enemy bees, and she’ll use a foreach loop to order her workers to defend the hive until all of the attackers are gone.
But there’s a problem. The Queen can use the Bee references to call DoJob because each subclass overrides Bee.DoJob. But she can’t use a Bee reference to call the DefendHive method, because that method isn’t part of the Bee class. So how does she call DefendHive?
Since DefendHive is only defined in each subclass, we’ll need to use casting to convert the Bee reference to the correct subclass in order to call its DefendHive method.
public void HiveUnderAttack() {
    foreach (Bee worker in workers) {
        if (EnemyHive.AttackingBees > 0) {
            if (worker.Job == "Hive Defender") {
                HiveDefender defender = (HiveDefender) worker;
                defender.DefendHive();
            } else if (worker.Job == "Nectar Defender") {
                NectarDefender defender = (NectarDefender) defender;
                defender.DefendHive();
            }
        }
    }
}

... but what if we add more Bee subclasses that can defend?
Some honey manufacturer and egg care bees want to step up and defend the hive, too. But that means we’ll need to add more else blocks to her HiveUnderAttack method.
This is getting complex. The Queen.DoJob method is nice and simple—a very short foreach loop that takes advantage of the Bee class model to call the specific version of the DoJob method that was implemented in the subclass. But we can’t do that with DefendHive because it’s not part of the Bee class—and we don’t want to add it, because not all bees can defend the hive. Is there a better way to have unrelated classes do the same job?
An interface defines methods and properties that a class must implement...
An interface contains a set of methods and properties that a class must implement. It works just like an abstract class: you define the interface using abstract methods, and then you use the colon (:) to make a class implement that interface.
So if we wanted to add defenders to the hive, but we could have an interface called IDefend. Here’s what that looks like. It uses the interface keyword to define the interface, and it includes a single member, an abstract method called Defend. All members in an interface are public and abstract by default, so C# keeps things simple by having you leave off the public and abstract keywords:

Any class that implements the IDefend interface must include a Defend method whose declaration matches the one in the interface. If it doesn’t, the compiler will give an error.
... but there’s no limit on interfaces that a class can implement
We just said that you use a colon (:) to make a class implement an interface. But hold on—what if that class is already using a colon to extend a base class? No problem! A class can implement many different interfaces, even if it already extends a base class.
class NectarDefender : NectarCollector, IDefend
{
   void Defend() {
       /* Code to defend the hive */
   }
}
When a class implements an interface, it must include all of the methods and properties listed inside the interface or the code won’t build.
Now we have a class that can act like a NectarCollector, but it can also defend the hive. NectarCollector extends Bee, so you use it from a Bee reference it acts like a Bee:
Bee worker = new NectarCollector();
Console.WriteLine(worker.Job);
worker.WorkTheNextShift();
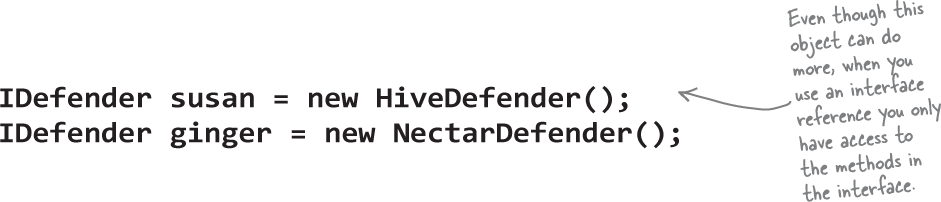
But if you use it from an IDefend reference, it acts like a hive defender:
IDefend defender = new NectarCollector();
defender.Defend();
Interfaces let unrelated classes do the same job
Interfaces can be a really powerful tool to help you design C# code that’s as easy to understand and build as possible. Start by thinking about specific jobs that classes need to do, because that’s what interfaces are all about.

So how does this help the queen? The IDefender interface lives entirely outside the Bee class hierarchy. So we can add a NectarDefender class that knows how to defend the hive, and it can still extend NectarCollector. The Queen can keep an array of all of her defenders:
IDefender[] defenders = new IDefender[2];
defenders[0] = new HiveDefender();
defenders[1] = new NectarDefender();
That makes it easy for her to rally her defenders:
private void DefendTheHive() {
  foreach (IDefender defender in defenders)
  {
     defender.Defend();
  }
}
And since it lives outside of the Bee class model, we can do this without modifying any existing code.
Get a little practice using interfaces
The best way to understand them is to start using them. So create a new Console Application project—let’s get started.
Do this
Add the Main method. Here’s the code for the method. Here’s the TallGuy class, and the code for the Main method that instantiates it using an object initializer and calls its TalkAboutYourself method. Nothing new here—we’ll use it in a minute:
class TallGuy {
    public string Name;
    public int Height;

    public void TalkAboutYourself() {
        Console.WriteLine($"My name is {Name} and I'm {Height} inches tall.");
    }
}

class Program
{
    static void Main(string[] args)
    {
         TallGuy tallGuy = new TallGuy() { Height = 76, Name = "Jimmy" };
         tallGuy.TalkAboutYourself();
    }
}
Add an interface. You already know that everything inside an interface has to be public, but don’t take our word for it. Add a new
IClowninterface to your project, just like you would add a class: right-click on the project in the Solution Explorer, select Add >> New Item... and choose Interface. Make sure it’s calledIClown.cs.The IDE will create an interface that includes the interface declaration. Add a Honk method:
Try coding the rest of the IClown interface. Before you go on to the next step, see if you can create the rest of the IClown interface, and modify the TallGuy class to implement this interface. In addition to the void method called Honk that doesn’t take any parameters, your IClown interface should also have a read-only string property called FunnyThingIHave that has a get accessor but no set accessor.
Here’s the IClown interface. Did you get it right? It’s okay if you put the Honk method first—the order of the members doesn’t matter in an interface, just like it doesn’t matter in a class.

Now modify the TallGuy class so that it implements IClown. Remember, the colon operator is always followed by the base class to inherit from (if any), and then a list of interfaces to implement, all separated by commas. Since there’s no base class and only one interface to implement, the declaration looks like this:
class TallGuy : IClown
Then make sure the rest of the class is the same, including the two fields and the method. Select Build Solution from the Build menu in the IDE to compile and build the program. You’ll see two errors:

Fix the errors by adding the missing interface members. The errors will go away as soon as you add all of the methods and properties defined in the interface. So go ahead and implement the interface. Add a read-only string property called FunnyThingIHave with a get accessor that always returns the string “big shoes”. Then add a Honk method that writes “Honk honk!” to the console.
Here’s what it’ll look like:

Now your code will compile! Update your Main method so that it prints the TallGuy object’s FunnyThingIHave property and then calls its Honk method.
static void Main(string[] args)
{
    TallGuy tallGuy = new TallGuy() { Height = 76, Name = "Jimmy" };
    tallGuy.TalkAboutYourself();
    Console.WriteLine($"The tall guy has {tallGuy.FunnyThingIHave}");
    tallGuy.Honk();
}

Tonight’s talk: An abstract class and an interface butt heads over the pressing question, “Who’s more important?”
| Abstract Class: | Interface: |
| I think it’s obvious who’s more important between the two of us. Programmers need me to get their jobs done. Let’s face it. You don’t even come close. | |
| Nice. This oughta be good. | |
| You can’t really think you’re more important than me. You don’t even use real inheritance—you only get implemented. | |
| Great, here we go again. Interfaces don’t use real inheritance. Interfaces only implement. That’s just plain ignorant. Implementation is as good as inheritance. In fact, it’s better! | |
| Better? You’re nuts. I’m much more flexible than you. Sure, I can’t be instantiated—but then, neither can you. But unlike you, I have the awesome power of inheritance. The poor saps that extend you can’t take advantage of virtual and override at all! | |
| Yeah? What if you want a class that inherits from you and your buddy? You can’t inherit from two classes. You have to choose which class to inherit from. And that’s just plain rude! There’s no limit to the number of interfaces a class can implement. Talk about flexible! With me, a programmer can make a class do anything. |
| Abstract Class: | Interface: |
| You might be overstating your power a little bit. | |
| Really, now? Well, let’s think about just how powerful I can be for developers that use me. I’m all about the job—when they get an interface reference, they don’t need to know anything about what’s going on inside that object at all. | |
| And you think that’s a good thing? Ha! When you use me and my subclasses, you know exactly what’s going on inside all us. I can handle any behavior that all of my subclasses need, and they just need to inherit it. Transparency is a powerful thing, kiddo! | |
| Nine times out of ten, a programmer wants to make sure an object has certain properties and methods, but doesn’t really care how they’re implemented. | |
| Really? I doubt that—programmers always care what’s in their properties and methods. | |
| OK, sure. Eventually. But think about how many times you’ve seen a programmer write a method that takes an object that just needs to have a certain method, and it doesn’t really matter right at that very moment exactly how the method’s built. Just that it’s there. So bang! The programmer just needs to use an interface. Problem solved! | |
| Yeah, sure, tell a coder they can’t code. | |
| Ugh you’re so frustrating! |
You can’t instantiate an interface, but you can reference an interface
Say you need an object that has a Defend method so you can use it in a loop to defend the hive. Any object that implemented the IDefender interface would do. It could be a HiveDefender object, a NectarDefender object, or even a HelpfulLadyBug object. As long as it implements the IDefender interface, that guarantees that it has a Defend method We just need to call it.
That’s where interface references come in. You can use one to refer to an object that implements the interface you need and you’ll always be sure that it has the right methods for your purpose—even if you don’t know much else about it.
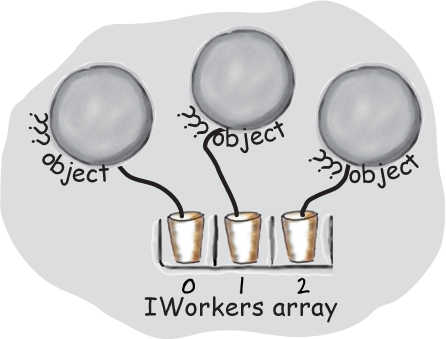
If you try to instantiate an interface, your code won’t build...
You can create an array of IWorker references, but you can’t instantiate an interface. But what you can do is point those references at new instances of classes that implement IWorker. Now you can have an array that holds many different kinds of objects!
If you try to instantiate an interface, the compiler will complain.

You can’t use the new keyword with an interface, which makes sense—the methods and properties don’t have any implementation. If you could create an object from an interface, how would it know how to behave?
...but use the interface to reference an object you already have
So you can’t instantiate an interface... but you can use the interface to make a reference variable, and use it to reference an object that implements the interface.
Remember how you could pass a Tiger reference to any method that expects an Animal, because Tiger extends Animal? Well, this is the same thing—you can use an instance of a class that implements IDefender in any method or statement that expects an IDefender.
These are ordinary new statements, just like you’ve been using for most of the book. The only difference is that you’re using a variable of type IDefender to reference them.

Interface references are ordinary object references
You already know all about how objects live on the heap. When you work with an interface reference, it’s just another way to refer to the same objects you’ve already been using.
Objects are created as usual.
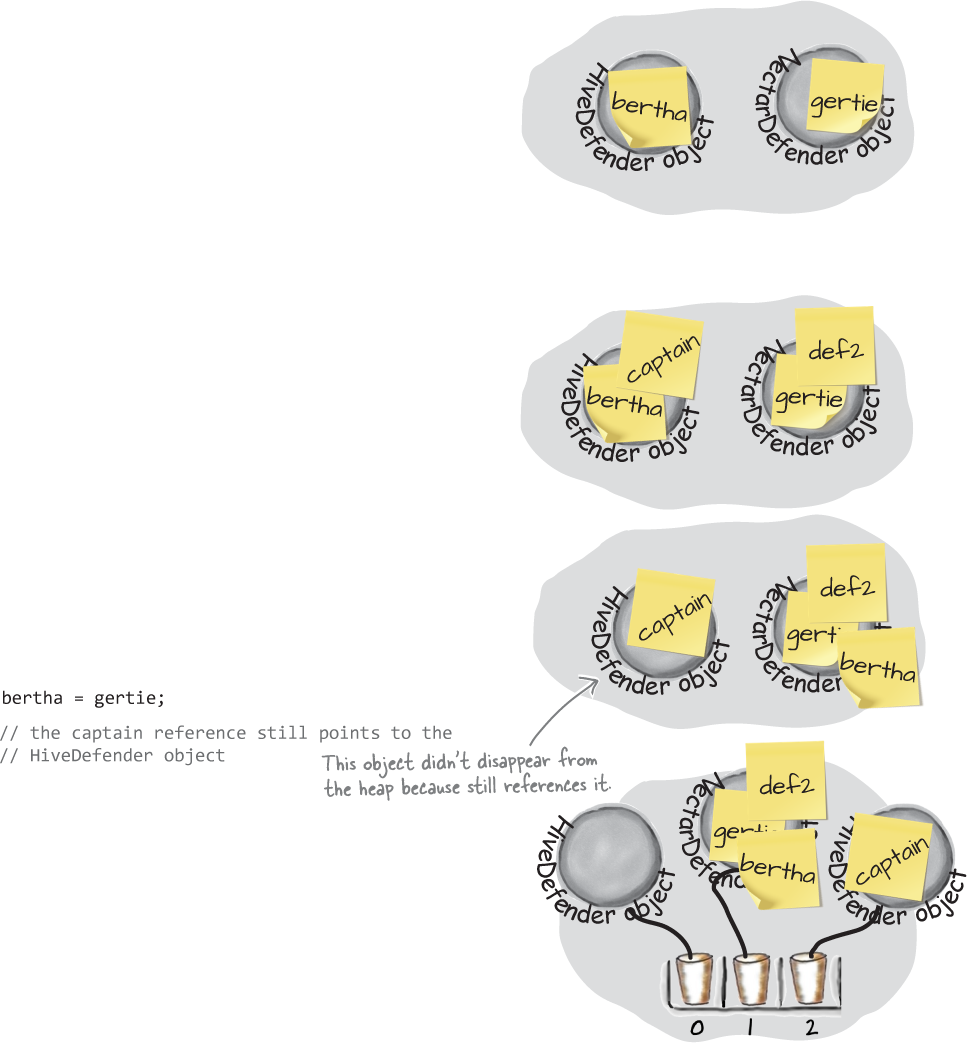
Let’s create some objects. We’ll create an instance of HiveDefender and an instance of NectarDefender—and both of those classes implement the IDefender interface.
HiveDefender bertha = new HiveDefender();
NectarDefender gertie = new NectarDefender();
Add IDefender references.
You can use interface references just like you use any other reference type. These two statements use interfaces to create new references to existing objects. You can only point an interface reference at an instance of a class that implements it.
IDefender def2 = gertie;
IDefender captain = bertha;
An interface reference will keep an object alive.
When there aren’t any references pointing to an object, it disappears. But there’s no rule that says those references all have to be the same type! An interface reference is just as good as any other object reference when it comes to keeping track of objects so they don’t get garbage colleected.
Use an interface like any other type.
You can create a new object with a new statement and assign it straight to an interface reference variable in a single line of code. And you can use interfaces to create arrays that can reference any object that implements the interface.
IDefender[] defenders = new IDefender[3];
defenders[0] = new HiveDefender();
defenders[1] = bertha;
defenders[2] = captain;
The RoboBee 4000 can do a worker bee’s job without using valuable honey

Bee-suiness was booming last quarter, and the Queen had enough spare budget to buy the latest in hive technology: the RoboBee 4000. It can do the work of three different bees, and best of all it doesn’t consume any honey! It’s not exactly environmentally friendly, though —it runs on gas. So how can we use interfaces to integrate RoboBee into the hive’s day-to-day business?

Take a close look at the class diagram to see how this would work.
We’ll start with a basic Robot class—everyone knows all robots run on gasoline, so it has a ConsumeGas method.
The RoboBee class inherits from Robot and implements IWorker. That means it’s a robot, but can do the job of three worker bees. Perfect!
The RoboBee class implements all of the IWorker interface members. We don’t have a choice in this—if RoboBee4000 class doesn’t implement everything in the IWorker interface, the code won’t compile.
And now you all we’d need to do is modify the Beehive Management System to use the IWorker interface instead of the abstract Bee class any time it needs to reference a worker.
Everything in a public interface is automatically public, because you’ll use it to define the public methods and properties of any class that implements it.
The IWorker’s Job propert y is a hack
Does something seem a little odd about the fact that every worker has a property called Job?
Think about all of the classes you’ve made so far. You didn’t include a property that returns the string “Pigeon” or “Ostrich” or “SwordDamage” or “ArrowDamage”—in fact, this is the only time in the book that you’ve done anything like the Job property.
So why do we think the Job property is a hack? Well, think about how much work you’ve put into preventing bugs. You’ve used access modifiers to prevent your classes from accidentally being misused. You’ve used abstract classes so you don’t accidentally create an instance of a class that should never be instantiated. And this all happens at compile time—the C# compiler does all of those checks for you when it builds your code, so they’ll never cause exceptions later on. So it would be a real shame to do all that work, only to have a simple typo break your code:


That’s right! C# gives you tools to work with types.
You don’t ever need a property like Job to keep track of the type of a class with strings like "Egg Care" or "Nectar Collector". C# gives you tools that let you check the type of an object.
Use “is” to check the t ype of an object
The Queen needs more workers! She wants to find all of the EggCare workers and have them work extra nighttime shifts to make eggs into workers more quickly. But all she has is her workers array, which means that all she can get is an IWorker reference. She could use the hacky Job property:
foreach (IWorker worker in workers) {
if (worker.Job == "Egg Care") {
    WorkNightShift((EggCare)worker);
}

void WorkNightShift(EggCare worker) {
   // Code to work the night shift
}
But that code will fail miserably if we accidentally type "Egg Crae" instead of "Egg Care". And if you set a HoneyManufacturer’s Job to "Egg Care" accidentally, you’ll get one of those InvalidCastException errors. It would be great if we could get the compiler could detect problems like that as soon as we write them, just like we use private or abstract members to get it to detect other kinds of problems.
C# gives us a tool to do exactly that: we can use the is keyword to check an object’s type. If you have an object reference, you can use is to find out if it’s a specific type:
objectReference is ObjectType newVariable
If the object that objectReference is pointing to has ObjectType as its type, then it returns true and creates a new reference called newVariable with that type.
So if the Queen wants to find all of her EggCare workers and have them work a night shift, she can use the is keyword:
foreach (IWorker worker in workers) {
    if (worker is EggCare eggCareWorker) {
        WorkNightShift(eggCareWorker);
    }
}
The if statement in this loop uses is to check each IWorker reference. Look closely at the conditional test:
worker is EggCare eggCareWorker
If the object referenced by the worker variable is an EggCare object, that test returns true, and assigns the reference to a new EggCare variable called eggCareWorker. This is just like casting, but the is statement is doing the casting for you safely.
The is keyword returns true if an object matches a type, and optionally declares a variable of the type it checked that references the object.
Use the “is” keyword to access methods in a subclass
Do This
Let’s pull together everything we’ve talked about so far into a new project. Here’s what we’ll do:
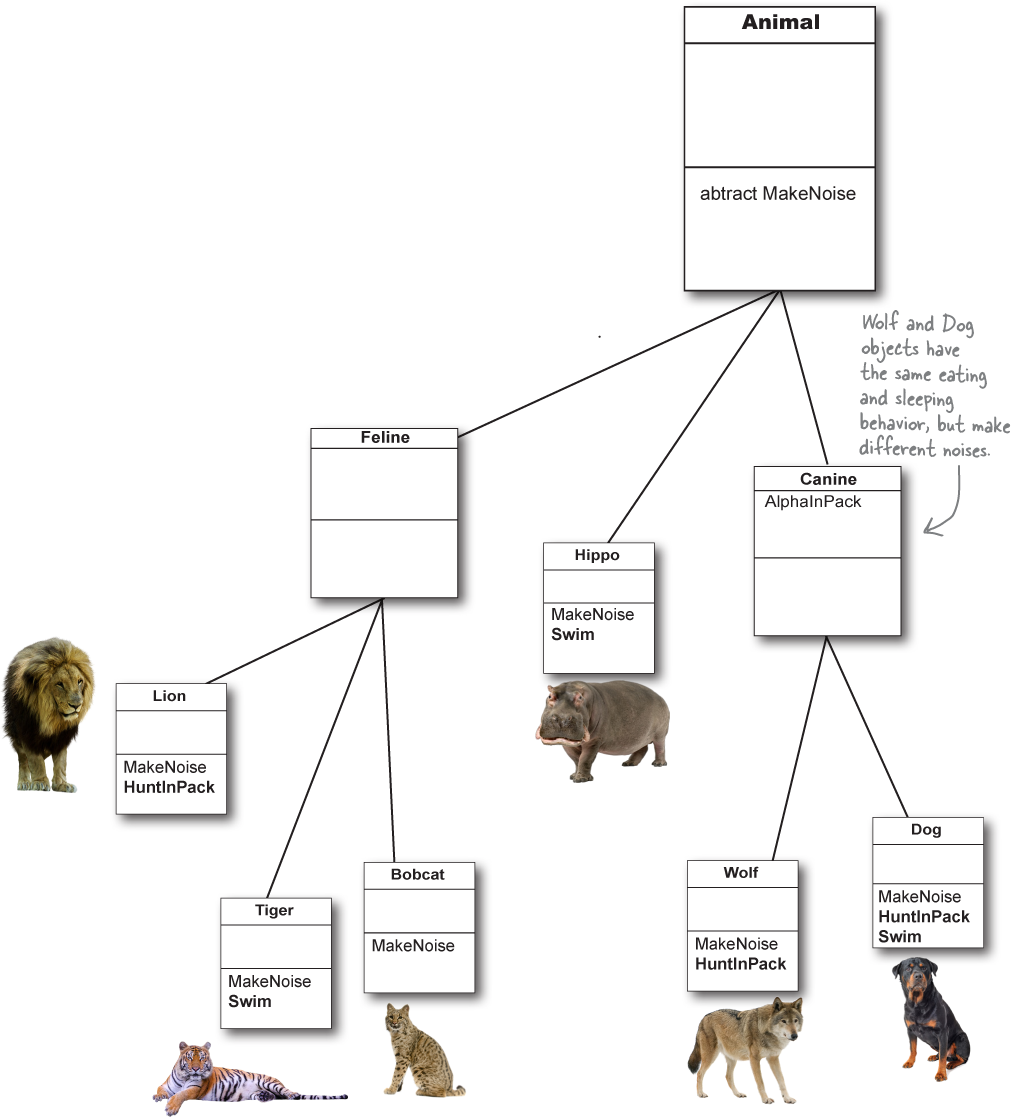
We’re going to implement a class model. At the top of the hierarchy is the abstract class Animal.
The Hippo subclass overrides the abstract MakeNoise method, and adds its own Swim method that has nothing to do with the Animal class.
Animal is also extended by an abstract class called Canine, which has its own abstract property AlphaInPack. The Wolf class extends Canine, and adds its own HuntInPack method.
Create a Console App and add these Animal, Hippo, Canine, and Wolf classes to it:
abstract class Animal
{
    public abstract void MakeNoise();
}

class Hippo : Animal
{
    public override void MakeNoise()
    {
        Console.WriteLine("Grunt.");
    }

    public void Swim()
    {
        Console.WriteLine("Splash! I'm going for a swim!");
    }
}

abstract class Canine : Animal
{
    public bool AlphaInPack { get; protected set; } = false;
}

class Wolf : Canine
{
    public Wolf(bool alphaInPack)
    {
        AlphaInPack = alphaInPack;
    }

    public override void MakeNoise()
    {
        if (AlphaInPack) Console.Write("I'm the alpha! ");
        Console.WriteLine("Aroooooo!");
    }

    public void HuntInPack()
    {
        if (AlphaInPack) Console.WriteLine("Let's go hunting. Follow me!");
        else Console.WriteLine("I'm following the alpha.");
    }
}

In Chapter 5 we learned that we could use different references to call different methods on the same object. When you didn’t use the override and virtual keywords, if your reference variable had the type Locksmith it called Locksmith.ReturnContents, but if it was a JewelThief type it called JewelThief. ReturnContents. We’re doing something similar here.
Next, fill in the Main method. Here’s what it does:
It creates an array of Hippo and Wolf objects, then uses a foreach loop to go through each of them.
It uses the Animal reference to call the MakeNoise method.
If it’s a Hippo, we want to call its Hippo.Swim method.
If it’s a Wolf, we want to call its Wolf.HuntInPack method.
The problem is that if have an Animal reference pointing to a Hippo object, you can’t use it to call Hippo.Swim:
  Animal animal = new Hippo();
  animal.Swim(); // <-- this line will not compile!
It doesn’t matter that your object is a Hippo. If you’re using an Animal variable, you can only access the fields, methods, and properties of Animal.
Luckily, there’s an easy way around this. If you’re 100% sure that you have a Hippo object, then you can cast your Animal reference to a Hippo—and then you can access its Swim method.
  Hippo hippo = (Hippo)animal;
  hippo.Swim(); // <-- It’s the same object, but now you can call its Swim method.
Here’s the Main method that uses the is keyword to call Hippo.Swim or Wolf.HuntInPack.

Take a few minutes and use the debugger to reallly understand what’s going on here. Put a breakpoint on the first line of the foreach loop, add watches for animal, hippo, and wolf, and step through it.
What if we want different animals to swim or hunt in packs?
Did you know that lions are pack hunters? Or that tigers can swim? And what about dogs, which hunt in packs AND swim? If we want to add the Swim and HuntInPack methods to all of the animals in our zoo simulator model, the foreach loop is just going to get longer and longer.
But it’s not just about saving code. The beauty of defining an abstract method or property in a base class and overriding it in a subclass is that you don’t need to know anything about the subclass to use it. You can add all of the Animal subclasses you want, and this loop will still work:
  foreach (Animal animal in animals) {
      animal.MakeNoise();
  }
The MakeNoise method will always be implemented by the object.
In fact, you can treat it like a contract that the compiler enforces.
So is there a way to treat the HuntInPack and Swim methods like contracts too, so we can use more general variables with them —just like we do with the Animal class?
Use interfaces to you work with classes that do the same job
Class that swim have a Swim method, and classes that hunt in packs have a HuntInPack method. Okay, that’s a good start. But now we want to write code that works with object that swim or hunt in packs —and that’s where interfaces shine. Let’s use the interface keyword to define two interfaces and add an abstract member to each interface:
Add this!
  interface ISwimmer {
      void Swim();
  }

  interface IPackHunter {
      void HuntInPack();
  }
Next make the Hippo and Wolf classes implement the interfaces by adding an interface to the end of the class declaration. Use a colon (:) to implement an interface, just like you do when you’re extending a class. If it’s already extending a class, you just add a comma after the superclass and then the interface name. Then you just need to make sure the class implements all the interface members, or you’ll get a compiler error.
  class Hippo : Animal, ISwimmer {
      /* The code stays exactly the same - it MUST include the Swim method */
  }

  class Wolf : Canine, IPackHunter {
      /* The code stays exactly the same - it MUST include the HuntInPack method */
  }
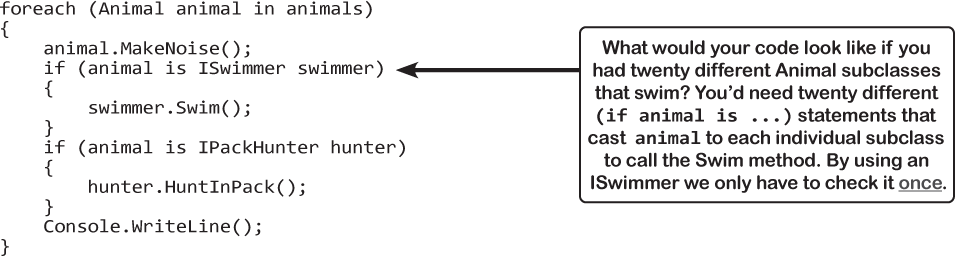
Use the is keyword to check if the Animal is a swimmer or pack hunter
You can use the is keyword to check if a specific object implements an interface—and it works no matter what other classes that object implements. If the animal variable references an object that implements the ISwimmer interface, then animal is ISwimmer will return true and you can safely cast it to an ISwimmer reference to call its Swim method. foreach (Animal animal in animals)
C# has another tool for safe type conversion: the as keyword
C# also gives you another tool for safe casting: the as keyword. It also does safe type conversion. Here’s how it works. Let’s say you have an IWorker reference called pearl, and you want to safely cast it to a NectarCollector variable irene. You can convert it safely to a NectarCollector like this:
NectarCollector irene = pearl as NectarCollector;
If the types are compatible, this statement sets the irene variable to reference the same object as the pearl variable. But if the type of the object doesn’t match the type of the variable, it doesn’t throw an exception. Instead, it just sets the variable to null, which you can check with an if statement:
  if (irene != null) {
     /* Code that uses a NectarCollector object */
  }
Use upcasting and downcasting to move up and down a class hierarchy
Class diagrams typically have the base class at the top, its subclasses below it, their subclasses below them, etc. The higher a class is on the diagram, the more abstract it is; the lower the class is on the diagram, the more concrete it is. “Absract higher, concrete lower” isn’t a hard-and-fast rule—it’s a convention that makes it easier for us to see at a glance how our class models work.
When you convert a reference to a different type, you’re moving up or down the class hierarchy. So if you start with this:
NectarCollector ida = new NectarCollector();
You can use the same normal assignment with the = operator (for superclasses) or casting (for interfaces) to move up the class hierarchy. This is called upcasting:
  // Upcast the NectarCollector to a Bee
  Bee beeReference = ida;

  // This upcast is safe because all Bees are IWorkers
  IWorker worker = (IWorker)beeReference;
And you can navigate the other direction by using the is operator to safely move down the class hierarchy. This is called downcasting:
  // Downcast the IWorker to NectarCollector
  if (worker is NectarCollector rose) { /* code that uses the rose reference */ }

A CoffeeMaker is also an Appliance
If you’re trying to figure out how to cut down your energy bill each month, you don’t really care what each of your appliances does—you only really care that they consume power. So if you were writing a program to monitor your electricity consumption, you’d probably just write an Appliance class. But if you need to distinguish a coffee maker from an oven, you’d have to build a class hierarchy, and add the methods and properties that are specific to a coffee maker or oven to your CoffeeMaker and Oven classes, which would inherit from an Appliance class that has their common methods and properties.
Then you could write a method to monitor the power consumption:
  void MonitorPower(Appliance appliance) {
     /* code to add data to a household
        power consumption database */
  }
If you want to use that method to monitor the power consumption for a coffee maker, you can create an instance of CoffeeMaker and pass its reference directly to the method:


Upcasting turns your CoffeeMaker into an Appliance
When you substitute a subclass for a base class—like substituting a CoffeeMaker for an Appliance, or a Hippo for an Animal—it’s called upcasting. It’s a really powerful tool that you get when you build class hierarchies. The only drawback to upcasting is that you can only use the properties and methods of the base class. In other words, when you treat a coffee maker like an appliance, you can’t tell it to make coffee or fill it with water. But you can tell whether or not it’s plugged in, since that’s something you can do with any appliance (which is why the PluggedIn property is part of the Appliance class).
Let’s create some objects.
Let’s start by creating instances of the CoffeeMaker and Oven classes as usual:
  CoffeeMaker misterCoffee = new CoffeeMaker();
  Oven oldToasty = new Oven();
What if we want to create an array of appliances?
You can’t put a CoffeeMaker in an Oven[] array, and you can’t put an Oven in a
CoffeeMaker[]array. But you can put both of them in an Appliance[] array:
But you can’t treat just any appliance like an oven.
When you’ve got an
Appliancereference, you can only access the methods and properties that have to do with appliances. You can’t use theCoffeeMakermethods and properties through theAppliancereference even if you know it’s really a CoffeeMaker. So these statements will work just fine, because they treat aCoffeeMakerobject like anAppliance:
your code won’t compile, and the IDE will display an error:

because once you upcast from a subclass to a base class, then you can only access the methods and properties that match the reference that you’re using to access the object.

Downcasting turns your Appliance back into a CoffeeMaker
Upcasting is a great tool, because it lets you use a coffee maker or an oven anywhere you just need an appliance. But it’s got a big drawback—if you’re using an Appliance reference that points to a CoffeeMaker object, you can only use the methods and properties that belong to Appliance. And that’s where downcasting comes in: that’s how you take your previously upcast reference and change it back. You can figure out if your Appliance is really a CoffeeMaker using the is keyword, and if it is you can convert it back to a CoffeeMaker.
We’ll start with the CoffeeMaker we already upcast.
Here’s the code that we used:
  Appliance powerConsumer = new CoffeeMaker();
  powerConsumer.ConsumePower();
But what if we want to turn the Appliance back into a CoffeeMaker?
We can’t just use our Appliance reference to call CoffeeMaker method:
powerConsumer.StartBrewing()
That statement won’t compile—you’ll get that “‘Appliance’ does not contain a definition for ‘StartBrewing’” compiler error because StartBrewing is a member of CoffeeMaker but you’re using an Appliance reference.

But since we know it’s a CoffeeMaker, let’s use it like one.
The is keyword is the first step. Once you know that you’ve got an Appliance reference that’s pointing to a CoffeeMaker object, you can use as to downcast it. And that lets you use the CoffeeMaker class’s methods and properties. And since CoffeeMaker inherits from Appliance, it still has its Appliance methods and properties.
  if (powerConsumer is CoffeeMaker javaJoe) {
     javaJoe.StartBrewing();
  }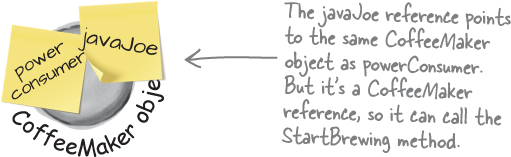
Upcasting and downcasting work with interfaces, too
Interfaces work really well with upcasting and downcasting. Let’s add an ICooksFood interface for any class that can heat up food. And we’ll add a Microwave class—both Microwave and Oven implement the ICooksFood interface. Now there are three different ways that you can access an Oven object. That means we have three different types of references that could point to an Overn object—and each of them can access different members, depending on the reference’s type. Luckily, the IDE’s IntelliSense can help you figure out exactly what you can and can’t do with each of them:
  Oven misterToasty = new Oven();
  misterToasty.


If you want to access ICooksFood interface members, convert it to an ICooksFood:
if (misterToasty is ICooksFood cooker) {
    cooker.

This is the same Oven class that we used earlier, so it also extends the Appliance base class. If you use an Appliance reference to access the object, you’ll only see members of the Appliance class.
if (misterToasty is Appliance powerConsumer)
    powerConsumer.

Three different references that point to the same object can access different methods and properties, depending on the reference’s type.
Interfaces can inherit from other interfaces
When one class inherits from another, it gets all of the methods and properties from the base class. Interface inheritance is simpler. Since there’s no actual method body in any interface, you don’t have to worry about calling base constructors or methods. The inherited interfaces accumulate all of the members of the interfaces that they extend.
So what does this look like in code? Let’s add an IDefender interface that inherits from IWorker:

When a class implements an interface, it must include every property and method in that interface. And if that interface inherits from another one, then all of those properties and methods need to be implemented, too. So any class that implements IDefender must implement all of the IDefender members, but must also implement all of the IWorker members. Here’s a class model that includes IWorker and IDefender, and two separate hierarchies that implement them.

The ScaryScary class extends the FunnyFunny class and implements the IScaryClown interface. Its constructor uses the base keyword to call the FunnyFunny constructor to set the private backing field.
class ScaryScary : FunnyFunny, IScaryClown
{
    private int scaryThingCount;

    public ScaryScary(string funnyThing, int scaryThingCount) : base(funnyThing)
    {
        this.scaryThingCount = scaryThingCount;
    }

    public string ScaryThingIHave { get { return $"{scaryThingCount} spiders"; } }

    public void ScareLittleChildren()
    {
        Console.WriteLine($"Boo! Gotcha! Look at my {ScaryThingIHave}!");
    }
}
To fix the Main method, replace lines 3 and 4 of the method with these lines that use the is operator:
  if (fingersTheClown is IScaryClown iScaryClownReference)
  {
      iScaryClownReference.ScareLittleChildren();
  }
Absolutely! Making fields readonly helps prevent bugs.
Go back to the ScaryScary.scaryThingCount field—the IDE put dots underneath the first two letters of the field name? Hover over the dots to get the IDE to pop up a window:

Press Ctrl-period to pop up a list of actions, and choose Add readonly modifier to add the readonly keyword to the declaration.
private readonly int scaryThingCount;
Now the field can only be set in when it’s declared or in the constructor. If you try to change its value anywhere else in the method, you’ll get a compiler error:

The readonly keyword... just another way C# helps you keep your data safe.
Interface references only know about the methods and properties that are defined in the interface.

Actually, you can add code to your interfaces by including static members and default implementations.
Interfaces aren’t just about making sure classes that implement them include certain members. Sure, that’s their main job. But interfaces can also contain code, just like the other tools you use to create your class model.
The easiest way to add code to an interface is to add static methods, properties, and fields. These work exactly like static members in classes: they can store data of any type—including references to objects—and you can call them just like any other static method: Interface.MethodName();
You can also include code in your interfaces by adding default implementations for methods. To add a default implementation, you just add a method body to the method in your interface. This method is not part of the object—this is not the same as inheritance—and you can only access it using an interface reference. But it can call methods implemented by the object, as long as they’re part of the interface.
Interfaces static members work exactly like in classes
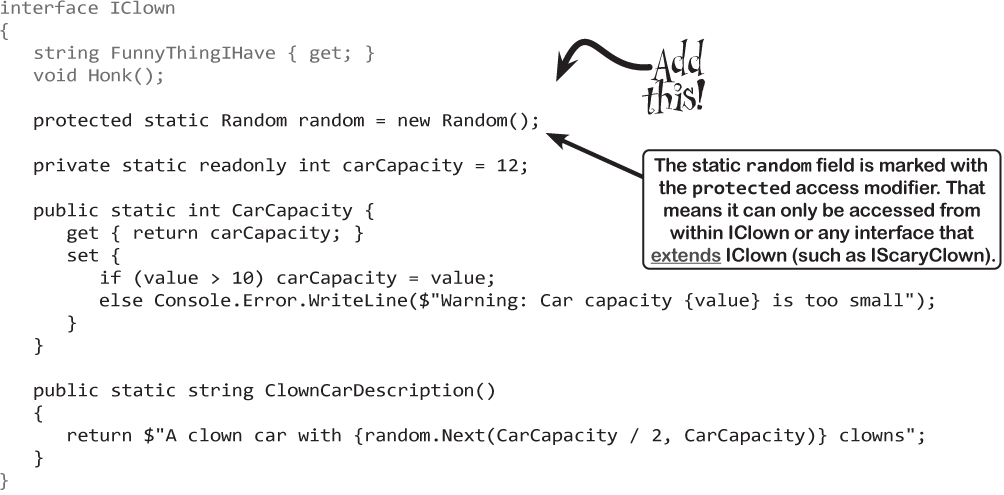
Everybody loves it when way too many clowns pack themselves into a tiny clown car! So let’s update the IClown class to add static methods that generate a clown car description. Here’s what we’ll add:
We’ll be using random numbers, so we’ll add a static reference to an instance of Random. It only needs to be used in IClown for now, but we’ll also use it in IScaryClown soon, so go ahead and mark it protected.
A clown car is only funny if it’s packed with clowns, so we’ll static int property with a private static backing field and a setter that only accepts values over 10.
A method called ClownCarDescription returns a string that describes the clown car.
Here’s the code—it uses a static field, property, and method just like you’d see in a class:

Now you can update the Main method to access the static IClown members.
  static void Main(string[] args)
  {
       IClown.CarCapacity = 18;
       Console.WriteLine(IClown.ClownCarDescription());

       // the rest of the Main method stays the same
  }
These static interface members behave exactly like the static class members that you’ve used in previous chapters. Public members can be used from any class, private members can only be used from inside IClown, and protected members can be used from IClown or any interface that extends it.
Default implementations give bodies to interface methods
All of the methods that you’ve seen in interfaces so far—except for the static methods—have been abstract: they don’t have bodies, so any class that implements the interface must provide an implementation for the method.
But you can also provide a default implementation for any of your interface methods. Here’s an example:
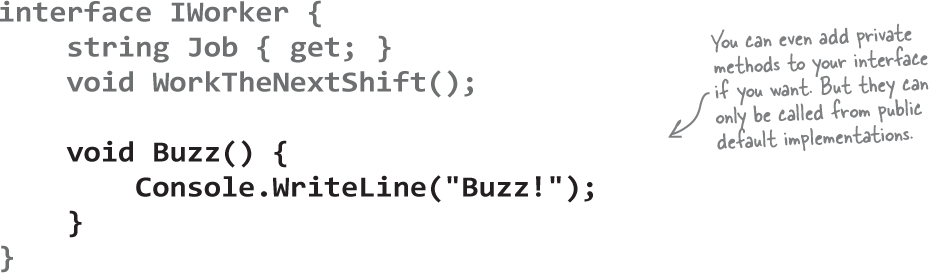
You can call the default implementation—but you must use an interface reference to make the call:
  IWorker worker = new NectarCollector();
  worker.Buzz();
But this code will not compile—it will give you the error ‘NectarCollector’ does not contain a definition for ‘Buzz’:
  NectarCollector pearl = new NectarCollector();
  pearl.Buzz();
The reason is that when an interface method has a default implementation, that makes it a virtual method, just like the ones you used in classes. Any class that implements the interface has the option to implement the method. But the virtual method is attached to the interface. And like any other interface implementation, it’s not inherited. And that’s a good thing—if a class inherited default implementations from every interface that it implemented, then if two of those interfaces had methods with the same name the class would run into the Deadly Diamond of Death.
Add a ScareAdults method with a default implementation
Our IScaryClown interface is state-of-the-art when it comes to simulating scary clowns. But there’s a problem: it only has a method to scare little children. What if we want to our clowns terrify the living $#!* out of adults too?
We could add an abstract ScareAdults method to the IScaryClown interface. But what if we already had dozens of classes that implemented IScaryClown? And what if most of them would be perfectly fine with the same implementation of the ScareAdults method? That’s where default implementations are really useful. A default implementation lets you add a method to an interface that’s already in use without having to update any of the classes that implement it. Add a ScareAdults method with a default implementation to IScaryClown:
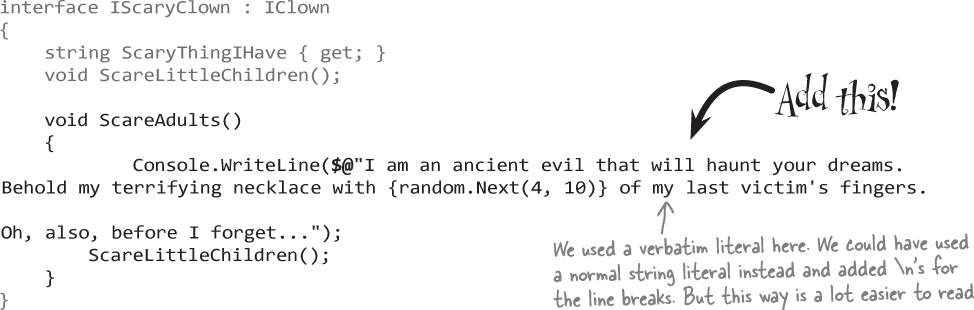
Take a close look at how the ScareAdults method works. That method only has two statements, but there’s a lot packed into them. Let’s break down exactly what’s going on:
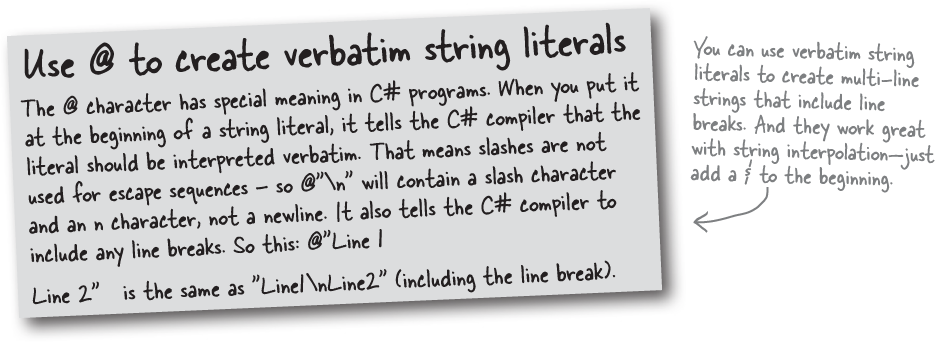
The Console.WriteLine statement uses a verbatim literal with string interpolation. The literal starts with $@ to tell the C# compiler two things: the $ tells it to use string interpolation, and the @ tells it to use a verbatim literal. That means the string will include three line breaks.
The literal uses string interpolation to call random.Next(4, 10), which uses the private static random field that IScaryClown inherited from IClown.
We’ve seen throughout the book that when there’s a static field, that means there’s only one copy of that field. So there’s just one instance of Random that both IClown and IScaryClown share.
The last line of ScareAdults method calls ScareLittleChildren. That method is abstract in the IScaryClown interface, so it will call the version of ScareLittleChildren in the class that implements IScaryClown.
That means ScareAdults will call the version of ScareLittleChildren that’s defined in whatever class implements IScaryClown.
Call your new default implementation by modifying the block after the if statement in your Main method to call ScareAdults instead of ScareLittleChildren:
  if (fingersTheClown is IScaryClown iScaryClownReference)
  {
      iScaryClownReference.ScareAdults();
  }

C# developers use interfaces all the time, especially when we use libraries, frameworks, and APIs.
Developers always stand on the shoulders of giants. You’re about halfway through this book, and in the first half you’ve written code that prints text to the console, draws windows with buttons, and renders 3D objects. But you didn’t need to write code to specifically output individual bytes to the console, or draw the lines and text to display buttons in a window, or do the math needed to display a sphere—you took advantage of code that other people wrote:
You’ve used frameworks like .NET Core and WPF.
You’ve used APIs like the Unity scripting API.
The frameworks and APIs contain class libraries that you access with
usingdirectives at the top of your code.
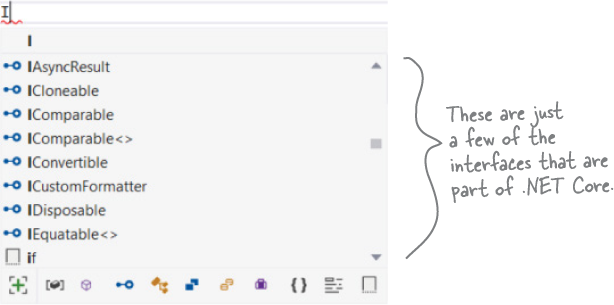
And when you’re using libraries, frameworks, and APIs, you use interfaces a lot. See for yourself: open up a .NET Core or WPF application, click inside of any method, and type I to pop up an IntelliSense window. Any potential match that has ![]() the symbol next to it is an interface. These are all interfaces that you can use to work with the framework.
the symbol next to it is an interface. These are all interfaces that you can use to work with the framework.
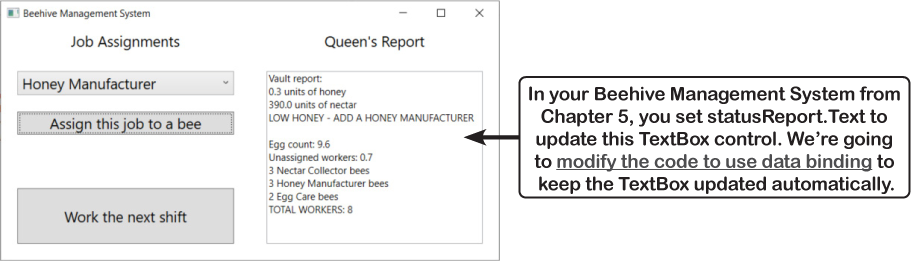
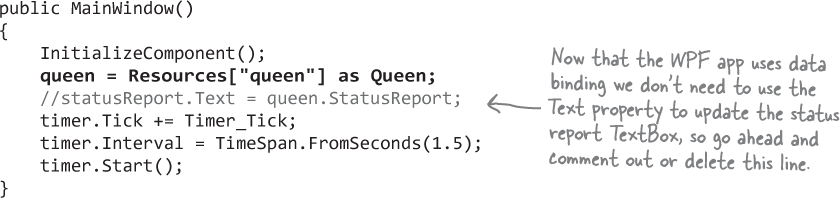
Data binding updates WPF controls automatically
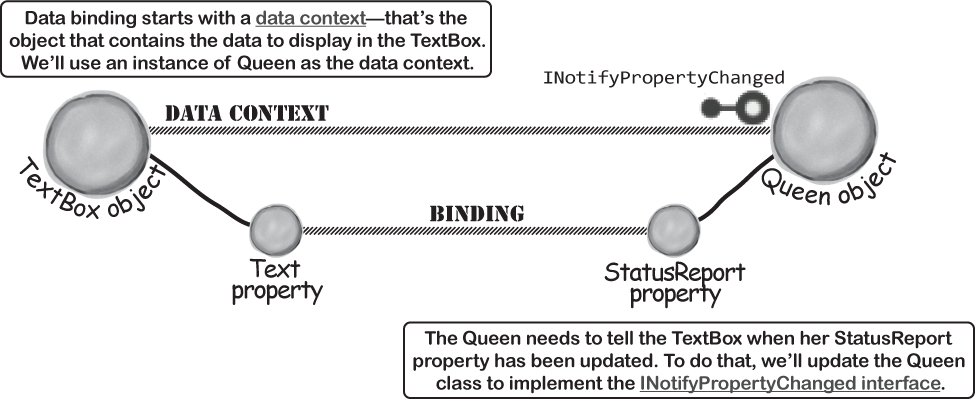
Here’s a great example of a real-world use of an interface: you can use one to take advantage of a really useful feature in WPF: data binding, which lets you set up your controls so their properties are automatically set and kept up to date by your objects.
Here’s what we’ll do to modify your Beehive Management System code to use data binding:
Modify the Queen class to implement the INotifyPropertyChanged interface.
This interface lets the Queen announce that the status report has been updated.
Modify the XAML to create an instance of Queen.
We’ll bind the TextBox.Text property to her StatusReport property.
Modify the code-behind so the queen field uses the instance of Queen we just created.
Right now the queen field in MainWindow.xaml.cs has a field initializer with a new statement to create an instance of Queen. We’ll modify it to use the instance we created with XAML instead.
Modify the beehive management system to use data binding
You only need to make a few changes to add data binding to your WPF app.
Do this!
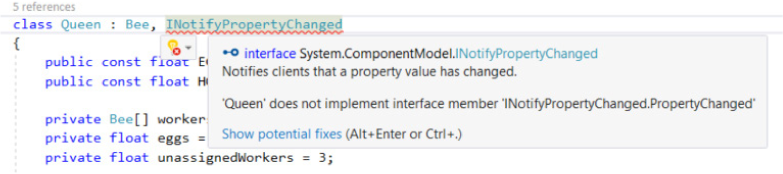
Modify the Queen class to implement the INotifyPropertyChanged interface.
Update the Queen class declaration to make it implement INotifyPropertyChanged. That interface is in the System.ComponentModel namespace, so you’ll need to add a using directive to the top of the class:
using System.ComponentModel;
Now you can add INotifyPropertyChanged to the end of the class declaration. The IDE will draw a red squiggly underline beneath it—which is what you’d expect, since you haven’t implemented the interface by adding its members yet.
Press Alt+Enter or Ctrl+. to show potential fixes and choose implement interface from the context menu. The IDE will add a line of code to your class. It the event keyword, which you haven’t seen yet:
public event PropertyChangedEventHandler PropertyChanged;
Guess what? You’ve used events before! The DispatchTimer has a Tick event, and WPF Button controls have a Click event. Now your Queen class has a PropertyChanged event. Any class that you use for data binding fires—or invokes—its PropertyChanged event to let WPF know a property has changed.
Your Queen class needs to fire its event, just like the DispatchTimer fires its Tick event on an interval and the Button fires Click its event when the user clicks on it. So add this OnPropertyChanged method:
  protected void OnPropertyChanged(string name)
  {
      PropertyChanged?.Invoke(this, new PropertyChangedEventArgs(name));
  }
Now you just need to modify the UpdateStatusReport method to call OnPropertyChanged:
private void UpdateStatusReport() { StatusReport = $"Vault report: {HoneyVault.StatusReport} " + $" Egg count: {eggs:0.0} Unassigned workers: {unassignedWorkers:0.0} " + $"{WorkerStatus("Nectar Collector")} {WorkerStatus("Honey Manufacturer")}" + $" {WorkerStatus("Egg Care")} TOTAL WORKERS: {workers.Length}"; OnPropertyChanged("StatusReport"); }Modify the XAML to create an instance of Queen.
You’ve created objects with the new keyword, and you’ve used Unity’s Instantiate method. XAML gives you another way to create new instances of your classes. Add this to your XAML just above the <Grid> tag:

Next, modify the
<Grid>tag to add a DataContext attribute:<Grid DataContext="{StaticResource queen}">Finally, add a Text attribute to the
<TextBox>tag to bind it to the Queen’s StatusReport property:<TextBox Text="{Binding StatusReport, Mode=OneWay}"Now the TextBox will update automatically any time the Queen object invokes its PropertyChanged event.
Modify the code-behind to use the instance of Queen in the window’s resources.
Right now the queen field in MainWindow.xaml.cs has a field initializer with a new statement to create an instance of Queen. We’ll modify it to use the instance we created with XAML instead.
First, comment out (or delete) the three occurences of the line that sets statusReport.Text. There’s one in the MainWindow constructor and two in the Click event handlers:
// statusReport.Text = queen.StatusReport;Next, modify the Queen field declaration to remove the field initializer (new Queen();) from the end:
private readonly Queen queen;
Finally, modify the constructor to set the queen field like this: Resources["queen"] as Queen – this code uses a dictionary called Resources. (This is a sneak peek at dictionaries! You’ll learn about them in the next chapter.)
Now run your game. It works exactly like before, but now the TextBox updates automatically any time the Queen updates the status report.
Congratulations! You just used an interface to add data binding to your WPF app.
Polymorphism means that one object can take many different forms
Any time you use a mockingbird in place of an animal or aged Vermont cheddar in a recipe that just calls for cheese, you’re using polymorphism. That’s what you’re doing any time you upcast or downcast. It’s taking an object and using it in a method or a statement that expects something else.
Keep your eyes open for polymorphism!
You’ve been using polymorphism all the time—we just didn’t use that word to describe it. So while you’re writing code over the next few chapters, be on the lookout for many different ways that you use polymorphism.
Here’s a list of four typical ways that you’ll use polymorphism. We gave you an example of each of them (you won’t see these particular lines in the exercise, though). As soon as write similar code in an exercise, come back to this page and check it off the following list:

You’re using polymorphism when you take an instance of one class and use it in a statement or a method that expects a different type, like a parent class or an interface that the class implements.
You’re an object-oriented programmer.
There’s a name for what you’ve been doing. It’s called object-oriented programming, or OOP. Before languages like C# came along, people didn’t use objects and methods when writing their code. They just used functions (which is what they call methods in a non-OOP program) that were all in one place—as if each program were just one big static class that only had static methods. It made it a lot harder to create programs that modeled the problems they were solving. Luckily, you’ll never have to write programs without OOP, because it’s a core part of C#.
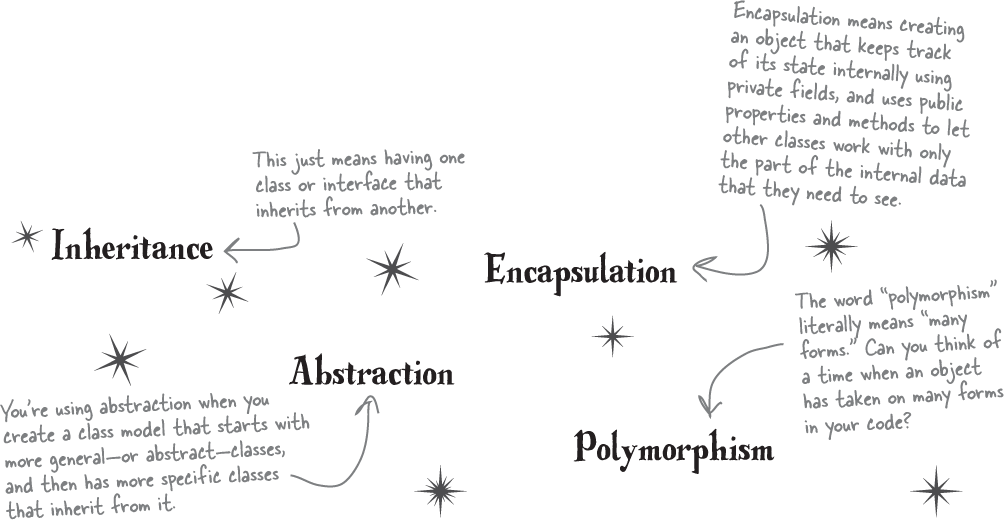
The four core principles of object-oriented programming
When programmers talk about OOP, they’re referring to four important principles. They should seem very familiar to you by now because you’ve been working with every one of them. You’ll recognize the first three principles just from their names: inheritance, abstraction, and encapsulation. The last one’s called polymorphism. It sounds a little odd, but it turns out that you already know all about it too.

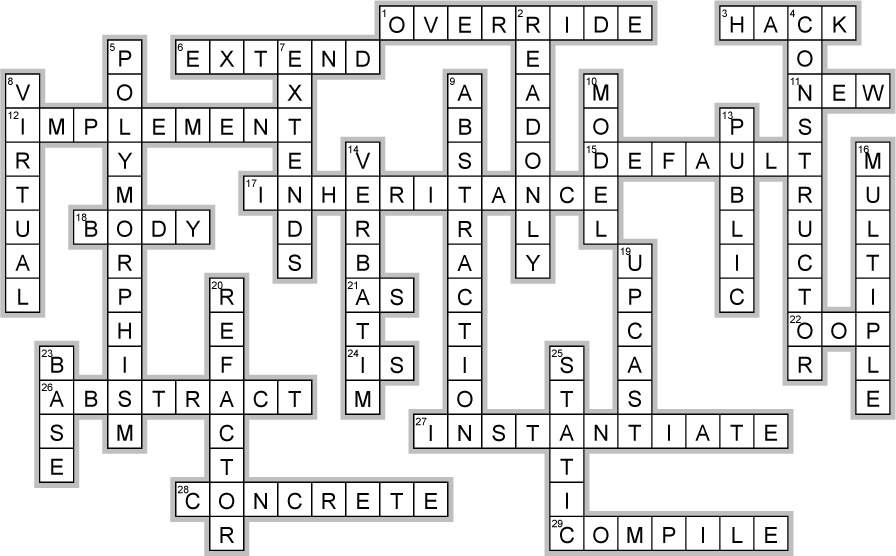
OOPcross
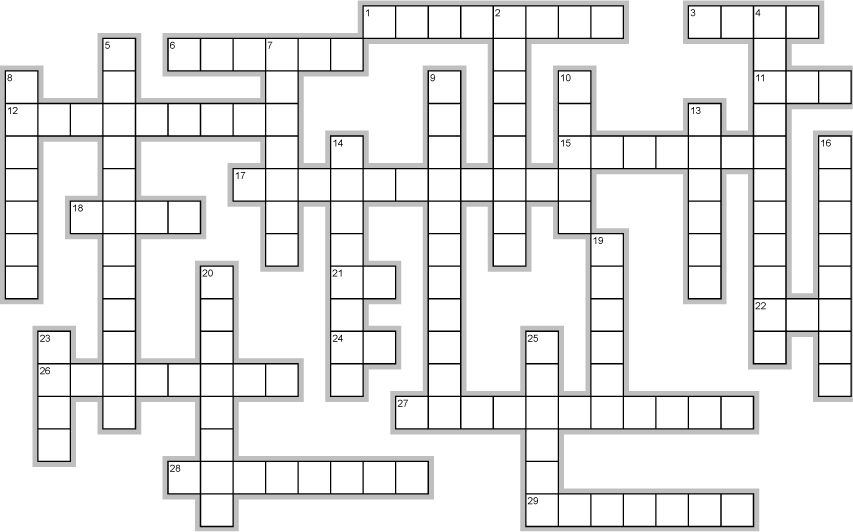
Across
1. The keyword you use in a subclass if you’re extending a member in its superclass
3. A really inelegant solution to a problem
6. What the colon (:) operator does with a class
11. The keyword you use when you’re hiding a method in a superclass
12. What the colon (:) operator does with an interface
15. The kind of implementation that gives a body to an interface method
17. A subclass gets members from its superclass because of this OOP principle
18. What an abstract method doesn’t have
21. A safe way to cast that returns null instead of throwing an InvalidCastException
22. What you’re doing when you create programs that combine data and code together into classes and objects
24. The keyword you use to safely downcast
26. Every method in an interface is automatically _______ by default
27. What you can’t do with an abstract class
28. The opposite of abstract
29. What your code won’t do if you fail to implement all of the members of an interface in a concrete class
Down
2. What to mark a field whose value doesn’t change after the class is instantiated
4. If a superclass has this, the subclass must call it
5. When you pass a subclass to a method that expects its base class, you’re using this OOP principle
7. If your class implements an interface that _______ another interface, you need to implement all of its members too
8. You can only extend members that are _______ or abstract
9. The OOP principle that sometimes has you move common methods from specific classes to a more general class
10. A set of classes that work together to represent things in the real world
13. What an interface member is by default if you don’t add an access modifier
14. Use @ at the beginning of a _______ string literal
16. C# doesn’t allow _______ inheritance
19. When you use the = operator to assign a reference to a variable with its superclass as the type
20. Modifying the structure of code without changing its behavior
23. Use this keyword in a subclass to access its superclass
25. What any private field in an interface must be
OOPcross Solution