Part II. Unity Lab 2: Write C# Code for Unity
Unity isn’t just a powerful, cross-platform engine and editor for building 2D and 3D games and simulations. It’s also a great way to get practice writing C# code.
In the last Unity Lab you learned how to navigate around Unity and your 3D space, and started to create and explore GameObjects. Now it’s time to write some code to take control of your GameObjects. The whole goal of that Lab was to get you oriented in the Unity editor (and give you an easy way to remind yourself of how to navigate around it if you need it).
In this Unity Lab, you’ll start writing code to control your GameObjects. You’ll write C# code to explore concepts you’ll use in the rest of the Unity Labs, starting with adding a method that rotates the 8 Ball GameObject that you created in the last Unity Lab, and. And you’ll start using the Visual Studio debugger with Unity to sleuth out problems in your games.
C# scripts add behavior to your GameObjects
Now that you can add a GameObject to your scene, you need a way to make it, well, do stuff. And that’s where your C# skills come in. Unity uses C# scripts to define the behavior of everything in the game.
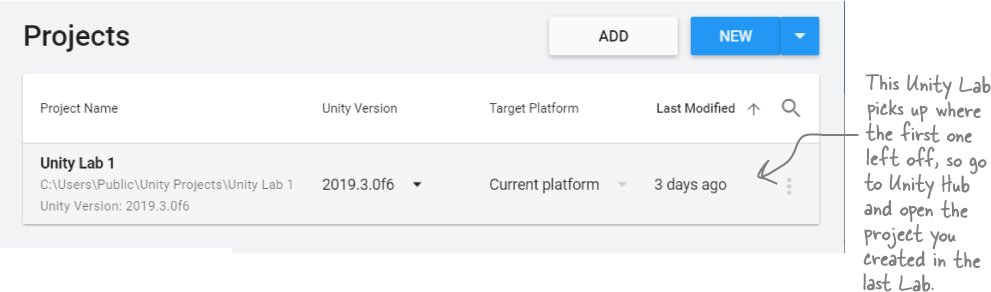
This Unity lab will introduce tools that you’ll use to work with C# and Unity. You’re going to build a simple “game” that’s really just a little bit of visual eye candy: you’ll make your 8 ball fly around the scene. Start by going to Unity Hub and opening the same project that you created in the first Unity Lab.
Here’s what you’ll do next:
Attach a C# script to your GameObject. You’ll add a Script component to your Sphere GameObject. When you add it, Unity will create a simple class for you. You’ll modify that class so that it drives the 8 ball sphere’s behavior.
Use Visual Studio to edit the script. Remember how you set the Unity editor preferences to make Visual Studio the script editor? That means you can just double-click on the script in the Unity editor and it will open up in Visual Studio.
Play your game in Unity. There’s a Play button at the top of the screen. When you press it, it starts executing all of the scripts attached to the GameObjects in your scene. You’ll use that button to run the script that you added to the Sphere.

Use Unity and Visual Studio together to debug your script. You’ve already seen how valuable the Visual Studio debugger is when you’re trying to track down problems in your C# code. That’s why Unity and Visual Studio work together seamlessly to let add breakpoints, use the Locals window, and work with the other familiar tools in the Visual Studio debugger while your game is running.
Add a C# script to your GameObject
Unity is more than an amazing platform for building 2D and 3D games. Many people use it for artistic work, data visualization, augmented reality, and more. But it’s especially valuable to you, as a C# learner, because you can write code to control everything that you see in a Unity game. That makes Unity a great tool for learning and exploring C#.
Let’s start using C# and Unity right now. Make sure the Sphere GameObject is selected, then click the Add Component button at the bottom of the Inspector window.

When you click it, Unity pops up a window with all of the different kinds of components that you can add—and there are a lot of them. Choose New Script to add a new C# Script to your Sphere GameObject. You’ll be prompted for a name. Name your script BallBehaviour.

Click the Create and Add button to add the script. Once you do, you’ll see a component called Ball Behaviour (Script) in the Inspector window.

You’ll also see the C# script in the Project window.
 Watch it!
Unity code uses British spelling.
If you’re American (like us), or if you’re used to the U.S. spelling of the word behavior, you’ll need to be careful when you work with Unity scripts because the class names often feature the British spelling behaviour.
Note
The Project window gives you a folder-based view of your project. Your Unity project is made up of files: media files, data files, C# scripts, textures, and more. Unity calls these files assets. The Project window was displaying a folder called “Assets” when you right-clicked inside it to import your texture, so Unity added it to that folder.
Note
Did you notice a folder called Materials appeared in the Project window as soon as you dragged the 8 ball texture onto your sphere?
Write C# code to rotate your sphere
At the beginning of this Lab you told Unity to use Visual Studio as its external script editor. So go ahead and double-click on your new C# script. When you do, Unity will open your script in Visual Studio. Your C# script contains a class called BallBehaviour with two empty methods called Start and Update.
using System.Collections;
using System.Collections.Generic;
using UnityEngine;

public class BallBehaviour : MonoBehaviour
{
    // Start is called before the first frame update
    void Start()
    {

    }

    // Update is called once per frame
    void Update()
    {

    }
}
Note
The Hierarchy window shows you a list of every GameObject in the current scene. When Unity created your project, it added a scene called SampleScene with a camera and a light. You added a sphere to it, so your Hierarchy window will show all of those things.
Here’s a line of code that will rotate your sphere. Add it to your Update method:
transform.Rotate(Vector3.up, 180 * Time.deltaTime);
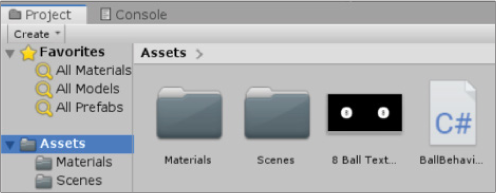
Now go back to the Unity editor and click the play button in the toolbar to start your game: ![]()
Add a breakpoint and debug your game
You can attach Visual Studio to Unity to debug your game in Visual Studio. Your code is running inside the Unity editor, and when Visual Studio is attached to another process running on your computer, attaching to that process lets you use the debugger to place breakpoints and watch variables on the running program. Let’s explore how that works.
Find the debug button in the Visual Studio toolbar—it now says “Attach to Unity” ![]() . When you’re editing a Unity project, Visual Studio will play the game in Unity when you start the debugger.
. When you’re editing a Unity project, Visual Studio will play the game in Unity when you start the debugger.
Start the debugger—press the debug button or choose Start Debugging (F5) from the Debug menu, just like before. Since your game is already running, Visual Studio will attach to the game currently in progress.
Next, add a breakpoint on the line that you added to the Update method.

Since Visual Studio is attached to Unity, when you add the breakpoint it breaks immediately.
Note
Congratulations, you’re now debugging a game!
Next, you’ll set a Hit Count condition to make your breakpoint stop only after it’s been run 500 times, then skip another 500 frames before stopping. Hover over the red breakpoint dot in the left margin of the code editor. You’ll see a gear for settings, and dots to enable and disable the breakpoint.
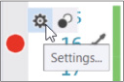
Click on the Settings gear to bring up the breakpoint settings. Check the Conditions box, choose Hit Count, and make the breakpoint trigger when the hit count is a multiple of 500.

When you close the settings window, a white plus appears inside the breakpoint dot ![]() to show that it has a condition.
to show that it has a condition.

Now the breakpoint will only pause the game every 500 times the Update method is run—or every 500 frames. So if your game is running at 60FPS, that means when you press Continue, the game will run for little over 8 seconds before it breaks again. So press Continue, then switch back to Unity and watch the ball spin until the breakpoint breaks.
 Watch it!
Having trouble getting the Visual Studio debugger to attach to Unity?
Unity and Visual Studio are built to work together! But you need to do a little configuration to make sure it works. First, make sure you followed the instructions at the start of the first Unity Lab to set the external script editor in Unity, and make sure the Editor Attaching checkbox is checked. If you still don’t see “Attach to Unity and Play” when Unity opens the script in Visual Studio, go to the Individual Tools section in the Visual Studio installer and make sure Visual Studio Tools for Unity is installed (Windows only). And a few users have found that unchecking Editor Attaching, restarting Unity, then re-checking it and restarting again can help fix it.
Use the debugger to understand time.deltaTime
You’re going to be using Time.deltaTime in many of the Unity Labs projects. Let’s take advantage of your breakpoint and use the debugger to really understand what’s going on with time.deltaTime.
While your game is paused on the breakpoint in Visual Studio, hover over Time.deltaTime to see the fraction of a second that elapsed since the previous frame (you’ll need to put your mouse cursor over deltaTime). Then add a watch for time.deltaTime by clicking on the value and choosing Add Watch from the pop-up menu.

Click Continue (use the ![]() button or choose Continue (F5) from the Debug menu) in Visual Studio to resume your game. The ball will start rotating again, and after another 500 frames the breakpoint will trigger again. You can keep running the game for 500 frames at a time. Keep your eye on the Watch window each time it breaks.
button or choose Continue (F5) from the Debug menu) in Visual Studio to resume your game. The ball will start rotating again, and after another 500 frames the breakpoint will trigger again. You can keep running the game for 500 frames at a time. Keep your eye on the Watch window each time it breaks.

Press Stop debugging (F5) to stop your program. Then start debugging again—since your game is still running, the breakpoint will continue to work. Once you’re done debugging, toggle your breakpoint again to delete it so the IDE will still keep track of it but not break when it’s hit. Stop debugging one more time to detach from Unity.
Go back to Unity and stop your game—and save it, because the Play button doesn’t automatically save the game.
Note
The Play button in Unity starts and stops your game. Visual Studio will stay attached to Unity even when the game is stopped.
Add a cylinder to show where the Y axis is
Your sphere is rotating around the Y axis at the very center of the scene. Let’s add a very tall and very skinny cylinder to make it visible. Choose 3D Object >> Cylinder from the GameObject menu to create a new cylinder. Make sure it’s selected in the Hierarchy window, then check the Inspector window and make sure that Unity created it at position (0, 0, 0) – if not, use the context menu ![]() to reset it.
to reset it.
Let’s make the cylinder very skinny. Choose the Scale Tool from the toolbar: either click on it ![]() or press the R key. You should see the Scale Gizmo appear on your cylinder:
or press the R key. You should see the Scale Gizmo appear on your cylinder:

Click and drag the green cube up to elongate your cylinder along the Y axis. Then click on the red cube and drag it towards the cylinder to make it very narrow along the X axis, and do the same with the blue cube to make it very narrow along the Z axis. Watch the Transform panel in the Inspector as you change the cylinder’s scale—the Y scale will get larger, and the X and Z will get much smaller.
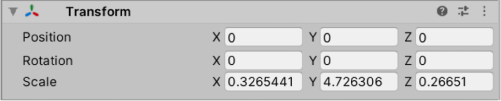
Click on the X label in the scale row in the Transform window and drag up and down. Make sure you click the actual X label to the left of the input box with the number. When you click the label it turns blue, and a blue box appears around the X value. As you drag your mouse up and down, the number in the box goes up and down, and the Scene view updates the scale in as you change it. Look closely as you drag—the scale can be positive and negative.
Now select the number inside the X box and type .1 – the cylinder gets very skinny. Press tab and type 20, then press tab again and type .1, and press enter.

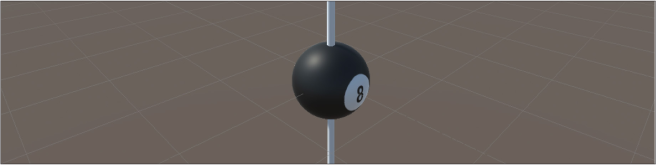
Now your sphere has a very long cylinder going through it that shows the Y axis where Y = 0.
Add fields to your class for the rotation angle and speed
In Chapter 1 you learned how C# classes can have fields that store values methods can use. Let’s modify your code to use fields. Add these four lines just under the class declaration, immediately after the first curly brace {:
public class BallBehaviour : MonoBehaviour
{
    public float XRotation = 0;
    public float YRotation = 1;
    public float ZRotation = 0;
    public float DegreesPerSecond = 180;
Note
These are like the fields that you added to the animal match game in Chapter 1. They’re variables that keep track of their values—each time Update is called it reuses the same field over and over again.
The XRotation, YRotation, and ZRotation fields contain a value between 0 and 1, which you’ll combine to create a vector that determines the direction that the ball will rotate:
new Vector3(XRotation, YRotation, ZRotation)
Note
You’ll learn a lot more about fields and the new keyword in the next chapter.
The DegreesPerSecond field contains the number of degrees to rotate per second, which you’ll multiply by Time.deltaTime just like before. Modify your Update method to use the fields. This new code creates a Vector3 variable called axis and passes it to the transform.Rotate method:
    void Update()
    {
        Vector3 axis = new Vector3(XRotation, YRotation, ZRotation);
        transform.Rotate(axis, DegreesPerSecond * Time.deltaTime);
    }
Select the Sphere in the Hierarchy window. Your fields now show up in the Script component. When the Script component renders fields, it adds spaces between the capital letters to make them easier to read.

Run your game again. While it’s running, select Sphere in the hierarchy and change the degrees per second to 360 or 90—the ball starts to spin at twice or half the speed. Stop your game—degrees per second field resets back to 180.
While the game is stopped, use the Unity editor to change the X Rotation to field to 1 and the Y Rotation field to 0. Start your game—the ball will rotate away from you. Click the X Rotation label and drag it up and down to change the value while the game is running,. As soon as the number turns negative, the ball starts rotating towards you. Make it positive again and it starts rotating away from you.

Use Debug.DrawRay to explore how 3D vectors work
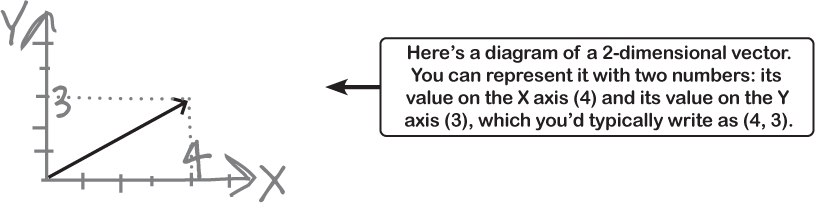
A vector is a value with a length (or magnitude) and a direction. If you ever learned about vectors in a math class, you probably saw lots of diagrams like this one of a 2D vector:
That’s not hard to understand... on an intellectual level. But even those of us took a math class that covered vectors don’t always have an intuitive grasp of how vectors work, especially in 3D. And here’s another area where we can use C# and Unity as a tool for learning and exploration.
Use Unity to visualize vectors in 3D
You’re going to add code to your game to help you really “get” how 3D vectors work. Start by having a closer look at the first line of your Update method:
Vector3 axis = new Vector3(XRotation, YRotation, ZRotation);
So what does this line do, exactly?
It has a type:
Vector3. Every variable declaration starts with a type. Instead of using string, int, or bool, you’re declaring it with the type Vector3. This is a type that Unity uses for 3D vectors.It has a variable name:
axis. It has a type: Vector3. And it has a type, just like the similar variable declarations that you saw in Chapter 1—except instead ofstring,int, orboolyou’re declaring it with the typeVector3, Unity’s 3D vector type.It uses the new keyword to create a
Vector3. It uses the XRotation, YRotation, and ZRotation fields to create a vector with those values.
So what does that 3D vector look like? There’s no need to guess—we can use one of Unity’s useful debugging tools to draw that vector for us. Add this line of code to the end of your Update method:
void Update()
{
    Vector3 axis = new Vector3(XRotation, YRotation, ZRotation);
    transform.Rotate(axis, DegreesPerSecond * Time.deltaTime);
    Debug.DrawRay(Vector3.zero, axis, Color.yellow);
}
The Debug.DrawRay method is a special method that Unity gives you to help you debug your games. It draws a ray—which is a vector that goes from one point to another—and takes parameters for its start point, end point, and color. But there’s one catch: the ray only appears in the Scene view. The methods in Unity’s Debug class are designed so that they don’t interfere with your game. They typically only affect how your game interacts with the Unity editor.
Run the game to see the ray in the Scene view
Now run your game again. You won’t see anything different in the Game view because the Debug.DrawRay is a tool for debugging that doesn’t affect gameplay at all. So the Scene tab to switch to the scene view. You may also need to reset the Wide layout by choosing Wide from the layout dropdown.

Now you’re back in the familiar Scene view. Then do these things to get a real sense of how 3D vectors work:
Set the X rotation to 0, Y rotation to 0, and Z rotation to 3. The ball was mid-rotation, so use the context menu
 in the Transform component to reset its position. You should now see a yellow ray coming directly out of the Z axis and the ball rotating around it.
Set the Z Rotation back to 3. Experiment with dragging the X Rotation and Y Rotation values to see what they do to the ray. Make sure to reset the Transform component each time you change them.
Use the Hand Tool and the Scene Gizmo to get a better view. Click the X cone on the Scene Gizmo to set it to the view from the right. Keep clicking the cones on the Scene Gizmo until you see the view from the front. It’s easy to get lost—you can reset the Wide layout to get back to a familiar view.
Add a duration to the Ray so it leaves a trail
You can add a fourth argument to your Debug.DrawRay method call that specifies the number of seconds the ray should stay on the screen. Add .5f to make each ray stay on screen for half a second:
Debug.DrawRay(Vector3.zero, axis, Color.yellow, .5f);
Now run the game again and switch to the Scene view. Now when you drag the numbers up and down, you’ll see a trail of rays left behind. This looks really interesting, but more importantly, it’s a great tool to visualize 3D vectors.

Rotate your ball around a point in the scene
Your code calls transform.Rotate method to rotate your ball around its center, which changes its X, Y, and Z rotation values. Select Sphere in the Hierarchy window and change its X position to 5 in the Transform component. Then use the context menu to reset the Script component to reset its fields so it rotates around the Y axis again. When you run the game, the ball will be at position (5, 0, 0) and rotating around its own Y axis.

Let’s modify the Update method to use a different kind of rotation. Now we’ll make the ball rotate around the center point of the scene, coordinate [0, 0, 0] using the transform.RotateAround method, which rotates a GameObject around a point in the scene. (This is different from the transform.Rotate you used earlier, which rotates it a GameObject around its center.) Its first parameter is the point to rotate around. We’ll use Vector3.zero for that parameter, which is a shortcut for writing new Vector3(0, 0, 0).
Note
This new Update method rotates the ball around the point (0, 0, 0) in the scene.
Here’s the new Update method:
void Update()
{
    Vector3 axis = new Vector3(XRotation, YRotation, ZRotation);
    transform.RotateAround(Vector3.zero, axis, DegreesPerSecond * Time.deltaTime);
    Debug.DrawRay(Vector3.zero, axis, Color.yellow, .5f);
}
Now run your code. This time it rotates the ball in a big circle around the center point:

Use Unity to take a closer look at rotation and vectors
You’re going to be working with 3D objects and scenes in the rest of the Unity Labs throughout the book. But even those of us who spend a lot of time playing 3D video games don’t have a perfect feel for how vectors, 3D objects, and how to move and rotate in a 3D space. Luckily, Unity is a great tool to explore how 3D objects work. Let’s start experimenting right now.
While your code is running, try changing parameters to experiment with the rotation:
Switch back to the Scene view so you can see the yellow ray that Debug.DrawRay renders in your BallBehaviour.Update method.
Use the Hierarchy window to select the Sphere. You should see its components in the Inspector window.
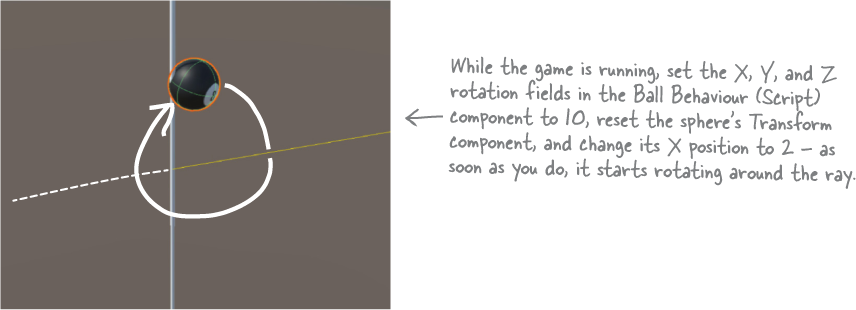
Change the X Rotation, Y Rotation, and Z Rotation values in the Script component to 10 so you see the vector rendered as a long ray. Use the Hand Tool (Q) to rotate the Scene View until you can clearly see the ray.
Use the Transform component’s context menu
 to reset the Transform component. Since the center of the sphere is now at the zero point in the scene (0, 0, 0), it will rotate around its own center.
Then change the X position in the Transform component to 2. The ball should now be rotating around the vector. You’ll see the ball cast a shadow on the Y axis cylinder as it flies by.
Try repeating the last three steps for different values of X, Y, and Z rotation, resetting the Transform component each time so you start from a fixed point. Then try clicking the rotation field labels and dragging them up and down—see if you can get a feel for how the rotation works.
Note
Unity is a great tool to explore how 3D objects work. by modifying properties on your GameObjects in real time.
Get creative!
This is your chance to experiment on your own with C# and Unity. You’ve seen the basics of how you combine C# and Unity GameObjects. Take some time and play around with the different Unity tools and methods that you’ve learned about in the first two Unity labs.
Add Cubes, Cylinders, or Capsules to your scene. Attach new scripts to them—make sure you give each script a unique name!—and make them rotate in different ways.
Try putting your rotating GameObjects in different positions around the scene. See if you can make interesting visual patterns out of multiple rotating GameObjects.
Try adding a light to the scene. What happens when you use Transform.rotateAround to rotate the new light around various axes?
Here’s quick coding challenge. Try modifying a script to use += to add a value to one of the fields in your BallBehaviour script. Make sure you multiply that value by Time.deltaTime. Try adding an if statement that resets the field to 0 if it gets too large.
Note
Before you run the code, try to figure out what it will do. Does it act the way you expected it to act? Trying to predict how the code you added will act is a great technique for getting better at C#.
Note
Take the time to experiment with the tools and techniques you just learned. This is a great way to take advantage of Unity and Visual Studio as tools for exploration and learning.