Part I. Unity Lab 1: Start Exploring Unity
Welcome to your first Head First C# Unity lab. Writing code is a skill, and like any other skill, getting better at it takes practice and experimentation, and Unity will be a really valuable tool for that.
Unity is a cross-platform game development tool that you can use to make professional-quality games and simulations. It’s also a fun and satisfying way to get practice with the C# tools and ideas you’ll learn throughout this book. We designed these short, targeted labs after every chapter in this book to help reinforce the concepts and techniques you just learned to help you hone your C# skills.
These labs are optional, but valuable practice—even if you aren’t planning on using C# to build games.
In this first lab, you’ll get up and running with Unity. You’ll get oriented with the Unity editor, and you’ll start creating and manipulating 3D shapes.
Unity is a powerful tool for game design
Welcome to the world of Unity, a complete system for designing professional-quality 2D and 3D games, simulations, tools, and projects. But what is Unity? Unity includes many powerful things, including...
A cross-platform game engine
A game engine displays the graphics, keeps track of the 2D or 3D characters, detects when they hit each other, makes them act like real-world physical objects, and much, much more. Unity will do all of these things for the 3D games you build throughout this book.
A powerful 2D and 3D scene editor
You’ll be spending a lot of time in the Unity Editor, which is like an IDE for your games. It lets you edit levels full of 2D or 3D objects, with tools that you can use to design complete worlds for your games. And since Unity games use C# to define their behavior, the Unity Editor integrates with Visual Studio to give you a seamless game development environment.
Note
While these Unity Labs will concentrate on C# development in Unity, if you’re a visual artist or designer, the Unity Editor has many artist-friendly tools designed just for you. Check them out here: https://unity3d.com/unity/features/editor/art-and-design
An ecosystem for game creation
Unity is more than “just” an enormously powerful tool for creating games. It also features an ecosystem to help you build and learn. The Learn Unity page (https://unity.com/learn) has valuable resources to help you learn, and the Unity forums (https://forum.unity.com/) help you connect with other game designers and ask questions. The Unity Asset Store (https://assetstore.unity.com/) lets you download free and paid assets like characters, shapes, and effects, that you can use in your Unity projects.
These Unity Labs will focus on using Unity as a tool to explore—and get lots of practice with!—the C# tools and ideas that you’ve learned throughout the book.
The Head First C# Unity Labs are laser-focused on a developer-centric learning path. The goal of these Labs is to help you ramp up on Unity quickly, with the same focus on brain-friendly just-in-time learning you’ll see throughout Head First C# to give you lots of targeted, effective practice with C# ideas and techniques.
Download Unity Hub
Unity Hub is an application that helps you manage your Unity projects and your Unity installations, and it’s the starting point for creating your new Unity project. Start by downloading and installing Unity Hub from https://store.unity.com/download – and once Unity Hub is installed, run it.
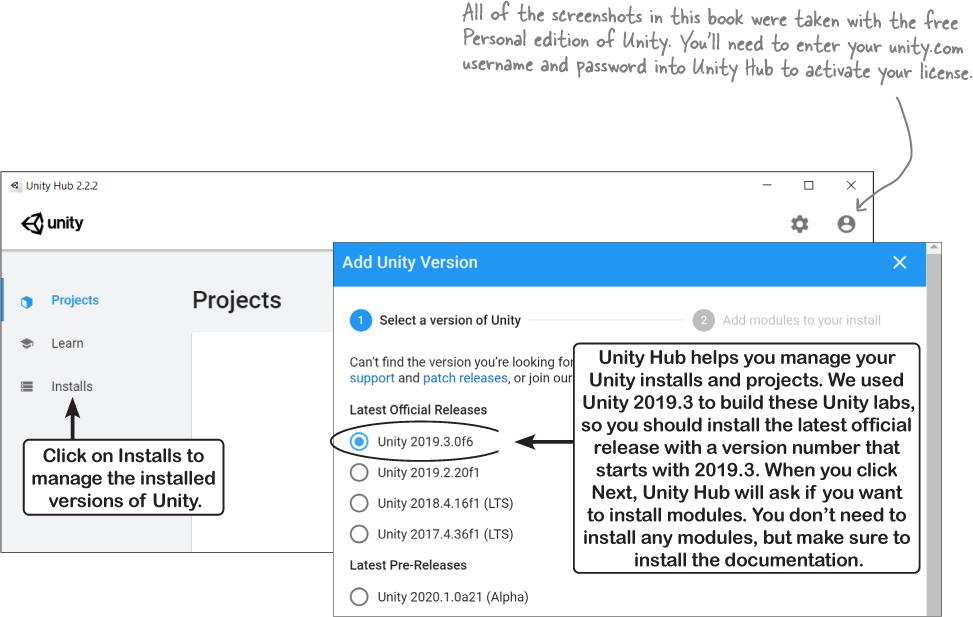
Unity Hub lets you install multiple versions of Unity on the same computer, so you should install the same version that we used to build these labs. Click Official Releases and install the latest version that starts with Unity 2019.3 – that’s the same version we used to take the screenshots in these labs. Once it’s installed, make sure that it’s set as the preferred version.
The Unity installer may prompt you to install a different version of Visual Studio. You can always have multiple installations of Visual Studio on the same computer. But if you already have one version of Visual Studio installed, there’s no need to make the Unity installer add another one.
You can learn more about installing Unity Hub on Windows, MacOS, and Linux here: https://docs.unity3d.com/2019.3/Documentation/Manual/GettingStartedInstallingHub.html
Note
Unity Hub lets you have many Unity installs on the same computer. So even if there’s a newer version of Unity available, you can use Unity Hub to install the version we used in the Unity Labs.
Use Unity Hub to create a new project
Click the ![]() button on the Project page in Unity Hub to create a new Unity project. Name it Unity Lab 1, make sure the 3D template is selected, and check that you’re creating it in a sensible location (usually the “Unity Projects” folder underneath your home directory).
button on the Project page in Unity Hub to create a new Unity project. Name it Unity Lab 1, make sure the 3D template is selected, and check that you’re creating it in a sensible location (usually the “Unity Projects” folder underneath your home directory).
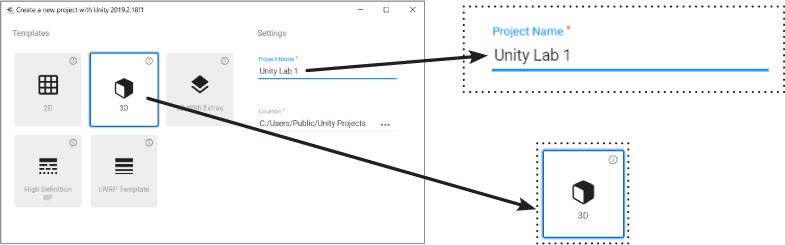
Click Create Project to create the new folder with the Unity project. When you create a new project, Unity generates a lot of files (just like Visual Studio does when it creates new projects for you). It could take Unity a minute or two to create all of the files for your new project.
Make Visual Studio your Unity script editor
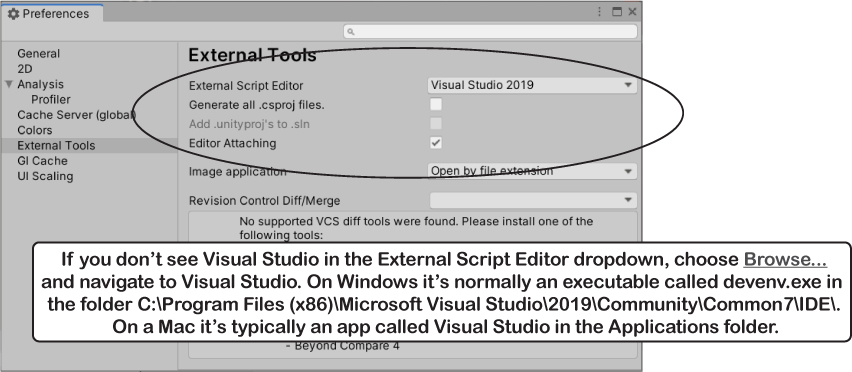
The Unity editor works hand-in-hand with the Visual Studio IDE to make it really easy to edit and debug the code for your games. So the first thing we’ll do is make sure that Unity is hooked up to Visual Studio. Choose Preferences from the Edit menu (or from the Unity menu on a Mac) to open the Unity Preferences window. Click on External Tools on the left, and choose Visual Studio from the External Script Editor window. Make sure the Editor Attaching box is checked, too—this will let you debug your Unity code in the IDE.
Okay! You’re all ready to get started building your first Unity project.
Note
You can use Visual Studio to debug the code in your Unity games. Just choose Visual Studio 2019 as the external script editor in Unity’s preferences and enable editor attaching.
Take control of the Unity layout
The Unity editor is like an IDE for all of the parts of your Unity project that aren’t C#. You’ll use it to work with scenes, edit 3D shapes, create materials, and so much more. And like Visual Studio, the windows and panels in the Unity editor can be rearranged in many different layouts.
Find the Scene tab near the top of the window. Click on the tab and drag it to detach the window.

Try docking it inside or next to other panels, then drag it to the middle of the editor to make it a floating window.
Note
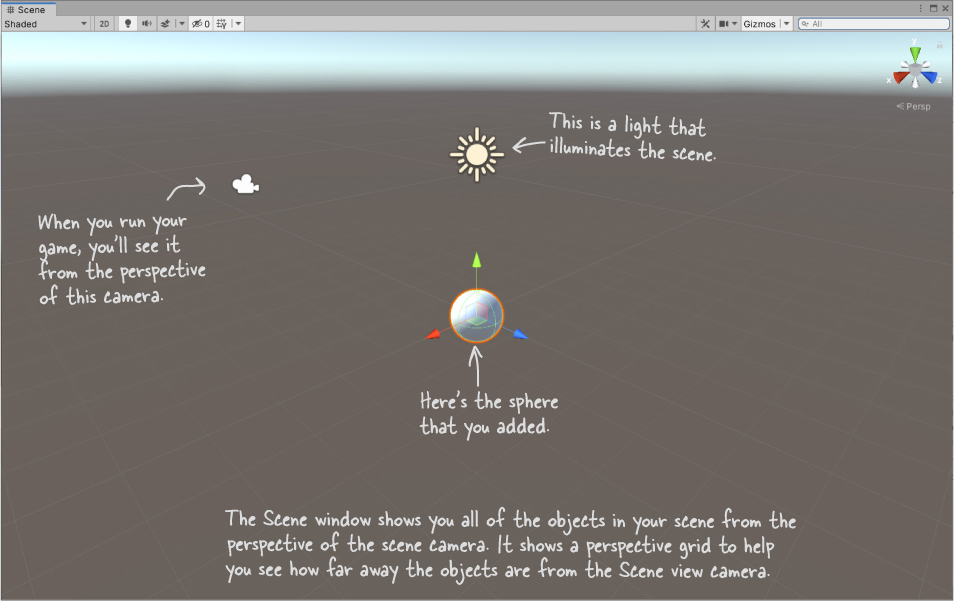
The Scene view is your main interactive view of the world that you’re creating. You use it to position 3D shapes, cameras, lights, and all of the other objects in your game.
Choose the Wide layout to match our screenshot
We’ve chosen the Wide layout because it works well for the screenshots in these labs. Find the Layout dropdown and choose Wide so your Unity editor looks like ours.

Here’s what your Unity editor should look like in the Wide layout.

Unity games are made with GameObjects
When you added a sphere to your scene, you created a new GameObject. The GameObject is a fundamental concept in Unity. Every item, shape, character, light, camera, and special effect in your Unity game is a GameObject. Any scenery, characters, and props that you use in a game are represented by GameObjects.
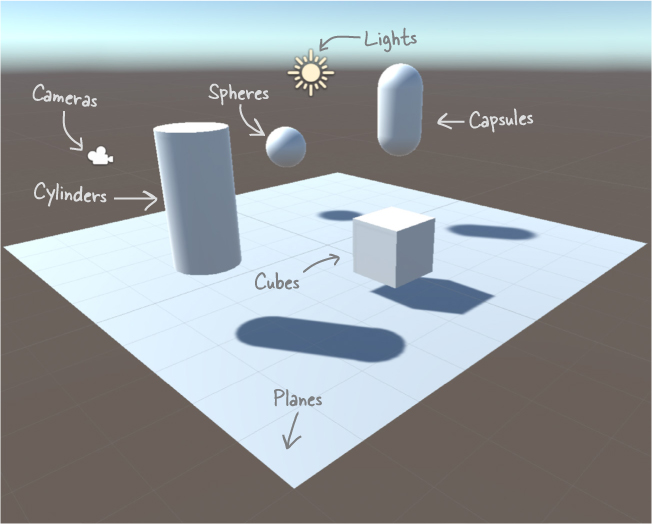
In these Unity Labs, you’ll build games out different kinds of GameObjects, including:
Note
GameObjects are the fundamental objects in Unity, and components are the basic building blocks of their behavior. The Inspector window shows you details about each GameObject in your scene and its components.
Each GameObject contains a number of components that provide its shape, set its position, and give it all of its behavior. For example:
Transform components determine the position and rotation of the GameObject.
Material components change the way the GameObject is rendered—or how it’s drawn by Unity—by changing the color, reflection, smoothness, and more.
Script components use C# scripts to determine the GameObject’s behavior.
Your scene is a 3D environment
As soon as you start the editor, you’re editing a scene. You can think of scenes as levels in your Unity games. Every game in Unity is made up of one or more scenes. Each scene contains a separate 3D environment, with its own set of lights, shapes, and other 3D objects. When you created your project, Unity added a scene called SampleScene, and stored it in a file called SampleScene.unity.
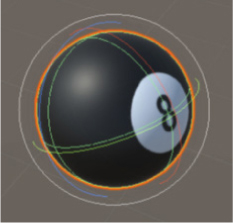
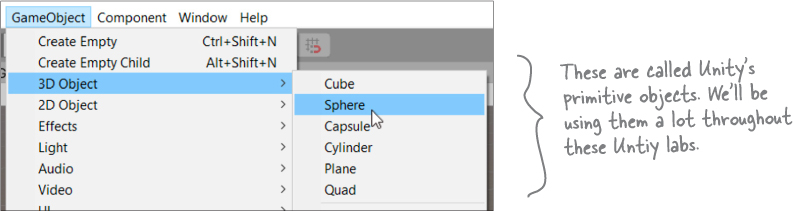
Add a sphere to your scene by choosing GameObject >> 3D Object >> Sphere from the menu:
A sphere will appear in your Scene window. Everything you see in the Scene window is shown from the perspective of the Scene view camera, which “looks” at the scene and captures what it sees.
Use the Move Gizmo to move your GameObjects
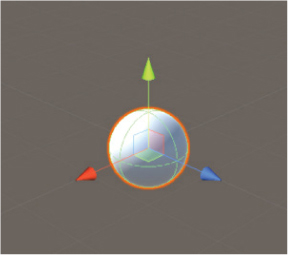
The toolbar at the top of the Unity Editor lets you choose Transform Tools. If the Move Tool isn’t selected, press its button to select it.

The Move Tool lets you use the Move Gizmo to move GameObjects around the 3D space. You should see red, green, and blue arrows and a cube appear in the middle of the window. This is the Move Gizmo, which you can use to move the selected object around the scene.
Note
Did you notice the grid in your 3D space? As you’re dragging the sphere around, hold down the control key. That causes the GameObject that you’re moving to snap to that grid. You’ll see the numbers in the Transform component move by whole numbers instead of small decimal increments.
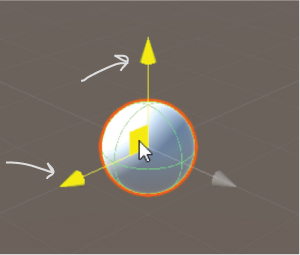
Move your mouse cursor over the cube at the center of the Move Gizmo—notice how each of the faces of the cube lights up as you move your mouse cursor over it? Click on the upper left face and drag the sphere around. You’re moving the sphere in the X-Y plane.
Note
When you click on the upper left face of the cube in the middle of the Move Gizmo, its X and Y arrows light up and you can drag your sphere around the X-Y plane in your scene.
Move your sphere around the scene to get a feel for how the Move Gizmo works. Click and drag each of the three arrows to drag it along each plane individually. Then try clicking on each of the faces of the cube in the Scene Gizmo to drag it around all three planes. Notice how the sphere gets smaller as it moves farther away from you—or really, the scene camera—and larger as it gets closer.
Note
The Move Gizmo lets you move GameObjects along any axis or plane of the 3D space in your scene.
The Inspector shows your GameObject’s components
As you move your sphere around the 3D space, watch the Inspector window, which is on the right side of the Unity Editor if you’re using the Wide layout. Look through the Inspector window—you’ll see that your sphere has four components labeled Transform, Sphere (Mesh Filter), Mesh Renderer, and Sphere Collider.
Note
If you accidentally deselect a GameObject, just click on it again. If it’s not visible in the scene, you can select it in the Hierarchy window, which shows all of the GameObjects in the scene.
Every GameObject has a set of components that provide the basic building blocks of its behavior, and every GameObject has a Transform component that drives its location, rotation, and scale.
You can see the Transform component in action as you use the Move Gizmo to drag the sphere around the X-Y plane. Watch the X and Y numbers in the Position row of the Transform component change as the sphere moves.

Try clicking on each of the other two faces of the Move Gizmo cube and drag to move the sphere in the X-Z and Y-Z planes. Then click on the red, green, and blue arrows and drag the sphere along just the X, Y, or Z axis. You’ll see the X, Y, and Z values in the Transform component change as you move the sphere.
Now hold down shift to turn the cube in the middle of the Gizmo into a square. Click and drag on that square to move the sphere in the plane that’s parallel to the Scene view camera.
Once you’re done experimenting with the Move Gizmo, use the sphere’s Transform component context menu to reset its Transform component. Click the context menu button (![]() ) at the top of the transform component and choose Reset from the menu.
) at the top of the transform component and choose Reset from the menu.

The position will reset back to [0, 0, 0].
Note
You can learn more about the tools and how to use them to position GameObjects in the Unity Manual. Click Help >> Unity Manual and search for the “Positioning GameObjects” page.
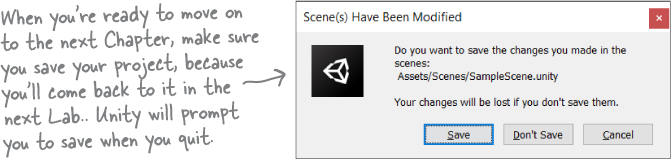
Save your scene often! Use File >> Save or Ctrl-S to save the scene right now.
Add a material to your sphere GameObject
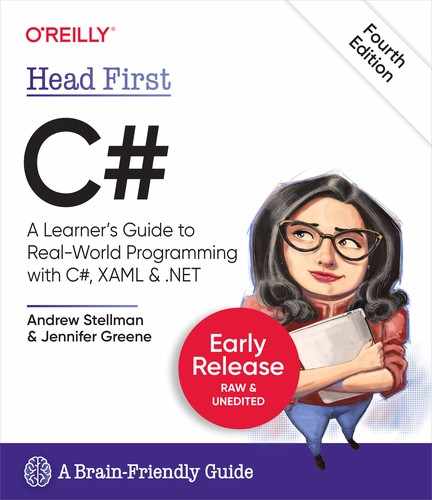
Unity uses materials to provide color, patterns, textures, and other visual effects. Your sphere looks pretty boring right now because it just has the default material, which causes the 3D object to be rendered in a plain, off-white color. Let’s make it look like a billiard ball.
Select the sphere.
When the sphere is selected, you can see its material as a component in the Inspector window:

We’ll make your sphere more interesting by adding a texture—that’s just a simple image file that’s wrapped around a 3D shape, almost like you printed the picture on a rubber sheet and stretched it around your object.
Go to our Billiard Ball Textures page on GitHub.
Go to https://github.com/head-first-csharp/fourth-edition and click on the Billiard Ball Textures link to browse a folder of texture files for a complete set of billiard balls.
Download the texture for the 8 ball.
Click on the file
8 Ball Texture.pngto view the texture for an 8 ball. This is a normal 1200x600 image file that you can open in your favorite image viewer.
Download the file into a folder on your computer.
(You might need to right-click on the Download button to save the file, or click Download to open it and then save it, depending your browser.)
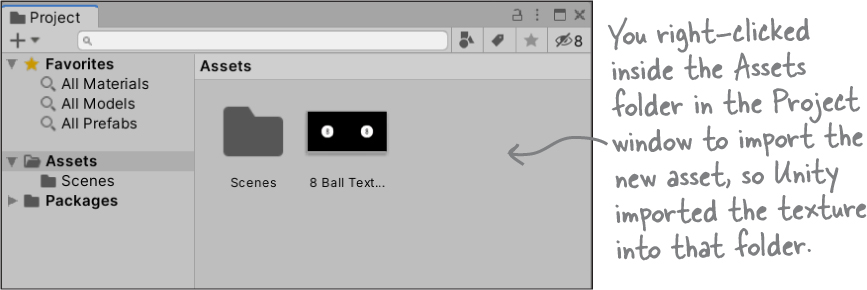
Import the 8 Ball Texture image into your Unity project.
Right-click on the Assets folder in the Project window, choose Import New Asset... and import the texture file. You should now see it when you click on the Assets folder in the Project window.
Add the texture to your sphere.
Now we just need to take that texture and “wrap” it around your sphere. Click on 8 Ball Texture in the Project window to select it. Once it’s selected, drag it onto your sphere.

Your sphere now looks like an 8 ball. Check the Inspector—now it has a new material component:


Unity is a great way to really “get” C#.
Programming is a skill, and the more practice that you get writing C# code, the better your coding skills will get. That’s why we designed the Unity labs throughout this book to specifically help you practice your C# skills and reinforce the C# tools and concepts that you learn in each chapter. As you write more C# code, you’ll get better at it, and that’s a really effective way to become a great C# developer. And neuroscience tells us that we learn more effectively when we experiment, so we designed these Unity labs with lots of options for experimentations, and suggestions for how you can get creative and keep going with each lab.
But Unity gives us an even more important opportunity to help get important C# concepts and techniques into your brain. When you’re learning a new programming language, it’s really helpful to see how that language works with lots of different platforms and technologies. That’s why we included both Console Apps and WPF Apps in the main chapter material, and in some cases even have you build the same project using both technologies. Adding Unity to the mix gives you a third perspective, which can really accelerate your understanding of C#.
Rotate your sphere
Click the Rotate Tool in the toolbar. You can use the Q, W, E, R, T, and Y keys to quickly switch between the Transform Tools—press E and W to toggle between the Rotate Tool and Move Tool.

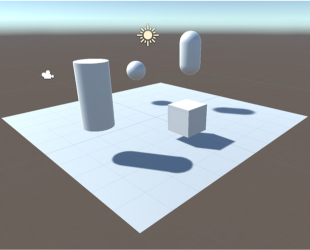
Click on the sphere. Unity will display a wireframe sphere Rotate Gizmo with red, blue, and green circles. Click the red circle and drag it to rotate the sphere around the X axis.

Click and drag the green and blue circles to rotate on the Y and Z axes. The outer white circle rotates the sphere along the axis coming out of the Scene view camera. Watch the Rotation numbers change in the Inspector window.
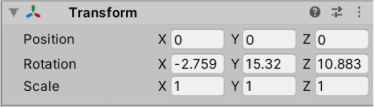
Open the context menu of the Transform panel in the Inspector window. Click Reset, just like you did before. It will reset everything in the Transform component back to default values—in this case, it will change your sphere’s rotation back to [0, 0, 0].

Use File >> Save or Ctrl-S to save the scene right now. Save early, save often!
Move the Scene view camera with the Hand Tool and Scene Gizmo
Use the mouse scroll wheel or scroll feature on your trackpad to zoom in and out, and toggle between the Move and Rotate Gizmos. Notice that the sphere changes size, but the Gizmos don’t. The Scene window in the editor shows you the view from a virtual camera, and the scroll feature zooms that camera in and out.
Press Q to select the Hand Tool, or choose it from the toolbar. Your cursor will change to a hand.

The Hand Tool pans around the scene by changing the position and rotation of the scene camera. When the Hand Tool is selected, you can click anywhere in the scene to pan. Hold down Alt (or Option on a Mac) while dragging and the Hand Tool turns into an eye and rotates the view around the center of the window.
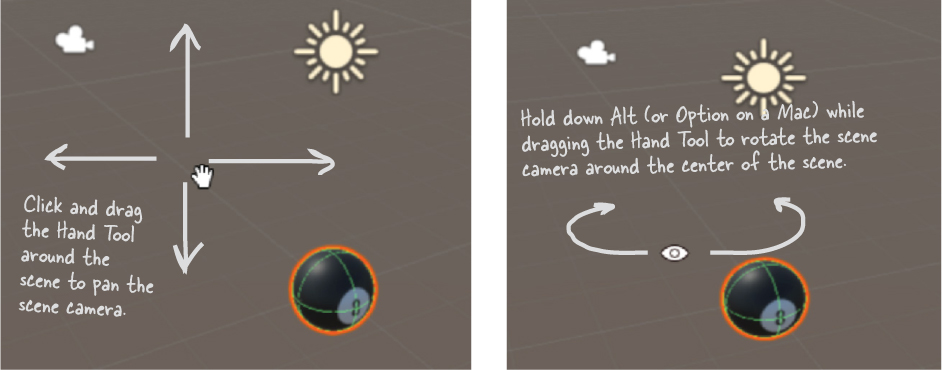
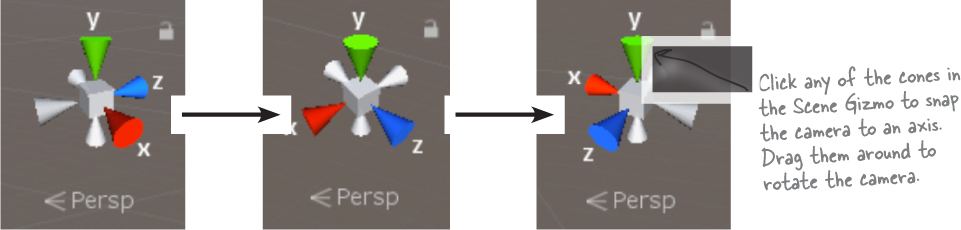
When you Alt-click (or Option-click) and drag the Hand Tool to rotate the Scene view around its center, keep an eye on the Scene Gizmo in the upper right corner of the Scene window. The Scene Gizmo always displays the camera’s orientation—keep your eye on it as you use the Hand Tool to move the Scene view camera. Click on the X, Y, and Z cones to snap the camera to an axis.
Get creative!
We built these Unity Labs to give you a platform to experiment on your own with C# because that’s the single most effective way for you to become a great C# developer. At the end of every Unity Lab, we’ll include a few suggestions for things that you can try on your own. Take some time to experiment with everything you just learned before moving on to the next chapter.
Add a few more spheres to your scene. Try using some of the other billiard ball maps. You can download them all from the same location that you downloaded
8 Ball Texture.png.Try adding other shapes by choosing different Cube, Cylinder, or Capsule from the GameObject >> 3D Object menu.
Experiment with using different images as textures. See what happens to photos of people or scenery when you use them to create textures and add them to different shapes.
Can you create an interesting 3D scene out of shapes, textures, and lights?
Note
The more C# code that you write, the better you’ll get at it. That’s the most effective way for you to become a great C# developer. We designed these Unity Labs to give you a platform for practice and experimentation.