
Chapter 13. Unit Testing: Code Quality Assurance
Are you sure your software is working right now? Really sure? Before you sent that new version to your users, you presumably tried out the new features to ensure they all worked. But did you try the old features to ensure you didn’t break any of them? All the old features? If that question makes you worry, your program needs automated testing. Automated tests ensure your program’s components work correctly, even after you change your code.
Unit tests are the most common, most important type of automated test. And Ruby includes MiniTest, a library devoted to unit testing. This chapter will teach you everything you need to know about it!
Automated tests find your bugs before someone else does
Developer A runs into Developer B at a restaurant they both frequent...
Developer A: | Developer B: |
How’s the new job going? | |
Not so great. I have to head back into the office after dinner. We found a bug that’s causing some customers to be billed twice as often as they should be. | |
Ouch. How did that get onto your billing server? | |
We think it might have gotten introduced a couple of months ago. One of our devs made some changes to the billing code then. | |
Wow, that long ago... And your tests didn’t catch it? | |
Tests? | |
Your automated tests. They didn’t fail when the bug got introduced? | |
Um, we don’t have any of those. | |
What?! |
Your customers rely on your code. When it fails, it can be disastrous. Your company’s reputation is damaged. And you’ll have to put in overtime fixing the bugs.
That’s why automated tests were invented. An automated test is a separate program that executes components of your main program, and verifies they behave as expected.

Not unless you’re going to test all the old features as well, to make sure your changes haven’t broken anything. Automated tests save time over manual testing, and they’re usually more thorough, too.
A program we should have had automated tests for
Let’s look at an example of a bug that could be caught by automated tests. Here we have a simple class that joins an array of strings into a list that could be used in an English sentence. If there are two items, they’ll be joined with the word and (as in “apple and orange”). If there are more than two items, commas will be added as appropriate (as in “apple, orange and pear”).
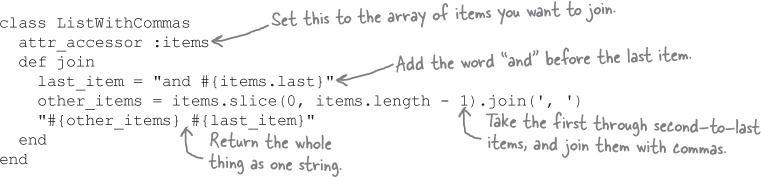
Within our join method, we take the last item in the array and add the word and to it. Then we use the array’s slice instance method to get all the items except the last item.
We’d better take a moment to explain the slice method. It takes a “slice” of an array. It starts at the index you specify, and retrieves the number of elements you specify. It returns those elements as a new array.

Our goal is to get everything except the last item. So we ask for a slice beginning at index 0. We subtract 1 from the length of the array to get the slice length.

Now that we know how our join method works, let’s try the class out with a couple of lists:
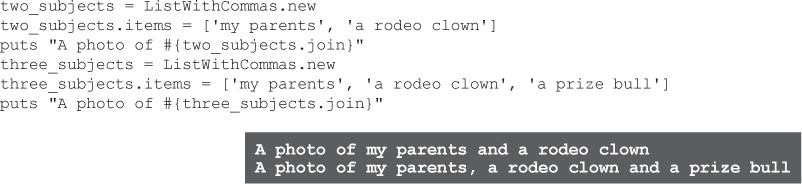
The join method seems to work! Until, that is, we make a change to it...
There’s a small problem with this output, though...
Maybe we’re just immature, but we can imagine this leading to jokes that the parents are a rodeo clown and a prize bull. And formatting lists in this way could cause other misunderstandings, too.
To resolve any confusion, let’s update our code to place an additional comma before the and (as in “apple, orange, and pear”). Then let’s retest the join method with three items.
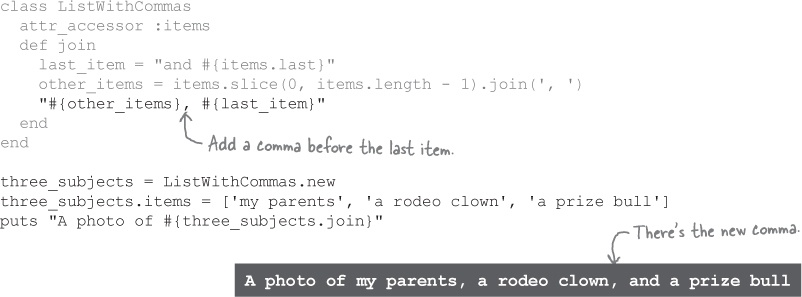
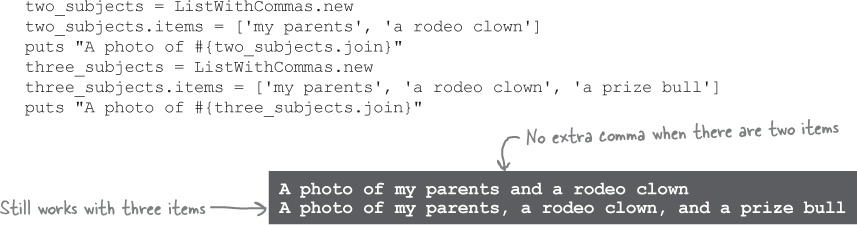
There! Now it should be clear that the parents were in the photo with the clown and the bull.

Uh, oh. Is that true? Let’s try a list of two items again...

The join method used to return "my parents and a rodeo clown" for this list of two items, but an extra comma got included here as well! We were so focused on fixing the list of three items that we forgot to try other scenarios.
If we had automated tests for this class, this problem could have been avoided.
An automated test runs your code with a particular set of inputs, and looks for a particular result. As long as your code’s output matches the expected value, the test will “pass.”
But suppose that you accidentally introduced a bug in your code (like we did with the extra comma). Your code’s output would no longer match the expected value, and the test would “fail.” You’d know about the bug immediately.
Having automated tests is like having your code inspected for bugs from top to bottom, automatically, every time you make a change!
Types of automated tests
There are actually many different types of automated tests in widespread use. Here are some of the most common:
Performance tests measure the speed of your program.
Integration tests run your entire program, to ensure that all its methods, classes, and other components integrate together successfully.
Unit tests run individual components (units) of your program, usually individual methods.
You can download libraries for writing all of these types of tests. But since Ruby comes with a library specifically intended for unit testing, that’s what this chapter will focus on.
MiniTest: Ruby’s standard unit-testing library
The Ruby standard library includes a unit-testing framework called MiniTest. (Ruby used to include a different library called Test::Unit. The new library is named MiniTest because it does many of the same things as Test::Unit, but with fewer total lines of code.)
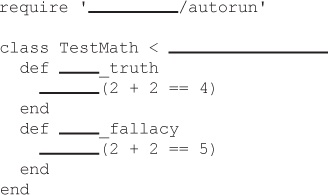
Let’s start by writing a simple test. This won’t test anything practical; we need to show you how MiniTest works first. Then we’ll move on to testing some actual Ruby code.
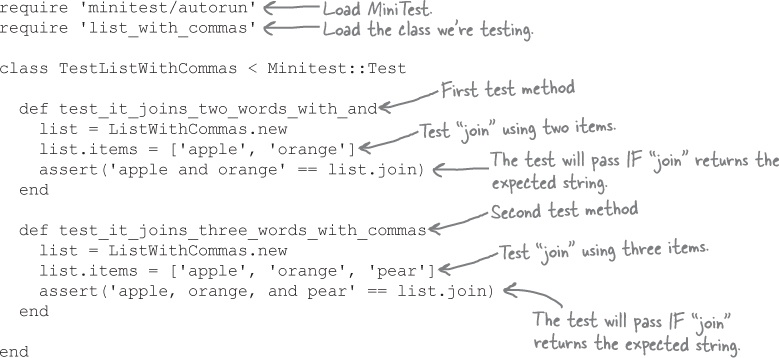
We start by requiring 'minitest/autorun' from the standard library, which loads MiniTest and sets it up to run tests automatically when they load.
Now we can create our test. We create a new subclass of the Minitest::Test class, named whatever we want. Subclasses of Minitest::Test can be run as unit tests.
When a test runs, MiniTest goes through the test class, finds all the instance methods whose names begin with test_, and calls them. (You can add methods with other names, but they won’t be treated as test methods.) We’ll add two test methods to our class.
And within our two test methods, we’ll make two calls to the assert method. The assert method is one of many methods inherited from Minitest::Test, and it’s used to test whether your code is behaving as expected. Its behavior is very simple: if you pass it a true value, it passes, but if you pass it a false value, the whole test fails and stops immediately. Let’s try passing true in one test, and false in the other.
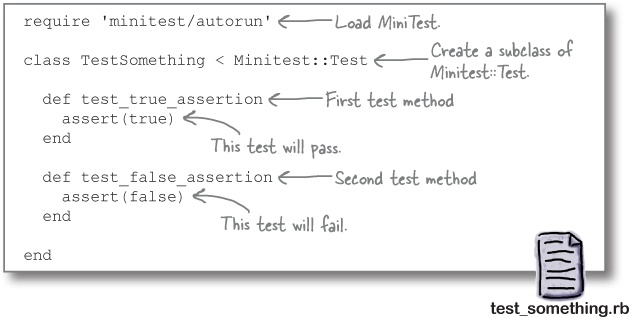
Let’s save this code to a file, named test_something.rb. It’s not much to look at, we admit. But let’s try running it and see what happens!
Running a test
In your terminal, change to the directory where you saved test_something.rb. Then run it with the command:
ruby test_something.rb
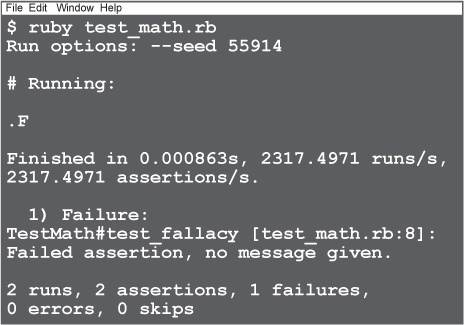
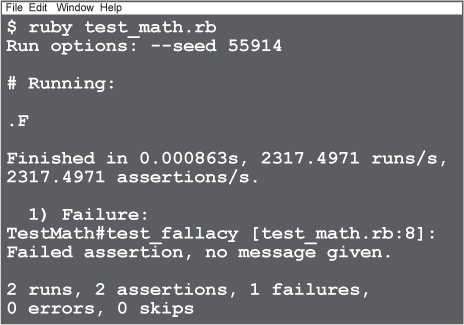
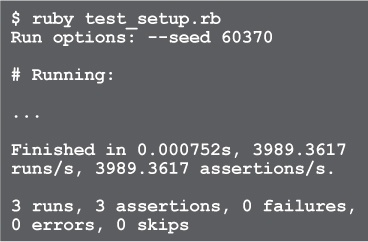
The tests will run automatically, and you’ll see a summary of the results.
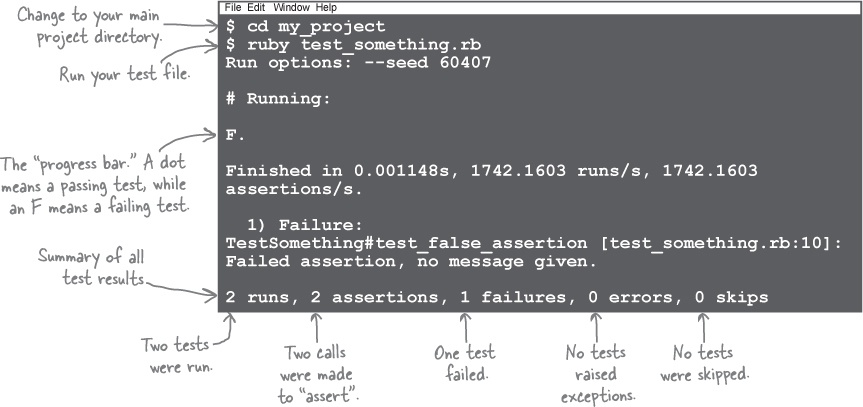
Eventually, you’ll have many tests, and they may take a while to run, so MiniTest prints a single character as each test runs, to form a “progress bar.” It prints a dot if the current test passed, and an F if it failed.
When the tests complete, you’ll see a report for each test that failed. It will include the name and line number of the test method, and the reason it failed. We’ll look at these failures in more detail in a few pages.
The most important part of the output is the test summary. It lists the number of test methods that were run, the number of calls to assert and similar methods, the number of tests that failed, and the number that raised unrescued exceptions (errors). If there were zero failures and zero errors, it means your code is working properly. (Well, assuming you haven’t made a mistake in your tests.)
Because we passed a false value to assert in one of our tests, the failure appears in the summary. Had this been an actual test, it would have been an indication that we needed to fix something in our code.
Testing a class
You’ve seen how to write and run a unit test in MiniTest. A test isn’t very useful all by itself, though. Now that you understand the mechanics of MiniTest, we’ll write a unit test for an actual Ruby class.
By convention (and to keep things neat), you should keep unit-test code in separate files from your main program code. So setting up and running this test will have a few extra steps...
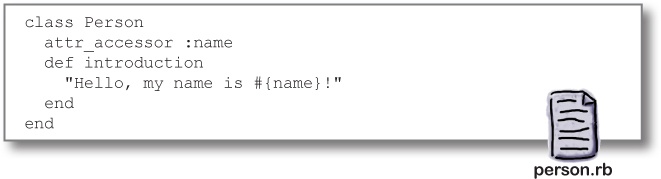
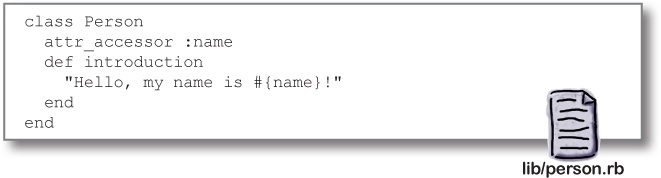
Save this simple class by itself in a file named person.rb.
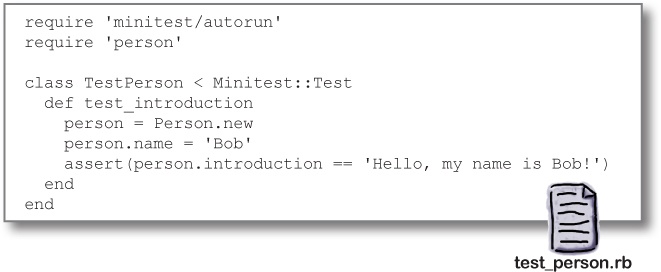
In a separate file named test_person.rb, create and save this test class. (We’ll talk about the details of this file’s contents in a moment.)
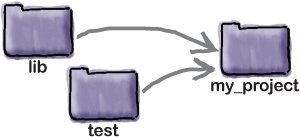
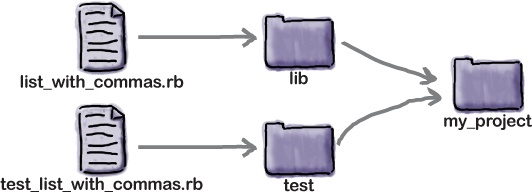
Create two directories within your main project directory. By convention, one subdirectory should be called lib, and the other should be called test.
Move the file with the class you want to test within the lib subdirectory, and move the test file into the test subdirectory.
In your terminal, change to your main project directory (the one that holds the lib and test directories). Then type this command:
ruby -I lib test/test_person.rb
The
-I libflag adds lib to the list of directories Ruby will search when you callrequire, allowing the person.rb file to be loaded. And specifying test/test_person.rb as the file to load will cause Ruby to look for a file named test_person.rb within the test subdirectory.Your unit tests will run and produce output similar to that shown here.

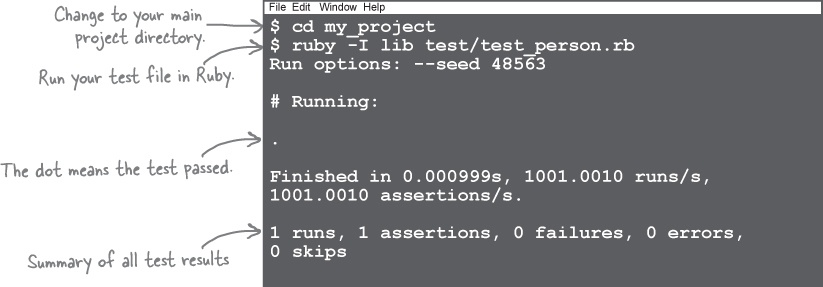
You can see in the summary at the bottom that there were zero failures and zero errors. Our test passed!
We’ll take a more detailed look at the test code on the next page...
A closer look at the test code
Now, let’s take a closer look at that code for the unit test. In our person.rb file in the lib directory, we have a simple class that we want to test, with one attribute and one instance method.
And in our test_person.rb file in the test directory, we have our test code.
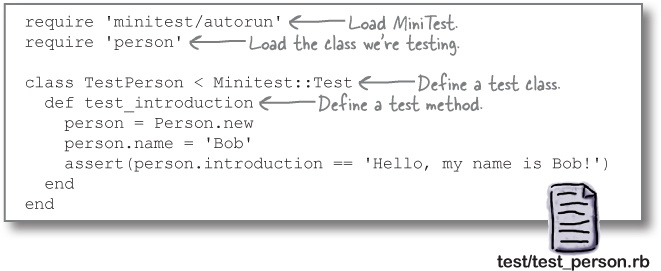
After loading MiniTest, we require the 'person' file in order to load the Person class. The call to require works because when running the test, we added the -I lib flag to the command line. That adds the lib directory to the list of directories Ruby searches for files to load.
Once all the classes we need are loaded, we can define our test. We create a new subclass of the Minitest::Test class, named TestPerson, and add one test method to it (ensuring the method name starts with test_).
And it’s within that test method that we finally determine whether our code is working correctly...
Testing your code within a test method is very similar to making calls to it from a regular program.
If we were to create a Person, set its name attribute to 'Bob', and then do an equality comparison to see if the return value from its introduction method was 'Hello, my name is Bob!', the result of that comparison would of course be true:

We perform exactly those steps within the test_introduction method. We create an ordinary Person instance, just like we would when using our class in an actual application. We assign a value to its name attribute, just like in an app. And we call its introduction method, just like we normally would.
The only difference is that we then compare the return value to the string we expect. If they are equal, the value true will be passed to assert, and the test will pass. If they’re not equal, the value false will be passed to assert, and the test will fail. (And we’ll know that we need to fix our code!)


Red, green, refactor
Once you have some experience with unit testing, you’ll probably fall into a cycle that’s commonly referred to as “red, green, refactor”:
Red stage: You write a test for the feature you want, even though it doesn’t exist yet. Then you run the test to ensure that it fails.
Green stage: You implement the feature in your main code. Don’t worry about whether the code you’re writing is sloppy or inefficient; your only goal is to get it working. Then you run the test to ensure that it passes.
Refactor stage: Now, you’re free to refactor the code, to change and improve it, however you please. You’ve watched the test fail, so you know it will fail again if your app code breaks. You’ve watched the test pass, so you know it will continue passing as long as your code is working correctly.
This freedom to change your code without worrying about it breaking is the real reason you want unit tests. Anytime you see a way to make your code shorter or easier to read, you won’t hesitate to do it. When you’re finished, you can simply run your tests again, and you’ll be confident that everything is still working.
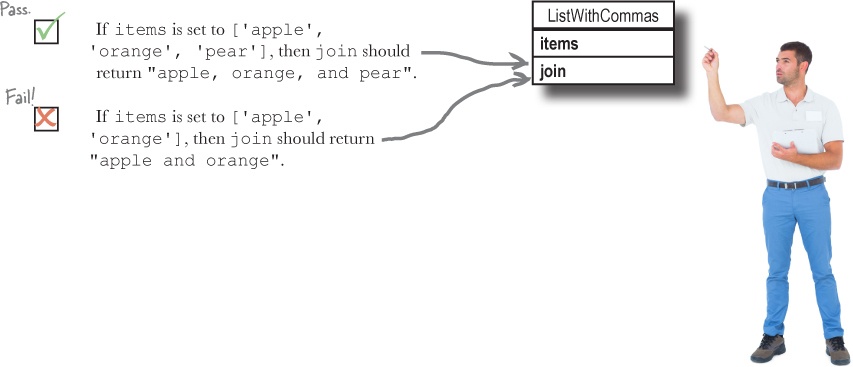
Tests for ListWithCommas
Now that we know how to write and run a unit test with MiniTest, let’s try writing a test to troubleshoot our ListWithCommas class.
ListWithCommas works just fine if we give it a list of three items to join:

But if we give it a list of just two items, we get an extra comma.

Let’s write some tests that show what we expect from the join method, run them, and confirm that they’re currently failing. Then, we’ll alter the ListWithCommas class to make the tests pass. Once the tests are passing, we’ll know our code is fixed!
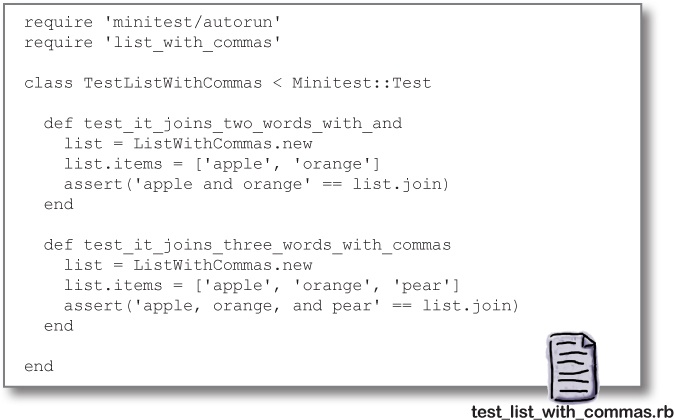
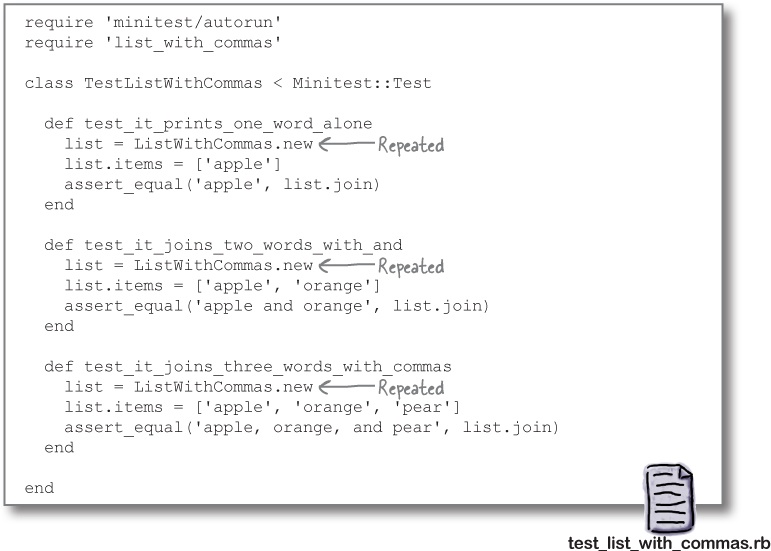
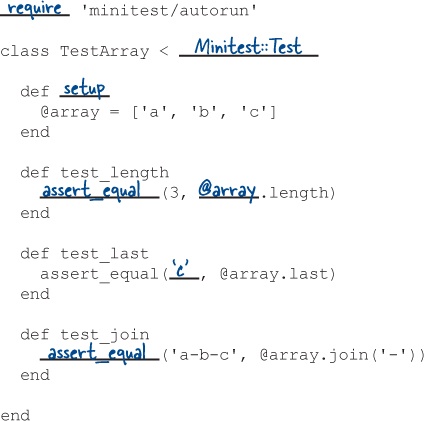
We’ll write two tests: one where we attempt to join two words, and one where we attempt to join three words. In each, we’ll create a ListWithCommas instance and assign an array to its items attribute, just like we did in our actual program. Then, we’ll call the join method and assert that its return value should equal our expected value.
We have our test class. Let’s get set up to run it!
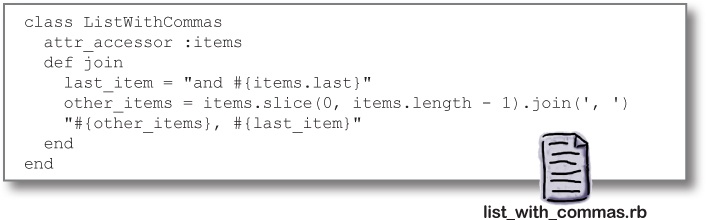
Save the
ListWithCommasclass in a file named list_with_commas.rb.Save the
TestListWithCommasclass in a separate file named test_list_with_commas.rb.As with the previous test, list_with_commas.rb should be saved in a directory named lib, and test_list_with_commas.rb should be saved in a directory named test. Those directories, in turn, should be placed within a single project directory.
Once the files are in place, in your terminal, change to your main project directory. Then type this command:
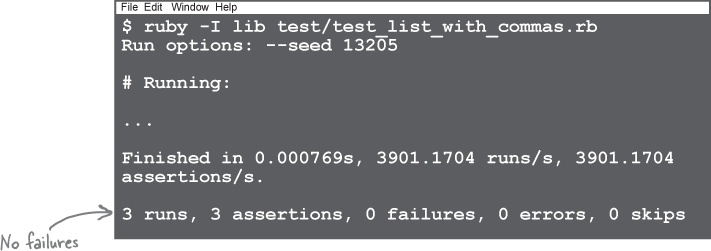
ruby -I lib test/test_list_with_commas.rb
Your unit tests will run and produce output similar to that shown here.

The summary shows that the test with three items passes, but the test with two items fails. We’ve reached the “red” phase of the “red, green, refactor” cycle! With a working test, it should be really easy to fix the ListWithCommas class.
Getting the test to pass
Right now we have two unit tests for our ListWithCommas class. The test with three items in the list passes, but the test with two items fails:
class ListWithCommas
  attr_accessor :items
  def join
    last_item = "and #{items.last}"
    other_items = items.slice(0, items.length - 1).join(', ')
    "#{other_items}, #{last_item}"
  end
endIf | |
If |
This is because the ListWithCommas join method includes an extra comma when outputting a list of just two items.

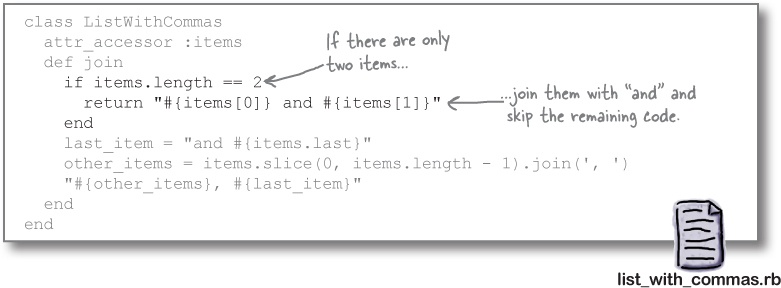
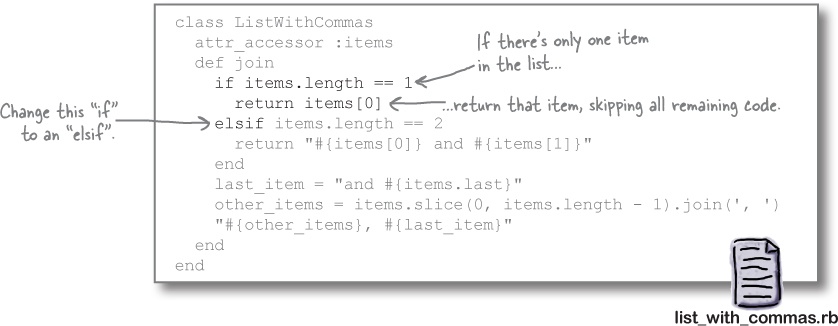
Let’s modify join so that when the list has just two items, it simply joins them with the word and. We’ll return the resulting string without running any of the remaining code.
We’ve updated our code, but is it working correctly? Our tests can tell us immediately! As before, type this in your terminal:
ruby -I lib test/test_list_with_commas.rb
We’ll see that both tests are now passing!
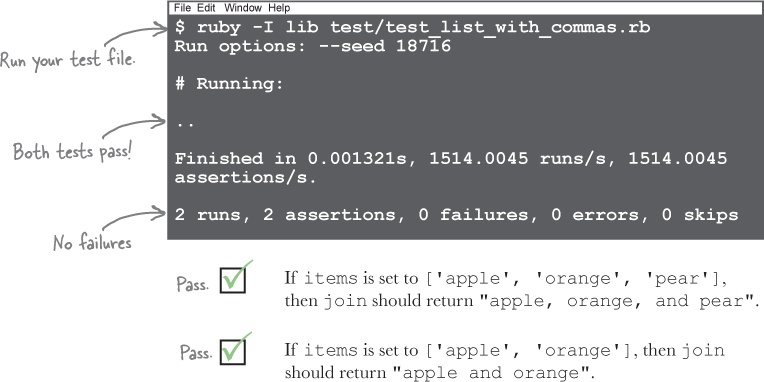
Our tests are “green”! We can say with certainty that join works with a list of two items now, because the corresponding unit test now passes. And we don’t need to worry about whether we broke any of the other code; we have a unit test assuring us that’s fine, too.
We can resume using our class with confidence!
Another bug to fix
It’s conceivable that ListWithCommas could be set up with only a single item. But its join method doesn’t behave very well at all in that case, treating that one item as if it appeared at the end of a list of items:

How should join behave in this case? If we have a list of one item, we don’t really need commas, the word and, or anything at all. We could simply return that one item.

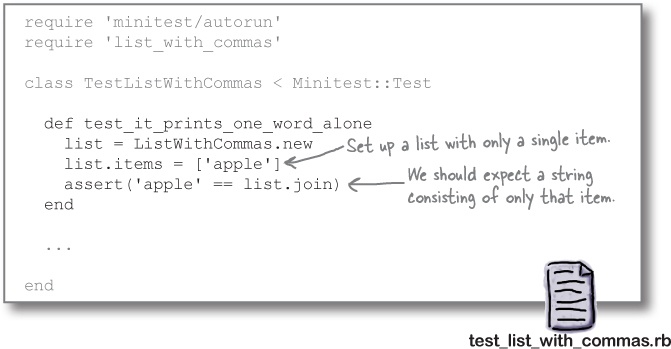
Let’s express this in a unit test. We’ll create a ListWithCommas instance, and set its items attribute to an array with only one element. Then we’ll add an assertion that its join method should return a string consisting of only that item.
Test failure messages
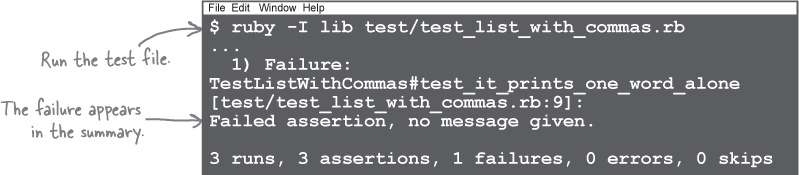
There’s the failure!
It’s unfortunate that this is the only feedback we’re given regarding the problem, though:
There are a couple of different ways we can get more information.
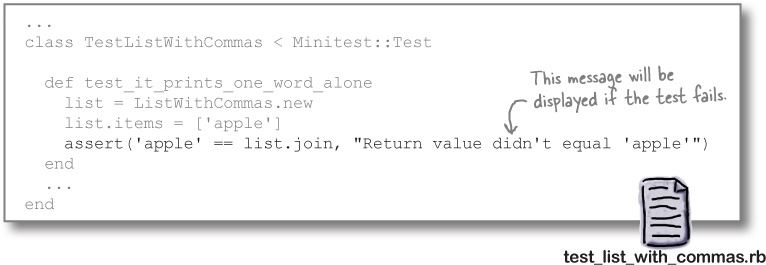
The first is to set up a test failure message. The assert method takes an optional second parameter with a message that should be displayed in the event the test fails. Let’s try adding a message now:
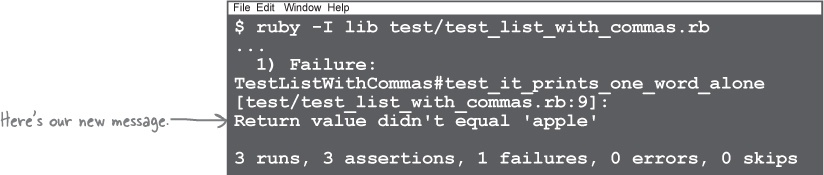
If we try running the updated test, we’ll see our custom error message in the failure summary.
A better way to assert that two values are equal
Although our custom error message is more descriptive, it still doesn’t show exactly why the test failed. It would help if the message showed what the join method actually returned, so that we could compare it to the expected value...
The second (and easier) way we can get a more descriptive failure message is to use a different assertion method. The assert method is just one of many methods that test classes inherit from Minitest::Test.
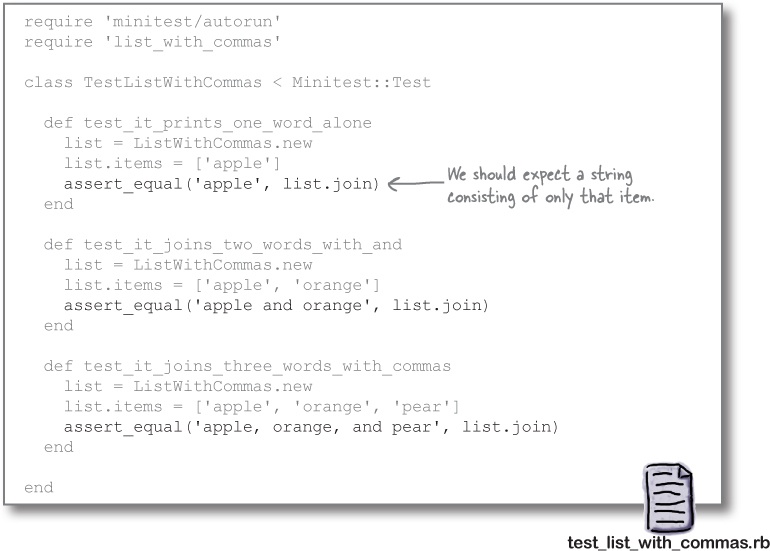
There’s also the assert_equal method, which takes two arguments and checks that they are equal. If they’re not, the test will fail, just as with assert. But more importantly, it will print the expected value and the actual value in the test summary, so that we can compare them easily.
Since all our calls to assert are doing equality comparisons, let’s replace them all with calls to assert_equal. The first argument to assert_equal should be the value we expect, and the second argument should be the value our code actually returns.
Let’s try running our tests again, and see if the output is any more helpful.
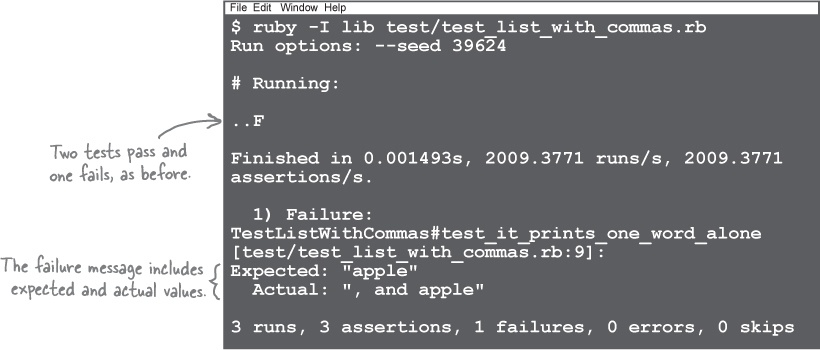
There they are in the output: the value we expected ("apple"), and the value we actually got (", and apple")!
Now that it’s clear what’s wrong, it should be easy to fix the bug. We’ll update our ListWithCommas code with another if clause. If there’s only one item in the list, we’ll simply return that item.
And if we rerun the tests, we’ll see that everything’s passing!
Some other assertion methods
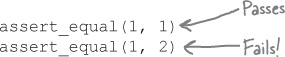
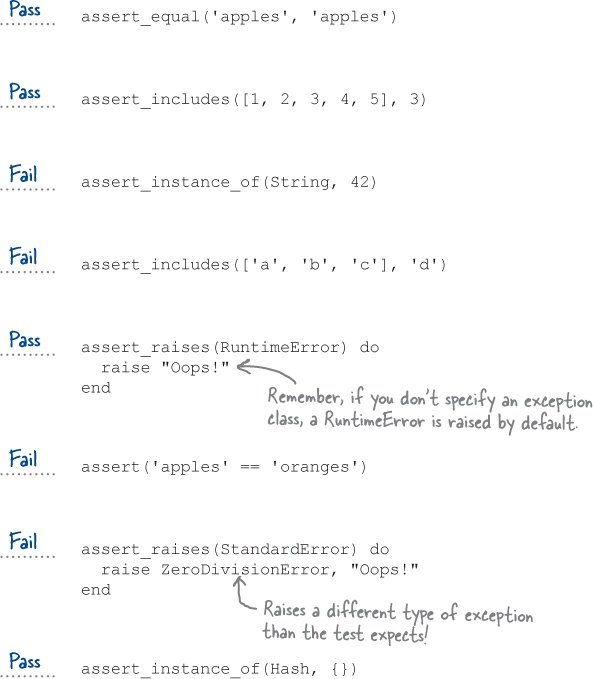
As we mentioned, test classes inherit many assertion methods from Minitest::Test. You’ve already seen assert, which passes if it receives a true value, and fails if it receives a false value:

And you’ve seen assert_equal, which takes two values, and fails if they are not equal:
Let’s take a brief look at some of the other assertion methods that are available...
The assert_includes method takes a collection as its first argument, and any object as its second argument. It fails if the collection does not include the given object.

The assert_instance_of method takes a class as its first argument, and any object as its second argument. It fails if the object is not an instance of the given class.

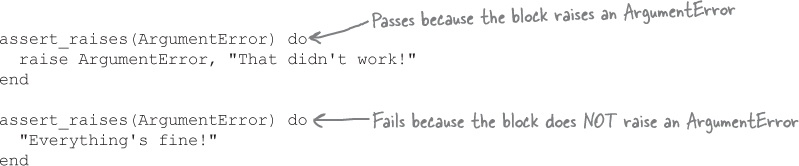
And the assert_raises method takes one or more exception classes as arguments. It also takes a block. If the block does not raise an exception that matches one of the specified classes, it fails. (This is useful when you’ve written code that raises an error in certain circumstances, and need to test that it actually raises the error at the appropriate time.)

Removing duplicated code from your tests
There’s some repeated code among our various tests... Every test starts with the creation of a ListWithCommas instance.
When you’re running multiple tests against the same type of object, it’s only natural that similar steps would be required to set each test up. So MiniTest includes a way of avoiding that repeated code...
The “setup” method
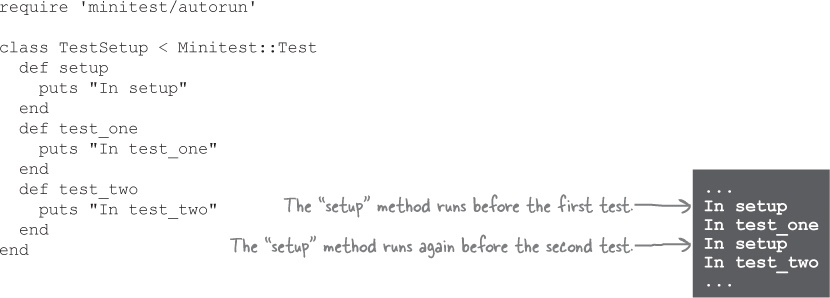
MiniTest looks for an instance method named setup on your test class and, if it’s present, will run it before each test.
The setup method can be used to set up objects for your test.
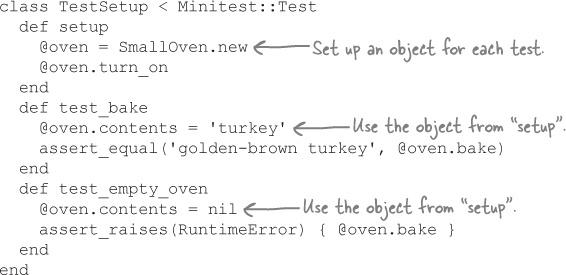
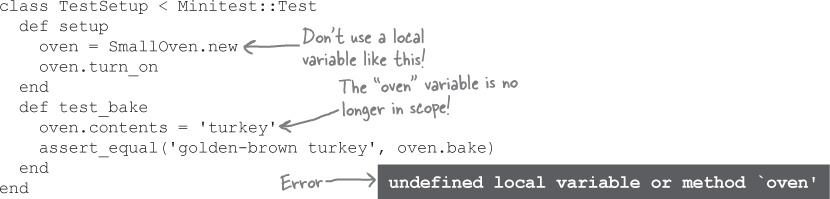
Note that if you’re going to use setup, it’s important to store the objects you create in instance variables. If you use local variables, they’ll be out of scope when your test method runs!
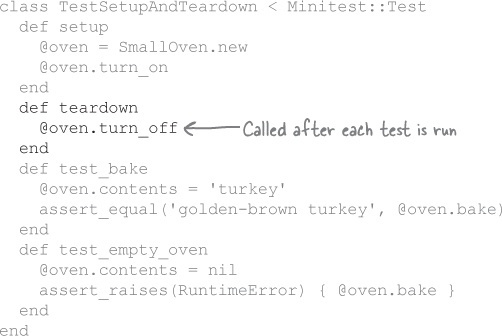
The “teardown” method
MiniTest also looks for a second instance method on your test class, named teardown. If it’s present, it will be run after each test.
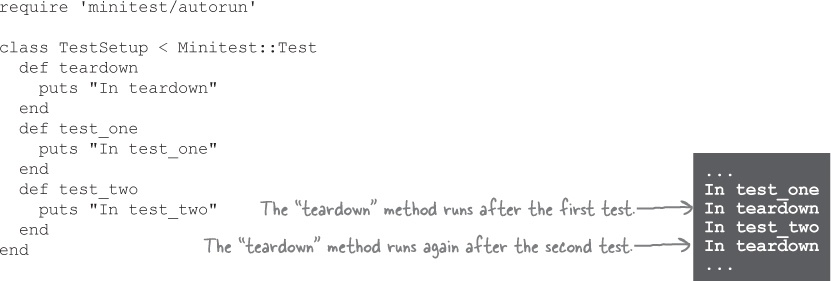
The teardown method is useful if you need to clean up after each test is run.
The setup and teardown methods run before and after each test, not just once. Even though there’s only one copy of your setup code, you’ll still have a fresh, clean object for each test you run. (It would quickly get messy if changes made to your object by a prior test could affect the result of the next test, after all.)
Up next, we’ll take what we’ve learned and see if we can eliminate the duplicated code in the ListWithCommas tests...
Updating our code to use the “setup” method
Previously, we had code to set up a ListWithCommas instance in each test method. Let’s move that duplicated code to a setup method. We’ll store the object for each test in a @list instance variable, which we’ll then reference from the test methods.
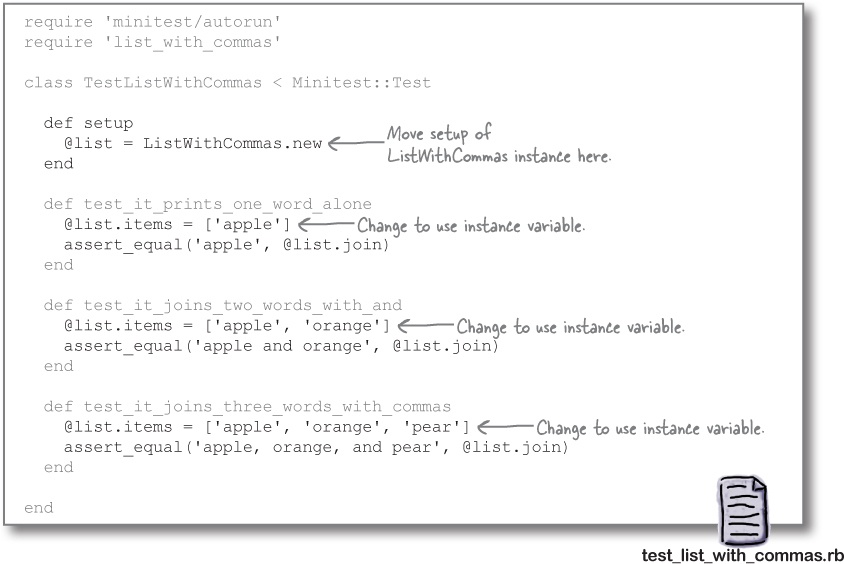
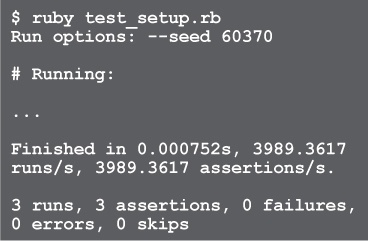
Much cleaner! And if we run the tests, we’ll see that everything passes as normal.
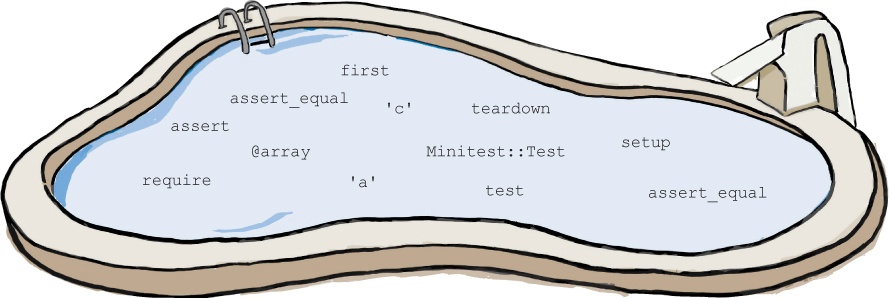
Your job is to take code snippets from the pool and place them into the blank lines in the code. Don’t use the same snippet more than once, and you won’t need to use all the snippets. Your goal is to make code that will run and produce the output shown.
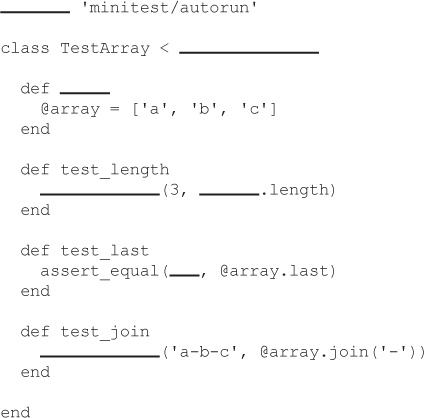
Output:
Note: each thing from the pool can only be used once!
Up Next...
We’re getting close to the end of the book! It’s time to put your Ruby skills to the test. Over the next two chapters, we’re going to code a full web app. Don’t be intimidated; we’ll be showing you Sinatra, a library that will make the whole process easy!