
Chapter 2. Methods and Classes: Getting Organized
You’ve been missing out. You’ve been calling methods and creating objects like a pro. But the only methods you could call, and the only kinds of objects you could create, were the ones that Ruby defined for you. Now, it’s your turn. You’re going to learn to create your own methods. You’ll also create your own classes—templates for new objects. You’ll decide what objects based on your class will be like. You’ll use instance variables to define what those objects know, and instance methods to define what they do. And most importantly, you’ll discover how defining your own classes can make your code easier to read and maintain.
Defining methods
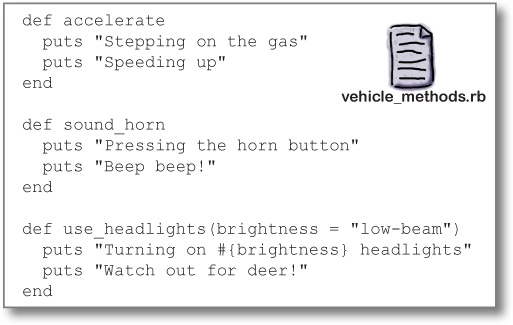
Got-A-Motor, Inc., is working on their “virtual test-drive” app, which lets their customers try vehicles out on their computers without needing to visit a showroom. For this first version, they need methods to let users step on the virtual gas, sound the virtual horn, and turn on the virtual headlights in low-beam or high-beam mode.
Method definitions look like this in Ruby:
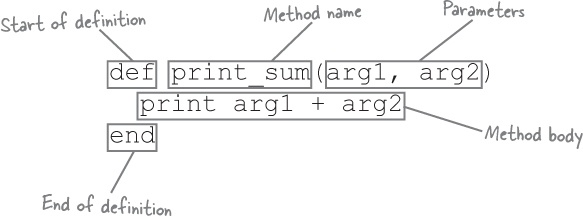
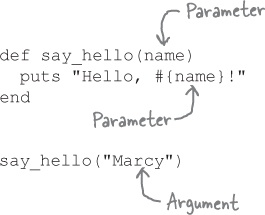
If you want calls to your method to include arguments, you’ll need to add parameters to the method definition. Parameters appear after the method name, within parentheses. (You should leave off the parentheses if there are no parameters.) Each argument on the method call gets stored in one of the parameters within the method.
The method body consists of one or more Ruby statements that are executed when the method is called.
Let’s create our very own methods to represent the actions in the test-drive app.
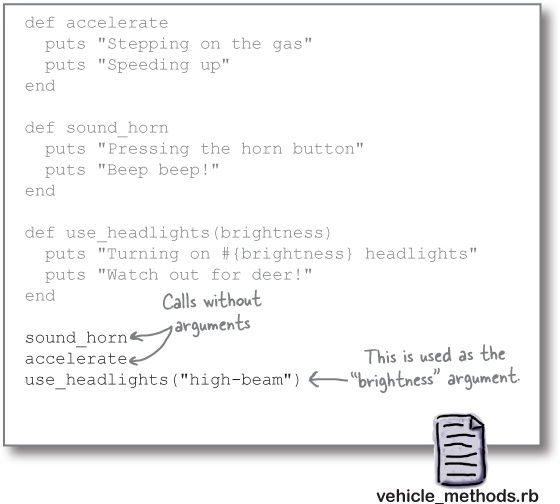
Here are two methods for accelerating and sounding the horn. They’re about as simple as Ruby methods can be; each method body has a pair of statements that print strings.
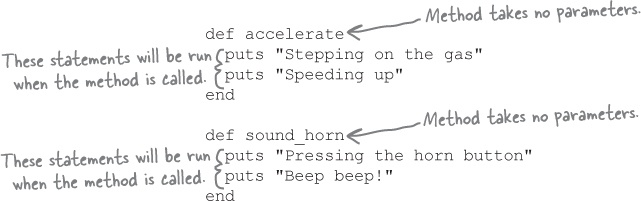
The use_headlights method is only slightly more complex; it takes a single parameter, which is interpolated into one of the output strings.

That’s all it takes! With these method definitions in place, we’re ready to make calls to them.
Calling methods you’ve defined
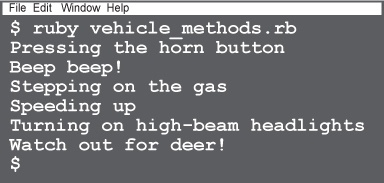
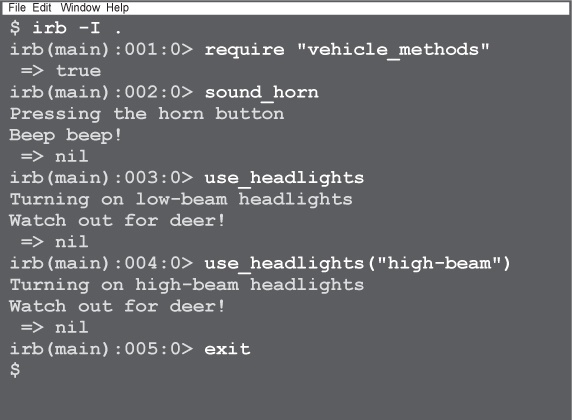
You can call methods you’ve defined just like any other. Let’s try out our new vehicle simulator methods.
Ruby lets you put calls to your methods anywhere—even within the same source file where you defined them. Since this is such a simple program at this point, we’ll do that, just for convenience. We’ll just stick the method calls right after the method declarations.
When we run the source file from the terminal, we’ll see the result of our method calls!
That’s right. Like puts and print, these methods are included in the top-level execution environment.
Methods that are defined outside of any class (like these examples) are included in the top-level execution environment. Like we saw back in Chapter 1, you can call them anywhere in your code, without using the dot operator to specify a receiver.
Method names
The method name can be one or more lowercase words, separated by underscores. (This is just like the convention for variable names.) Numbers are legal, but rarely used.
It’s also legal for a method name to end in a question mark (?) or exclamation point (!). These endings have no special meaning to Ruby. But by convention, methods that return a Boolean (true/false) value are given names that end in ?, and methods that have potentially surprising side effects are given names that end in !.
Lastly, it’s legal for a method name to end in an equals sign (=). Methods ending in this character are used as attribute writers, which we’ll be looking at in the upcoming section on classes. Ruby does treat this ending specially, so don’t use it for a regular method, or you may find it acts strangely!
Conventional Wisdom
Method names should be in “snake case”: one or more lowercase words, separated by underscores, just like variable names.
def bark
end

def wag_tail
end
As with method calls, you should leave parentheses off the method definition if there are no parameters. Please don’t do this, even though it’s legal:
def no_args()
  puts "Bad Rubyist!"
end
But if there are parameters, you should always include parentheses. (Back in Chapter 1, we saw some tasteful exceptions when we were making method calls, but there are no exceptions when we’re declaring methods.) Leaving them off is legal, but again, don’t do it:
def with_args first, second
  puts "No! Bad!"
end
Parameters
If you need to pass data into your method, you can include one or more parameters after the method name, separated by commas. In your method body, parameters can be accessed just like any variable.
def print_area(length, width)
  puts length * width
end
Optional parameters
Got-A-Motor’s developers are happy with our work on the virtual test-drive system...mostly.
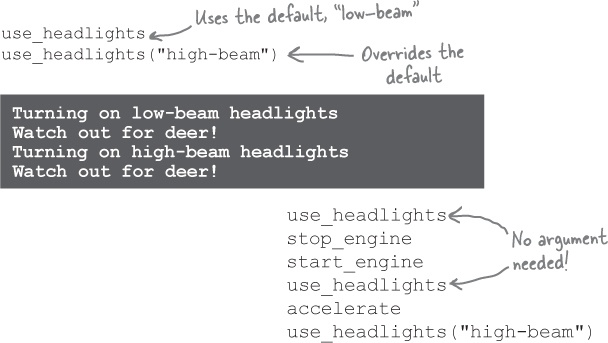
use_headlights("low-beam")
stop_engine
buy_coffee
start_engine
use_headlights("low-beam")
accelerate
create_obstacle("deer")
use_headlights("high-beam")
This scenario is pretty common—you use one particular argument 90% of the time, and you’re tired of repeating it everywhere. But you can’t just take the parameter out, because 10% of the time you need a different value.
There’s an easy solution, though: make the parameter optional. You can provide a default value in the method declaration.
Here’s an example of a method that uses default values for some of its parameters:
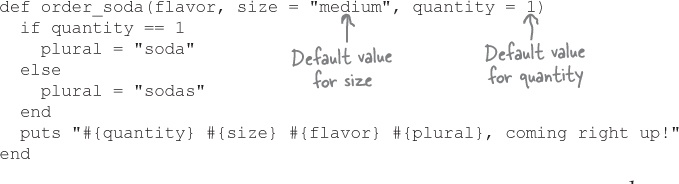
Now, if you want to override the default, just provide an argument with the value you want. And if you’re happy with the default, you can skip the argument altogether.
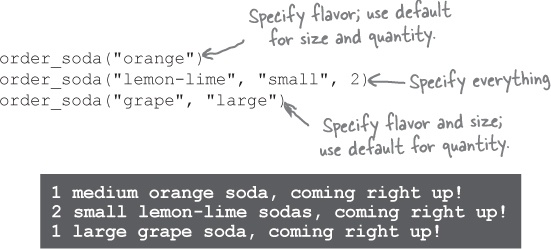
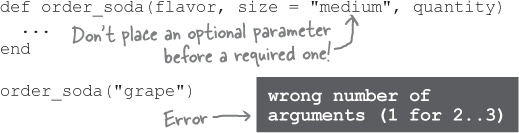
There is one requirement to be aware of with optional parameters: they need to appear after any other parameters you intend to use. If you make a required parameter following an optional parameter, you won’t be able to leave the optional parameter off:
Let’s make that use_headlights parameter optional, to earn some goodwill with the developers using our methods.
def use_headlights(brightness = "low-beam")
  puts "Turning on #{brightness} headlights"
  puts "Watch out for deer!"
end
Now, they won’t have to specify the brightness, unless they want the high beams.

We’ve finished up our methods for Got-A-Motor’s virtual test-drive app. Let’s try loading them up in irb, and take them for a spin.
Step One: | Save our method definitions to a file, named vehicle_methods.rb. |
Step Two: | Open a terminal window and navigate into the directory where you saved your file. |
Now, you can type in a call to any of our methods, and they’ll be run!
Return values
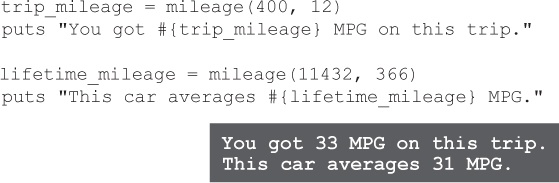
Got-A-Motor wants the test-drive app to highlight how fuel-efficient their cars are. They want to be able to display the mileage a car got on its most recent trip, as well as lifetime average mileage.
In the first scenario, you’re dividing the mileage from the car’s trip odometer by the number of gallons from your last fill-up, and in the second you’re dividing the main odometer’s value by the car’s lifetime fuel use. But in both cases, you’re taking a number of miles and dividing it by a number of gallons of fuel. So do you still have to write two methods?
Nope! As in most languages, Ruby methods have a return value, a value that they send back to the code that called them. A Ruby method can return a value to its caller using the return keyword.
Methods return a value to the code that called them.
You can write a single mileage method and use its return value in your output.
def mileage(miles_driven, gas_used)
  return miles_driven / gas_used
end
Then, you can use the same method to calculate both types of mileage.
Conventional Wisdom
Rubyists generally prefer implicit return values over explicit return values. With a short method, there’s no reason to write this:
def area(length, width)
  return length * width
end
...when you can just write this:
def area(length, width)
  length * width
end
Implicit return values
You don’t actually need the return keyword in the above method. The value of the last expression evaluated within a method automatically becomes that method’s return value. So our mileage method could be rewritten without an explicit return:
def mileage(miles_driven, gas_used)
  miles_driven / gas_used end
puts mileage(400, 12)
It will still work in exactly the same way.
Returning from a method early
There are still some circumstances where the return keyword is useful.
The return keyword causes the method to exit, without running the lines of code that follow it. This is useful in situations where running that code would be pointless, or even harmful.
For example, consider the case where a car is brand-new and hasn’t been driven anywhere yet. The miles driven and the gas used would both be zero. What happens if you call the mileage method for such a car?
Well, mileage works by dividing miles_driven by gas_used... And, as you may have learned in your other programming language, dividing anything by zero is an error!

We can fix this by testing whether gas_used is zero, and if so, returning from the method early.
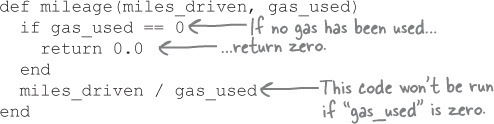
If we try the same code again, we’ll see that it returns 0.0, without attempting the division operation. Problem solved!
Methods are a great way to reduce duplication, and keep your code organized. But sometimes methods by themselves aren’t enough. Let’s leave our friends at Got-A-Motor for now, to look at a somewhat fuzzier problem...
Some messy methods
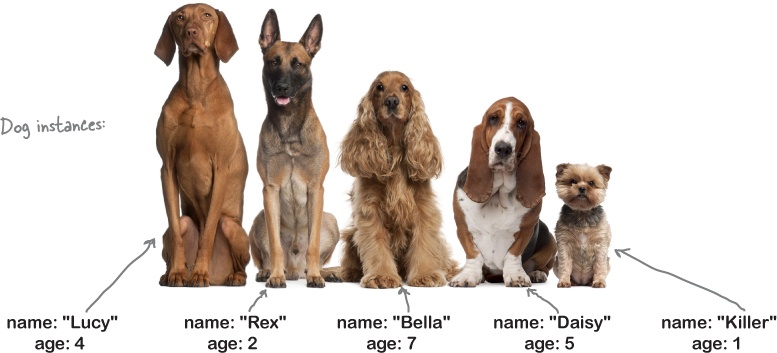
The folks at Fuzzy Friends Animal Rescue are in the middle of a fundraising drive, and are creating an interactive storybook application to raise awareness. They’ve approached your company for help. They need many different types of animals, each of which has its own sounds and actions.
They’ve created some methods that simulate movement and animal noises. They call these methods by specifying the animal type as the first argument, followed by any additional arguments that are needed.
Here’s what they have so far:
And here are some typical calls to those methods:

Fuzzy Friends just needs you to add 10 more animal types and 30 more actions, and version 1.0 will be done!
Too many arguments
Part of the problem with the virtual storybook methods is that we’re having to pass around too much data. Look at these calls to the move method, for example:
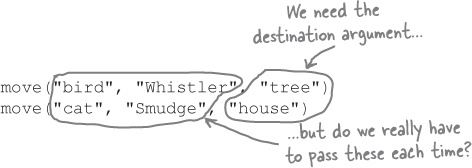
The destination argument belongs there, sure. It doesn’t make sense to move without a destination. But do we really have to keep track of values for the animal_type and name arguments, so that we can include them each time? It’s also becoming hard to tell which argument is which!
Too many “if” statements
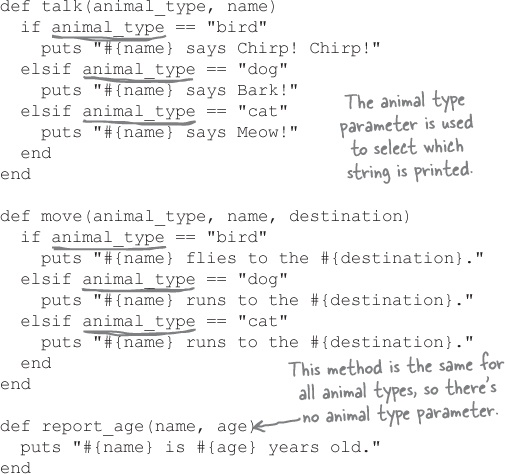
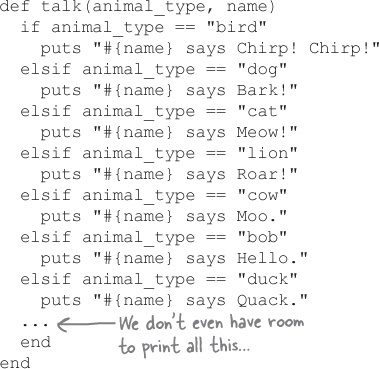
The problem isn’t just with the method arguments, either—things are messy inside the methods. Consider what the talk method would look like if we added 10 more animal types, for example...
Each time you want to change the sound an animal makes (and you will be asked to change the sounds; you can count on it), you’ll have to search through all those elsif clauses to find the right animal type... What happens when the code for talk becomes more complex, adding things like animations and sound file playback? What happens when all of the action methods are like that?
What we need is a better way to represent which animal type we’re working with. We need a better way to break all that code up by animal type, so that we can maintain it more easily. And we need a better way to store the attributes for each individual animal, like their name and their age, so we don’t have to pass so many arguments around.
We need to keep the animals’ data, and the code that operates on that data, in one place. We need classes and objects.
Designing a class
The benefit of using objects is that they keep a set of data, and the methods that operate on that data, in one place. We want those benefits in the Fuzzy Friends app.
To start creating your own objects, though, you’re going to need classes. A class is a blueprint for making objects. When you use a class to make an object, the class describes what that object knows about itself, as well as what that object does.
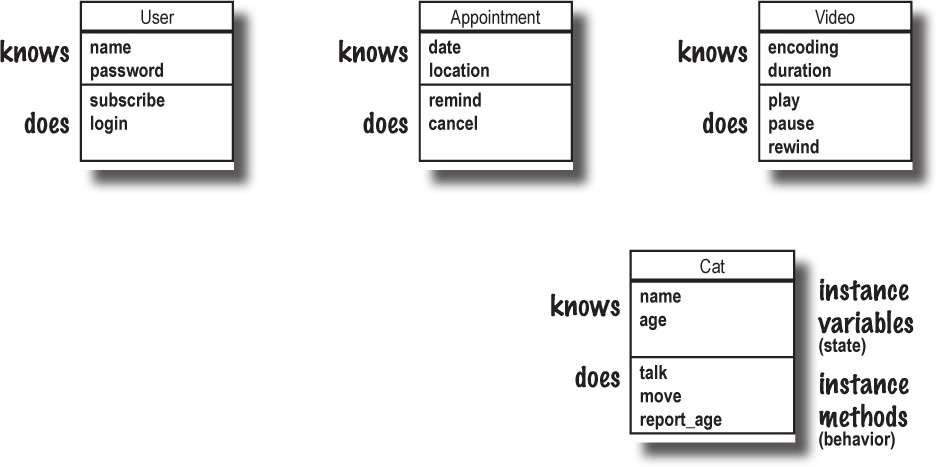
Things an object knows about itself are called: instance variables
Things an object does are called: instance methods
An instance of a class is an object that was made using that class. You only have to write one class, but you can make many instances of that class.
Think of “instance” as another way of saying “object.”
Instance variables are variables that belong to one object. They comprise everything the object knows about itself. They represent the object’s state (its data), and they can have different values for each instance of the class.
Instance methods are methods that you can call directly on that object. They comprise what the object does. They have access to the object’s instance variables, and can use them to change their behavior based on the values in those variables.
What’s the difference between a class and an object?
A class is a blueprint for an object. The class tells Ruby how to make an object of that particular type. Objects have instance variables and instance methods, but those variables and methods are designed as part of the class.
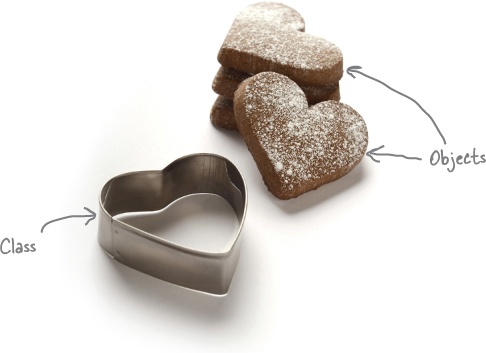
If classes are cookie cutters, objects are the cookies they make.
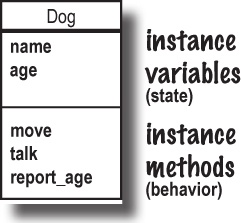
Each instance of a class can have its own values for the instance variables used within that class’s methods. For example, you’ll define the Dog class only once. Within that Dog class’s methods, you’ll specify only once that Dog instances should have name and age instance variables. But each Dog object will have its own name and age, distinct from all the other Dog instances.
Your first class
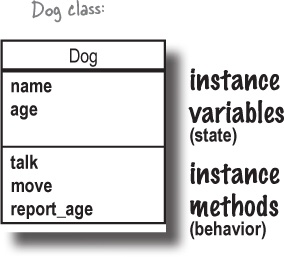
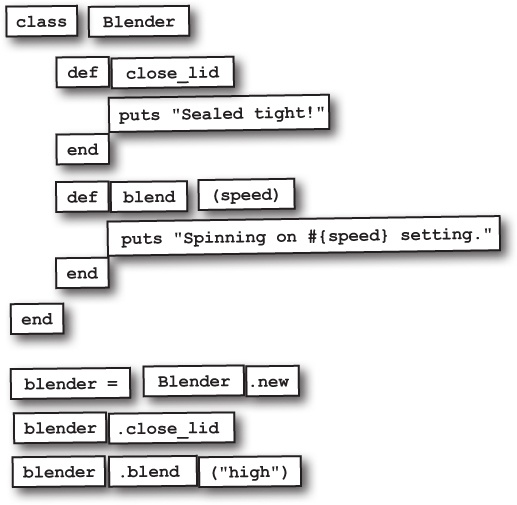
Here’s an example of a class we could use in our interactive storybook: a Dog class.
We use the class keyword to start a new class definition, followed by the name of our new class.
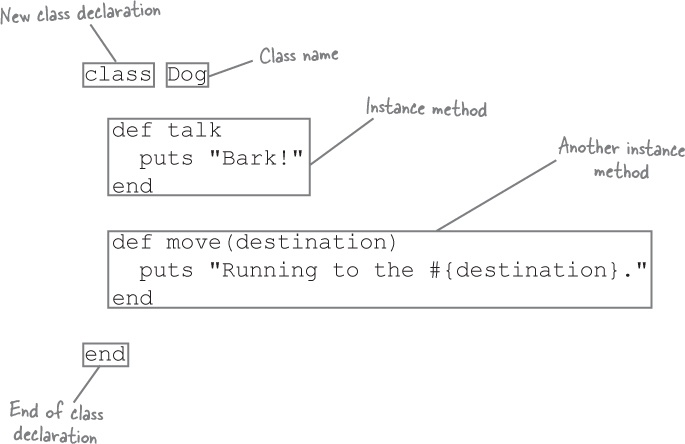
Within the class definition, we can include method definitions. Any method we define here will be available as an instance method on instances of the class.
We mark the end of the class definition with the end keyword.
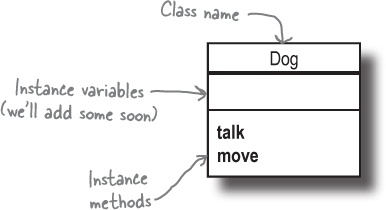
A diagram of this class might look like this...
Creating new instances (objects)
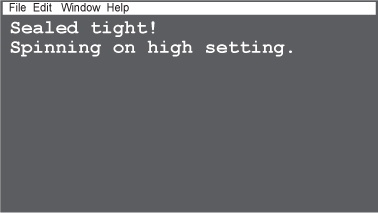
If we call the new method on a class, it will return a new instance of that class. We can then assign that instance to a variable, or do whatever else we need to do with it.
fido = Dog.new
rex = Dog.new
Once we have one or more instances of the class, we can call their instance methods. We do it in the same way we’ve called all other methods on objects so far: we use the dot operator to specify which instance is the method’s receiver.

Breaking up our giant methods into classes
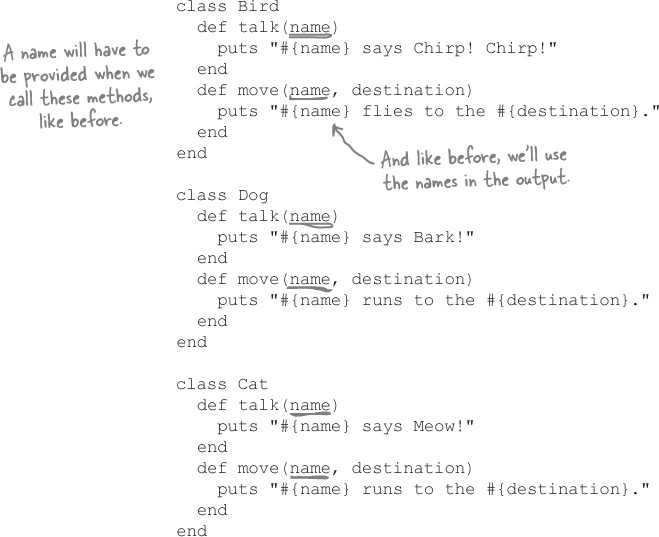
The animal rescue’s solution uses strings to track what type of animal they’re dealing with. Also, all knowledge of the different ways that different animals should respond is embedded in giant if/else statements. Their approach is unwieldy, at best.
def talk(animal_type, name)
  if animal_type == "bird"
    puts "#{name} says Chirp! Chirp!"
  elsif animal_type == "dog"
    puts "#{name} says Bark!"
  elsif animal_type == "cat"
    puts "#{name} says Meow!"
  end
end
The object-oriented approach
Now that you know how to create classes, we can take an object-oriented approach to the problem. We can create a class to represent each type of animal. Then, instead of one big method that contains behavior for all the animal types, we can put little methods in each class, methods that define behavior specific to that type of animal.

Conventional Wisdom
Ruby class names must begin with a capital letter. Letters after the first should be lowercase.
class Appointment
  ...
end
If there’s more than one word in the name, the first letter of each word should also be capitalized.
class AddressBook
  ...
end
class PhoneNumber
  ...
end
Remember how the convention for variable names (with underscores separating words) is called “snake case”? The style for class names is called “camel case,” because the capital letters look like the humps on a camel.
Creating instances of our new animal classes
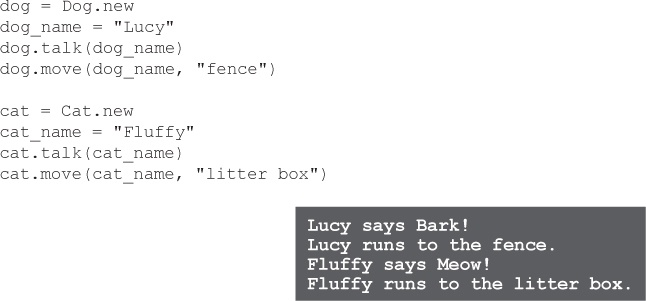
With these classes defined, we can create new instances of them (new objects based on the classes) and call methods on them.
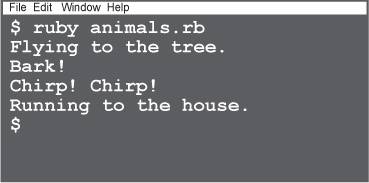
Just as with methods, Ruby lets us create instances of classes right in the same file where we declared them. You probably won’t want to organize your code this way in larger applications, but since this is such a simple app right now, we can go ahead and create some new instances right below the class declarations.
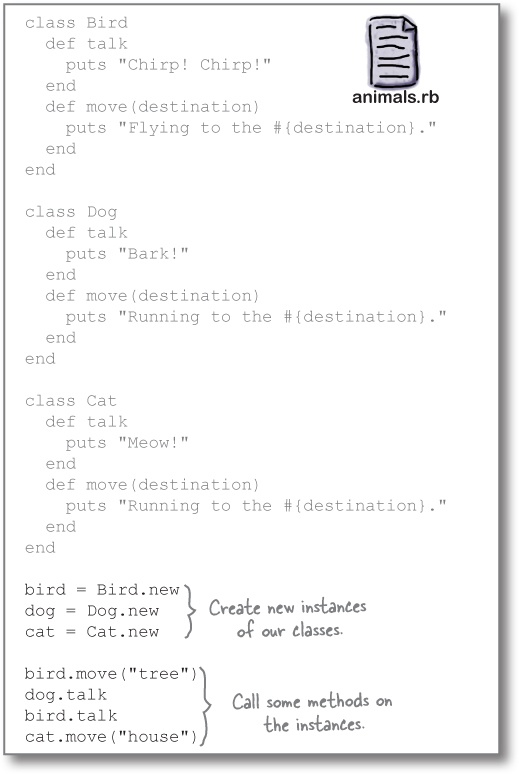
If we save all this to a file named animals.rb, then run ruby animals.rb from a terminal, we’ll see the output of our instance methods!
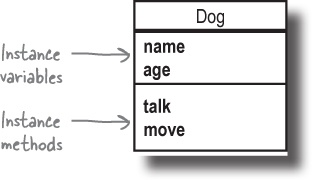
Updating our class diagram with instance methods
If we were to draw a diagram of our new classes, they’d look something like this:
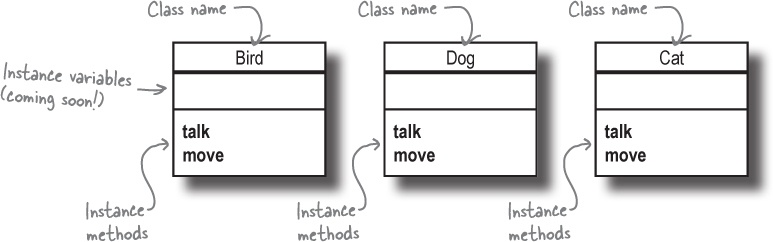
At this point, instances of our classes have two instance methods (things they can do): talk and move. They don’t yet have any instance variables (things they know), however. We’ll be looking at that next.
Our objects don’t “know” their names or ages!
The animal rescue’s lead developer points out a couple of details we forgot to address with our class-based solution:


She has a point; we’re missing a couple of features from the original program.
Let’s start by readding the name parameter to the talk and move methods:
Too many arguments (again)
Now that we’ve readded the name parameter to the talk and move methods, we can once again pass in the animal’s name to be printed.
dog = Dog.new
dog_name = "Lucy"
cat = Cat.new
cat_name = "Fluffy"
Actually, we can do better. We can use instance variables to store data inside the object.
One of the key benefits of object-oriented programming is that it keeps data, and the methods that operate on that data, in the same place. Let’s try storing the names in the animal objects so that we don’t have to pass so many arguments to our instance methods.
Local variables live until the method ends
So far, we’ve been working with local variables—variables that are local to the current scope (usually the current method). When the current scope ends, local variables cease to exist, so they won’t work for storing our animals’ names, as you’ll see below.
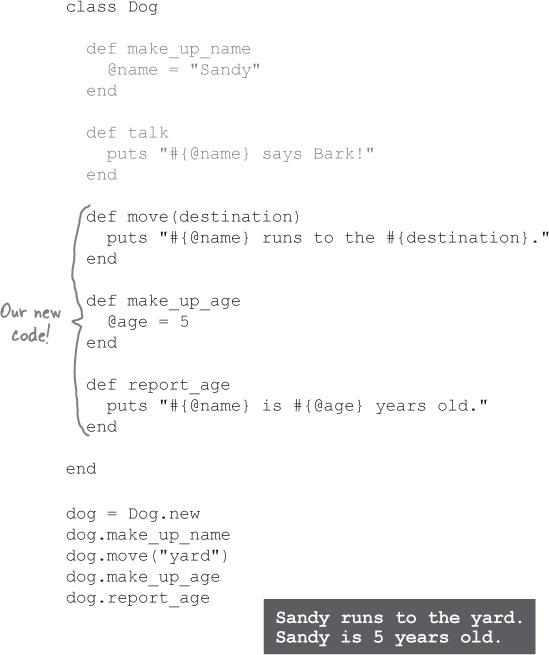
Here’s a new version of the Dog class with an additional method, make_up_name. When we call make_up_name, it stores a name for the dog, for later access by the talk method.
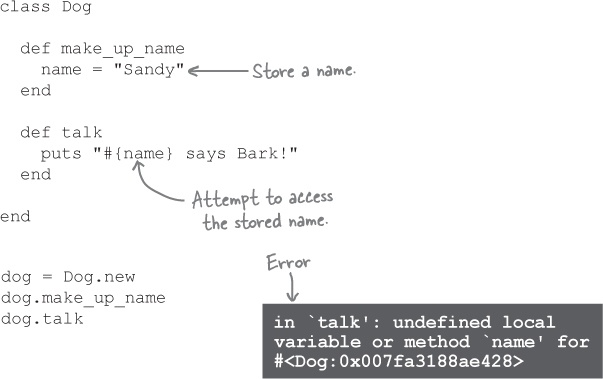
The moment we call the talk method, however, we get an error, saying the name variable doesn’t exist:
What happened? We did define a name variable, back in the make_up_name method!
The problem, though, is that we used a local variable. Local variables live only as long as the method in which they were created. In this case, the name variable ceases to exist as soon as make_up_name ends.
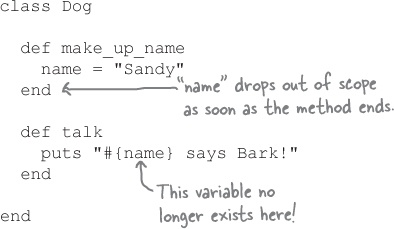
Trust us, the short life of local variables is a good thing. If any variable was accessible anywhere in your program, you’d be accidentally referencing the wrong variables all the time! Like most languages, Ruby limits the scope of variables in order to prevent this sort of mistake.

Instance variables live as long as the instance does
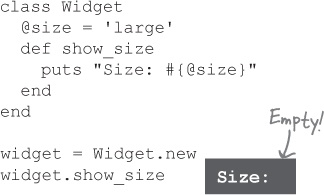
Any local variable we create disappears as soon as its scope ends. If that’s true, though, how can we store a Dog’s name together with the object? We’re going to need a new kind of variable.
An object can store data in instance variables: variables that are tied to a particular object instance. Data written to an object’s instance variables stays with that object, getting removed from memory only when the object is removed.
An object’s instance variables are kept around as long as the object is.
An instance variable looks just like a regular variable, and follows all the same naming conventions. The only difference in syntax is that its name begins with an “at” symbol (@).

Here’s that Dog class again. It’s identical to the previous one, except that we added two little @ symbols to convert the two local variables to one instance variable.
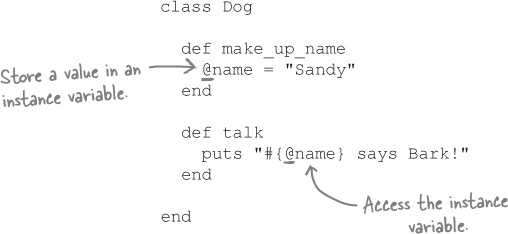
Now, we can make the exact same call to talk that we did before, and the code will work! The @name instance variable that we create in the make_up_name method is still accessible in the talk method.

With instance variables at our disposal, it’s easy to add the move and report_age methods back in as well...
And now that we have instance variables, we can finally fill in that hole in the class diagram for Dog!

That’s true. Up next, we’ll discuss a way to set a dog’s name and age to other values.
Encapsulation
Thanks to instance variables, we now have a way to store names and ages for our animals. But our make_up_name and make_up_age methods only allow us to use hardcoded values (we can’t change them when the program’s running). We need a way for our program to set any values we want.
class Dog

  def make_up_name
    @name = "Sandy"
  end

  def make_up_age
    @age = 5
  end
...
end
Code like this won’t work, though:

Ruby never allows us to access instance variables directly from outside our class. This isn’t due to some authoritarian agenda; it’s to keep other programs and classes from modifying your instance variables willy-nilly.
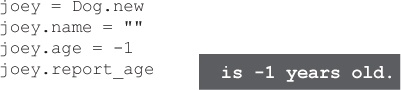
Let’s suppose that you could update instance variables directly. What’s to prevent other portions of the program from setting the variables to invalid values?

Who is how old? This object’s data is clearly invalid, and the user can see it in the program output!
Blank names and negative ages are just the start. Imagine someone accidentally replacing the value in an Appointment object’s @date instance variable with a phone number. Or setting the @sales_tax on all their Invoice objects to zero. All kinds of things could go wrong!
To help avoid exposing an object’s data to malicious (or clumsy) users, most object-oriented languages encourage the concept of encapsulation: preventing other parts of the program from directly accessing or changing an object’s instance variables.
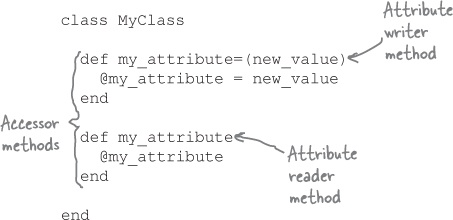
Attribute accessor methods
To encourage encapsulation and protect your instances from invalid data, Ruby doesn’t allow you to access or change instance variables from outside the class. Instead, you can create accessor methods, which will write values to the instance variables and read them back out again for you. Once you’re accessing your data through accessor methods, it’s easy to extend those methods to validate your data—to reject any bad values that get passed in.
Ruby has two kinds of accessor methods: attribute writers and attribute readers. (An attribute is another name for a piece of data regarding an object.) Attribute writer methods set an instance variable, and attribute reader methods get the value of an instance variable back.
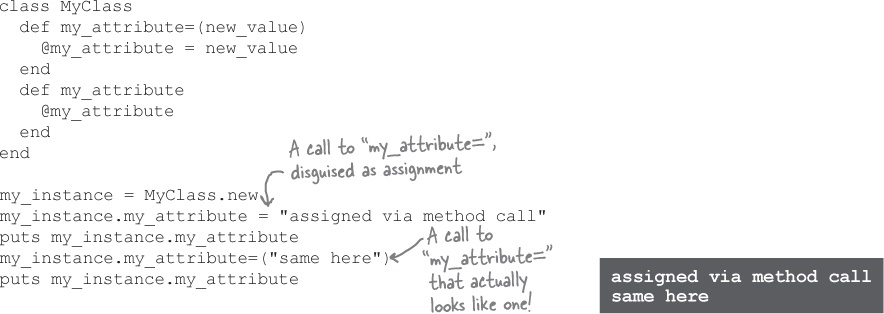
Here’s a simple class with writer and reader methods for an attribute named my_attribute:
If we create a new instance of the above class... |
|
...we can set the attribute like this... |
|
...and read the attribute like this. |
|
Accessor methods are just ordinary instance methods; we only refer to them as “accessor methods” because their primary purpose is to access an instance variable.
Look at the attribute reader method, for example; it’s a perfectly ordinary method that simply returns the current value of @my_attribute.

Like attribute reader methods, an attribute writer method is a perfectly ordinary instance method. We just call it an “attribute writer” method because the primary thing it does is to update an instance variable.
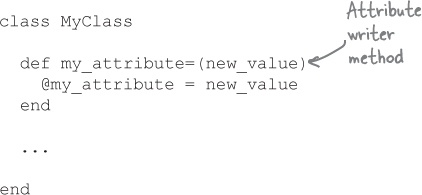
It may be a perfectly ordinary method, but calls to it are treated somewhat specially.
Remember that earlier in the chapter, we said that Ruby method names could end in = (an equals sign)? Ruby allows that equals-sign ending so that it can be used in the names of attribute writer methods.

When Ruby sees something like this in your code:
my_instance.my_attribute = "a value"
...it translates that into a call to the my_attribute= instance method. The value to the right of the = is passed as an argument to the method:

The above code is valid Ruby, and you can try it yourself if you like:
Using accessor methods
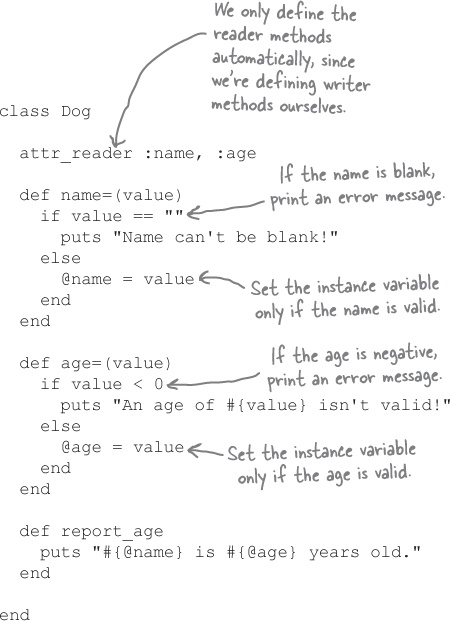
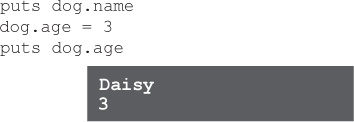
Now we’re ready to use what we’ve learned in the Fuzzy Friends application. As a first step, let’s update the Dog class with methods that will let us read and write @name and @age instance variables. We’ll also use @name and @age in the report_age method. We’ll look at adding data validation later.
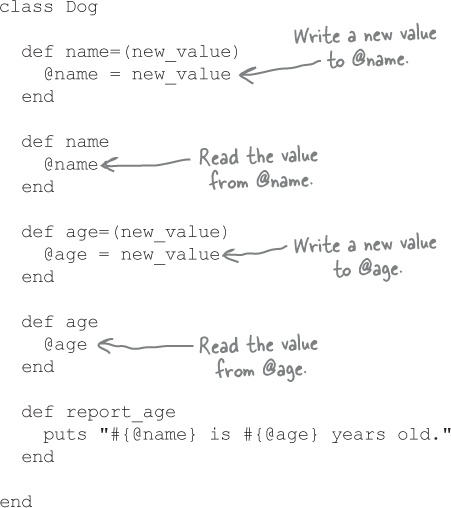
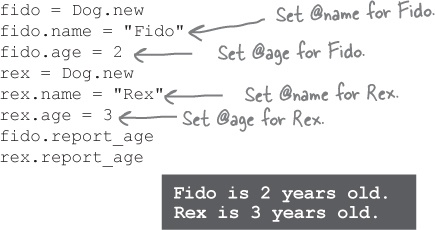
With accessor methods in place, we can (indirectly) set and use the @name and @age instance variables from outside the Dog class!
Conventional Wisdom
The name of an attribute reader method should usually match the name of the instance variable it reads from (without the @ symbol, of course).
def tail_length
  @tail_length
end
The same is true for attribute writer methods, but you should add an = symbol on to the end of the name.
def tail_length=(value)
  @tail_length = value
end
Writing a reader and writer method by hand for each attribute can get tedious, though. Next, we’ll look at an easier way...
Attribute writers and readers
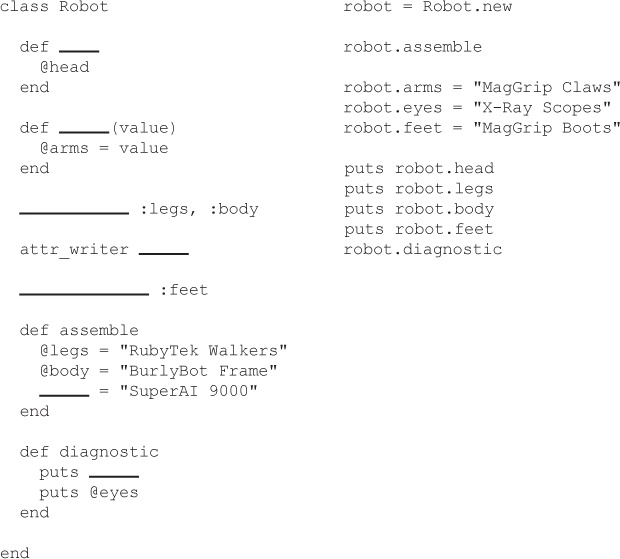
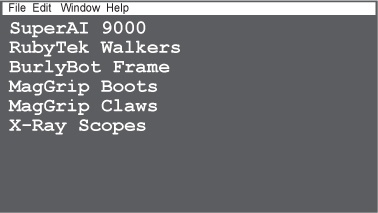
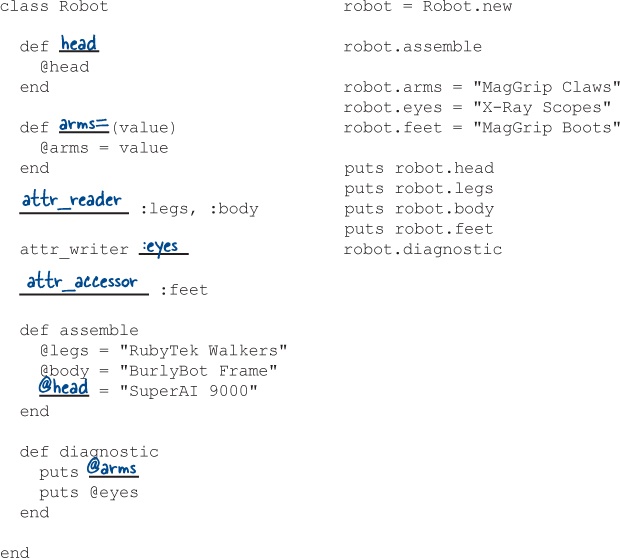
Creating this pair of accessor methods for an attribute is so common that Ruby offers us shortcuts—methods named attr_writer, attr_reader, and attr_accessor. Calling these three methods within your class definition will automatically define new accessor methods for you:
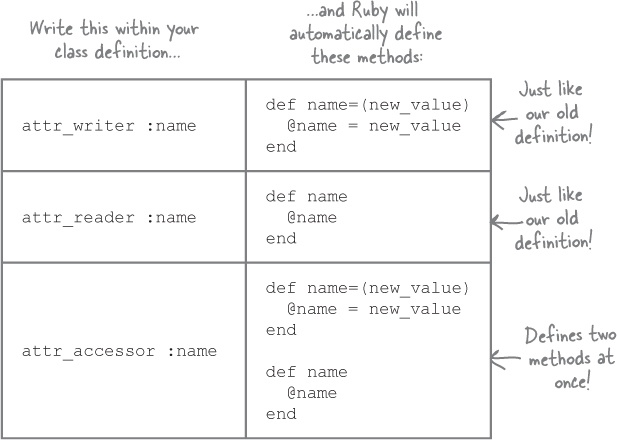
All three of these methods can take multiple arguments, specifying multiple attributes that you want to define accessors for.

Symbols
In case you’re wondering, those :name and :age things are symbols. A Ruby symbol is a series of characters, like a string. Unlike a string, though, a symbol’s value can’t be changed later. That makes symbols perfect for use inside Ruby programs, to refer to anything whose name doesn’t (usually) change, like a method. For example, if you call the method named methods on an object in irb, you’ll see that it returns a list of symbols.
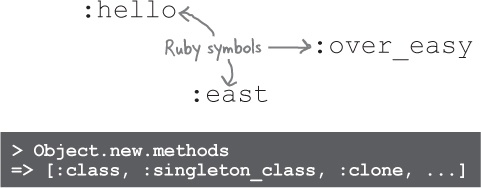
A symbol reference in Ruby code always begins with a colon (:). A symbol should be in all lowercase, with words separated by underscores, just like a variable name.
Attribute writers and readers in action
The Dog class currently devotes 12 lines of code to accessor methods. With the attr_accessor method, we can shrink that down to 1 line!
It will let us reduce our Dog class’s size...
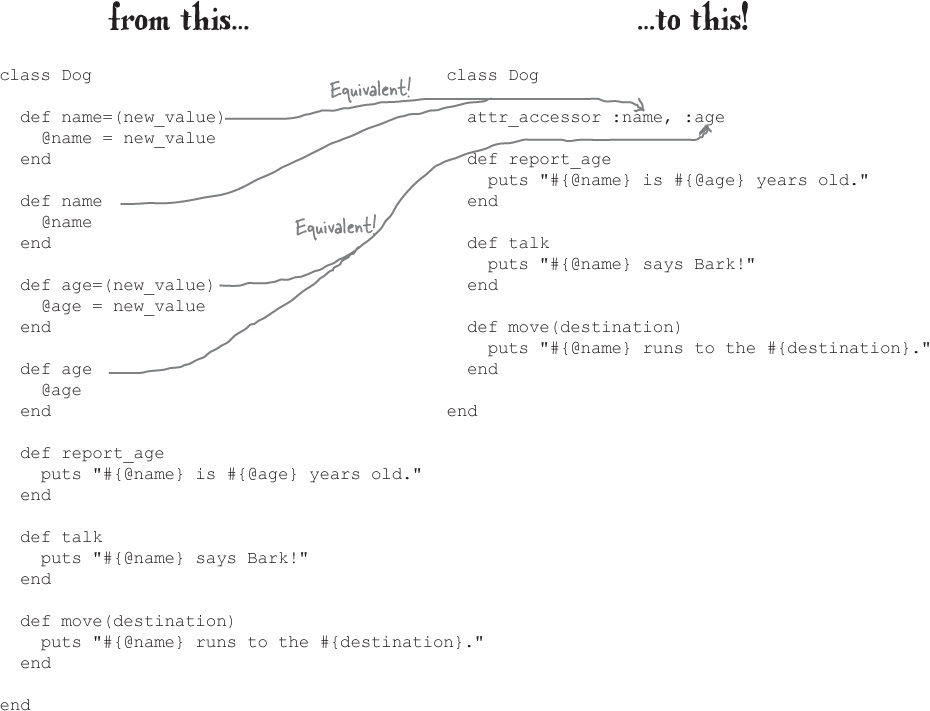
How’s that for efficiency? It’s a lot easier to read, too!
Let’s not forget why we’re writing accessor methods in the first place, though. We need to protect our instance variables from invalid data. Right now, these methods don’t do that... We’ll see how to fix this in a few pages!
We haven’t really gotten to play around with classes and objects much yet. Let’s try another irb session. We’ll load up a simple class so we can create some instances of it interactively.
Step One:
Save this class definition to a file, named mage.rb.

Step Two:
In a terminal window, navigate into the directory where you saved your file.
Step Three:
We want to be able to load Ruby files from the current directory, so as in the previous exercise, type the following to launch irb:
irb -I .
Step Four:
As before, we need to load the file with our saved Ruby code. Type this line:
require "mage"
With our Mage class’s code loaded, you can try creating as many instances as you like, set their attributes, and have them cast spells at each other! Try the following for starters:
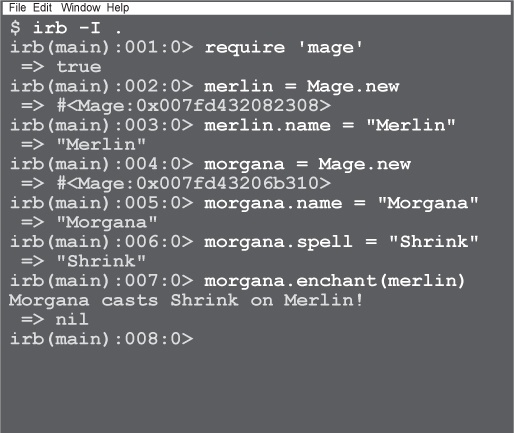
merlin = Mage.new
merlin.name = "Merlin"
morgana = Mage.new
morgana.name = "Morgana"
morgana.spell = "Shrink"
morgana.enchant(merlin)

A bunch of Ruby concepts, in full costume, are playing a party game, Who am I? They’ll give you a clue—you try to guess who they are based on what they say. Assume they always tell the truth about themselves. Fill in the blanks to the right to identify the attendees. (We’ve done the first one for you.)
Tonight’s attendees: Any of the terms related to storing data within an object just might show up!
Name | |
I stay within an object instance and store data about that object. | instance variable |
I’m another name for a piece of data about an object. I get stored in an instance variable. | _______________ |
I store data within a method. As soon as the method returns, I disappear. | _______________ |
I’m a kind of instance method. My main purpose is to read or write an instance variable. | _______________ |
I’m used in Ruby programs to refer to things whose names don’t change (like methods). | _______________ |
I stay within an object instance and store data about that object. | instance variable |
I’m another name for a piece of data about an object. I get stored in an instance variable. | attribute |
I store data within a method. As soon as the method returns, I disappear. | local variable |
I’m a kind of instance method. My main purpose is to read or write an instance variable. | accessor method |
I’m used in Ruby programs to refer to things whose names don’t change (like methods). | symbol |
Your job is to take code snippets from the pool and place them into the blank lines in the code. Don’t use the same snippet more than once, and you won’t need to use all the snippets. Your goal is to make code that will run and produce the output shown.
Output
Note: each thing from the pool can only be used once!


Ensuring data is valid with accessors
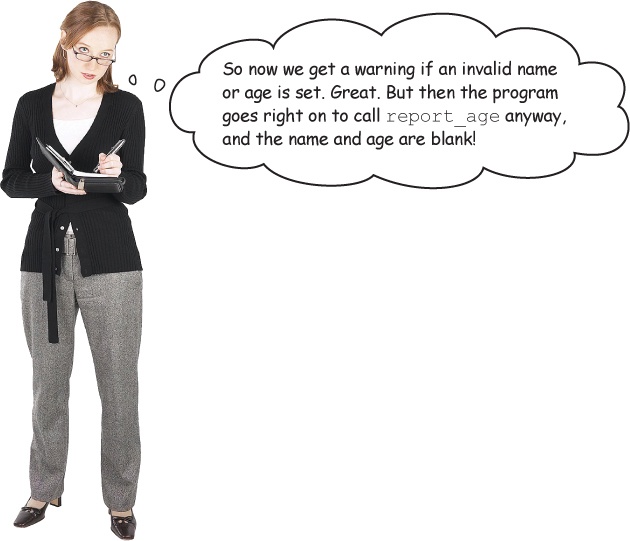
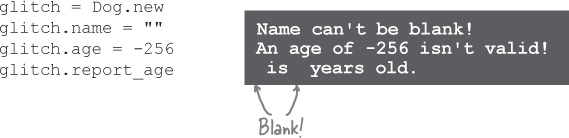
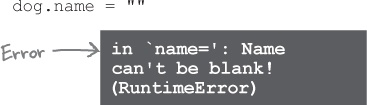
Remember our scenario from a nightmare world where Ruby let programs access instance variables directly, and someone gave your Dog instances blank names and negative ages? Bad news: now that you’ve added attribute writer methods to your Dog class, someone actually could!
Don’t panic! Those same writer methods are going to help us prevent this from happening in the future. We’re going to add some simple data validation to the methods, which will give an error any time an invalid value is passed in.
Since name= and age= are just ordinary Ruby methods, adding the validation is really easy; we’ll use ordinary if statements to look for an empty string (for name=) or a negative number (for age=). If we encounter an invalid value, we’ll print an error message. Only if the value is valid will we actually set the @name or @age instance variables.
Errors—the “emergency stop” button
Instead of just printing a message, we need to deal with invalid parameters in the name= and age= accessor methods in a more meaningful way. Let’s change the validation code in our name= and age= methods to use Ruby’s built-in raise method to report any errors.
raise "Something bad happened!"
That’s raise as in “raise an issue.” Your program is bringing a problem to your attention.
You call raise with a string describing what’s wrong. When Ruby encounters the call, it stops what it’s doing and prints your error message. Since this program doesn’t do anything to handle the error, it will exit immediately.
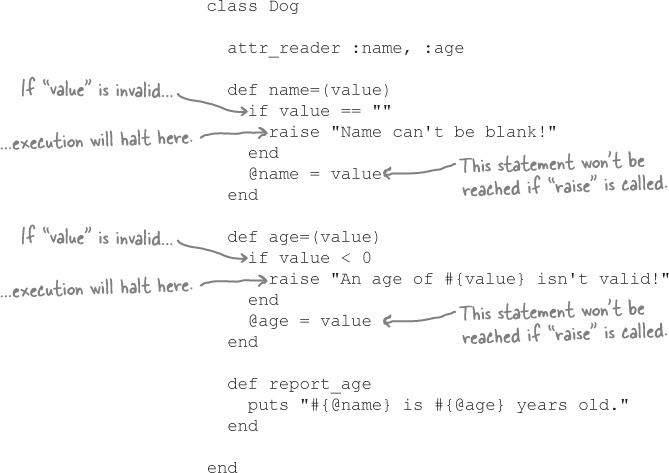
Using “raise” in our attribute writer methods
Here’s our updated code for the Dog class...
Now that we’re using raise in both of our writer methods, we don’t need to use an else clause on the if statements. If the new value is invalid and the raise statement is executed, the program will halt. The statement that assigns to the instance variable will never be reached.
Now, if a blank name is passed in to name=, Ruby will report an error, and the entire program will exit.
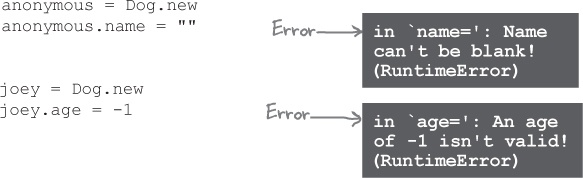
You’ll get another error message if someone tries to set the age to a number less than zero.
In Chapter 12, we’ll see that errors can also be handled by other parts of your program, so that it can continue running. But for now, naughty developers that try to give your Dog instance a blank name or a negative age will know immediately that they have to rewrite their code.
Our complete Dog class
Here’s a file with our complete Dog class, plus some code to create a Dog instance.
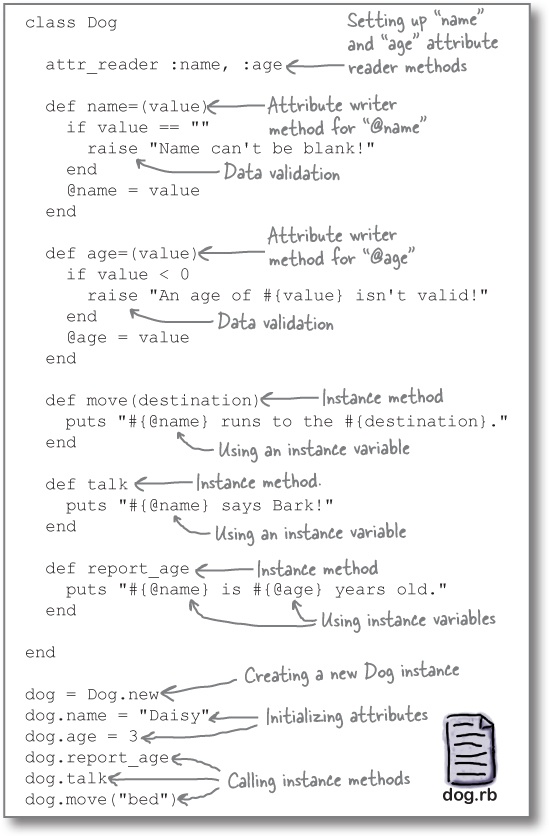
We have instance methods that act as attribute accessors, letting us get and set the contents of our instance variables.
We have instance methods that let our dog object do things, like move, make noise, and report its age. The instance methods can make use of the data in the object’s instance variables.
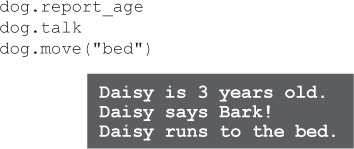
And we’ve set up our attribute writer methods to validate the data passed to them, raising an error if the values are invalid.
Up Next...
You’ve created a complete Dog class. Now we just need to add all the same features to the Cat and Bird classes!
Not excited by the prospect of duplicating all that code? Don’t worry! The next chapter is all about inheritance, which will make the task easy!