
Chapter 15. Saving and Loading Data: Keep It Around
Your web app is just throwing users’ data away. You’ve set up a form for users to enter data into. They’re expecting that you’ll save it, so that it can be retrieved and displayed to others later. But that’s not happening right now! Anything they submit just disappears.
In this, our final chapter, we’ll prepare your app to save user submissions. We’ll show you how to set it up to accept form data. We’ll show you how to convert that data to Ruby objects, how to save those objects to a file, and how to retrieve the right object again when a user wants to see it. Are you ready? Let’s finish this app!
Saving and retrieving form data
In the last chapter, we learned how to use the Sinatra library to respond to HTTP GET requests from a browser. We built a Movie class and embedded movie data into an HTML page.
We even learned how to serve an HTML form so that users can enter new movie data.
But that’s as far as HTTP GET requests can take us. We have no way to submit that form back to the server. And we wouldn’t know how to save the form data if we got it.
In this chapter, we’re going to fix all that! We’ll learn how to take the user’s form data and convert it to Ruby objects for easy storage. We’ll also learn how to save those objects to a file and then retrieve them for display later. This chapter is going to bring your movie data full-circle!
Setup
Handling requests
Set up a route to get the list of movies. | |
Create our first HTML page. | |
Set up Sinatra to respond with the HTML. |
Displaying objects with HTML
Saving and loading objects
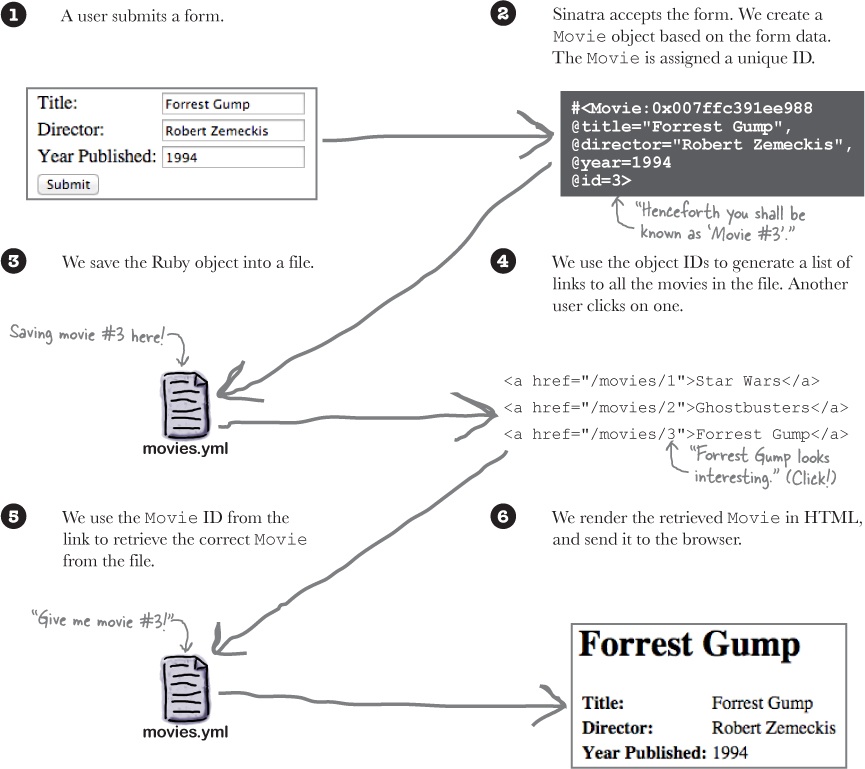
Our users will be entering movie data into a form. We need a sensible format in which to store the data so that we can retrieve it later and display it. So we’re going to convert the form data to Movie objects and assign each Movie a unique ID. Then, we’ll save the Movie to a file.
Later, we’ll be able to go through the file and create a set of links containing all the Movie IDs. When a user clicks a link, we’ll get the ID from the link they clicked and retrieve the appropriate Movie.
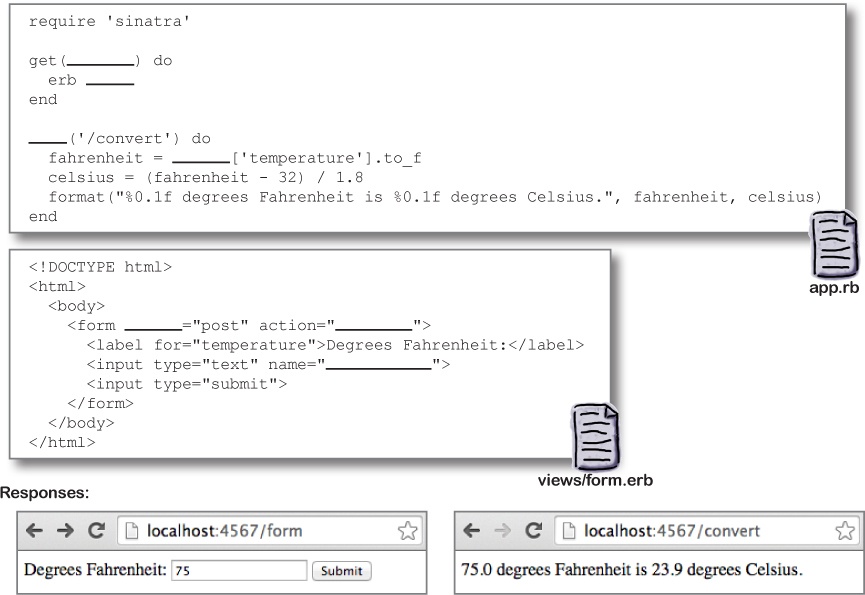
Our browser can GET the form...
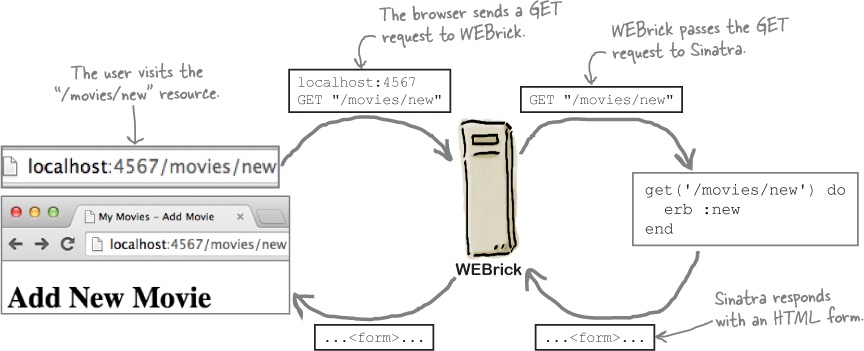
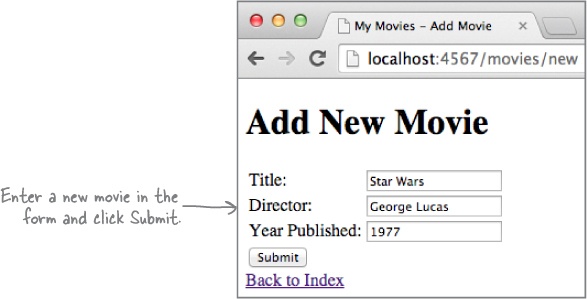
When we left off last chapter, we had just added a form to our Sinatra app for movie data. The browser can submit a GET request for the '/movies/new' path, and Sinatra will respond with an HTML form. But nothing happens when the user clicks Submit!

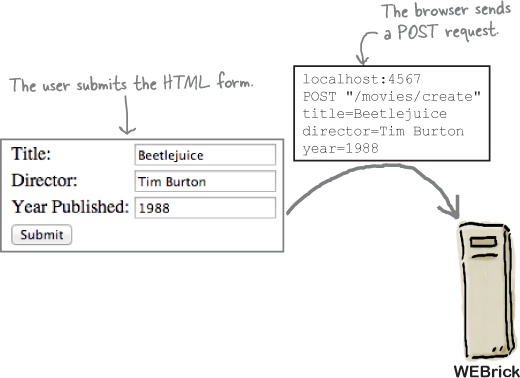
Here’s the problem: submitting an HTML form actually requires two requests to the server: one to get the form, and a second to send the user’s entries back to the server.
We’re already set up to handle the GET request for the form:
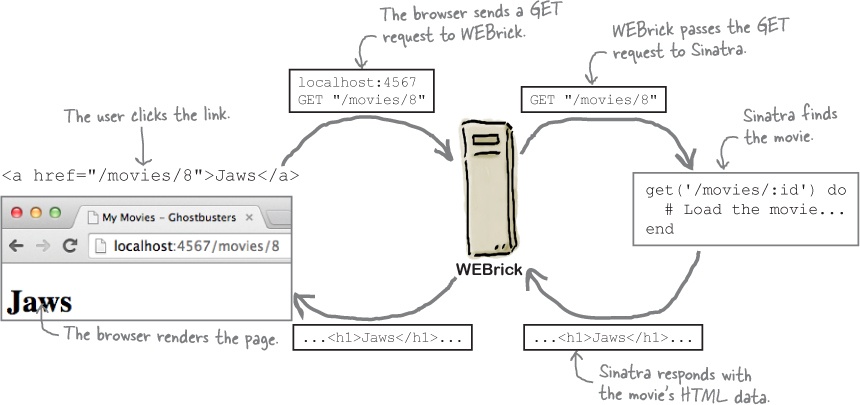
A user visits the
'/movies/new'resource by typing a URL or clicking a link.The browser sends an HTTP GET request for the
'/movies/new'resource to the server (WEBrick).The server forwards the GET request to Sinatra.
Sinatra invokes the block for its
get('/movies/new')route.The block responds with the form’s HTML.
... But it needs to POST the response
Now we need to set up Sinatra to handle an HTTP POST request, to process the form contents. Whereas GET requests get data from the server, POST requests add data to the server. (Why’s it called “POST”? When you want to make a message available for others to read, you post it somewhere—same idea.)
The whole process goes like this:
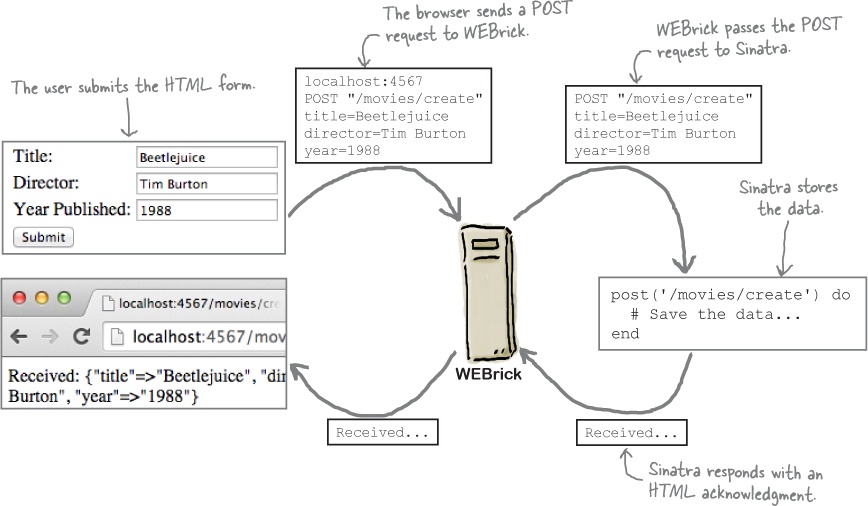
The user fills in the form with a movie’s data and clicks Submit.
The browser sends an HTTP POST request for the
'/movies/create'resource to the server (WEBrick). The request includes all the form data.The server forwards the POST request to Sinatra.
Sinatra invokes the block for its
post('/movies/create')route.The block gets the form data from the request and stores it.
The block responds with some HTML that indicates the data was received successfully.
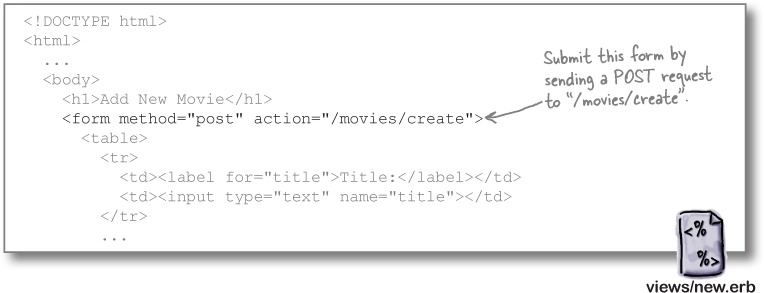
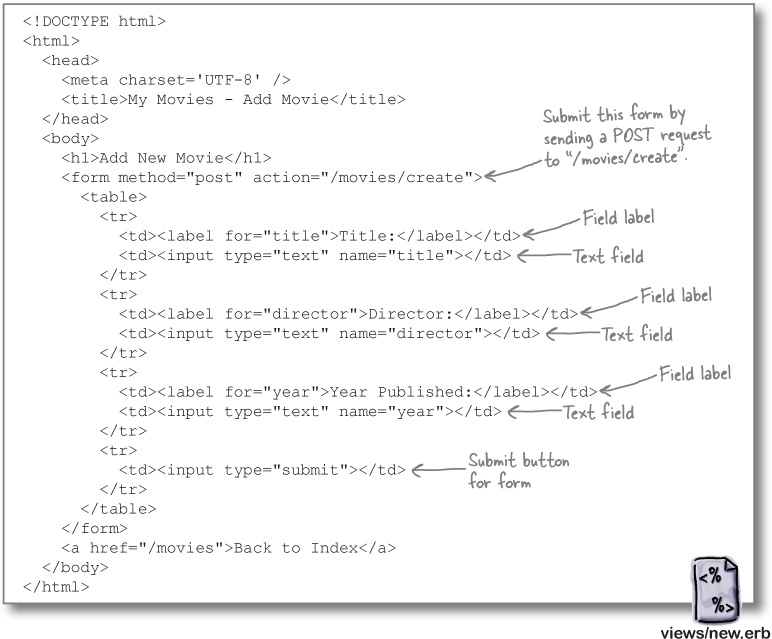
Setting the HTML form to send a POST request
The first step in processing form data is to ensure that the data reaches the server. And to do that, we need to configure the form to send a POST request. We’ll need to add two attributes to the < form> tag in our HTML:
method: The HTTP request method to use.action: A resource path for the request. This will be matched to a Sinatra route.
Let’s modify the HTML in our new.erb file to add these attributes to the form. Since we want to use the POST method, we’ll set the method attribute to "post". Then we’ll set the resource path in the action attribute to "/movies/create".
That sets up the form to send a POST request, but we don’t have any way to handle the request yet. We’ll take care of that next...
Setting up a Sinatra route for a POST request
We have the HTML form submitting POST requests to the '/movies/create' path. Now we need to set Sinatra up to process those requests.
To set up a Sinatra route for HTTP GET requests, you call the get method. And to set up a route for POST requests, you call—you guessed it—the post method. It works just like the get method; the method name represents the type of request it will look for, and it takes a string argument with the resource path to look for in the request. Like get, post also takes a block that will be called whenever a matching request is received.
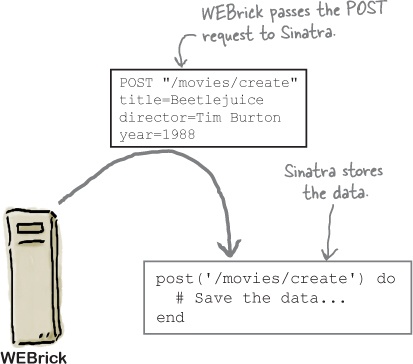
Within the block for a post route, you can call the params method to get a hash containing the form data from the request.
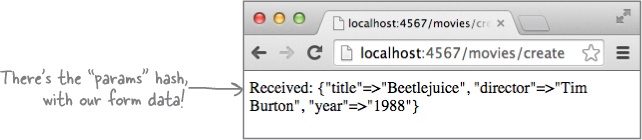
Let’s set up a simple post route so that we can get a look at the form data. In the app.rb file, we’ll call post with a resource path matching the one we set up in the form: '/movies/create'. We’ll have the block simply return a string with the value of params.inspect to the browser.

We’ve set our HTML form up to send a POST request...
< form method="post" action="/movies/create"> ... < /form>
And we’ve set up a corresponding route in our Sinatra app...
post('/movies/create') do
  "Received: #{params.inspect}"
end
Let’s try out our new route. Restart the app and reload the form page in your browser. Fill out the form using any movie you’d like, and click Submit.
The form will submit a POST request to Sinatra, which will respond with a plain-text string representing the params hash.
Lastly, let’s create a Movie object based on the contents of the params hash. We’ll update the route block in app.rb to assign a new Movie object to an instance variable. Then, we’ll assign each of the hash values to an attribute of the Movie.
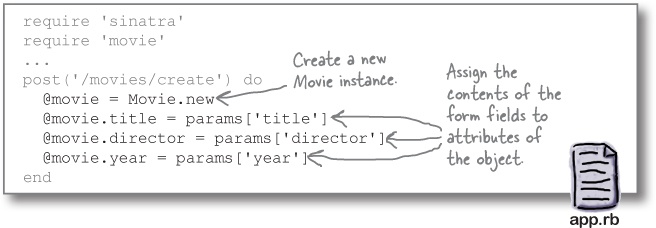
We’ve written a Sinatra route that accepts the form data and uses it to populate the attributes of a new Movie object. That’s another task complete!
We’re not saving that Movie object anywhere right now, though. Fixing that will be our next task.

Converting objects to and from strings with YAML
We’ve added code to convert our HTML form’s data to a Movie object:
post('/movies/create') do
  @movie = Movie.new
  @movie.title = params['title']
  @movie.director = params['director']
  @movie.year = params['year']
end
But that object disappears as soon as we create it. We need to save it somewhere!
The YAML library, which comes with Ruby as part of its standard library, can help. YAML stands for “YAML Ain’t Markup Language,” and it’s a standard for representing objects and other data in string form. Those strings can be saved to files, and converted back to objects later. You can read more about the YAML standard on its website at:
Before we try saving the YAML to a file, let’s try converting some objects to strings, so we can see what the YAML format looks like. Don’t worry, you don’t actually need to know YAML. The YAML library will convert Ruby objects to and from YAML format for you!
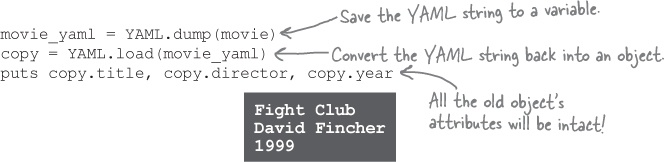
The YAML module has a dump method that can convert almost any Ruby object to a string representation. The code below creates a Movie object, then dumps it to a string:
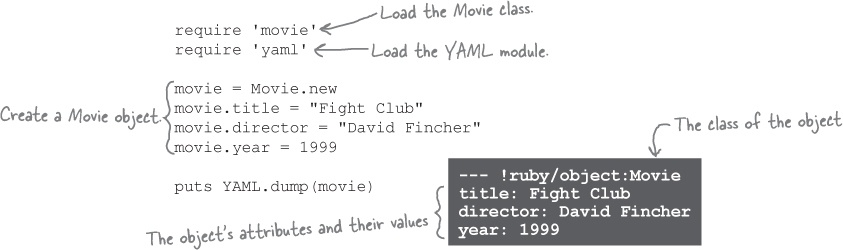
The YAML module also has a load method that takes a string with YAML data and converts it back to an object. This will help us load our saved objects back in later.
This code dumps the above Movie object to a YAML string, then converts that string back to an object, with all the attribute values intact:
Saving objects to a file with YAML::Store
Converting the objects to strings and back is only half of the solution, though—we still need to be able to save them for later. The YAML library includes a class named YAML::Store, which can save Ruby objects to disk and load them back in later.
The code for adding objects to a YAML::Store instance and retrieving them later looks very similar to the code for accessing a hash. You specify a key and a value you want to assign to that key. Later, you can access that same key and get the same value back.
The big difference, of course, is that YAML::Store saves the keys and values to a file. You can restart your program, or even access the file from a completely different program, and the keys and values will still be there.
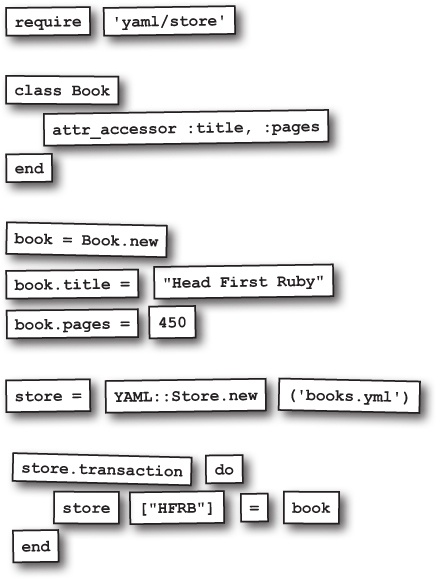
To use YAML::Store within our Ruby code, we first need to load the library:
require 'yaml/store'
Then, we can create a YAML::Store instance. The new method takes an argument with the name of the file the object should write to and/or read from. (A single store object can read from and write to the file.)
Before we can add any objects to the store or read any objects from it, we have to call the transaction method. (YAML::Store is programmed to raise an error if we don’t.) Why is this required? Well, if one program wrote to the file while another program was reading from it, we could get corrupted data back. The transaction method protects against this possibility.
So, to write some data to the file, we call the transaction method on the YAML::Store instance and pass it a block. Within the block, we assign the value we want to a key, just like we would with a hash.
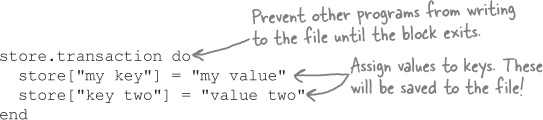
It’s the same process to read a value back out: make a call to transaction, and within the block, access the value you want.

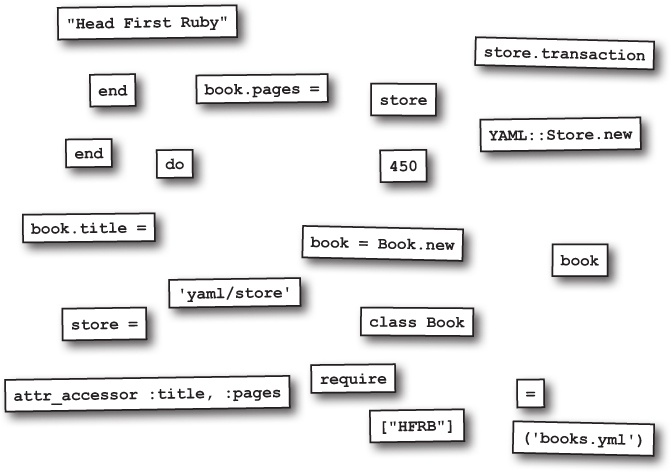
Saving movies to a file with YAML::Store
In a few pages, we’re going to make a class that will manage a YAML::Store instance for us, writing Movie objects to it and retrieving them again. But while we’re getting the hang of this, let’s write a simple script that uses a YAML::Store directly to save some movies to a file.
At the start of the script, we have to do some setup... Since the Movie and YAML::Store classes aren’t available until we load them, we start with calls to require both 'movie' and 'yaml/store'. Then, we create a YAML::Store instance that reads and writes a file named test.yml. We create a couple of Movie instances and set all of their attributes.
Then comes the good part: we call the transaction method on the YAML::Store instance and pass it a block. Within the block, we do a couple of operations:
We assign the movie objects to keys within the store.
We retrieve the value for one of the keys we stored earlier, and print it.
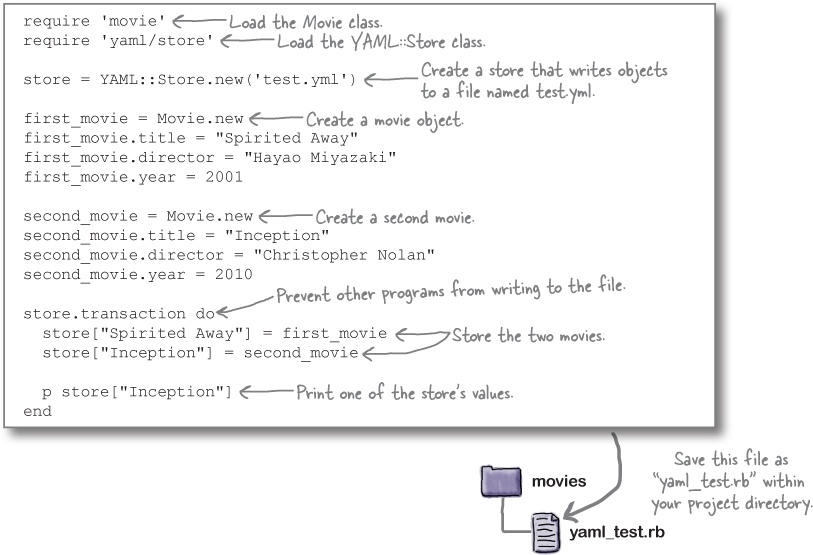
Let’s try this out! Save the script with a name of yaml_test.rb. Store it in your Sinatra project directory, alongside the lib directory, so that we can load the movie.rb file when we run it.
In your terminal, change to the project directory and run the script with:
ruby -I lib yaml_test.rb
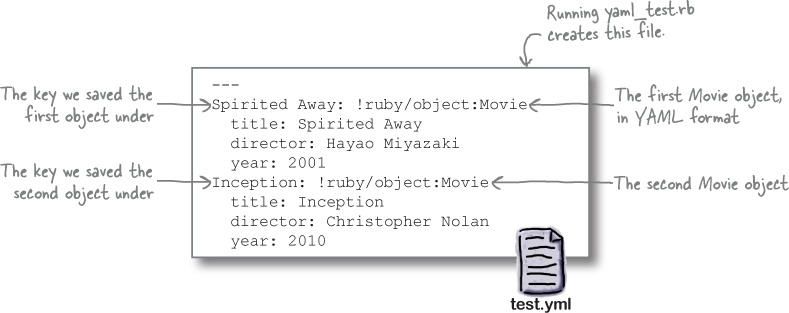
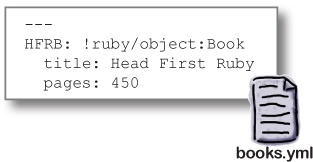
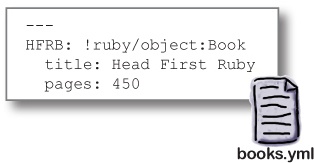
The script will create the test.yml file, and store the two movie objects in it. Then it will access one of the movies and print a debug string for it.

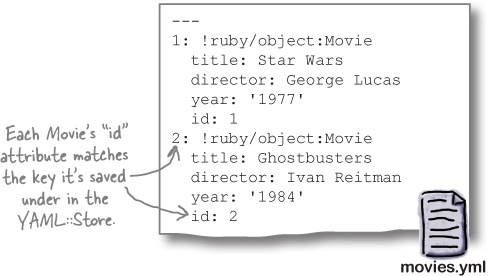
If you open the test.yml file in your text editor, you’ll see our Movie objects in YAML format, as well as the keys we saved them under.
A system for finding Movies in the YAML::Store
We’re about ready to start saving our Movie objects to a YAML::Store!

Before we do, though, it would be wise to ask ourselves a question: How will we get them back out again?
Later on, we’re going to need to generate a list of links to all the movies in our database. When a user clicks that link, it will send a request to our app to get that movie. We need to be able to find a Movie object within the YAML::Store based solely on the information in that link.
So what do we use as an identifier for a movie? The title attribute might seem like an obvious choice. We were able to use titles as YAML::Store keys in our earlier script:
But one problem with titles is that they often contain spaces, and space characters aren’t allowed in URLs. You can use character encodings as a workaround, but that’s really ugly:

Titles aren’t really unique identifiers, either. There was a movie named Titanic released in 1997, yes, but there was also a movie named Titanic released in 1953!
We’re going to need something else to identify movies by...
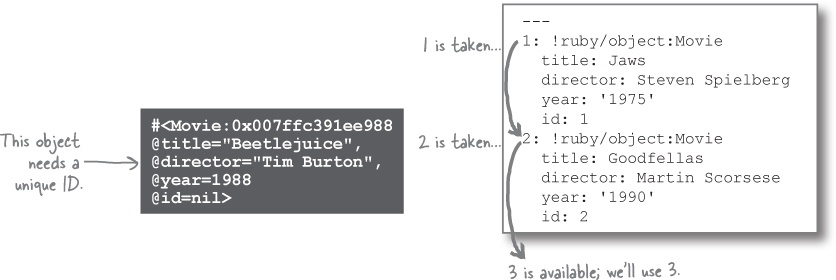
Numeric IDs for Movies
For reasons like these, most web apps these days use simple numeric IDs to identify records within their databases. It’s easier and more efficient. So, we’re going to use numeric IDs as keys within our YAML::Store.
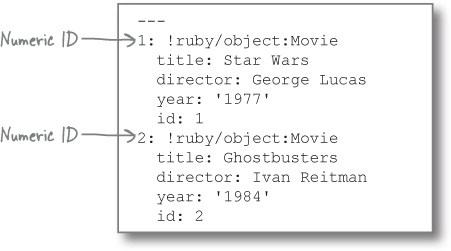
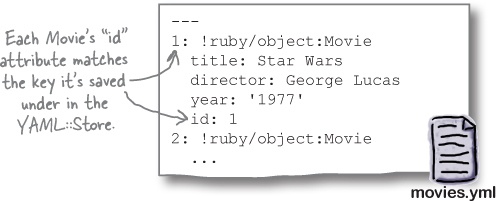
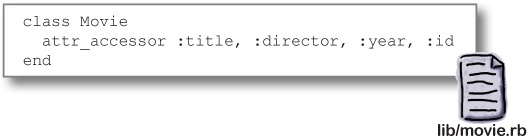
To help us quickly link a Movie object with its YAML::Store key, let’s open up the movie.rb file within the lib directory, and add an id attribute to the Movie class:
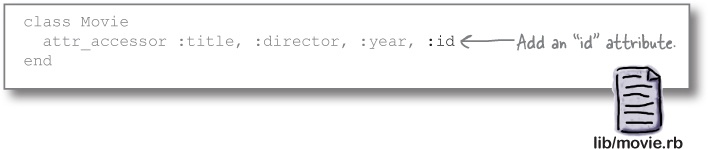
This will make it easier to do things like generate URLs later.
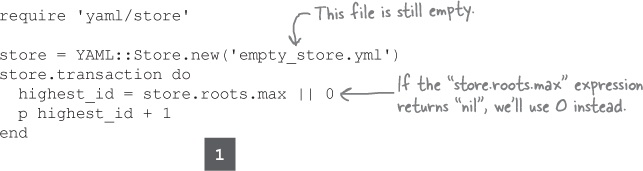
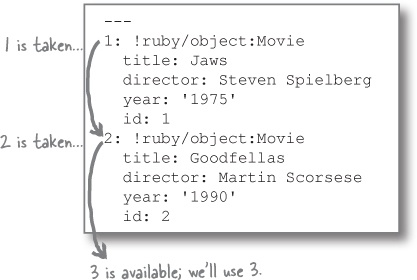
Finding the next available movie ID
Now, let’s suppose that we’ve created a new Movie object based on the form contents, and it doesn’t have an ID yet. What YAML::Store key should we assign it to? We’ll need to go through the existing keys to find one that’s available.
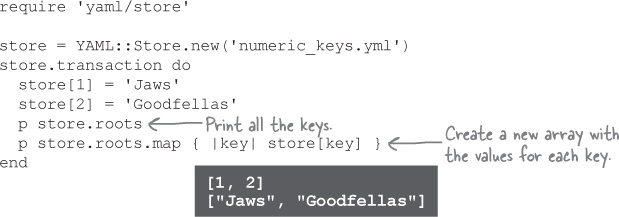
To process the keys, we can use the roots instance method on a YAML::Store. The roots method returns all the keys in the store as an array:
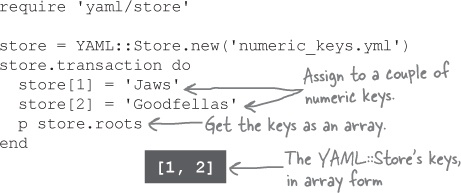
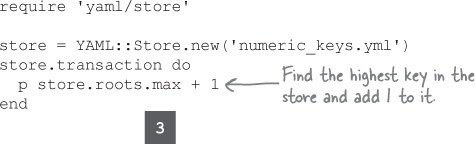
Now we need to find the highest number in the array. Arrays have an instance method named max that will find the highest value in that array:
So we just call roots to get the array of keys, call max to get the highest number, and add 1 to the highest number to get our new ID.
There’s a catch, though. What if we’re working with a YAML::Store that’s empty? (And our store will be empty until we save our first movie...)
In that event, the roots method will return an empty array. Calling max on an empty array returns nil. And trying to add 1 to nil raises an error!
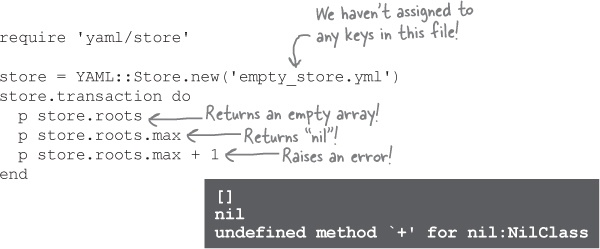
To be safe, we’ll need to check whether max returns nil, and use a value of 0 instead. And we can do this quickly and easily using the Boolean “or” operator (||). We saw this back in Chapter 9: if the value on the left side of || is false or nil, it will be ignored, and the value on the right side will be used instead. So we’ll simply write:
store.roots.max || 0
...and we’ll get 0 if there are no keys in the store, or the highest existing key if there are keys.
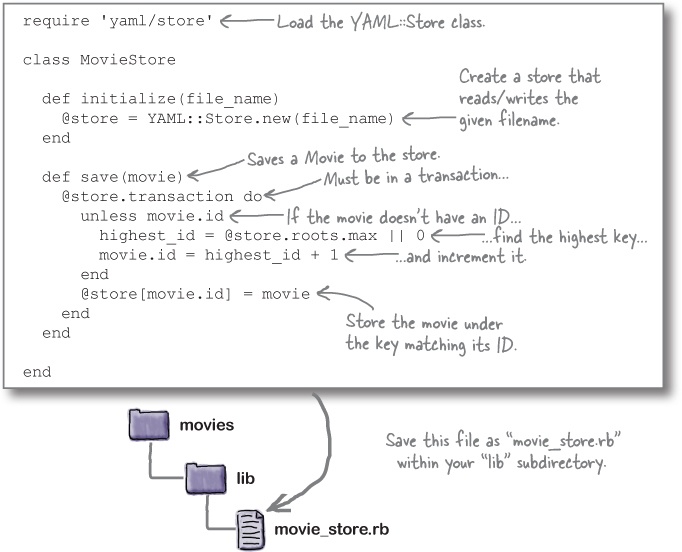
A class to manage our YAML::Store
We’ve figured out some reliable code to assign IDs to new movie objects in our YAML::Store. But we probably shouldn’t add this code into the Sinatra app; there’s enough clutter in there as it is. Instead, let’s write a separate class to handle saving objects to a YAML::Store.
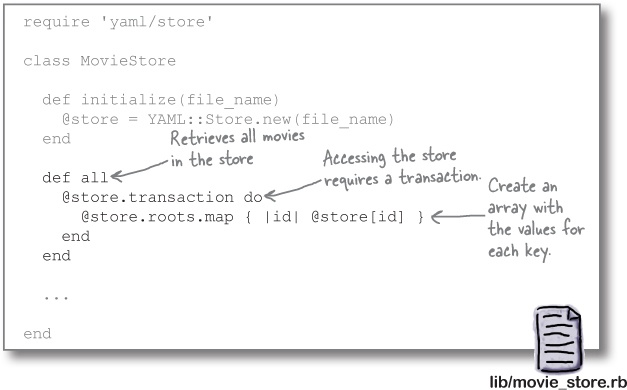
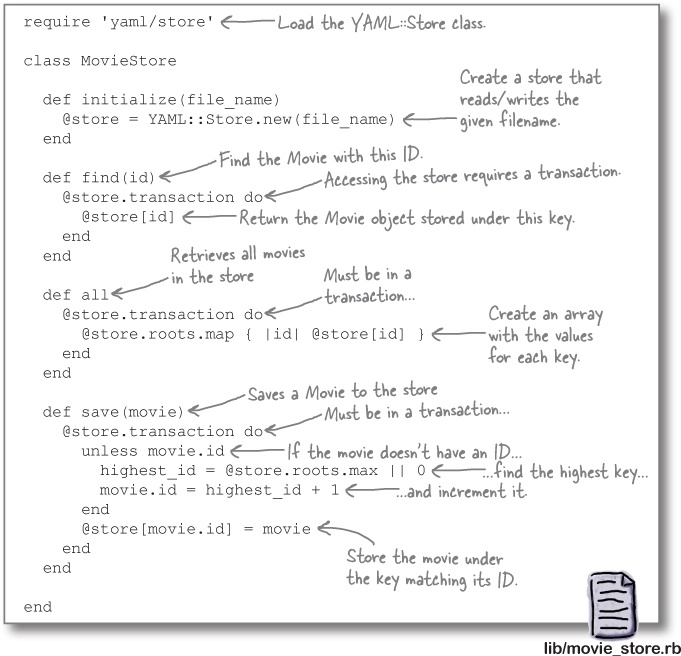
Let’s create a file named movie_store.rb, in our lib subdirectory. Within it, we’ll define a class named MovieStore. We’ll have its initialize method take a filename and create a YAML::Store that writes to that file. Then we’ll add a save method that takes a Movie. If the Movie doesn’t already have an assigned id, save will find the next available ID and assign that to the Movie. Once the Movie has an id, save will assign it to a key matching that ID within the store.
Using our MovieStore class in the Sinatra app
We had to create a special class, MovieStore, to hold the code that works with YAML::Store. But now we reap the benefits: using MovieStore within our Sinatra app is super-simple!
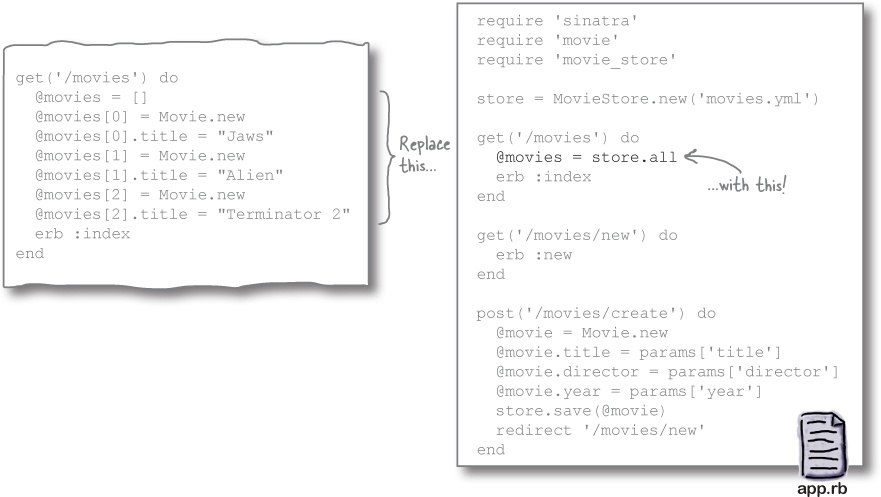
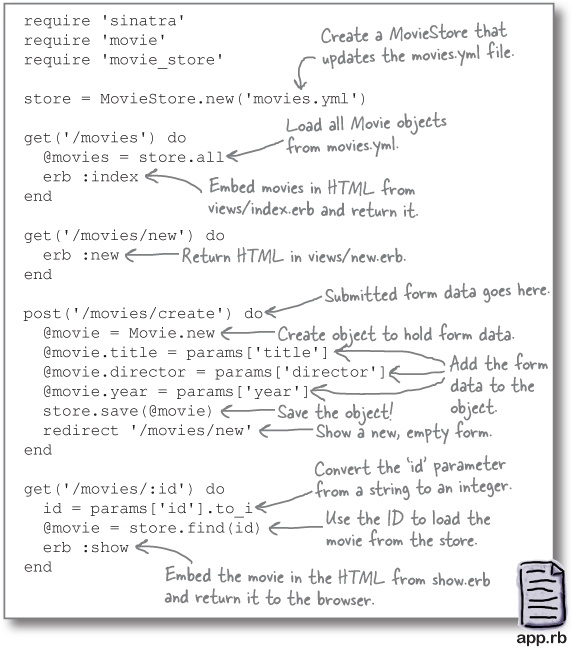
At the top of app.rb, we need to require 'movie_store' in order to load the new class. We also create a new instance of MovieStore, and pass a filename of 'movies.yml' to tell it which file to write to and read from.
Our block for the post('/movies/create') route is already set up to create a Movie object based on the data from the movie form. So we only need to pass the Movie to the save method on the MovieStore.
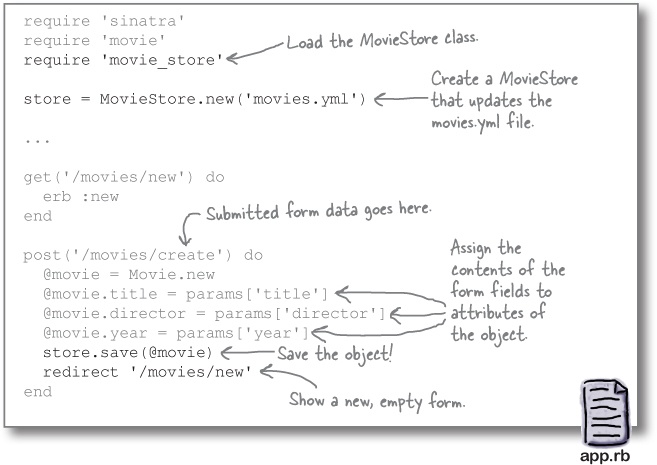
After we save the movie, we need to show something in the browser, so we make a call to a Sinatra method that we haven’t used before: redirect. The redirect method takes a string with a resource path (or an entire URL if need be) and sends a response to the browser directing it to load that resource. We use a path of '/movies/new' to direct the browser to load the new movie form again.
Testing the MovieStore
You know the routine by now: go to your project directory in your terminal and restart the app. Then visit the page to add a new movie:
http://localhost:4567/movies/new
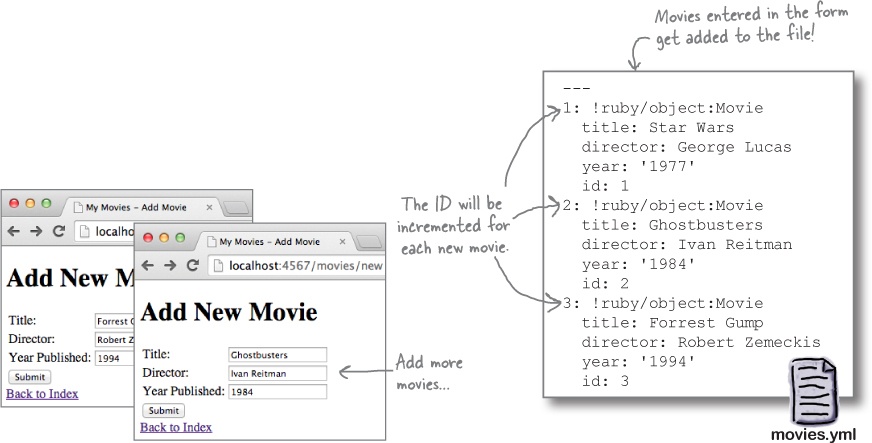
Enter a movie in the form and click Submit. All you’ll see in the browser is that the form clears (because the redirect response tells the browser to load the form page again)...
But if you look in your project directory, you’ll see a new movies.yml file sitting there. And if you open the file, you’ll see the movie you entered, in YAML format!
If you enter more movies, they’ll be added to the YAML file as well. You’ll also see that the ID is incremented for each new movie.
Loading all movies from the MovieStore
It took some work, but we’re finally able to save movie objects to the YAML::Store. Another task is complete!
Our next task is to get all those movies back out and display them on the movie index.
Right now, if you visit the index page:
http://localhost:4567/movies
...you’ll see the placeholder movies we created earlier, instead of our saved movies. They’re still hardcoded into the get('/movies') route block in app.rb.
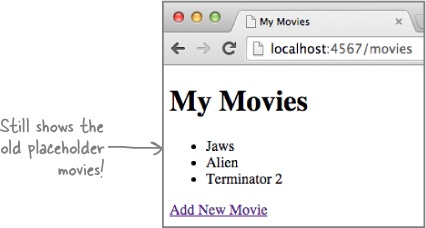
We’ll need to load our saved movies in from the file instead, if we want them to appear in the index...
We need to add a method to MovieStore that returns an array of all the values in the YAML::Store. But while the roots method can give us an array of all the keys, there’s no single method that can give us all the values...
That’s okay, though! Since roots returns an array, we can simply use the map method on it. As you probably remember from Chapter 6, map passes each element of an array to a block, and returns a new array with all the block’s return values. So we can simply pass a block to map that returns the value of each key in the store. Here’s a simple script that demonstrates this in action on our numeric_keys.yml store from earlier:
Loading all movies from the MovieStore (continued)
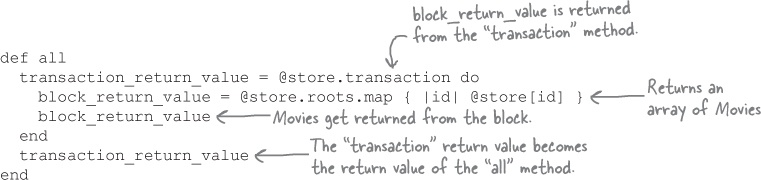
Now let’s use the same idea in our MovieStore. We’ll create a new method named all, which returns every Movie object in the store. We’ll use map on the array returned by roots to get the Movie stored under each key.
Loading all movies in the Sinatra app
Now that we’ve added a method to retrieve all the movies from our MovieStore, we don’t have to change much in the Sinatra app.
Previously, we had a set of hardcoded placeholder movies that we stored in the @movies instance variable, for use in the index.erb HTML template. All we have to do is replace those Movie objects with a call to store.all.
The Movie objects saved in our YAML::Store will be loaded into the @movies instance variable, ready for use in our HTML index!
After you make the change above, restart your app in the terminal. The old placeholder movie titles will be replaced with the movies from your movies.yml file!

Building HTML links to individual movies
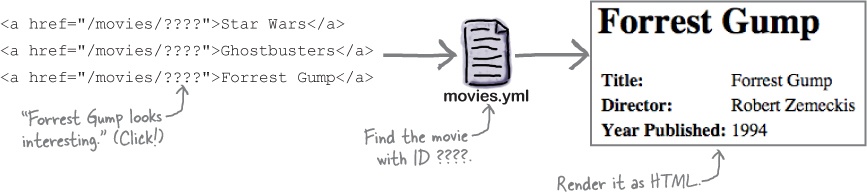
Listing all the movies in the file was relatively easy. Next, we need the ability to create links to individual movies.
Our movie index page shows the title attribute for each Movie object. But we’ve been filling in director and year attributes too. We should really display those somewhere as well...
So, we’ll make a page where we can show an individual movie’s data. We’ll present all of the Movie object’s attributes, in table form.

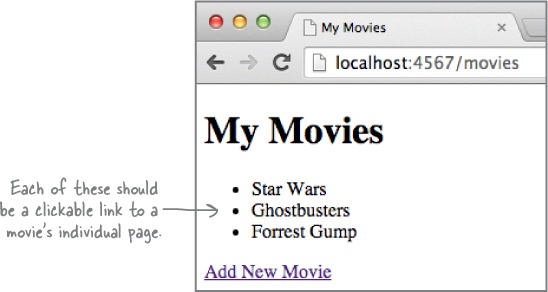
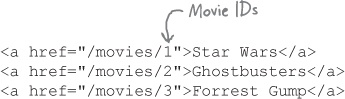
We also need a way to find the individual pages for each movie... On the movie index page, let’s convert each movie title to a clickable link that takes us to that movie’s specific page.
In order for a link to a movie’s detail page to work, its path needs to contain enough information for us to find the resource (the Movie object) it links to.
Every HTML link contains a resource path it needs to retrieve, in its href attribute. When you click a link, it sends a GET request for that resource path to the server (just like when you enter a URL in the address bar).
Sinatra needs to be able to find a Movie in our YAML::Store, based entirely off that resource path in the link.
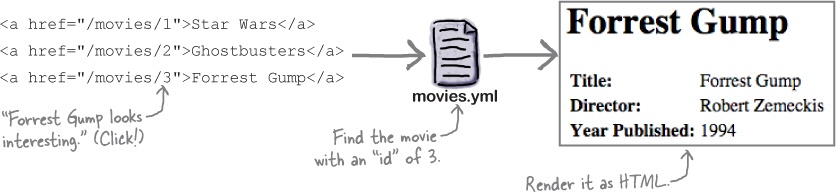
So what information can we include to help identify the right Movie? How about its id attribute?
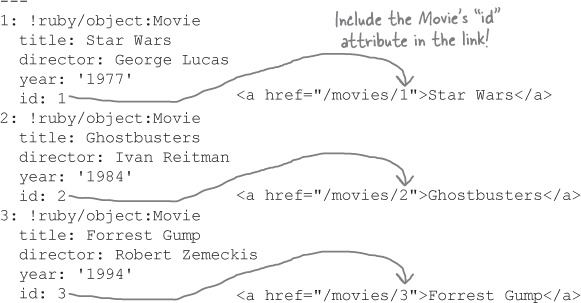
We can embed the id in the links we create... Later, when a user clicks those links, the ID will be part of the resource path sent to the server. We simply look up that key in our YAML::Store, and use the Movie object it returns to generate an HTML page!
Building HTML links to individual movies (continued)
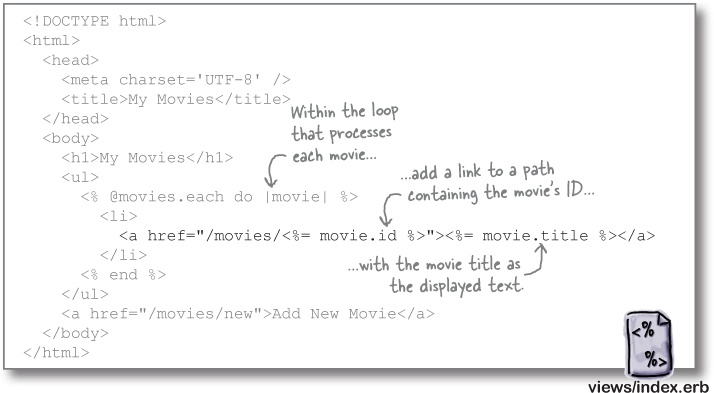
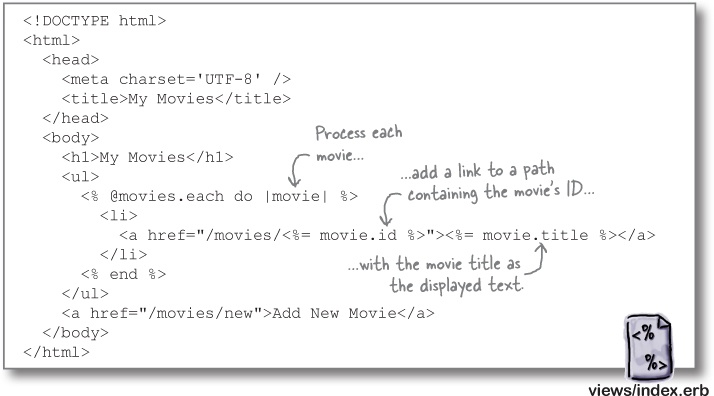
Let’s update the HTML for our movie index page to add unique links to the individual movie pages. Open the index.erb file in the views subdirectory. Within the each block that processes each Movie object, add an < a> tag surrounding the movie title. Using an ERB < %= %> tag, set the href attribute to refer to the current Movie object’s id attribute.
If you visit http://localhost:4567/movies in your browser, the updated HTML for the movie list will look something like this:
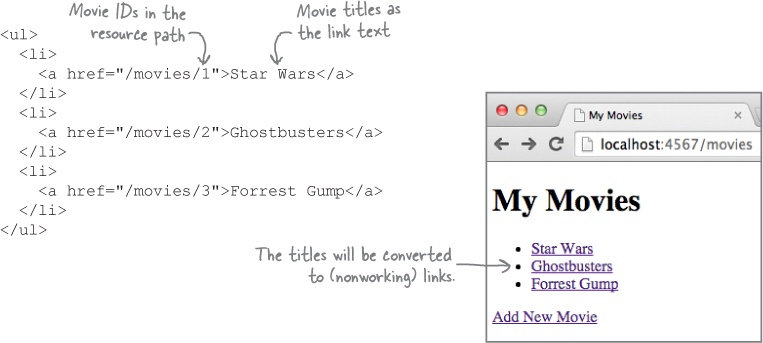
...and the movie titles will be converted to clickable links. Those links won’t lead anywhere for now, but we’ll fix that next!
Named parameters in Sinatra routes
We had to add a route in our Sinatra app to handle requests for the movie index:
get('/movies') do
  @movies = store.all
  erb :index
end
And we had to add another route to handle requests for the form to add a movie:
get('/movies/new') do
  erb :new
end
So it shouldn’t surprise you to learn that we’ll need a route for the individual movie pages as well. But, of course, it’s not practical to add a route for each movie:
get('/movies/1') do
  # Load movie 1
end
get('/movies/2') do
  # Load movie 2
end
get('/movies/3') do
  # Load movie 3
end
Sinatra allows you to create a single route that can handle requests for multiple resources by using a named parameter in the resource path. Following any slash (/) in the path string, you can put a colon (:) followed by a name to indicate a named parameter. The route will process requests for any path that matches the route’s pattern, and will record the segments of the path that match the named parameter in the params hash for your code to access.
It’s probably simpler just to see it in action. If you were to run Sinatra code like this:
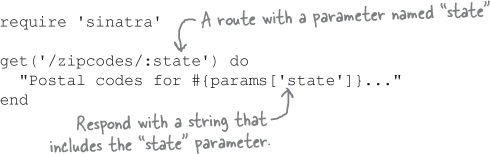
...then you could access this URL:
http://localhost:4567/zipcodes/Nebraska

...and Sinatra would respond with the string "Postal codes for Nebraska...". You could also access:
http://localhost:4567/zipcodes/Ohio
...and Sinatra would respond with "Postal codes for Ohio...". Whatever string follows '/zipcodes/' in the URL will be stored under the 'state' key in the params hash.
Using a named parameter to get a movie’s ID
So, we need Sinatra to respond to any URL in a format like this:
http://localhost:4567/movies/1
http://localhost:4567/movies/2
http://localhost:4567/movies/3
...but we don’t want to write code like this:
get('/movies/1') do
   # Load movie 1
end
get('/movies/2') do
   # Load movie 2
end
...
Let’s try adding a single route that uses a named parameter, 'id', in its request path. It will handle any request whose URL matches the format above. It will also capture the ID from the path, so we’ll be able to use it in looking up a Movie object.
Define a new get route with a path of '/movies/:id' at the bottom of the app.rb file. (It’s important that this route appear after the other routes; we’ll talk about why in a moment.)
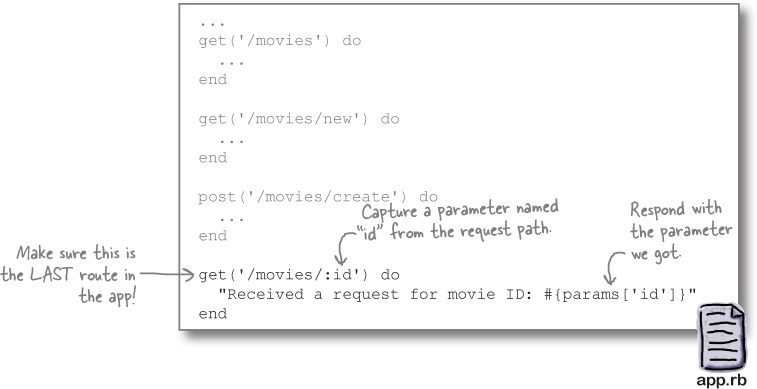
Then, try visiting these URLs:
http://localhost:4567/movies/1
http://localhost:4567/movies/2
http://localhost:4567/movies/3
...or any other ID you like. Sinatra will respond to all of them, and will include the 'id' parameter in its response.

Defining routes in order of priority
We mentioned that it was important to define the get('/movies/:id') route after the other routes in your Sinatra app. Here’s why: the first Sinatra route to match a request is the one that gets to process it. All later routes get ignored.
Suppose we had an order processing app. It has a route to request a form for a new order, and another route with a parameter named 'part' to view all existing orders that include a particular part. And suppose that we define the route with the named parameter before the other route...
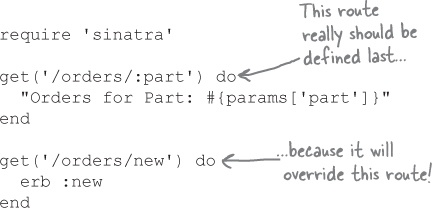
If we tried to access the new order form at:
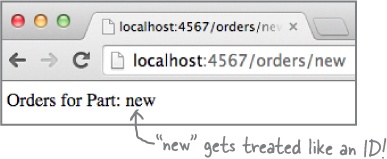
http://localhost:4567/orders/new
...the first route defined would take priority, and Sinatra would try to present us orders for a part with an 'id' of 'new'!
In our movies app, if we had defined the get('/movies/:id') route before the get('/movies/new') route, we would have faced the same problem. Any attempt to load the new movie form at:
http://localhost:4567/movies/new
...would be treated as a request to show details for a movie with an 'id' of 'new'.
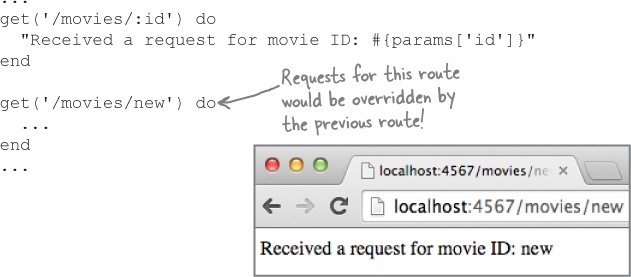
The lesson here is that more specific Sinatra routes should be defined first, and less specific ones later. If one of your routes has named parameters, it should probably be among the last routes you define.
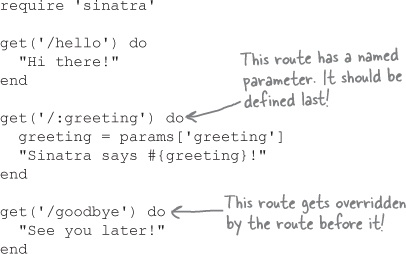
This Sinatra app isn’t working quite right. Match the three URLs below with the response this app would give. (You won’t use one of the responses.)
require 'sinatra'

get('/hello') do
  "Hi there!"
end

get('/:greeting') do
  greeting = params['greeting']
  "Sinatra says #{greeting}!"
end

get('/goodbye') do
  "See you later!"
end
......http://localhost:4567/hello ......http://localhost:4567/ciao ......http://localhost:4567/goodbye
Finding a Movie in the YAML::Store
We’ve got our movie IDs embedded in the links on our site, and we’re set up to capture a parameter with the ID from the HTTP GET request. Now it’s time to use that ID to look up a Movie object.
Our movies are all saved in the YAML::Store using their ID as a key. Retrieving them should be simple!
Add a find instance method to the MovieStore class. It should take an ID for use as a key, and return the value (the Movie object) under that key in the YAML::Store.
As with all other YAML::Store operations, this will need to take place within a
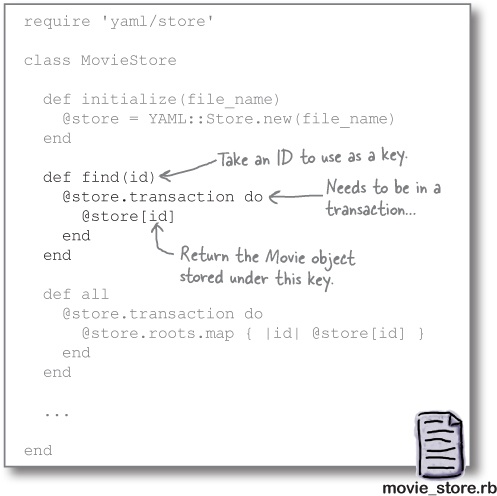
That’s it! We’re now set up to find movies that we’ve saved.
An ERB template for an individual movie
Our MovieStore class has a new find method, ready to return an individual movie’s data. All that remains is to utilize find in the Sinatra app and add HTML for displaying a movie. We’re almost done!
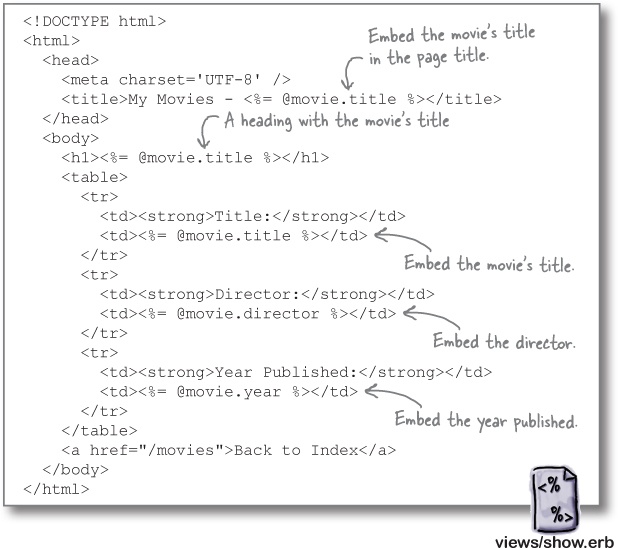
We’re set up to load an individual Movie so we can display its attributes, but we still need an HTML template to display it within. Let’s create a show.erb file within the views subdirectory, and add this HTML to it.

There’s not much new about this page. We access a Movie object that’s stored within the @movie instance variable (which we’ll set up in the Sinatra route in a moment). We use < %= %> ERB tags to embed the movie’s attributes within the HTML.
An HTML < table> tag displays the movie’s attributes in rows. The first column of each row is a label for the attribute. The HTML < strong> tag (which we haven’t used thus far) simply displays the text in bold. The second column holds the attribute’s value.

Finishing the Sinatra route for individual movies
We’ve added a find method to the MovieStore that can load a Movie based on its id attribute, and a show.erb file to display the Movie. It’s time to link those two together. In our Sinatra app, let’s modify our get('/movies/:id') route to load a movie and render it in HTML.
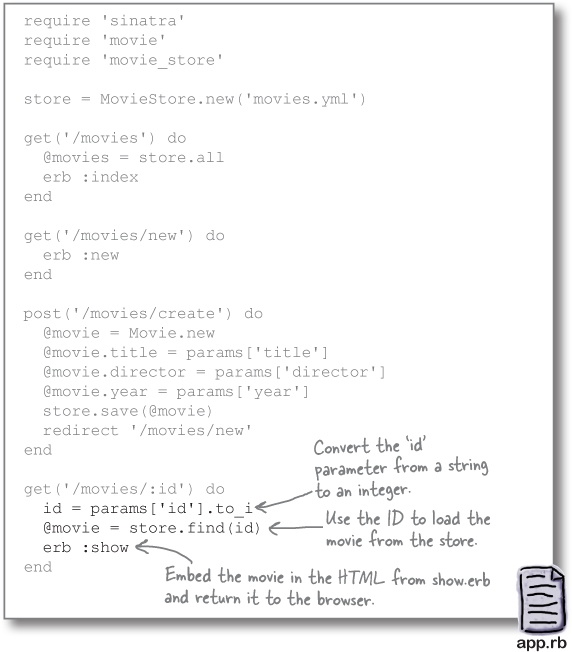
We need to take the 'id' parameter from the resource path so we can load the Movie from the MovieStore. The parameter will be a string, though, and the MovieStore’s keys are all integers. So the first thing we do in the route block is convert the string to an integer using the to_i method.
Once we have the ID as an integer, we can pass it to the find method on the MovieStore. We’ll get a Movie object back, which we store in the @movie instance variable (for use by the ERB template).
Lastly, we call erb :show, which will load the show.erb template from the views directory, embed the @movie object’s attributes into it, and return the resulting HTML to the browser.
After all that hard work setting up movie data, wiring it into the app was pretty easy. Our Sinatra app is complete! Create a movie object based on the form contents.
Let’s try it all out!
Are you ready? We’ve done a lot of work to get this far, so this is the big moment...
Restart your app from the terminal, and visit http://localhost:4567/movies in your browser. Click on the link to any of the movies.
The app will get the movie ID from the URL, load the Movie instance from the YAML::Store, embed its attributes in the show.erb template, and send the resulting HTML to your browser.

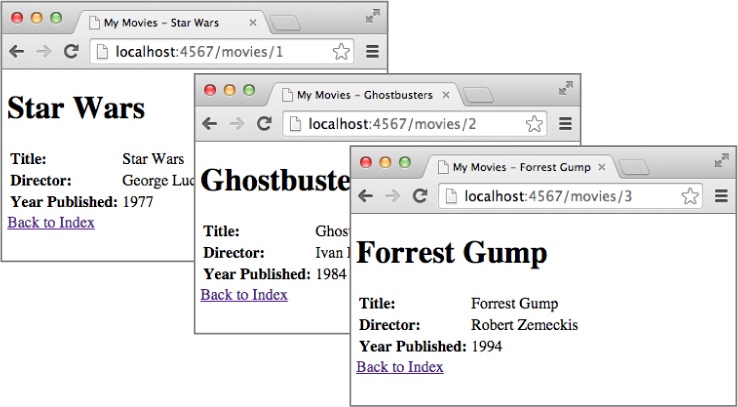
And there, at long last, is your movie data! It took quite a few components to make it all work, but you now have a complete web app!
Our complete app code
Here’s the project directory structure for our complete app:
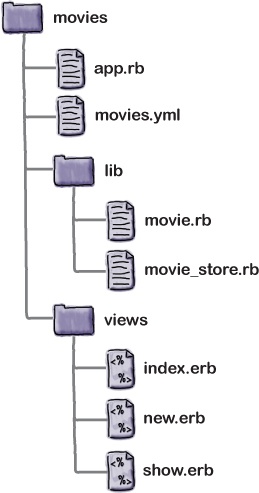
The app.rb file is the core of the app. It holds all our Sinatra routes.
The movies.yml file holds all the movie data saved by the MovieStore class. (Its contents will vary depending on what you’ve entered in the HTML form.)
Our Movie class simply specifies a few attributes for each object.
The MovieStore class is responsible for saving Movie objects to the YAML file and retrieving them later.
In the views subdirectory, the show.erb file contains an ERB template with HTML to embed a single movie’s data within.
And the index.erb file contains a template that creates a link to each of the individual movies. views/show.erb
Lastly, the new.erb file contains an HTML form for entering a new movie’s data. When the form is submitted, it sends the movie data in an HTTP POST request to the '/movies/create' path. A Sinatra route in app.rb uses the data to create a new Movie object, and saves it using the MovieStore.
And that’s it—a complete web app that can store user-submitted data and retrieve it again later.
Writing web apps can be a complex process, but Sinatra leverages the power of Ruby to make it as simple as possible for you!
Up Next...
We’re not done! There’s a lot we didn’t have room to cover in this book, so we’ve added an appendix with the most important items, plus some resources to help you plan your next Ruby project. Read on!
Congratulations!
You made it to the end.
Of course, there’s still an appendix.
And the index.
And then there’s the website...
There’s no escape, really.