
Setting the Color Balance
18.1 White Balance
If you are using a Sony HDW camera there are three positions for the switch on the side of the camera that determine which form and setting of white balance you are using. Most professional High Definition (HD) cameras will have similar controls so I will describe those on the Sony here. The positions are labeled Preset, A and B. With the switch at Preset the camera will set the white balance to its own internal setting. You can create your own white balance on position A or B by switching to them and operating the white balance switch on the front of the camera.
18.2 What is White Balance?
Most digital video cameras are set up to show a color correct image when the scene is lit with tungsten light, but not all, so check the situation with the camera you are using. The RED One, for instance, has a native color balance of 5000 K but can be programmed for the two more conventional settings of 3200 and 5600 K.
With the Sony HDW cameras the nearer of the two filter wheels to the camera body, situated just above the lens mount and on the operator side of the camera, contains three filters and a clear glass. With the clear glass in place, the overall effect is to make the camera have the same color balance as tungsten balanced film. The other positions give various color corrections, the values of which are shown in Figure 18.1. This wheel places a colored filter between the lens and the image splitter block, much as one would put, say, a Wratten 85 filter in front of a film camera lens in order to have the correct color balance when shooting under daylight with tungsten balanced film. Curiously, Sony correct to a slightly warmer color more akin to using a Wratten 85B on a film camera. This often looks very pleasing but corrects to 6300 K, not a commonly used value. The cross filter has no effect on color. It is the equivalent of a light four-point star filter. I have no idea why Sony incorporated this filter as I have only ever used it twice and always have a couple of light star filters in my filter kit anyway. More recent Sony cameras are beginning to appear with the star filter replaced by one correcting the color balance to 5600 K, a very welcome change in my opinion.

Figure 18.1: Internal Camera Filter Wheel settings for the wheel nearest to the camera body on a Sony HDW 750
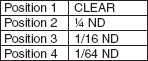
Figure 18.2: Internal Camera Filter Wheel settings for the wheel farthest from the camera body on a Sony HDW 750
18.3 Neutral Density (ND) Filters
On the Sony HDW cameras the filter wheel farthest from the camera body deploys four filters that have no effect on color but only affect exposure. The value of these filters is shown in Figure 18.2.
18.4 A Warning!
On the Sony cameras, with the exception of zero ND and the star filter, each position on both the ND and the color correction wheels will have an independent white balance written to it. This means that if you have white balanced at zero ND and you swing the filter to an ND 0.6 you will now have the last white balance setting you made when you used an ND 0.6 filter. This function can be switched off in the internal menus.
18.5 Setting the White Balance Using a White Card
Having chosen the filter in the filter wheel that most accurately reflects the light you are working under, select either position A or B on the Preset selector if using a Sony camera or the similar control on the camera you are using, fill at least 70 percent of the screen area with a white card or paper that is illuminated by the primary source of light you are working under and press the white balance switch on the front of the camera. The following applies to virtually all digital cameras when carrying out a white balance. In just a couple of seconds you should see in the viewfinder “White Balance OK”. The camera has now electronically given you the best possible color balance for the conditions you are working under. Until you make another white balance on the A or B setting you have chosen, the camera will always give you the same color set-up every time you switch to your chosen position.
It is important that you have a correct exposure when you carry out a white balance as the camera is set up to make the correction in this mode, otherwise you may get a message in the viewfinder telling you the brightness is too low or too high and the balance will not have been set.
Be careful what white card or paper you use to white balance. Office papers that are sometimes called “high white” or something similar are, in fact, tinted a little blue to give them a whiter appearance and this may affect your white balance. If you use one of these papers you may find your scene looking a little warmer than you expected. This can be attractive but you need to be aware it is happening. Keeping a piece of good white art card with you is a much safer option.
18.6 Setting the White Balance Using a Colored Card
One way to make any video camera show an image that does not have the same color cast as the original scene is to white balance to a card or paper that is not white. I don’t use white balance very often but should you, perhaps, wish to warm up the overall look of a scene you might white balance to a pale blue card. The white balance process will remove the blue from the setup and the overall result will be warmer by the same factor as the card was cool. The reverse is true if you use a pink card; the result will be cooler as the pink will have been removed.
Green and yellow, or indeed any color, can be used in this way and the result will be a color change diametrically opposed to the color of the card you are using. I find colors other than pink and blue of very little use unless I still have a green cast from fluorescent lights after doing a standard white balance, when balancing again to a very pale green card can sometimes help.
You can easily obtain pastel-colored thin card in almost any color from art shops; they usually come in large sheets but are not expensive and easily cut to standard office paper size. I always carry a folding clipboard with me in which I keep my colored cards, several white cards in case they get dirty, and my star chart for setting the back focus. As the clipboard has a folding cover, it keeps everything clean and dry, and can easily be folded backwards so that it can be propped up if I am white balancing or setting my back focus when on my own. If you choose to use a cover like this, make sure you use a black one. When the paper is clipped to it some of the folder will be in shot; the color of the folder may then affect the white balance. I say this from experience as my first folder was red and it took me some time to work out why my white balance always looked a little cool. We can all be fooled!
18.7 Setting the White Balance Under Fluorescent Lighting
With any digital camera I rarely use the white balance facility, for I prefer to stay on Preset and occasionally use filters as if I were filming. The exception to this rule is when I am filming under fluorescent light. Here I find the best way to white balance is, having checked all the fluorescent tubes are the same make and specification, to take the white card quite close to a tube and balance it there. This is to make sure that no spurious light that may have picked up some other color from reflection off another surface is being allowed to influence the setting.
18.8 The Outer Filter Wheel on a Sony HDW Camera
The filter wheel farthest from the camera body on a Sony HDW camera has no effect on color; again, it has a straight-through position with the other three positions having ND filters of varying strength in them. Many other cameras have the capability to employ ND filters. Most HD cameras have an ND switch somewhere reasonably obvious and to hand. This is to allow you to keep the lens working at a reasonably wide aperture when filming under bright light. At first glance you might think that using as small an aperture as possible, and thereby getting a great depth of field, would be a good idea. After all, in these circumstances keeping focus would hardly be difficult. This is not always a good thing for two reasons. First, some lenses do not perform at their best at very large apertures; the Panavision Primos, Zeiss Digi Primes and Cooke S4s and a few other lenses are an exception to this rule, as often they are at their best at the wide end of the aperture range. Secondly, one thing that most film people dislike about video is that everything seems sharp and it is impossible to separate the foreground from the background using discriminatory focus. Deploying these ND filters can overcome both these problems.
18.9 Black Balance
Black balance is primarily used to reset the voltage at which an image signal reaches the lowest point the camera or the recording format can cope with. This can change for a variety of reasons, a change in temperature of the circuitry, for example. It is therefore very important to maintain the system’s ability to record the best possible black available; operating the black balance should do this.
With the Sony HDW cameras, pushing the same switch as is used for white balance in the opposite direction operates the black balance. It is worth familiarizing yourself with how black balance works on the camera you are using. With any HD camera you should black balance the camera first thing every morning and whenever you change the position of the gain switch on the camera. It is also a wise precaution to carry out a black balance if the camera has experienced a large change in temperature, though this is probably being hyper-cautious.