Export My Video?

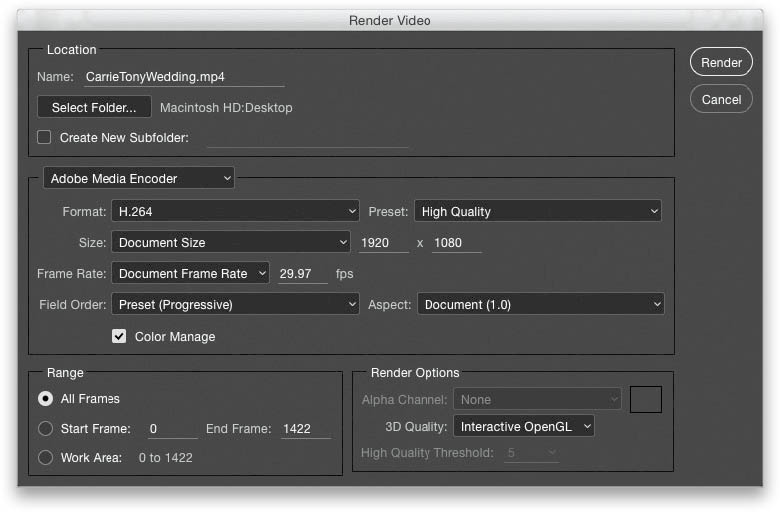
In the bottom-left corner of the Timeline panel, click on the Render Video icon (it looks like a right-facing, curved arrow). This brings up the Render Video dialog (shown above), where you render the final video and save it in a format based on where you’re going to be sharing it. At the top, give your movie file a name, and then choose where you want to save it on your computer. In the Adobe Media Encoder section, to the right of the Format pop-up menu, is the Preset pop-up menu, which has a bunch of presets for common types of exporting, like saving for YouTube, or Vimeo, or for exporting to an iPhone or Android device, and so on. The other settings, here, are for more advanced video exporting, so if the rest of these options look like, “What?!” at least you won’t feel bad. Okay, once you’ve selected a preset, click the Render button at the top right, and it starts rendering and exporting your video. Don’t be surprised if this takes a while (don’t be surprised if it takes 5 or 10 minutes either)—of course, the longer your video, the longer it will take to export. Once it’s done, your movie is complete, and now it’s time to share it with the world, and sit back while throngs of angry, bitter, disaffected Internet trolls tell you that your video is total rubbish. Or, of course, it could go the other way, and Hollywood immediately contacts you to direct the next Star Wars. There’s no in-between—it’ll be either A or B. I thought you should at least know that up front.

