Chapter 5. Creating Custom Themes & Templates
Take Ownership of Your Presentation’s Design


BUILDING A THEME FROM SCRATCH 119


CREATING CUSTOM BACKGROUNDS IN POWERPOINT 128

CREATING CUSTOM BACKGROUNDS WITH PHOTOSHOP ELEMENTS 132

CREATING A CUSTOM TEMPLATE 138

Modifying Existing Themes
By far the easiest and most efficient way to create a custom theme is to modify one that already exists. The development team at Microsoft invested quite a bit of research and development time in creating themes that work. They also listened to their customers and made sure that just about everything can be customized to create infinite new design possibilities. Building on something that already works is a great way to begin.
Where to Start
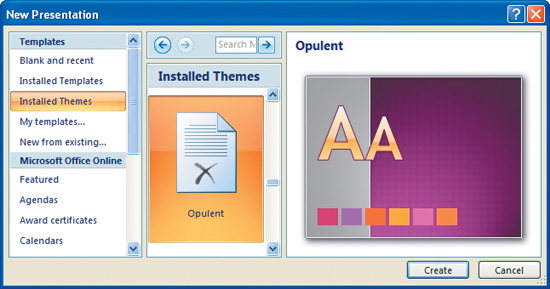
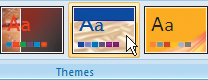
When you click the Office Button in PowerPoint and select the New button, you’re given a series of choices. The best place to start is right in the Installed Themes section. All of these themes are fully customizable to meet just about any presentation need.
A Good Foundation
It’s best to select a theme with a layout that is somewhat close to what you are looking for. It’s simple to make a few subtle changes to a theme to create an entirely original look. The fewer changes that need to be made to achieve a unique look, the more efficient you’ll be.
More Themes. Look at the Microsoft Office Online Web site at http://office.microsoft.com for more Themes. Check back every so often for updates.
Where Are All My Slides?
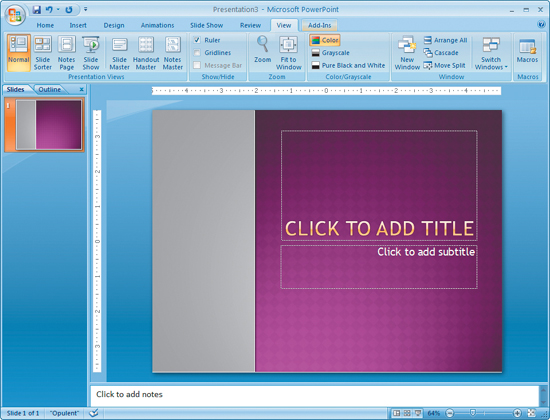
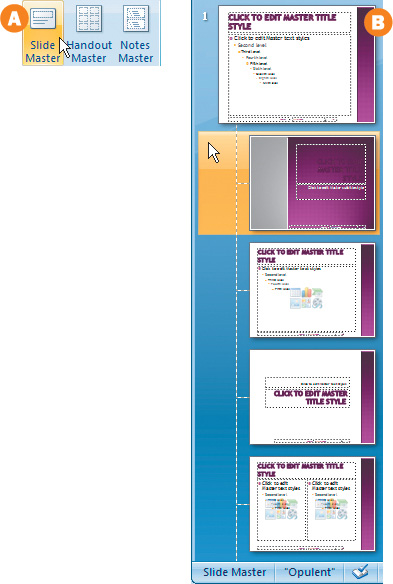
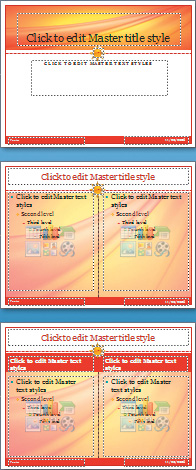
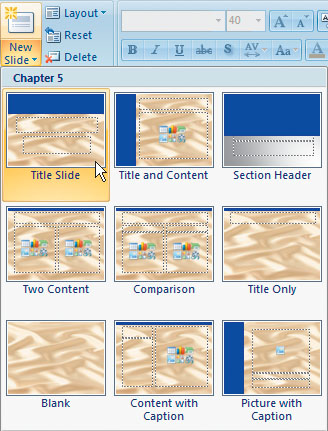
When you create a new document based on Installed Themes, the document will open with just one slide thumbnail on the left of your main slide viewing pane. To get a better appreciation of all the layout possibilities in the theme, you’ll need to view the Slide Master in the Presentation Views group under the View tab. All of the slides under the top Slide Master are called Layouts.
Slide Master
While still in Slide Master view A, you can experiment with global changes. If you make changes to the font on the Slide Master that include text effects, these changes are reflected in all of the subordinate layouts B. Bullet style changes made in the Slide Master will carry over to layouts within that theme as well. You can also make global changes to anchor graphics or backgrounds that appear on the Slide Master.
Rogue Slides
Sometimes you’ll want a unique look for a layout that fits within the overall look of the theme but stands out from all of the other layouts. When you are modifying an existing theme, you can identify these layouts when you are making global changes. They will not comply. You can edit a single layout by double-clicking the thumbnail and making changes directly in the main viewing pane.
Colors
You’ll notice that as you make modifications to existing themes, sometimes the colors will refuse to comply with your changes. This can mean that an integrated graphic element is not an editable shape or image with a recolor property applied. If you’ve selected a shocking purple theme because you liked the layout, you can instantly change the presentation’s overall color scheme by selecting a color palette from another installed theme.
Fonts
PowerPoint has decided that it will allow only two fonts per theme. While this may seem restrictive, having only two fonts will help maintain consistency throughout your presentation. Keeping your presentation restricted to one Heading font and one Body font from slide to slide will ensure a professionally designed look. The place to start when modifying the fonts for your new theme is within the presets. Select the Slide Master and then open up the Fonts drop-down menu in the Edit Theme group and roll your cursor over the font sets in the Built-In group. As you roll over each set, you’ll be able to see instant feedback on your slide.
Effects
You’ll have a variety of effects available to you that will use your theme colors. You can decide if you want your theme to have, among others, a flat vector-art look, a textured look, or a polished, metallic look with drop–shadows. The key with effects is to use them in moderation. Once you’ve decided upon a look for your theme, stick with it.
Saving Your Custom Theme
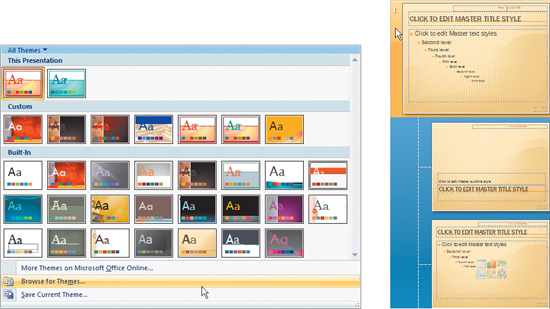
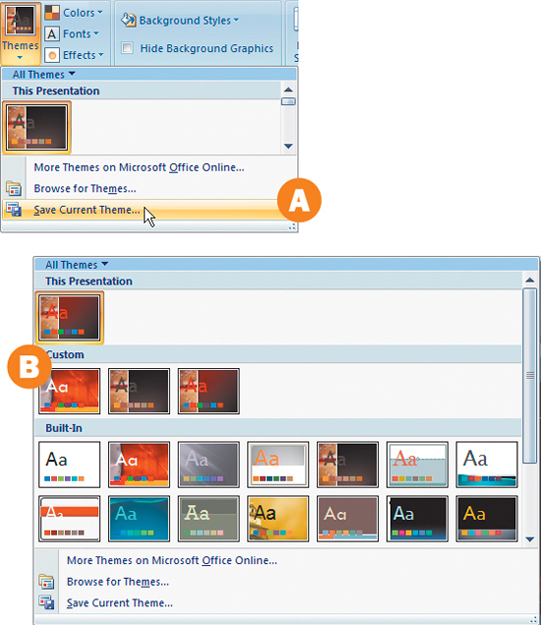
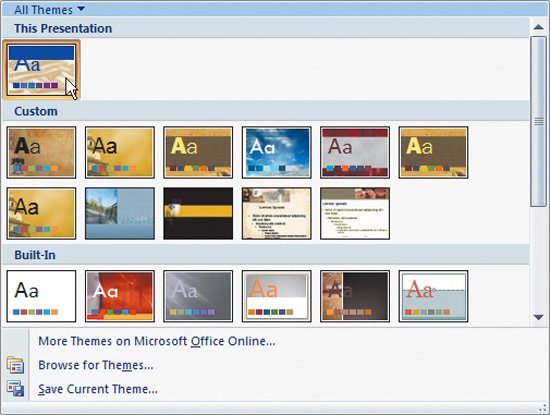
Once you’re happy with your new theme, save it by clicking the Themes button in the Slide Master tab, and then selecting Save Current Theme in the drop-down menu A. Now when you browse through your theme thumbnails, your theme will be listed under the Custom group B.
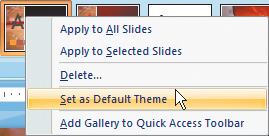
Setting a Default Theme
If you know that you are building this theme as the cornerstone of many presentations that need to have a consistent look and feel, then it’s a good idea to set it as your default theme. In the Design tab, right-click the thumbnail of the theme that you would like to make your default and then select the Set as Default Theme button. It’s also a good idea to encourage anyone else who’s responsible for presentation creation to do the same. It’s easy to apply your custom theme after a presentation has been created, but having the right theme set as a default on the entire presentation team’s computers will prevent inconsistencies. ![]()
Building a Theme from Scratch
Designing Every Aspect of a Custom Theme
1. Start Fresh
From the project CD-ROM, open the HTW Project Files folder and copy the Chapter 5 folder to your local hard drive. This folder contains all of the files needed for the projects in this chapter. Click the Office Button and select New from the drop-down menu. Then select the Blank Presentation within the Blank and Recent group. A completely bare-bones slide opens up in your main viewing pane, with a placeholder for a title and subtitle. There is much more to this “blank” presentation than meets the eye. Under the View tab click the Slide Master button in the Presentation Views group A. Even though this is a blank presentation, PowerPoint is assuming that you’ll probably need a few layouts to get started B.

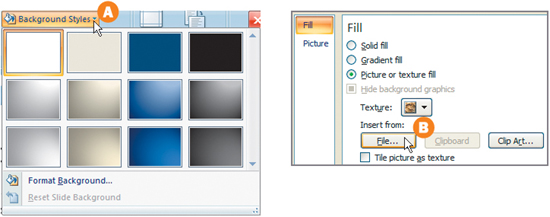
Most of your layouts will depend upon the look of your background. Background design elements will dictate where text and images will be the most readable and pleasing to the eye. Your Theme colors will dictate the default backgrounds available in the Background Styles drop-down menu. While still in the Slide Master tab, click the Background Styles button in the Background group A. Then click the Format Background button to open up other options besides just gradients. Now click the Picture or texture fill radio button and then click the Insert from: File button B. Navigate to the images folder inside the Chapter 5 folder that you copied to your computer and select tan_waves.jpg.
3. Accent Bars
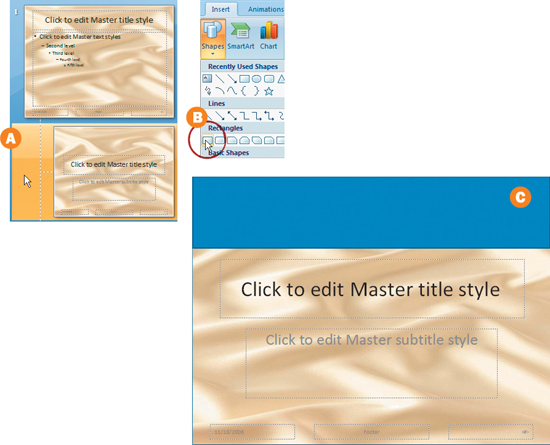
Now we’ll go into our layouts and add in an accent bar. Click on the Title Slide Layout (the first layout under the Slide Master) A. Then click the Insert tab in your Ribbon and Select the Shapes button in the Illustrations group. Select the first rectangle in the Rectangles group B. Your cursor will turn into cross-hairs. Click and drag from the upper left corner of the layout until you have a solid masthead bar C. Repeat this step to form additional top horizontal bars and left vertical bars on various layouts in your theme.
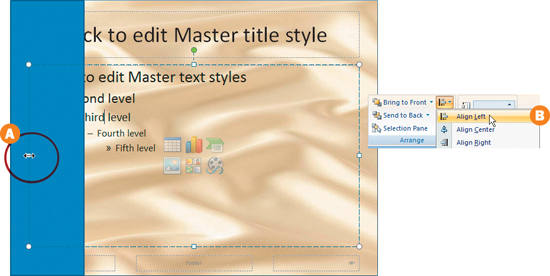
The vertical blue side bar has carried over a graphic theme to the next slide, but now it has obstructed the Master title placeholder, as well as the content placeholder below it. Click each content window and then click on the handles on the left side and drag them to the right A. Now the content on your main title slide will no longer be obstructed. To make sure that you’ve aligned each content window accurately, select them both by holding down the shift key and clicking each one. Next, click the Format tab, and then click the Align Left button in the Align drop-down menu B.
5. Fonts
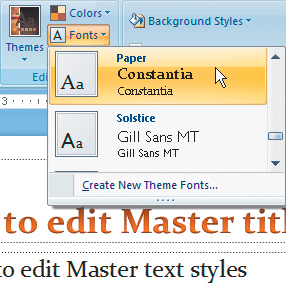
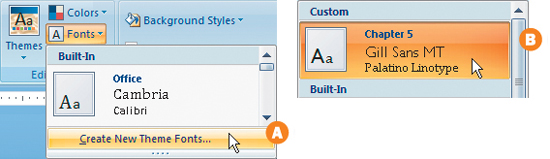
In the Slide Master tab, select the Fonts drop-down menu in the Edit Theme group and then select the Create New Theme Fonts button A. Select any two fonts on your system and name your new Theme fonts “Chapter 5.” Now when you select the Fonts drop-down menu in the Themes group, your new custom font theme is on top of the list B.
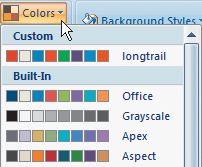
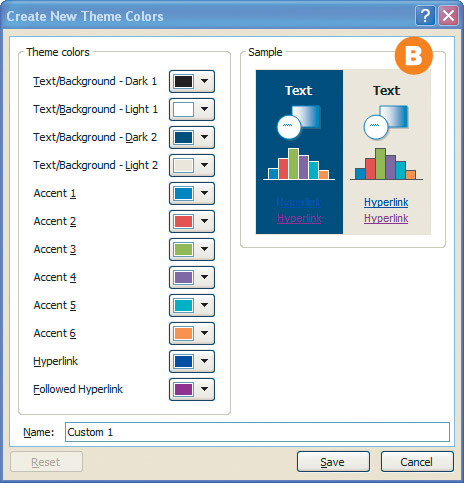
6. Theme Colors
To customize the colors, click the Colors drop-down menu in the Edit Theme group. Now select the Create New Theme Colors button A. The Create New Theme Colors window opens to reveal a series of variables for light and dark backgrounds. Theme colors are broken up into three categories—Text, Accent, and Hyperlink. Text colors are then subdivided into colors that show enough contrast on light backgrounds and colors that will stand out on dark backgrounds.
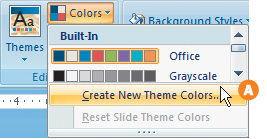
Accent colors and Hyperlink colors need to be visible on both light and dark backgrounds. In the Sample window with a light and dark background split screen, PowerPoint will show you if your colors are on target B. Select each color and modify it. In your sample window, review how much contrast the color has on both light and dark backgrounds. In the name field, type “Chapter 5” and click Save.
7. Save It
In your Slide Master tab click the Themes button in the Edit Themes group, then click the Save Current Theme button. In the File Name field type “Chapter 5” and click Save. ![]()

Slide Masters
The easiest way to have total control over a presentation is to have a good knowledge of its Slide Master and subordinate layouts. If you stay true to the Slide Master when populating your presentation, it won’t be necessary to pull an all-nighter when last minute changes arrive. And they will—we promise.
What Is a Slide Master?
The Slide Master is where all of your globally editable information resides. Within the Slide Master are your backgrounds, font and bullet design choices, and content place holders. The Slide Master determines the font size, style, colors, and bullet treatment for the entire presentation.

Layouts
Each subordinate layout begins its life as a copy of the Slide Master. Content areas are added to give each layout a more specific purpose. Think of your favorite magazine. There are specific ways a feature story is handled. There is a specific way the table of contents page and the letters to editor page are laid out. These layout styles give the reader a sense of consistency throughout the publication even though each one has unique attributes. PowerPoint uses the term layout in the same fashion.
Placeholders
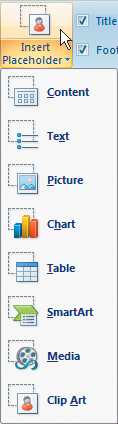
Each layout contains a placeholder for content. When designing layouts in the Slide Master view, you must use the Insert Placeholder command if you want to be able to edit that content in the Normal View. Placeholders are designed to position text and objects like graphics, charts, tables, and media neatly on a slide. They make it clear where you need to add specific content when building a presentation.
What Can Be Modified in the Normal View?
You can modify fonts and placeholder positions in the Normal View. You can also modify an individual slide’s background. A layout is a suggestion; some rules are made to be broken. You may discover that a layout usually works well, but for one specific slide the content area is not large enough to accommodate a chart or text. Content areas or placeholders can be resized in the Normal View if needed. It’s also possible to change a font or font characteristics on just one slide for emphasis.
Multiple Masters
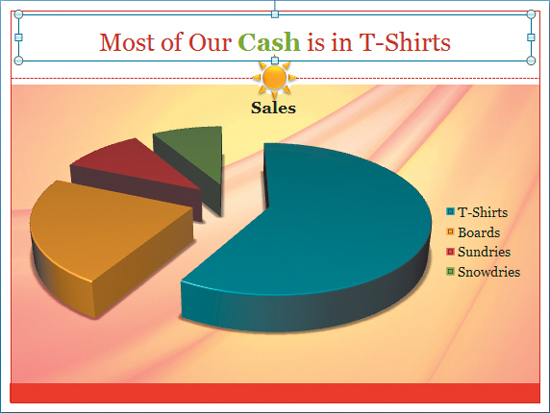
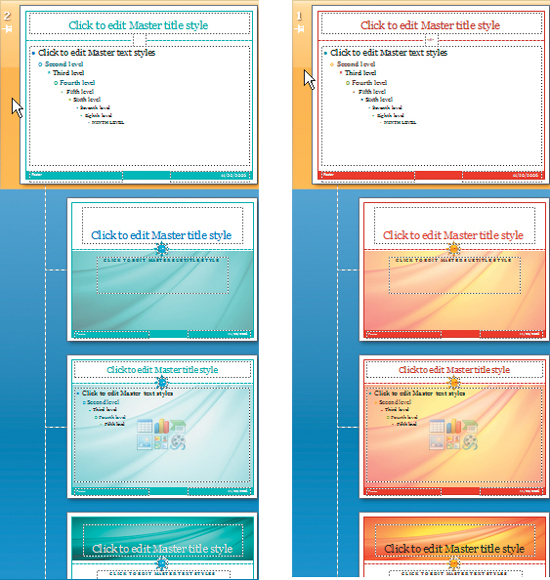
It’s possible to have multiple masters in one presentation. To demonstrate why this is important, we had some fun with a fictional Sun & Snow presentation. There is a consistent brand throughout all the slides; however, within individual slides there is a distinct look for the summer season and one for the winter season. With two complete sets of Slide Masters and Layouts, it’s possible to do a yearly overview in one presentation incorporating both Masters. It’s also possible to focus on just one master if necessary.
Making Global Changes
Proper preparation gives you the ability to make global changes instantly. If your boss tells you that she prefers a stronger, heavier font on all of the titles, you can make one change to the Slide Master and Layouts and it’s immediately reflected on all of your slides. Can you imagine if you needed to reposition a logo that you’d copied and pasted on each slide of an 80-slide presentation? It would take quite a bit of time. If the logo were positioned on a Slide Master Layout, you would only have to reposition it once and the change would be reflected on all 80 slides. It may seem easier to just make a little tweak here and there on a slide in Normal View, but it pays off in the long run to manipulate everything with your Slide Master.
Building Masters for Flexibility
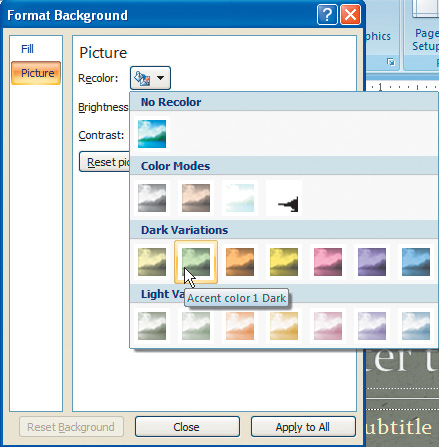
If you want to build a Slide Master that can reflect global changes in color, you’ll need to make sure all of the images you’ve imported (including background images) are formatted with the Recolor option. For background images select the Format Background button under the Background Styles drop-down menu. Then select the Recolor button in the Picture group. Select a color from the Light or Dark Variations thumbnails. Next, select any other non-background photo and click Recolor under the Format tab in the Adjust group. Select a color from the Light or Dark Variations thumbnails. Using that option assigns one of the six accent colors in a Light or Dark Variation to colorize the image. If the Theme colors are changed, your image will reflect those changes. Keep in mind however that this will dramatically affect how your color images look. If you need to maintain the image’s original look, then it will not be an option to reflect global changes in color by changing the Theme colors.
Setting Animations Globally
You can assign animations to your Slide Master Layouts. Assigning animations in this manner will allow you to maintain consistency and to have the option to change your animations globally. We can assure you that no matter how you set up your animations, someone will suggest changing them. They’ll be either too fast or too slow, or too distracting, or not exciting enough. If they’re all set up in the Master Layouts, your response will be, “No problem.” It’s also useful to be able to change the presentation’s timings globally to advance some slides automatically and have others driven by the presenter. We will cover animation in Chapter 6. ![]()
Finding Source Material
Building custom templates requires source images. You’ll need textures and photos to create your own backgrounds. By using your own images, you can craft the perfect look to carry your message. We’ve personally witnessed a day of presentations where the same three templates kept popping up. It’s important that your messages come wrapped in their own look, otherwise they will just blend into all the rest and become digital noise.
Microsoft Office Online
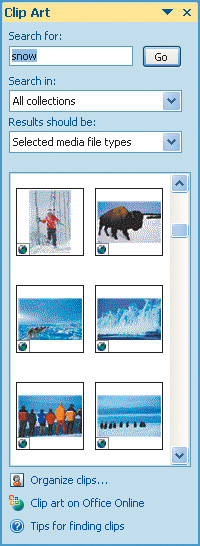
One of your first stops should be Microsoft Office Online. You can browse for artwork in the Clip Art task pane inside PowerPoint. From the task pane you can click the Clip Art on Office Online button to launch a Web browser and search through more than 150,000 pieces of artwork and sound effects. These images are all cleared for you to use in presentations. The primary advantage of this system is that you can browse the files and add them to your basket. When you are done shopping, you just go to “checkout” and the images are downloaded (for free) into the Microsoft Clip Organizer.
Stock Photo Web Sites
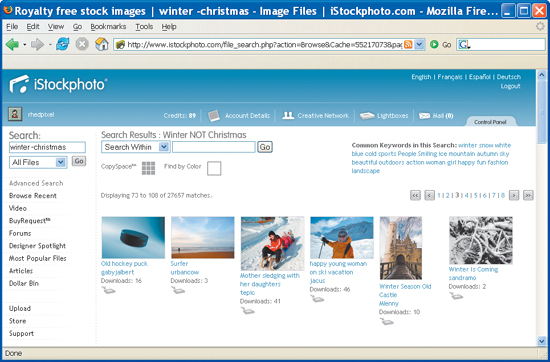
The stock photography industry is a source of great creativity. There are thousands of providers who offer a myriad of choices and licensing options. Some of the highest profile Web sites can be very expensive, but don’t get turned off. Those higher fees are often for exclusive licenses or to cover model and photographer fees. With a little bit of searching you’ll be able to find high-quality images that match your budget. Here are a few of our personal favorites:
• www.iStockphoto.com— Most images cost between $1.00 and $10.00, with several options to choose from. This site is constantly updated with new options and is easy to search.
• www.Shutterstock.com— This Web site offers a variety of subscription plans. It has a large collection, but limits you to 25 downloads a day.
• www.Clipart.com— This extensive Web site boasts over 6 million downloads. The site offers short-term membership plans from one week, but greater savings are with monthly and annual plans.
• www.Fotolia.com— This Web site offers several options and search criteria. Images are affordably priced at $1.00 to $3.00 per image.
• www.Stockxpert.com— This extensive Web site features great organization and images. Most low-resolution images are priced at $1.00 to $2.00.
Getting the Resolution Right. Most stock images Web sites offer photos at various resolutions. The size you needs will depend on output. Usually the more expensive images are intended for high-resolution print output. You’ll usually be able to get away with the lower quality or multimedia files. Just look at an image’s sizing details (measured in pixels). Generally, if an image is 1024 x 768 pixels (or greater), it will work in your presentation.
Free Image Web Sites
You need to be careful when browsing “free” image Web sites. There are a lot of images viewable online, but that does not mean they are free to use. For example, nearly every image you’ll find using Google Image Search (www.images.google.com) is copyrighted. Be sure to look for usage rights and explicit permission to use images you find online. If you’re careless you can open yourself up to major legal and financial risk. Here are some free image sites or directories worth checking out:
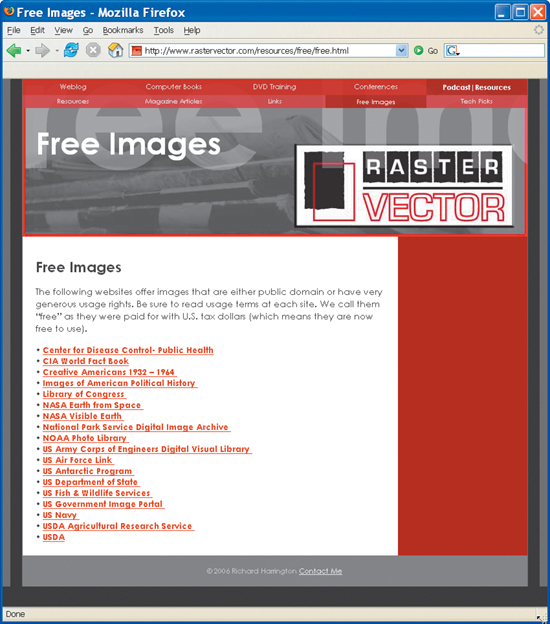
• Raster/Vector Free Images page (www.rastervector.com/resources/free/free.html)— This is a blog and resource site on computer graphics that we run. On this page you will find links to numerous government Web sites with high-quality images that are made available for free (specific usage rights on each Web site).
• Morgue File (www.morguefile.com)— This Web site provides a large variety of images that are generally free to use (see its Terms page).
• Flickr's Creative Commons pool (www.flickr.com/creativecommons)— This directory site allows you to search through images that others are sharing for use with Creative Commons licenses.
• Everystockphoto (www.everystockphoto.com)— This Web site also indexes items that are made available through Creative Commons licenses.
Creative Commons. Creative Commons is a movement that allows for the legal sharing and reuse of cultural, educational, and scientific works. To learn more and find participants visit www.creativecommons.org.
Digital Camera
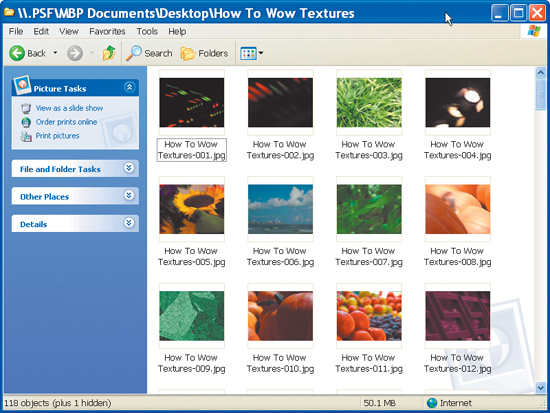
Even if you don’t consider yourself a good photographer, a digital camera can come in handy to take photos of what you need. You can spread objects out on a conference table and start shooting your own backgrounds. Take a quick field trip, and you’ll come across all sorts of great textures that you can use to start your own backgrounds. To inspire and motivate you, we’ve included some digital photos that we’ve taken. You’ll find them on the book’s CD-ROM in the Stock Photos folder.
From Your Organization
If you are creating a template for your office, association, or professional group, chances are it already has some print materials or a Web site. Find out what assets already exist. Are there photos and a color palette? Perhaps someone has already purchased stock images and locked in a “look.” If you are creating a new presentation template, always check first to see if any assets exist.![]()
Creating Custom Backgrounds in PowerPoint
Photoshop-Style Techniques for PowerPoint
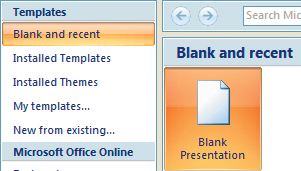
1. Open a Blank Presentation
Let’s start with a Blank Presentation. Click the Office Button and then select the New button. Click the Blank and recent button. Once you’ve created a background that you’re happy with, we’ll show you how to convert it for use in any later presentation.
2. Add the Background on the Master
If you create the background on the Slide Master, it will automatically populate all of the slides in your template. Open the View tab and select the Slide Master button in the Presentation Views group. Select the Slide Master. It’s the first slide in the series of thumbnails on the left. In the Background group, click the Background Styles drop-down menu and then select Format Background. Select the Picture or texture fill radio button and then select the Insert from: File button. Navigate to the Images folder in the Chapter 5 folder that you previously copied to your computer and select tan_waves.jpg. Then click the Close button in the Format Background window.
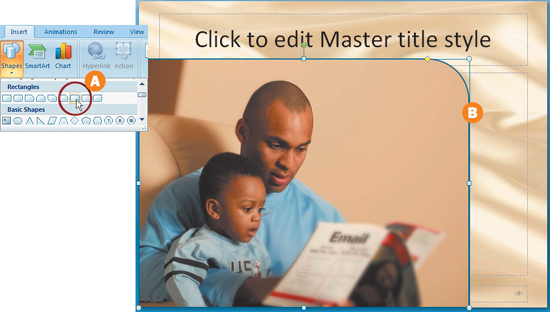
3. Use a Shape to Carry a Photo
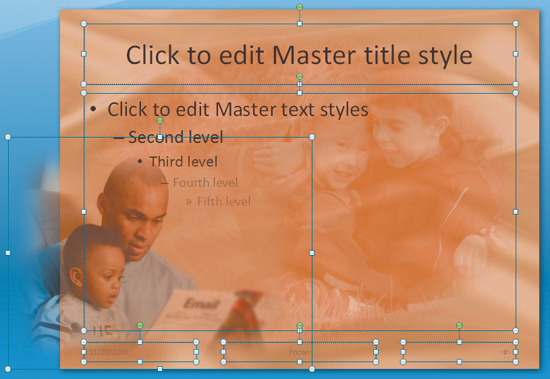
Now we’ll add a photo on top of our background. To have a little more control of your image, place it within a shape. Click the Insert tab and select Shapes from the Illustrations group. Select the Round Single Corner Rectangle A. Your cursor will change into crosshairs. Click and drag to form a large shape on your screen. Now select the Format tab. Click the Shape fill button in the Shape Styles group and select Picture from the drop-down menu. Navigate to your Chapter 5 Images folder and select FatherandSon.jpg and this will fill your shape B.
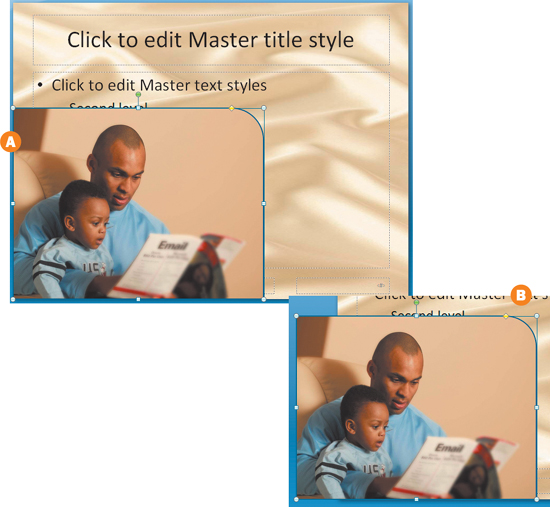
4. Arrange the Photo
Scale the photo down by clicking on a corner handle and dragging toward the center of the photo A. Now position the photo so that the back edge of the toddler’s head is aligned with the left edge of the slide B. In the Format tab select the No Outline button from the Shape Outline drop-down menu.
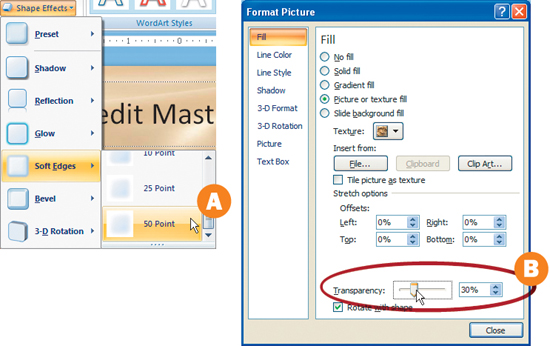
5. Composite the Photo with the Background
With the photo still selected, click the Shape Effects button in the Shape Styles group. Select 50 Point from the Soft Edges drop-down menu A. Now select the Format tab under Picture tools heading. In the Adjust group, click the Brightness button and select Picture Corrections Options. Now click the Fill button and adjust the Transparency to 30% B.
6. Add Another Photo
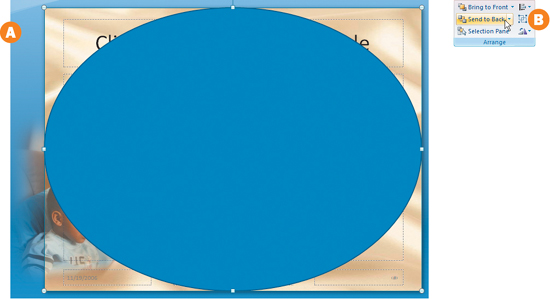
In the Insert tab select an oval and drag it so that it touches each edge of the slide A. In the Format tab select the Shape Fill drop-down menu and select Picture. Navigate to your Chapter 5 Images folder and select Boys.tif. Under the Picture Tools heading, select the Format tab. Click the Send to Back button in the Arrange group B.
7. Composite Photo
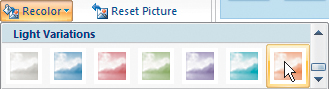
With your photo selected, click the Picture Effects button and select 50 point from the Soft Edges drop-down menu. In the Adjust group select the Recolor drop-down menu. Then select Accent Color 6, the last option in the Light Variations group. Now, in the Brightness drop-down menu in the Adjust group click on the Picture Corrections Options group. Click the Fill button and adjust the transparency to 50 percent.
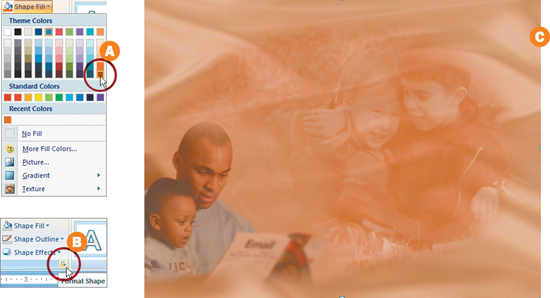
In the Insert tab, select a rectangle shape from the Shapes drop-down menu. Click and drag it so that it covers the entire slide. Select the Format tab and then click the Shape Fill drop-down menu. Select a warm brown color A. Now click the very well-hidden Format Shape button B. Click the Fill button and adjust the transparency to around 65 percent. Next, click the Shape Outline button and select No Outline from the drop-down menu to remove any unwanted color. The warm brown color overlay will help tie all of the colors together for a more cohesive look C.
9. Convert the Composite into a Flattened Image
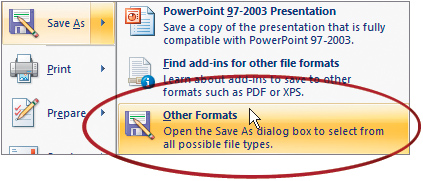
To improve your presentation’s performance, it’s best to convert this composited background into a flattened image. In the View tab select Normal in the Presentation Views group. In the Home tab select the New Slide button and select the Blank layout thumbnail. Click the Office Button and select Save As, and then select Other Formats. In the Save As type field, select JPEG. Next, in the pop-up window select Current Slide Only. ![]()
Creating Custom Backgrounds with Photoshop Elements
This Feature-Rich Application Makes Backgrounds Easy

1. Download and Install the Free Trial
Adobe Photoshop is the number one computer graphics tool on the planet. It is used in nearly every industry, from Web design and magazine publishing to medical imaging and forensic science. But all that power can cost you. Fortunately Adobe has distilled some of that power into an affordable package that is well-suited for the business professional. Adobe Photoshop Elements is priced at only $89 to download or $99 in stores. For this you get to explore many options for creating backgrounds to use in PowerPoint. Download the free trial from Adobe’s Web site (it will work for 30 days) in order to complete these exercises—www.adobe.com/products/photoshopelwin.
2. Launch Photoshop Elements
Download and install the Photoshop Elements trial. After installation is completed, launch the application. The Photo-shop Elements welcome screen opens with choices for starting points. Click the Edit and Enhance Photos button to access complete controls. The application launches and presents you with an activation box. Click the Continue Trial button to continue using the program.
Photoshop Elements can create a new document using predefined sizes. Choose File > New > Blank File to open the Document Window. Click the preset list and choose 1024 X 768 to create a document sized for a standard PowerPoint presentation. Click OK to make the new document.

4. Create a New Background with Built-In Templates
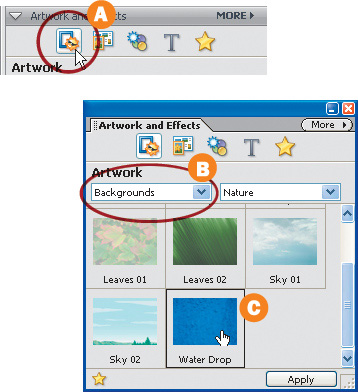
There are several built-in templates for backgrounds that are included with Photoshop Elements. Select the Artwork and Effects window (if its not visible choose Window > Artwork and Effects). Click the category button to access built-in presets A. From the Category list choose Backgrounds B. Then from the subcategory list explore the different options C. For this exercise, choose the Nature subcategory and choose the Water Drop background. Double-click the thumbnail to apply the background.
Even More Backgrounds. You will find 150-plus textures on this book’s CD-ROM. You can open these textures and use them as backgrounds for this technique. Choose File > Place to add an image into your document; navigate to the desired folder (using Thumbnail view is best). Select the image you want and click Place to add it to your document. You can scale the image by dragging its corners, as well as by positioning the image and pressing the Enter key to apply the image.
5. Convert the Background into a Layer
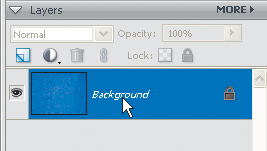
Photoshop uses a system of overlapping artwork called layers. Each layer can hold artwork, text, or logos. In order to further modify the Background it needs to be converted into a layer. In the Layers palette, double-click in the word “Background.” A new window opens asking you to name the layer. Call this layer Water Drops and click OK. Save your file by choosing File > Save. Name the file WaterBG.psd and click OK.
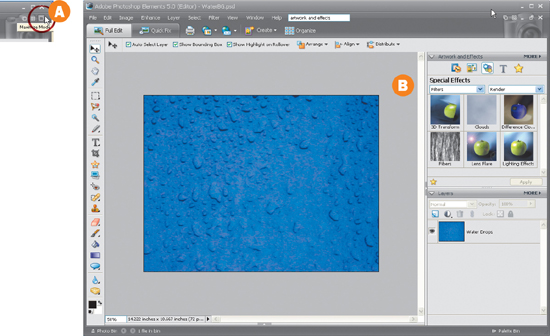
For these next steps, it will be easier of you can see a global view of your image. In the upper-right-hand corner of the application window, click the Maximize Mode button A to bring the image window full-screen. In order to see the borders of your image, Choose View > Zoom Out until you can see a gray border around it B.
7. Add Screen Layers
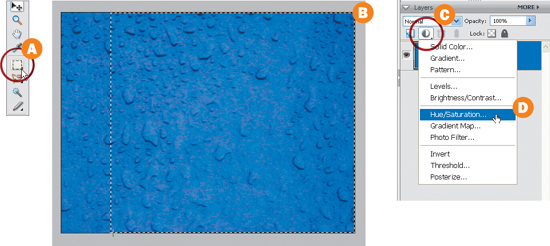
In order to create backgrounds, we can screen back portions of the photo to make it lighter. These “empty” areas are well suited to hold text or charts. These screen layers will be created using a special adjustment layer. Select the Marquee tool by pressing the letter M, or click the Marquee in the Tools window A. Click in the top right corner and drag down to the left in the window to create a marquee selection that leaves a small strip of color on the left edge B. This selection will become the screened area. In the Layers palette, click the Adjustment Layer icon C and choose Hue/Saturation D.
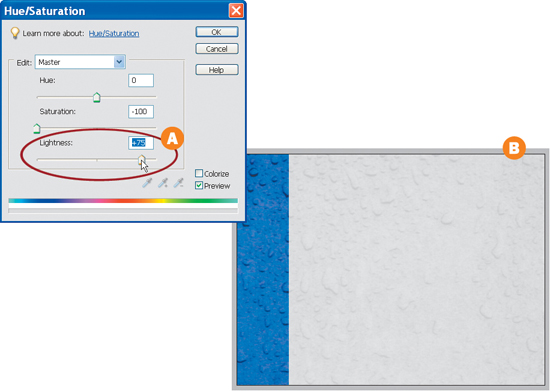
8. Adjust Saturation and Lightness
A new window opens that allows you to adjust the hue, saturation, and lightness of the selected area. Pull the Saturation slider to the left to desaturate the image (this removes all color). Next adjust the Lightness slider by dragging it toward the right A. Pick a value that creates a white textured background B.
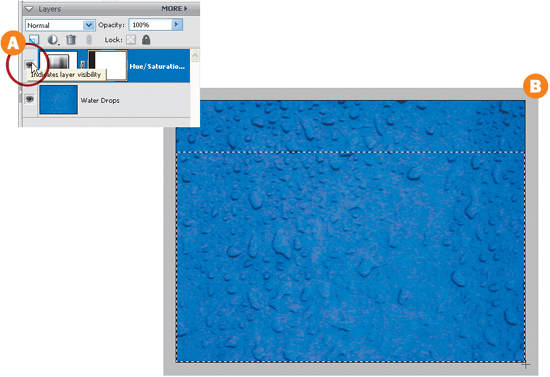
9. Make Another Background
Turn the adjustment layer off by clicking the eye icon next to its name A. You can now create a new selection using the Marquee tool. Create a rectangle selection that leaves a strip of color across the top edge B. Add a new Hue/Saturation Adjustment layer and adjust Saturation and Lightness to taste.
One advantage to using Photoshop is that you can add a logo file to your slides and have it stay in a consistent position throughout your slide show. Choose File > Place and navigate to the chapter exercise folder you copied to your computer at the start of this lesson. Choose the file RockRiver.png and click Place. The logo is added to the center of your slide. Click Enter to apply the logo (this large version will serve as a title graphic) A. To make a smaller version, right-click on the logo in the Layers palette and choose Duplicate Layer. Name the layer RockRiver Small. Click on the corner of the logo and scale it down. Size the logo small and position it in the lower left corner B. Press Enter to apply the changes to the logo.

Logos with Transparency. If you need a logo with a transparent background, look for files with these extensions: .png, .eps, or .ai.
11. Save Your Work and Background Images
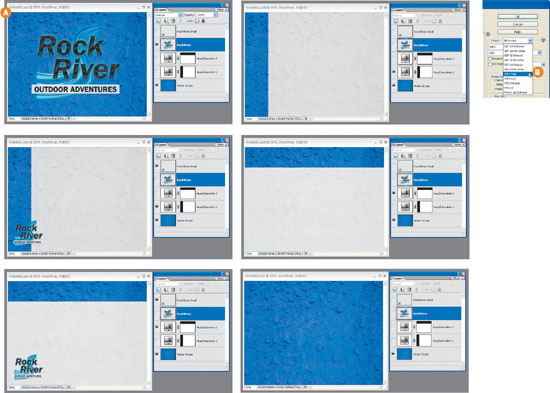
Before moving forward, it is a good idea to save your work. Press Ctrl+S to save your file. Your document has five layers and several combinations that will be useful for the PowerPoint template. By turning the visibility (eye) icons off and on for different combinations, you can create several different looks. Use the layer combinations shown here to create different options for PowerPoint A. After creating a combination, choose File > Save for Web. In the preset pick JPEG High B and click OK. In the file services box, pick a destination, give the file a unique name, and click Save.
12. Close Photoshop and Switch to PowerPoint
Now that your images are saved as JPEG files, you can close Photoshop (be sure you’ve saved your work). You can now switch to PowerPoint and use these new background images in an existing Template or Theme (or create a new one). To add a background image, switch to the Design tab. In the Background group click the Background Styles button and choose Format Background A. In the Format Background window choose Picture or texture Fill, then click the File button B and navigate to the new background image and click Insert. When satisfied, close the window. ![]()

Create Even More. Now that you have a template built, creating new backgrounds is a snap. Just replace the logo layer with your own content. Additionally, you can easily swap out the WaterDrop layer and use additional textures found in Photoshop Elements, those included on the CD-ROM, or any of your own.
Creating a Custom Template
Often, you will need to create multiple presentations that cover the same type of information in a similar order. Once you have determined the best approach to guide your audience effectively through a presentation, it’s a good idea to capture it and create a template that you can continue to refine as you receive feedback.
Where to Start
You can create a custom template from any presentation, or you can build one based on an existing theme. To illustrate the components of a template, we’ll look at one that starts with a blank slate. Open up a new Blank Presentation. First, you should apply a Theme. You can find Themes under the Design tab. Earlier in the chapter we created a Theme called Chapter 5. Click the Chapter 5 thumbnail in the Themes group.
More Templates. Have a look at the Microsoft Office Online Web site (http://office.microsoft.com) for more templates. Keep in mind that you can download any template and update it using your preferred theme.
Layouts
Most Themes have a series of layouts built in for you to choose from. It’s usually not necessary to incorporate every layout into a template. Decide which layouts will best suit your presentation and integrate them by clicking the New Slide button in the Home tab. When you click the New Slide button, the drop-down window will show you all of the available layouts in the Theme that you’ve selected.
Modifying Layouts
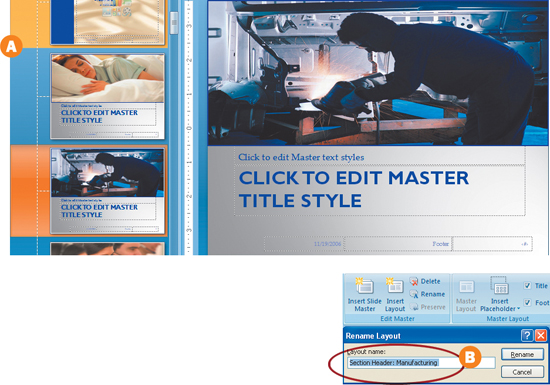
You may have different topics that you intend to cover such as divisions of a company, age groups in a study, or stages of a project. You can help your audience differentiate between topics by modifying the backgrounds, photos or accent colors of a particular layout in the Slide Master view. Click the Home tab. Select the slides that you would like to modify and then click the Duplicate Selected Slides under the New Slide button. Now you can select the items that you want to modify such as photos, font colors, object colors, and backgrounds in the Slide Master tab A. Be sure to rename each layout specifically using the Rename button in the Edit Master group B.
Corporate Logos
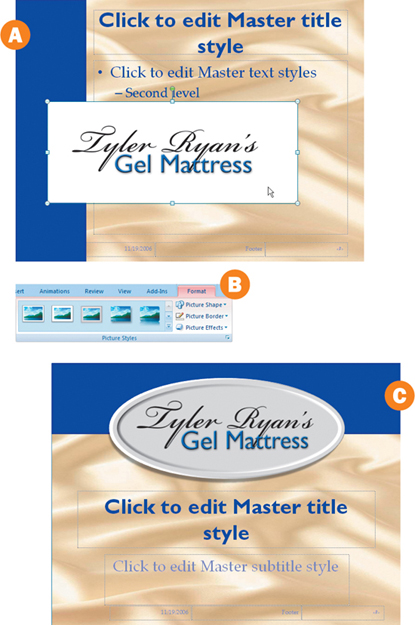
It’s always best to start with a vector-based logo, as we discussed in Chapter 3. More often than not, however, you’ll be faced with incorporating a raster-based logo into your template. You can import the logo as a picture and then manipulate it to integrate into the presentation. The logo will usually be rectangular in shape on import A. In the Picture Styles group under the Format tab B, you can manipulate the shape, border, and overall effects to match your presentation. Now the logo matches the presentation and is more dynamic and appealing C. Once the logo has been imported and modified, it can be copied, pasted, and resized to fit on any other Master Layout or individual slide.
Scaling 3-D Objects. When you scale some 3-D objects, the Bevel, Depth, and Contour may need to be adjusted to conform to the new size.
Slide Content
When you incorporate new slides into your template, they are just physical representations of your Master Layouts. They will contain placeholder areas for text, charts, objects, and images. They will not provide an order or information for presentation organization. If you want guide your template user, type in sample text that is intended to go with the layout. This will help the template user understand how to best use each layout and help preserve consistency.
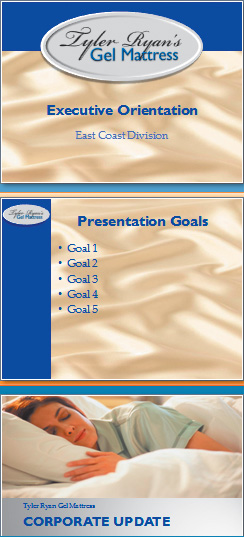
Refining the Template
When all your layouts have been modified, build a sample presentation. Order your slides logically. In our example we’ve put together a template that covers an executive overview. We’ve split up the company by division. Each division has a unique Section Header and is named appropriately. Here is your opportunity to make some suggestions. We’ve added a slide after our introductory slide that is titled “Presentation Goals,” and we’ve also added a slide at the end titled “Conclusion.” Each slide consists of a short series of bullets. This can work as a subtle reminder for the presenter to recap at the end of a presentation to aid in audience information retention.

Checking for Consistency
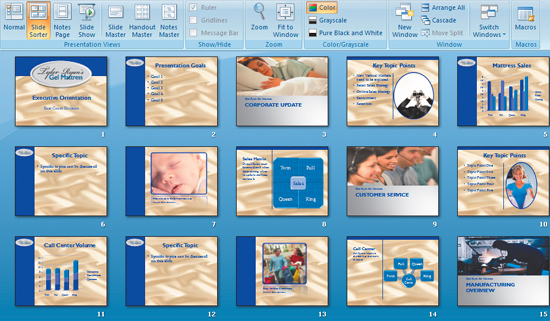
After proofing each slide of your template, it’s often a good idea to view the entire template in Slide Sorter view. At a glance you can see if your template has a consistent look and if there are any glaring errors. This is also a good way to reorder your slides if the need for a better sequence becomes evident.
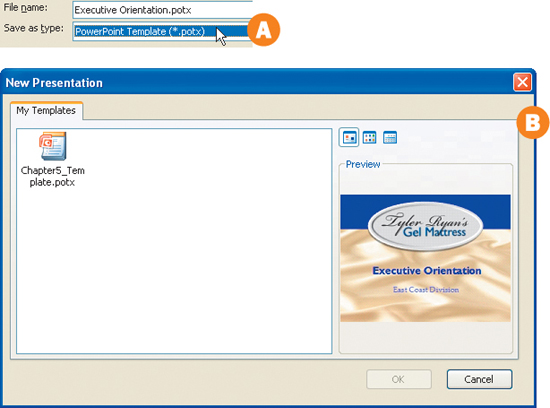
Saving Your Template
What makes a PowerPoint presentation a PowerPoint template is simply how you save it. Under the Office Button click Save As and then Click PowerPoint Presentation. In the Save as type: window be sure to select PowerPoint Template (*.potx) A. When you open a new presentation, by selecting the My Templates button you will have the option to select from all of the templates that you’ve created. Clicking this button will reveal a New Presentation window. Now you can review your templates by seeing each first slide in a Preview window and selecting the one you want B. ![]()