
Chapter 7. Delivering the Presentation
How to Take a Presentation on the Road and Share it with Others


MAKING THE PRESENTATION MOBILE 167


CREATING AND CUSTOMIZING HANDOUTS 174

CREATING A KIOSK PRESENTATION 177

IMPLEMENTING REHEARSED TIMINGS 179


SAVING FILES AS STILL IMAGES OR PDFS 182


Final Proofing
Before you send a presentation out the door, you must closely examine it for errors and inconsistencies. We find that no matter how much scrutiny and care is applied during the construction of a presentation, errors still manage to sneak in. But with some care, determination, and teamwork you can deal with embarrassing mistakes in the comfort of your cubicle rather than on center stage.
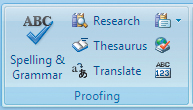
Spell Checking
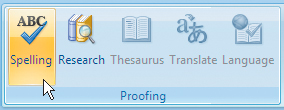
PowerPoint includes a built-in spell check that can be used to catch most spelling errors. In fact, you’ll occasionally see that words are underlined with a jagged red line. That line indicates a misspelling (or a word that has not yet been added to the PowerPoint’s dictionary). The Spell check can be invoked by choosing the Review tab in the Ribbon and clicking the Spelling button. Alternately, you can right-click an underlined word and pick a replacement from a list of suggestions.
High Tech and Product Names. Brand names, technology words, product names, or proper nouns may be missing from the built-in dictionary. If you know a word is correct, click the Add button within the Spelling dialog box.
Grammar Checking
Regular users of Microsoft Word will be surprised and disappointed that there is no built-in grammar check for PowerPoint. If you need to clean up a large portion of text and want to harness a grammar check command, then you’ll need to use the shared Office clipboard. You can select a block of text and choose to copy it (Ctrl+C) to your clipboard. Switch to Word and paste the text into a new document. There you can run a grammar check by choosing the Review tab and clicking Spelling & Grammar. The text can then be copied back to your clipboard so it can be returned to PowerPoint.
Viewing as Grayscale for Contrast
Not all slide color combinations are well suited for presentations. Some color combinations lack adequate contrast, which can make a slide hard for the audience to comprehend. This can be especially problematic for older audience members, those with poor vision, or those who may be color-blind. Printing your slides as a grayscale image first is a great way to check for proper contrast.

Color Contrast. When you are comparing colors and combinations, it may be difficult to understand where contrast problems come from. Remember there are three components to a color—Hue, Saturation, and Luminance. Hue is the color of the spectrum that is used, Saturation is the intensity of that color, and Lightness is the presence of white or black. When Hue and Saturation are removed it is easy to see problems in contrast.
Proofing a Hard Copy
One point we make frequently is that it’s hard to catch a mistake if you don’t change your setting. Mistakes made while typing on a computer are much harder to spot when proofreading on a computer. The best way to spot errors is to go the traditional route when proofing. Print out a hard (paper) copy of your slides to mark up, then take a red pen to the page and look for errors. This method of catching mistakes really does work.
Having a Friend Help You Out
Related to catching errors on your own is calling upon a peer to help you out. If a presentation is really important you should really enlist another set of eyes. We find that a coworker can often find errors that we miss. Don’t be afraid to ask for help; it will only benefit your presentation.
Taking It to the Big Screen
We like to do a click-through of a presentation on a large screen in order to look for errors. By running your presentation on a projector, you can create a situation where errors stand out easily. This “tech rehearsal” is a great time to look for glitches, missing transitions, and broken links. Actors hold several dress rehearsals before opening night; the goal is to work out all of the kinks in the show before there is a live audience. Needless to say, this is a very good idea in the world of presentations. ![]()
Customizing the Show
Use One Presentation to Create Custom Shows
1. Prepare Your Files
In order to complete this exercise (and others in this chapter) you’ll need to copy the files to your local computer. From the project CD-ROM, open the HTW Project Files folder and copy the Chapter 7 folder to your local hard drive. This folder contains all of the files needed for this chapter. Open the file CH7_The_Key_to_Effective_Presentations.pptx.

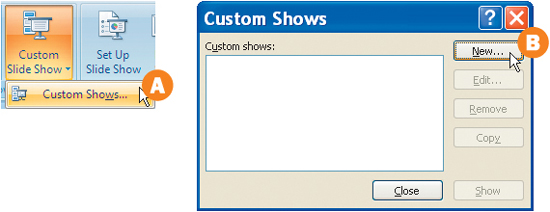
2. Create a New Custom Show
In your Ribbon, Select the Slide Show tab. In the Start Slide Show Group, select the Custom Slide Show button and then the Custom Shows button A. The Custom Shows window will open. Click the New button to create a Custom Show from your existing slides B.
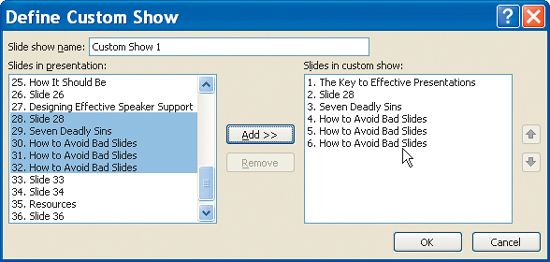
3. Define Your Custom Show
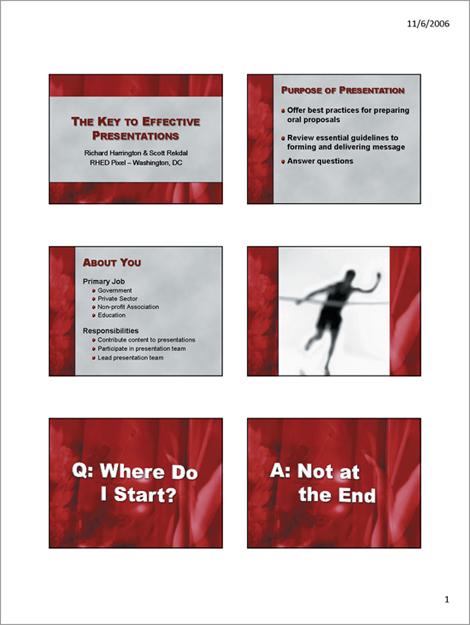
The Define Custom Show window is divided into two sections—the Slides in presentation window and the Slides in custom show window. In the Slide show name box, type in 7 Deadly Sins (always, name your custom shows to ensure that you’ll be able to identify them quickly).
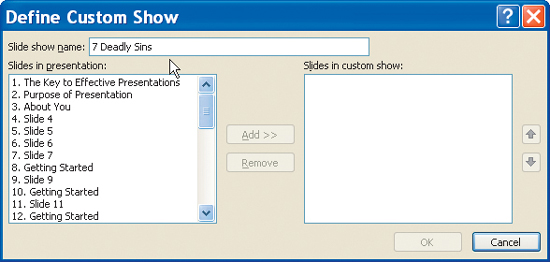
Select Slides 1, 28, 29, 30, 31, 32, and 33 and then click the Add button (if you hold down the control key after you click slide one, you can select each additional slide as well) A.
To reorder the slides in your custom show, select the slide that you would like to move and then click the up or down arrows to change its order in the show B. Click OK.
5. Test Your Show
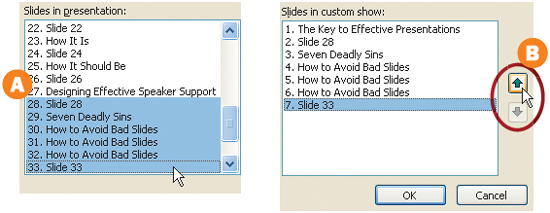
After you click OK, the Custom shows window will open, showing you the custom shows that are available. Select the 7 Deadly Sins show and then click the Show button. Your presentation will begin. Click through your custom show to ensure that each slide that you’ve selected in the Define Custom Show window is indeed displayed in order.
6. Build Multiple Custom Shows
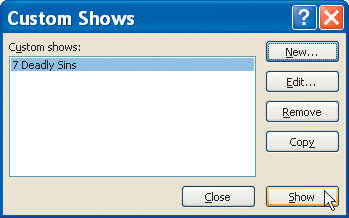
Now that you’ve tested your custom show, go back and repeat the process for another custom show. In the Slide Show tab, click the Custom Shows button. Then 7 Deadly Sins and the additional show that you’ve just created will appear as options in the drop-down window.
Now it is possible to have a complete corporate overview, with a custom show for each division or each product, or an entire semester broken down into custom shows for each lesson plan.
Another way to customize a presentation quickly is to hide selected slides. It’s useful to hide slides when you’re not sure if you’ll have enough time to go into detail. Then if a question is asked or if you have more time than expected, they are there for you to call up. Select a slide thumbnail on the left of your main viewing window and right-click it. Select Hide Slide from the content menu. The thumbnail will fade, and a line will cut through the slide number, indicating that the slide is hidden.

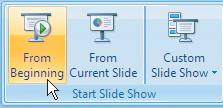
8. Run the Presentation with Hidden Slides
Go to the Slide Show tab in the ribbon. Click the From Beginning button in the Start Slide Show Group. Advance through the presentation. The presentation will run as if the slides that you’ve hidden do not exist.

9. Show Hidden Slides
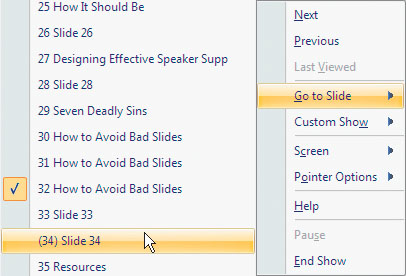
If you need to refer to a hidden slide, there is an easy way to do it. With the presentation still running in Slide Show mode, right-click anywhere on the screen. A menu will appear. Click the Go to Slide button. All of your slide titles will appear (it’s quickly apparent why it’s important to make sure each slide is named here). You’ll notice that the slide numbers that are hidden appear within parentheses. Select a hidden slide. The hidden slide will be temporarily unhidden. You’ll also notice that you can access your custom shows on the fly from this menu. ![]()
Making the Presentation Mobile
There’s a Lot You Can Do to Get a Presentation Ready
1. Open the Presentation You Want to Prep
In order to optimize a presentation, you’ll need to have the document open. You can use the same project file that you opened earlier in this chapter. Be sure to have all fonts active, and run the presentation off a disk that can be modified (in other words, not a CD-ROM).
2. Save a Copy of the Presentation
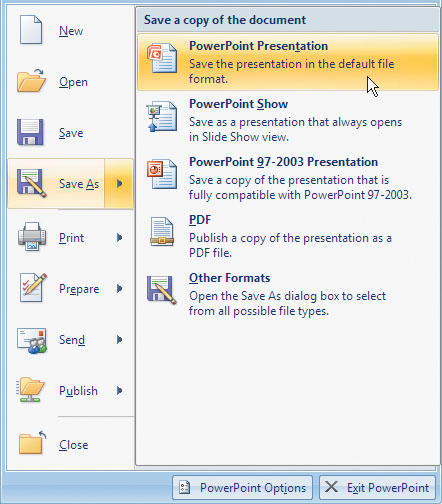
Before you significantly modify the presentation, it’s a good idea to back up your work. An easy way to do that is to use the Save As command. In the ribbon, click the Office Button. Choose Save As > PowerPoint Presentation and rename the file. We recommend keeping the existing name but adding an additional word, Optimized.
A presentation file’s size is often greatly affected by the digital photos inside it. Many users drop in full-quality images direct from their digital cameras or scanners. These files are higher quality, as they are often intended for printing, which requires the extra information to make a clean print. Screen graphics, however, are much lower quality. By optimizing the images in your presentation, you can make the size smaller, which in turn will make slides load faster and make it easier to move a presentation to another machine.
In order to optimize images, you must have an active selection. Switch to slide 4 and select the photo of a runner. Click the Format tab in the Ribbon. In the Adjust Group, click the Compress Picture button A. A new dialog box opens; click Options to access greater controls. You have several options B. We usually choose to optimize for screen at 150 ppi. When ready, you can choose to apply the compression to the selected photos only or to all of the photos in the presentation.
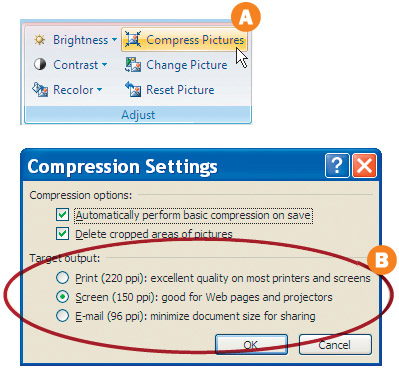
Why 150 ppi? Choosing 150 ppi (pixels per inch) strikes a good balance between file size and image quality. The 150 ppi setting is the same quality as a newspaper. It is more than you need for the screen (which is usually 72-96 ppi) and enough to produce acceptable-quality printouts. Since most users print their slides at a smaller size, the slides will print very clearly. Plus, this image optimization only applies to photos (or raster) art elements. Vector artwork will always print at the maximum quality of your printer.
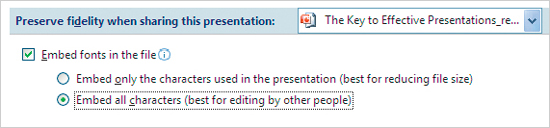
4. Embed the Fonts
In order to avoid font errors on your presentation machine, you’ll need to ensure that all fonts you’ve used make the journey too. PowerPoint can embed fonts into a presentation, which will allow you to open and modify your slides on another machine without having the font loaded.
To enable font embedding, click the Office Button in the Ribbon. Choose the Save category, then enable Embed fonts in the file. We recommend choosing the Embed all characters option for greater flexibility.
For the Font Paranoid. If you really want to be safe, you can access your Fonts Control Panel. From here you can select the fonts you’ve used and copy them to your project folder as a backup. Redundancy is okay when it’s your presentation that’s on the line.
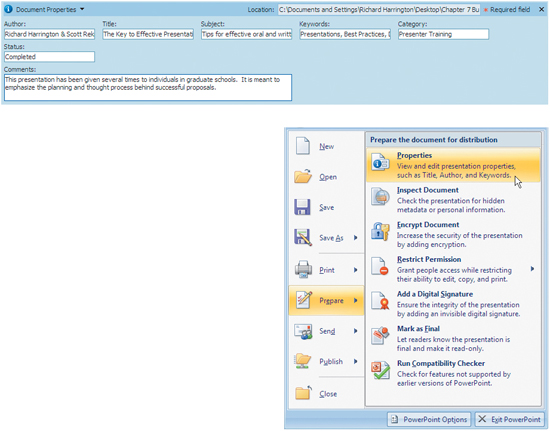
Before you send the presentation out the door, you might want to put your name on it. By modifying the document properties you can insert biographical information that makes it easier to claim ownership of a slide show.
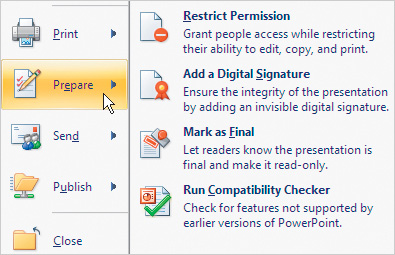
Click the Office Button in the Ribbon and choose Prepare > Properties. A pane opens above the slide presentation allowing you to enter several pieces of information about the slide show. This can be helpful when sharing the presentation or sifting for content. If you click the drop-down menu next to Document Properties you can access Advanced Properties including statistics for your show’s content and a list of review and approvals. You can click the X to close the Document Properties pane.
6. Inspect the Document
If you are concerned about releasing personal information with your slide show, then you should let PowerPoint inspect it to clean the file. Click the Office Button in the Ribbon and choose Prepare > Inspect Document. If you have any unsaved changes, PowerPoint will prompt you to save the file first. In the Document Inspector window, ensure that all tasks are checked so they will be performed, then click the Inspect button. For this presentation file PowerPoint will warn you that you have comments attached and give you the option to remove them (in this case, just click cancel and leave them intact).

PowerPoint 2007 adds new features (such as SmartArt and character styles) that are not fully compatible with older versions. Click the Office Button in the Ribbon and choose Prepare > Compatibility Checker (the presentation may take a few moments to prepare itself, so don’t worry about the pause).
After the check is completed, PowerPoint will generate a series of warnings about saving to an older format. Usually these warnings mean that you will lose the ability to edit certain features of your slide if you save to a backwards-compatible file. You can click OK to close the list of warnings.

Why Go Back? You may wonder why you’d save a PowerPoint 2003 format presentation. The simple answer is that you may not have a choice. If you are unsure of which version of the software will be available to you on the presentation computer then backwards compatibility is a must. After all, not all companies (or individuals) upgrade the software as fast as you (the smart and industrious individual that you are).
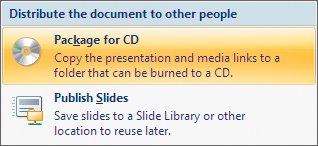
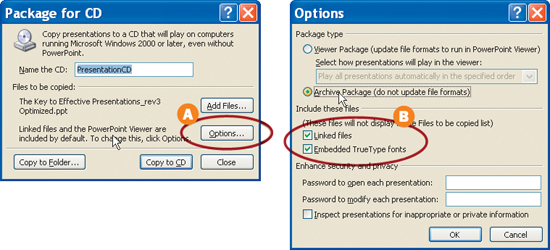
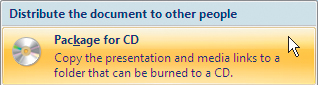
8. Gather Source Files & Package for CD
Now that you have proofed and tested your presentation file it is time to bundle that presentation so you can move it to another machine. If you’ve followed our advice about keeping project files together in one folder, then you should be able to just copy that folder to some form of removable magnetic or optical media (see Mobile Media next in this chapter). However, if you are a little less organized, PowerPoint offers a helping hand. You can click the Office Button and choose Prepare > Package for CD. A warning box appears to let you know that a backwards-compatible file will also be created, click OK to continue and the Package for CD window opens. Click the Options button A to specify a few advanced settings. Make sure that both Linked files and Embedded True Type fonts boxes are checked to gather more source materials B. If you’d like you can choose to Archive Package, which will simply gather the files and not make a new backwards-compatible file. When ready, click OK. You can now choose to Copy to Folder or Copy to CD depending upon your needs. We usually use Copy to Folder and then move the files manually to a target drive. Click Copy to Folder to complete the archive procedure. You now must set a folder name as well as a destination, then click OK. Another box asks you if you are sure you want to complete the task and sure that you trust all of the sources; you can go ahead and click Yes. When the task is completed, you must click Close to close the Package for CD window. ![]()
Mobile Media
Successfully taking a presentation from your cubicle, corner office, classroom, place of worship, or garage out to the masses will require a basic knowledge of mobile media. Knowing the type of media to carry that message is half the battle. You’ll also need to make sure that all of the files are transferred properly with security options enabled (if necessary). As with any new media, before purchasing any new hardware, it’s best to check out all of the customer reviews.
Using Mini USB Flash Drives
KRZYSCIN/ISTOCKPHOTO
The ability of this device to put several gigabytes of information on a drive that is roughly the size of your thumb makes going mobile a snap. A flash drive works the same way your internal drives work. Just drag and drop, copy and paste, or save to one of these mini-drives and you’re ready to plug it into a backup computer if something goes wrong (make sure to save a version as PowerPoint 97-2003 as well). Everyone who uses a computer should have one of these. It will get you out of a jam, we promise. These drives are small and easy to lose; they are also prone to getting bent or damaged. Look for drives that are rugged. One manufacturer claims that its drive will withstand 2000 pounds of pressure. We’ve seen a car drive over one, and it still worked. If your information is confidential, make sure to password protect the presentation and the drive itself (if it comes with software to do so).
Protect Your Investment. A USB flash drive will protrude from your laptop or desktop and make it easy to accidentally bump into it and damage your internal USB card. It’s a good practice to remove the drive immediately after the files have been transferred.
Using Portable Hard Drives
KRZYSIEK Z POCZTY/ISTOCKPHOTO
If you have a lot of video content, software to demo, or generally more information than will fit on a mini USB Flash drive, a portable hard drive can be a good option. The same rules apply for file security with these, make sure to encrypt or password-protect sensitive data. What you should look for in a portable drive is capacity, durability, bus-powered and included backup, and encryption software. Bus-powered drives require no power adapter to plug into an outlet. This will allow you to use the drive when your laptop is running off of battery alone. Some drives include a protective carrying case as well.
iPod = Portable Hard Drive. Remember that your iPod can also work as a portable hard drive. It can run a presentation using just a few accessories, including a dock, remote, and A/V cable. Just save your slides as JPEGs and advance through them in photo slide show mode. How cool is that?
Copying to CD and DVD

CDs and DVDs are inexpensive ways to backup and transfer your presentations. Using the Package for CD command mentioned earlier in this chapter is the best method to ensure that all the needed files are copied onto your CD. If you would like to archive the presentation to a DVD you can package the presentation to a folder and then use your normal DVD burning software to copy that folder to a DVD. If you would like to make a DVD of the presentation that will run from a computer with a DVD drive and most standard DVD players, there are third party software packages available that will allow you to do this. One option, from Wondershare, is called PPT2DVD. Keep in mind that not all laptops will have DVD players, so choose your media wisely.
E-mailing a Presentation
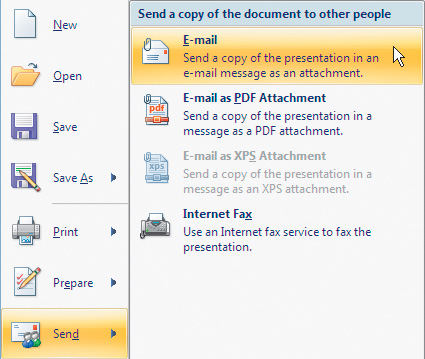
Inevitably you need to to e-mail a presentation for review purposes or to send it to someone that wasn’t able to attend. You can speed up the process by e-mailing the presentation directly from PowerPoint. Under the Office Button drop-down menu, click the Send button. Then click the E-mail button to configure who will receive the presentation. Keep in mind that your e-mail profile must be configured properly in your control panel for this function to work properly.
Optimize Before E-mailing. Make sure to optimize your presentation for the smallest file size before attempting to e-mail it. Many e-mail providers will only allow a small file size to transfer through their system. Even if large file sizes are allowed, many people will not appreciate the added wait time that you’ve caused them when they attempt to download and view their mail.
Transferring to a Laptop
The most efficient way to transfer files from a desktop computer to a laptop is by using the Package for CD option that we mentioned earlier. By selecting the Copy to Folder option you can save the presentation and all of the linked files to a folder on your desktop. Then use a portable media device such as a mini USB Flash Drive or a portable hard drive to transfer the files to your laptop.![]()
Creating and Customizing Handouts
When Your Audience Needs to Walk Away with Information
1. Open the Presentation to Format the Handout Master
Let’s go back to the presentation that we’ve been using for this chapter. Make sure to open the version that you’ve copied from the project CD. Select the View tab and then select the Handout Master button in the Presentation Views group.
2. Decide How Many Slides Per Page
You’ll need to determine how many slides per page your presentation will require. If most of your slides consist of bullet points set in 25-point or higher text, you can get away with six slides per page. If your presentation has slides with a lot of text, or charts with small text, or detailed graphics, you might want to consider one or two slides per page. For this presentation, click the Slides Per Page button and click the 6 Slides button in the Page Setup Group.

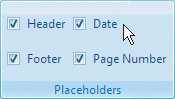
Under the Placeholders group, select the attributes that you would like to have printed on each page of your handouts. You can modify the header to display your company name and the footer to display the content of your presentation by clicking in the appropriate text field in the main window. The page numbers will be set automatically for you.
4. Prepare for Printout
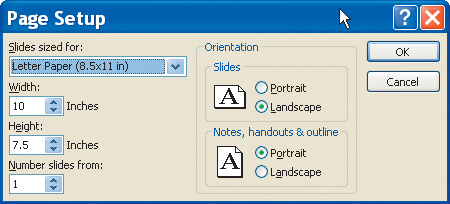
Under the Page Setup group, select the Page Setup button. Click the Slides sized for: drop-down menu and select Letter Paper (8.5 x 11 in). In the Orientation group, select Landscape under the Slides area and Portrait under the Notes, handouts & outline area.
5. Print
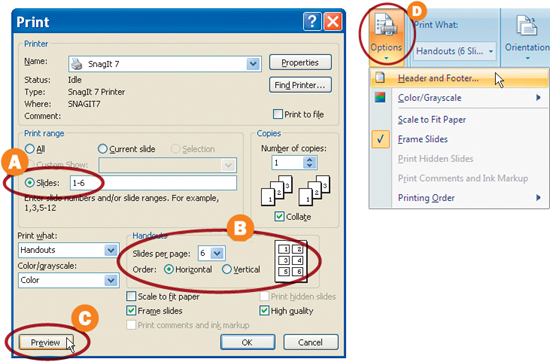
Click the Office Button and the Print button from the submenu. In the Print window select your default printer. Select slides 1–6 in the Print range group A. In the Handouts group, select 6 in the Slides per page menu, and the order should be horizontal B. Check the High Quality box and the Frame slides box. Next, hit the Preview button C. Inside the Print Preview tab, click the Options button in the Print group to reveal more options before you commit to the Print button D.
6. Need More Control? Save as a Word Document
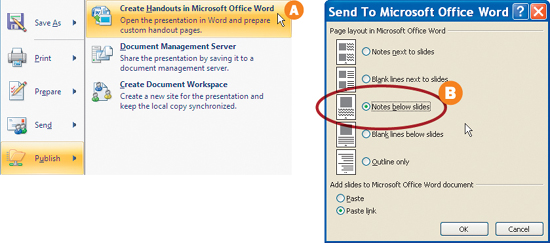
If you would like to have a little more control over the look or content in a handout, you can save the handouts as Word documents. Click the Office Button and then click the Publish button in the drop-down menu. Then select the Create Handouts in Microsoft Office Word button A. In the Send To Microsoft Office Word window select Notes below slides in the Page Layout group and Paste link in the Add slides to Microsoft Office Word document group B. PowerPoint will now automate the creation of a fully editable Microsoft Word Presentation Handout. ![]()
Useful Handouts. Make sure to take advantage of the option of providing more information in the notes fields of your handouts. Your audience will appreciate a written explanation of your bullet points when they are reviewing them after the presentation.
Creating a Kiosk Presentation
When the Show Must Go On Without You
1. It’s All in the Timing
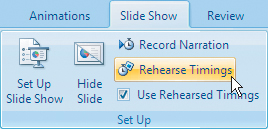
Kiosk Presentations can be used at trade show booths, company reception areas, museums, and anywhere you might need a presentation to run without having someone there to interact with it. The first step to creating this kind of presentation is to get the slide timing down. Open the Key to Effective Presentations show that you copied to your hard drive earlier. In the Slide Show tab, click the Rehearse Timings button in the Set Up group. Be prepared to jump to step 2 quickly.
2. Time Each Slide
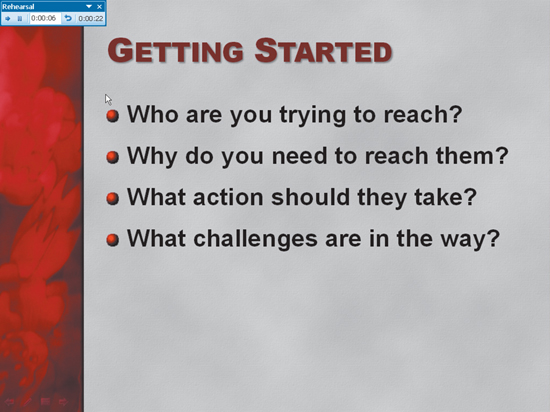
The presentation will open with a Rehearsal Tool bar in the upper right corner. Slowly read each slide twice and then click the Next button to advance to the next slide. Repeat this action for each slide. When a slide has a full screen photograph or a photo with just a few words use your best judgment on how long it should stay visible. The more complex the photo, the longer it should stay up. Keep in mind that if it stays up too long, people may lose interest and assume that the presentation has stalled. We’ve found that about 5 seconds is usually enough for most photos.
3. Determine Total Time of Show
Once the presentation has completed and you’ve timed out each slide, a dialog box will appear asking you if you would like to keep the timings that you’ve set when you view the slide show. Select Yes. Your presentation will then open in the Slide Sorter view with the timings that you’ve attributed to each slide appearing to the bottom left. (The little star icon represents a transition that has been set up for that slide. You can click that to see a preview.)
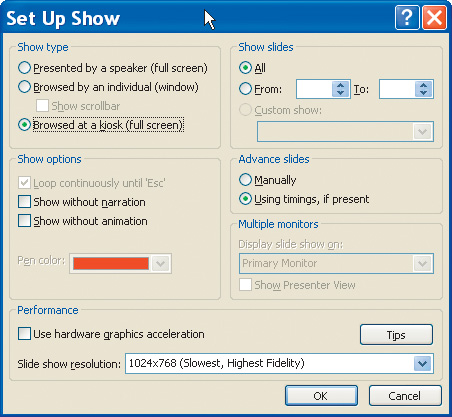
4. Set Up Slide Show
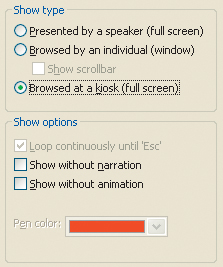
Click the Set Up Slide Show button in the Set Up group. This will open a Set Up Show window that will allow you to set the preferences needed for the presentation to run in Kiosk mode. In the Show type group select the Browsed at a kiosk (full screen) option. In the Advance slides group, select Using timings, if present option.
5. Start the Show and Head Out for Coffee
In the Slide Show tab click From Beginning button in the Start Slide Show group. This will begin the presentation in kiosk mode and loop it continuously until you hit the escape button. The multimedia options that we discussed in Chapter 4 might be able to spice up your presentation in your absence. ![]()

Narrated Presentations. Yes, you can record a narration for your slides in PowerPoint. However, you can turn a good presentation into an unwatchable disaster with a poorly recorded narration. Unless your 100 percent confident in your recording equipment and voice talent, you’re better off without it.
Implementing Rehearsed Timings
Imagine a world where your presentation runs on its own, with little need for human intervention. Does that sound scary or helpful? The answer may be “it depends.” If you navigate to the Slide Show tab in the Ribbon, you can click the Rehearse Timings button. This will launch your slide show so you can then navigate through it in real time. When you click to trigger a bullet build or slide transition, PowerPoint memorizes timings for the slide. Knowing when to harness Rehearsed Timings will save you time and potential embarrassment.
When to Use Rehearsed Timings

There are some very good reasons to use Rehearsed Timings. Previously, you used them when creating a self-running kiosk style presentation. In a similar fashion, you may need to repeatedly give a presentation in less than ideal situations (such as at a trade-show booth). In this scenario, the presentation is likely to be highly scripted, with little or no audience interaction. The use of Rehearsed Timings will allow you to create a slide presentation that runs on its own, thus freeing the presenter to focus more on their talk and less on clicking. We recommend Rehearsed Timings for those situations when a presenter will not be present or when the presenter is unable to focus on the operation of the slide show.
When Not to Use Rehearsed Timings

JEFFREY SMITH/ISTOCKPHOTO
There is nothing more boring than a presentation when the presenter is literally on autopilot—merely a robot (or extension of the computer) and totally oblivious to the audience. The purpose of PowerPoint is to serve as speaker support, not speaker replacement. If you remove your ability to interact with the audience, to read facial expressions, to adjust the flow due to audience response or questions, then you are greatly impacting the quality of your presentation. The role of the presenter is to evoke a change in thinking or action; you’ll need as much connection as possible to bring this about.![]()
Using the Presenter View
PowerPoint 2007 adds a new option called Presenter View which gives a presenter more options when running a presentation from one computer (like a laptop) and sending it to another screen (like a projector). Presenter View gives you powerful options, like thumbnails for selecting slides out of sequence, as well as a Preview text for the next slide and the ability to see your speaker notes on the presenter’s computer (but not the main screen).
Requirements for Presenter View
In order to harness the Presenter View you must meet certain technical requirements:
1. PowerPoint 2007 must be loaded on the computer.
2. The computer needs to be able to support multiple monitors. This may mean a second video card for a desktop computer (but laptops usually have this feature built-in).
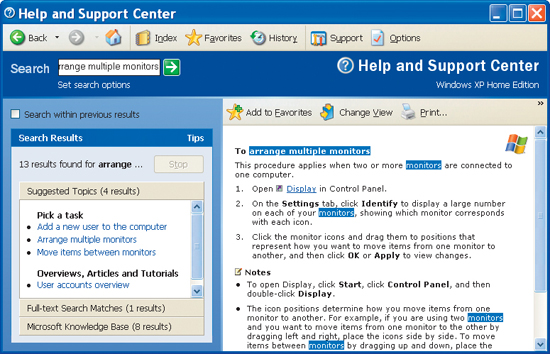
3. Multiple monitor support for your computer must be turned on. (The exact way will vary depending on the version of the Operating System you have loaded.) A search for “arrange multiple monitors” in the Help and Support Center will give you detailed instructions.
Enabling Presenter View

Turning on the Presenter View is easy. Ensure that the second monitor is active. Then in the Ribbon click the Slide Show tab, and from the Monitors group check the box next to the Use Presenter View option. When you start the Slide Show (F5) the Presenter View will be visible.
An Overview of Presenter View

There are several icons and buttons you’ll need to use to navigate the Presenter View. The figure above illustrates the major controls that you’ll want to use.
A A thumbnail list of slides that you can use to navigate through your slide show.
B The active slide that the audience is viewing.
C The ability to annotate a slide.
D Forward and backward buttons.
E The slide number of the current slide.
F The elapsed time (in minutes and seconds) since beginning the presentation.
G The speaker’s notes, which you can use as a memory jogger.![]()
Saving Files as Still Images or PDFs
It Is Possible to Export Various Graphic Files Including PDF
1. Load the PDF Plug-in
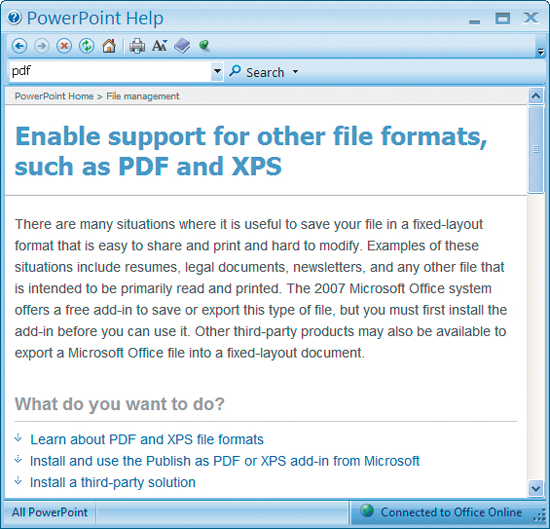
The PDF is an excellent format for sharing your presentation with others, as it allows for easy viewing with the free Adobe Reader. The files maintain the exact appearance of the slide and cannot be easily modified by the end user. While PowerPoint does not support PDF files out of the box, adding the capability is very easy. The location of this plug-in can vary on Microsoft’s Web site. The easiest way to find the plug-in is to launch the help menu (F1) and type PDF in the search box. A detailed help article with a direct link to the PDF installer will be first on the list. Download the installer and run the executable file.
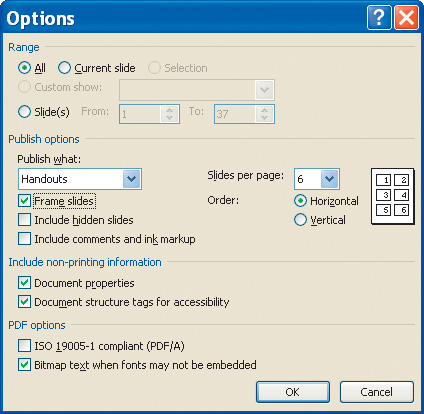
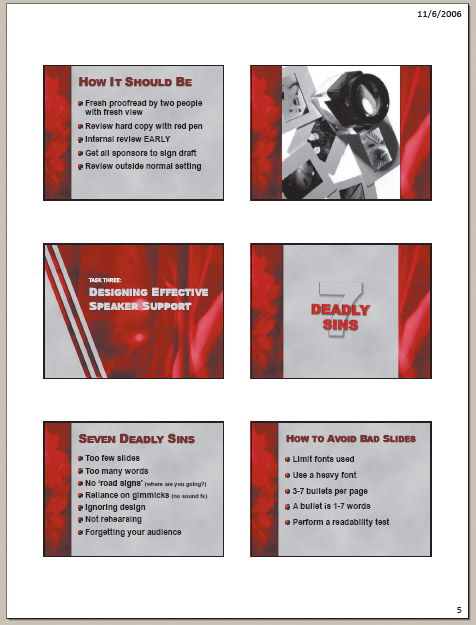
Once the plug-in is installed, saving a PDF is easy. Work with the sample presentation from earlier in this chapter. Click the Office Button in the ribbon and choose Save As > PDF. In the Save dialog box you can specify a name and destination for the file. You can choose to optimize the file to reduce its size for e-mail, or leave it at standard quality for both print and screen. To choose different layouts, click the Options button. You can specify to print full screen slides or fit multiple slides to the page by choosing Handouts. When you’ve finished modifying your options, click OK to close the Options window. You should then name the file and specify a save location (such as the desktop) and click Publish. A PDF file is created, which can now be easily shared with others via e-mail and the Web.
3. View the PDF File
If the file did not automatically open, then find it in its saved location and double-click it. The PDF translation process should have occurred quickly and generated a small file that is very compatible. This file can now be shared with Windows, Mac, Linux, and multiple mobile computing platforms. When finished viewing, close the document and return to PowerPoint.
4. Choose to Save Each Slide as a Still Graphic
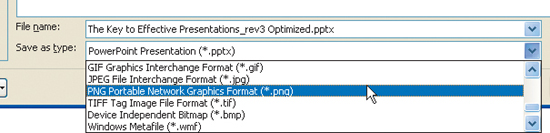
PowerPoint can export each slide as a still graphic. This can be very useful for those working with page layout software (like Quark Xpress or Adobe InDesign) or video editing tools (like Apple Final Cut Pro or Adobe Premiere Pro). PowerPoint supports seven different graphic formats, including the versatile JPEG and PNG formats. To save a series of still graphics, click the Office Button and choose Save As > Other Formats. Near the bottom of the Save dialog box is a Save as type drop-down menu. You can pick the file format you need (such as TIFF for printing), specify a location for the files, and click Save. PowerPoint then gives you three options: export Every Slide, Current Slide Only, or Cancel. For this example, choose Current Slide Only to write the file. ![]()
Which Format Do I Want? PowerPoint offers several graphic formats. Here are some of the more useful choices:
• JPG— good for e-mailing to clients or posting to the Internet
• PNG— a newer format that is well suited for Web and multimedia uses
• TIF— best for printing
• EMF— preserves vectors within a slide, which is good for making enlargements
Publishing a Web Page
Placing a Presentation Online is Useful for Web Conferences and Client Reviews

1. Save the Presentation
Before you can create a Web page, you’ll need to have a presentation open with no unsaved changes. You can use the same project file from earlier in the chapter, just be sure to save any changes (Ctrl+S).
2. Use the Save As Command
In order to turn a presentation into a Web page, click the Office Button and choose Save As > Other Formats. Next specify a location to save the files to. This can be to a Web directory (such as a Web site) or to a local folder that can be transferred later to a Web server. For now, target your desktop to hold the page files.
3. Choose a Format for the Web Archive
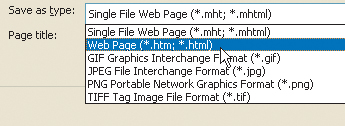
PowerPoint gives you two choices from the Save as type list. The first, Single File Web Page will create a Mime HTML formatted file.
The second option, Web Page, will create a folder and place all of the Web content into it. This folder can be uploaded to a server or turned into a Zip archive in order to e-mail. This option is more compatible with both Mac and PC Web browsers. Choose the Web Page option from the Save as type list.
What Is Mime HTML? This is a convenient way to embed all of the Web content into a single page. This works well for e-mail, but the recipient must use newer versions of Internet Explorer or Opera to view the file.
4. Specify Publish Settings
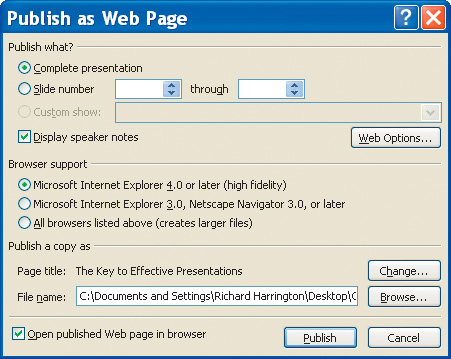
Click the Publish button to specify options in the Publish as Web Page dialog box. You can modify several options that affect what your audience will see.
• Specify which slides you want to publish in the Publish what? section.
• Enable or disable speaker notes with the Display speaker notes check box.
• Modify additional properties by click Web Options. Here you can specify page color as well as image size.
• Specify which Web browser support you’d like.
• Click Browse to change the path to where you’d like to save files.
More Page Views. To increase browser compatibility, choose All browsers from the Browser support list.
5. Save the Page
Click Publish to write the Web page. PowerPoint may take a few minutes to write the file (larger presentation files will take longer). PowerPoint will create the Web page archive and place all of the files into a folder. ![]()
![]()