

Implementing security options
This chapter shows you how to get up and running with security in Liberty Java virtual machine (JVM) server. The first sections are about basic security infrastructure that you need. Later, we cover the details about several options for securing your web applications.
This chapter describes the following topics:
For more information about the different security authentication and authorization options that are available in the Liberty server environment on CICS, refer to Chapter 4, “Security options” on page 57.
8.1 Start the angel process
The angel process is a long-running started task required for the Liberty JVM server in CICS Transaction Server (CICS TS) to use System Authorization Facility (SAF)-authorized services. There needs to be one, and only one, angel process started in each logical partition (LPAR). In addition to Liberty JVM server in CICS TS, two other products also use the angel process. These are WebSphere Liberty Profile on z/OS, and zOSMF. If there is already an angel process started for either of those products, Liberty JVM server can use that angel process also.
|
Note: Only one Liberty JVM server per CICS region can connect to the angel process. Therefore, you can have only one Liberty JVM server per CICS region that integrates with CICS security.
|
Next, we describe how to start the angel process.
8.1.1 Copy and modify the angel process procedure
The angel process started task JCL procedure is shipped with CICS in the USSHOME directory, for example:
/usr/lpp/cicsts53/wlp/templates/zos/procs/bbgzangl.jcl.
Example 8-1 shows the procedure.
Example 8-1 bbgzangl.jcl
//BBGZANGL PROC PARMS='',COLD=N
//*------------------------------------------------------------------
// SET ROOT='/u/MSTONE1/wlp'
//*------------------------------------------------------------------
//* Start the Liberty angel process
//*------------------------------------------------------------------
//* This proc may be overwritten by fixpacks or iFixes.
//* You must copy to another location before customizing.
//*------------------------------------------------------------------
//STEP1 EXEC PGM=BPXBATA2,REGION=0M,
// PARM='PGM &ROOT./lib/native/zos/s390x/bbgzangl COLD=&COLD &PARMS'
//STDOUT DD SYSOUT=*
//STDERR DD SYSOUT=*
//* ================================================================ */
//* PROPRIETARY-STATEMENT: */
//* Licensed Material - Property of IBM */
//* */
//* (C) Copyright IBM Corp. 2011, 2012 */
//* All Rights Reserved */
//* US Government Users Restricted Rights - Use, duplication or */
//* disclosure restricted by GSA ADP Schedule Contract with IBM Corp.*/
//* ================================================================ */
We now begin the copy and modify procedure:
1. Copy this JCL to a JES procedure library.
2. On the line where it reads, // SET ROOT=’/u/MSTONE1/wlp’, change ROOT to USSHOME/wlp.
// SET ROOT=’/usr/lpp/cicsts53/wlp’
8.1.2 Specify the user ID under which the angel process runs
The following command adds an SAF STARTED profile to specify the user ID that the angel process runs under. For example, in RACF, the following commands specify that user ID WLPUSER will be the user ID for the angel process. WLPUSER must already be a valid SAF user ID:
RDEFINE STARTED BBGZANGL.* UACC(NONE) STDATA(USER(WLPUSER))
SETROPTS RACLIST(STARTED) REFRESH
8.1.3 Start the angel process and verify that it is up
Example 8-2 shows the console command to start the angel process.
Example 8-2 Start command for the angel process
START BBGZANGL
If BBGZANGL started successfully, it will be a visible long-running job. If it started and then ended immediately, then likely the problem is that there is already an active angel process in the LPAR. Example 8-3 is a sample of this situation.
Example 8-3 Sample console message
23.03.15 STC47564 IEF403I BBGZANGL - STARTED
23.03.15 STC47564 CWWKB0062E A WEBSPHERE FOR Z/OS ANGEL PROCESS IS ALREADY STARTED
23.03.15 STC47564 CWWKB0063I ACTIVE ANGEL ASID 94 JOBNAME IZUANG1
23.03.15 STC47564 CWWKB0058E WEBSPHERE FOR Z/OS ANGEL PROCESS ENDED ABNORMALLY, 701
701 REASON=14
|
Note: In the messages, the active angel process is jobname IZUANG1. That is the name of the angel process when started with instructions for zOSMF. There is no problem with that. A Liberty JVM server in CICS can connect to, and use, this angel process with no problem.
|
8.2 Server.xml security elements
There are several necessary server.xml elements required for security. This section describes how to add these to the server.xml file:
1. Add the cicsts:security-1.0 and the ssl-1.0 features. With autoconfigure=true in the jvmprofile, these features are added automatically if CICS security is active. See Example 8-4.
Example 8-4 Enabling features in server.xml
<featureManager>
…
<feature>cicsts:security-1.0</feature>
<feature>ssl-1.0</feature>
…
</featureManager>
2. Ensure that there is an httpsPort. See Example 8-5.
Example 8-5 Setting HTTP and HTTPS ports in server.xml
<httpEndpoint host="*" httpPort="53130" httpsPort="53131" id="defaultHttpEndpoint"/>
3. Specify the following SSL-related elements. These elements are added automatically when using autoconfigure and CICS security is active. This is shown in Example 8-6.
This causes the Liberty server to dynamically configure an SSL keystore using a Java keystore on zFS.
Example 8-6 Configuring SSL in server.xml
<ssl id="defaultSSLConfig" keyStoreRef="defaultKeyStore" sslProtocol="TLS"/>
<keyStore id="defaultKeyStore" password="defaultPassword"/>
4. Activate SAF authorization with the element shown in Example 8-7.
With this element, Liberty JVM server uses SAF EJBROLE profiles to authorize access to web applications, and does not use the application-bnd element. Without this element, it is the opposite. Liberty JVM server does not use SAF EJBROLE profiles to authorize access to web applications. Instead, Liberty JVM server uses the application-bnd element.
Example 8-7 Activate SAF authorization in server.xml
<safAuthorization id="saf"/>
5. Specify the server name. The angel process will know the Liberty JVM server by this name. This name will be used for the APPL class profile and as the prefix for EJBROLE profiles. The default name is BBGZDFLT. Specify a name that is unique to this Liberty JVM server, such as the CICS applid.
Example 8-8 shows the Liberty server name defined as LIBSRV01. This name is used in further examples in this section.
Example 8-8 shows the Liberty server name defined as LIBSRV01. This name is used in further examples in this section.
Example 8-8 Specify Liberty server name in server.xml
<safCredentials profilePrefix="LIBSRV01" />
For more information about configuring SSL in Liberty with SAF key rings, see the IBM Knowledge Center at this link:
8.3 Set up the SAF unauthenticatedUser user ID
If you are using an SAF user registry, it is necessary to specify an SAF user ID that represents the unauthenticated state. The name of the unauthenticated user ID is specified on the unauthenticatedUser attribute of the SAFCredentials element in server.xml. See Example 8-9.
Example 8-9 Define unauthenticated user in server.xml
<safCredentials unauthenticatedUser="WSGUEST"/>
This establishes the user ID that is treated as the unauthenticatedUser. The user ID you specify here needs to have been established in the following way.
It is important to define this user ID correctly in your SAF registry. If you are using a RACF SAF user registry, the unauthenticated user (default WSGUEST) needs a unique default group (DFLTGRP) with no other user IDs connected to that group, an OMVS segment, but not a TSO segment, and the options NOPASSWORD, NOOIDCARD, and RESTRICTED. If you have another SAF user registry, instead of RACF, find the user ID options that are provided by that SAF registry that are equivalent to these RACF options.
By running the appropriate commands, you can correctly set up an unauthenticated user in your SAF user registry. An unauthenticated user that is set up incorrectly can cause a security exposure.
|
Note: An unauthenticated user that is set up incorrectly can cause a security exposure.
|
The procedure for setting up the SAF unauthenticatedUser user ID follows:
Example 8-10 Add group command
ADDGROUP WSGUESTG SUPGROUP(SYS1)OWNER(SYS1)
DATA('WAS Unauthenticated User Group')
OMVS(AUTOGID)
Example 8-11 Add user command
ADDUSER WSGUEST DFLTGRP(WSGUESTG) OWNER(SYS1)
OMVS(AUTOUID
HOME(/u/WSGUEST)
PROGRAM(/bin/sh))
NAME('WAS unauth')
NOPASSWORD NOOIDCARD
RESTRICTED
The options NOPASSWORD and NOOIDCARD protect this user ID from being revoked by repeated attempts to guess the password.
The option RESTRICTED means that this user ID cannot gain access to protected resources unless it is explicitly permitted to that resource, even is that resource has a general access setting of UACC(READ).
|
Note: After the unauthenticated user ID (WSGUEST) is defined to the SAF registry, ensure that the user ID is permitted to only the minimum number of SAF resources. If the Liberty server is using SAF APPL resource check to control which users can connect to the Liberty z/OS System Security Access Domain, the unauthenticated user ID must be given access to the APPL profile.
Run the PERMIT command:
PERMIT BBGZDFLT CLASS(APPL) ID(WSGUEST) ACCESS(READ)
If you receive the RACF authorization failure message ICH408I because the unauthenticated user (WSGUEST) does not have access to a RACF resource, it is almost always incorrect to permit the unauthenticated user ID to the resource profile to resolve the problem. This message usually means that the request is running in an unauthenticated state, when it should be running in an authenticated state. The actual problem is probably a failure to authenticate properly. Whenever it appears necessary to permit the unauthenticated user ID to an SAF resource profile, consider carefully whether that is the correct action to take. Permitting the unauthenticated user ID to any SAF resource profile makes that resource available to everyone, including users who are not authenticated. There are almost no instances where that is required. However, the APPL profile that controls access to the WZSSAD is one exception.
|
8.4 SAF definitions and permissions
Set up the following SAF definitions and permissions.
8.4.1 Server class authorizations
The CICS region user ID must be authorized to connect to and access necessary services provided by the angel process. The commands in Example 8-12 show how to do this with RACF.
Example 8-12 Server class authorizations
RDEFINE SERVER BBG.ANGEL UACC(NONE)
PERMIT BBG.ANGEL CLASS(SERVER) ACCESS(READ) ID(cics_region_userid)
RDEFINE SERVER BBG.AUTHMOD.BBGZSAFM.SAFCRED UACC(NONE)
PERMIT BBG.AUTHMOD.BBGZSAFM.SAFCRED CLASS(SERVER) ACCESS(READ) ID(cics_region_userid)
RDEFINE SERVER BBG.AUTHMOD.BBGZSAFM UACC(NONE)
PERMIT BBG.AUTHMOD.BBGZSAFM CLASS(SERVER) ACCESS(READ) ID(cics_region_userid)
RDEFINE SERVER BBG.AUTHMOD.BBGZSAFM.PRODMGR UACC(NONE)
PERMIT BBG.AUTHMOD.BBGZSAFM.PRODMGR CLASS(SERVER) ACCESS(READ) ID(cics_region_userid)
RDEFINE SERVER BBG.SECPFX.LIBSRV01 UACC(NONE)
PERMIT BBG.SECPFX.LIBSRV01 CLASS(SERVER) ACCESS(READ) ID(cics_region_userid)
8.4.2 APPL class authorizations
Every user ID needs read access to the Liberty server APPL class profile. The profile name in this example is LIBSRV01 because that is what was specified earlier in the <safCredentials> element. Example 8-13 shows how to define and activate the profile in RACF.
Example 8-13 Define Liberty server APPL class profile
RDEFINE APPL LIBSRV01 UACC(NONE)
SETROPTS CLASSACT(APPL)
Permit read access for every user ID to this profile. In the following examples, ALLUSERS is a RACF group that all users are connected to. WSGUEST is the unauthenticated user ID. It needs access too. See Example 8-14.
Example 8-14 Permit read access to Liberty server APPL class profile
PERMIT LIBSRV01 CLASS(APPL) ACCESS(READ) ID(ALLUSERS)
PERMIT LIBSRV01 CLASS(APPL) ACCESS(READ) ID(WSGUEST)
SETROPTS RACLIST(APPL) REFRESH
8.5 Web application security
Controlling access to a web application involves a combination of Java Platform, Enterprise Edition authorization and CICS transaction security. There are two ways to do Java Platform, Enterprise Edition authorization. You can use SAF authorization or Liberty security-role authorization:
•SAF authorization uses SAF profiles in the EJBROLE class. An EJBROLE profile represents a role in a web application. By permitting groups and users access to those profiles, you authorize those groups and users to those roles in the web application.
•Liberty security-role authorization takes place outside of SAF. Security-role information is present in the application element that defines each web application in server.xml or in other .xml files that are logically part of server.xml. This security-role information maps an application role with the groups and users who are authorized to those roles in the web application.
You must set up your Liberty JVM server to do either SAF authorization or Liberty security-role authorization. It cannot do both. You control which one to use by the <safAuthorization/> element in server.xml. In Example 8-7 on page 146, you were directed to include the <safAuthorization id="saf"/> element in server.xml.
With that element present in server.xml, your Liberty JVM server will use SAF authorization. Any security-role information in the application elements in server.xml is ignored.
Similarly, if the safAuthorization element is not present in server.xml, Liberty JVM server will use Liberty security-role authorization. That is, Liberty JVM server will map roles to users and groups using security-roles information in the application element. Any SAF EJBROLE profiles and permissions are ignored.
The method of Java Platform, Enterprise Edition authorization affects how you set up CICS transaction security. Sometimes, Java Platform, Enterprise Edition authorization totally controls access to the web application and you do not need to use CICS transaction security to control access. Other times, Java Platform, Enterprise Edition authorization is effectively bypassed, and you need to use CICS transaction security to control access.
See 8.6, “SAF authorization” on page 150 for assistance in getting up and running with securing your web applications using SAF authorization.
See 8.7, “Liberty security-role authorization” on page 152 for assistance in getting up and running with securing your web applications using Liberty security-role authorization.
Each section uses several web applications as examples:
com.ibm.cics.server.examples.wlp.hello.war One of the CICS SDK servlet example applications.
com.ibm.cics.wlp.defaultapp The Liberty JVM server default application.
GenAppWeb A sample application that is provided as a SupportPac.
CatalogBrowse A fictional web application that does not have a security constraint.
8.6 SAF authorization
When using SAF authorization, you need to do the following steps to secure your web applications:
1. Set up EJBROLE profiles and permissions
2. Set up a TCICSTRN profile and permissions for transaction CJSA
3. Define a URIMAP to specify a static user ID for applications with no security constraints
8.6.1 Set up EJBROLE profiles and permissions
For each web application, set up appropriate EJBROLE class definitions and permissions. The examples in this section show how to do this by using RACF commands for sample applications. First, we cover some background information.
|
Note: Unlike other SAF profiles, changes to EJBROLE profiles do not take effect until the address space is stopped and restarted. Therefore, you need to restart your CICS region if adding or changing EJBROLE profiles in this section.
|
The EJBROLE profiles defined in this section are based on the following server.xml elements:
<safCredentials profilePrefix=“LIBSRV01”/>
<safRoleMapper profilePattern="%profilePrefix%.%resource%.%role%"
toUpperCase=“false“ />
In the safRoleMapper profilePattern, %profilePrex%, %resource% and %role% are substitution variables. At run time, they are substituted as follows:
%profilePrefix% The name specified in safCredentials profilePrefix.
%resource$ The name of the application.
%role% The name of the role.
So, if you are checking authorization for the role Broker in application GenAppWeb, the name of the EJBROLE profile is LIBSRV01.GenAppWeb.Broker.
The specification of the safRoleMapper element is the default. If you specify something different for safRoleMapper, you change the EJBROLE profile. For example, if you specify the following, when checking for the role of Broker in application GenAppWeb, the name of the EJBROLE profile is LIBSRV01.GenAppWeb.allRoles:
<safRoleMapper profilePattern="%profilePrefix%.%resource%.allRoles"
toUpperCase=“false“ />
The following examples describe how to set up EJBROLE class definitions and permissions using RACF commands for sample applications.
com.ibm.cics.server.examples.wlp.hello.war
The security constraint in the deployment descriptor for com.ibm.cics.server.examples.wlp.hello.war declares that role cicsAllAuthenticated is authorized to this application. Rather than permit all users to this role, you can specify UACC(READ) on the definition for the profile. This allows all authenticated users to run this web application. See Example 8-15.
Example 8-15 Define read access to the Hello World application
RDEFINE EJBROLE LIBSRV01.com.ibm.cics.server.examples.wlp.hello.war.cicsAllAuthenticated
UACC(READ)
SETROPTS RACLIST(EJBROLE) REFRESH
com.ibm.cics.wlp.defaultapp
The default application, com.ibm.cics.wlp.defaultapp, has a security constraint that authorizes the role of User to the entire application. The following RACF commands map the role of User to a group called USERGRP. This allows all users who are associated with group USERGRP to run the default application. See Example 8-16.
Example 8-16 Define read access to the default application
RDEFINE EJBROLE LIBSRV01.com.ibm.cics.wlp.defaultapp.User UACC(NONE)
PERMIT LIBSRV01.com.ibm.cics.wlp.defaultapp.User CLASS(EJBROLE) ACCESS(READ) ID(USERGRP)
SETROPTS RACLIST(EJBROLE) REFRESH
The default application has an additional security constraint that controls the ability to access links to some of the key files, such as server.xml and messages.log. Access to those files is authorized to the role of Administrator. The following RACF commands authorize an appropriate group, ADMINS, to that role. Any user connected to the ADMINS group is able to use those links in the default application. See Example 8-17.
Example 8-17 Define read access to the default application for the administrator role
RDEFINE EJBROLE LIBSRV01.com.ibm.cics.wlp.defaultapp.Administrator UACC(NONE)
PERMIT LIBSRV01.com.ibm.cics.wlp.defaultapp.Administrator CLASS(EJBROLE) ACCESS(READ) ID(ADMINS)
SETROPTS RACLIST(EJBROLE) REFRESH
GenAppWeb
The GenAppWeb deployment descriptor has a security constraint that authorizes the role of Broker to the entire application. The following commands map a RACF group called BROKERS to that role. Any user connected to group BROKERS is authorized to run GenAppWeb. See Example 8-18.
Example 8-18 Define read access to the GenAppWeb application
RDEFINE EJBROLE LIBSRV01.GenAppWeb.Broker UACC(NONE)
PERMIT LIBSRV01.GenAppWeb.Broker CLASS(EJBROLE) ACCESS(READ) ID(BROKERS)
SETROPTS RACLIST(EJBROLE) REFRESH
|
Note: At the time of this writing, changes to the EJBROLE profiles do not take effect until the CICS region is stopped and restarted.
|
BrowseCatalog
There is no security constraint in the BrowseCatalog deployment descriptor. There will be no authentication and no authorization on a request to run this application. Therefore, you do not have to define any EJBROLE profiles.
8.6.2 Set up a TCICSTRN profile and permissions for transaction CJSA
In 8.6.1, “Set up EJBROLE profiles and permissions” on page 150, we used EJBROLE class profiles to control access to web applications. Therefore, you do not need transaction attach security to further limit who can access the web applications. The following RACF commands permit all users access to the default Liberty JVM server transaction, CJSA. See Example 8-19.
Example 8-19 Permit access to Liberty JVM transaction
RDEFINE TCICSTRN CJSA UACC(NONE)
PERMIT CJSA CLASS(TCICSTRN) ACCESS(READ) ID(ALLUSERS)
SETROPTS RACLIST(TCICSTRN) REFRESH
Define a URIMAP to specify a static user ID for applications with no security constraints.
Having completed all of these steps, and if you have the appropriate authority, you should be able to access the three web applications.
8.7 Liberty security-role authorization
Liberty security-role authorization does not use SAF EJBROLE profiles. Liberty security-role authorization uses role-to-user and role-to-group security information that is specified inside of the application element of each application. Who supplies the application element for each web application, and the security information within it, depends on how you define the application to Liberty JVM server.
One method of defining a web application to Liberty JVM server is to deploy it in a CICS bundle. When you do it that way, CICS builds the application element and puts it in installedApps.xml which is included in, and logically part of, server.xml. CICS also builds role-to-user and role-to-group security information inside that application element. You have no control over it. See 8.7.1, “Deploying your web application in a CICS bundle” on page 153 for a discussion about securing web applications that are deployed in a CICS bundle.
Another method of defining a web application to Liberty JVM server is for you to build the application element and put it into server.xml. When you do it that way, you supply the security information that maps the web application roles to the users and groups authorized to those roles. Section 8.7.2, “Defining a web application in server.xml” on page 156 discusses how to secure web applications that you define that way.
Whichever method you use to get Liberty JVM server to use, the security information in the application element, you must ensure there is no <safAuthorization/> element in server.xml.
8.7.1 Deploying your web application in a CICS bundle
When you deploy a web application to Liberty JVM server in CICS in a CICS bundle, CICS automatically builds the application element for the application in a file called installedApps.xml, which is included in, and logically part of, server.xml. This application element always specifies just one security role, cicsAllAuthenticated, and maps it to a special subject that stands for all authenticated users. There are two main implications of this.
•If your application has a security constraint, the only role that can pass authorization is cicsAllAuthenticated.
•Your application will be authorized to all authenticated users. You cannot use Java Platform, Enterprise Edition authorization to authorize the application to a smaller subset of users.
The effect of this use of cicsAllAuthenticated on bundle-installed web applications is that Java Platform, Enterprise Edition security role authorization is effectively bypassed. This means that you need to use transaction security to control the access to each web application.
The following are the steps to use transaction security to control access to a web application:
1. Define a new transaction for the web application. The attributes should be the same as those of transaction CJSA.
2. Define a URIMAP whose Path attribute specifies the generic context root of the application. On the URIMAP transaction attribute, specify the transaction ID of the transaction defined in step 1 above.
3. Define a SAF TCICSTRN profile for the transaction. Permit read access to that profile for whatever group is appropriate to run the web application.
The following are specific instructions for setting up security for the example transactions when you are not using SAF authorization, and you are installing and deploying the applications in a CICS bundle.
com.ibm.cics.server.examples.wlp.hello.war
The deployment descriptor for this application authorizes a role of cicsAllAuthenticated to the entire application. That matches perfectly with the security role built automatically when you deploy a web application as a CICS bundle. See Example 8-20.
Example 8-20 Authorizing roles to application
<auth-constraint>
<role-name>cicsAllAuthenticated</role-name>
</auth-constraint>
The next step is to define a transaction ID and URIMAP for this web application.
Define and install a transaction definition
Define and install a transaction definition with the following attributes:
Description Copy of transaction CJSA for servlet hello example
Name HIEX
Program Name DFHSJTHP
Task Data Location Any
System Purge Yes
CmdSec Yes
ResSec Yes
Define and install a URIMAP definition
Define and install a URIMAP definition with the following attributes:
Description URIMAP for servlet hello example
Name HELLOSRV
Host *
Path /com.ibm.cics.server.examples.wlp.hello.war/*
Transaction HIEX
Usage JVMSERVER
TCICSTRN definition and permission
The following RACF commands show how to give access to group ALLUSERS to the new transaction. See Example 8-21.
Example 8-21 Give transaction access to the ALLUSERS group
RDEFINE TCICSTRN HIEX UACC(NONE)
PERMIT HIEX CLASS(TCICSTRN) ACCESS(READ) ID(ALLUSERS)
SETROPTS RACLIST(TCICSTRN) REFRESH
GenAppWeb
The deployment descriptor for this application authorizes a role of Broker to the entire application. Since, when deployed as a CICS bundle, the application element will not specify a security-role for Broker, you are not able to run GenAppWeb. The solution is to alter the deployment descriptor to add the cicsAllAuthenticated role.
Alter the deployment descriptor
Follow these steps to alter the deployment descriptor:
1. In the development environment, expand the GenAppWeb project, as shown in Figure 8-1.
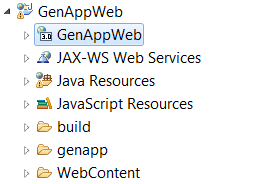
Figure 8-1 View of the GenAppWeb project in the Java EE perspective
2. Double-click the highlighted 3.0 GenAppWeb directory. This opens the web.xml file in the deployment descriptor editor.
3. Add a security role for cicsAllAuthenticated, as shown in Figure 8-2.

Figure 8-2 Add security role in the deployment descriptor
4. Highlight Security Constraint, and then add cicsAllAuthenticated as an extra authorization constraint, as shown in Figure 8-3.
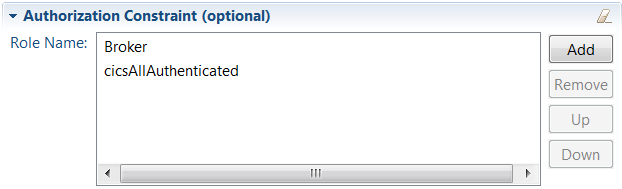
Figure 8-3 Add additional authorization constraints
Example 8-22 Sample of updated web.xml
<security-role>
<role-name>Broker</role-name>
</security-role>
<security-constraint>
<web-resource-collection>
<web-resource-name>full app</web-resource-name>
<url-pattern>/*</url-pattern>
</web-resource-collection>
<auth-constraint>
<role-name>Broker</role-name>
<role-name>cicsAllAuthenticated</role-name>
</auth-constraint>
<user-data-constraint>
<transport-guarantee>CONFIDENTIAL</transport-guarantee>
</user-data-constraint>
</security-constraint>
<security-role>
<role-name>cicsAllAuthenticated</role-name>
</security-role>
When you have more than one role in an auth-constraint, you only need to belong to one role in order to satisfy the constraint. So with these changes, all authenticated users are able to run GenAppWeb. But that is not what you want. You only want Brokers to be able to run GenAppWeb. To enforce that, you need to use a transaction, URIMAP, and TCICSTRN permissions.
Define and install a transaction definition
Define and install a transaction definition with the following attributes:
Description - Copy of transaction CJSA for GenAppWeb
Name - GENA
Program Name – DFHSJTHP
Task Data Location – Any
System Purge - Yes
CmdSec - Yes
ResSec - Yes
Define and install a URIMAP definition
Define and install a URIMAP definition with the following attributes:
Description - URIMAP for GenAppWeb
Name - GENAPPWB
Host – *
Path - /GenAppWeb/*
Transaction - GENA
Usage - JVMSERVER
TCICSTRN definition and permission
The following RACF commands show how to give access to group BROKERS to the new transaction. See Example 8-23.
Example 8-23 Give transaction access to the BROKERS group
RDEFINE TCICSTRN GENA UACC(NONE)
PERMIT GENA CLASS(TCICSTRN) ACCESS(READ) ID(ALLUSERS)
SETROPTS RACLIST(TCICSTRN) REFRESH
8.7.2 Defining a web application in server.xml
When you define the application in server.xml, and you are not using SAF authorization, you can fully control access to your web application. Nevertheless, you still need to be able to pass transaction security. Here, for each of the sample applications, we provide examples of how to do that.
com.ibm.cics.server.examples.wlp.hello.war
The deployment descriptor for this application authorizes a role of cicsAllAuthenticated to the entire application so you need to make the appropriate updates to the server. This example application element in server.xml maps the cicsAllAuthenticated role to RACF group ALLUSERS. Any authenticated user that is connected to group ALLUSERS is authorized to the application. See Example 8-24 on page 157.
Example 8-24 Mapping groups to security role for the hello.war application in server.xml
<application id="com.ibm.cics.server.examples.wlp.hello.war"
Location=”/u/reds13/cicsts53/com.ibm.cics.server.examples.wlp.hello.war.war"
name="com.ibm.cics.server.examples.wlp.hello.war" type="war">
<application-bnd>
<security-role name="cicsAllAuthenticated">
<group name="ALLUSERS"/>
</security-role>
</application-bnd>
</application>
|
Note: RACF Groups and user IDs specified in a security-role must have an OMVS segment and must have a unique GID or UID.
|
TCICSTRN definition and permission
Ensure that the group ALLUSERS has access to the TCICSTRN profile for CJSA. Here are the RACF commands to do that. See Example 8-25.
Example 8-25 Define and permit ALLUSERS group access to the TCICSTRN profile
RDEFINE TCICSTRN CJSA UACC(NONE)
PERMIT GENA CLASS(TCICSTRN) ACCESS(READ) ID(ALLUSERS)
SETROPTS RACLIST(TCICSTRN) REFRESH
GenAppWeb
The GenAppWeb deployment descriptor has a security constraint that authorizes the role Broker. The following example application element maps the Broker role to RACF group BROKERS. Any authenticated user that is connected to group BROKERS is authorized to the application. See Example 8-26.
Example 8-26 Map Broker role to BROKERS group in the server.xml
<application id="GenAppWeb"
location="/u/reds13/cicsts53/GenAppWebBundle_1.0.0/GenAppWeb.war" name="GenAppWeb" type="war">
<application-bnd>
<security-role name="Broker">
<group name="BROKERS"/>
</security-role>
</application-bnd>
</application>
|
Note: RACF Groups and user IDs specified in a security-role must have an OMVS segment and must have a unique GID or UID.
|
TCICSTRN definition and permission
Make sure group BROKERS has access to the TCICSTRN profile for CJSA. Here are the RACF commands to do that. See Example 8-27 on page 158.
Example 8-27 Define and permit BROKERS group access to the TCICSTRN profile
RDEFINE TCICSTRN CJSA UACC(NONE)
PERMIT GENA CLASS(TCICSTRN) ACCESS(READ) ID(BROKERS)
SETROPTS RACLIST(TCICSTRN) REFRESH
BrowseCatalog
The deployment descriptor for BrowseCatalog does not specify any security constraints. Therefore, a request to run BrowseCatalog will not go through authentication or authorization. So there is no need for security-role information in the application element in server.xml. That application element might look like that in Example 8-28.
Example 8-28 BrowseCatalog application without security-role information in server.xml
<application id="BrowseCatalog"
location="/u/reds13/cicsts53/BrowseCatalog.war"
name="BrowseCatalog" type="war">
</application>
Because there is no security constraint, a request to run this application needs to run the CJSA transaction using a static user ID.
URIMAP definition
Define and install a URIMAP definition with the following attributes:
Description - URIMAP for BrowseCatalog
Name - BROWSCAT
Host – *
Path - /BrowseCatalog/*
Usage - JVMSERVER
Userid - PUBLIC01
TCICSTRN definition and permission
Ensure that the user ID PUBLIC01 has access to the TCICSTRN profile for transaction CJSA. Example 8-29 shows the RACF commands to do that.
Example 8-29 Define and permit PUBLIC01 user ID access to the TCICSTRN profile
RDEFINE TCICSTRN CJSA UACC(NONE)
PERMIT CJSA CLASS(TCICSTRN) ACCESS(READ) ID(PUBLIC01)
SETROPTS RACLIST(TCICSTRN) REFRESH
..................Content has been hidden....................
You can't read the all page of ebook, please click here login for view all page.