

Application development
In this section, we cover the key areas of concern when developing applications to run within Liberty in CICS.
This chapter describes the following topics:
2.1 Application development
We begin by looking into the application invocation options. Then, we look into data connectivity options, differences between JDBC driver types, and deployment and redeployment options. Finally, we cover the different technologies that are available for optimizing the serving of static data, and then look at the tools available for migrating existing applications to Liberty.
2.1.1 Web invocation options
Many options are available when it comes to the invocation of Liberty web applications when running within CICS. You can run your applications with servlets running presentation logic, or you can expose services using applications that focus on integration logic, using web services technologies.
The following sections explore the technologies that are available when choosing how you invoke your applications.
Servlets
Liberty is, at its heart, a web container that can run lightweight Java servlets, JavaServer Pages (JSP), and JavaServer Faces (JSF). This allows developers to use features of the Java servlet and JSP specifications to write modern interfaces running on Liberty in CICS. Java servlets can be produced by using the Java Servlet API, which enables the development of dynamic web content.
JavaServer Pages (JSP)
JSP extends the Java Servlet API by providing a document-centric or page-centric solution for dynamically generating content for web user interfaces. JSP allows Java code to be written into static web content. This code is then translated into a servlet and executed in the server to generate an output document that is sent to the requesting client.
JavaServer Faces (JSF)
JSF is also an extension of the Java Servlet API. They provide a component-based model-view-controller (MVC) framework. JSF is a Java framework that is designed for enterprise web application development. In particular, JSF removes the need for developers to provide functions in their applications that handle HTTP request parameters, or that convert or validate input.
Web services
Presentation logic applications are not the only type that can be used to interact with CICS. Applications can be written that interact with CICS and Liberty in CICS through integration applications. Two technologies that are available are SOAP web services and Representational State Transfer (RESTful) web services.
SOAP web services
SOAP is a simple XML-based protocol for applications to exchange information over application layer protocols such as HTTP. SOAP can be used to create request-response interactions. SOAP is a protocol that is independent of platform, operating system, and method of transport.
This XML-based protocol consists of the following three parts:
•An envelope that defines what is in the message and how to process it
•A set of encoding rules for expressing instances of application-defined data types
•A convention for representing procedure calls and responses
The most common method of exchanging SOAP messages uses HTTP. However, SOAP can be used with various transport protocols, such as Simple Mail Transfer Protocol (SMTP), File Transfer Protocol (FTP), or Java Message Service (JMS).
For more information about CICS SOAP web services, see Implementing CICS Web Services, SG24-7206 at this location:
SOAP web services can also be enabled through Liberty in CICS with the jax-ws-1.0 feature.
RESTful web services
In CICS TS V5.3, you can deploy RESTful web services and SOAP web services. For information about RESTful and JavaScript Object Notation (JSON), see Chapter 9, “Porting a web application” on page 161.
For information about the use of RESTful and JSON in CICS or Liberty in CICS, see Implementing IBM CICS JSON Web Services for Mobile Applications, SG24-8161:
2.2 Accessing CICS data
There are three key ways for web applications to access the data from CICS applications:
•JCICS
•JCA
•JDBC
In addition, Liberty provides access to non-relational databases, such as the non-SQL database MongoDB.
2.2.1 CICS Java class library (JCICS) API
CICS includes the JCICS, the Java equivalent of the EXEC CICS API. By using JCICS, you can write Java applications that access CICS resources and integrate with programs written in other languages. Most of the functions of the EXEC CICS API are supported. The library is supplied in the com.ibm.cics.server.jar file with CICS and the IBM CICS Explorer® software development kit (SDK). JCICS provides the ability to link to any other CICS applications, and to directly access VSAM files or CICS managed temporary storage or transient data queues.
Java EE Connector Architecture (JCA)
The JCA APIs are used to connect enterprise systems, such as CICS, to the Java EE platform. CICS TS V5.3 provides a local implementation of the JCA ECI resource adapter that was previously only provided by the CICS Transaction Gateway.
The support of JCA inside of CICS allows you to migrate Java Platform, Enterprise Edition applications from other application servers into CICS without modification. An example of this would be an enterprise who hosts their presentation logic on a distributed application server, which uses JCA ECI calls into CICS to access business logic. In most cases this application can be moved from the distributed application server to run inside of Liberty in CICS. You might choose to do this if you require resources through CICS access and need to reduce the number of tiers in your architecture for ease of maintenance or to gain potential operational savings.
2.3 Database access options
There are a number of ways available to access data depending on your needs. Namely, local IBM DB2, remote relational DB, or document-oriented databases. For example:
•Traditional local DB2 via the DB2 attachment facility.
•Remote database using a JDBC type 4 driver. This can be either a remote DB2 or another relational database with a type 4 driver, such as the Apace Derby database.
•MongoDB using the MongoDB API.
2.3.1 JDBC access options
You can define data sources using driver type 2 or type 4. The main difference between these two drivers is that, with type 2, you use a database-specific API to make the calls and then access the data. With type 4, you simply use Java libraries to connect directly to the database.
Figure 2-1 on page 21 illustrates in more detail some scenarios with two different driver types within a Liberty environment. Some additional information, such as EXEC SQL or the distributed data facility (DDF), is included in the graphic as a general sample, although not expanded on in this book.

Figure 2-1 JDBC type 2 and type 4 drivers
When it comes to creating the actual data source for Liberty, you would do all of this configuration in the server.xml file. The following subsections describe in more detail the implementation differences between these driver types.
JDBC type 2
As mentioned earlier, type 2 driver connections require a database-specific driver to connect to a particular local database. The driver provides the APIs and is compiled for a specific platform. Being database-specific, the connection parameters might differ between data sources. From here on, we focus on DB2.
Before moving forward with the creation of a CICS DB2 JDBC type 2 driver data source, you first need to configure your CICS region to connect to DB2 in the same manner as though you were using a traditional CICS COBOL program issuing SQL commands. When defining a CICS DB2 connection, set the global attributes for that connection, the relationship between CICS transactions and DB2 resources, among other items.
For more information about how to define the CICS DB2 connection, refer to the Defining the CICS DB2 connection portion of the IBM Knowledge Center at this location:
After you have the CICS DB2 connection defined, creating a type 2 driver data source requires that you edit the server.xml file. Following are some of the elements that need to be updated to define a type 2 driver data source:
1. Add the cicsts:jdbc-1.0 feature to the featureManager element. This enables use of the cicsts_jdbcDriver and cicsts_dataSource elements that are used later in the server.xml file.
<featureManager>
<feature>cicsts:jdbc-1.0</feature>
</featureManager>
2. Add a cicsts_jdbcDriver element. This enables support for access to JDBC type 2 driver data sources using either java.sql.DriverManager or javax.sql.DataSource. The cicsts_jdbcDriver element must refer to a library definition that specifies the library from which the JDBC driver components (the DB2 JDBC .jar and native .dll files) are to be loaded. Typical definitions might look like this:
<cicsts_jdbcDriver libraryRef="defaultCICSDb2Library"/>
<library id="defaultCICSDb2Library">
<fileset dir="/usr/lpp/db2v11/jdbc/classes" includes="db2jcc4.jar
db2jcc_license_cisuz.jar"/>
<fileset dir="/usr/lpp/db2v11/jdbc/lib" includes="libdb2jcct2zos4_64.so"/>
</library>
|
Note: Only one cicsts_jdbcDriver element is required. If more than one is specified, only the last in the server.xml file is used and the others are ignored.
|
3. If just java.sql.DriverManager support is required, the preceding steps are sufficient. To access DB2 connections using data source definitions, a cicsts_dataSource element is required for each data source for which access is to be defined. A cicsts_dataSource specifies a jndiName attribute. This defines the Java Naming and Directory Interface (JNDI) name that is a reference used by your application program when establishing a connection to that data source. A definition might look like this:
<cicsts_dataSource id="defaultCICSDataSource" jndiName="jdbc/defaultCICSDataSource"/>
|
Note: The data source class used is com.ibm.db2.jcc.DB2SimpleDataSource that implements javax.sql.DataSource.
|
4. Optionally, you can set properties for the cicsts_dataSource element using a properties.db2.jcc element. The following example shows how to do this:
<cicsts_dataSource id="defaultCICSDataSource"
jndiName="jdbc/defaultCICSDataSource">
<properties.db2.jcc currentSchema="DB2USER"
fullyMaterializeLobData="true" />
</cicsts_dataSource>
Not all properties permitted in the properties.db2.jcc element are appropriate for JDBC type 2 driver data sources. The inappropriate properties are ignored.
|
Note: Unrecognized properties are ignored. The following properties are not relevant for the CICS JDBC type 2 driver support. If specified, they are also ignored and a warning message issued: driverType, serverName, portNumber, user, password, and databaseName.
|
The Liberty server, when started, is configured to allow access to DB2 databases using a JDBC type 2 driver connection.
|
Note: Dynamic updates of the CICS data source and its components are not supported. Updating the configuration while the Liberty server is running can result in DB2 application failures. Be sure to recycle the server to activate any changes.
|
JDBC type 4
Unlike the type 2 driver that we just analyzed, the DB2 JDBC type 4 driver data source does not use the CICS DB2 connection resource.
DB2 JDBC type 4 driver data source can also be manually enabled via the server.xml configuration file. This allows the establishment of connections to remote DB2 databases. Because updates made to a DB2 database using a JDBC type 4 driver do not use the CICS DB2 connection resource, they are not part of the CICS unit of work unless they are made within a JTA user transaction. See Java Transaction API (JTA).
Here are some of the elements that you need to update to define a Type 4 data source:
1. Add the jdbc-4.0 feature to the featureManager element. This enables use of the dataSource and jdbcDriver elements that are used later in the server.xml file.
<featureManager>
<feature>jdbc-4.0</feature>
</featureManager>
2. Add dataSource and jdbcDriver elements. The dataSource element must refer to a library definition that specifies the library from which the JDBC driver components (the DB2 JDBC .jar and native .dll files) are to be loaded. Typical definitions might look like this:
<dataSource jndiName="jdbc/defaultCICSDataSource">
<jdbcDriver libraryRef="db2Lib"/>
<properties.db2.jcc driverType="4"
serverName="winmvs2c.hursley.ibm.com"
portNumber="41100"
databaseName="DSNV11P2"
user="DBUSER"
password="{xor}Lz4sLCgwLTs="/>
</dataSource>
<library id="db2Lib">
<fileset dir="/usr/lpp/db2v11/jdbc/classes" includes="db2jcc4.jar
db2jcc_license_cisuz.jar" />
</library>
The dataSource element specifies a jndiName attribute. This defines the JNDI name that is a reference used by your application program when establishing a connection to that data source. The required properties are set in the properties.db2.jcc element as follows:
•driverType
– Description: Database driver type, must be set to 4 to use the pure Java driver
– Default value: 4
– Required: false
– Data type: int
•serverName
– Description: The host name of the server where the database is running. This is the SQL DOMAIN value of the DB2 DISPLAY DDF command
– Default value: localhost
– Required: false
– Data type: string
•portNumber
– Description: Port on which to obtain database connections. This is the TCPPORT value of the DB2 DISPLAY DDF command
– Default value: 50000
– Required: false
– Data type: int
•databaseName
– Description: Specifies the name for the data source. This is the LOCATION value of the DB2 DISPLAY DDF command
– Required: true
– Data type: string
•user
– Description: The user ID to connect to the database
– Required: true
– Data type: string
•password
– Description: The password of the user ID to connect to the database. The value can be stored in clear text or encoded form. It is recommended that you encode the password by using the securityUtility tool with the encode option
– Required: true
– Data type: string
For more information about the Liberty profile securityUtility command, see the IBM Knowledge Center at this location:
The Liberty server, when started, is configured to allow access to DB2 databases using a JDBC type 4 driver connection.
2.3.2 JTA
The Java Transaction API (JTA) is used to coordinate transactional updates to Java based resource managers in the Liberty JVM server environment. This includes XA-based data sources, such as type 4 driver data sources, a remote transactional JCA resource adapter, or third-party resource managers.
When using a type 4 JDBC driver, the Liberty transaction manager is the transaction coordinator and the CICS unit of work is subordinate, as though the transaction had originated outside of the CICS system.
When using a type 2 JDBC driver, all requests flow through the CICS DB2 attachment facility. Therefore, it is not necessary to use JTA to coordinate with updates to other CICS resources, as the CICS recovery manager is the transaction coordinator.
In JTA, you create a UserTransaction object to encapsulate the global transaction. This provides two key methods begin() and commit(), which demarcate the transactional scope of the work performed.
The following code fragment illustrates how to control a User Transaction:
InitialContext ctx = new InitialContext();
UserTransaction tran =
(UserTransaction)ctx.lookup("java:comp/UserTransaction");
DataSource ds = (DataSource)ctx.lookup("jdbc/SomeDB");
Connection con = ds.getConnection();
// Start the User Transaction
tran.begin();
// Perform updates to CICS resources via JCICS API and
// to database resources via JDBC/SQLJ APIs
if (allOk) {
// Commit updates on both systems
tran.commit();
} else {
// Backout updates on both systems
tran.rollback();
}
Unlike a CICS unit-of-work (UOW), a UserTransaction must be explicitly started by using the begin() method. Invoking begin() causes CICS to commit any updates that might have been made before starting the UserTransaction. The UserTransaction is terminated by invoking either of the commit() or rollback() methods, or by the web container when the web application terminates.
While the UserTransaction is active, it is not possible to issue a CICS synncpoint command, from either the JCICS API or linked to programs that issue EXEC CICS commands. The effect of this means that the Java program cannot invoke the JCICS Task Task.commit() and Task.rollback() will not be valid within a JTA transaction context. If either is attempted, an InvalidRequestException will be thrown.
Note that if a Liberty JVM server fails during two-phase commit processing of a Java transaction, and the Java transaction is left in doubt, CICS initiates transaction recovery as soon as the Liberty JVM server initialization is complete. If the JVM server is installed as disabled, recovery runs when it is set to enabled.
2.3.3 Access to non-SQL databases
Document-oriented databases, such as MongoDB, are increasing in popularity. You query these databases by using custom C++ syntax as opposed to SQL queries. In these non-SQL databases, the data is stored in BSON files, which are a binary representation of JSON files. A typical BSON entry looks like this:
{
ID: 6535435
name: CICS
area: TP
}
At the time of this writing, MongoDB is available for distributed platforms and
Linux on z Systems. The mongodb-2.0 driver is available to allow for remote database instances to be configured in the server configuration. Applications would interact with these databases through the MongoDB APIs.
Linux on z Systems. The mongodb-2.0 driver is available to allow for remote database instances to be configured in the server configuration. Applications would interact with these databases through the MongoDB APIs.
You must download the MongoDB driver from GitHub at this location:
After the driver is downloaded, place the driver in a directory where the CICS Liberty JVM server can access it.
Similarly, as with the JDBC drivers, MongoDB connections are defined in the server.xml file. The following are some of the elements that you need to update to enable MongoDB:
1. Add in a shared library reference to the MongoDB Java driver that was just downloaded:
<library id="MongoLib">
<file name="${server.config.dir}/lib/mongo-java-2.11.1.jar" />
</library>
2. Configure a library reference for each application that uses MongoDB:
<application name="MyApp1" location="MyApp1.war">
<classloader commonLibraryRef="MongoLib"/>
</application>
3. Enable the MongoDB feature and, if required, the JNDI feature:
<featureManager>
<feature>mongodb-2.0</feature>
<feature>jndi-1.0</feature>
</featureManager>
JNDI is only required if you are planning to use the JNDI lookup method of accessing MongoDB.
4. Configure a reference to the MongoDB database:
<mongo id="mongo" libraryRef="MongoLib" hostNames="winmvsXX.myserver.com" ports="27017"/>
The values in hostNames and ports must point at the user’s instance of MongoDB.
5. Configure a reference to MongoDB for use within the application itself:
<MongoDB jndiName="mongo/testdb" mongoRef="mongo" databaseName="db-test" />
The jndiName is used within the application to gain reference to MongoDB. The mongoRef attributes reference the ID of the mongo tag in server.xml.
Accessing MongoDB from your web application
Update your application web.xml file to match the MongoDB references just defined in the server.xml file:
<resource-env-ref>
<resource-env-ref-name>mongo/testdb</resource-env-ref-name>
<resource-env-ref-type>com.mongodb.DB</resource-env-ref-type>
</resource-env-ref>
The resource-env-ref-name matches the value of the jndiName that you defined in the server.xml file.
You can now make use of MongoDB in your web application. There are two main supported ways of doing this:
•Resource injection works by adding the following to the top of your Java class:
@Resource(name = "mongo/testdb")
protected DB testdb;
•A JNDI lookup can be used by adding the following to a method of your Java class:
DB lookup = (DB) new InitialContext().lookup("java:comp/env/mongo/testdb");
Limitations
For the MongoDB feature, the following restrictions apply for WebSphere Liberty Profile:
•There is no integration with Java transaction or CICS recovery, as there is no transactional access to the database.
•MongoDB is not supported on IBM z/OS. Therefore, connections must be made to a remote database, such as Linux on z Systems or a distributed platform.
•Only versions 2.10.0 and later are supported for the Java driver.
For more information about the current level of support, see the MongoDB website:
2.4 Optimizing static content
Caching the static content is a key technique for improving application performance. It can be used to host internal or external websites. Caching static content at the edge, like images and scripts, is only the beginning as far as offloading requests. For a typical web application, caching can take place at several different layers:
•At the web client or browser
•In a caching proxy set-up in front of the Liberty profile in CICS
•In an HTTP web server
•In the application server in DynaCache
•In the back-end database tier
2.4.1 Static content separation
The content of a web application can consist of two types: Dynamic or static. The dynamic runtime components are those that require some type of processing to be generated (such as servlets, JSP, and PHP scripts). The static content are the pieces that will never, or only occasionally, change (such as HTML files, graphic images, audio files, or style sheets).
When developing Java Platform, Enterprise Edition web applications, the easiest approach is to deploy the entire application onto the application server. But, with this approach, both the static and runtime components of the application are deployed to the application server, the Liberty Profile running in CICS. Some of these static elements can be large and frequently requested, so for performance reasons, especially in a high workload environment, the preference is for static content to be served from a dedicated web server rather than a fully functional application server.
Optimizing static data in CICS
In the CICS Liberty JVM server, by default, all HTTP requests run as CICS transactions on a T8 task control block (TCB). However, requests to serve static data, such as .gif or .jpeg files, do not need the security or transaction environment this provides. Therefore, as an optimization, you can use the following JVM system properties to ensure that requests for static data run as Liberty threads only, and do not run as CICS transactions. This will both improve the efficiency of the requests and reduce queuing for CICS tasks:
•com.ibm.cics.jvmserver.wlp.optimize.static.resources={true|false}
Enables CICS to use fewer transactions to satisfy a request by using static resource optimization. The following types of file are recognized as static: .css, .gif, .ico, .jpg, .jpeg, .js, and .png.
•com.ibm.cics.jvmserver.wlp.optimize.static.resources.extra=
If com.ibm.cics.jvmserver.wlp.optimize.static.resources =true, you can provide a custom list of extra static resources for optimization. Items must be comma-separated, and begin with a period, for example: .css, .gif, .ico.
Using a dedicated web server
In the Servlet 2.2 specification, Sun introduced the web archive (WAR) file that can contain all of the compiled Java code that makes up a web application. It can contain servlets, JSP pages, utility classes, static documents, client-side applets, beans and classes, and metadata that ties everything together. However, if the static content within an application is to be served separately from the dynamic content, a simple way is to ensure the images are not deployed within the WAR using a local reference (such as src="images/images1.gif") but instead referenced using absolute paths to remote URLs on a dedicated web server from where the static data can be cached.
Figure 2-2 shows a topology where the static content is serviced within the web server and the dynamic content is serviced on the server side in the Liberty profile. This configuration is a way to separate the static and dynamic content, but it is not necessarily the best way. For instance, you need to use a separate host name and port number for each server.

Figure 2-2 Serving static content in web server and dynamic content in back-end
Using the web server plug-in
Another option is to use the WebSphere Application Server to provide a way to let the web server instance know about all the applications that are running within the Liberty Profile in CICS and how to access them. The configuration in Figure 2-3 shows that all requests are received by the web server, which allows the web server plug-in to forward any requests to the Liberty Profile in CICS, depending on how it is configured. This allows the web server to serve the static content without having to send the request to the back end for servicing. In addition, the dynamic content can still be served by the back end. The user in this case will only be aware of the host name and port number of the web server. This configuration also provides easier scalability if wanted.
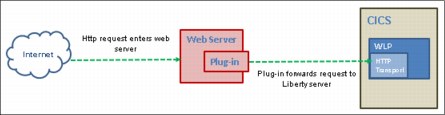
Figure 2-3 Using a web server plug-in to forward request to Liberty in CICS
Many web browsers and intermediate servers cache web content to help speed up its delivery and display. This is useful for servicing static data, the unchanging content such as HTML, graphics, and JavaScript files. But what about dynamically generated web content?
2.4.2 Dynamic caching
Static caching is a valuable benefit. However, dynamic caching is much more useful, as it provides caching of HTML pages based on its request path, query strings, cookies, and request headers. Dynamic requests tend to use far more enterprise resources in building a response, so dynamic caching can dramatically enhance performance.
Caching the output of servlets, commands, and JavaServer Pages (JSP) improves application performance by serving requests from an in-memory cache. Cache entries contain servlet output, the results of a servlet after it runs, and metadata. The Liberty Profile uses a service called dynamic caching to consolidate these caching activities. Dynamic caching (or DynaCache) is an in-memory cache with the ability to offload the content on disks. Dynamic caching is more complex than static caching and requires detailed knowledge of the application. You must consider the candidates for dynamic caching carefully, because dynamically generated content can be different based on the state of the application. Therefore, it is important to consider under what conditions dynamically generated content can be cached to return the correct response. This requires knowledge of the application, its possible states, and other data, such as parameters that ensure the dynamic data is generated in a deterministic manner. A good candidate for dynamic caching is any data that is dynamic and, at the same time, is stable long enough for it to be reused.
The concept behind dynamic caching is to store results of a first execution of a dynamically generated web page. Any subsequent requests made to the same page go to cache. This helps to avoid the overhead incurred by executing an application that renders output that does not change. The dynamic cache service of the Liberty Profile allows you to cache the output of servlets and JSP files.
The caching service works within the application server process. It is invoked before a service() method call of a servlet. The service can either execute the service() method and save the output in the cache or directly serve cached content and avoid a call to the service() method. Because Java Platform, Enterprise Edition applications have high read/write ratios and can tolerate small degrees of latency in the currency of their data, the dynamic cache can create an opportunity to improve server response time, throughput, and scalability.
To cache the servlets and JSP, when the application server starts and a targeted servlet or JSP is called for the first time, no cached entry is found and so the service() method of the servlet is called. The DynaCache web container intercepts the response from the service() invocation and caches the results as shown in Figure 2-4.

Figure 2-4 Before caching, a request must traverse all layers
The next time that the servlet is called and a match is found in the caching rules engine, the cached results are returned and the service() method is not called. This bypasses all of the processing that would have been done by the servlet, resulting in a substantial performance boost. However, if there is no cache entry for this ID, the service() method is run as normal, and the results are caught and placed in the cache before they are returned to the requester.
Figure 2-5 on page 31 illustrates how DynaCache increases performance by bypassing the service() method call entirely whenever a cache hit occurs.
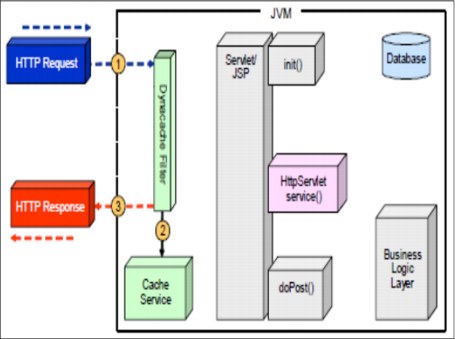
Figure 2-5 A cache hit means the servlet and business logic are not called
Servlets and JSP are configured for caching with entries in the cachespec.xml file. In Liberty, this file has to be packaged within the application, either in WEB-INF or META-INF. The file defines the structure and elements for cachespec.xml. This is in dev/api/ibm/schema.
DynaCache stores objects in a JVM heap or on disk. It later retrieves and serves them from its cache based on data matching rules. It creates a unique user-defined key in which to store and retrieve cache items.
With the Liberty profile, caches are defined in the server.xml file. To enable caching, add the webCache-1.0 feature to the list of enabled features in the server.xml file. In Liberty, there is no distinction between servlet cache instances and object cache instances. All cache instances are a distributed map. Applications can include a cache-spec.xml file to customize the response caching.
To define the cache, use the distributedMap element:
<featureManager>
<feature>webCache-1.0</feature>
</featureManager>
<distributeMap id="baseCache" jndiName="services/cache/baseCache">
<diskCache/>
</distributeMap>
When you enable the webCache-1.0 feature, the following caches are configured and created:
•basecache with JNDI name services/cache/basecache
•default with JNDI name services/cache/distributedmap
The messages.log file shows the following messages for the cache initialization:
DYNA0053I: Offload to disk is enabled for cache named baseCache in directory /u/reds10/cicsts53/workdir/CREDS10A/DFHWLP/wlp/usr/servers/defaultServer/workarea/_dynacache/baseCache.
DYNA0061I: Flush to disk on stop is disabled for cache name baseCache.
DYNA0059I: The disk cache configuration for cache name baseCache. The configuration is: DiskCacheSize=100000 DiskCacheSizeInGB=3 DiskCachePerformanceLevel=3 DelayOffload=true DiskCacheEvictionPolicy=1 DiskCacheHighThreshold=80 DiskCacheLowThreshold=70 DataHashtableSize=477551 DepIdHashtableSize=47743 TemplateHashtableSize=1031
DYNA1001I: WebSphere Dynamic Cache instance named baseCache initialized successfully.
DYNA1071I: The cache provider default is being used.
DYNA1056I: Dynamic Cache (object cache) initialized successfully.
DYNA1055I: Dynamic Cache (servlet cache) initialized successfully.
By default, this cache is in the server workarea directory, as shown in Figure 2-6.

Figure 2-6 Directory structure containing the cache
2.5 Application deployment options
In Java EE applications, modules are packaged based on their functionality. There are three key archive types supported for deployment into Liberty in CICS:
•Web archive (WAR)
This is used to package a dynamic web project containing servlets, JSP files, supporting files, gif, and HTML pages. This is the simplest form of archive, and is best used when either simple web applications with limited external dependencies or when migrating a web application from another server.
•Enterprise archive (EAR):
This is used to package enterprise applications containing EJB beans and one or more web applications. This is the best archive to use when deploying EJB applications because Liberty does not support EJB in Open Services Gateway initiative (OSGi).
•Enterprise bundle archive (EBA):
This is used to deploy OSGi application projects containing OSGi bundles and web enabled OSGi bundles (WABs). This is the archive type to use for modular OSGi application development, allowing you to share OSGi bundles between components in the same runtime.
When dealing with Liberty applications running in CICS, several ways are available to deploy applications as an archive file (WAR, EAR, or EBA). The first set of options uses Liberty deployment methods. You can deploy an application either by dropping it into a previously defined dropins directory or by adding an application entry to the server configuration. In addition to this mechanism, you can use the CICS deployment method, which enables you to package Liberty applications inside CICS bundles. In addition, you can share common utility bundles between multiple applications when needed. This section provides an overview of these options.
Figure 2-7 demonstrates the various ways a web application can be deployed to the Liberty Profile in CICS.
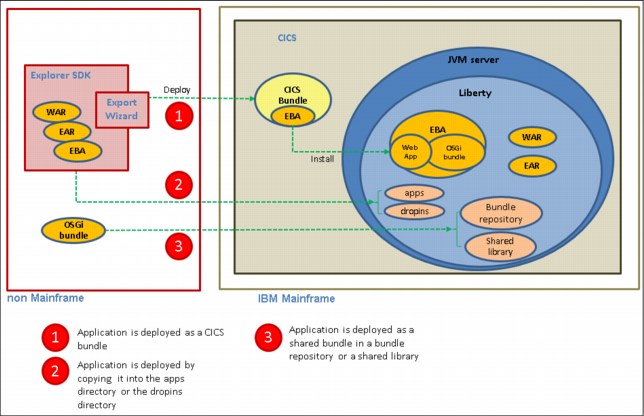
Figure 2-7 Various ways to deploy a web application
2.5.1 Liberty deployment methods
The Liberty Profile supports two models for deploying applications. By default, Liberty looks for applications in two directories: The apps and dropins directories in the server configuration directory. By using the Liberty runtime, web applications can be copied into the server dropins directory to be deployed, or they can be specified directly as applications within the server.xml configuration file.
Deploy to the dropins directory for a quick start
In a development environment, running your application in an expanded format is common. The quickest way to do this is to use the dropins deployment method because this automatically deploys your application. This method uses a predefined dropins directory that is periodically scanned by Liberty. If any new applications are in this directory, the Liberty configuration is updated with the changes so that the new application is deployed. Your application can be packaged as an archive file, a directory, or as a loose application where files are in multiple locations. When you use this model, CICS is not aware of the web application that is running in the Liberty JVM server.
With this approach, there is no application specific entry in the server.xml file, so you do not have as much control over certain aspects. Applications that are deployed by this method do not benefit from additional qualities of service, such as security, and always run under the CJSA transaction.
|
Note: By default, in CICS, this deployment option is turned off. If you accept the defaults provided by CICS, which specifies -Dcom.ibm.cics.jvmserver.wlp.autoconfigure=true in the JVM profile, the dropins directory is not automatically created or monitored by the Liberty JVM server.
|
To automatically deploy applications using the dropins method, all you need to do is to enable the feature in the applicationMonitor element. Then, just copy the application files in binary mode to the ${server.config.dir}/dropins folder:
1. Verify application monitoring is defined in the server.xml, and update as needed.
Here is an example of the applicationMonitor element.
Here is an example of the applicationMonitor element.
<applicationMonitor dropins="dropins" dropinsEnabled="true" pollingRate="5s" updateTrigger="disabled"/>
The dropins property specifies the name of the directory used as the dropins directory.
The dropinsEnabled property determines whether the applications in the dropins directory are deployed. In CICS by default, this is set to false.
The pollingRate property determines the interval amount and the unit of time (such as ms for milliseconds, s for seconds, and so on).
The updateTrigger property specifies whether the Liberty server should monitor for application updates. It has three possible values:
polled The runtime environment scans the server.xml file for changes using the timing interval specified by the monitorInterval property on the <config../> element.
Mbean The runtime environment only looks for updates when prompted to do so through a call to an MBean. This is the mode that is used by the developer tools to update the server.xml file, unless you override it.
disabled The updates are not dynamically applied.
2. Copy the file in binary mode to ${server.config.dir}/dropins.
There are several options for placing applications in the dropins directory. Each provides a way for the server to determine the application type.
The following list describes the placement options:
•Place the archive file with its identifying suffix (ear, war, eba, and so on) directly in the dropins directory: ${server.config.dir}/dropins/myApp.war
•Extract the archive file into a directory that is named with the application name and the identifying suffix: ${server.config.dir}/dropins/myApp.war/WEB-INF/...
•Place the archive file or the extracted archive into a subdirectory that is named with the identifying suffix: ${server.config.dir}/dropins/war/myApp/WEB-INF/...
If you put your applications in the dropins directory, you must not include an entry for the application in the server configuration file or deploy the application in a CICS bundle resource. Otherwise, the server tries to load the application more than once and an error might occur.
Deploy to the apps directory for more control
In certain situations, the preference might be to deploy an application to Liberty with more control. As an alternative to using the dropins mechanism, you can manually define your application in the server configuration and use the apps directory. This method consists of a set of statements that locate the application and define its properties. This allows you to specify additional properties, such as the context root, alter application start behavior, and so on. You can use the <application…/> element, which supports the following attributes:
•ID: Must be unique and is used internally by the server.
•Name: Must be unique and dependent on the application.
•Type: Specifies the type of application; supported types are WAR, EBA, and EAR.
•Location: Specifies the path to the application; this can be an absolute path or URL.
The location attribute is the only required attribute for a declared application. The location can be on the file system or at a URL.
The steps provided here show how to configure an application in the server configuration:
1. Define the application to the server configuration (server.xml)
<application id=myApp type="war" name="myApp" location="myApp.war"/>
2. Copy the file in binary mode to ${server.config.dir}/apps
Type-specific application elements can be used to simplify the declaration of applications:
•<republication.../>
•<osgiApplication.../>
•<enterpriseApplication.../>
These elements are used in a manner identical to the generic <application.../> element, but eliminate the type attribute because the application type is built into the shorthand of the element.
2.5.2 CICS deployment methods
CICS TS allows you to package web applications inside a CICS bundle project where you have to reference the Liberty applications (WARs, EARs, or EBAs) as components. The BUNDLE resource represents the application so you can also manage its availability by enabling and disabling it in CICS. It is a collection of CICS resources, artifacts, references, and a manifest that you can deploy into a CICS region to represent all or part of an application.
Deploy as a CICS bundle to manage application lifecycle
When you have created a CICS bundle project in CICS Explorer, you must export it to a CICS region. You can either export the project directly to zFS (or any server with an FTP daemon), or you can use the CICS build toolkit on a build machine to automate this function. You must also define and enable a BUNDLE resource for the CICS bundle project. CICS then creates the Bundle project resources dynamically for you. The CICS bundle deployment process from CICS Explorer automates the creation of the Liberty application reference using the installedApps.xml configuration file, which is included from server.xml. This approach is best suited to a production environment.
|
Note: You can export a Bundle directly to a zFS system only if your network is using Internet Protocol version 4 (IPv4). The procedure does not work for IPv6 networks. The port can be secured to accept Secure Sockets Layer (SSL) traffic. If this is done, CICS Explorer detects this and switches to SSL mode so that no data flows decrypted. If an SSL connection cannot be established, basic authentication is used.
|
The steps presented here show how to deploy the application in a CICS bundle resource:
1. Verify that the following line is in server.xml. This file is used to define CICS Bundle deployed applications.
<include location="${server.output.dir}/installedApps.xml"/>
2. Create a CICS bundle definition to control the lifecycle of the application.
3. Add the application reference to the CICS bundle.
4. Export the CICS bundle project to a zFS location.
5. Create and install the CICS BUNDLE resource definition.
The installedApps directory is used to define CICS bundle deployed applications. This include is added automatically if -Dcom.ibm.cics.jvmserver.wlp.autoconfigure=true is specified in the JVM profile.
2.5.3 Deploying shared (middleware) bundle
OSGi applications can share many common bundles. To simplify maintenance, an application does not have to include its own copy of each bundle. Instead, bundles can be shared from a bundle repository or a shared library. You can deploy the shared bundles in various ways depending on how it is supplied, as DLL files, JAR files, or OSGi bundles.
Libpath
For middleware supplied as .dll files, copy the files to a directory that is referred to by the LIBPATH_SUFFIX option of the JVM profile.
Bundle repository
For middleware supplied as OSGi bundle JAR files, you can share these common OSGi bundles both locally or remotely so that your OSGi applications can access them. This can be accomplished by placing them in a directory and configuring the bundleRepository element in the server.xml.
Here is a local repository configuration:
<bundleRepository>
<fileset dir="directory_path" include="*.jar"/>
<bundleRepository>
The directory_path used to define a local OSGi bundle repository is the path to the directory containing the common OSGi bundles.
Here is a remote repository configuration type:
<bundleRepository location="URL" />
The URL used to define a remote OSGi bundle repository defines the location of an OSGi Bundle Repository XML file, and it supports HTTP, HTTPS, and file protocol types. You can define a remote and local repository at the same time by using both a location attribute and nested fileset tags within the same bundleRepository entry.
Shared libraries
Shared libraries provide a collection of classes that can be used by multiple applications or data sources. You can use shared libraries and global libraries to reduce the number of duplicate library files on your system. Libraries have three elements: <folder>, <file>, and <fileset>. Copy the JAR files to a directory that is referred to in a global library definition in the server.xml file:
<library>
<folder dir="..." />
<file name="..." />
<fileset dir="..." includes="*.jar" scanInterval="5s" />
</library>
Where:
•<folder>: All resources under each configured folder will be loadable.
•<file>: Each configured file should be either a native library or a container for resources (such as a JAR or a ZIP file). All resources within a container are loadable, and any other file type that is specified will have no effect.
•<fileset>: Each configured fileset is effectively a collection of files. Each file in the fileset should be a native library or a container for resources (such as a JAR or a ZIP file). All resources within a container are loadable, and any other file type that is specified will have no effect.
A library on the Liberty profile server is composed of a collection of file sets that reference the JAR files to be included in the library.
There are three types of shared libraries in Liberty:
•Global shared libraries that allow all applications to share a common instance of the library
•Configured common libraries that allow specific applications to share a common instance of the library
•Configured private libraries that allow specific applications to use private instances of the library
A global shared library can be used by any application. The library is visible to all applications deployed in the server. All applications access the same instances of those classes. The JAR files are placed in a directory and then are specified in the class loader configuration for each application. You can place global libraries in one of the following locations:
•${shared.config.dir}/lib/global
•${server.config.dir}/lib/global
Using a global library can be useful in some situations, especially for CICS deployed WAR or EAR components, but it does have drawbacks:
•All applications have visibility to the same static variables in the library classes (they are not isolated)
•It is not possible to provide different versions of the same library for use by different applications
When the application is started, if files are present in the global location, and that application does not have a <classloader> element configured, the application uses the global libraries. If a class loader configuration is present for the application, the global libraries are not used unless explicitly referenced.
The following code shows a global library entry added to the server configuration (server.xml) file:
<fileset dir="/u/myApp/shared" id="myappshare" includes="*.jar"/>
<library filesetRef=" myappshare" id="global"/>
A configured library can be used in an application by creating a classloader definition for the application in the server configuration. The application classloader can share the in-memory copy of the library classes with other applications, or it can have its own private copy of the classes that are loaded from the same location. A shared library can be used only by applications that are explicitly configured in the server.xml file. Applications without configuration, such as those placed in the dropins directory or those deployed using CICS, cannot use a global shared library.
The following code shows a library entry added to the server configuration (server.xml) file and applications using the classloader child element:
<library id="myLibrary">
<fileset dir="${shared.resource.dir}/lib" includes="*.jar" />
<file name="${shared.resource.dir}/App/app.jar"/
</library>
<application location="Application1.war">
<classloader commonLibraryRef="myLibrary"/>
</application>
<application location="Application2.war">
<classloader privateLibraryRef="myLibrary"/>
</application>
In this example, Application1 shares its copy of the myLibrary classes with any other application that specifies it as a commonLibraryRef. Application2 has its own private copy of the myLibrary classes. Common libraries are useful where different versions of a library should be made visible to different applications, but the same instance of each version can be safely shared by the consuming applications. This limits the memory use of the library classes. Private libraries are useful where a shared library instance needs to be isolated for each application, or if the library needs to be able to access the application classes.
2.6 Application redeployment options
When configuring the Liberty Profile to run in CICS, important considerations are the methods for updating applications when you want to make changes. In the previous section, we described the various methods for deploying applications to run in Liberty Profile. In this section, we look at the ways to redeploy those applications so your changes are picked up.
2.6.1 Redeploy by using Liberty deployment methods
Within Liberty, three types of dynamic updates can be controlled through the configuration:
•Changing the server configuration
•Adding and removing applications
•Updating installed applications
For all deployed applications, you can configure whether application monitoring is enabled and how often it should check for updates to applications. When deployed applications are monitored for updates, the updates are dynamically applied to the running application. This applies both to applications that are deployed from the dropins directory or applications that are deployed through configuration entries in server.xml. In addition, for the dropins directory, you can also configure the name and location of the directory and choose whether to deploy the applications that are in that directory.
Within a CICS Liberty JVM server, application monitoring is turned off by default. So if you are using the Liberty deployment methods to deploy your applications, you must enable application monitoring by specifying the applicationMonitor element within server.xml. This element defines how the Liberty server responds to application additions, updates, and deletions. For example, the following line causes Liberty to scan the dropins folder every
5 seconds for any application updates, and for any applications that have been added or removed. The pollingRate is applicable only when the updateTrigger is set to polled:
5 seconds for any application updates, and for any applications that have been added or removed. The pollingRate is applicable only when the updateTrigger is set to polled:
<applicationMonitor dropins="dropins" dropinsEnabled="true" pollingRate="5s" updateTrigger="polled"/>
For applications that are deployed using the app directory, the config element can be used to control how often the server.xml file is scanned for updates:
<config monitorInterval="5s" updateTrigger="polled"/>
For applications in the dropins directory, the file name and file extension are used by the application monitor to determine the type of application, and to generate the application ID and application name. Therefore, specifying the version number for the application by using the file name or file extension is not possible. In a production environment, we suggest that you not use the dropins directory.
2.6.2 Redeploy using CICS bundle deployment
Within a CICS environment, the preference is to deploy web applications using a CICS bundle. This allows CICS to manage the lifecycle of the application so that updating and managing are easier.
There are three main methods for redeploying Liberty web applications when using a CICS bundle project.
•Refresh the bundle in the Liberty JVM
•Create a version of the bundle with a new context root URI
•Use cloned JVM servers and set up load balancing
In this section, we look at each of these options. We also discuss the shared bundles and what to consider for deployment.
Refresh the bundle
The first method that you can use to redeploy a CICS bundle is to replace the deployed CICS bundle project completely with a new version of the project. This method can be used when a server outage can be tolerated during the update process. No new CICS resources are created, but you might need to update the existing CICS BUNDLE resource definition. To replace an existing Bundle with a new version of the application, you can do the following steps:
1. Create a new version of the web application.
2. Export to the same zFS location as the old version.
3. Disable the installed BUNDLE resource that represents the previous version. This removes and stops the application.
4. Enable the installed BUNDLE resource. This reinstalls the application.
|
Note: At Step 2, you can optionally export to a different zFS directory, which would enable you to roll back to the previous version more easily. However, if you do this, you need to edit the BUNDLE resource to modify the BUNDLEDIR attribute to reference the new zFS directory, and then discard and reinstall the BUNDLE resource.
|
The new version of the application is now deployed to the Liberty server. This method is a quick way of redeploying changes to an application, but has the disadvantage that it will cause an outage in a production environment.
Version the bundle and context root
The next two methods allow you to maintain multiple versions of the bundle as one. Within CICS, managing changes to CICS bundles is accomplished by using version control if possible. Each CICS bundle project has an ID and version information that uniquely identifies it. This means that the CICS bundle ID does not need to be unique because it is qualified by the version. This allows you to have more than one version of the CICS bundle installed at the same time.
The second approach to using version control is to create a new version of the bundle with a new URL for the context root. Using this approach allows for two versions of the application to be active at the same time. The application can then be switched between different versions by updating the reference to the URL. Use the following steps to perform this process:
1. Create a new version of the web application with a new URI context root
2. Add the web application to a new version of your CICS bundle project (using the same ID but a new version)
3. Export to a new location in zFS
4. Create a new BUNDLE resource referring to the new zFS location
5. Install new CICS BUNDLE, and the web application is enabled because the URL is unique
The updated version of the bundle is deployed alongside the old version. This versioning method results in no outage to the users, but since Liberty does not allow web applications with duplicate URLs to be installed, it does require a different URL for the context root of the new version. Therefore, you need some forwarding proxy to handle this externally to CICS.
When you are satisfied that the new version of the application is working, you can disable and discard the BUNDLE resource for the old version of the application. In addition, to ensure that the new version of the bundle is installed if a cold or initial start occurs, ensure that you update any CICS group lists that reference the CSD groups that contain the BUNDLE definition for the old version to reference the CSD groups that contain the new bundle definition.
Table 2-1 shows a versioning scheme that can be used with a web application deployed in an EBA in a CICS bundles project.
Table 2-1 Versioning scheme for CICS bundles with EBAs
|
Item
|
Configuration attribute
|
V100
|
V101
|
|
CICS bundle resource definition
|
BUNDLE resource in CSD
|
MYBUN100
|
MYBUN101
|
|
CICS bundle zFS location
|
BUNDLEDIR attribute on BUNDLE resource
|
mybundle.eba.cicsbundle_1.0.0
|
/mybundle.eba.cicsbundle_1.0.1
|
|
CICS bundle ID
|
cics.xml id=
|
""mybundle.eba.cicsbundle
|
mybundle.eba.cicsbundle
|
|
CICS bundle version
|
cics.xml bundleMajorVer="1" bundleMinorVer="0" bundleMicroVer="n"
|
1.0.0
|
1.0.1
|
|
EBA symbolic name
|
OSGi application manifest: Application-SymbolicName:
|
mybundle.eba
|
mybundle.eba
|
|
EBA version
|
OSGi application manifest: Application-Version:
|
1.0.0
|
1.0.1
|
|
WAB bundle ID
|
WAB MANIFEST.MF Bundle-SymbolicName:
|
mybundle.wab
|
mybundle.wab
|
|
WAB bundle version
|
WAB MANIFEST.MF Bundle-Version:
|
1.0.0
|
1.0.1
|
|
Context root URI
|
ibm-web-ext.xml <context-root uri=" " />
|
app100
|
app101
|
Cloned JVM servers
The third method for redeploying your web applications is to use cloned JVM servers and use a load balancing mechanism to distribute the web requests between the servers. An instance of a JVM server can be easily created or cloned. The cloned JVM servers will appear identical to the user. As users request a CICS web application, they will not distinguish what JVM clone is servicing their requests.
Start the newly cloned JVM server, and install the new version of your application. Meanwhile, continue to run the old version in the old JVM server. When you are happy with the newly cloned server and updated application, phase out the old JVM server.
This solution can handle an outage, although, during initialization of the Liberty JVM server, there will be a period during which the HTTP listener is active and the web applications might not yet have finished installing. In this case, Liberty returns the error Context Root Not Found until the application is successfully started.
2.7 Migrating a Java EE application to Liberty
To migrate a Java EE application from a third-party Java Platform, Enterprise Edition server to Liberty in CICS, the Java EE environment that is required by the application must be provided by Liberty. This environment consists of the Liberty features installed in the server, instance configuration for specific resources (for example, data sources, connection factories) and other data, such as system properties. The primary mechanism for configuring the Liberty server environment, the server.xml configuration file, is different from that used by other Java Platform, Enterprise Edition application servers so the required environment must be migrated to server.xml definitions.
This section gives an overview of the main considerations when migrating a Java Platform, Enterprise Edition application to Liberty in CICS and the tools available to help with this. The main considerations are:
•Application validation
•Java EE server environment migration
•External dependency migration
These are considered in turn, although they would not necessarily always be performed in this exact order.
2.7.1 Application validation
The first step in migrating a Java Platform, Enterprise Edition application to Liberty in CICS is to check that the application is eligible for migration, that is, it uses only Java Platform, Enterprise Edition features that are supported in Liberty in CICS. This can be done manually by checking the application design documentation, source code, and so on, or tools can be used to assist.
WebSphere Liberty provides a suite of tools to assist in migrating web applications from WebSphere Application Server full profile or other Java Platform, Enterprise Edition servers to the Liberty profile. The rest of this section gives an overview of these tools and how they can be used to help configure Liberty in CICS. In Chapter 8, “Implementing security options” on page 143, we guide you through the process of using the tools to help migrate a web application.
Migration toolkit for application binaries files (technology preview)
This command-line tool is a Java application that can analyze the packaged binary of an existing Java Platform, Enterprise Edition application and produce a report in the form of an HTML file:
•An overview Technology Report that identifies the Java Platform, Enterprise Edition technologies, roughly equivalent to Liberty features, which are used by the application, and whether those technologies are supported in the target server environment.
•A more detailed Analysis Report for migrating the application from a specified source server to a specified target server. This tool incorporates a set of source-target specific rules, which are used to check the application binary and produce a report of the rules that match.
The command line Analysis Report tool is a limited version of the Eclipse-based Migration Toolkit below, capable of analyzing migration only from WebSphere V7.0+ and Java SE V6+ to Liberty.
WebSphere Application Server Migration Toolkit
This Eclipse-based tool performs the same task as the second of the command-line tools listed, although capable of analyzing rules for migration from earlier versions of WebSphere, and third-party servers. Because it is integrated into Eclipse, it can also pinpoint source code locations where changes need to be made.
For more information about the WebSphere Application Migration Toolkit and its use, see this site:
|
Note: Because the WebSphere Application Server Migration Toolkit is not tailored for CICS, it does not report features that are unsupported in Liberty in CICS, nor any restrictions that apply to the available features. For details about the available features and restrictions that need to be checked against the application dependencies, see the latest CICS IBM Knowledge Center page at this site:
|
What to do if your application depends on unsupported features
In this case, the application has to be remediated to remove dependencies on the unsupported features before it can be migrated. This is a manual development task, which can be assisted by the tool in the WebSphere Application Server Migration Toolkit. The tool can help by suggesting source code changes as quick fixes.
2.7.2 Server environment migration
The next stage of migration is to extract details of the server configuration from the original Java Platform, Enterprise Edition server, and replicate these in server.xml. Only those elements of the configuration that are required by the application need to be migrated. The required subset can be determined referring to the results of the application validation stage above.
There are a number of ways to determine which features and resources need to be configured in Liberty:
•Manual analysis of the application, with information from the application migration exercise
The results of the validation step above will show which features and resources are required by the application. This informs you which of the configuration properties from the original Java Platform, Enterprise Edition server will need to be migrated.
•From the existing Java Platform, Enterprise Edition server configuration
The existing Java Platform, Enterprise Edition server configuration can be checked from its configuration files or administrative console. Alternatively, in the case of the WebSphere Application Server full profile, the configuration can be extracted from the running server as a set of properties, using wsadmin AdminTask.extractConfigProperties.
Equivalent configuration declarations can then be added to server.xml.
•Using the WebSphere Configuration Migration tool
WebSphere Liberty provides an Eclipse-based tool, which can analyze the configuration of another Java Platform, Enterprise Edition server and generate configuration fragments suitable for inclusion in a WebSphere Liberty configuration.
An overview of the migration tool is available at this site:
In Chapter 8, “Implementing security options” on page 143, we give an example of updating a server.xml Liberty configuration file to support a web application using servlets, JSP, and a JCA connection.
2.7.3 External dependency migration
So far in this section, we discussed the issue of migrating the application view of a Java Platform, Enterprise Edition server, comprising the Java Platform, Enterprise Edition features and resources required by the application. In some cases, an application has external dependencies, for example on a database, web services, or JCA connection. When the application is moved to Liberty in CICS, it might make sense for some of these dependencies to be migrated at the same time.
Therefore, the last stage in the migration is to consider whether any of the application’s external dependencies should be migrated along with the application, for example:
•A JDBC connection to a local database might be migrated to DB2 on z/OS accessed using a Type-2 JDBC connection
•Web services calls to CICS programs can be replaced with direct JCICS calls
•A JCA connection using CTG can be changed to use a local CICS ECI connector
The migration of these external dependencies needs to be considered on a case-by-case basis. The resources that are potential candidates for migration are those that have earlier been configured in server.xml, plus other external dependencies, such as web services endpoints, which might not explicitly appear in server.xml.
..................Content has been hidden....................
You can't read the all page of ebook, please click here login for view all page.